
FG - SLR camera NIKON - Free user manual and instructions
Find the device manual for free FG NIKON in PDF.
| Product type | 35mm SLR camera |
| Brand | Nikon |
| Model | FG |
| Image format | 24 x 36 mm |
| Lens mount | Nikon bayonet (AI type) |
| Shutter | Metal vertical-travel focal-plane shutter, electronic control |
| Shutter speeds | 1 to 1/1000 s continuous (P/A), 11 manual speeds (1 to 1/1000 s), M90 (mechanical 1/90 s), B (mechanical bulb) |
| Exposure modes | Programmed (P), Aperture priority (A), Manual (M) |
| Metering system | TTL center-weighted, full aperture |
| Metering range | EV 1 to 18 (with 50mm f/1.4, ISO 100) |
| Film speed (ISO) | 12 to 3200 |
| Viewfinder | Fixed pentaprism, 92% coverage, 0.84x magnification (50mm at infinity) |
| Focusing screen | Standard Type K: central split-image rangefinder, microprism collar, matte/Fresnel area |
| Power supply | 1 lithium 3V battery (CR-1/3N) or 2 silver-oxide 1.55V batteries (S-76/SR-44) or 2 alkaline-manganese 1.5V batteries (LR-44) |
| Dimensions (W x H x D) | 136 x 87.5 x 54 mm |
| Weight (body only) | approx. 490 g |
| Exposure compensation | +/-2 EV in 1/2 steps |
| Flash | X-sync at 1/90 s; ISO hot shoe with TTL contacts |
| Self-timer | Approx. 10 s, cancellable |
| Motor drive | Compatible with MD-14 (up to 3.2 fps) and MD-E (1.5 fps) |
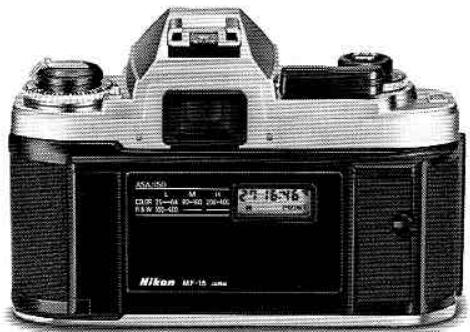
| Databack | Interchangeable MF-15 (date/time/counter imprint) |
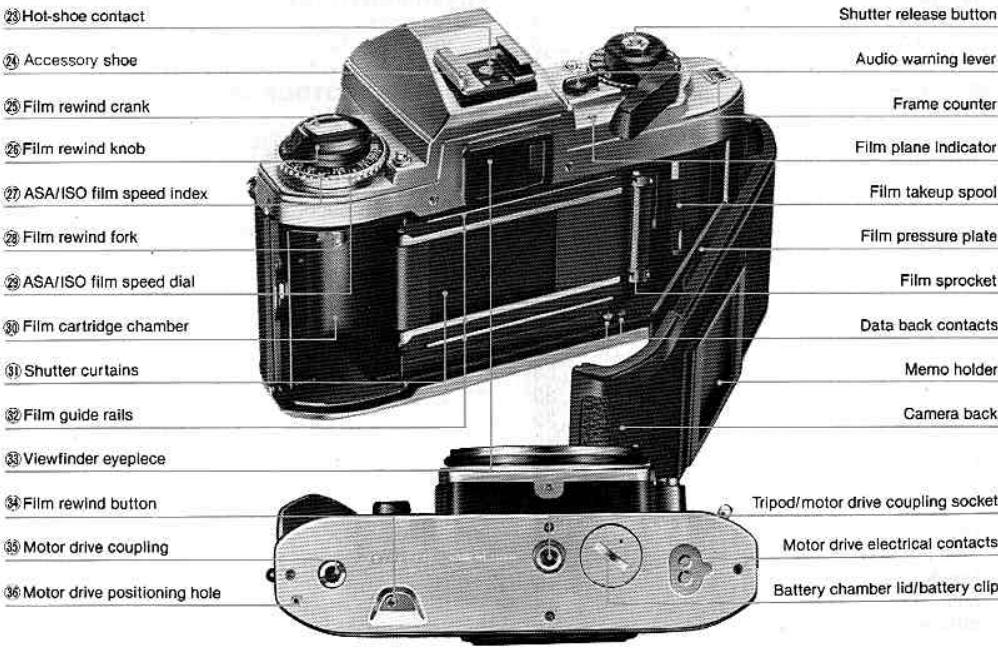
| Care and cleaning | Clean lenses with a blower or special cloth; avoid humidity; remove batteries if not used for extended periods. |
| Safety | Keep batteries out of reach of children; do not dispose of in fire; observe polarity. |
| Spare parts and repairability | Parts available from authorized Nikon dealers; repair by qualified technician. |
| General information | 35mm SLR camera with selective exposure, compatible with over 60 Nikkor and Nikon Series E lenses. |
Frequently Asked Questions - FG NIKON
User questions about FG NIKON
0 question about this device. Answer the ones you know or ask your own.
Ask a new question about this device
Download the instructions for your SLR camera in PDF format for free! Find your manual FG - NIKON and take your electronic device back in hand. On this page are published all the documents necessary for the use of your device. FG by NIKON.
USER MANUAL FG NIKON
Film advance lever Exposure compensation dial lock (2)
A/P setting lock button Exposure compensation dial (3)
Shutter speed/mode selector Exposure compensation dial index 1
Deckstrap eyelet Exposure compensation button (5
and grip
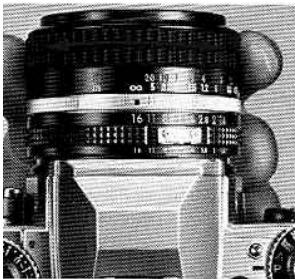
Self-timer lever Lens mounting index(1)
Reflex mirror Lens release button
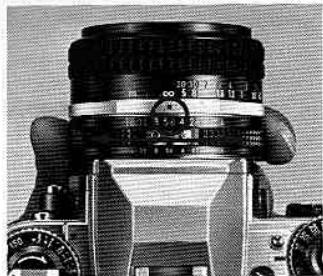
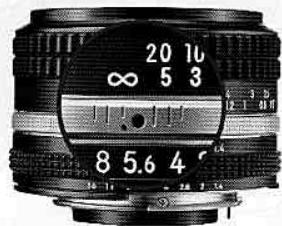
ens aperture scale Infrared focusing index 19
Distance scale Lens aperture ring
Depth-of-field indicators Lens mounting ring
Aperture/distance scale index Lens focusing ring
CONTENTS
)MENCLATURE 2 FLASH PHOTOY 47
IREWORD 5 Accessory Shoe. 48
SIC OPERATION 6 Viewfinder Ready-Light. 48
KON AND NIKKOR LENSES Nikon FG and Speedlight Combinations... 49
IR THE NIKON FG 19 CLOSE-UP PHOTOGRAPHY 50
INTROLS IN DETAIL 20 ACCESSORIES 52
Shutter Speed/Mode Selector Dial. 20 Electronic Flash Units.. 52
Exposure Measuring System. 21 Motor Drive MD-14. 53
LED Viewfinder Indications.. 22 Data Back MF-15. 54
Exposure information. 22 Other Accessories.. 55
Improper exposure warning information.. 23 TIPS ON CAMERA CARE. 58
Flash ready-light information. 23 OPTIMUM BATTERY PERFORMANCE. 59
How To Determine Shooting Modes. 24 SPECIFICATIONS 60
P-programmed exposure mode. 24 63
A-automatic exposure mode. 28
Manual exposure mode. 35
Shutter Release Button 38
Film Advance Lever. 39
Frame Counter. 39
Audio Warning Lever. 40
ASA/ISO Film Speed Dial. 41
Exposure Compensation Dial. 42
Exposure Compensation Button. 43
Self-Timer Lever. 44
Film Plane Indicator 44
Handgrip. 45
Memo Holder. 46
Infrared Focusing Index 46
FOREWORD
As Nikon's selective-exposure 35mm SLR camera, the Nikon FG gives you the choices not only of total exposure programming but also aperture-priori automatic exposure as well as full manual control. Compact and lightweight, the FG additionally offers such advanced photographic features as an exposure compensation dial, an exposure compensations button and an audio warning system, plus its own matching electronic flash with TTL measurement automatic motor drive and automatic data back. And of course with the FG, you've full admission into the comprehensive Nikon System of over six interchangeable lenses and a host of accessories and equipment. To get the most out of your FG study the instructions in this manual carefully. Ever basic operation and all controls and features are explained in detail. Practise using your FG with film until you are familiar with the simple operatir instructions, then keep this manual on hand for ready reference. A few minutes now is your assurance of the best future results as you enter the exciting world of selective-exposure photopro
ASIC OPERATION
Remove the battery clip
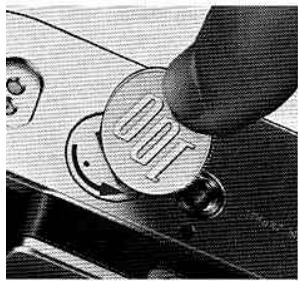
e a coin to twist the lid counter-ckwise to unscrew it.
2 Install the battery or batteries.
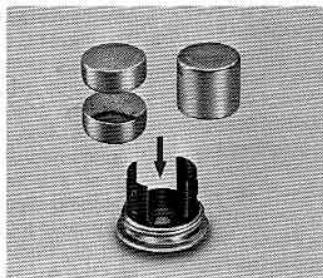
Wipe battery terminals clean and insert either one 3V lithium battery, two 1.55V silver-oxide batteries, or two 1.5V alkaline manganese batteries into the battery clip, making sure each "+" sign is up.
Caution: Keep batteries away from infants and small children. In case a battery is accidentally swallowed, call a doctor immediately as the material inside the batteries can cause serious problems.
3 Replace the battery clip.
Slip the battery clip back into the camera body and screw it clockwise tightly in place.
4 Check the battery power.
Looking through the viewfinder, depress the shutter release button halfway and confirm that any of the red LEDs (light emitting diodes) light up steadily or blink continuously for 16 seconds after you have taken your finger off the button. This means battery installation is proper and power is sufficient. If no LEDs light up or if they turn off immediately when you take your finger off the button, replace the battery (ies).
Note: To check battery power, set the shutter speed/mode selector dial (3) to any setting except M90 and B.
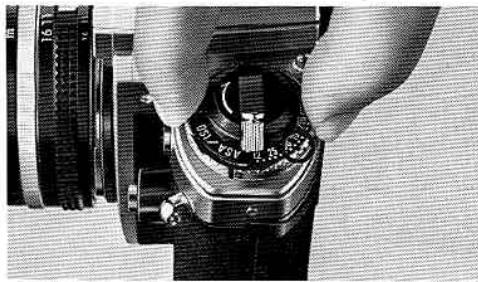
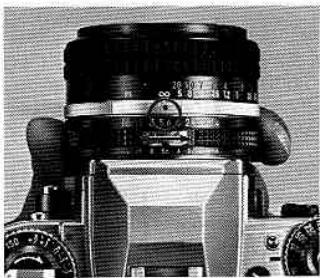
Mount the lens.
Grasp the lens by its mounting ring, then line up the aperture/distance scale index on the lens and the mounting index on the camera body and twi the lens counterclockwise until it clicks into place. Make sure the aperture/distance scale index exactly on top.
To remove, while pushing the lens release button turn the lens clockwise.
ASIC OPERATION—continued
Open the camera back
ll up the film rewind knob as as it will go and the camerack will pop open.
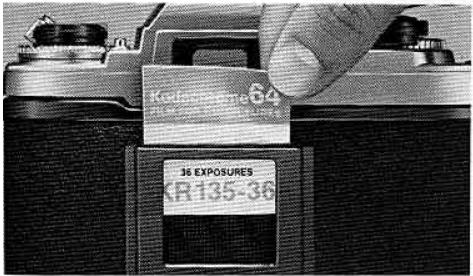
- Load the film.
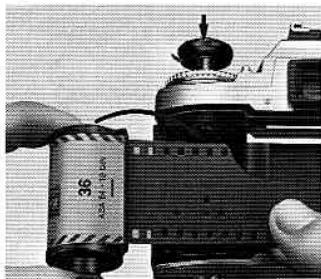
Drop the film cartridge into the film cartridge chamber so the film leader points towards the makeup spool, and while rotating the rewind knob push it back down to secure the cartridge in place.
Notes:
1) All 35mm film can be used.
2) Avoid loading film in direct sunlight. If there is no shade available, turn your back to the sun and use your own shadow to shield the camera.
Insert the film leader in the makeup spool.
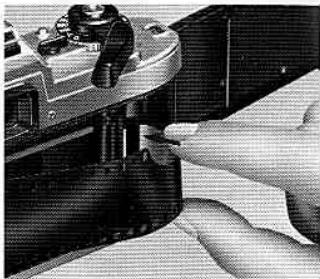
Pull the leader across the camera and insert it into any one of the slots in the makeup spool.
Engage the film's perforations with the sprocket teeth.
Advance the makeup spool slightly with your finger to engage the film's perforations with the teeth of the makeup spool and the sprocket. Confirm the film is located properly between both guide rails and that there is no film slack.
- Advance the film with the film advance lever ①.
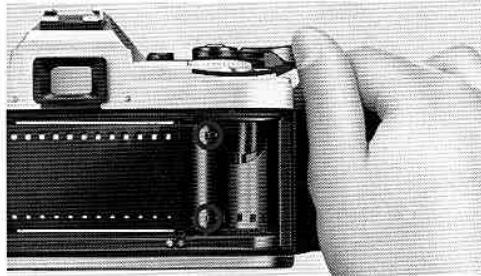
Alternately wind the film advance lever and depres the shutter release button until the perforations of both film edges are securely engaged with the sprocket teeth and the film is advanced properly.
ASIC OPERATION—continued
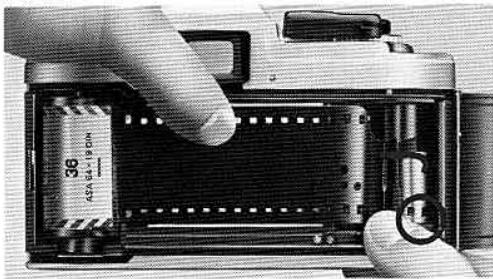
1. Close the camera back.
Snap the camera back shut.
12. Take up the film slack. Fold out the film rewind crank and rotate it gently in the direction of the arrow until you feel a slight resistance. Then fold the crank back in.
13. Make blank exposures until the frame counter shows "1."
To dispose of the first few frames exposed during film loading, continue to alternately advance the film and depress the shutter release button until the frame counter shows "1." Check that the rewind knob is rotating, indicating the film has been loaded correctly and is being advanced. If the knob does not rotate, reload the film.
Note: Do not take pictures prior to frame "1" as the meter does not function until the counter reaches "1." Up to "1," the 1/60 and 1/125 sec. LEDs in the viewfinder will blink, showing the shutter is automatically set at 1/90 sec.
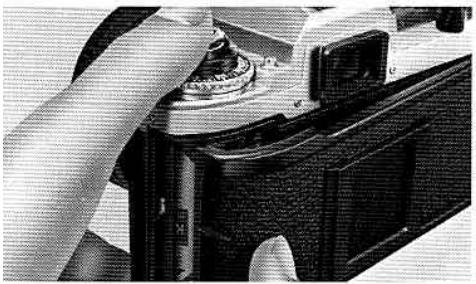
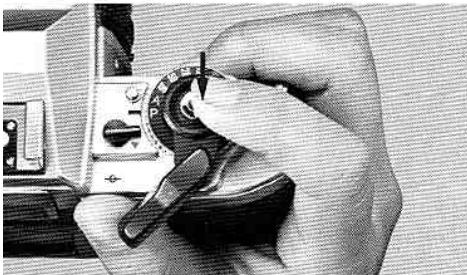
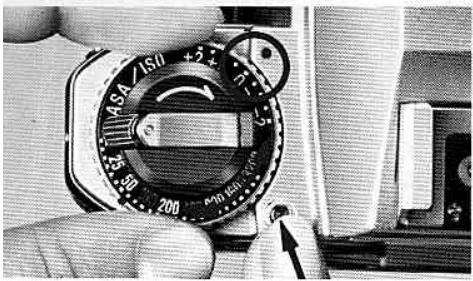
14. Set the ASA/ISO film speed dial 2
Lift up the ASA/ISO film speed dial and rotate it either direction until the index dot is opposite the film speed in use. Make sure the exposure compensatio dial is set at "0." These actions are essential to activate the camera's exposure meter for correct exposure of the film being used.
Note: Film speed is printed on the film package and cartridge
ASIC OPERATION—continued
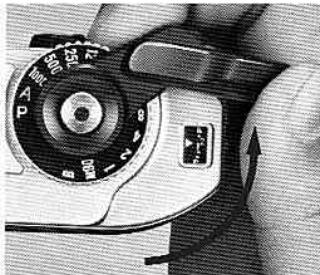
Set the shutter speed/mode selector to P.
hile depressing the A/P setting lock button ② , turn e shutter speed/mode selector until P is opposite index. The built-in locking mechanisms at P and A insure that the dial cannot be accidentally shifted om either the P or A position during shooting.
Note: The Nikon FG camera has two more shooting modes besides P (Program): A (Auto) and manual. For details ofooting at these modes, see pages 28~34 for A (Auto) and ages 35~37 for manual.
16. Set the lens f/stop to its minimum aperture opening (i.e., the largest f/number).
Turn the aperture ring of the lens until the largest f/ number is opposite the aperture index. If the aperture is not set to f/11 or larger, both warning LEDs in the viewfinder will blink alternately, warning of improper setting.
17. Turn the audio warning lever to switch it on.
Turn the lever as far as it will go, uncovering the audio warning mark (V).
Hold the camera steady. Fold out the film advance lever to the stand off position. With your right hand grasping the hand grip steadily and your right index finger restit comfortably on the shutter release button, position your right thumb between the camera body and the lever. Then cradle the camera in the left hand with the thumb and fingers holding the lens focusing ring. The camera may be switched from horizontal- to vertical format shooting in this position.
ASIC OPERATION—continued

Out of focus
In focus
9. Compose and focus on the subject.
tile looking through the viewfinder, compose your oto with the main subject in the center to assure correct exposure. Then turn the focusing ring of lens until the subject looks clear. The FG employs standard Type K focusing screen for all-purpose otography. For precise pinpoint focusing for sub-ots with distinct contours, use the central splitage rangefinder and turn the focusing ring until the it image becomes whole. For rapid focusing and subjects with indistinct outlines, use the micro
prism collar and turn the focusing ring until the shimmering image becomes sharp. When doing close-ups or macrophotography or shooting with telephoto lenses of maximum apertures of approx. f/4.5 or smaller, the split-image spot and microprism collar are likely to darken. Therefore, use the matte outer field and turn the focusing ring until the image becomes sharp.
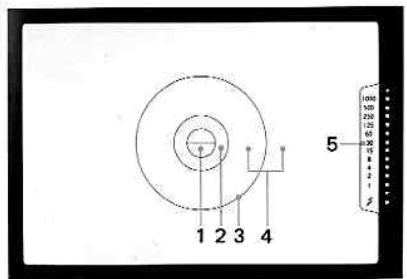
1.3mm dia. split-image spot
2.1mm-wide microprism collar
3. 12mm dia. area
4. Fine matte/Fresnel outer field
5.Shutter speed scale
6. Top warning LED
7.Shutter speed LEDs
8. Bottom warning LED
9. Flash ready-light
10. Thunderbolt mark
Notes:
1) The meter reads the light over the entire focusing screen but is distinctly biased toward the central 12mm dia, area.
2) Frame coverage is approx. 92% which means actual photographs will be slightly larger than the finder image.
ASIC OPERATION—continued
Take the photograph.
Look through the viewfinder and press the shutter release button halfway to turn on the exposure meter. When the audio warnings are not sound, depress the button all the way to take the picture. In this case, the proper shutter speed to match scene brightness is displayed the LED inside the viewfinder. If the warning sounds, check the viewer information. If either the top or bottom warning LED blinks, the available light is too bright or too dim for the meter's range and correct posure is not possible without adjustment. Use either a neutral density er to reduce the amount of light reaching the film or artificial light to increase the subject's brightness. If the LED at 1/30 sec. or below lights, shutter speed is too slow and blur may result. In this case, use a pod to prevent blurred images. When you correct the exposure, the dio warning will stop.
- Advance the film.
Stroke the film advance lever to transport the film to the next frame.
22. At the end of the roll, push the rewind button 34.
After the last exposure, the film advance lever will not move. Depress the film rewind button on the camera base plate to disengage the film sprocket drive so you can rewind the exposed film back into its cartridge.
23 Rewind the film.
Fold out the film rewind crank and turn gently in the direction of the arrow until you feel a increased tension. Give it a few more turns until the tension is gone and the crank turns freely, indicating the film leader is rewound completely back into the cartridge.
BASIC OPERATION—continued
4 Remove the film cartridge.
Open the camera back by pulling up the wind knob and take out the film cartridge. Avoid loading in direct sunlight. If there is no shade available, turn your back to the sun and use your ownadow to shield the camera.
NIKON AND NIKKOR LENSES FOR THE NIKON FG
The lenses usable for the Nikon FG are all the AI-type Nikon/Nikkor lenses, including most of the AI converted lenses, certain Reflex Nikkor and PC Nikkor lenses. Non-AI Nikkor lenses and lenses of other manufacturers which do not have the AI feature must not be forcibly mounted on the FG. Attempts to mount such lenses will damage the camera's indexing mechanism. Note that in addition to non-AI lenses, the following lenses cannot be used:
AI-converted 55mm f/1.2 (No. 184711~970110)
AI-converted 28mm f/3.5 (No. 625611~999999)
AI-converted 35mm f/1.4 (No. 385001~400000)
Fisheye Nikkor 6mm f/5.6 (all lenses)
Fisheye Nikkor 10mm f/5.6 OP (all lenses)
Reflex Nikkor 1000mm f/11 (No. 143000 or smaller)
Reflex Nikkor 2000mm f/11(No. 200310 or smaller)
PC Nikkor 28mm f/4 (No. 180900 or smaller)
PC Nikkor 35mm f/2.8 (No. 851001~906200)
Zoom Nikkor 180~600mm f/8 ED
No.174180 or smaller
Zoom Nikkor 200~600mm f/9.5
No.301922 or smaller
Zoom Nikkor 360~1200 mm f/11 ED
No.174127 or smaller
Focusing Unit AU-1
When using the Teleconverter TC-200,TC-201,TC-301 or TC-14A
Exposure compensation, which is required when using Nikon AI-type cameras with lenses having a maximum aperture faster than f/2 or faster than f/1.8 (when using the TC-14A), is not necessary when using the FG in its P or A mode. In the A mode, however, note that the actual shutter speed will be faster than that indicated in the viewfinder by less than one step. Therefore, before shooting, be sure that the shutter speed LED(s) in the viewfinder indicates a speed slower than 1/250 sec. In the manual mode, exposure compensation using the ASA/ISO film speed dial is necessary. See the teleconverter's Instruction manual for complete details.
CONTROLS IN DETAIL
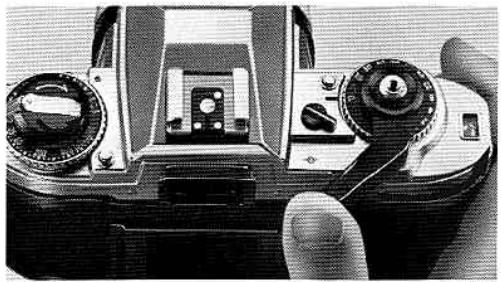
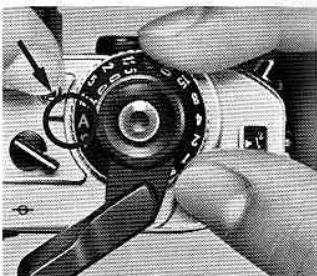
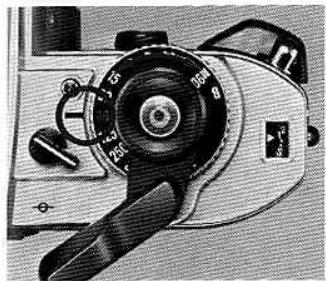
hutter Speed/Mode selector Dial ⑧
e Nikon FG offers programmed mode operation, venture-priority automatic mode operation, and annual control of all shutter speeds from 1 to 1/1000 c., including M90 and B (Bulb) settings. To set the sired shooting mode or shutter speed, rotate the utter speed/module selector dial until the desired tting click-stops opposite the index line. Note that A and P settings, a locking mechanism is provided prevent accidental shifts of the setting. To rotate dial to or from the A or P setting, depress the lock itton ② provided. The shutter speed/module selector has the following settings: B, M90, eleven speeds
from 1 to 1/1000 sec., A and P. Intermediate settings cannot be used.
P (Programmed)
Used for completely automatic programmed mode shooting. The optimum combination of shutter speed and aperture value is automatically set by the FG's microcomputer, depending upon scene brightness and the film speed in use. The electronically controlled shutter speed is stepless between 1 and 1/1000 sec.
A (Auto)
Used for aperture-priority automatic mode shooting. The f/stop is set manually and the FG's microcomputer selects the matching electronically controlled shutter speeds stepplessly between 1 and 1/1000 sec. depending on the scene's brightness and the film speed in use.
Manual
Used for full manual control of both f/stop and shutter speed. All of the eleven shutter speeds indicated on the dial are electronically set, with accuracy assured by a quartz oscillator controlling shutter timing. Each number shown on the scale is reciprocal, i.e., 2 means 1/2 second, and 125 means 1/125 second. A one-step change will either halve or double the exposure, e.g., a shutter speed of 1/125 sec. lets in twice as much light as a setting of 1/250 sec., and half as
much light as 1/60 sec.
Note: When you set the shutter speed/mode selector dial to either M90 or B, the exposure meter does not work and the viewfinder LEDs don't light.
M90 (1/90 sec.)
At this setting, the shutter operates mechanically at 1/90 sec., and is used mainly when the battery is drained and other shutter speed modes are not operable, and for flash photography with an electronic flash.
B(Bulb)
At this mechanical setting, the shutter curtains remain open as long as you press the shutter release button. B is used for long time exposures.
Note: When the shutter speed/mode selector dial is set somewhere between 1 sec. and M90 and the shutter release button 電 is accidentally depressed, the shutter curtains remain open. If the film is rewound in this situation, every frame will be re-exposed, damaging the pictures taken. Therefore, before rewinding make sure that the selector dial is not in this intermediate position.
Exposure Measuring System
The Nikon FG employs TTL (through-the-lens) center weighted full-aperture exposure measurement which measures the amount of light passing through lens with the aperture fully open, thus always assuring a bright finder image during shooting. Exposure measurement emphasis is placed especially on the brightness in the 12mm dia. central area (refer to page 15), although the meter reads the light over the entire focusing screen. Thus, correct exposure assured when shooting with the main subject situated in this central area.
On both P and A modes, the FG employs instantaneous stopped-down exposure measurement. The measurement system sets the optimum combination of shutter speed and aperture at the actual split second moment of picture taking, assuring accurate exposures even if the light changes at the very last instant. A sensitive SPD (silicon photodiode) is used to measure light intensity.
CONTROLS IN DETAIL—continued
ED Viewfinder Indications
LEDs (light emitting diodes) located opposite the.
utter speed scale at the right-hand side of the viewder light up when the shutter release button is pressed halfway. These function in three capaies-for exposure information, for improper exposure warning, and for convenient flash shooting.
Exposure information
Exposure information
On P or A, a steady LED indicates the shutter speed automatically set. Two adjacent LEDs indicate set speed is intermediate between the two. On manual, a steady LED indicates the shutter speed set manually and the blinking LED(s) signals the correct speed to match the selected aperture.
Notes:
1) At M90 and B, there is no LED display.
2) Shutter speed selection is stepless on P and A; however on manual, intermediate speeds cannot be set.
Possible
Improper exposure warning information
On P or A, a blinking top warning LED indicates possible overexposure. In this case, use a neutral density filter or change to a slower speed film. A blinking lower warning LED signals possible underexposure, necessitating an electronic flash or a change to the B setting for long exposure. On P, A and manual, an LED lighting at 1/30 sec, or below indicates shutter speed is too slow for hand-held shooting and a tripod is necessary to steady the camera or a high-speed film or electronic flash should be used.
Note: When using a tripod with a large head, use Nikon's tripod adapter to mount the FG; otherwise contact between lens barrel and head may make it difficult to operate the lens.
Flash ready-light
Flash ready-light information
An LED opposite the thunderbolt mark enables you to confirm flash readiness without removing your eye from the viewfinder.
CONTROLS IN DETAIL—continued
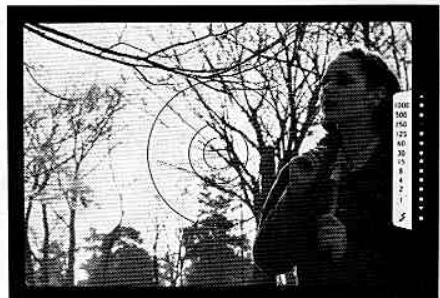
How To Determine Hooting Modes
correct exposure—whether your photo comes out at right and neither too dark (underexposed) nor too hot (overexposed)—depends on two factors in relation to your film: light and time. These factors are controlled by f/stop (aperture opening) and shutter feed. The FG offers three different ways (modes) to pose photos—P (Program), A (Auto) and manual, depending on photographic conditions and your own personal requirements, choose any one of these free. On P, exposure measurements are totally indled by the camera, so all you do to take perfect fixtures is focus and shoot. On A, still enabling automatic exposure, f/stop selection is under your control, allowing you to create special depth-of-field effects, and the FG matches with the correct shutter feed. (For details on depth of field, refer to page 32.) I manual, both f/stop and shutter speed selection controlled by you, giving you the chance to hieve special effects and to grow in your photographic skills.
P-programmed exposure mode
A new feature with the Nikon FG, the P mode not only greatly simplifies operation, but also lets you concentrate completely on picture composition and further, gives you greater opportunities to shoot, especially in quickly changing situations or for candid shots, because no exposure calculation is necessary. On P, the optimum combination of stepless shutter speed and stepless f/stop is determined by the FG's microcomputer at the instant of exposure, according to a scientifically pre-arranged program. Perfect exposure is thus assured for every shot.
P mode operation
(1) While depressing the A/P setting lock button, turn the selector dial to P.
(2) Set the f/stop of the lens to its minimum aperture opening (i.e., the largest f/number).
(3) Turn on the audio warning system.
(4) While looking through the viewfinder, depress the shutter release button halfway to turn on the exposure meter.
If the audio warning does not sound, exposure is correct—just focus and shoot. One lighted LED in the viewfinder signals what shutter speed is set. Two lighted LEDs indicate the set shutter speed is intermediate between the two lighted LEDs.
If the audio warning does sound, improper exposure may result and you must check the LED view finder indications (explained on the followin page) for necessary adjustments.
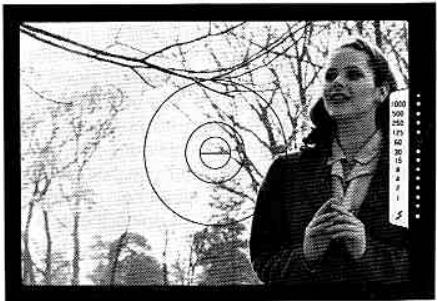
CONTROLS IN DETAIL—continued
Too little light
Shutter speed is too slow

Either upper or lower warning LED blinks.
A blinking upper LED means too much light; try either a neutral density filter or change to a slower speed film. A blinking lower LED means too little light; use an electronic flash or switch from P to a long exposure at B setting.
The LED lights up at 1/30 sec. or below.
shutter speed is too slow for hand-held shooting and picture blur may result. Use a tripod to steady the camera, change to high-speed film, or use an electronic flash.
f/stop is not set at f/11 or a larger f/number.
During blank exposure both 1/60 and 1/125 sec. LEDs light up.
Notes:
1) If the f/stop is not set at f/11 or a larger f/number, both warning LEDs blink alternately. Reset the f/stop to its minimum aperture setting (the largest f/number). When using a Nikon Teleconverter TC-200, TC-300, or TC-14, PK ring or Al-converted lens, be sure to set the aperture to its minimum opening since the warning LEDs will not blink in warning.
2) If you do not wish to turn on the audio warning system, check the LEDs in the viewfinder before shooting to confirm if any adjustments are necessary in order to assure correct exposure.
3) During blank exposures before the frame counter reaches "1," both the 1/60 and 1/125 sec. LEDs will light up as the shutter is automatically set at 1/90 sec. Do not take pictures before "1" as the exposure meter does not operate until "1."
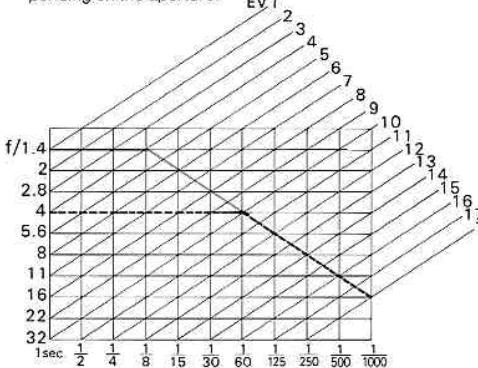
Programmed exposure measurement graph
The graph represents the optimum combinations of f/stop and shutter speed, for the brightness of any scene, which were determined through intensive statistical and empirical studies and fed into the FG's computer brain for its pre-arranged exposure program. Thus, when actual exposure measurement takes place at the time of shooting, the ideal combination for actual conditions is selected and perfect exposure results for every shot.
(Graph—green line represents the curve for the f/1.4 lens. For lenses with other apertures, the graph is read from that particular aperture opening until intersection with the diagonal line and then in the same downward line, e.g., the black line for the f/4 lens.)
Notes:
1) On P , the following lenses will cause slower shutter speeds than those indicated in the viewfinder while correct exposure is assured. Therefore, in cases where more exact shutter speed information is desired, A or manual mode is recommended:
50mm f/1.2 Nikkor (No. 250525 or smaller)
58mm f/1.2 Noct-Nikkor (No. 175000 or smaller)
ED 50~300mm f/4.5 Zoom Nikkor (No. 179500 or smaller)
Every Al-converted 85mm f/1.8 Nikkor
Every Al-converted 105mm f/4 Micro Nikkor
Every Al-converted 85~250mm f/4 Zoom Nikkor
2) On P , the following lenses and accessories cannot be used as they do not have an aperture coupling device. Use
these lenses on A or manual modes.
All Reflex Nikkors
All PC Nikkors
(when perspective is shifted, use manual mode)
Bellows attachment
Extension Ring Set K
3) On P when using teleconverters or Al-converted lenses or maximum apertures of 1/4.5 or smaller, shutter speed available are limited to very slow ones. Therefore, A manual mode is recommended.
4) On P when using Al-converted lenses of maximum aperture larger than 1/2.8, the metering range for the higher EVs values will be reduced down to a maximum of two EVs depending on the aperture. EV1
CONTROLS IN DETAIL—continued
-automatic exposure mode
with the FG set on A, you select the f/stop and the computer matches it with the correct stepless shutter feed. The A mode is especially useful for creating facial effects in depth of field while still using the imera on automatic mode to assure perfect exposure (aperture-priority selection). Deeper depth of field (or greater focus zone in foreground and background around subject) is achieved as you stop down the lens to its smaller aperture openings (larger numbers). Shallower depth of field (softly blurred in front and behind your main subject) results in larger aperture openings (smaller f/numbers) and emphasizes the main subject.
A mode operation—aperture-priority selection
(1) Depress the A/P setting lock button and rotate the dial until the "A" click-stops opposite the index line.
(2) Set the desired f /stop on the lens.
(3) Turn on the audio warning system.
(4) While looking through the viewfinder, depress the shutter release button halfway to turn on the exposure meter. If the audio warning does not sound, the scene brightness is within the FG's metering range—focus and shoot. The shutter speed automatically set is indicated in the viewfinder by either one LED or two LEDs. If the audio warning sounds, LEDs in the viewfinder will indicate one of the conditions described on the next page.
he top warning LED blinks to warn of overexposure, he bottom warning LED blinks to warn of underexposure.
he LED lights up at 1/30 sec. or below to warn of icture blur.
these cases, to adjust exposure, rotate the lens aperture ring to a larger or smaller value as indicated ow until the blinking LED disappears and an LED(s) its up steadily opposite 1/60 sec, or faster.
/verexposure—Rotate to a larger f/number. If after his the LED still blinks, use a neutral density filter r change to a slower speed film.
Inderexposure-Rotate to a smaller f/number. If after this the LED still blinks, use an electronic flash switch from A to B (Bulb) setting for long exposures. If the LED at 1/30 sec. or below lights up
after adjustment, picture blur may result-use a tripod, higher speed film or electronic flash.
- Picture blur—Rotate to a smaller f/number. If the shutter speed does not increase above 1/30 sec., use a tripod to steady the camera, change to a higher speed film or use an electronic flash.
Note: If the audio warning system is not turned on, check the LEDs in the viewfinder for improper exposure conditions before shooting.

Set the desired speed by turning the lens aperture ring.
A mode operation—shutter speed priority selection
For shooting moving subjects, the FG also enables you to select the shutter speed on A mode to either freeze the action and produce sharp outlines with a faster shutter speed, or to cause an intentional blur by choosing a slower shutter speed. To operate the FG as a shutter-speed priority automatic camera,
depress the shutter release button halfway and match the lighted LED with the speed you desire to turning the lens aperture ring. Improper exposure is indicated by LEDs and the audio warning system as in aperture-priority selection.
CONTROLS IN DETAIL—continued
depth of field
depth of field refers to the clear focus zones in front and behind the main subject when you focus the ns. With the FG's aperture-priority automatic exposure, you have full control over depth of field by varying the f/stop. The following are important points to member.
By stopping down the aperture to smaller openings (larger f/numbers), depth of field becomes deeper and not only your main subject but foreground and background will also be in clear focus. On the contrary, by opening up the aperture to larger openings (smaller f/numbers), depth of field becomes shallower and both fore- and background will be out of focus, thus enabling you to emphasize the main subject.
(2) The farther the subject from the camera, the deeper the depth of field; the closer to the camera, the shallower the depth of field.
(3) Usually, background clarity is sharper than that of the foreground; thus, in shallow depth-of-field situations, you can expect your foreground images to be less clear than those behind the subject.
(4) The shorter the focal length of the lens, the deeper the depth of field.
(5) With Nikkor or Nikon Series E lenses, depth of field is indicated by pairs of colored lines on the lens which correspond to the colors of the f/number. Therefore, depth-of-field range can be obtained by the corresponding distance scale.

Lens set at f/1.4
Only main subject is in focus
Lensetatf/16
Most objects near to far are in focus
CONTROLS IN DETAIL—continued
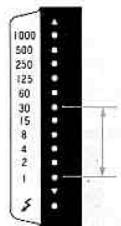
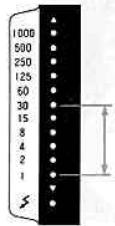
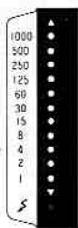
V Range
The FG's meter may be used only within the meter's exposure value (EV) range which determines the possible combinations of aperture and shutter speed, depending on the film speed in use. The chart shows the relationships between the f/stop, shutter speed and film speed, indicating the functioning shutter
speeds (for metering purposes) with any film speed/ aperture combination. Careful attention to this chart will assure precise exposure, automatically, over the complete exposure control and meter range capabilities of your Nikon FG.

| 1 | 2 | 3 | 4 | 5 | 6 | / | 8 | 9 | 10 | 11 | 12 | 13 | 14 | 15 | 16 | 17 | 18 |
| 1 | 1/2 | 1/4 | 1/8 | 1/15 | 1/30 | 1/60 | 1/125 | 1/250 | 1/500 | 1/1000 | |||||||
| 1 | 1 | 1/2 | 1/4 | 1/8 | 1/15 | 1/30 | 1/60 | 1/125 | 1/250 | 1/500 | 1/1000 | ||||||
| 1 | 1 | 1/2 | 1/4 | 1/8 | 1/15 | 1/30 | 1/60 | 1/125 | 1/250 | 1/500 | 1/1000 | ||||||
| 1 | 1 | 1/2 | 1/4 | 1/8 | 1/15 | 1/30 | 0 | 1/125 | 1/250 | 1/500 | 1/1000 | ||||||
| 1 | 1 | 1/2 | 1/4 | 1/8 | 1/15 | 1/30 | 1/60 | 1/125 | 1/250 | 1/500 | 1/1000 | ||||||
| 8 | 1 | 1/2 | 1/4 | 1/8 | 1/15 | 1/30 | 1/60 | 1/125 | 1/250 | 1/500 | 1/1000 | ||||||
| 8 | 1 | 1/2 | 1/4 | 1/8 | 1/15 | 1/30 | 1/60 | 1/125 | |||||||||
| 11 | 1 | 1/2 | 1/4 | 1/8 | 1/15 | 1/30 | 1/60 | 1/125 | 1/250 | 1/500 | 1/1000 | ||||||
| 16 | 1 | 1/2 | 1/4 | 1/8 | 1/15 | 1/30 | 1/60 | 1/125 | 1/250 | 1/500 | 1/1000 |
Manual exposure mode
Manual operation allows you to shoot at your choice of any combination of the f/stops and eleven shutter speeds on the camera's dials. (Note that you cannot set shutter speed between numbered settings.) By varying these combinations, you can achieve not only correct exposure but also such special effects as under- or overexposure, blurred action, etc. Manual is also valuable to develop your photographic instincts and skills, and is additionally recommended when an electronic flash other than the Nikon dedicated flash unit is used.
How to select f/stop and shutter speeds
Exposure is determined by the combination of the shutter speed and f/stop (aperture opening). As the numbers on either the f/stop or shutter speed differ, increase by one value, the amount of light entering the film is reduced by approximately one half. For example, the amount of light at 1/125 sec. is about one-half that at 1/60 sec., and the amount of light at 1/16 is one-half that at 1/11. Brighter scenes require either faster shutter speeds or smaller aperture openings (larger f/numbers) or a combination of both which will give the same amount of exposure; darker scenes require the reverse. For example, 1/250 sec at f/8 is the same as either 1/500 sec. at f/5.6 at 1/125 sec. at f/11.
Shutter speed/aperture combination to give the same exposure.
| Shutter speed (sec.) | 1/1000 | 1/500 | 1/250 | 1/125 | 1/60 |
| Aperture (f/number) | 4 | 5.6 | 8 | 11 | 16 |
CONTROLS IN DETAIL—continued
manual mode operation
) Set the f/stop you desire or turn the shutter speed/ mode selector dial to any of eleven numbered settings you desire. (Note that you cannot set the dial between indicated settings.)
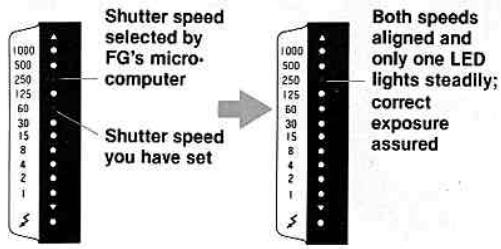
While looking through the viewfinder, depress the shutter release button halfway and check the lighted LEDs.
- The blinking LED(s) indicates the shutter speed selected by the FG's microcomputer to match the f/stop you have set.
The lighted LED indicates the shutter speed you have set.
If one LED is blinking, to get the correct exposure rotate the aperture ring and/or the shutter speed dial so that both the blinking LED and the steadily lighted LED are aligned and only one LED lights up steadily. If two LEDs are blinking, rotate the aperture ring and/or shutter speed dial until one LED lights up steadily or the blinking LEDs come as close as possible to it; then make further fine adjustments by rotating the aperture ring so that only one LED lights up steadily.
If you wish to create intentional under- or overexposure, set either the aperture ring or shutter speed dial so that your selected shutter speed is displayed in the viewfinder either above or below that selected by the FG.
Notes:
1) At the mechanical settings of M90 and B, the meter does not function and no LEDs are displayed.
2) The audio warning system does not function on manual.
Fast shutter speed
(freeze action)
Slow shutter speed
(intentional blur)
CONTROLS IN DETAIL—continued
Shutter Release Button
eressing the shutter release button halfway vitches on the exposure meter for approx. 16 sec., pen after taking your finger off the button, and uses the viewfinder LED(s) to light up steadily. Jashing the button all the way down releases the butter.
) check battery power, depress the button halfway. the viewfinder LED(s) lights steadily, power is sufficient. If the LED(s) disappears the instant you remove your finger from the button, power is weak and you must change batteries. If you continue to use
the camera in this situation, the batteries will be completely exhausted: when the shutter release button is depressed, the shutter curtains will not open and the mirror will be locked in the up position. To return the mirror to its place, switch to the B setting.
The shutter release button is threaded at the center to accept a standard cable release.
CONTROLS IN DETAIL—continued
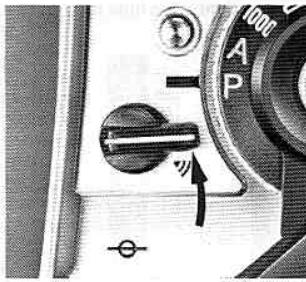
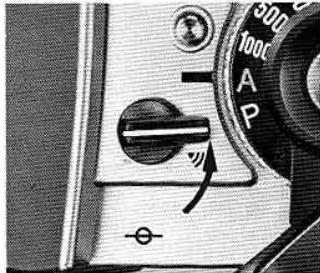
Audio Warning Lever
prevent incorrect exposure or blurred photos relting from extreme shooting conditions, the Nikon is equipped with an audio warning device, oper- 1e on P or A modes, in addition to the visual LED arning indications. To switch the device on, turn lever as far as it will go, uncovering the audio warning mark (串) , and depress the shutter release itton halfway. While the button is depressed, the audio warning will sound indicating that scene brightness is out of the metering range of 1 1 / 1000 sec. Which results in over- or underexposure, or that utter speed is too slow for hand-held shooting.
Check the viewfinder for LED indications and adjust exposure as on pages 26 27 or 30 31 . If you don't want to hear the warning sound, simply turn the lever to the OFF position (to cover the mark), but be sure to check the viewfinder LED before shooting to confirm if scene brightness is within metering range.
Note: The audio warning device does not function even with the lever set at ON when both top and bottom warning LEDs are alternately blinking to warn of improper aperture setting on P .
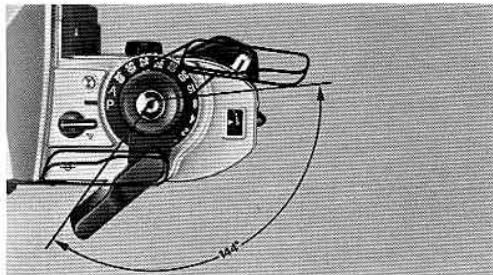
Film Advance Lever
The film advance lever is coaxial with the shutter release button and is specially contoured to fit the thumb. A hinged lever, it fits snugly to the camera body. It has a throw of 144^ , and is operated in one complete stroke or a series of shorter ones. After completion of film winding, the lever quick-returns to the stand-off position when your finger is taken off the lever.
Notes:
1) At the end of the roll the lever will not wind. In this case, don't force the lever, just release your finger, depress the film rewind button ⑧ and rewind the film.
2) Be sure to release your finger from the shutter release button while advancing the film to prevent taking a picture accidentally at the instant the film is advanced.
Frame Counter
To keep track of the number of exposed frames, the frame counter is graduated from S (Start = two frames below 0) to 36. After "1," and starting from "2," every two frames are numbered in white with white indices in between. When making blank shots with the shutter speed/mode selector set at other than M90 and B, the 1/60 and 1/125 sec. LEDs we blink until the frame counter reaches "1," showing that the shutter is firing at 1/90 sec. Only after "1" will both the meter and viewfinder information work normally. Don't take pictures until the frame counter reaches "1." The frame counter automatically reset to "S" when the camera back is opened.
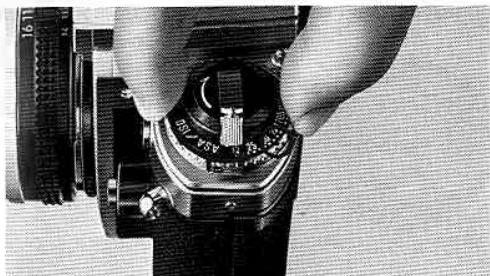
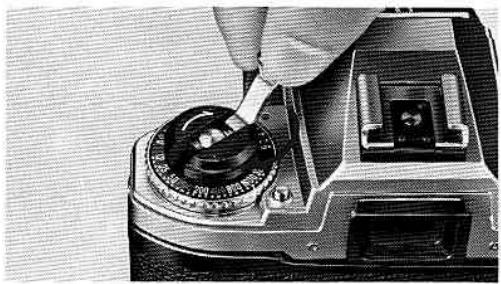
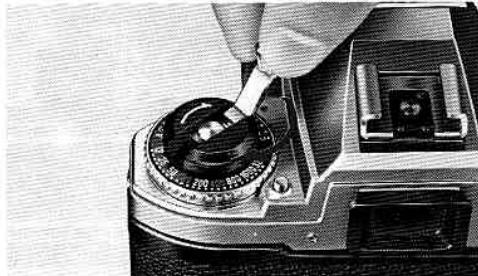
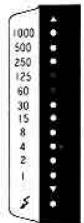
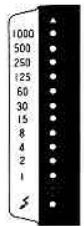
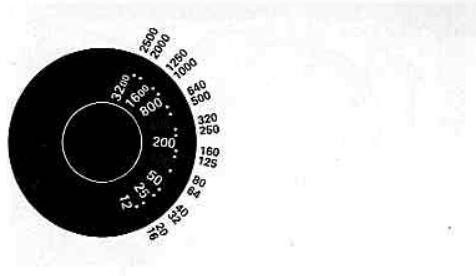
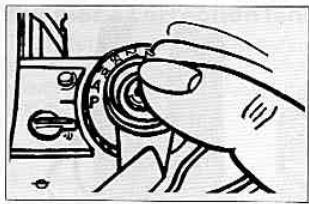
ASA/ISO Film Speed Dial
The scale on the ASA/ISO dial has numbered settings for speeds from ASA/ISO 12 to 3200. Two dots between each number stand for intermediate settings, such as 64, 80, etc. The 64, 100 and 400 settings are indicated in red. The table gives the speeds for all intermediate settings. To set the film speed in use, lift up the dial and rotate it until the desired number (or dot representing the film speed) click-stops opposite the index dot ⑦
ASA/ISO is a numerical rating of the film's sensitivity to a given amount of light. The higher the number, the
greater the sensitivity, and vice versa. The film's ASA ISO is indicated on the cartridge itself, on the fil carton and on the data sheet packed inside.
This dial can also be used to compensate exposure as in the following example: with ASA/ISO 100 film set the dial to 50 to overexpose +1 step; to 25 for +2 steps; to 200 for -1 step; to 400 for -2 steps. After compensated shootings, be sure to return the dial to the film's original speed.
CONTROLS IN DETAIL—continued
Suggested Applications for Exposure Compensation
+2 white background, snow scene
+1 white background occupying half of viewing area
-1 spotlighted subject, black background occupying half of viewing area
-2 black background
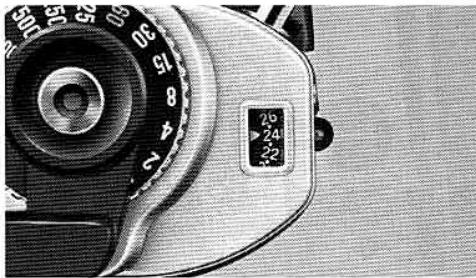
xposure Compensation Dial 13
or unusual lighting situations, such as shown in the agram, the exposure compensation dial allows ljustments to prevent over- or underexposure. Also, a dial can be used to intentionally obtain special fects like over- or underexposure, even under normal lighting conditions. Conveniently operable on and A, the dial ranges from +2EV to -2EV in oneIf increments.
Operate, press the lock button and turn the dial until it click-stops opposite the desired compensation line. On P, each increment causes a corresponding lift in both shutter speed and f/stop (except for when the graph line becomes horizontal, and then only shutter speed is shifted); on A, shutter speed
only is shifted, corresponding to the compensated amount. New shutter speed setting is visible in the viewfinder. After taking the picture, return the dial to 0, or incorrect exposures will result in ordinary shooting. In addition to the dial, exposures can be compensated with the exposure compensation button by changing the ASA/ISO setting, and by changing shutter speed or aperture setting in the manual mode.
Note: At ASA/ISO 25: Only 1 step compensation in the + direction; - direction is normal. At ASA/ISO 1600: Only 1 step compensation in the - direction; + direction is normal. At ASA/ISO 12: Cannot compensate in the + direction; - direction is normal. At ASA/ISO 3200: Cannot compensate in the - direction; + direction is normal.
Exposure Compensation Button
Conveniently operable on P and A, this gives a compensation of +2EV to quickly and easily adjust exposure when shooting snow scenes, sidelit or backlit subjects, or in cases where the main subject and background are strongly contrasted. Keep the button depressed as you press the shutter release button. On P, both f/stop and shutter speed are shifted toward a slower speed and smaller f/number by an equivalent of two EVs, according to the programmed graph. On A, shutter speed is shifted two stops, e.g., from 1/250 sec. to 1/60 sec. On both P and A, the new shutter speed is displayed in the viewfinder.
Backlit subject
After compensated
CONTROLS IN DETAIL—continued
elf-Timer Lever ⑥
is provides an approx. 10-sec. exposure delay, dependent of the shutter mechanism, the self-timer n be set either before or after the film is advanced. can be operated at all modes except the B setting. de the lever away from the lens as far as it will go, ver the viewfinder eyepiece to prevent stray light om entering through the viewfinder, then depress a shutter release button. After use, return the lever its original position. The self-timer is cancellable y time before shooting by returning the lever to its ginal position.
Film Plane Indicator
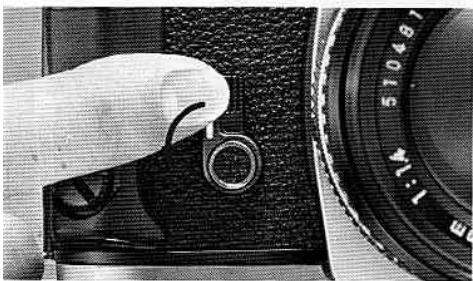
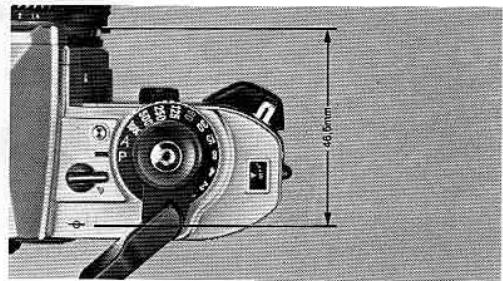
The film plane indicator () is engraved on the top deck just behind the audio warning lever. It indicates the exact position of the film plane inside the camera and is used to measure the exact distance between the subject and film plane, such as in macrophotography. The distance between the film plane and lens mounting flange is exactly 46.5mm .
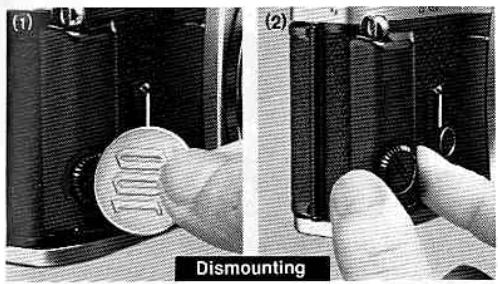
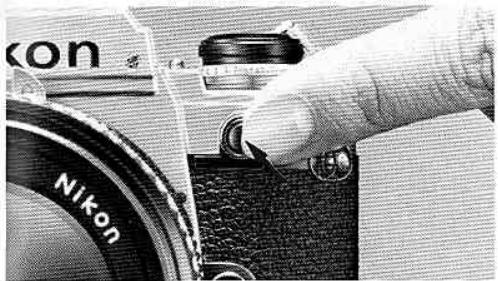
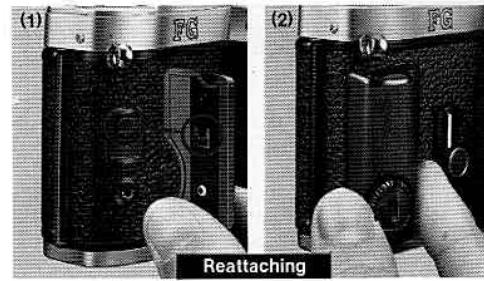
Hand Grip ⑥
This not only allows steady shooting but also a secure comfortable fit in your hand. When shooting with motor drive, the grip should be dismounted. To do this, (1) insert a coin into the slot, turn the screw counterclockwise until it loosens, (2) then slide it down until it separates from the body. To reattach, (1) align the grip attachment screw with the inner hole in the hand grip, (2) slip the grip up until it stops, then screw clockwise until it becomes tight.
CONTROLS IN DETAIL—continued
lemo Holder 45
a reminder of film type, ASA/ISO speed, and the number of exposures on the roll in use, clip off the end of the film carton and insert into the memo holder.
Infrared Focusing Index 19
The red dot located just beside the focusing index on most lenses is the infrared focusing index. When shooting with black-and-white infrared film, it is necessary to refocus the lens to compensate for the fact that infrared rays focus at a point slightly in front of visible light. To use the index, focus on your subject through the viewfinder, then look at the lens and take note of the focused distance. Finally, reset the focusing ring so that the desired distance is aligned with the red dot.
FLASH PHOTO
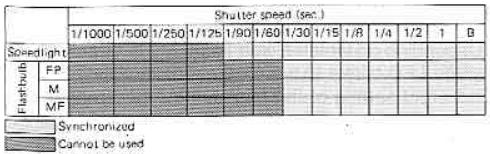
Electronic flashes are convenient not only for night or low-light shooting but also as a supplemental light to fill in shadows in the daytime. When shooting with electronic flashes such as the Nikon Speedlights SB-18, SB-16B and SB-15, the FG's shutter speed is automatically switched to 1/90sec. on P, A and on manual modes when the manual shutter speed is 1/125sec. or above. If the manual shutter speed is 1/60sec. or below, the shutter will operate at the set speed. The Nikon FG directly accepts the Nikon SB-18, SB-16B and SB-15 which have an ISO-type hot-shoe mount, and the SB-12, SB-16A and SB-17 via the Flash Unit Coupler AS-6. Be sure to check the guide number of the flash unit and set the aperture to match the shooting distance. The sync contact of the FG is an X-contact only and synchronizes at the speed of 1/90sec. or slower. Flash bulbs can also be used at the following shutter speed sync ranges:
LASH PHOTOSGRAPHY—continued
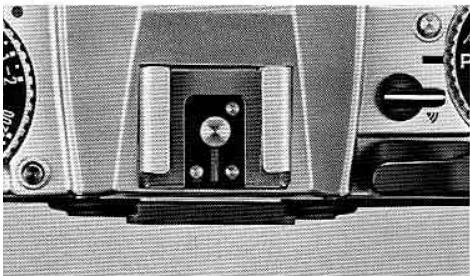
accessory Shoe 24
located at the top of the pentaprism viewfinder, the slit shoe allows direct mounting of the Nikon Speedlight SB-18, SB-16B, SB-15 or any electronic flash with ISO-type mounting foot. Other flash units may be mounted with an adapter—see the table on the next page. Four electrical contacts provide synchronizability of the flash unit, flash output stop signal on TTL code, identification of the TTL flash, and both ready-to-heat indication in the camera's viewfinder (via an ID) and auto switching to the proper sync speed of 90 sec. with some Nikon dedicated flashes.
Note: Use of other manufacturer's flash units, even with the me ISO-type mounting foot, may cause abnormalities in utter speed precision or even breakage of the IC circuit.
Viewfinder Ready-Light
When the Nikon FG is used together with Nikon flash units such as the SB-18, SB-16B, SB-15, etc., a viewfinder ready-light LED opposite the thunderbolt mark lights up when the flash is fully charged or recycled. This way, you're easily informed of flash readiness without having to take your eye off the viewfinder. Depending on which Nikon flash unit is attached, the same LED blinks to warn of insufficient flash output, incorrect setting of the flash unit or incorrect setting of the FG. For more detailed information, refer to the flash unit's instruction manual.
Note: When the camera's meter switch is off, the ready-light will not light up except at the M90 or B setting.
Nikon FG and Speedlight Combinations
| Speedlight | Connection | Camera's ready-light indication | Shutter speed automatically switched to 1/90 sec. | Usable flash modes |
| SB-19 | direct | provided | yes | auto |
| SB-18 | direct | provided | yes | TTL, manual |
| SB-17 | Via AS-6 coupler | provided | yes | auto, manual, MD |
| SB-16A | Via AS-6 coupler | provided | yes | auto, manual, MD |
| SB-16B | direct | provided | yes | TTL, auto, manual, MD |
| SB-15 | direct | provided | yes | TTL, auto, manual, MD |
| SB-11/14 | Via SC-13 sensor cord | provided | yes | auto, manual |
| SB-12 | Via AS-6 coupler | provided | yes | manual |
| SB-10 | direct | provided | yes | auto, manual |
| SB-7E | Via AS-2 coupler | not provided | no | auto, manual |
| SB-E | direct | provided | yes | auto |
;LOSE-UP PHOTOGRAPHY
r nature lovers, scientists, even general use, close-photography provides the means to see the world all its smallest details. The following are available: close-up work at a shorter distance than that of index engraved on the lens:
Close-up lenses—No. 0, No. 1, No. 2, No. 3T, No. 4T, No. 5T and No. 6T lenses; direct mounting; normal exposure method.
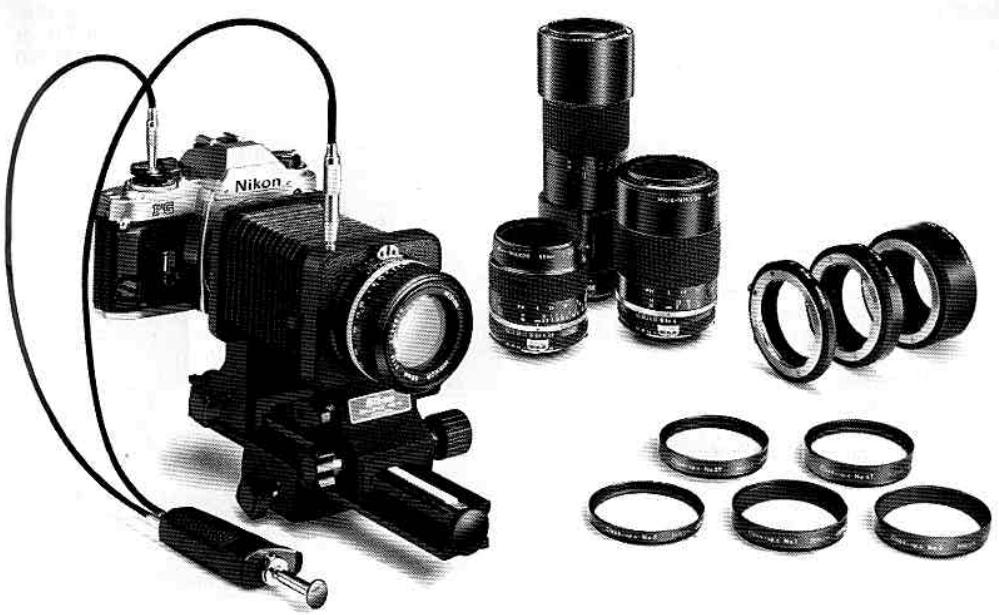
Auto rings—PK-11, PK-12 and PK-13; mount between lens and camera body; usable only in combination with AI lenses; normal exposure method. Bellows Focusing Attachment PB-6—Use the aperture control lever of the PB-6 for stop-down measurement as follows: on A, release the shutter button after turning the PB-6's aperture control lever; on manual, turn the aperture control of the PB-6 and turn either the f/stop or shutter dial until only the steady LED begins to light, indicating correct exposure for manual mode. Note that P (Program) mode is unusable. Shooting magnification is successively changeable by the expansion and contraction of the bellows.
Any combination of Nos. 1, 2, and 3 is possible.
(4) Micro-Nikkor 55mm f/2.8, 105 mm f/4 and 200 mm f/4 (IF)—When using AI-type Micro-Nikkor lenses at a shooting magnification range from 1/2 to 1/1, use the Auto Ring PK-13 or Teleconverter TC-200 (in the case of the TC-200, usable from infinity to 1/1 magnification) with the 55 mm f/2.8; use the PN-11 with the 105 mm f/4. In the case of the 200 mm f/4 (IF), the Teleconverter TC-300 is recommended for photos with a wide magnification range from infinity to 1/1. Because both the auto rings and teleconverters have automatic aperture coupling devices, they enable automatic exposure control when combined with Micro-Nikkor lenses.
For close-up photography with these accessories, it is recommended to shoot at A or manual modes since depth of field is generally shallow and you must stop your aperture down as much as possible to get the greatest area of clear focus. In focusing, it is essential to focus on the matte field. To measure the exact distance between the subject and the film plane, use the film plane indicator.
CCESSORIES
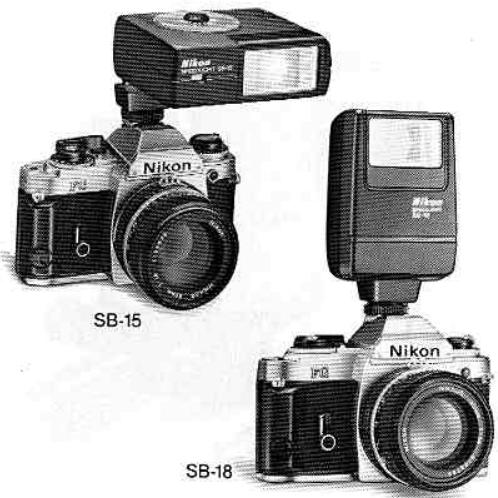
Electronic Flash Units
signed to complement the versatility of the FG, on has three electronic flash units which mount ectly to the camera's accessory shoe and feature tomatic TTL (through-the-lens) control of the flash posure. Also, with the camera on P, A, or a manual ting of 1/125sec. or faster, the FG is automatically itched to 1/90sec.—the correct synchronization used for flash photography. Nothing could be easier.
Jeedlight SB-15
atures special tilting flashtube module for bounce sh or shooting close-ups. Guide number of 25 (ASA/ 100 and meters) or 41 (ASA/ISO 25 and feet).
Seedlight SB-16B
st versatile direct-mounting flash from Nikon. Truly native bounce flash possible with two flash heads: din head has zoom settings for 28, 35, 50, and 85mm uses and tilts back 90^ and rotates 270^ ; smaller condary head faces straight ahead to provide a tchlight in the eyes. Special MD (motor drive) setting wps shooting of 8 consecutive frames at 4 frames r second. Powerful guide number of 32 (ASA/ISO 0 and meters) or 52 (ASA/ISO 25 and feet).
Speedlight SB-18
Lightweight and easy to operate. Choice of TTL or manual control. Guide number of 20 (ASA/ISO 100 and meters) or 33 (ASA/ISO 25 and feet).
Motor Drive MD-14
Made for the Nikon FG, the MD-14 Motor Drive enables shooting up to 3.2fps (frames per second) on high speed setting, or 2fps on low speed setting, using the FG's shutter release button as the motor drive trigger and for auto winding. One-frame-at-a-time picture taking is also possible, enabling you to follow a moving subject without ever taking your eye from the subject. To attach, remove the FG's hand grip ⑤ and engage the tripod socket ④ of the camera with the attachment screw. The MD-14 is also operable with the Nikon EM camera, providing the same shooting ratio as that for the Nikon FG. The FG also accepts the compact, lightweight MD-E Motor Drive for 1.5fps shooting. Attachment and operation are the same as above.
ACCESSIONS—continued
ata Back MF-15
keep track of when photos were taken, the FG accepts the slim, lightweight Data Back MF-15 which ps on in place of the FG's regular camera back 46 th no sync cord needed. Three imprinting modes possible: year/month/day (up to year 2100), day/ur/minute, or picture counting (up to 2000); displayed on the data back in clear LCDs and printed, you choose, on the photo in unobtrusive red LED merals. For double-duty as a handy clock, a quartz er with alarm function is incorporated.
Other Accessories
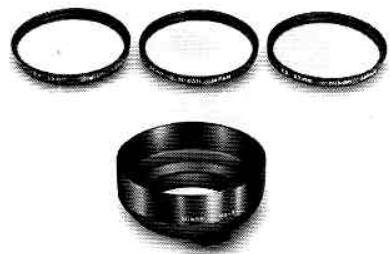
Filters
Nikon offers a wide selection of filters of various sizes and types to meet the needs of color and black-and-white photography. These filters work best with Nikon/ Nikkor lenses. They are also useful for protecting the front of the lens.
Lens hoods
These are recommended to prevent side or slanted light from entering the lens and causing ghost images and flare. Four types are available to match various Nikon/Nikkor lenses: snap-on, screw-in, telescopic (already incorporated into the lens), and slip-on.
Nikon Filters
| Type | Fitter Description | Fitter Factor | Screen in type (mm) | Drop in type (Score x) | Repair model type | ||||||||||
| Daylight | Tangents knot | 36 | 52 | 67 | 79 | 85 | 92 | n98 | |||||||
| For both Back and Back and white Fim | Skylight | L10E | 1 | 1 | ● | ● | ● | ● | ● | ● | ● | ● | ● | ● | |
| Ultraviolet | L32C | 1 | 1 | ● | ● | ● | ● | ● | ● | ● | ● | ● | ● | ||
| Ultraviolet | L39 | 1 | 1 | ● | ● | ● | ● | ● | ● | ● | ● | ● | ● | ||
| For Back and White Fim | Light | Y44 | 1.5x1/2 | 1 | ● | ● | ● | ● | ● | ● | ● | ● | ● | ● | |
| Medium | Y45 | 1.7x1/2 | 1.2x1/2 | ● | ● | ● | ● | ● | ● | ● | ● | ● | ● | ||
| Deep | Y52 | 2x1 | 1.4x1/2 | ● | ● | ● | ● | ● | ● | ● | ● | ● | ● | ||
| Orange | O55 | 3.5x1/2 | 2x1 | ● | ● | ● | ● | ● | ● | ● | ● | ● | ● | ||
| Kes | R50 | 8x1/2 | 5x2/2 | ● | ● | ● | ● | ● | ● | ● | ● | ● | ● | ||
| Green | Light | X3 | 2x1 | 1.7x1/2 | ● | ● | ● | ● | ● | ● | ● | ● | ● | ||
| Deep | X1 | 3x2/2 | 3.5x1/2 | ● | ● | ● | ● | ● | ● | ● | ● | ● | |||
| No. 1 | 1 | ● | ● | ● | ● | ● | ● | ● | ● | ● | ● | ||||
| No. 2 | 1 | ● | ● | ● | ● | ● | ● | ● | ● | ● | ● | ||||
| PQH | 2x4-1(2-x) | ● | ● | ● | ● | ● | ● | ● | ● | ● | ● | ||||
| Neutral Density | N27X | 2 (1) | ● | ● | ● | ● | ● | ● | ● | ● | ● | ● | |||
| N24X | 4 (2) | ● | ● | ● | ● | ● | ● | ● | ● | ● | ● | ||||
| N26X | 8 (2) | ● | ● | ● | ● | ● | ● | ● | ● | ● | ● | ||||
| N24X0X | 400 (5 x 5) | ● | ● | ● | ● | ● | ● | ● | ● | ● | ● | ||||
| For black Fim | Amber | Light | A2 | 1.2x1/2 | ● | ● | ● | ● | ● | ● | ● | ● | ● | ● | |
| Deep | A12 | 7 (1) | ● | ● | ● | ● | ● | ● | ● | ● | ● | ● | |||
| Blue | Light | B2 | 1.2x1/2 | ● | ● | ● | ● | ● | ● | ● | ● | ● | ● | ||
| Medium | B8 | 1.6x1/2 | ● | ● | ● | ● | ● | ● | ● | ● | ● | ● | |||
| Deep | B12 | 2.2x1/2 | ● | ● | ● | ● | ● | ● | ● | ● | ● | ● | |||
()indicate increaseinstop
ACCESSORIES—continued
yepiece correction lenses
correct both near- and far-sightedness, nine lenses are available from -5 to +3 diopter values. These values are derived from the dioptry of both the finder and the correction lens.
ubber eyecup
helping to block stray light from entering the eyee cce, this improves the apparent brightness and.
intrast of the viewfinder image and facilitates focusg. Attach directly to the viewfinder or eyepiece
rrection lens' frame.
yepieceadapter
used when attaching the Magnifier DG-2. Be sure to use the adapter before opening the camera back.
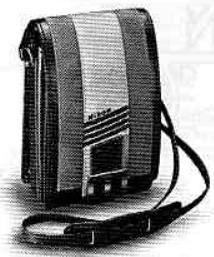
Semi-soft cases
Two types are available: the CF-17 for use with standard lenses and the CF-18 for use with the Nikon Series E 36 72mm f/3.5 or smaller lenses. The CF-18A Front-Flap for use with the Zoom-Nikkor 35 70mm f/3.5 lens and the CF-19D Camera Case Base Portion for use when the Data Back MF-15 is attached are also available.
Custom shoulder bags
Three types are available: CB-1, blue; CB-2, green; CB-3, beige.
Neckstrand
Available in several colors: AN-1, leather; AN-4Y, AN-4B, AN-6Y and AN-6W, webbed nylon.
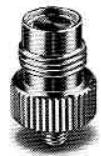
Shutter Release Adapter AR-8
For use with the Cable Release AR-2 or Double Cable Release AR-4. Screw into the center of the shutter release button.

TIPS ON CAMERA CARE
- Don't force your camera's controls—they are designed to work with a minimum of pressure.
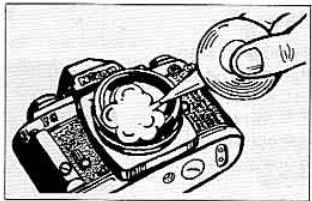
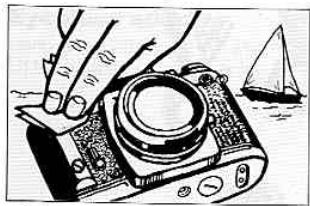
Clean all lens and prism surfaces periodically with a blower-type brush or lens tissue moistened with an approved photo lens cleaning liquid.
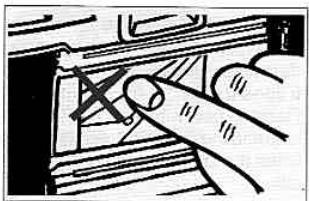
- Avoid touching the camera's interior surfaces, especially the shutter curtains ③ and film pressure plate ④.
- If the camera body is exposed to rain or mist, wipe moisture gently with a soft cloth and dry the camera. After using the camera near salt water, take care that you wipe it with a cloth moistened with pure water to remove possible traces of salt.
- Store your camera, lenses and accessories in a cool, dry place. Remove the batteries when the camera or accessories are not to be used for an extended period.
- Dispose of used batteries properly—never throw them into fire. For battery performance by brand, refer to manufacturer's literature.
OPTIMUM BATTERY PERFORMANCE
Caution: Keep batteries away from infants and small children. In case a battery is accidentally swallowed, call a doctor immediately as the material inside the batteries can cause serious problems.
New batteries: Between manufacturing and first use, all batteries exhibit some drain. Therefore, care should be taken to purchase the newest (and freshest) ones possible. To help you do this, some manufacturers stamp the date of manufacture on the bottom of each battery. Ask your camera dealer for assistance in interpreting the codes.
Temperature: Battery life ratings are based on operation at around 25^ (77^) . At other temperatures, battery life is shortened. Spare batteries should therefore be kept available if operation in low temperatures is anticipated.
Continuous use: Batteries are drained much more quickly by continuous use than by intermittent use.
Storage: When not in use, the batteries should be removed to prevent damage from leakage. To minimize drain during the period of disuse, store the batteries in a cool, dry place.
Battery brand: Do not use mixed brands of batteries, nor batteries with different model numbers. Also, avoid mixing new and old batteries since proper performance will not be obtained and battery leakage into your FG may occur.
Polarity: When installing batteries, observe the voltage polarities carefully. Reversal of positive (+) and negative (-) terminals will result in leakage. If leakage should occur, clean carefully or take your FG to your dealer.
SPECIFICATIONS
| Type of camera | Electronically controlled 35mm single-lens reflex camera |
| Picture format | 24mm×36mm (standard 35mm film format) |
| Lens mount | Nikon bayonet mount |
| Lenses | Nikkor 50/1.2, 50/1.4, 50/1.8, Nikon Series E 50/1.8 as standard; more than 60 Nikkor and Nikon Series E lenses available |
| Shutter | Electronically controlled vertical-travel metal focal-plane shutter |
| Shutter speeds | Stepless speeds from 1 to 1/1000 sec. on P (Program) and A (Auto) modes; 11 speeds quartz-controlled from 1 to 1/1000 sec. on manual; mechanically controlled, 1/90 sec. at M90 setting and long exposure at B setting |
| (Program) mode | Light intensity feed-back type; shutter speed and aperture set automatically and steplessly |
| \( Exposure control \) | Aperture priority type: aperture set manually while shutter speed set automatically and steplessly |
| Manual mode exposure control | Both aperture and shutter speed set manually. Shutter speed timing controlled by quartz |
| Viewfinder information | Shutter speed scale with LED display, exposure warning signal, ready-light when used with electronic flash |
| Exposure meter | TTL center-weighted full-aperture measurement; meter incorp- rates one silicon photodiode (SPD) |
| Metering range | EV 1 to EV 18 (i.e., f/1.4 at 1 sec. to f/16 at 1/1000 sec. at ASA/ISO 100 and with 50mm f/1.4 lens) |
| Film speed range | ASA/ISO 12~3200 |
| Audio warning alarm | "Beep-beep" warning sound activated when shutter release button is pressed halfway if shutter speed is approx. 1/30 sec. and below, or above approx. 1/1000 sec.; can be turned off via audio warning lever |
| Exposure compensation | +2EV~-2EV in 1/2 increments |
Exposure compensation button
Viewfinder
Focusing screen
Approx. +2EV when exposure compensation button is kept depressed as shutter release button is depressed
Fixed eyelevel pentaprism type with built-in TTL exposure meter; approx. 92% frame coverage
Fixed-type Nikon standard Type K screen; comprised of central split-image rangefinder spot, microprism collar and matte/ Fresnel outer field; 12mm-dia. reference circle denotes area of center-weighted metering 0.84X (50mm lens set at infinity)
Finder magnification Film advance
Via film winding lever of 144^ winding angle; hinged type; either one continuous stroke or series of shorter strokes possible
Frame counter
Additive type; automatically resets to "S" when camera back is opened
Film rewind
Manual; film rewind crank rotates after rewind button is depressed.
Hot-shoe contacts
Standard ISO-type accepts Nikon Speedlight SB-18, SB-16 SB-15 or other ISO-type Nikon flash unit directly
Speeds up to 1/90sec, with electronic flash; with the Nikon dedicated flash unit, flash sync is automatically set to 1/90 sec when shutter speed/mode selector is set at P, A or manually 1 / 125 1 / 1000 sec.; while set to 1 1 / 60 sec. manually, the shutter speed will operate as set; the flash ready-light lights up when flash is recycled
Ready-light Motor drive coupling
Incorporated in the viewfinder Electrical contacts and mechanical coupler built in for operation with the Motor Drive MD-14 or MD-E
Camera back
Swings open when film rewind knob is pulled up; memo holde provided; interchangeable with the Data Back MF-15
PECIFICATIONS—continued
If-timer
Lever provided can be set for
up to approx. 10 sec. exposure
delay; setting cancellable before
Two 1.55V silver-oxide batteries
(S-76 or SR-44 type), two 1.5V
alkaline-manganese batteries
(LR-44 type) or one 3V lithium
battery (CR-1 3N type)
wer ON/OFF
witch
Meter switched on when shutter
release button is pressed
halfway: stays switched on for
approx. 16 seconds after finger
is lifted off button
mensions
136.0mm(W)×87.5mm(H)×
54mm(D)
eight
Approx. 490g (body only)
Imera cases
Semi-soft cases CF-17, 18
and 19D
IMPORTANT
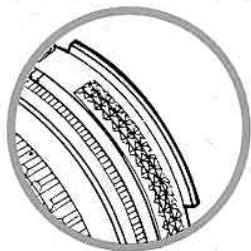
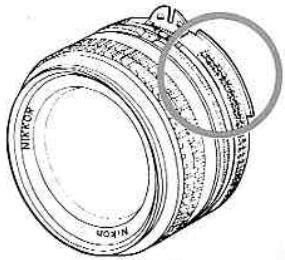
The camera body you purchased is packaged separately from the lens. Before mounting the lens, check if it is capable of Automatic Maximum Aperture Indexing (AI) operation with your camera body by verifying that the lens' aperture ring is fitted with a meter coupling ridge as illustrated at the right.
If the lens is fitted with the meter coupling ridge, it is capable of full-aperture exposure measurement; to attach it to the camera, follow the directions provided in the Basic Operation section of this instruction manual. If the lens is non-AI, it cannot be mounted on the Nikon FG. For further details on usable lenses and their recommended modes, please refer to pages 19 and 27.
Note: AI conversion of most non-AI Nikkor lenses having both an automatic diaphragm and meter coupling prong is available at reasonable cost for the convenience of Nikkor lens users. Please contact your local authorized Nikor dealer.
- CONTENTS
- FOREWORD
- ASIC OPERATION
- ASIC OPERATION—continued
- Notes:
- Compose and focus on the subject.
- Take the photograph.
- At the end of the roll, push the rewind button 34.
- Rewind the film.
- BASIC OPERATION—continued
- Remove the film cartridge.
- NIKON AND NIKKOR LENSES FOR THE NIKON FG
- When using the Teleconverter TC-200,TC-201,TC-301 or TC-14A
- CONTROLS IN DETAIL
- hutter Speed/Mode selector Dial ⑧
- P (Programmed)
- A (Auto)
- Manual
- M90 (1/90 sec.)
- B(Bulb)
- Exposure Measuring System
- CONTROLS IN DETAIL—continued
- ED Viewfinder Indications
- Exposure information
- Improper exposure warning information
- Flash ready-light information
- How To Determine Hooting Modes
- P-programmed exposure mode
- P mode operation
- Programmed exposure measurement graph
- -automatic exposure mode
- A mode operation—shutter speed priority selection
- depth of field
- V Range
- Manual exposure mode
- How to select f/stop and shutter speeds
- manual mode operation
- Shutter Release Button
- Audio Warning Lever
- Film Advance Lever
- Frame Counter
- ASA/ISO Film Speed Dial
- xposure Compensation Dial 13
- Film Plane Indicator
- Infrared Focusing Index 19
- FLASH PHOTO
- LASH PHOTOSGRAPHY—continued
- Viewfinder Ready-Light
- ;LOSE-UP PHOTOGRAPHY
- CCESSORIES
- Electronic Flash Units
- Jeedlight SB-15
- Seedlight SB-16B
- Speedlight SB-18
- Motor Drive MD-14
- ACCESSIONS—continued
- ata Back MF-15
- Other Accessories
- Filters
- Lens hoods
- ACCESSORIES—continued
- yepiece correction lenses
- ubber eyecup
- yepieceadapter
- Semi-soft cases
- Custom shoulder bags
- Neckstrand
- Shutter Release Adapter AR-8
- TIPS ON CAMERA CARE
- OPTIMUM BATTERY PERFORMANCE
- SPECIFICATIONS
- Exposure compensation button
- Viewfinder
- Focusing screen
- Finder magnification Film advance
- Film rewind
- Hot-shoe contacts
- Ready-light Motor drive coupling
- Camera back
- PECIFICATIONS—continued
- IMPORTANT
Brand : NIKON
Model : FG
Category : SLR camera