
PSR-E243/YPT-240 - Arranger keyboard YAMAHA - Free user manual and instructions
Find the device manual for free PSR-E243/YPT-240 YAMAHA in PDF.
User questions about PSR-E243/YPT-240 YAMAHA
0 question about this device. Answer the ones you know or ask your own.
Ask a new question about this device
Download the instructions for your Arranger keyboard in PDF format for free! Find your manual PSR-E243/YPT-240 - YAMAHA and take your electronic device back in hand. On this page are published all the documents necessary for the use of your device. PSR-E243/YPT-240 by YAMAHA.
USER MANUAL PSR-E243/YPT-240 YAMAHA
This product utilizes batteries or an external power supply (adapter). DO NOT connect this product to any power supply or adapter other than one described in the manual, on the name plate, or specifically recommended by Yamaha.
WARNING: Do not place this product in a position where anyone could walk on, trip over, or roll anything over power or connecting cords of any kind. The use of an extension cord is not recommended! If you must use an extension cord, the minimum wire size for a 25' cord (or less) is 18 AWG. NOTE: The smaller the AWG number, the larger the current handling capacity. For longer extension cords, consult a local electrician.
This product should be used only with the components supplied or; a cart, rack, or stand that is recommended by Yamaha. If a cart, etc., is used, please observe all safety markings and instructions that accompany the accessory product.
SPECIFICATIONS SUBJECT TO CHANGE:
The information contained in this manual is believed to be correct at the time of printing. However, Yamaha reserves the right to change or modify any of the specifications without notice or obligation to update existing units.
This product, either alone or in combination with an amplifier and headphones or speaker/s, may be capable of producing sound levels that could cause permanent hearing loss. DO NOT operate for long periods of time at a high volume level or at a level that is uncomfortable. If you experience any hearing loss or ringing in the ears, you should consult an audiologist.
IMPORTANT: The louder the sound, the shorter the time period before damage occurs.
Some Yamaha products may have benches and / or accessory mounting fixtures that are either supplied with the product or as optional accessories. Some of these items are designed to be dealer assembled or installed. Please make sure that benches are stable and any optional fixtures (where applicable) are well secured BEFORE using.
Benches supplied by Yamaha are designed for seating only. No other uses are recommended.
NOTICE:
Service charges incurred due to a lack of knowledge relating to how a function or effect works (when the unit is operating as designed) are not covered by the manufacturer's warranty, and are therefore the owners responsibility. Please study this manual carefully and consult your dealer before requesting service.
ENVIRONMENTAL ISSUES:
Yamaha strives to produce products that are both user safe and environmentally friendly. We sincerely believe that our products and the production methods used to produce them, meet these goals. In keeping with both the letter and the spirit of the law, we want you to be aware of the following:
Battery Notice:
This product MAY contain a small non-rechargeable battery which (if applicable) is soldered in place. The average life span of this type of battery is approximately five years. When replacement becomes necessary, contact a qualified service representative to perform the replacement.
This product may also use "household" type batteries. Some of these may be rechargeable. Make sure that the battery being charged is a rechargeable type and that the charger is intended for the battery being charged.
When installing batteries, never mix old batteries with new ones, and never mix different types of batteries. Batteries MUST be installed correctly. Mismatches or incorrect installation may result in overheating and battery case rupture.
Warning:
Do not attempt to disassemble, or incinerate any battery. Keep all batteries away from children. Dispose of used batteries promptly and as regulated by the laws in your area. Note: Check with any retailer of household type batteries in your area for battery disposal information.
Disposal Notice:
Should this product become damaged beyond repair, or for some reason its useful life is considered to be at an end, please observe all local, state, and federal regulations that relate to the disposal of products that contain lead, batteries, plastics, etc. If your dealer is unable to assist you, please contact Yamaha directly.
NAME PLATE LOCATION:
The name plate is located on the bottom of the product. The model number, serial number, power requirements, etc., are located on this plate. You should record the model number, serial number, and the date of purchase in the spaces provided below and retain this manual as a permanent record of your purchase.
Model
Serial No.
Purchase Date
PLEASE KEEP THIS MANUAL
92-BP (bottom)
FCC INFORMATION (U.S.A.)
1. IMPORTANT NOTICE: DO NOT MODIFY THIS UNIT!
This product, when installed as indicated in the instructions contained in this manual, meets FCC requirements. Modifications not expressly approved by Yamaha may void your authority, granted by the FCC, to use the product.
- IMPORTANT: When connecting this product to accessories and/or another product use only high quality shielded cables. Cable/s supplied with this product MUST be used. Follow all installation instructions. Failure to follow instructions could void your FCC authorization to use this product in the USA.
- NOTE: This product has been tested and found to comply with the requirements listed in FCC Regulations, Part 15 for Class "B" digital devices. Compliance with these requirements provides a reasonable level of assurance that your use of this product in a residential environment will not result in harmful interference with other electronic devices. This equipment generates/uses radio frequencies and, if not installed and used according to the instructions found in the users manual, may cause interference harmful to the operation of other electronic devices. Compliance with FCC regulations does
not guarantee that interference will not occur in all installations. If this product is found to be the source of interference, which can be determined by turning the unit "OFF" and "ON", please try to eliminate the problem by using one of the following measures:
Relocate either this product or the device that is being affected by the interference.
Utilize power outlets that are on different branch (circuit breaker or fuse) circuits or install AC line filter/s.
In the case of radio or TV interference, relocate/reorient the antenna. If the antenna lead-in is 300 ohm ribbon lead, change the lead-in to co-axial type cable.
If these corrective measures do not produce satisfactory results, please contact the local retailer authorized to distribute this type of product. If you can not locate the appropriate retailer, please contact Yamaha Corporation of America, Electronic Service Division, 6600 Orangethorpe Ave, Buena Park, CA90620
The above statements apply ONLY to those products distributed by Yamaha Corporation of America or its subsidiaries.
Information for Users on Collection and Disposal of Old Equipment and used Batteries
These symbols on the products, packaging, and/or accompanying documents mean that used electrical and electronic products and batteries should not be mixed with general household waste. For proper treatment, recovery and recycling of old products and used batteries, please take them to applicable collection points, in accordance with your national legislation and the Directives 2002/96/EC and 2006/66/EC.
By disposing of these products and batteries correctly, you will help to save valuable resources and prevent any potential negative effects on human health and the environment which could otherwise arise from inappropriate waste handling.

For more information about collection and recycling of old products and batteries, please contact your local municipality, your waste disposal service or the point of sale where you purchased the items.
[For business users in the European Union]
If you wish to discard electrical and electronic equipment, please contact your dealer or supplier for further information.
[Information on Disposal in other Countries outside the European Union]
These symbols are only valid in the European Union. If you wish to discard these items, please contact your local authorities or dealer and ask for the correct method of disposal.
Note for the battery symbol (bottom two symbol examples):
This symbol might be used in combination with a chemical symbol. In this case it complies with the requirement set by the Directive for the chemical involved.
(weee_battery_eu_en_01)
COMPLIANCE INFORMATION STATEMENT (DECLARATION OF CONFORMITY PROCEDURE)
Responsible Party : Yamaha Corporation of America
Address: 6600 Orangethorpe Ave., Buena Park, Calif. 90620
Telephone:714-522-9011
Type of Equipment : Digital Keyboard
Model Name: PSR-E243/YPT-240
This device complies with Part 15 of the FCC Rules.
Operation is subject to the following two conditions:
1) this device may not cause harmful interference, and
2) this device must accept any interference received including interference that may cause undesired operation.
See user manual instructions if interference to radio reception is suspected.
- This applies only to products distributed by
(FCC DoC)
YAMAHA CORPORATION OF AMERICA.
OBSERVERA!
The model number, serial number, power requirements, etc., may be found on or near the name plate, which is at the bottom of the unit. You should note this serial number in the space provided below and retain this manual as a permanent record of your purchase to aid identification in the event of theft.
Model No.
Serial No.
(bottom_en_01)
In addition to this Owner's Manual, the following Online materials (PDF files) are available.

MIDI Reference
Contains MIDI-related information, such as the MIDI Implementation Chart.

MIDI Basics (only in English, French, German and Spanish)
Contains basic explanations about what MIDI is and can do.

Computer-related Operations
Contains instructions about computer-related functions.

iPhone/iPad Connection Manual
Explains how to connect the instrument to smart devices, such iPhone, iPad, etc.
To obtain these manuals, access the Yamaha Downloads, enter "PSR-E243, for example" to the Model Name box, then click [SEARCH].
Yamaha Downloads
http://download.yamaha.com/

Song Book (only in English, French, German and Spanish)
Contains music scores for the preset Songs (excluding the Demo Songs) of this instrument. After completing the user registration at the website below, you can download this Song Book free of charge.
Yamaha Online Member
https://member.yamaha.com/myproduct/regist/
You will need the PRODUCT ID on the sheet ("Online Member Product Registration") packaged with this manual in order to fill out the User Registration form.
Included Accessories
- Owner's Manual (this book)
- AC Power Adaptor*1
Music Rest
Online Member Product Registration*2
1: May not be included depending on your particular locale. Check with your Yamaha dealer.
2: The PRODUCT ID on the sheet will be needed when you fill out the User Registration form.
Formats and functions

GM System Level 1
"GM System Level 1" is an addition to the MIDI standard which ensures that any GM-compatible music data can be accurately played by any GM-compatible tone generator, regardless of manufacturer. The GM mark is affixed to all software and hardware products that support GM System Level.

XGlite
As its name implies, "XGlite" is a simplified version of Yamaha's high-quality XG tone generation format. Naturally, you can play back any XG song data using an XGlite tone generator. However, keep in mind that some songs may play back differently compared to the original data, due to the reduced set of control parameters and effects.

USB
USB is an abbreviation for Universal Serial Bus. It is a serial interface for connecting a computer with peripheral devices. It allows "hot swapping" (connecting peripheral devices while the power to the computer is on).
Thank you for purchasing this Yamaha Digital Keyboard!
We recommend that you read this manual carefully so that you can fully take advantage of the advanced and convenient functions of the instrument.
We also recommend that you keep this manual in a safe and handy place for future reference.
Contents
About the Manuals. 4
Included Accessories. 4
Formats and functions 4
Setting Up
Panel Controls and Terminals 8
Setting Up 10
Power Requirements 10
Using the music rest. 11
Connecting Headphones or External Audio Equipment .. 11
Connecting a Footswitch to the SUSTAIN jack... 11
Turning the Power On/Off. 11
Auto Power Off Function 12
Selecting an EQ Setting for the Best Sound..... 12
Display Items and Basic Operations 13
Display Items. 13
Basic Operations 13
Reference
Playing a Variety of Instrument Voices 14
Selecting a Voice. 14
Fun Sounds 14
Playing the "Grand Piano" 14
Using the Metronome 15
Playing with enhanced, more spacious sound (Ultra-Wide Stereo) 15
Applying Effects to the Sound 15
Playing Styles 16
Style Variations-Sections 17
Changing the Tempo. 17
Chord Types for Style Playback 18
Looking Up Chords Using the Chord Dictionary. 19
Playing Songs 20
Listening to a Demo Song 20
Selecting and Playing Back a Song 20
BGMPlayback 20
Song Fast Forward, Fast Reverse, and Pause .. 21
Changing the Melody Voice. 21
A-B Repeat 21
Turning Each Part On/Off 22
Using the Song Lesson Feature 23
Three Types of Song Lesson 23
Practicing with Song Lesson 23
The Functions 24
Using with a Computer or iPad/iPhone 26
Connecting to a computer 26
Connecting an iPad/iPhone 26
Backup and Initialization 26
Backup Parameters. 26
Initialization 26
Appendix
Troubleshooting 27
Voice List 28
Drum Kit List 32
Song List 35
Style List 36
Effect Type List 37
Specifications 38
Index 39
PRECAUTIONS
PLEASE READ CAREFULLY BEFORE PROCEEDING
Please keep this manual in a safe and handy place for future reference.

WARNING
Always follow the basic precautions listed below to avoid the possibility of serious injury or even death from electrical shock, short-circuiting, damages, fire or other hazards. These precautions include, but are not limited to, the following:
Power supply/AC power adaptor
- Do not place the power cord near heat sources such as heaters or radiators. Also, do not excessively bend or otherwise damage the cord, or place heavy objects on it.
- Only use the voltage specified as correct for the instrument. The required voltage is printed on the name plate of the instrument.
- Use the specified adaptor (page 38) only. Using the wrong adaptor can result in damage to the instrument or overheating.
- Check the electric plug periodically and remove any dirt or dust which may have accumulated on it.
Do not open
- This instrument contains no user-serviceable parts. Do not open the instrument or attempt to disassemble or modify the internal components in any way. If it should appear to be malfunctioning, discontinue use immediately and have it inspected by qualified Yamaha service personnel.
Water warning
- Do not expose the instrument to rain, use it near water or in damp or wet conditions, place on it any containers (such as vases, bottles or glasses) containing liquids which might spill into any openings. If any liquid such as water seeps into the instrument, turn off the power immediately and unplug the power cord from the AC outlet. Then have the instrument inspected by qualified Yamaha service personnel.
- Never insert or remove an electric plug with wet hands.
Fire warning
- Do not put burning items, such as candles, on the unit. A burning item may fall over and cause a fire.
Battery
- Follow the precautions below. Failure to do so might result in explosion, fire, overheating or battery fluid leakage.
- Do not tamper with or disassemble batteries.
- Do not dispose of batteries in fire.
- Do not attempt to recharge batteries that are not designed to be charged.
- Keep the batteries separate from metallic objects such as necklaces, hairpins, coins, and keys.
- Use the specified battery type (page 10) only.
- Use new batteries, all of which are the same type, same model, and made by the same manufacturer.
- Always make sure all batteries are inserted in conformity with the +/- polarity markings.
- When the batteries run out, or if the instrument is not to be used for a long time, remove the batteries from the instrument.
- When using Ni-MH batteries, follow the instructions that came with the batteries. Use only the specified charger device when charging.
- Keep batteries away from small children who might accidentally swallow them.
- If the batteries do leak, avoid contact with the leaked fluid. If the battery fluid should come in contact with your eyes, mouth, or skin, wash immediately with water and consult a doctor. Battery fluid is corrosive and may possibly cause loss of sight or chemical burns.
If you notice any abnormality
-
When one of the following problems occur, immediately turn off the power switch and disconnect the electric plug from the outlet. (If you are using batteries, remove all batteries from the instrument.) Then have the device inspected by Yamaha service personnel.
-
The power cord or plug becomes frayed or damaged.
- It emits unusual smells or smoke.
- Some object has been dropped into the instrument.
- There is a sudden loss of sound during use of the instrument.

CAUTION
Always follow the basic precautions listed below to avoid the possibility of physical injury to you or others, or damage to the instrument or other property. These precautions include, but are not limited to, the following:
Power supply/AC power adaptor
- Do not connect the instrument to an electrical outlet using a multiple-connector. Doing so can result in lower sound quality, or possibly cause overheating in the outlet.
- When removing the electric plug from the instrument or an outlet, always hold the plug itself and not the cord. Pulling by the cord can damage it.
- Remove the electric plug from the outlet when the instrument is not to be used for extended periods of time, or during electrical storms.
Location
- Do not place the instrument in an unstable position where it might accidentally fall over.
-
Before moving the instrument, remove all connected cables, to prevent damage to the cables or injury to anyone who might trip over them.
-
When setting up the product, make sure that the AC outlet you are using is easily accessible. If some trouble or malfunction occurs, immediately turn off the power switch and disconnect the plug from the outlet. Even when the power switch is turned off, electricity is still flowing to the product at the minimum level. When you are not using the product for a long time, make sure to unplug the power cord from the wall AC outlet.
- Use only the stand specified for the instrument. When attaching the stand or rack, use the provided screws only. Failure to do so could cause damage to the internal components or result in the instrument falling over.
Connections
- Before connecting the instrument to other electronic components, turn off the power for all components. Before turning the power on or off for all components, set all volume levels to minimum.
- Be sure to set the volumes of all components at their minimum levels and gradually raise the volume controls while playing the instrument to set the desired listening level.
Handling caution
- Do not insert a finger or hand in any gaps on the instrument.
- Never insert or drop paper, metallic, or other objects into the gaps on the panel or keyboard. This could cause physical injury to you or others, damage to the instrument or other property, or operational failure.
- Do not rest your weight on, or place heavy objects on the instrument, and do not use excessive force on the buttons, switches or connectors.
- Do not use the instrument/device or headphones for a long period of time at a high or uncomfortable volume level, since this can cause permanent hearing loss. If you experience any hearing loss or ringing in the ears, consult a physician.
Yamaha cannot be held responsible for damage caused by improper use or modifications to the instrument, or data that is lost or destroyed.
Always turn the power off when the instrument is not in use.
Even when the [ ] (Standby/On) switch is in standby status, electricity is still flowing to the instrument at the minimum level.
When you are not using the instrument for a long time, make sure you unplug the power cord from the wall AC outlet.
Make sure to discard used batteries according to local regulations.
NOTICE
To avoid the possibility of malfunction/ damage to the product, damage to data, or damage to other property, follow the notices below.
Handling and Maintenance
- Do not use the instrument in the vicinity of a TV, radio, stereo equipment, mobile phone, or other electric devices. Otherwise, the instrument, TV, or radio may generate noise. When you use the instrument along with the application on your iPhone/iPad, we recommend that you set "Airplane Mode" to "ON" on your iPhone/iPad in order to avoid noise caused by communication.
- Do not expose the instrument to excessive dust or vibrations, or extreme cold or heat (such as in direct sunlight, near a heater, or in a car during the day) to prevent the possibility of panel disfiguration, damage to the internal components or unstable operation. (Verified operating temperature range: 5^ - 40^ , or 41^ - 104^ .)
- Do not place vinyl, plastic or rubber objects on the instrument, since this might discolor the panel or keyboard.
- When cleaning the instrument, use a soft, dry cloth. Do not use paint thiners, solvents, cleaning fluids, or chemical-impregnated wiping cloths.
Saving data
- Saved data may be lost due to malfunction or incorrect operation.
Information
About copyrights
Copyright of the commercially available musical data including but not limited to MIDI data and/or audio data is strictly prohibited except for your personal use.
This product incorporates and bundles computer programs and contents in which Yamaha owns copyrights or with respect to which it has license to use others' copyrights. Such copyrighted materials include, without limitation, all computer software, style files, MIDI files, WAVE data, musical scores and sound recordings. Any unauthorized use of such programs and contents outside of personal use is not permitted under relevant laws. Any violation of copyright has legal consequences. DON'T MAKE, DISTRIBUTE OR USE ILLEGAL COPIES.
■ About functions/data bundled with the instrument
- Some of the preset songs have been edited for length or arrangement, and may not be exactly the same as the original.
■ About this manual
- The illustrations and LCD screens as shown in this manual are for instructional purposes only, and may appear somewhat different from those on your instrument.
- iPhone and iPad are trademarks of Apple Inc., registered in the U.S. and other countries.
The company names and product names in this manual are the trademarks or registered trademarks of their respective companies.
Front Panel
[O] (Standby/On) switch. page 11
2 [MASTER VOLUME] control... page 11
[DEMO] button... page 20
4 [FUNCTION] button... page 24
[METRONOME] button.. page 15
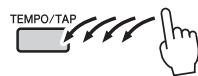
[TEMPO/TAP] button... page 17
LESSON PART
[L] button . page 23
[R] button.. page 23
Keyboard
Since this keyboard does not have touch response, the level of the sound does not change in response to your playing strength. Therefore, your performance may not sound correctly as in the preset Songs.
The "Press & Hold" Symbol

Buttons having this indication can be used to call up an alternate function when the relevant button is pressed and held. Hold down this button until the function is called up.
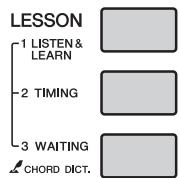
[1 LISTEN & LEARN] button... page 23
[2 TIMING] button... page 23
[3 WAITING] button... page 23
In the Song mode
[ABREPEAT] button.. page 21
[REW] button.. page 21
[FF] button. page 21
[PAUSE] button . page 21
In the Style mode
[ACMP ON/OFF] button page 16
INTRO/ENDING/rit.] button.. page 17
[MAIN/AUTO FILL] button.. page 17
[SYNC START] button... page 16
Rear Panel
[START/STOP] button.. page 20
[SONG] button page 20
[VOICE] button...page 14
[STYLE] button. page 16
19 Number buttons [0]–[9], [+], [-]. page 13
[PORTABLE GRAND] button page 14
[ULTRA-WIDE STEREO] button......page 15
[Sound Effect] button.. page 14
Drum illustrations for the Drum Kit ...page 14
Each of these indicates the drum or percussion instrument assigned to the corresponding key for "Standard Kit 1."
SUSTAIN jack. page 11
25 USB TO HOST terminal* . page 26
26 PHONES/OUTPUT jack.. page 11
DC IN jack.. page 10
- For connecting to a computer. For details, refer to "Computer-related Operations" (page 4) on the website. When connecting, use an AB type USB cable of less than 3 meters. USB 3.0 cables cannot be used.
Power Requirements
Although the instrument will run either from an optional AC adaptor or batteries, Yamaha recommends use of an AC adaptor whenever possible. An AC adaptor is more environmentally friendly than batteries and does not deplete resources.
Using an AC Power Adaptor
1 Make sure that the power of the instrument is off (display is blank, except for notation staff).

WARNING
- Use the specified adaptor (page 38) only. Using the wrong adaptor can result in damage to the instrument or overheating.
2 Connect the AC adaptor to the power supply jack.
3 Plug the AC adaptor into an AC outlet.

CAUTION
- When setting up the product, make sure that the AC outlet you are using is easily accessible. If some trouble or malfunction occurs, immediately turn off the power switch and disconnect the plug from the outlet. Even when the power switch is turned off, electricity is still flowing to the product at the minimum level. When you are not using the product for a long time, make sure to unplug the power cord from the wall AC outlet.
Using Batteries
This instrument requires six "AA" size, Alkaline (LR6)/Manganese (R6) batteries, or rechargeable nickel-metal hydride batteries (rechargeable Ni-MH batteries). The Alkaline batteries or rechargeable Ni-MH batteries are recommended for this instrument, since other types may result in poorer battery performance.

WARNING
- When using Ni-MH batteries, follow the instructions that came with the batteries. Use only the specified charger device when charging.
■ Installing the batteries
1 Make sure that the power of the instrument is off (display is blank, except for notation staff).
2 Open the battery compartment cover located on the instrument's bottom panel.
3 Insert the six new batteries, being careful to follow the polarity markings on the inside of the compartment.
4 Replace the compartment cover, making sure that it locks firmly in place.
NOTICE
- Connecting or disconnecting the power adaptor with batteries installed may turn the power off, resulting in loss of data being recorded or transferred at the time.
When battery power becomes too low for proper operation, the volume may be reduced, the sound may be distorted, and other problems may occur. When this happens, make sure to replace all batteries with new ones or already-recharged ones.
NOTE
- This instrument cannot charge the batteries. Use only the specified charger device when charging.
- Power will be automatically drawn from the AC adaptor if an AC adaptor is connected while batteries are installed in the instrument.
Setting the battery type
After installing new batteries and turning the power on, make sure to set the Battery Type appropriately (rechargeable or not) via Function number 025 (page 25).
NOTICE
- Failure to set the Battery Type may shorten the amount of the battery life. Make sure to set the Battery Type correctly.
Using the music rest
Connecting Headphones or External Audio Equipment
Any pair of stereo headphones with a 1/4 ” stereophone plug can be plugged in here for convenient monitoring. The speakers are automatically shut off when a plug is inserted into this jack.
The PHONES/OUTPUT jack also functions as an external output. You can connect the PHONES/OUTPUT jack to a keyboard amplifier, stereo system, mixer, tape recorder, or other line-level audio device to send the instrument's output signal to that device.
CAUTION
- Do not use the instrument/device or headphones for a long period of time at a high or uncomfortable volume level, since this can cause permanent hearing loss. If you experience any hearing loss or ringing in the ears, consult a physician.
- Before connecting the instrument to other electronic components, set all volume levels to the minimum, then turn off the power for all components.
NOTICE
- When the instrument's sound is output to an external device, first turn on the power to the instrument, then to the external device. Reverse this order when you turn the power off.
Connecting a Footswitch to the SUSTAIN jack
You can produce a natural sustain as you play by pressing an optional Footswitch plugged into the [SUSTAIN] jack.
NOTE
- Make sure that the footswitch plug is properly connected to the SUSTAIN jack before turning on the power.
- Do not press the footswitch while turning the power on. Doing this changes the recognized polarity of the footswitch, resulting in reversed footswitch operation.
Turning the Power On/Off
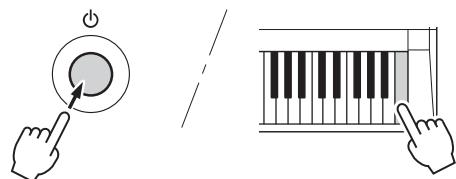
Turn down the [MASTER VOLUME] control to "MIN" then press the [ ] (Standby/On) switch to turn on the power. While playing the keyboard, adjust the [MASTER VOLUME] control. To turn off the power, press the [ ] (Standby/On) switch again for a second.
While playing the keyboard, use the [MASTER VOLUME] control to adjust the volume to an appropriate level.
CAUTION
- When using a power adaptor, even when the power is off, a small amount of electricity is still being consumed by the instrument. When you are not using the instrument for a long time, make sure to unplug the AC power adaptor from the wall AC outlet.
Auto Power Off Function
To prevent unnecessary power consumption, this instrument features an Auto Power Off function that automatically turns the power off if the instrument is not operated for a specified period of time. The amount of time that will elapse before the power is automatically turned off is set by default to 30 minutes.
To disable the Auto Power Off function:
Turn off the power, then press the [ ] (Standby/On) switch to turn on the power while holding down the lowest key.

To set the time that elapses before Auto Power Off is executed:
While holding down the [FUNCTION] button, press the [+] or [-] button several times until "AutoOff"
(Function 024) appears then select the desired value.
Settings: OFF, 5, 10, 15, 30, 60, 120 (minutes)
Default value: 30 (minutes)
NOTE
- Generally, the settings are maintained even when the power is turned off. For details, see page 26.
NOTICE
- Depending on the instrument status, the power may not turn off automatically, even after the elapse of the specified period of time. Always turn off the power manually when the instrument is not in use.
- When the instrument is not operated for a specified period of time while connected to an external device such as an amplifier, speaker or computer, make sure to follow the instructions in the Owner's Manual to turn off the power to the instrument and the connected devices, in order to protect the devices from damage. If you do not want the power to turn off automatically when a device is connected, disable Auto Power Off.
Selecting an EQ Setting for the Best Sound
Several different master equalizer (EQ) settings give you the best possible sound when listening through different reproduction systems—the instrument's internal speakers, headphones, or an external speaker system.
Hold down the [ULTRA-WIDE STEREO] button for longer than a second to call up "013 MasterEQ."
"MasterEQ" is shown in the display for a few seconds, and the current Master EQ type appears.
![YAMAHA PSR-E243/YPT-240 - Hold down the [ULTRA-WIDE STEREO] button for longer than a second to call up "013 MasterEQ." - 1](/content/2025/01/115271/images/6212bb6c21090ce1128c6187255b1a586c227ab085af9ea9d9c495df161dab59.jpg)
Hold for longer than a second.
![YAMAHA PSR-E243/YPT-240 - Hold down the [ULTRA-WIDE STEREO] button for longer than a second to call up "013 MasterEQ." - 2](/content/2025/01/115271/images/bf5de1fc5ed96374a183088729e460bd23ef259f0473cd7c27c661374f69626a.jpg)
![YAMAHA PSR-E243/YPT-240 - Hold down the [ULTRA-WIDE STEREO] button for longer than a second to call up "013 MasterEQ." - 3](/content/2025/01/115271/images/9bc96ecf42ef5091f3dc4acdc7e70367b314423a5d63df75a037ad378fb6503f.jpg)
Current Master EQ type
2 Use the [+] or [-] button to select the desired Master EQ type.
Master EQ types
| 1 | Speaker | Optimum for listening via the instru- ment's built-in speakers. |
| 2 | Headphone | Optimum for headphones, or for listen- ing via external speakers. |
| 3 | Boost | Features more powerful sound. |
| 4 | Piano | Optimum for piano solo performance. |
| 5 | Bright | Lowers the mid range for a brighter sound. |
| 6 | Mild | Lowers the high range for a softer sound. |
Display Items
Notation
Normally this indicates the notes you play. When the Song Lesson function is used, this indicates the current notes and chord of playback. When the Dictionary function (page 19) is used, this indicates the notes of the chord you specify.
NOTE
- Any notes occurring below or above the staff are indicated by "Bva."
- For a few specific chords, not all notes may be shown, due to space limitations in the display.
Song/Voice/Style
These indicate the operating condition of the instrument.
SONG
VOICE
STYLE
On/Off status
This area indicates the on/off status of each function. Each indication is shown when the corresponding function is turned on.
WIDE
Page 15
ACMP ON
Page 16
DUAL
Indicates that a Dual Voice
(No.122-131) is selected.
Chord
Indicates the chord which is played in the Auto Accompaniment range (page 16) of the keyboard, or specified via Song playback.

Measure or Function
Normally indicates the current measure number of current Style or Song. When the [FUNCTION] button (page 24) is in use, this indicates the Function number.
MEASURE 003
FUNCTION 025
Keyboard Display
Indicates notes currently being played. Indicates the melody and chord notes of a Song when the Song lesson function is in use.
Also indicates the notes of a chord—either when playing a chord or when using the Dictionary function.
Song Track status
Information related to the Song tracks is shown here (page 22).

Lit: Track contains data

Unlit: Track is muted or contains no data
Beat
Indicates the current beat of playback.


Basic Operations
Before operating the instrument, it may be helpful to familiarize yourself with the basic controls below that are used to select items and change values.
Number buttons
Use the Number buttons to directly enter an item or value. For numbers that start with one or two zeroes, the first zeroes can be omitted.
Example: Selecting Voice 003, Bright Piano.
Press number buttons [0], [0], [3], or simply press [3].
[-] and [+ ] buttons
Press the [+] button briefly to increase the value by 1, or press the [-] button briefly to decrease the value by 1. Press and hold either button to continuously increase or decrease the value in the corresponding direction.
![YAMAHA PSR-E243/YPT-240 - [-] and [+ ] buttons - 1](/content/2025/01/115271/images/b0ed869489f584f5177b86cb465a79ffcdcfafff5c737644e8ffc394339f1fb9.jpg)
In addition to piano, organ, and other "standard" keyboard instruments, this instrument has a large range of voices that includes guitar, bass, strings, sax, trumpet, drums and percussion, and even sound effects—giving you a wide variety of musical sounds.
Selecting a Voice
Press the [VOICE] button.
The Voice number and name will be shown.
![YAMAHA PSR-E243/YPT-240 - Press the [VOICE] button. - 1](/content/2025/01/115271/images/0a3b5105a5b8890ccdd7c5c231a6b6c69017f7568b2dd3f8ac861e78ef01f250.jpg)
2 Use the number buttons [0]–[9], [+], [-] buttons to select the desired Voice.
Refer to the Voice List on page 28.
![YAMAHA PSR-E243/YPT-240 - Use the number buttons [0]–[9], [+], [-] buttons to select the desired Voice. - 1](/content/2025/01/115271/images/36e055a385923bbfa8cfdc8d573db9979abf2ef43c54a0e411d9e7e1510352ba.jpg)
3 Play the keyboard.
Preset Voice Types
| 001–139 | Instrument Voices (including sound effects). |
| 140–152 (Drum Kit) | Various drum and percussion sounds are assigned to individual keys, from which they can be played. Details on the instruments and key assignments of each Drum Kit can be found in the Drum Kit List on page 32. |
| 153–385 | XGlite Voices |
| 000 | One Touch Setting (OTS) The One Touch Setting feature automatically selects the most suitable Voice when you select a Style or Song. Simply select Voice number “000” to activate this feature. |
Fun Sounds
You'll be able to play various sound effects from the keyboard: barking, braying, yelling, and much more. Press the [SOUND EFFECT] button.

Try out each key and enjoy the sounds. Don't forget the black keys! After trying out these sounds, press the [PORTABLE GRAND] button to reset the instrument Voice to the default setting of Voice "Grand Piano1."
For details on the sound effects assigned to each key, refer to Drum Kit List (Voice No.152) on page 34.
Playing the "Grand Piano"
When you want to reset various settings to default and simply play a Piano sound, press the [PORTABLE GRAND] button.

The Voice "Grand Piano" will automatically be selected as the Voice.
Using the Metronome
The instrument features a built-in metronome (a device that keeps an accurate tempo), convenient for practicing.
Press the [METRONOME] button to start the metronome.

2 Press the [METRONOME] button again to stop the metronome.
To change the tempo:
Press the [TEMPO/TAP] button to call up the Tempo value, then use the number buttons [0]-[9], [+] , [-] .
Press the [+] and [-] buttons simultaneously to instantly reset the value to the default tempo.
To set the Time Signature:
Press and hold the [METRONOME] button to call up "TimeSig" (Functions 018; page 25), then use the Number buttons.
To set the Metronome Volume:
This can be set via Function number 019 (page 25).
Playing with enhanced, more spacious sound (Ultra-Wide Stereo)
You can play the keyboard with a spacious, wider sound effect that gives you the sensation of hearing the sound outside of the speakers by turning on the Ultra-Wide Stereo effect.
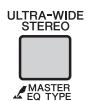
Press the [ULTRA-WIDE STEREO] button to turn it on.
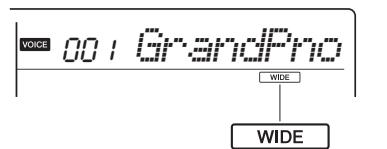
Appears when UltraWide Stereo is on.
The sound will expand around you—as if the speaker position is outside of the instrument.
2 Press the [ULTRA-WIDE STEREO] button again to turn it off.
To select the Ultra-Wide Stereo type:
Press and hold the [ULTRA-WIDE STEREO] button to call up "Wide" (Function 014; page 25), then use the Number buttons.
Applying Effects to the Sound
This instrument can apply various Effects as listed below to the instrument's sound.
Reverb
Adds the ambience of a club or concert hall to the sound. Although the best-suited Reverb type is called up by selecting a Song or Style, you can select another one via Function number 009 (page 25). You can also set the Reverb depth via Function number 010 (page 25).
Chorus
Makes the Voice sound richer, warmer and more spacious. Although the best-suited Chorus type is called up by selecting a Song or Style, you can select another one via Function number 011 (page 25).
Sustain
By turning on the Sustain parameter of Function number 012 (page 25), you can add a fixed sustain to the keyboard Voices. Sustain can also be applied with the optional footswitch (page 11).
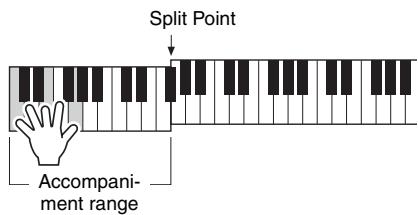
This instrument includes the Auto Accompaniment feature that plays appropriate "Styles" (rhythm + bass + chord accompaniment). You can select from a huge variety of Styles covering a wide range of musical genres.
Press the [STYLE] button, then use the number buttons [0]–[9], [+], [-] to select the desired Style.
The Style List is provided on the front panel, or in the Style List (page 36).
2 Press the [ACMP ON/OFF] button to turn on the Auto Accompaniment.
With this operation, the area of the keyboard to the left of the Split Point (54: F#2) becomes the "Auto Accompaniment range" and is used only for specifying the chords.
The highest key for the Auto Accompaniment range is referred to as the "Split Point," which can be changed from the default of F#2 via Function number 005 (page 24).
3 Press the [SYNC START] button to turn Synchro Start on.

4 Play a chord in the Auto Accompani-ment range to start playback.
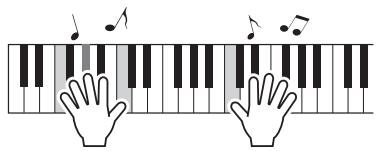
Play a melody with the right hand and chords with the left hand.
For information about chords, refer to "Chord Types for Style Playback" (page 18) or use the Chord Dictionary function (page 19).

5 Press the [START/STOP] button to stop playback.

You can add intro, ending and rhythm variations to Style playback by using "Sections." For details, refer to page 17.
To play back the rhythm part only
If you press the [START/STOP] button (without pressing the [ACMP ON/OFF] button in step 2), only the rhythm part can be played back, and you can play a melody performance using the entire keyboard range.
NOTE
- Since the Pianist category Styles (093-100) have no rhythm parts, no sound will be produced if you start rhythm-only playback.
Adjusting the Style Volume
To adjust the volume balance between Style playback and keyboard, you can adjust the Style Volume. This can be set via Function number 001 (page 24).
Style Variations—Sections
Each Style consists of "Sections" that allow you to vary the arrangement of the accompaniment to match the song you are playing. These instructions cover a typical example for using the Sections.
STYLE

ACMP ON/OFF

INTRO/ ENDING/rit.

MAIN/ AUTO FILL

SYNC START
1-3
Same as Steps 1-3 in page 16.
4 Press the [MAIN/AUTO FILL] button to select Main A or Main B.
![YAMAHA PSR-E243/YPT-240 - Press the [MAIN/AUTO FILL] button to select Main A or Main B. - 1](/content/2025/01/115271/images/f835439dadc129ed82dfd6faa88d8f1a3526be42d6ef94c035d2381c49d82916.jpg)
MAIN/ AUTO FILL
![YAMAHA PSR-E243/YPT-240 - Press the [MAIN/AUTO FILL] button to select Main A or Main B. - 2](/content/2025/01/115271/images/b8cd1ac0e7ce606ef0860518c7ad509ec0d0526a7dd4773c3763a848763748e3.jpg)
Current Section
5 Press the [INTRO/ENDING/rit.] button.
![YAMAHA PSR-E243/YPT-240 - Press the [INTRO/ENDING/rit.] button. - 1](/content/2025/01/115271/images/748af79a9dd97f9eb249dc5710b6d6b1cfe14cf4feb759e1ed713bea26805b2e.jpg)
INTRO/ ENDING/rit.
![YAMAHA PSR-E243/YPT-240 - Press the [INTRO/ENDING/rit.] button. - 2](/content/2025/01/115271/images/501d318b786c2ce734fa6cf5a1ec07b6454c302a5ed8d072e5bc68f5708eb8c3.jpg)
Now, you're ready to start Style playback from the Intro section.
6 Play a chord with your left hand to start playback of the Intro.
For this example, play a C major chord (as shown below). For information on how to enter chords, refer to "Chord Types for Style Playback" on page 18.
7 After the Intro finishes, play the keyboard according to the progression of the Song you are playing.
Play chords with your left hand while playing melodies with your right hand, and press the [MAIN/AUTO FILL] button as necessary. The Section will change to Fill-in then Main A or B.

MAIN/ AUTO FILL

Press the [INTRO/ENDING/rit.] button.
![YAMAHA PSR-E243/YPT-240 - Press the [INTRO/ENDING/rit.] button. - 1](/content/2025/01/115271/images/b8c89c3fbdfc49a1f40786c4434cfab43db5a2112854776fd627739ecd798883.jpg)
INTRO/ ENDING/rit.
![YAMAHA PSR-E243/YPT-240 - Press the [INTRO/ENDING/rit.] button. - 2](/content/2025/01/115271/images/a540bd06f0e98e3f830f1dce8959e7882300e3866ffa064dce1f3a715eee235a.jpg)
The Section switches to the Ending. When the Ending is finished, Style playback stops automatically. You can have the Ending gradually slow down (ritardando) by pressing the [INTRO/ENDING/rit.] button again while the Ending is playing back.
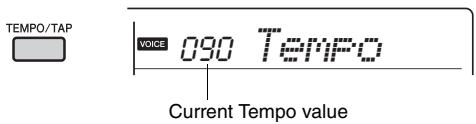
Changing the Tempo
Press the [TEMPO/TAP] button to call up the Tempo value, then use the [-] and [+] buttons to adjust the Tempo value.

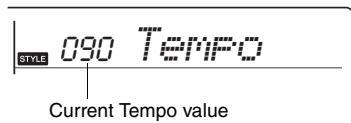
Press the [+] and [-] buttons simultaneously to reset the value to the default tempo of the current Style or Song.
Using the Tap function
While a Song or Style is playing back, press the [TEMPO/TAP] button just twice at the desired tempo to change the tempo. While Song or Style playback is stopped, tap the [TEMPO/TAP] button several times to start playback at the tapped tempo—four times for a 4-beat Song or Style or three times for a 3-beat Song or Style.
Chord Types for StylePlayback
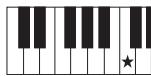
For users who are unfamiliar with chords, this chart conveniently shows how to play common chords in the Auto Accompaniment range of the keyboard. Since there are many useful chords and many different ways to use them musically, refer to commercially available chord books for further details.
indicates the root note.
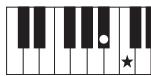
| Major | Minor | Seventh | Minor Seventh | Major Seventh |
| C | Cm | C7 | Cm7 | CM7 |
| ★ | ★ | ★ | ||
| D | Dm | D7 | Dm7 | DM7 |
| ★ | ★ | ★ | ||
| E | Em | E7 | Em7 | EM7 |
| ★ | ★ | ★ | ||
| F | Fm | F7 | Fm7 | FM7 |
| ★ | ★ | ★ | ||
| G | Gm | G7 | Gm7 | GM7 |
| ★ | ★ | ★ | ||
| A | Am | A7 | Am7 | AM7 |
| ★ | ★ | ★ | ||
| B | Bm | B7 | Bm7 | BM7 |
| ★ | ★ | ★ |
- Inversions can be used as well as in "root" position—with the following exceptions: m7, m7 5, 6, m6, sus4, aug, 7, 7 5, 6(9), sus2
- Inversion of the 7sus4 and m7(11) chords are not recognized if the notes are omitted.
- Sus2 chords are indicated by the root name only.
- When playing a chord which cannot be recognized by this instrument, nothing is shown on the display. In such a case, only the rhythm and bass parts will be played.
Easy Chords
This method lets you easily play chords in the accompaniment range of the keyboard using only one, two, or three fingers.
For root "C"
C
To play a major chord
Press the root note () of the chord.
Cm
To play a minor chord
Press the root note together with the nearest black key to the left of it.
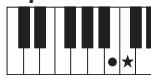
C7
To play a seventh chord
Press the root note together with the nearest white key to the left of it.
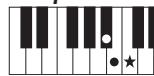
Cm7
To play a minor seventh chord
Press the root note together with the nearest white and black keys to the left of it (three keys altogether).
Looking Up Chords Using the Chord Dictionary
The Dictionary function is useful when you know the name of a certain chord and want to quickly learn how to play it.
Press and hold the [3 WAITING] button for longer than a second to call up "Dict."
"Dict." will appear in the display.
![YAMAHA PSR-E243/YPT-240 - Press and hold the [3 WAITING] button for longer than a second to call up "Dict." - 1](/content/2025/01/115271/images/ca7b1b5c4bd9e6a6ecfe45c0d49e96625fb23c2e3cfd1332a02433cd3dce0e39.jpg)
This operation will divide the entire keyboard into the three ranges as illustrated below.
- The range to the right of "ROOT":
Lets you specify the Chord Root, but produces no sound.
- The range between "CHORD TYPE" and "ROOT":
Lets you specify the Chord Type, but produces no sound.
- The range to the left of "CHORD TYPE":
Lets you play and confirm the Chord specified in the above two ranges.
![YAMAHA PSR-E243/YPT-240 - Press and hold the [3 WAITING] button for longer than a second to call up "Dict." - 2](/content/2025/01/115271/images/d70234e1ea7ce28107abe65801480c59dae32a2eb188536b8534925ff457714a.jpg)
2 As an example, learn how to play a GM7 (G major seventh) chord.
2-1. Press the "G" key in the section to the right of "ROOT▶" so that the "G" is shown as the root note.
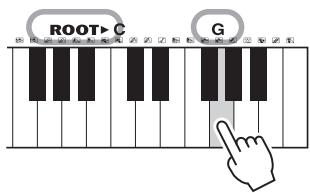
2-2. Press the key labeled "M7" in the section between "CHORD TYPE " and "ROOT." The notes you should play for the specified chord (root note and chord type) are conveniently shown in the display, both as notation and in the keyboard diagram.
To call up possible inversions of the chord, press the [+] /[-] buttons.
NOTE
- About major chords: Simple major chords are usually indicated only by the root note. For example, "C" refers to C major. However, when specifying major chords here, make sure to select "M" (major) after pressing the root note.
These chords are not shown in the Chord Dictionary function: 6(9), M7(9), M7(#11), b5, M7b5, M7aug, m7(11), mM7(9), mM7b5, 7b5, sus2
3 Following the notation and keyboard diagram in the display, try playing a chord in the range to the left of "CHORD TYPE▶."
When you've played the chord properly, a bell sound signals your success and the chord name in the display flashes.
You can simply enjoy listening to the internal Songs, or use them with just about any of the functions, such as Lesson.
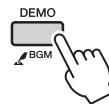
Listening to a Demo Song
Press the [DEMO] button to play Songs in sequence. Playback will repeat continuously, starting again from the first Song (001).

To stop playback, press the [DEMO] button.
NOTE
- You can select a song by using the [+] button after pressing the [DEMO] button. The [-] button can be used to go back to the beginning of the selected Song.
Selecting and Playing Back a Song
Press the [SONG] button, then use the Number buttons to select the desired Song.
Refer to the Song List (page 35).
Appears after the [Song] button is pressed.
2 Press the [START/STOP] button to start playback.
To stop playback, press the [START/STOP] button again.

To change the tempo:
Refer to page 17.
Adjusting the Song Volume
To adjust the volume balance between Song playback and keyboard, you can adjust the Song Volume. This can be set via Function number 002 (page 24).
BGM Playback
With the default setting, pressing the [DEMO] button will play back only three internal Demo Songs repeatedly. This setting can be changed so that, all internal Songs automatically play back, letting you use the instrument as a background music source.
Hold down the [DEMO] button for longer than a second.
"DemoGrp" is shown in the display for a few seconds, followed by the current repeat playback target.
Hold for longer than a second.
2 Use the [+] or [-] button to select a playback group.
| Demo | Preset songs (001–003) |
| Preset | All preset songs (001–102) |
3 Press the [DEMO] button to start playback.
To stop playback, press the [DEMO] button again or press the [START/STOP] button.
Random Song Playback
When the Demo Group (above) is set to "Preset," the playback order via the [DEMO] button can be changed between numerical order and random order. To do this, press the [FUNCTION] button several times until "PlayMode" (Function 022; page 25) is called up, then select "Normal" or "Random."
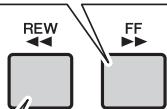
Song Fast Forward, Fast Reverse, and Pause
Like the transport controls on an audio player, this instrument lets you fast forward (FF), rewind (REW) and pause (PAUSE) playback of the Song.
Fast Forward
During playback, press this button to rapidly skip ahead to a later point in the Song.

PAUSE
Fast Reverse
During playback, press this button to rapidly return to an earlier point in the Song.
Pause
During playback, press this button to pause playback, and press again to start from that point.
NOTE
- When the A-B repeat is specified, the Fast Reverse and Fast Forward will only work within the range between A and B.
- [REW], [FF] and [PAUSE] button cannot be used during Song playback by using the [DEMO] button.
Changing the Melody Voice
You can change a Song's melody Voice to any other desired Voice.
1 Select a Song.
2 Select the desired Voice.
3 Press and hold the [VOICE] button for longer than a second.
"SONG MEODY VOICE" appears in the display for a few seconds, and the selected Voice replaces the Song's original melody Voice.
NOTE
- Selecting another Song will cancel the changed Melody Voice.
A-B Repeat
You can play back only a specific section of a Song repeatedly by setting the A point (start point) and B point (end point) in one-measure increments.
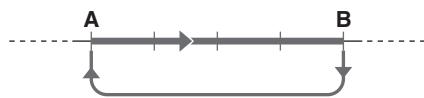
Repeat playback of this section
1 Start playback of the Song (page 20).
2 When playback reaches to the point you want to specify as the start point, press the [A-B REPEAT] button to set the A point.

3 When playback reaches to the point you want to specify as the end point, press the [A-B REPEAT] button again to set the B point.
The specified A-B section of the song will now play repeatedly.
NOTE
- You can also set the A-B Repeat function when the Song is stopped. Simply use the [REW] and [FF] buttons to select the desired measures, pressing the [A-B REPEAT] button for each point, then start playback.
- If you want to set the start point "A" at the top of the Song, press the [A-B REPEAT] button before starting playback.
4 To cancel repeat playback, press the [A-B REPEAT] button.
To stop playback, press the [START/STOP] button.
NOTE
- The A-B Repeat function will be canceled when you select another Song mode.
Turning Each Part On/Off
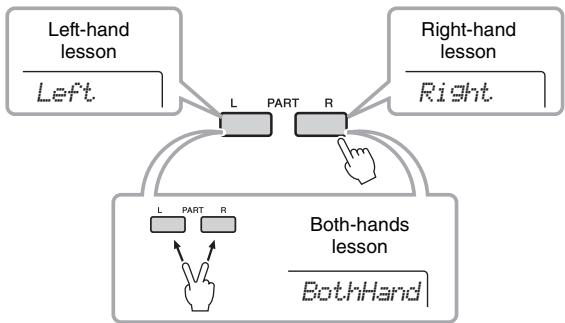
As indicated above the panel buttons (shown below), a Song consists of two Parts, which can be turned on or off individually by pressing the corresponding button, L or R.
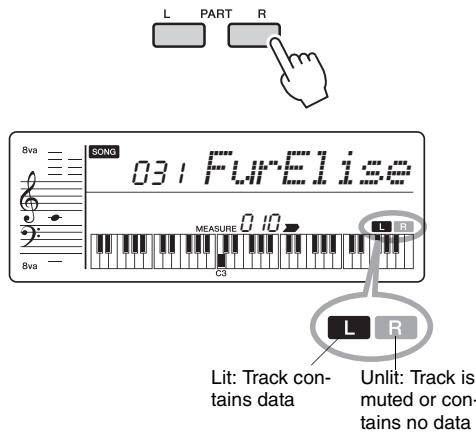
By turning the left- and right-hand parts on or off during playback, you can listen to the Part (that is turned on), or practice the other part (that is turned off) on the keyboard.
NOTE
- Selecting another Song will cancel the on/off status of the Parts.
You can use the selected Song for a left-hand, right-hand, or both-hands lesson. Try practicing with these three Song Lesson types while referring to the music scores in the Song Book (page 4).
Three Types of Song Lesson
- Lesson 1—Listen & Learn
In this Lesson, you need not play the keyboard. The model melody/chords of the part you selected will sound. Listen to it carefully and remember it well.
- Lesson 2—Timing
In this Lesson, simply concentrate on playing the notes with the correct timing. Even if you play wrong notes, the correct notes shown in the display will sound.
- Lesson 3—Waiting
In this Lesson, try playing the correct notes shown on the display. The Song pauses until you play the right note, and playback tempo will change to match the speed at which you are playing at.
NOTE
- If you want to keep a steady playback tempo maintained during Lesson 3: Waiting, set the Your Tempo parameter to OFF via the Function number 020 (page 25).
Practicing with Song Lesson
Press the [SONG] button then select a Song for your lesson.
2 Press either or both the [R] and [L] buttons to select the part you want to practice.
NOTE
- In this step, "No LPart" may appear, indicating that the current Song does not contain a left-hand part.
3 Press the [1 LISTEN & LEARN], [2 TIMING], or [3 WAITING] button to start playback of the Song Lesson.
NOTE
- During playback, you can change the Lesson mode by pressing this button, and you can stop the Lesson at any time by pressing the [START/STOP] button.
4 When Lesson playback reaches to the end, check your evaluation Grade on the display.
"2 Timing" and "3 Waiting" will evaluate your performance in four levels.
Excellent.
Very Good
Good
口
After the evaluation display has appeared, the lesson will start again from the beginning.
NOTE
- When the melody Voice of the Song is changed, the key position shown in the display may be shifted (in octave units), depending on the selected Voice.
5 Stop the Lesson mode.
You can stop the Lesson mode at any time by pressing the [START/STOP] button.
The Functions settings provide access to a range of detailed instrument parameters such as Tuning, Split Point, Voices and Effects.
Press the [FUNCTION] button several times until the desired item appears.
Each time the [FUNCTION] button is pressed, the Function number increases one by one. You can also decrease the Function number by one when you press the [-] button briefly while holding down the [FUNCTION] button.
![YAMAHA PSR-E243/YPT-240 - Press the [FUNCTION] button several times until the desired item appears. - 1](/content/2025/01/115271/images/25311ae0269d9cfc281e5d3f6cf71a36f753160854967b26a6de486d736377f7.jpg)
After a few seconds, the Function name may be replaced with the setting value depending on the selected Function.
NOTE
- The Function number does not appear in the display during Song, Style or metronome playback. The beat value appears instead.
2 Set the value by using the number buttons [0]-[9], [+] , [-] .
![YAMAHA PSR-E243/YPT-240 - Set the value by using the number buttons [0]-[9], [+] , [-] . - 1](/content/2025/01/115271/images/4c122ee4a53aad47e58f6eba3777f46d1daa39209a0d1c4072a8575d7cc01b63.jpg)
NOTE
- To exit the Function settings, press one of these buttons; [SONG], [VOICE], [STYLE] or [GRAND PIANO].
Function List
| Function Number | Function name | Display | Range/Settings | Default Value | Descriptions |
| Volume | |||||
| 001 | Style Volume | StyleVol | 000-127 | 100 | Determines the volume of the Style. (page 16) |
| 002 | Song Volume | SongVol | 000-127 | 100 | Determines the volume of the Song. (page 20) |
| Overall | |||||
| 003 | Transpose | Transpos | -12-12 | 0 | Determines the pitch of the instrument in semitone increments. |
| 004 | Tuning | Tuning | 427.0Hz-453.0Hz | 440.0Hz | Determines the fine tuning of the pitch of the entire instrument in approx. 0.2Hz increments. |
| 005 | Split Point | SplitPnt | 036-096 (C1-C6) | 54 (F#2) | Determines the Split "point"-in other words, the key that sepa-rates the auto accompaniment range and Voice. |
| Voice (page 14) | |||||
| 006 | Volume | M. Volume | 000-127 | * | Determines the volume of the Voice. |
| 007 | Octave | M. Octave | -2 - +2 | * | Determines the octave range for the Voice. |
| 008 | Chorus Depth | M. Chorus | 000-127 | * | Determines how much of the Voice's signal is sent to the Chorus effect. |
| Effects | |||||
| 009 | Reverb Type | Reverb | 01-10 | ** | Determines the Reverb type, including off (10). (page 37) |
| 010 | Reverb Level | RevLevel | 000-127 | 64 | Determines how much of the Voice's signal is sent to the Reverb effect. (page 37) |
| 011 | Chorus Type | Chorus | 01-05 | ** | Determines the Chorus type, including off (05). |
| 012 | Sustain | Sustain | ON/OFF | OFF | Determines whether the Sustain function is on or off. |
| 013 | Master EQ Type | MasterEQ | 1 (Speaker)2 (Headphone)3 (Boost)4 (Piano)5 (Bright)6 (Mild) | 1 (Speaker) | Sets the equalizer applied to the speaker output for optimum sound in different listening situations. (page 12) |
| 014 | Wide Type | Wide | 1 (Wide1)2 (Wide2)3 (Wide3) | 2 (Wide2) | Determines the Ultra-Wide Stereo type.Higher values produce a greater Wide effect. (page 15) |
| MIDI | |||||
| 015 | Local Control | Local | ON/OFF | ON | Determines whether the instrument's keyboard controls the internal tone generator (ON) or not (OFF). When you record your key-board performance to the application software on the computer via MIDI, set this parameter to OFF. |
| 016 | External Clock | ExtClock | ON/OFF | OFF | Determines whether the instrument synchronizes to the internal clock (OFF) or an external clock (ON). When you record your key-board performance to the application software on the computer via MIDI, set this parameter to ON. |
| 017 | Initial Send | InitSend | YES/NO | - | Lets you send the data of the panel settings to a computer. Press [+/YES] to send, or press [-/NO] to cancel. This operation should be done immediately after starting the Recording operation on the computer. |
| Metronome (page 15) | |||||
| 018 | Time Signature Numerator | TimeSig | 00-15 | ** | Determines the time signature of the Metronome. |
| 019 | Metronome Volume | MetroVol | 000-127 | 100 | Determines the volume of the Metronome. |
| Lesson (page 23) | |||||
| 020 | Your Tempo | YourTemp | ON/OFF | ON | This parameter is for the Lesson 3 "Waiting." When set to ON, playback tempo will change for matching the speed you are play-ing at. When set to OFF, playback tempo will be maintained regardless of the speed you are playing at. |
| Demo (page 20) | |||||
| 021 | Demo Group | DemoGrp | 1 (Demo)2 (Preset) | 1 (Demo) | Determines the repeat playback group. |
| 022 | Demo Play Mode | PlayMode | 1 (Normal)2 (Random) | 1 (Normal) | Determines the repeat playback mode. |
| 023 | Demo Cancel | D-Cancel | ON/OFF | OFF | Determines whether Demo cancel is enabled or not. When this is set to ON, the Demo Song will not play, even if the [DEMO] button is pressed. |
| Auto Power Off (page 12) | |||||
| 024 | Auto Power Off Time | AutoOff | OFF, 5/10/15/30/60/120 (minutes) | 30 minutes | Specifies the time that will elapse before the instrument's power is automatically turned off. |
| Battery (page 11) | |||||
| 025 | Battery Type | Battery | 1 (Alkaline)2 (Ni-MH) | 1 (Alkaline) | Selects the type of batteries you have installed to this instrument. Alkaline: Alkaline battery/manganese battery Ni-MH: Rechargeable battery |
- The appropriate value is automatically set for each Voice combination.
** The appropriate value is automatically set for each Song or Style.
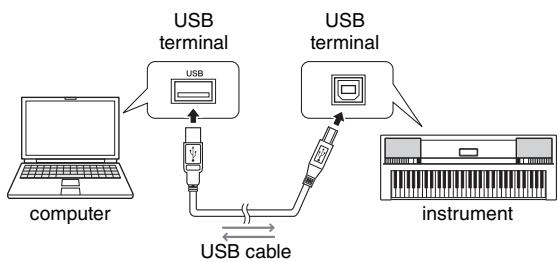
Connecting to a computer
This instrument supports MIDI (Musical Instrument Digital Interface) and can be connected to a computer via a USB cable. For details, refer to "Computer-related Operations" (page 4) on the website.
Connecting an iPad/iPhone
By connecting your smart device, such as an iPhone or iPad, to a compatible Yamaha digital instruments and using applications, you can take advantage of various functions—expanding the potential of the instrument and make it an even more integral part of your total music life. To connect your iPhone/iPad to the USB TO HOST terminal of the instrument, an i-UX1 interface is necessary. For details, refer to "iPhone/ iPad Connection Manual" (page 4) on the website.
Backup and Initialization
Backup Parameters
The following settings are always backed up, and maintained even when this instrument is turned off.
Backup parameters
FUNCTION Settings: (page 24) Tuning, Your Tempo, Master EQ type, Panel Sustain, Auto Power Off, Battery Type
To initialize Backup data, execute "Backup Clear."
NOTICE
Note that the following situations cannot back up or maintain the settings of the Backup parameters.
- When the Power Adaptor is unplugged with the power on (even if batteries are installed):
- When the power is turned off due to accidents such as electric power failure:
- When the Alkaline battery/Manganese battery runs down (without connecting the Power Adaptor):
Initialization
This function erases the Backup data, then restores all the default factory settings. As required, execute the following procedure.
Backup Clear
This operation initializes the backup data.
While holding down the highest white key on the keyboard, press the [ ] (Standby/On) switch to turn the power on.
| Problem | Possible Cause and Solution |
| When the instrument is turned on or off, a popping sound is temporarily produced. | This is normal and indicates that the instrument is receiving electrical power. |
| When using a mobile phone, noise is produced. | Using a mobile phone in close proximity to the instrument may produce interference. To prevent this, turn off the mobile phone or use it further away from the instrument. |
| Noise is heard from the instrument's speakers or headphones when using the instrument with the application on iPhone/iPad. | When you use the instrument along with the application on your iPhone/iPad, we recommend that you set "Airplane Mode" to "ON" on your iPhone/iPad in order to avoid noise caused by communication. |
| There is no sound even when the keyboard is played or when a song or style is being played back. | Check that nothing is connected to the PHONES/OUTPUT jack on the rear panel. When a set of headphones is plugged into this jack, no sound is output. |
| Check the Local Control on/off setting. (See page 25 Function 015.) | |
| Playing keys in the right hand area of the keyboard does not produce any sound. | When using the Dictionary function (page 19), the keys in the right hand area are used only for entering the chord root and type. |
| Not all of the voices seem to sound, or the sound seems to be cut off. | The instrument is polyphonic up to a maximum of 32 notes. If a style or Song is playing back at the same time, some notes/sounds may be omitted (or "sto-len") from the accompaniment or Song. |
| The Style or Song does not play back when the [START/STOP] button is pressed. | Is External Clock set to ON? Make sure External Clock is set to OFF; refer to "Function Settings" on page 25 (Function 016). |
| The ACPI ON indicator does not appear when the [ACMP ON/OFF] button is pressed. | Always press the [STYLE] button first when you are going to use any Style-related function. |
| The Style does not sound properly. | Make sure that the Style Volume (page 24 Function 001) is set to an appropri-ate level. |
| Is the Split Point set to an appropriate key for the chords you are playing? Set the Split Point to an appropriate key (page 24 Function 005). Is the "ACMP ON" indicator showing in the display? If it is not showing, press the [ACMP ON/OFF] button so that it does show. | |
| The Style does not sound as you play a chord. | The auto accompaniment will sometimes not change when related chords are played in sequence (e.g., some minor chords followed by the minor sev-enth).Two-note fingerings will produce a chord based on the previously played chord.Playing two same root keys in the adjacent octaves produces accompani-ment based only on the root. |
| The footswitch (for sustain) seems to produce the opposite effect. For example, pressing the footswitch cuts off the sound and releasing it sustains the sounds. | The polarity of the footswitch is reversed. Make sure that the footswitch plug is properly connected to the SUSTAIN jack before turning on the power. |
| The sound of the voice changes from note to note. | This is normal. The AWM tone generation method uses multiple recordings (samples) of an instrument across the range of the keyboard; thus, the actual sound of the voice may be slightly different from note to note. |
| The volume is too soft.The sound quality is poor.The rhythm stops unexpectedly or will not play.The recorded data of the song, etc. does not play cor-rectly.The LCD display suddenly goes dark, and all panel settings are reset. | The batteries are low or dead. Replace all six batteries with completely new ones, or use the optional AC adaptor. |
| Power suddenly and unexpectedly turns off. | This is normal and the Auto Power Off function may have been activated (page 12). If you need to disable the Auto Power Off function, select "Off" in the Function settings (page 25 Function 024). |
Maximum Polyphony
The instrument has 32-note maximum polyphony. This means that it can play a maximum of up to 32 notes at once, regardless of what functions are used. Auto accompaniment uses a number of the available notes, so when auto accompaniment is used the total number of available notes for playing on the keyboard is correspondingly reduced. The same applies to the Song functions. If the maximum polyphony is exceeded, earlier played notes will be cut off and the most recent notes have priority (last note priority).
NOTE
- The Voice List includes MIDI program change numbers for each voice. Use these program change numbers when playing the instrument via MIDI from an external device.
- Program Numbers 001 to 128 directly relate to MIDI Program Change Numbers 000 to 127. That is, Program Numbers and Program Change Numbers differ by a value of 1. Remember to take this into consideration.
- Some voices may sound continuously or have a long decay after the notes have been released while the sustain pedal (footswitch) is held.
Panel Voice List
| Voice No. | Bank Select | MIDI Program Change# (1-128) | Voice Name | |
| MSB (0-127) | LSB (0-127) | |||
| PIANO | ||||
| 1 | 0 | 112 | 1 | Grand Piano1 |
| 2 | 0 | 0 | 1 | Grand Piano2 |
| 3 | 0 | 0 | 2 | Bright Piano |
| 4 | 0 | 0 | 4 | Honky-tonk Piano |
| 5 | 0 | 0 | 7 | Harpsichord |
| E.PIANO | ||||
| 6 | 0 | 0 | 5 | Electric Piano 1 |
| 7 | 0 | 0 | 6 | Electric Piano 2 |
| 8 | 0 | 0 | 3 | Electric Grand Piano |
| 9 | 0 | 0 | 8 | Clavi |
| ORGAN | ||||
| 10 | 0 | 0 | 17 | Drawbar Organ |
| 11 | 0 | 0 | 18 | Percussive Organ |
| 12 | 0 | 0 | 19 | Rock Organ |
| 13 | 0 | 0 | 20 | Church Organ |
| 14 | 0 | 0 | 21 | Reed Organ |
| ACCORDION | ||||
| 15 | 0 | 0 | 22 | Accordion |
| 16 | 0 | 0 | 24 | Tango Accordion |
| 17 | 0 | 0 | 23 | Harmonica |
| GUITAR | ||||
| 18 | 0 | 0 | 25 | Nylon Guitar |
| 19 | 0 | 0 | 26 | Steel Guitar |
| 20 | 0 | 0 | 27 | Jazz Guitar |
| 21 | 0 | 0 | 28 | Clean Guitar |
| 22 | 0 | 0 | 29 | Muted Guitar |
| 23 | 0 | 0 | 30 | Overdriven Guitar |
| 24 | 0 | 0 | 31 | Distortion Guitar |
| 25 | 0 | 0 | 32 | Guitar Harmonics |
| BASS | ||||
| 26 | 0 | 0 | 33 | Acoustic Bass |
| 27 | 0 | 0 | 34 | Finger Bass |
| 28 | 0 | 0 | 35 | Pick Bass |
| 29 | 0 | 0 | 36 | Fretless Bass |
| 30 | 0 | 0 | 37 | Slap Bass 1 |
| 31 | 0 | 0 | 38 | Slap Bass 2 |
| 32 | 0 | 0 | 39 | Synth Bass 1 |
| 33 | 0 | 0 | 40 | Synth Bass 2 |
| STRINGS | ||||
| 34 | 0 | 0 | 49 | Strings 1 |
| 35 | 0 | 0 | 50 | Strings 2 |
| 36 | 0 | 0 | 51 | Synth Strings 1 |
| 37 | 0 | 0 | 52 | Synth Strings 2 |
| 38 | 0 | 0 | 45 | Tremolo Strings |
| 39 | 0 | 0 | 46 | Pizzicato Strings |
| 40 | 0 | 0 | 41 | Violin |
| Voice No. | Bank Select | MIDI Program Change# (1-128) | Voice Name | |
| MSB (0-127) | LSB (0-127) | |||
| 41 | 0 | 0 | 42 | Viola |
| 42 | 0 | 0 | 43 | Cello |
| 43 | 0 | 0 | 44 | Contrabass |
| 44 | 0 | 0 | 47 | Orchestral Harp |
| 45 | 0 | 0 | 56 | Orchestra Hit |
| CHOIR | ||||
| 46 | 0 | 0 | 53 | Choir Aahs |
| 47 | 0 | 0 | 54 | Voice Oohs |
| 48 | 0 | 0 | 55 | Synth Voice |
| SAXOPHONE | ||||
| 49 | 0 | 0 | 67 | Tenor Sax |
| 50 | 0 | 0 | 66 | Alto Sax |
| 51 | 0 | 0 | 65 | Soprano Sax |
| 52 | 0 | 0 | 68 | Baritone Sax |
| 53 | 0 | 0 | 69 | Oboe |
| 54 | 0 | 0 | 72 | Clarinet |
| 55 | 0 | 0 | 70 | English Horn |
| 56 | 0 | 0 | 71 | Bassoon |
| TRUMPET | ||||
| 57 | 0 | 0 | 57 | Trumpet |
| 58 | 0 | 0 | 60 | Muted Trumpet |
| 59 | 0 | 0 | 58 | Trombone |
| 60 | 0 | 0 | 61 | French Horn |
| 61 | 0 | 0 | 59 | Tuba |
| BRASS | ||||
| 62 | 0 | 0 | 62 | Brass Section |
| 63 | 0 | 0 | 63 | Synth Brass 1 |
| 64 | 0 | 0 | 64 | Synth Brass 2 |
| FLUTE | ||||
| 65 | 0 | 0 | 74 | Flute |
| 66 | 0 | 0 | 73 | Piccolo |
| 67 | 0 | 0 | 76 | Pan Flute |
| 68 | 0 | 0 | 75 | Recorder |
| 69 | 0 | 0 | 77 | Blown Bottle |
| 70 | 0 | 0 | 78 | Shakuhachi |
| 71 | 0 | 0 | 79 | Whistle |
| 72 | 0 | 0 | 80 | Ocarina |
| SYNTH | ||||
| 73 | 0 | 0 | 81 | Square Lead |
| 74 | 0 | 0 | 82 | Sawtooth Lead |
| 75 | 0 | 0 | 83 | Calliope Lead |
| 76 | 0 | 0 | 84 | Chiff Lead |
| 77 | 0 | 0 | 85 | Charang Lead |
| 78 | 0 | 0 | 86 | Voice Lead |
| 79 | 0 | 0 | 87 | Fifths Lead |
| 80 | 0 | 0 | 88 | Bass & Lead |
| 81 | 0 | 0 | 89 | New Age Pad |
| 82 | 0 | 0 | 90 | Warm Pad |
| 83 | 0 | 0 | 91 | Poly Synth Pad |
| 84 | 0 | 0 | 92 | Choir Pad |
| 85 | 0 | 0 | 93 | Bowed Pad |
| 86 | 0 | 0 | 94 | Metallic Pad |
| 87 | 0 | 0 | 95 | Halo Pad |
| 88 | 0 | 0 | 96 | Sweep Pad |
| 89 | 0 | 0 | 97 | Rain |
| 90 | 0 | 0 | 98 | Sound Track |
| 91 | 0 | 0 | 99 | Crystal |
| 92 | 0 | 0 | 100 | Atmosphere |
| 93 | 0 | 0 | 101 | Brightness |
| 94 | 0 | 0 | 102 | Goblins |
| 95 | 0 | 0 | 103 | Echoes |
| 96 | 0 | 0 | 104 | Sci-Fi |
| PERCUSSION | ||||
| 97 | 0 | 0 | 12 | Vibraphone |
| 98 | 0 | 0 | 13 | Marimba |
| 99 | 0 | 0 | 14 | Xylophone |
| 100 | 0 | 0 | 115 | Steel Drums |
| 101 | 0 | 0 | 9 | Celesta |
| 102 | 0 | 0 | 11 | Music Box |
| 103 | 0 | 0 | 15 | Tubular Bells |
| 104 | 0 | 0 | 48 | Timpani |
| 105 | 0 | 0 | 10 | Glockenspiel |
| 106 | 0 | 0 | 113 | Tinkle Bell |
| 107 | 0 | 0 | 114 | Agogo |
| 108 | 0 | 0 | 116 | Woodblock |
| 109 | 0 | 0 | 117 | Taiko Drum |
| 110 | 0 | 0 | 118 | Melodic Tom |
| 111 | 0 | 0 | 119 | Synth Drum |
| 112 | 0 | 0 | 120 | Reverse Cymbal |
| WORLD | ||||
| 113 | 0 | 0 | 105 | Sitar |
| 114 | 0 | 0 | 16 | Dulcimer |
| 115 | 0 | 0 | 106 | Banjo |
| 116 | 0 | 0 | 107 | Shamisen |
| 117 | 0 | 0 | 108 | Koto |
| 118 | 0 | 0 | 109 | Kalimba |
| 119 | 0 | 0 | 110 | Bagpipe |
| 120 | 0 | 0 | 111 | Fiddle |
| 121 | 0 | 0 | 112 | Shanai |
| DUAL* | ||||
| 122 | - | - | - | Octave Piano |
| 123 | - | - | - | Piano & Strings |
| 124 | - | - | - | Piano Pad |
| 125 | - | - | - | E.P. Pad |
| 126 | - | - | - | Octave Strings |
| 127 | - | - | - | Octave Brass |
| 128 | - | - | - | Orchestra Tutti |
| 129 | - | - | - | Octave Choir |
| 130 | - | - | - | Jazz Section |
| 131 | - | - | - | Flute & Clarinet |
| SOUND EFFECTS | ||||
| 132 | 0 | 0 | 121 | Fret Noise |
| 133 | 0 | 0 | 122 | Breath Noise |
| 134 | 0 | 0 | 123 | Seashore |
| 135 | 0 | 0 | 124 | Bird Tweet |
| 136 | 0 | 0 | 125 | Telephone Ring |
| 137 | 0 | 0 | 126 | Helicopter |
| 138 | 0 | 0 | 127 | Applause |
| 139 | 0 | 0 | 128 | Gunshot |
| Voice No. | Bank Select | MIDI Program Change# (1-128) | Voice Name | |
| MSB (0-127) | LSB (0-127) | |||
| DRUM KITS | ||||
| 140 | 127 | 0 | 1 | Standard Kit 1 |
| 141 | 127 | 0 | 2 | Standard Kit 2 |
| 142 | 127 | 0 | 9 | Room Kit |
| 143 | 127 | 0 | 17 | Rock Kit |
| 144 | 127 | 0 | 25 | Electronic Kit |
| 145 | 127 | 0 | 26 | Analog Kit |
| 146 | 127 | 0 | 28 | Dance Kit |
| 147 | 127 | 0 | 33 | Jazz Kit |
| 148 | 127 | 0 | 41 | Brush Kit |
| 149 | 127 | 0 | 49 | Symphony Kit |
| 150 | 126 | 0 | 1 | SFX Kit 1 |
| 151 | 126 | 0 | 2 | SFX Kit 2 |
| 152 | 126 | 0 | 113 | Sound Effect Kit |
| XGlite | ||||
| 153 | 0 | 1 | 1 | Grand Piano KSP |
| 154 | 0 | 40 | 1 | Piano Strings |
| 155 | 0 | 41 | 1 | Dream |
| 156 | 0 | 1 | 2 | Bright Piano KSP |
| 157 | 0 | 1 | 3 | Electric Grand Piano KSP |
| 158 | 0 | 32 | 3 | Detuned CP80 |
| 159 | 0 | 1 | 4 | Honky-tonk Piano KSP |
| 160 | 0 | 1 | 5 | Electric Piano 1 KSP |
| 161 | 0 | 32 | 5 | Chorus Electric Piano 1 |
| 162 | 0 | 1 | 6 | Electric Piano 2 KSP |
| 163 | 0 | 32 | 6 | Chorus Electric Piano 2 |
| 164 | 0 | 41 | 6 | DX + Analog Electric Piano |
| 165 | 0 | 1 | 7 | Harpsichord KSP |
| 166 | 0 | 35 | 7 | Harpsichord 2 |
| 167 | 0 | 1 | 8 | Clavi KSP |
| 168 | 0 | 64 | 11 | Orgel |
| 169 | 0 | 1 | 12 | Vibraphone KSP |
| 170 | 0 | 1 | 13 | Marimba KSP |
| 171 | 0 | 64 | 13 | Sine Marimba |
| 172 | 0 | 97 | 13 | Balimba |
| 173 | 0 | 98 | 13 | Log Drums |
| 174 | 0 | 96 | 15 | Church Bells |
| 175 | 0 | 97 | 15 | Carillon |
| 176 | 0 | 35 | 16 | Dulcimer 2 |
| 177 | 0 | 96 | 16 | Cimbalom |
| 178 | 0 | 97 | 16 | Santur |
| 179 | 0 | 32 | 17 | Detuned Drawbar Organ |
| 180 | 0 | 33 | 17 | 60s Drawbar Organ 1 |
| 181 | 0 | 34 | 17 | 60s Drawbar Organ 2 |
| 182 | 0 | 35 | 17 | 70s Drawbar Organ 1 |
| 183 | 0 | 37 | 17 | 60s Drawbar Organ 3 |
| 184 | 0 | 40 | 17 | 16+2'2/3 |
| 185 | 0 | 64 | 17 | Organ Bass |
| 186 | 0 | 65 | 17 | 70s Drawbar Organ 2 |
| 187 | 0 | 66 | 17 | Cheezy Organ |
| 188 | 0 | 67 | 17 | Drawbar Organ 2 |
| 189 | 0 | 24 | 18 | 70s Percussive Organ |
| 190 | 0 | 32 | 18 | Detuned Percussive Organ |
| 191 | 0 | 33 | 18 | Light Organ |
| 192 | 0 | 37 | 18 | Percussive Organ 2 |
| 193 | 0 | 64 | 19 | Rotary Organ |
| 194 | 0 | 65 | 19 | Slow Rotary |
| 195 | 0 | 66 | 19 | Fast Rotary |
| 196 | 0 | 32 | 20 | Church Organ 3 |
| 197 | 0 | 35 | 20 | Church Organ 2 |
| 198 | 0 | 40 | 20 | Notre Dame |
| 199 | 0 | 64 | 20 | Organ Flute |
- When you select a Voice of the DUAL category, two voices sound at the same time.
| Voice No. | Bank Select | MIDI Program Change# (1-128) | Voice Name | |
| MSB (0-127) | LSB (0-127) | |||
| 200 | 0 | 65 | 20 | Tremolo Organ Flute |
| 201 | 0 | 40 | 21 | Puff Organ |
| 202 | 0 | 32 | 23 | Harmonica 2 |
| 203 | 0 | 64 | 24 | Tango Accordion 2 |
| 204 | 0 | 43 | 25 | Velocity Guitar Harmonics |
| 205 | 0 | 96 | 25 | Ukulele |
| 206 | 0 | 35 | 26 | 12-string Guitar |
| 207 | 0 | 40 | 26 | Nylon & Steel Guitar |
| 208 | 0 | 41 | 26 | Steel Guitar with Body Sound |
| 209 | 0 | 96 | 26 | Mandolin |
| 210 | 0 | 32 | 27 | Jazz Amp |
| 211 | 0 | 32 | 28 | Chorus Guitar |
| 212 | 0 | 40 | 29 | Funk Guitar |
| 213 | 0 | 41 | 29 | Muted Steel Guitar |
| 214 | 0 | 45 | 29 | Jazz Man |
| 215 | 0 | 43 | 30 | Guitar Pinch |
| 216 | 0 | 40 | 31 | Feedback Guitar |
| 217 | 0 | 41 | 31 | Feedback Guitar 2 |
| 218 | 0 | 65 | 32 | Guitar Feedback |
| 219 | 0 | 66 | 32 | Guitar Harmonics 2 |
| 220 | 0 | 40 | 33 | Jazz Rhythm |
| 221 | 0 | 45 | 33 | Velocity Crossfade Upright Bass |
| 222 | 0 | 18 | 34 | Finger Dark |
| 223 | 0 | 40 | 34 | Bass & Distorted Electric Guitar |
| 224 | 0 | 43 | 34 | Finger Slap Bass |
| 225 | 0 | 45 | 34 | Finger Bass 2 |
| 226 | 0 | 65 | 34 | Modulated Bass |
| 227 | 0 | 28 | 35 | Muted Pick Bass |
| 228 | 0 | 32 | 36 | Fretless Bass 2 |
| 229 | 0 | 33 | 36 | Fretless Bass 3 |
| 230 | 0 | 34 | 36 | Fretless Bass 4 |
| 231 | 0 | 32 | 37 | Punch Thumb Bass |
| 232 | 0 | 43 | 38 | Velocity Switch Slap |
| 233 | 0 | 40 | 39 | Techno Synth Bass |
| 234 | 0 | 6 | 40 | Mellow Synth Bass |
| 235 | 0 | 12 | 40 | Sequenced Bass |
| 236 | 0 | 18 | 40 | Click Synth Bass |
| 237 | 0 | 19 | 40 | Synth Bass 2 Dark |
| 238 | 0 | 40 | 40 | Modular Synth Bass |
| 239 | 0 | 41 | 40 | DX Bass |
| 240 | 0 | 8 | 41 | Slow Violin |
| 241 | 0 | 8 | 45 | Slow Tremolo Strings |
| 242 | 0 | 40 | 45 | Suspense Strings |
| 243 | 0 | 40 | 47 | Yang Chin |
| 244 | 0 | 3 | 49 | Stereo Strings |
| 245 | 0 | 8 | 49 | Slow Strings |
| 246 | 0 | 35 | 49 | 60s Strings |
| 247 | 0 | 40 | 49 | Orchestra |
| 248 | 0 | 41 | 49 | Orchestra 2 |
| 249 | 0 | 42 | 49 | Tremolo Orchestra |
| 250 | 0 | 45 | 49 | Velocity Strings |
| 251 | 0 | 3 | 50 | Stereo Slow Strings |
| 252 | 0 | 8 | 50 | Legato Strings |
| 253 | 0 | 40 | 50 | Warm Strings |
| 254 | 0 | 41 | 50 | Kingdom |
| 255 | 0 | 3 | 53 | Stereo Choir |
| 256 | 0 | 32 | 53 | Mellow Choir |
| 257 | 0 | 40 | 53 | Choir Strings |
| 258 | 0 | 40 | 55 | Synth Voice 2 |
| 259 | 0 | 41 | 55 | Choral |
| 260 | 0 | 64 | 55 | Analog Voice |
| 261 | 0 | 35 | 56 | Orchestra Hit 2 |
| 262 | 0 | 64 | 56 | Impact |
| Voice No. | Bank Select | MIDI Program Change# (1-128) | Voice Name | |
| MSB (0-127) | LSB (0-127) | |||
| 263 | 0 | 32 | 57 | Warm Trumpet |
| 264 | 0 | 18 | 58 | Trombone 2 |
| 265 | 0 | 6 | 61 | French Horn Solo |
| 266 | 0 | 32 | 61 | French Horn 2 |
| 267 | 0 | 37 | 61 | Horn Orchestra |
| 268 | 0 | 35 | 62 | Trumpet & Trombone Section |
| 269 | 0 | 20 | 63 | Resonant Synth Brass |
| 270 | 0 | 18 | 64 | Soft Brass |
| 271 | 0 | 41 | 64 | Choir Brass |
| 272 | 0 | 40 | 66 | Sax Section |
| 273 | 0 | 40 | 67 | Breathy Tenor Sax |
| 274 | 0 | 6 | 81 | Square Lead 2 |
| 275 | 0 | 8 | 81 | LM Square |
| 276 | 0 | 18 | 81 | Hollow |
| 277 | 0 | 19 | 81 | Shroud |
| 278 | 0 | 64 | 81 | Mellow |
| 279 | 0 | 65 | 81 | Solo Sine |
| 280 | 0 | 66 | 81 | Sine Lead |
| 281 | 0 | 6 | 82 | Sawtooth Lead 2 |
| 282 | 0 | 8 | 82 | Thick Sawtooth |
| 283 | 0 | 18 | 82 | Dynamic Sawtooth |
| 284 | 0 | 19 | 82 | Digital Sawtooth |
| 285 | 0 | 20 | 82 | Big Lead |
| 286 | 0 | 96 | 82 | Sequenced Analog |
| 287 | 0 | 65 | 83 | Pure Lead |
| 288 | 0 | 64 | 85 | Distorted Lead |
| 289 | 0 | 35 | 87 | Big Five |
| 290 | 0 | 16 | 88 | Big & Low |
| 291 | 0 | 64 | 88 | Fat & Perky |
| 292 | 0 | 65 | 88 | Soft Whirl |
| 293 | 0 | 64 | 89 | Fantasy |
| 294 | 0 | 66 | 92 | Itopia |
| 295 | 0 | 65 | 97 | African Wind |
| 296 | 0 | 66 | 97 | Carib |
| 297 | 0 | 27 | 98 | Prologue |
| 298 | 0 | 12 | 99 | Synth Drum Comp |
| 299 | 0 | 14 | 99 | Popcorn |
| 300 | 0 | 18 | 99 | Tiny Bells |
| 301 | 0 | 35 | 99 | Round Glockenspiel |
| 302 | 0 | 40 | 99 | Glockenspiel Chimes |
| 303 | 0 | 41 | 99 | Clear Bells |
| 304 | 0 | 42 | 99 | Chorus Bells |
| 305 | 0 | 65 | 99 | Soft Crystal |
| 306 | 0 | 70 | 99 | Air Bells |
| 307 | 0 | 71 | 99 | Bell Harp |
| 308 | 0 | 72 | 99 | Gamelimba |
| 309 | 0 | 18 | 100 | Warm Atmosphere |
| 310 | 0 | 19 | 100 | Hollow Release |
| 311 | 0 | 40 | 100 | Nylon Electric Piano |
| 312 | 0 | 64 | 100 | Nylon Harp |
| 313 | 0 | 65 | 100 | Harp Vox |
| 314 | 0 | 66 | 100 | Atmosphere Pad |
| 315 | 0 | 64 | 102 | Goblins Synth |
| 316 | 0 | 65 | 102 | Creeper |
| 317 | 0 | 67 | 102 | Ritual |
| 318 | 0 | 68 | 102 | To Heaven |
| 319 | 0 | 70 | 102 | Night |
| 320 | 0 | 71 | 102 | Glisten |
| 321 | 0 | 96 | 102 | Bell Choir |
| 322 | 0 | 32 | 105 | Detuned Sitar |
| 323 | 0 | 35 | 105 | Sitar 2 |
| 324 | 0 | 97 | 105 | Tamboura |
| 325 | 0 | 28 | 106 | Muted Banjo |
| 326 | 0 | 96 | 106 | Rabab |
| 327 | 0 | 97 | 106 | Gopichant |
| 328 | 0 | 98 | 106 | Oud |
| 329 | 0 | 96 | 108 | Taisho-kin |
| 330 | 0 | 97 | 108 | Kanoon |
| 331 | 0 | 96 | 113 | Bonang |
| 332 | 0 | 97 | 113 | Altair |
| 333 | 0 | 98 | 113 | Gamelan Gongs |
| 334 | 0 | 99 | 113 | Stereo Gamelan Gongs |
| 335 | 0 | 100 | 113 | Rama Cymbal |
| 336 | 0 | 97 | 115 | Glass Percussion |
| 337 | 0 | 98 | 115 | Thai Bells |
| 338 | 0 | 96 | 116 | Castanets |
| 339 | 0 | 96 | 117 | Gran Cassa |
| 340 | 0 | 64 | 118 | Melodic Tom 2 |
| 341 | 0 | 65 | 118 | Real Tom |
| 342 | 0 | 66 | 118 | Rock Tom |
| 343 | 0 | 64 | 119 | Analog Tom |
| 344 | 0 | 65 | 119 | Electronic Percussion |
| 345 | 64 | 0 | 1 | Cutting Noise |
| 346 | 64 | 0 | 2 | Cutting Noise 2 |
| 347 | 64 | 0 | 4 | String Slap |
| 348 | 64 | 0 | 17 | Flute Key Click |
| 349 | 64 | 0 | 33 | Shower |
| 350 | 64 | 0 | 34 | Thunder |
| 351 | 64 | 0 | 35 | Wind |
| 352 | 64 | 0 | 36 | Stream |
| 353 | 64 | 0 | 37 | Bubble |
| 354 | 64 | 0 | 38 | Feed |
| 355 | 64 | 0 | 49 | Dog |
| 356 | 64 | 0 | 50 | Horse |
| 357 | 64 | 0 | 51 | Bird Tweet 2 |
| 358 | 64 | 0 | 56 | Maou |
| 359 | 64 | 0 | 65 | Phone Call |
| 360 | 64 | 0 | 66 | Door Squeak |
| 361 | 64 | 0 | 67 | Door Slam |
| 362 | 64 | 0 | 68 | Scratch Cut |
| 363 | 64 | 0 | 69 | Scratch Split |
| 364 | 64 | 0 | 70 | Wind Chime |
| 365 | 64 | 0 | 71 | Telephone Ring 2 |
| 366 | 64 | 0 | 81 | Car Engine Ignition |
| 367 | 64 | 0 | 82 | Car Tires Squeal |
| 368 | 64 | 0 | 83 | Car Passing |
| 369 | 64 | 0 | 84 | Car Crash |
| 370 | 64 | 0 | 85 | Siren |
| 371 | 64 | 0 | 86 | Train |
| 372 | 64 | 0 | 87 | Jet Plane |
| 373 | 64 | 0 | 88 | Starship |
| 374 | 64 | 0 | 89 | Burst |
| 375 | 64 | 0 | 90 | Roller Coaster |
| 376 | 64 | 0 | 91 | Submarine |
| 377 | 64 | 0 | 97 | Laugh |
| 378 | 64 | 0 | 98 | Scream |
| 379 | 64 | 0 | 99 | Punch |
| 380 | 64 | 0 | 100 | Heartbeat |
| 381 | 64 | 0 | 101 | Footsteps |
| 382 | 64 | 0 | 113 | Machine Gun |
| 383 | 64 | 0 | 114 | Laser Gun |
| 384 | 64 | 0 | 115 | Explosion |
| 385 | 64 | 0 | 116 | Firework |
- “ ” indicates that the drum sound is the same as "Standard Kit 1".
Each percussion voice uses one note. - The MIDI Note # and Note are actually one octave lower than keyboard Note # and Note. For example, in "140: Standard Kit 1", the "Seq Click H" (Note# 36/Note C1) corresponds to (Note# 24/Note C0).
| E1 | D1 | C1 | F1 | G1 | E2 | F2 | G2 | E3 | D3 | E3 | D3 | E3 | D3 | E3 | D3 | E3 | D3 | E3 | D3 | E3 | D3 | E3 | D3 | E3 | D3 | |
| A1 | A1 | A1 | A1 | A1 | A1 | A1 | A1 | A1 | A1 | A1 | A1 | A1 | A1 | A1 | A1 | A1 | A1 | A1 | A1 | A1 | A1 | A1 | A1 | A1 | A1 | A1 |
| G1 | G1 | G1 | G1 | G1 | G1 | G1 | G1 | G1 | G1 | G1 | G1 | G1 | G1 | G1 | G1 | G1 | G1 | G1 | G1 | G1 | G1 | G1 | G1 | G1 | G1 | |
| F1 | F1 | F1 | F1 | F1 | F1 | F1 | F1 | F1 | F1 | F1 | F1 | F1 | F1 | F1 | F1 | F1 | F1 | F1 | F1 | F1 | F1 | F1 | F1 | F1 | F1 | |
| G1 | G1 | G1 | G1 | G1 | G1 | G1 | G1 | G1 | G1 | G1 | G1 | G1 | G1 | G1 | G1 | G1 | G1 | G1 | G1 | G1 | G1 | G1 | G1 | G1 | G1 |
| MSB (0-127)/LS (0-727)/PC (1-128) | |||||||||||||||||||||||||||||||||||||||||||||||||||||||||||||||||||||||||||||||||||||||||||||||||||||||||||||||||||||||||||||||||||||||||||||||||||||||||||||||||||||||||||||||||||||||||||||
| Note | Note | Note# | Note | Note# | Note | Note# | Note | Note | Note | Note | Note | Note | Note | Note | Note | Note | Note | Note | Note | Note | Note | Note | Note | Note | Note | Note | Note | Note | Note | Note | Note | Note | Note | Note | Note | Note | Note | Note | Note | Note | Note | Note | Note | Note | Note | Note | Note | Note | Note | Note | Note | Note | Note | Note | Note | Note | Notes | Notes | Notes | Notes | Notes | Notes | Notes | Notes | Notes | Notes | Notes | Notes | Notes | Notes | Notes | Notes | Notes | Notes | Notes | Notes | Notes | Notes | Notes | Notes | Notes | Notes | Notes | Notes | Notes | Notes | Notes | Notes | Notes | Notes | Notes | Notes | Notes | Notes | Notes | Notes | Notes | Notes | Notes | Notes | Notes | Notes | Notes | Notes | Notes | Notes | Note | Note | Note | Note | Note | Note | Note | Note | Note | Note | Note | Note | Note | Note | Note | Note | Note | Note | Note | Note | Note | Note | Note | Note | Note | Note | Note | Note | Note | Note | Note | Note | Note | Note | Note | Note | Note | Note | Note | Note | Note | Note | Note | Note | Note | Note | Note | Note | Note | No. | No. | No. | No. | No. | No. | No. | No. | No. | No. | No. | No. | No. | No. | No. | No. | No. | No. | No. | No. | No. | No. | No. | No. | No. | No. | No. | No. | No. | No. | No. | No. | No. | No. |
| 141 | D -1 | Suo Open | |||||||||||||||||||||||||||||||||||||||||||||||||||||||||||||||||||||||||||||||||||||||||||||||||||||||||||||||||||||||||||||||||||||||||||||||||||||||||||||||||||||||||||||||||||||||||||
| 13 | D -1 | Whi Shap | |||||||||||||||||||||||||||||||||||||||||||||||||||||||||||||||||||||||||||||||||||||||||||||||||||||||||||||||||||||||||||||||||||||||||||||||||||||||||||||||||||||||||||||||||||||||||||
| E1 | |||||||||||||||||||||||||||||||||||||||||||||||||||||||||||||||||||||||||||||||||||||||||||||||||||||||||||||||||||||||||||||||||||||||||||||||||||||||||||||||||||||||||||||||||||||||||||||||||||||||
| Q1 | |||||||||||||||||||||||||||||||||||||||||||||||||||||||||||||||||||||||||||||||||||||||||||||||||||||||||||||||||||||||||||||||||||||||||||||||||||||||||||||||||||||||||||||||||||||||||||||||||||||||
| G1 | |||||||||||||||||||||||||||||||||||||||||||||||||||||||||||||||||||||||||||||||||||||||||||||||||||||||||||||||||||||||||||||||||||||||||||||||||||||||||||||||||||||||||||||||||||||||||||||||||||||||
| F1 | B1 | ||||||||||||||||||||||||||||||||||||||||||||||||||||||||||||||||||||||||||||||||||||||||||||||||||||||||||||||||||||||||||||||||||||||||||||||||||||||||||||||||||||||||||||||||||||||||||||||||||||||
| MRS (0-127)/LS (0-27)/IPC (1-520) | |||||||||||||||||||||||||||||||||||||||||||||||||||||||||||||||||||||||||||||||||||||||||||||||||||||||||||||||||||||||||||||||||||||||||||||||||||||||||||||||||||||||||||||||||||||||||||||||||||||||||||||||||||||||||||||||||||||||||||||||||||||||||||||||||||||||||||||||||||||||||||||||||||||||||||||||||||||||||||||||||||||||||||||||||||||||||||||||||||||||||||||||||||||||||||||||||||||||||||||||||||||||||||||||||||||||||||||||||||||||||||||||||||||||||||||||||||||||||||||||||||||||||||||||||||||||||||||||||||||||||||||||||||||||||||||||||||||||||||||||||||||||||||||||||||||||||||||||||||||||||||||||||||||||||||||||||||||||||||||||||||||||||||||||||||||||||||||||||||||||||||||||||||||||||||||||||||||||||||||||||||||||||||||||||||||||||||||||||||||||||||||||||||||||||||||||||||||||||||||||
| Note | Note | Note | Note | Note | Sunder Mute | Sunder Mute | Sunder Mute | Sunder Mute | Sunder Mute | Sunder Mute | Sunder Mute | Sunder Mute | Sunder Mute | Sunder Mute | Sunder Mute | Sunder Mute | Sunder Mute | Sunder Mute | Sunder Mute | Sunder Mute | Sunder Mute | Sunder Mute | Sunder Mute | Sunder Mute | Sunder Muto | Sunder Mute | Sunder Mute | Sunder Mute | Sunder Mute | Sunder Mute | Sunder Mute | Sunder Mute | Sunder Mute | Sunder Mute | Sunder Mute | Sunder Mute | Sunder Mute | Sunder Mute | Sunder Mute | Sunder Mute | Sunder Mute | Sunder Mute | Sunder Mute | Sunder Mute | Sunder Mote | Sunder Mute | Sunder Mute | Sunder Mute | Sunder Mute | Sunder Mute | Sunder Mute | Sunder Mute | Sunder Mute | Sunder Mute | Sunder Mute | Sunder Mute | Sunder Mute | Sunder Mute | Sunder Mute | Sunder Mute | Sunder Mute | Sunder Mute | Sunder Mute | Sunder Mute | Sunder Mone | Sunder Mone | Sunder Mone | Sunder Mone | Sunder Mone | Sunder Mone | Sunder Mone | Sunder Mone | Sunder Mone | Sunder Mone | Sunder Mone | Sunder Mone | Sunder Mone | Sunder Mone | Sunder Mone | Sunder Mone | Sunder Mone | Sunder Mone | Sunder Mone | Sunder Mone | Sunder Mote | Sunder Mote | Sunder Mote | Sunder Mote | Sunder Mote | Sunder Mote | Sunder Mote | Sunder Mote | Sunder Mote | Sunder Mote | Sunder Mote | Sunder Mote | Sunder Mote | Sunder Mote | Sunder Mote | Sunder Mote | Sunder Mote | Sunder Mote | Sunder Mote | Sunder Mote | Sunder Mone | Sunder Mone | Sunder Mone | Sunder Mone | Sunder Mone | Sunder Mone | Sunder Mone | Sunder Mone | Sunder Mone | Sunder Mone | Sunder Mone | Sunder Mone | Sunder Mone | Sunder Mone | Sunder Mone | Sunder Mone | Sunder Mone | Sunder Mone | Sunder Mone | Sunder Mome | Sunder Mone | Sunder Mone | Sunder Mone | Sunder Mone | Sunder Mone | Sunder Mone | Sunder Mone | Sunder Mone | Sunder Mone | Sunder Mone | Sunder Mone | Sunder Mone | Sunder Mone | Sunder Mone | Sunder Mone | Sunder Mone | Sunder Mone | Sunder Mone | Sunder Mone | Sunder MONE | Sunder Mone | Sunder Mone | Sunder Mone | Sunder Mone | Sunder Mone | Sunder Mone | Sunder Mone | Sunder Mone | Sunder Mone | Sunder Mone | Sunder Mone | Sunder Mone | Sunder Mone | Sunder Mone | Sunder Mone | Sunder Mone | Sunder Mone | Sunder Mone | Sunder Mone | Sunder Mzone | Sunder Mone | Sunder Mone | Sunder Mone | Sunder Mone | Sunder Mone | Sunder Mone | Sunder Mone | Sunder Mone | Sunder Mone | Sunder Mone | Sunder Mone | Sunder Mone | Sunder Mone | Sunder Mone | Sunder Mone | Sunder Mone | Sunder Mone | Sunder Mone | Sunder Mone | Sunder Mnone | Sunder Mone | Sunder Mone | Sunder Mone | Sunder Mone | Sunder Mone | Sunder Mone | Sunder Mone | Sunder Mone | Sunder Mone | Sunder Mone | Sunder Mone | Sunder Mone | Sunder Mone | Sunder Mone | Sunder Mone | Sunder Mone | Sunder Mone | Sunder Mone | Sunder Mone | Sunder M zone | Sunder Mone | Sunder Mone | Sunder Mone | Sunder Mone | Sunder Mone | Sunder Mone | Sunder Mone | Sunder Mone | Sunder Mone | Sunder Mone | Sunder Mone | Sunder Mone | Sunder Mone | Sunder Mone | Sunder Mone | Sunder Mone | Sunder Mone | Sunder Mone | Sunder Mone | Sunder M one | Sunder Mone | Sunder Mone | Sunder Mone | Sunder Mone | Sunder Mone | Sunder Mone | Sunder Mone | Sunder Mone | Sunder Mone | Sunder Mone | Sunder Mone | Sunder Mone | Sunder Mone | Sunder Mone | Sunder Mone | Sunder Mone | Sunder Mone | Sunder Mone | Sunder Mone | Sunder Mones | Sunder Mone | Sunder Mone | Sunder Mone | Sunder Mone | Sunder Mone | Sunder Mone | Sunder Mone | Sunder Mone | Sunder Mone | Sunder Mone | Sunder Mone | Sunder Mone | Sunder Mone | Sunder Mone | Sunder Mone | Sunder Mone | Sunder Mone | Sunder Mone | Sunder Mone | Sunder Moned | Sunder Mone | Sunder Mone | Sunder Mone | Sunder Mone | Sunder Mone | Sunder Mone | Sunder Mone | Sunder Mone | Sunder Mone | Sunder Mone | Sunder Mone | Sunder Mone | Sunder Mone | Sunder Mone | Sunder Mone | Sunder Mone | Sunder Mone | Sunder Mone | Sunder Mone | Sunder MOne | Sunder Mone | Sunder Mone | Sunder Mone | Sunder Mone | Sunder Mone | Sunder Mone | Sunder Mone | Sunder Mone | Sunder Mone | Sunder Mone | Sunder Mone | Sunder Mone | Sunder Mone | Sunder Mone | Sunder Mone | Sunder Mone | Sunder Mone | Sunder Mone | Sunder Mone | Sunder Meme | Sunder Mone | Sunder Mone | Sunder Mone | Sunder Mone | Sunder Mone | Sunder Mone | Sunder Mone | Sunder Mone | Sunder Mone | Sunder Mone | Sunder Mone | Sunder Mone | Sunder Mone | Sunder Mone | Sunder Mone | Sunder Mone | Sunder Mone | Sunder Mone | Sunder Mone | Sunder Mme | Sunder Mone | Sunder Mone | Sunder Mone | Sunder Mone | Sunder Mone | Sunder Mone | Sunder Mone | Sunder Mone | Sunder Mone | Sunder Mone | Sunder Mone | Sunder Mone | Sunder Mone | Sunder Mone | Sunder Mone | Sunder Mone | Sunder Mone | Sunder Mone | Sunder Mone | Sunder Mame | Sunder Mone | Sunder Mone | Sunder Mone | Sunder Mone | Sunder Mone | Sunder Mone | Sunder Mone | Sunder Mone | Sunder Mone | Sunder Mone | Sunder Mone | Sunder Mone | Sunder Mone | Sunder Mone | Sunder Mone | Sunder Mone | Sunder Mone | Sunder Mone | Sunder Mone | Sunder Mime | Sunder Mone | Sunder Mone | Sunder Mone | Sunder Mone | Sunder Mone | Sunder Mone | Sunder Mone | Sunder Mone | Sunder Mone | Sunder Mone | Sunder Mone | Sunder Mone | Sunder Mone | Sunder Mone | Sunder Mone | Sunder Mone | Sunder Mone | Sunder Mone | Sunder Mone | Sunder Mmente | Sunder Mone | Sunder Mone | Sunder Mone | Sunder Mone | Sunder Mone | Sunder Mone | Sunder Mone | Sunder Mone | Sunder Mone | Sunder Mone | Sunder Mone | Sunder Mone | Sunder Mone | Sunder Mone | Sunder Mone | Sunder Mone | Sunder Mone | Sunder Mone | Sunder Mone | Sunder Momena | Sunder Mone | Sunder Mone | Sunder Mone | Sunder Mone | Sunder Mone | Sunder Mone | Sunder Mone | Sunder Mone | Sunder Mone | Sunder Mone | Sunder Mone | Sunder Mone | Sunder Mone | Sunder Mone | Sunder Mone | Sunder Mone | Sunder Mone | Sunder Mone | Sunder Mone | Sunder Mmena | Sunder Mone | Sunder Mone | Sunder Mone | Sunder Mone | Sunder Mone | Sunder Mone | Sunder Mone | Sunder Mone | Sunder Mone | Sunder Mone | Sunder Mone | Sunder Mone | Sunder Mone | Sunder Mone | Sunder Mone | Sunder Mone | Sunder Mone | Sunder Mone | Sunder Mone | SunderMone | Sunder Mone | Sunder Mone | Sunder Mone | Sunder Mone | Sunder Mone | Sunder Mone | Sunder Mone | Sunder Mone | Sunder Mone | Sunder Mone | Sunder Mone | Sunder Mone | Sunder Mone | Sunder Mone | Sunder Mone | Sunder Mone | Sunder Mone | Sunder Mone | Sunder Mone | SunderMome | Sunder Mone | Sunder Mone | Sunder Mone | Sunder Mone | Sunder Mone | Sunder Mone | Sunder Mone | Sunder Mone | Sunder Mone | Sunder Mone | Sunder Mone | Sunder Mone | Sunder Mone | Sunder Mone | Sunder Mone | Sunder Mone | Sunder Mone | Sunder Mone | Sunder Mone | SunderMeme | Sunder Mone | Sunder Mone | Sunder Mone | Sunder Mone | Sunder Mone | Sunder Mone | Sunder Mone | Sunder Mone | Sunder Mone | Sunder Mone | Sunder Mone | Sunder Mone | Sunder Mone | Sunder Mone | Sunder Mone | Sunder Mone | Sunder Mone | Sunder Mone | Sunder Mone | SunderMomena | Sunder Mone | Snder Mone | Snder Mone | Snder Mone | Snder Mone | Snder Mone | Snder Mone | Snder Mone | Snder Mone | Snder Mone | Snder Mone | Snder Mone | Snder Mone | Snder Mone | Snder Mone | Snder Mone | Snder Mone | Snder Mone | Snder Mone | Snder Mone | Snder Mone | Sider Mone | Sider Mone | Sider Mone | Sider Mone | Sider Mone | Sider Mone | Sider Mone | Sider Mone | Sider Mone | Sider Mone | Sider Mone | Sider Mone | Sider Mone | Sider Mone | Sider Mone | Sider Mone | Sider Mone | Sider Mone | Sider Mone | Sider Mone | Siden Mone | Siden Mone | Siden Mone | Siden Mone | Siden Mone | Siden Mone | Siden Mone | Siden Mone | Siden Mone | Siden Mone | Siden Mone | Siden Mone | Siden Mone | Siden Mone | Siden Mone | Siden Mone | Siden Mone | Siden Mone | Siden Mone | Siden Mone | Sieni Mone | Sieni Mone | Sieni Mone | Sieni Mone | Sieni Mone | Sieni Mone | Sieni Mone | Sieni Mone | Sieni Mone | Sieni Mone | Sieni Mone | Sieni Mone | Sieni Mone | Sieni Mone | Sieni Mone | Sieni Mone | Sieni Mone | sieni Mone | sieni Mone | sieni Mone | sieni Mone | sieni Mone | sieni Mone | sieni Mone | sieni Mone | sieni Mone | sieni Mone | sieni Mone | sieni Mone | sieni Mone | sieni Mone | sieni Mone | sieni Mone | sieni Mzone | sieni Mzone | sieni Mzone | sieni Mzone | sieni Mzone | sieni Mzone | sieni Mzone | sieni Mzone | sieni Mzone | sieni Mzone | sieni Mzone | sieni Mzone | sieni Mzone | sieni Mzone | sieni Mzone | sieni Mzone | sieni Mzone | sienii Mzone | sieni Mzone | sieni Mzone | sieni Mzone | sieni Mzone | sieni Mzone | sieni Mzone | sieni Mzone | sieni Mzone | sieni Mzone | sieni Mzone | sieni Mzone | sieni Mzone | sieni Mzone | sieni Mzone | sieni Mzone | sieni Mzone | Sieni Mzone | sieni Mzone | sieni Mzone | sieni Mzone | sieni Mzone | sieni Mzone | sieni Mzone | sieni Mzone | sieni Mzone | sieni Mzone | sieni Mzone | sieni Mzone | sieni Mzone | sieni Mzone | sieni Mzone | sieni Mzone | sieni MZone | sieni Mzone | sieni Mzone | sieni Mzone | sieni Mzone | sieni Mzone | sieni Mzone | sieni Mzone | sieni Mzone | sieni Mzone | sieni Mzone | sieni Mzone | sieni Mzone | sieni Mzone | sieni Mzone | sieni Mzone | sieni Mzone | sienia Mzone | sieni Mzone | sieni Mzone | sieni Mzone | sieni Mzone | sieni Mzone | sieni Mzone | sieni Mzone | sieni Mzone | sieni Mzone | sieni Mzone | sieni Mzone | sieni Mzone | sieni Mzone | sieni Mzone | sieni Mzone | sieni Mzone | miani Mzone | sieni Mzone | sieni Mzone | sieni Mzone | sieni Mzone | sieni Mzone | sieni Mzone | sieni Mzone | sieni Mzone | sieni Mzone | sieni Mzone | sieni Mzone | sieni Mzone | sieni Mzone | sieni Mzone | sieni Mzone | sieni Mzone | ||||||||||||||||||||||||||||||||||||||||||||||||||||||||||||||||||||||||||||||||||||||||||||||||||||
- Actual keyboard notes of the SFX Kit 1 and 2 are one octave lower than the ones described in the list below.
| G1 | G1 | G1 | G1 | G1 | G1 | G1 | G1 | G1 | G1 | G1 | G1 | G1 | G1 | G1 | G1 | G1 | G1 | G1 | G1 | G1 | G1 | G1 | G1 | G1 | G1 | G1 | G1 | G1 | G1 | G1 | G1 | G1 | G1 |
| E1 | E1 | E1 | E1 | E1 | E1 | E1 | E1 | E1 | E1 | E1 | E1 | E1 | E1 | E1 | E1 | E1 | E1 | E1 | E1 | E1 | E1 | E1 | E1 | E1 | E1 | E1 | E1 | E1 | E1 | E1 | E1 | E1 | E1 |
| G1 | G1 | G1 | G1 | G1 | G1 | G1 | G1 | G1 | G1 | G1 | G1 | G1 | G1 | G1 | G1 | G1 | G1 | G1 | G1 | G1 | G1 | G1 | G1 | G1 | G1 | G1 | G1 | G1 | G1 | G1 | G1 | G1 | |
| A1 | A1 | A1 | A1 | A1 | A1 | A1 | A1 | A1 | A1 | A1 | A1 | A1 | A1 | A1 | A1 | A1 | A1 | A1 | A1 | A1 | A1 | A1 | A1 | A1 | A1 | A1 | A1 | A1 | A1 | A1 | A1 | ||
| G1 | G1 | G1 | G1 | G1 | G1 | G1 | G1 | G1 | G1 | G1 | G1 | G1 | G1 | G1 | G1 | G1 | G1 | G1 | G1 | G1 | G1 | G1 | G1 | G1 | G1 | G1 | G1 | G1 | G1 | G1 | |||
| G2 | G2 | G2 | G2 | G2 | G2 | G2 | G2 | G2 | G2 | G2 | G2 | G2 | G2 | G2 | G2 | G2 | G2 | G2 | G2 | G2 | G2 | G2 | G2 | G2 | G2 | G2 | G2 | G2 | G2 | ||||
| B1 | B1 | B1 | B1 | B1 | B1 | B1 | B1 | B1 | B1 | B1 | B1 | B1 | B1 | B1 | B1 | B1 | B1 | B1 | B1 | B1 | B1 | B1 | B1 | B1 | B1 | B1 | B1 | B1 | |||||
| G1 | G1 | G1 | G1 | G1 | G1 | G1 | G1 | G1 | G1 | G1 | G1 | G1 | G1 | G1 | G1 | G1 | G1 | G1 | G1 | G1 | G1 | G1 | G1 | G1 | G1 | G1 | G1 | ||||||
| A1 | A1 | A1 | A1 | ||||||||||||||||||||||||||||||
| A1 | A1 | A1 | A1 | ||||||||||||||||||||||||||||||
| A1 | A1 | A1 | A1 | ||||||||||||||||||||||||||||||
| A1 | A1 | A1 | A1 | A4 | |||||||||||||||||||||||||||||
| A1 | A1 | A1 | A1 | A4 | |||||||||||||||||||||||||||||
| A1 | A1 | A1 | A1 | A4 | A4 | ||||||||||||||||||||||||||||
| A1 | A1 | A1 | A1 | A4 | A4 | ||||||||||||||||||||||||||||
| A1 | A1 | A1 | A1 | A4 | A4 | A4 | |||||||||||||||||||||||||||
| A1 | A1 | A1 | A1 | A4 | A4 |
| USB (0~127) / USB (0~127) / PC (1~128) | |||||||||||||||||||||||||||||||||||||||||||||||||||||||||||||||||||||||||||||||||||||||||||||||||||||||||||||||||||||||||||||||||||||||||||||||||||||||||||||||||||||||||||||||||||||||||||||||||||||||||||||||||||||||||||||||||||||||||||||||||||||||||||||||||||||||||||||||||||||||||||||||||||||||||||||||||||||||||||||||||||||||||||||||||||||||||||||||||||||||||||||||||||||||||||||||||||||||||||||||||||||||||||||||||||||||||||||||||||||||||||||||||||||||||||||||||||||||||||||||
| Note | Note | Note | Note | Note | Note | Note | Note | Note | Note | Note | Note | Note | Note | Note | Note | Note | Note | Note | Note | Note | Note | Note | Note | Note | Note | Note | Note | Note | Note | Note | Note | Note | Note | Note | Note | Note | Note | Note | Note | Note | Note | Note | Note | Note | Note | Note | Note | Note | Note | Notes | Notes | Notes | Notes | Notes | Notes | Notes | Notes | Notes | Notes | Notes | Notes | Notes | Notes | Notes | Notes | Notes | Notes | Notes | Notes | Notes | Notes | Notes | Notes | Notes | Notes | Notes | Notes | Notes | Notes | Notes | Notes | Notes | Notes | Notes | Notes | Notes | Notes | Notes | Notes | Notes | Notes | Notes | Notes | Notes | Notes | Notes | Notes | Notes | Notes | Note | Note | Note | Note | Note | Note | Note | Note | Note | Note | Note | Note | Note | Note | Note | Note | Note | Note | Note | Note | Note | Note | Note | Note | Note | Note | Note | Note | Note | Note | Note | Note | Note | Note | Note | Note | Note | Note | Note | Note | Note | Note | Note | Note | Note | Note | Note | Note | Note | No | No | No | No | No | No | No | No | No | No | No | No | No | No | No | No | No | No | No | No | No | No | No | No | No | No | No | No | No | No | No | No | No | No | No | No | No | No | No | No | No | No | No | No | No | No | No | No | No | No | NO | NO | NO | NO | NO | NO | NO | NO | NO | NO | NO | NO | NO | NO | NO | NO | NO | NO | NO | NO | NO | NO | NO | NO | NO | NO | NO | NO | NO | NO | NO | NO | NO | NO | NO | NO | NO | NO | NO | NO | NO | NO | NO | NO | NO | NO | NO | NO | NO | NO | No | No | No | No | No | No | No | No | No | No | No | No | No | No | No | No | No | No | No | No | No | No | No | No | No | No | No | No | No | No | No | No | No | No | No | No | No | No | No | No | No | No | No | No | No | No | No | No | No | no | no | no | no | no | no | no | no | no | no | no | no | no | no | no | no | no | no | no | no | no | no | no | no | no | no | no | no | no | no | no | no | no | no | no | no | no | no | no | no | no | no | no | no | no | no | no | no | no | no | NO | NO | NO | NO | NO | NO | NO | NO | NO | NO | NO | NO | NO | NO | NO | NO | NO | NO | NO | NO | NO | NO | NO | NO | NO | NO | NO | NO | NO | NO | NO | NO | NO | NO | NO | NO | NO | NO | NO | NO | NO | NO | NO | NO | NO | NO | NO | NO | NO | no | no | no | no | no | no | no | no | no | no | no | no | no | no | no | no | no | no | no | no | no | no | no | no | no | no | no | no | no | no | no | no | no | no | no | no | no | no | no | no | no | no | no | no | no | no | no | no | no | n/a | n/a | n/a | n/a | n/a | n/a | n/a | n/a | n/a | n/a | n/a | n/a | n/a | n/a | n/a | n/a | n/a | n/a | n/a | n/a | n/a | n/a | n/a | n/a | n/a | n/a | n/a | n/a | n/a | n/a | n/a | n/a | n/a | n/a 99.99999999999999999999999999999999999999999999999999999999999999999999999999999999999999999999999999998888888888888888888888888888888888888888888888888888888888888888888888888888888888888888888888888888 |
| Song No. | Song Name |
| Topicks | |
| 001 | Demo 1 |
| 002 | Demo 2 |
| 003 | Demo 3 |
| ORCHESTRA | |
| 004 | Danse des Mirlitons from "The Nutcracker" (P.I. Tchaikovsky) |
| 005 | "Orphée aux Enfers" Ouverture (J. Offenbach) |
| 006 | Slavonic Dances No.10 (A. Dvořák) |
| 007 | La Primavera (from Le Quattro Stagioni) (A. Vivaldi) |
| 008 | Méditation (Thai's) (J. Massenet) |
| 009 | Guillaume Tell (G. Rossini) |
| 010 | Fruhlingslied (F. Mendelssohn) |
| 011 | Ungarische Tanze Nr.5 (J. Brahms) |
| PIANIST | |
| 012 | Dolly's Dreaming and Awakening (T. Oesten) |
| 013 | La Candeur (J.F. Burgmüller) |
| 014 | Arabesque (J.F. Burgmüller) |
| 015 | Pastorale (J.F. Burgmüller) |
| 016 | Petite Réunion (J.F. Burgmüller) |
| 017 | Innocence (J.F. Burgmüller) |
| 018 | Progrès (J.F. Burgmüller) |
| 019 | Tarentelle (J.F. Burgmüller) |
| 020 | La Chevaleresque (J.F. Burgmüller) |
| 021 | Etude op.10-3 "Chanson de l'airieu" (F. Chopin) |
| 022 | Marcia alla Turca (L.v. Beethoven) |
| 023 | Turkish March (W.A. Mozart) |
| 024 | Valse op.64-1 "Petit Chien" (F. Chopin) |
| 025 | Menuett (L. Boccherini) |
| 026 | Nocturne op.9-2 (F. Chopin) |
| 027 | Moments Musicaux op.94-3 (F. Schubert) |
| 028 | The Entertainer (S. Joplin) |
| 029 | Prelude (Wohtemperierte Klavier 1-1) (J.S. Bach) |
| 030 | La Viollette (Streabbog) |
| 031 | Für Elise (L.v. Beethoven) |
| PRACTICE | |
| 032 | America the Beautiful (S.A. Ward) |
| 033 | Londonderry Air (Traditional) |
| 034 | Ring de Banjo (S.C. Foster) |
| 035 | Wenn ich ein Vöglein wär ? (Traditional) |
| 036 | Die Lorelei (F. Silcher) |
| 037 | Funiculi Funicula (L. Denza) |
| 038 | Turkey in the Straw (Traditional) |
| 039 | Old Folks at Home (S.C. Foster) |
| 040 | Jingle Bells (J.S. Pierpont) |
| 041 | Muss i dann (F. Silcher) |
| 042 | Liebesträume Nr.3 (F. Liszt) |
| 043 | Jesu, Joy Of Man's Desiring (J.S. Bach) |
| 044 | Ode to Joy (L.v. Beethoven) |
| 045 | Song of the Pearl Fisher (G. Bizet) |
| 046 | Gavotte (F.J. Gossec) |
| 047 | String Quartet No.17 2nd mov. "Serenade" (F.J. Haydn) |
| 048 | Menuett (J.S. Bach) |
| 049 | Canon (J. Pachelbel) |
| 050 | From "The Magic Flute" (W.A Mozart) |
| 051 | Piano Sonata op.27-2 "Mondschein" (L.v. Beethoven) |
| 052 | "The Surprise" Symphony (F.J. Haydn) |
| 053 | To a Wild Rose (E.A. MacDowell) |
| 054 | Chanson du Toreador (G. Bizet) |
| 055 | O Mio Babbino Caro (G. Puccini) |
| Song No. | Song Name |
| DUET | |
| 056 | Row Row Row Your Boat (Traditional) |
| 057 | On Top of Old Smoky (Traditional) |
| 058 | We Wish You A Merry Christmas (Traditional) |
| 059 | Scarborough Fair (Traditional) |
| 060 | Im Mai (Traditional) |
| 061 | O Christmas Tree (Traditional) |
| 062 | Mary Had a Little Lamb (Traditional) |
| 063 | Ten Little Indians (Septimus Winner) |
| 064 | Pop Goes The Weasel (Traditional) |
| 065 | Twinkle Twinkle Little Star (Traditional) |
| 066 | Close Your Hands, Open Your Hands (J.J. Rousseau) |
| 067 | The Cuckoo (Traditional) |
| 068 | O du lieber Augustin (Traditional) |
| 069 | London Bridge (Traditional) |
| CHORD LESSON | |
| 070 | Bill Bailey (Won't You Please Come Home) (H. Cannon) |
| 071 | When Irish Eyes Are Smiling (E.R. Ball) |
| 072 | Down by the Riverside (Traditional) |
| 073 | When the Saints Go Marching In (Traditional) |
| 074 | Fruhlingsstimmen (J. Strauss II) |
| 075 | Camptown Races (S.C. Foster) |
| 076 | Little Brown Jug (Joseph Winner) |
| 077 | Loch Lomond (Traditional) |
| 078 | Oh! Susanna (S.C. Foster) |
| 079 | Greensleeves (Traditional) |
| 080 | Aura Lee (G. Poulton) |
| 081 | Silent Night (F. Gruber) |
| 082 | The Danube Waves (I. Ivanovici) |
| 083 | Twinkle Twinkle Little Star (Traditional) |
| 084 | Close Your Hands, Open Your Hands (J.J. Rousseau) |
| 085 | The Cuckoo (Traditional) |
| 086 | O du lieber Augustin (Traditional) |
| 087 | London Bridge (Traditional) |
| 088 | American Patrol (F.W. Meacham) |
| 089 | Beautiful Dreamer (S.C. Foster) |
| 090 | Battle Hymn of the Republic (Traditional) |
| 091 | Home Sweet Home (H. Bishop) |
| 092 | Valse Des Fleurs (From "The Nutcracker") (P.I. Tchaikovsky) |
| 093 | Aloha Oe (Q. Liliuokalani) |
| 094 | I've Been Working On The Railroad (Traditional) |
| 095 | My Darling Clementine (Traditional) |
| 096 | Auld Lang Syne (Traditional) |
| 097 | Grandfather's Clock (H.C. Work) |
| 098 | Amazing Grace (Traditional) |
| 099 | My Bonnie (H.J Fulmer) |
| 100 | Yankee Doodle (Traditional) |
| 101 | Joy to the World (G.F. Handel) |
| 102 | Ave Maria (F. Schubert) |
- Some songs have been edited for length or for ease in learning, and may not be exactly the same as the original.
- A song book (free downloadable scores) is available that includes scores for all internal songs (excepting Songs 1-3). To obtain the Song Book, complete the user registration at the following website.
https://member.yamaha.com/myproduct/register/
| Style No. | Style Name |
| 8Beat | |
| 001 | 8BeatModern |
| 002 | 60sGtrPop |
| 003 | 8BeatAdria |
| 004 | 60s8Beat |
| 005 | 8Beat |
| 006 | OffBeat |
| 007 | 60sRock |
| 008 | HardRock |
| 009 | RockShuffle |
| 010 | 8BeatRock |
| 16Beat | |
| 011 | 16Beat |
| 012 | PopShuffle |
| 013 | GuitarPop |
| 014 | 16BtUptempo |
| 015 | KoolShuffle |
| 016 | HipHopLight |
| Ballad | |
| 017 | PianoBallad |
| 018 | LoveSong |
| 019 | 6/8ModernEP |
| 020 | 6/8SlowRock |
| 021 | OrganBallad |
| 022 | PopBallad |
| 023 | 16BeatBallad |
| Dance | |
| 024 | EuroTrance |
| 025 | Ibiza |
| 026 | SwingHouse |
| 027 | Clubdance |
| 028 | ClubLatin |
| 029 | Garage1 |
| 030 | Garage2 |
| 031 | TechnoParty |
| 032 | UKPop |
| 033 | HipHopGroove |
| 034 | HipShuffle |
| 035 | HipHopPop |
| Disco | |
| 036 | 70sDisco |
| 037 | LatinDisco |
| 038 | SaturdayNight |
| 039 | DiscoHands |
| Swing&Jazz | |
| 040 | BigBandFast |
| 041 | BigBandBallad |
| 042 | JazzClub |
| 043 | Swing1 |
| 044 | Swing2 |
| 045 | Five/Four |
| 046 | Dixieland |
| 047 | Ragtime |
| Style No. | Style Name |
| R&B | |
| 048 | Soul |
| 049 | DetroitPop |
| 050 | 6/8Soul |
| 051 | CrocoTwist |
| 052 | Rock&Roll |
| 053 | ComboBoogie |
| 054 | 6/8Blues |
| Country | |
| 055 | CountryPop |
| 056 | CountrySwing |
| 057 | Country2/4 |
| 058 | Bluegrass |
| Latin | |
| 059 | BrazilianSamba |
| 060 | BossaNova |
| 061 | Forro |
| 062 | Tijuana |
| 063 | Mambo |
| 064 | Salsa |
| 065 | Beguine |
| 066 | Reggae |
| Ballroom | |
| 067 | VienneseWaltz |
| 068 | EnglishWaltz |
| 069 | Slowfox |
| 070 | Foxtrot |
| 071 | Quickstep |
| 072 | Tango |
| 073 | Pasodoble |
| 074 | Samba |
| 075 | ChaChaCha |
| 076 | Rumba |
| 077 | Jive |
| Trad&World | |
| 078 | USMarch |
| 079 | 6/8March |
| 080 | GermanMarch |
| 081 | PolkaPop |
| 082 | OberPolka |
| 083 | Tarantella |
| 084 | Showtune |
| 085 | ChristmasSwing |
| 086 | ChristmasWaltz |
| 087 | ScottishReel |
| Waltz | |
| 088 | SwingWaltz |
| 089 | JazzWaltz |
| 090 | CountryWaltz |
| 091 | OberWalzer |
| 092 | Musette |
| Style No. | Style Name |
| Pianist | |
| 093 | Stride |
| 094 | PianoSwing |
| 095 | Arpeggio |
| 096 | Habanera |
| 097 | SlowRock |
| 098 | 8BeatPianoBallad |
| 099 | 6/8PianoMarch |
| 100 | PianoWaltz |
Reverb Types
| No. | Reverb Type | Description |
| 01–03 | Hall 1–3 | Concert hall reverb. |
| 04–05 | Room 1–2 | Small room reverb. |
| 06–07 | Stage 1–2 | Reverb for solo instruments. |
| 08–09 | Plate 1–2 | Simulated steel plate reverb. |
| 10 | Off | No effect. |
Chorus Types
| No. | Chorus Type | Description | |
| 01–02 | Chorus 1–2 | Conventional chorus program with rich, warm chorusing. | |
| 03–04 | Flanger 1–2 | This produces a rich, animated wavering effect in the sound. | |
| 05 | Off | No effect. | |
| Size/Weight | Dimensions (W x D x H) | 945mm x 348mm x 117mm (37-3/16" x 13-11/16" x 4-5/8") | |
| Weight | 4.0kg (not including batteries) (8lbs 13oz.) | ||
| Keyboard | Number of Keys | 61 | |
| Display | Display | LCD display | |
| Language | English | ||
| Voices | Tone Generation | Tone Generating Technology | AWM Stereo Sampling |
| Polyphony | Number of Polyphony (Max.) | 32 | |
| Preset | Number of Voices | 139 panel Voices + 13 drum/SFX kits + 233 XGlite Voices | |
| Compatibility | GM/XGlite | ||
| Effects | Types | Reverb | 9 types |
| Chorus | 4 types | ||
| Ultra-Wide Stereo | 3 types | ||
| Master EQ | 6 types | ||
| Functions | Panel Sustain | Yes | |
| Accompaniment Styles | Preset | Number of Preset Styles | 100 |
| Fingering | Multi finger | ||
| Style Control | ACMP ON/OFF, SYNC START, START/STOP, INTRO/ENDING/rit., MAIN/AUTO FILL | ||
| Other Features | One Touch Setting (OTS) | Yes | |
| Songs | Preset | Number of Preset Songs | 102 |
| Function | Lesson/Guide | [1 LISTEN & LEARN], [2 TIMING], [3 WAITING], [A-B REPEAT], [CHORD DICTIONARY] | |
| Overall | Metronome | Yes | |
| Tempo Range | 11-280 | ||
| Transpose | -12 to 0, 0 to +12 | ||
| Tuning | 427.0-440.0-453.0 Hz (approx. 0.2Hz increments) | ||
| Miscellaneous | Portable Grand Button | Yes | |
| Connectivity | USB TO HOST, DC IN 12V, PHONES/OUTPUT, SUSTAIN | ||
| Amplifiers/Speakers | Amplifiers | 2.5W+2.5W | |
| Speakers | 12cmx2 | ||
| Power Supply | Power Supply | Adaptor | Users within U.S or Europe: PA-130 or an equivalent recommended by Yamaha Others: PA-3C, PA-130 or an equivalent |
| Batteries | Six "A"A size alkaline (LR6), manganese (R6) or Ni-MH rechargeable batteries | ||
| Power Consumption | 8W (When using PA-130 power adaptor) | ||
| Auto Power Off Function | Yes | ||
| Accessories | Included Accessories | • Music Rest • Owner's Manual • AC Power adaptor *1 (PA-130 or an equivalent recommended by Yamaha) • Online Member Product Registration *1 May not be included depending on your particular area. Please check with your Yamaha dealer. | |
| Optional Accessories | • AC Power Adaptor: Users within U.S or Europe: PA-130 or an equivalent recommended by Yamaha Others: PA-3C, PA-130 or an equivalent • Keyboard Stand: L-2C • Headphones: HPE-150/HPE-30 • Footswitch: FC4/FC5 • USB MIDI Interface for iPhone/iPod touch/iPad (i-UX1) | ||
- Specifications and descriptions in this owner's manual are for information purposes only. Yamaha Corp. reserves the right to change or modify products or specifications at any time without prior notice. Since specifications, equipment or options may not be the same in every locale, please check with your Yamaha dealer.
A
A-B Repeat 21
AC adaptor 10
ACMP ON/OFF 16
Auto Accompaniment 16
Auto Accompaniment range .........16
AUTO FILL 17
Auto Power Off 12, 25
B
Backup 26
Backup Clear 26
Backup Parameter 26
battery 10
Battery Type 25
Beat 13
BGM 20
C
Chord 13
Chord Dictionary 19
Chord Type 18
Chorus 15,25
computer 26
Computer-related Operations 4
D
Demo 20
Demo Group 25
Demo Play Mode 25
Display 13
Drum Kit List 32
E
Effect 15,25
Effect Type List 37
ENDING 17
EQ Setting 12
EQ type 12
External Clock 25
F
Fast Forward 21
Fast Reverse 21
Footswitch 11
Function 24
Function List 24
G
GM System Level 1 4
Grade 23
Grand Piano 14
H
Headphone 11
1
Initial Send 25
Initialization 26
INTRO 17
iPad 26
iPhone 26
iPhone/iPad Connection Manual .4
i-UX1 26
K
Keyboard Display 13
L
Lesson 23
Listen & Learn 23
Local Control 25
M
MAIN 17
Master EQ Type 25
MASTER VOLUME 11
Measure 13
Metronome 15
Metronome Volume 15, 25
MIDI Basics 4
MIDI Reference 4
Music Rest 4, 11
N
Notation 13
0
One Touch Setting 14
P
Part 22
Pause 21
Power Requirements 10
R
Random 20
Reverb 15,25
rhythm 16
rit. 17
s
Section 17
Song 20
Song Book 4
Song List 35
Song Volume 24
sound effect 14
Specification 38
Split Point 24
Style 16
Style List 36
Style Volume 16, 24
Sustain 15,25
Synchro Start 16
T
Tap 17
Tempo 15, 17
Time Signature 15, 25
Timing 23
Transpose 24
Troubleshooting 27
Tuning 24
U
Ultra-Wide Stereo 15
USB 4
USB TO HOST 9
V
Voice 14,24
Voice List 28
Volume 24
W
Waiting 23
Wide Type 25
X
XGlite 4
Y
Your Tempo 25

YAMAHA
LIMITED 1-YEAR WARRANTY ON
PORTABLE KEYBOARD
(NP, NPV, PSRE, EZ, DGX230, DGX530, YPG AND YPT SERIES)
Thank you for selecting a Yamaha product. Yamaha products are designed and manufactured to provide a high level of defect-free performance. Yamaha Corporation of America ("Yamaha") is proud of the experience and craftsmanship that goes into each and every Yamaha product. Yamaha sells its products through a network of reputable, specially authorized dealers and is pleased to offer you, the Original Owner, the following Limited Warranty, which applies only to products that have been (1) directly purchased from Yamaha's authorized dealers in the fifty states of the USA and District of Columbia (the "Warranted Area") and (2) used exclusively in the Warranted Area. Yamaha suggests that you read the Limited Warranty thoroughly, and invites you to contact your authorized Yamaha dealer or Yamaha Customer Service if you have any questions.
Coverage: Yamaha will, at its option, repair or replace the product covered by this warranty if it becomes defective, malfunctions or otherwise fails to conform with this warranty under normal use and service during the term of this warranty, without charge for labor or materials. Repairs may be performed using new or refurbished parts that meet or exceed Yamaha specifications for new parts. If Yamaha elects to replace the product, the replacement may be a reconditioned unit. You will be responsible for any installation or removal charges and for any initial shipping charges if the product(s) must be shipped for warranty service. However, Yamaha will pay the return shipping charges to any destination within the USA if the repairs are covered by the warranty. This warranty does not cover (a) damage, deterioration or malfunction resulting from accident, negligence, misuse, abuse, improper installation or operation or failure to follow instructions according to the Owner's Manual for this product; any shipment of the product (claims must be presented to the carrier); repair or attempted repair by anyone other than Yamaha or an authorized Yamaha Service Center; (b) any unit which has been altered or on which the serial number has been defaced, modified or removed; (c) normal wear and any periodic maintenance; (d) deterioration due to perspiration, corrosive atmosphere or other external causes such as extremes in temperature or humidity; (e) damages attributable to power line surge or related electrical abnormalities, lightning damage or acts of God; or (f) RFI/EMI (Interference/ noise) caused by improper grounding or the improper use of either certified or uncertified equipment, if applicable. Any evidence of alteration, erasing or forgery of proof-of-purchase documents will cause this warranty to be void. This warranty covers only the Original Owner and is not transferable.
In Order to Obtain Warranty Service: Warranty service will only be provided for defective products within the Warranted Area. Contact your local authorized Yamaha dealer who will advise you of the procedures to be followed. If this is not successful, contact Yamaha at the address, telephone number or website shown below. Yamaha may request that you send the defective product to a local authorized Yamaha Servicer or authorize return of the defective product to Yamaha for repair. If you are uncertain as to whether a dealer has been authorized by Yamaha, please contact Yamaha's Service Department at the number shown below, or check Yamaha's website at www.Yamaha.com. Product(s) shipped for service should be packed securely and must be accompanied by a detailed explanation of the problem(s) requiring service, together with the original or a machine reproduction of the bill of sale or other dated, proof-of-purchase document describing the product, as evidence of warranty coverage. Should any product submitted for warranty service be found ineligible therefore, an estimate of repair cost will be furnished and the repair will be accomplished only if requested by you and upon receipt of payment or acceptable arrangement for payment.
Limitation of Implied Warranties and Exclusion of Damages: ANY IMPLIED WARRANTY, INCLUDING WARRANTY OF MERCHANTABILITY AND FITNESS FOR A PARTICULAR PURPOSE SHALL BE LIMITED IN DURATION TO THE APPLICABLE PERIOD OF TIME SET FORTH ABOVE. YAMAHASHALL NOT BE RESPONSIBLE FOR INCIDENTAL OR CONSEQUENTIAL DAMAGES OR FOR DAMAGES BASED UPON INCONVENIENCE, LOSS OF USE, DAMAGE TO ANY OTHER EQUIPMENT OR OTHER ITEMS AT THE SITE OF USE OR INTERRUPTION OF PERFORMANCES OR ANY CONSEQUENCES. YAMAHAS LIABILITY FOR ANY DEFECTIVE PRODUCT IS LIMITED TO REPAIR OR REPLACEMENT OF THE PRODUCT, AT YAMAHAS OPTION. SOME STATES DO NOT ALLOW LIMITATIONS ON HOW LONG AN IMPLIED WARRANTY LASTS OR THE EXCLUSION OR LIMITATION OF INCIDENTAL OR CONSEQUENTIAL DAMAGES, SO THE ABOVE LIMITATION OR EXCLUSION MAY NOT APPLY TO YOU. This Warranty gives you specific legal rights, and you may also have other rights which vary from state to state. This is the only express warranty applicable to the product specified herein; Yamaha neither assumes nor authorizes anyone to assume for it any other express warranty.
If you have any questions about service received or if you need assistance in locating an authorized Yamaha Servicer, please contact:

YAMAHA
CUSTOMER SERVICE
Yamaha Corporation of America
6600 Orangethorpe Avenue, Buena Park, California 90620-1373
Telephone: 800-854-1569
www.yamaha.com
Do not return any product to the above address without a written Return Authorization issued by YAMAHA.
©2012 Yamaha Corporation of America.
| Important Notice: Guarantee Information for customers in EEA* and Switzerland For detailed guarantee information about this Yamaha product, and Pan-EEA* and Switzerland warranty service, please either visit the website address below (Printable file is available at our website) or contact the Yamaha representative office for your country. * EEA: European Economic Area | |
| Wichtiger Hinweis: Garantie-Information für Kunden in der EWR* und der SchweizFür ähnliche Garantie-Information über diesen Produkt von Yamaha, sowie über den Pan-EWR* und Schweizer Garantieservice, besuchen Sieitte entweder die folgenden angegebene Internetadresse (eine druckfähige Version befindet sich auch auf unserer Seiten), oder wenden Sie sich an den für Ihr Land zuständigen Yamaha-Vertrieb. *EWR: Europäischer Wirtschaftswraum | |
| Remarque importante: informations de garantie pour les clients de l'EEE et la SuissePour des informations plus détaillées sur la garantie de ce produit Yamaha et sur le service de garantie applicable dans l'ensemble de l'EEA ainsi qu'en Suisse, consultez notre site Web à l'adresse ci-dessous (le filchier imprimable est disponible sur notre site Web) ou contactez directement Yamaha dans vos pays de résidence. * EEE: Espace Economique Européen | |
| Belangrije mededeling: Garantie-informatiek voor klanten in de EER* en ZwitserlandVoor gedetailleerde garantie-informatiek over dit Yamaha-product en de garantieservice in heel de EER* en Zwitserland, gaat u waar de onderstaande website (u vinden aan afdrukbaar bestand op once website) of neemt u contact op met de vertegenwoordig van Yamaha in uw land. * EER: Europese Economische Ruimte | |
| Aviso importante: información sobre la garantía para los clients del EEE* y SuizaPara una información detallada sobre este producto Yamaha y sobre el soporte de garantía en la zona EEE* y Suiza, visite la direction web que se incluye más bajo (la version del archiv para imprintir esta disponible en了我的to situ web) o póngase encontacto con el representante de Yamaha en su pays. * EEE: Espacio Económico Europeo | |
| Aviso importante: informazioni sulla garanzia por i clienti residenti nell'EEA* e in SvizzeraPer informazioni dettagliate sulla garanzia relativa a quello prodotto Yamaha e l'assistenza in garanciai nei paesi EEA* e in Svizzera, potete consulhare il site Web all'indirizzo riportato di seguito (é disponible il file in formato stampabile) oppure contattare luffido di rappresentanza locale della Yamaha. * EEA: Area Economica Europea | |
| Aviso importante: informações sobre as garantias para cliente da AEE* e da SuiraPara obter uma informação penormorizada sobre este produits da Yamaha e sobre o service de garantia na EEE* e na Suira, visite o site a seguir (o arquvo para impressão está disorientel nonoxso site) ou entre em contacto com o escritório de representation da Yamaha no seu pays. * EAE: Área Econômica Europeia | |
| Σημαντίκη συμειώνη Πλρροφορίες εγγύησης για του πελάτε στόν ΕΟΧ* και ΕλβείτιΓι λεπτομείς πλρροφορίες εγγύησης σχετίκα με το τραρον τροίον ητής Yamaha και την καλίμη εγγύησης σε ἀλες τις χωρες tou EOX και την Ελβείτι, επικερίσετη την τραρατων τοιθελίδΑ (Ekτιμιωμιμρόρόν εἰναι διαθέδμισι Μτυνιοσελίδα μας) ἡιτεύθυδείτη στήν αντροσωντίαει Μτήν χώρα σας. * EOX: Eupμταίκός Οικόνομίκός Κύρος | |
| Viktigt: Garantiinformation für kunder i EES-området* och SchweizFür detailerad information omenna Yamahaproduktsamt garantiservice i hela EES-området* och Schweiz kan du antingenbesöka nedanstäende webaddress (en utskriftsvänåg fil finns på webplatsen) erller kontakte Yamaha officiella representanti i ditt land. * EES: Europeiska Ekonomiska Samarbetssområdet | |
| Viktig merknad: Garantiinformationjfor kunder i EOS* og SveitsDelantaljertGarantiinformationjommelette YamahaProdukt og garantiservice for heile EØS-området* og Sveits kan fãs enten ved abesöke nettadressen nedenfor (utskriftsversjon finnes på väre nettsdiser) erller kontakte kontakte Yamaha-kontoret i landet der du bor. *EØS: Det europeiske økonomiske samarbeidsområdet | |
| Vigtt opysnig: Garantioplysninger til kunder i EOO* og SchweizDe kan findinge detailerede garantioplysninger om ditte Yamaha-produkt og den fælles garantiserviceordning for EOO* (og Schweiz)ved at besage det websted, der er angivet nedenfor (der findes en fil, som kan udskrives, på vores websted), erller ved at kontakteYamahas nationale représentationskontor i det land, hvor De bor. * EOO: Det Europeiske økonomiske Omrade |
| Tärkea ilmoitus: Takuutiedot European paloualseuen (ETA)* ja Sveitsin asiakkaille | Suomi |
| Tämän Yamaha-ruoteen sekä ETA-alueen ja Sveitsin takuuta koskevat yksityskohtaiset tiedot saatte alla olevasta nettiosoit-teesta. (Tulostettava tiedosto saatavissa svistollamme.) Voitte myös ottaa yhtyttä paikillseen Yamaha-edustajaan. *ETA: European taloualse | |
| Wažne: Warunki gwarancjyne obowiażuće w EOG* i Szwajcarii | Polski |
| Aby dowiedzieć sie weitere na temat warunków gwarancjnychideo produktu firmy Yamaha i serwu gwarancjnégo w calym EOG* i Szwajcarii, nález odwiedzić wskazana pönizje strone internetowá (Plk gotowy do wydruku znajduje są na naszej stronie internetowej) lub skontatkować sie z przyzdawcielem stwem firmy Yamaha w swoim kraju. * EOG — Europejski Obszar Gospodarczy | |
| Duležite oznámni: Zaručni informrace pro zákazníky v EHS* a ve Švycarsku | Česky |
| Podrobné zaručni informace o toto produktu Yamaha a zaručním servisu v celém EHS* a ve Švycarsku naceznete na niže uvedene webove odreùs (sousor k tisku je dostupné na našich webovych stránkách) nebo se muzěte obrát i na zastupeni firmy Yamaha ve svě zemi. * EHS: Evropský hospodáfský prostor | |
| Fontos figyelmeztétés: Garancia-informácíoz e EGT* területén és Šváčban elő vásárlók számára | Magyar |
| A jelen Yamaha termékre vona:tko zróştes garancia-informácíó, valamint az EGT*-re és Šváčra kiterjedó garanciális szolgáttatas tekintetényen keresse fel webhelyunket az alábbi címen (a webhelyen nyomtathato fajlt is talál), vagy pedig lépjen kapcsolbatza az országában mühödō Šyama képviselti irodával. * EGT: Europai Gazdasági Térseg | |
| Oluline margkus: Garantiteave Euroopa Majanduspiirkonna (EIP)* ja Šveitsi klientidele | Eesti keel |
| Tapsema teabe saamëseklesse syllamae darjnoi ngkogu Euroopa Majanduspiirkonna ja Šveitsi garantiitēninduse kohta, kūlastage palun veebisaiti alljargneval addresil (meie saidil on saadaval prinditav fail) vovi poörduge Teie regiooni Yamaha esinduse pleode. * EMP: Euroopa Majanduspiirkond | Latviešu |
| Svarīgs pazinojums: garantijas informácja klientiem EEE* un Šveicé | Liatviesu |
| Lai sapemtu detaližētu garantijas informácji par so Yamaha produktu, kārì garantijas apkalpošanu EEE* un Šveicé, lūdzu, apmekljēt zemāk norādīto timekla viétrnes adresi (timekla viétrne ir pieejams drukajams fails) vai sazinieties ar jusu valsti apkalpojso Šyama párstavniecibu. * EEE: Eropas Ekonomikas zona | |
| Démesio: informacija del galantijos pirkéjams EEE* ir Šveicarijoke | Lietuviu kalba |
| Jei reikia issamis informacijos apie ši „Yamaha“ produkta ir jo technine priežúřa visoje EEE* ir Šveicarijoke, apslankykite mushu svetainëjie toliau nurodytu adressu (svetainëjie yra spausdinitas failas) arba kreipkités i „Yamaha“ atstovybé savo šalai. *EEE—Europos ekonomíne erdvé | |
| Doležite upozornenie: Informací o zaručne pre zákaznikov v EHP* a Šváčiarsku | Slovenčina |
| Podrobné informácí o zaručne týkajúce sa tohto produktu odspočnosti Yamaha a garancnom servise v EHP* a Šváčiarsku nájdeta na webovej stränké uvedenej nižíše (na našej webovej stränké je k dispeziciiút suhor na tlac) aleba so obràte na zástupcu spočnosti Yamaha va svojé krajine. * EHP: Europsky hospodársky priestor | |
| Pomembno obvestilo: Informací o garanciji za cupke v EGP* in Švici | Slovensčina |
| Za podrobnejše informací o tem Yamaha imezidku ter garancijskem servisi v celotnem EGP in Švici, obščite spltevo mesto, ki je navedeno spodaj (natislija datoteka je na voljo na našem spltevmestu), ali se obrnite na Yamahainega predstavnika v svoji državi. * EGP: Evropski gastodarski prostor | |
| Baxncho sbɔbșeșnec: Ιnhofpompțuța 3a râpanțuțta 3a klneniţи в EIIN* i Šhebeiцря | Бълар检кі smix |
| 3a noþdobna inhofpompțuța 3a râpanțuțta 3a tozni noþdýknt ha Yamaha n râpanțuhoHHTO obnilučnuBa n pânebroneckata 30naHa EIIN* i Šhebeiцря iii noþctete noþcenhny noþ-donyu baycay (ha nauhny yebc城市建设у phailnza за чупат), iii se cbpxkete c pânédctabniletni oφinc na Yamaha bvbвашатастара. * EIIN: Evponeckko inkohomuneckno prooctpantcbo | |
| Notificare importantă: Informazioni despite garantei pentruclientii din SEE* si Elvetia | Limba română |
| Pentu informazioni detailate privindi astcut gestores deiugurie Pan-SEE* si Elvetia, vizitätsi site-ul la adresa de mai jos (fişierul imprimabil disponiope site-ul nostru) sa contacti biroul representantei Yamaha din ʒara dumnevoastră. * SEE: Spajul Economic European |
For details of products, please contact your nearest Yamaha representative or the authorized distributor listed below.
Yamaha Canada Music Ltd.
135 Milner Avenue, Scarborough, Ontario,
M1S 3R1, Canada
Tel: 416-298-1311
U.S.A.
Yamaha Corporation of America
6600 Orangethorpe Ave., Buena Park, Calif. 90620,
U.S.A
Tel: 714-522-9011
CENTRAL & SOUTH AMERICA
MEXICO
Yamaha De Mexico, S.A. de C.V.
Av. Insurgentes Sur 1647 "Prisma Insurgentes",
Col. San Jose Insurgentes, Del. Benito Juarez,
03900, Mexico, D.F.
Tel: 55-5804-0600
BRAZIL
PANAMA AND OTHER LATIN
AMERICAN COUNTRIES
CARIBBEAN COUNTRIES
Yamaha Music Latin America, S.A.
Torre Banco General, Piso 7, Urbanizacion Marbella,
Sherbourne Drive, Tilbrook, Milton Keynes,
MK7 8BL, England
Tel: 01908-366700
GERMANY
Yamaha Music Europe GmbH
Siemensstraße 22-34, 25462 Rellingen, Germany
Tel: 04101-3030
Branch Switzerland in Zurich
Seefeldstrasse 94,8008 Zurich,Switzerland
Tel: 044-387-8080
AUSTRIA
Yamaha Music Europe GmbH Branch Austria
Schleiergasse 20, A-1100 Wien, Austria
Tel: 01-60203900
CZECH REPUBLIC/HUNGARY/
ROMANIA/SLOVAKIA/SLOVENIA
Yamaha Music Europe GmbH
Branch Austria (Central Eastern Europe Office)
Schleiergasse 20, A-1100 Wien, Austria
Tel: 01-602039025
POLAND/LITHUANIA/LATVIA/ESTONIA
Yamaha Music Europe GmbH
Branch Poland Office
Yamaha Music Europe GmbH, Branch Italy
Viale Italia 88, 20020 Lainate (Milano), Italy
Tel: 02-935-771
SPAIN/PORTUGAL
Yamaha Music Europe GmbH Ibérica, Sucursal
en España
Ctra.de la Coruna km.17,200,28230
Las Rozas (Madrid), Spain
Tel: 91-639-8888
GREECE
Philippos Nakas S.A. The Music House
147 Skiathou Street, 112-55 Athens, Greece
Tel: 01-228 2160
SWEDEN
Yamaha Music Europe GmbH Germany filial
Scandinavia
J. A. Wettergrens Gata 1, Box 30053
S-400 43 Göteborg, Sweden
Tel: 031 89 34 00
DENMARK
Yamaha Music Europe GmbH, Tyskland - filial
Denmark
Generatorvej 6A, DK-2730 Herlev, Denmark
Tel: 44 92 49 00
FINLAND
F-Musiikl
Kluuvikatu 6, P.O. Box 260,
SF-00101 Helsinki, Finland
Tel: 09 618511
NORWAY
Yamaha Music Europe GmbH Germany -
Norwegian Branch
Grini Næringspark 1, N-1345 Østerås, Norway
Tel: 67 16 77 70
ICELAND
Skifan HF
Skeifan 17 P.O. Box 8120, IS-128 Reykjavik, Iceland
Tel: 525 5000
RUSSIA
Yamaha Music (Russia)
Room 37, bld. 7, Kievskaya street, Moscow,
121059, Russia
Tel: 495 626 5005
OTHER EUROPEAN COUNTRIES
Yamaha Music Europe GmbH
Siemensstraße 22-34, 25462 Rellingen, Germany
Tel: +49-4101-3030
AFRICA
Yamaha Corporation,
Asia-Pacific Sales & Marketing Group
Nakazawa-cho 10-1, Naka-ku, Hamamatsu,
Japan 430-8650
Tel: +81-53-460-2313
MIDDLE EAST
TURKEY/CYPRUS
Yamaha Music Europe GmbH
Siemensstraße 22-34, 25462 Rellingen, Germany
Tel: 04101-3030
OTHER COUNTRIES
Yamaha Music Gulf FZE
LOB 16-513, P.O.Box 17328, Jubel Ali,
Dubai, United Arab Emirates
Tel: +971-4-881-5868
ASIA
THE PEOPLE'S REPUBLIC OF CHINA
Yamaha Music & Electronics (China) Co.,Ltd.
2F, Yunhedasha, 1818 Xinzha-lu, Jingan-qu.
Shanghai, China
Tel: 021-6247-2211
HONG KONG
Tom Lee Music Co., Ltd.
11/F., Silvercord Tower 1, 30 Canton Road,
Tsimshatsui, Kowloon, Hong Kong
Tel: 2737-7688
INDIA
Yamaha Music India Pvt. Ltd.
Spazedge building, Ground Floor, Tower A, Sector
47, Gurgaon- Sohna Road, Gurgaon, Haryana, India Tel: 0124-485-3300
INDONESIA
PT. Yamaha Musik Indonesia (Distributor)
PT. Nusantik
Gedung Yamaha Music Center, Jalan Jend. Gatot
SubROTO Kav. 4, Jakarta 12930, Indonesia
Tel: 021-520-2577
KOREA
Yamaha Music Korea Ltd.
8F, 9F, Dongsung Bldg. 158-9 Samsung-Dong,
Kangnam-Gu, Seoul, Korea
Tel: 02-3467-3300
MALAYSIA
Yamaha Music (Malaysia) Sdn., Bhd.
Lot 8, Jalan Perbandaran, 47301 Kelana Jaya,
Petaling Jaya, Selangor, Malaysia
Tel: 03-78030900
PHILIPPINES
Yupangco Music Corporation
339 Gil J. Puyat Avenue, P.O. Box 885 MCPO,
Makati, Metro Manila, Philippines
Tel: 819-7551
SINGAPORE
Yamaha Music (Asia) PRIVATE LIMITED
Blk 202 Hougang Street 21, #02-00,
Singapore 530202, Singapore
Tel: 6747-4374
TAIWAN
Yamaha KHS Music Co., Ltd.
3F, #6, Sec.2, Nan Jing E.Rd.Taipei.
Taiwan 104, R.O.C.
Tel: 02-2511-8688
THAILAND
Siam Music Yamaha Co., Ltd.
4, 6, 15 and 16th floor, Siam Motors Building,
891/1 Rama 1 Road, Wangmai,
Pathumwan, Bangkok 10330, Thailand
Tel: 02-215-2622
OTHER ASIAN COUNTRIES
Yamaha Corporation,
Asia-Pacific Sales & Marketing Group
Nakazawa-cho 10-1, Naka-ku, Hamamatsu,
Japan 430-8650
Tel: +81-53-460-2313
OCEANIA
AUSTRALIA
Yamaha Music Australia Pty. Ltd.
Level 1, 99 Queensbridge Street, Southbank,
Victoria 3006, Australia
Tel: 3-9693-5111
NEW ZEALAND
Music Works LTD
P.O.BOX 6246 Wellesley,Auckland 4680
New Zealand
Tel: 9-634-0099
COUNTRIES AND TRUST
TERRITORIES IN PACIFIC OCEAN
Yamaha Corporation,
Asia-Pacific Sales & Marketing Group
Nakazawa-cho 10-1, Naka-ku, Hamamatsu,
Japan 430-8650
Tel: +81-53-460-2313

YAMAHA
Yamaha Global Site
http://www.yamaha.com/
Yamaha Downloads
http://download.yamaha.com/
U.R.G., Digital Musical Instruments Division
© 2012 Yamaha Corporation
212POTY*.-01A0
Printed in China