MI-H20-1001 - Vacuum Cleaner Rovus - Free user manual and instructions
Find the device manual for free MI-H20-1001 Rovus in PDF.

User questions about MI-H20-1001 Rovus
0 question about this device. Answer the ones you know or ask your own.
Ask a new question about this device
Download the instructions for your Vacuum Cleaner in PDF format for free! Find your manual MI-H20-1001 - Rovus and take your electronic device back in hand. On this page are published all the documents necessary for the use of your device. MI-H20-1001 by Rovus.
USER MANUAL MI-H20-1001 Rovus
natural_image
White BOVUS handheld vacuum cleaner with green handle and yellow grip (no visible text or symbols)360 - CORDLESS HAND VAC
Please read this manual thoroughly before using and save it for future reference.
ROVUS
EN....4
AL....7
BG....11
BIH....17
CZ....20
EE....24
HR....27
HU....32
KS....36
KZ....39
LT....43
LV....46
MD....49
ME....53
MK....56
PL....61
RO....65
RS....68
RU....72
SI....78
SK....82
UA....85
(EN) PICTURES / (AL) FOTOGRAFIN / (BG) ИЛЮСТРАЦИИ / (BIH) SLIKE / (CZ) OBRÁZKY / (EE) JOONISED / (HR) SLIKE / (HU) KÉPEK / (KS) FOTOGRAFIN / (KZ) CYPETTEP / (LT) PAVEIKSLIUKAI / (LV) ATTEL / (MD) IMAGINI / (ME) SLIKE / (MK) СЛИКИ / (PL) RYSUNKI / (RO) IMAGINI / (RS) SLIKE / (RU) РИСУНКИ / (SI) SLIKE / (SK) OBRÁZKY / (UA) МАЛЮНКИ
Picture 1

text_image
C D E B F H I J G APicture 2

text_image
13.1 13Picture 3

text_image
13 14.1 14 14.2Picture 4

text_image
13.2Picture 5 Picture 7Picture 6
 | |
| 0-10% | |
| 10-25% | |
| 25-50% | |
| 50-75% | |
| 75-100% |
natural_image
Technical line drawing of a mechanical device with an open lid and internal components, showing no text or symbols.
text_image
1 0Picture 8

natural_image
Technical line drawing of a mechanical tool or device with a handle and connector (no text or symbols)
natural_image
Diagram of a handheld device with two arrows indicating rotation or adjustment (no text or symbols)Picture 10Picture 9

text_image
a) b)Picture 11

natural_image
Three basic kitchen faucet icons with different shapes and colors, no text or symbols presentPicture 12

natural_image
Simple line drawings of three common objects: a faucet with a drop, a hand cleaning a surface, and a cup with liquid (no text or symbols)Picture 13
natural_image
Technical line drawing of a mechanical device with two components and directional arrows indicating motion (no text or symbols)EN
Please read this manual thoroughly before using and save it for future reference.
WARNINGS
- This device can be used by children aged from 8 years and above as well as by persons with reduced physical, sensory or mental capabilities or lack of experience and knowledge if they have been given supervision or instruction concerning use of the device in a safe way and understand the hazards involved. Children shall not play with the appliance. Cleaning and user maintenance should not be done by children unless they are older than 8 and supervised.
- This product is intended for household and dry use only.
- If the device is not working as it should, has received a sharp blow, has been dropped, damaged, left outdoors or dropped into water, do not use it.
- Do not attempt any modification or repair by yourself and ensure that any repair is conducted only by appropriately qualified technician.
- Never run the device unless it is fully assembled.
- This device should never operate empty because such action
could result in appliance failure and/or injuries to the user.
-
Do not place the power cable near a heated surface.
-
Plug in power supply that corresponds to the rated one on charger only. In case of misusage power supply or device failure may occur.
-
Never use the power cable to pick up, carry, drag, pull, or lift the charger. Do not pull the power cable against or around sharp corners and edges.
-
A charger that is suitable for one type of battery pack may create a risk of fire when used with another battery pack; never use the charger with another device or attempt to charge this product with another charger.
-
When the battery charger has been continuously used, the battery charger will be hot. Once the charging has been completed, give 15 minutes rest until the next charge.
-
Do not expose to high temperatures >50^ C. The battery may degrade at high temperatures.
-
Charge battery in conditions between 5°C to 30°C with the specified charger designed for this battery.
-
Do not use battery if it has been stored at 5^ C or less. Allow it to “normalize” at room temperature before usage/charging.
-
Use care when operating the device by keeping all foreign objects, fingers, body parts, hair, loose clothing and jewelry away from openings.
-
Regularly remove blockages caused by dust, fluff, hair etc. because they greatly reduce device's suction power and/or general performance.
-
Please refer to below paragraphs about details on cleaning, operating and settings for accessories.
-
Although the product has been checked its usage and consequences are strictly user responsibility.
1. PARTS (see PICTURES: picture 1)
A = Battery (not included)
B = Handle
C = Main unit
D = Power switch
E = Air outlet
F = Dust container
G = Filter
H = Brush nozzle
I = Crevice tool
J = Battery charger (not included)
2. BEFORE USE
Battery replacement and charging
NOTE: Battery pack and battery charger are NOT included in the set. You must use it from Rovus 360 - Cordless pressure washer set or buy it separately.
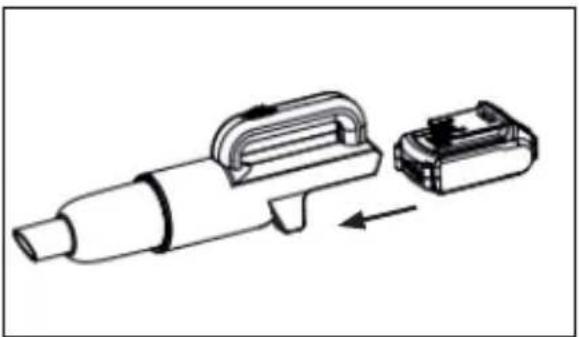
Step 1: Press the battery release button on Cordless pressure washer main unit (13.1) and gently slide the battery (13) from the main device's handle (see PICTURES, picture 2).
Step 2: Plug the battery charger (14) into a power supply (see PICTURES, picture 3).
Step 3: The red light (14.1) will turn on to indicate the charger has power.
Step 4: Slide the battery into the charger.
Step 5: Within few seconds beside red light lit the green light will start to flash indicating that charging has begun.
Step 6: When the battery is fully charged red light turns off and green light comes on.
Step 7: Remove the battery from the battery charger by sliding it from the charger.
NOTES:
- If the battery charger has been in continuous use or exposed to the sun (or heat source) it will be hot. Once the charging has been completed, leave the charger 15 minutes to cool until next use.
- If the red indicator flickers rapidly, check for and remove any foreign objects in the charger's battery slot. If there are no foreign objects Allow battery/charger to rest and try again.
- To check the amount of charge left in the battery pack, press the charge level indicator button (13.2). determine how much power is left (See PICTURES, picture 4 and picture 5).
- The battery should only be used and/or charged when battery temperature is between 5°C and 30°C.
3. USAGE
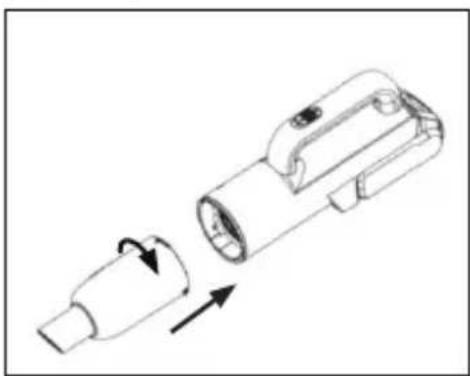
Step 1: When battery is full, insert it into back of the main unit (see PICTURES; picture 6).
Step 2: Attachment of your choice can be slid on the nozzle of the duct container (see PICTURES, picture 8)
Step 3: Push power switch forward to turn the device on (see PICTURES; picture 7).
Step 4: Start vacuuming. When done, turn the device off by sliding the power switch backwards
3.1 ACCESSORIES
Types and applications:
- Brush tool - to clean delicate surfaces.
- Crevice tool - to vacuum corners or narrow gaps
3.2 REPLACING THE FILTERS
Replace the filter according to usage but not later than every 6 months.
4. CLEANING AND MAINTENANCE
Step 1: Remove the battery from the device before carrying out any adjustment, servicing or maintenance.
Step 2: Rotate the dust container counter clockwise and slide it out from the main unit (see PICTURES; picture 9).
Step 3: Take out the filter from the dust container, turn the container upside down and dump the dust out (see PICTURES, picture 10).
Step 4: Clean the filter under water or with a soft brush (not included). Make sure to dry the filter thoroughly before further use (see PICTURES, picture 11).
Step 5: Clean the dust container under water or with a damp cloth. Make sure to dry the dust container thoroughly before further use (see PICTURES, picture 12).
Step 6: Reassemble the device (see PICTURES, picture 13).
Step 7: Store in a secure and dry, frost free place out of the reach of children.
Step 8: Do not place other objects on the product.
5. TROUBLESHOOTING
NOTE: Remove the battery from the device before carrying out adjustment, servicing or maintenance.
| PROBLEM SOLUTION | |
| The device does not work. | Battery running low on energy. Recharge it. |
| The device may have been switched on while it was on the charger. Make sure it is switched off when you charge it. | |
| The device does not vacuum properly. | Dust container is not assembled properly to the main unit. Check and reassemble if needed. |
| Dust container may be full. Empty it. | |
| Filter may be clogged. Clean it. | |
| The device does not work properly when accessories are attached to the nozzle. | Accessory may be clogged. Remove the obstruction from the accessory. |
AL
EN / Explanation of markings
/AL/Shpjegimi per shenimet/BiH/Objašnjenje oznaka/BG/Обяснение на означенията/CZ/Vysvětlení značení/EE/Tähiste tähendused/HR/Objašnjenje oznaka/HU/Jelmagyarázat/KS/Shpjegimi i shenjave/KZ/Аспапты тиісінше кәдеге жарату /LT/Simbolių paaiškinimas/LV/Markējuma skaidrojumi/MD/Explicarea marcajelor/ME/Objašnjenje oznaka/MK/Објаснувања за ознаките/PL/Wyjašnienie oznakowań/RO/Explicarea marcajelor/RS/Objašnjenje oznaka na pakovanju/RU/Надлежащая утилизация прибора/SI/Razlaga oznak/SK/Vysvetlenie značení/UA/Poz'яснення маркуванн
© 2021 TOP SHOP INTERNATIONAL SA. All rights reserved.
UM-RO-110069434-3CHV-A-2101