YT5204 - Lawn mower Cotech - Free user manual and instructions
Find the device manual for free YT5204 Cotech in PDF.


| Brand | Cotech |
| Model | YT5204 |
| Product Type | Lawn Mower (Grass Trimmer) |
| Power Supply | 230 V ~ 50 Hz |
| Power Consumption | 350 W |
| No-Load Speed | 9000 rpm |
| Cutting Circle Diameter | 25 cm |
| Cutting Wire Diameter | 1.6 mm |
| Noise Level | 96 dB |
| Weight | 2.9 kg |
| Adjustable Shaft | Yes |
| Adjustable Handle | Yes |
| Wheel | Yes (screw-mounted) |
| Cutting Guard | Included |
| Safety Catch | Yes (for On/Off switch) |
| Extension Cable Hook | Yes |
| Trimmer Head Rotation | Adjustable with button |
| Automatic Wire Feed | Yes (tap on ground) |
| Residual Current Device (RCD) Required | Yes (≤30 mA) |
| Replacement Wire Type | Original cutting wire only (1.6 mm) |
| Cleaning | Keep ventilation holes clean; remove grass/leaves |
| Disposal | Follow local regulations |
| Certification | CE, complies with 98/37/EC, 2006/95/EC, 2004/108/EC |
Frequently Asked Questions - YT5204 Cotech
User questions about YT5204 Cotech
0 question about this device. Answer the ones you know or ask your own.
Ask a new question about this device
Download the instructions for your Lawn mower in PDF format for free! Find your manual YT5204 - Cotech and take your electronic device back in hand. On this page are published all the documents necessary for the use of your device. YT5204 by Cotech.
USER MANUAL YT5204 Cotech
Read the entire instruction manual carefully and make sure that you fully understand it before you use the equipment. Keep the manual for future reference.
Viktig information:
Grass Trimmer, product no. 30-9942, model YT5204
Please read the entire instruction manual before using and save it for future use. We apologise for any text or photo errors and any changes of technical data. If you have any questions concerning technical problems please contact our Customer Service Department (see address on reverse.)
Contents
Safety
Product description
Assembly
Use
Care and maintenance
Disposal
Specifications
Safety
Explanation of symbols on the trimmer

General risk warning.

Read instructions.

Use safety goggles.
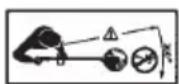
Keep other people at a safe distance from the trimmer.

Remove the plug from the socket before servicing and cleaning. Do not forget to remove the plug from the socket when you leave the trimmer unattended.

Do not expose the trimmer to rain and damp.
Safety instructions
- Always disconnect the plug from the power point.
- if the power cable is damaged while in use (Attention! Do not touch the power cable before turning off the power).
- when you leave the trimmer unattended.
- before servicing and adjusting the trimmer head.
-
if the machine starts vibrating violently.
-
Check the electric cable before use. The grass trimmer should not be used if the power cable is damaged in any way.
- If the power cable is damaged it can only be replaced by qualified personnel.
- Check the trimmer before use. Do not use when damaged and repair when needed. Repairs may only be carried out by qualified personnel.
- Connect the grass trimmer to the mains via a Residual Current Device (RCD) with a tripping current of not more than 30 mA. Check the RCD before every use.
- The grass trimmer may only be used by people who are familiar with the trimmer's functions and applications.
- Never allow children or animals to be close by when the trimmer is in use.
- Never use the trimmer if any part of the protective cover is missing or damaged.
- Never place your hands or feet near the trimmer head when the motor starts.
- Never assemble/disassemble sharp metal parts.
- Keep the motor's ventilation holes clean. Remove grass and leaves.
- Keep the extension cable away from the cutting wire when working with the trimmer.
- The cutting wire continues to spin when the power has been turned off. Wait until it has completely stopped before servicing etc.
- Avoid using the grass trimmer in wet grass.
- Do not place your hand or foot near a rotating cutting wire.
• Always use non-skid protective shoes with toecaps. - Always switch the trimmer head to standby after replacement or adjustment of the wire.
- Only use original cutting wire, never use metal wire.
- Only use an approved extension cable.
- The extension cable's plug should be protected from water splashes, and should either be made from rubber or sealed with rubber.
- Keep the grass trimmer out of reach of children.
Product description
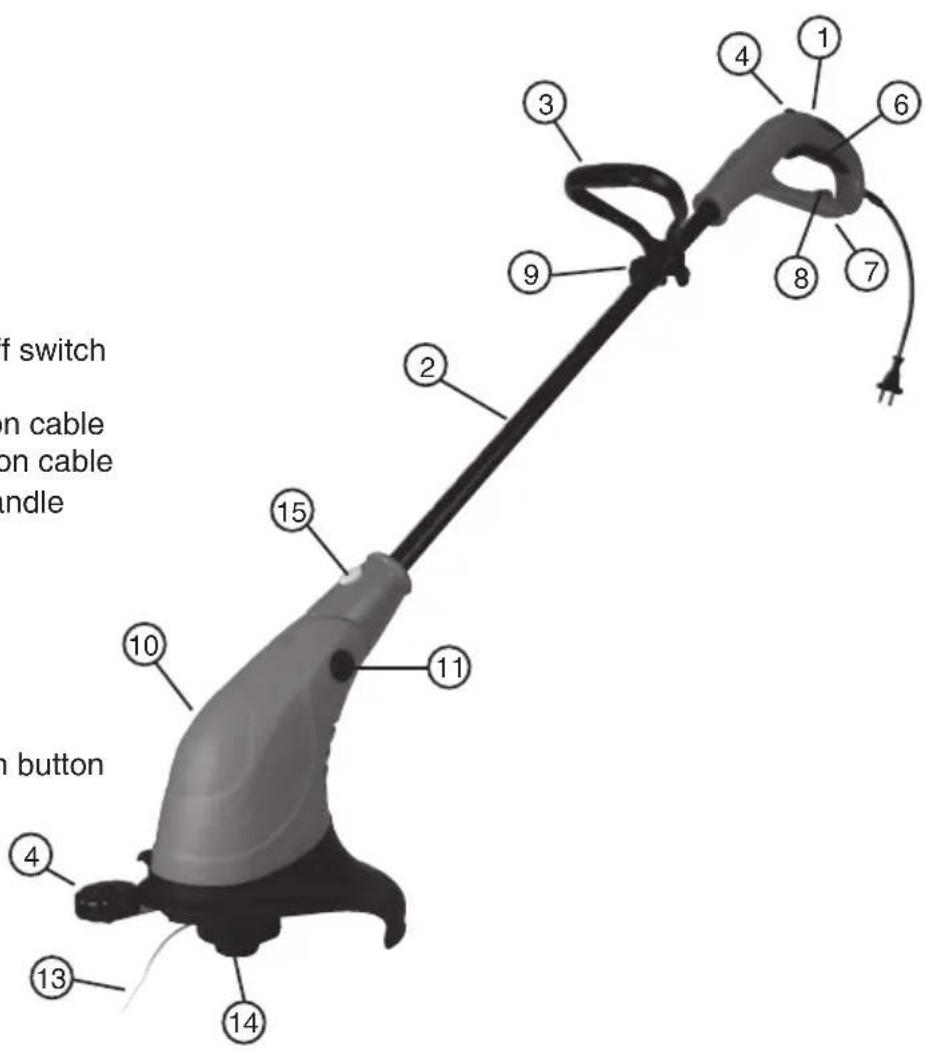
- Handle
- Adjustable shaft
- Adjustable handle
- Wheel
- Safety catch for On/Off switch
- On/Off switch
- A hole for the extension cable
- A hook for the extension cable
- Knob for adjustable handle
- Trimmer head
- Trimmer head angle adjustment button
- Cutting guard
- Cutting wire
- Spool carrier
- Trimmer head rotation button
Assembly/Disassembly
- Place the cutting guard over the trimmer head with the head facing upwards (see fig. 1).

natural_image
Mechanical component with curved and flanged parts, labeled Fig. 1 and Fig. 2 (no text or symbols on the diagram itself)
natural_image
Close-up of a mechanical component with a tool inserted, showing internal structure and no visible text or symbols.Fig. 1 Fig. 2
- Screw tight the guard in place using the four screws provided (see fig. 2).
- Screw the wheel onto the guard using with two screws (see fig. 1).
Use
Starting the trimmer
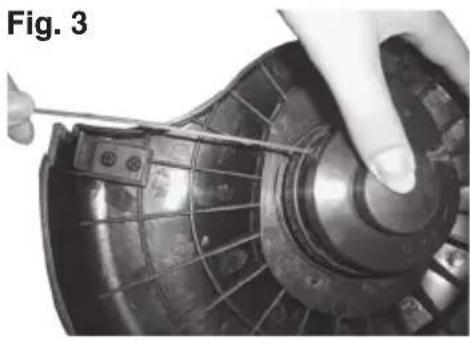
- Check that the cutting wire is long enough. If too short, push in the centre of the spool and pull the ends of the cutting wire at the same time (see fig. 3).
When in use you can automatically extend the cutting wire by "tapping" the trimmer lightly on the ground and pushing in the centre of the spool (see fig. 4).
natural_image
Close-up of a hand using a tool to adjust or install a mechanical component, no visible text or symbols
- Adjust the shaft and handle as required (see fig. 5).
- Connect the extension cable according to the instructions below.
- Hold the grass trimmer steady without it touching the ground. To start the grass trimmer, push the safety catch forward at the same time as you press the on/off switch.

natural_image
Hand holding a black mechanical tool with a loop handle, labeled 'Fig. 5' (no other text or symbols visible)Connecting the extension cable
- Make sure the extension cable is not connected to the mains.
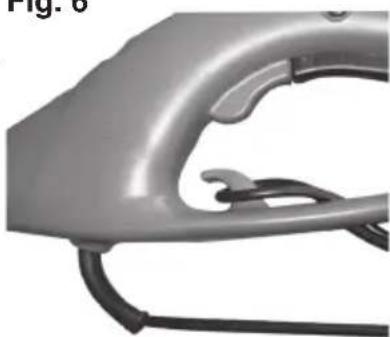
- Make a loop with 20-25 cm of the extension cable and thread it through the hole of the handle.
- Hang the loop on the hook (see fig. 6).
- Connect the grass trimmer's plug to the extension cable.
- Connect the extension cable to a socket when you wish to use the trimmer.
Fig. 6
natural_image
Close-up of a metallic automotive head component with visible wiring and clasp (no text or symbols)Tips for use
- Start the grass trimmer making sure it is at full power before you come into contact with the grass.
- Do not cut wet grass.
- Before packing away, clean the protective casing.
Care and maintenance
Replacing the cutting wire
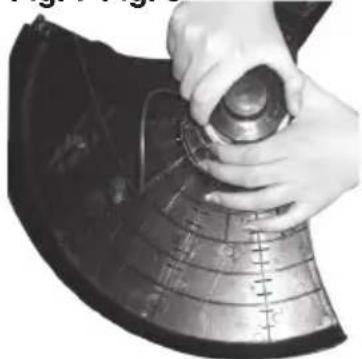
To disassemble the spool carrier, hold the outer ribbed part of the assembly with one hand and with the other hand turn the wire spool anticlockwise until the spool carrier can be removed. Hold the spool in the centre firmly so that it does not fall out. The spool carrier can now be disassembled (see fig. 7 & 8).
Fig. 7 Fig. 8
natural_image
Close-up of hands operating a curved metal device with a circular dial (no visible text or symbols)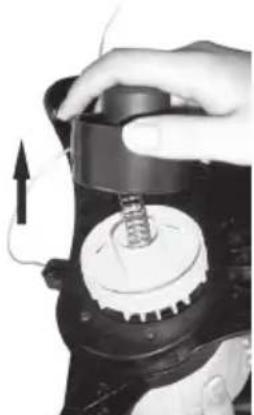
natural_image
Close-up of a hand using a handheld device to press or install a mechanical component (no visible text or symbols)Remove remaining cutting wire from the spool carrier.
Use a 1.6 mm cutting wire. Remove the middle of the cutting wire and place it in the notch in the spool carrier (see fig. 9).
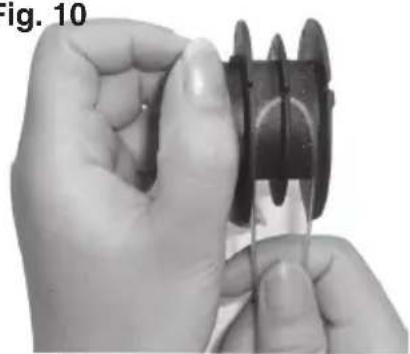
Fig. 9 Fig. 10
natural_image
Close-up of hands holding a coiled cable or wire component (no visible text or symbols)
natural_image
Close-up of a hand holding a coiled mechanical component (no visible text or symbols)Now wind the two wire halves in the spool carrier according to the image (see fig. 10).
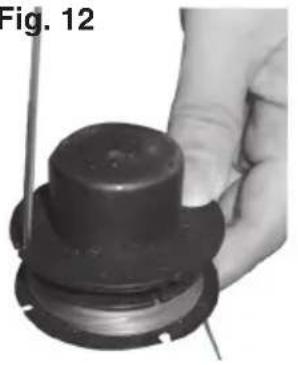
Fig. 11 Fig. 12
natural_image
Hand holding a black mechanical component with a cylindrical top and flange (no visible text or symbols)
natural_image
Close-up of a black and white electronic device with a curved top and base, no visible text or symbols.Lock the cutting wires opposite each other with the help of the notches in the spool carrier (see fig. 11).
Place the white plastic ring around the spool carrier and pull the cutting wires out in their respective notches in the plastic ring below (see fig. 12).
natural_image
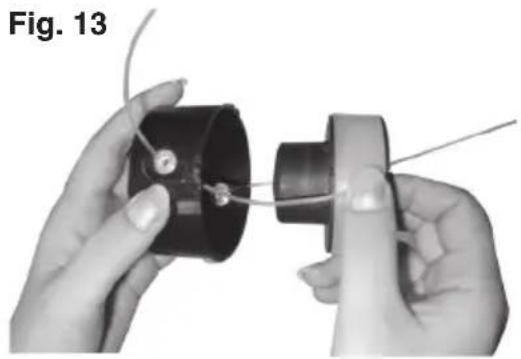
Close-up of hands assembling a mechanical component with wires (no text or symbols visible)Thread the cutting wires through each of the holes in the spool carrier's cover and place the carrier in the cover (see fig. 13).
Place the spring in the middle of the carrier and move the spool carrier with the spring against
the grass trimmer. Push in at the same time as the spool carrier is turned clockwise.
To check that the spool carrier rotates as it should, push in the centre of the spool and at the same time pull the ends of the cutting wire and check that it rotates easily.
Start the grass trimmer by reading the previous instructions," starting the trimmer".

Disposal
When you decide to dispose of the product it should be carried out in accordance with local regulations. If you are not sure how you should proceed, contact your local council.
Specifications
Power supply 230 V \~ 50 Hz
Power 350 W
Noise level 96 dB
No-load speed 9000 rpm
Cutting wire ∅ 1.6 mm
Cutting circle 25 cm
Weight 2.9 kg
Grästrimmer, art.nr 30-9942, modell YT5204
natural_image
Two mechanical components, one showing a circular component being adjusted, the other showing a mechanical assembly with a tool (no visible text or symbols)natural_image
Close-up of a hand using a tool to adjust or install a mechanical component, no visible text or symbols
natural_image
Hand holding a black tool with a loop handle, labeled 'Bild 5' in the top-left corner (no other text or symbols)natural_image
Close-up of a metallic electric shock absorber component (no text or symbols visible)natural_image
Close-up of hands holding a metallic cylindrical object over a curved metal surface (no text or symbols visible)
natural_image
Close-up of a hand using a handheld device to press or install a mechanical component, with no visible text or symbols.natural_image
Close-up of hands holding a mechanical component with a spool, no visible text or symbols
natural_image
Close-up of a hand holding a coiled mechanical component (no visible text or symbols)natural_image
Hand holding a black mechanical component with a cylindrical top and flange (no visible text or symbols)
natural_image
Close-up of a black and white electronic device with a coiled cable, no visible text or symbols.natural_image
Close-up of hands assembling a mechanical component with wires, labeled 'Bild 13' (no other text or symbols visible)natural_image
Two mechanical components, one showing a circular component being adjusted, the other showing a mechanical assembly with a tool inserted (no visible text or symbols)natural_image
Close-up of a hand using a tool to adjust or install a mechanical component, no visible text or symbols
natural_image
Hand holding a black tool with a loop handle, no visible text or symbolsnatural_image
Close-up of a metallic automotive component with curved and straight ends (no visible text or symbols)Brukertips
natural_image
Close-up of hands holding a metallic cylindrical object over a curved metal surface (no text or symbols visible)
natural_image
Close-up of hands operating a mechanical device with a spring and gear mechanism (no visible text or symbols)natural_image
Close-up of hands holding a mechanical component, possibly a wire or pulley, with no visible text or symbols.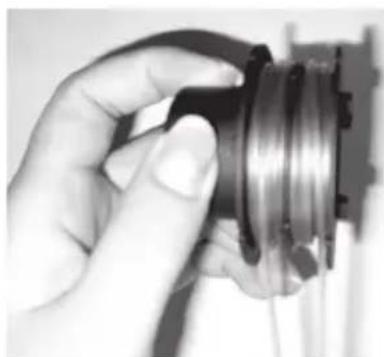
natural_image
Close-up of a hand holding a coiled mechanical component (no visible text or symbols)natural_image
Hand holding a black mechanical component with a white rod, labeled 'Bilde 12' in the top left corner (no other text or symbols visible)
natural_image
Close-up of a black and white electronic device with a coiled cable, no visible text or symbols.natural_image
Close-up of hands assembling a mechanical component with wires, labeled 'Bilde 13' (no other text or symbols visible)Asennus
natural_image
Two mechanical components labeled Kuva 1 and Kuva 2, showing assembly steps with arrows indicating direction (no text or symbols on the parts themselves)natural_image
Close-up of a hand using a tool to adjust or install a mechanical component, no visible text or symbols
natural_image
Hand holding a black mechanical tool with a loop handle, labeled 'Kuva 5' in the top-left corner (no other text or symbols)natural_image
Close-up of a metallic electric shaver with black cable (no text or symbols visible)natural_image
Close-up of hands holding a metallic cylindrical object over a curved metal surface (no text or symbols visible)
natural_image
Close-up of a hand using a mechanical tool to press or install a component, with no visible text or symbols.natural_image
Close-up of hands holding a mechanical component with a spool, no visible text or symbols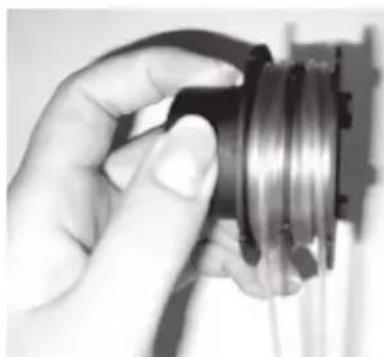
natural_image
Close-up of a hand holding a coiled mechanical component (no visible text or symbols)natural_image
Close-up of a hand holding a black cylindrical component with a wire, labeled 'Kuva 12' in the top-left corner (no other text or symbols visible)
natural_image
Close-up of a black and white electronic device with a curved cable, no visible text or symbols.natural_image
Close-up of hands assembling a black cylindrical component with wires, labeled 'Kuva 13' (no other text or symbols visible)Declaration of Conformity
C€
Hereby, Clas Ohlson AB declares that the machinery:
GRASS TRIMMER CO/TECH 30-9942 / YT5204
Complies with the following Directives:
98/37/EC MACHINERY
2006/95/EC LOW VOLTAGE EQUIPMENT
2004/108/EC EMC
Complies with the following harmonized standards:
EN 60335-1:2002 + A1 + A11 + A2 + A12
EN 60335-2-91:2003
EN 55014-1:2000 + A1 + A2
EN 55014-2:1997 + A1
EN61000-3-2:2000 + A2
EN61000-3-3:1995 + A1 + A2
Insjön, Sweden, January 2008
K. Balkow,
President.
Clas Ohlson, 793 85 Insjön, Sweden
KONTAKT • YHTEYSTIEDOT • CONTACT
SVERIGE
KUNDTJÄNST Tel: 0247/445 00
Fax: 0247/445 09
E-post: kundtjanst@clasohlson.se
ÖVRIGT Tel vxl: 0247/444 00
Fax kontor: 0247/444 25
INTERNET www.clasohlson.se
BREV Clas Ohlson AB, 793 85 INSJÖN
NORGE
KUNDESENTER Tlf.: 23 21 40 00
Faks: 23 21 40 80
E-post: kundesenter@clasohlson.no
INTERNETT www.clasohlson.no
POST Clas Ohlson AS
Postboks 485 Sentrum, 0105 OSLO
SUOMI
ASIAKASPALVELU Puh: 020 111 2222
Faksi: 020 111 2221
For consumer contact, please visit
www.clasohlson.co.uk and click on
customer service.
INTERNET www.clasohlson.co.uk


- Viktig information:
- Grass Trimmer, product no. 30-9942, model YT5204
- Contents
- Safety
- Explanation of symbols on the trimmer
- Safety instructions
- - Always disconnect the plug from the power point.
- Product description
- Assembly/Disassembly
- Use
- Starting the trimmer
- Connecting the extension cable
- Tips for use
- Care and maintenance
- Replacing the cutting wire
- Disposal
- Specifications
- Grästrimmer, art.nr 30-9942, modell YT5204
- Brukertips
- Asennus
- Declaration of Conformity
- C€
- GRASS TRIMMER CO/TECH 30-9942 / YT5204
- KONTAKT • YHTEYSTIEDOT • CONTACT
- SVERIGE
- NORGE
- SUOMI
Brand : Cotech
Model : YT5204
Category : Lawn mower