
MOB-LR06-230/C - Lawn mower Cotech - Free user manual and instructions
Find the device manual for free MOB-LR06-230/C Cotech in PDF.


| Product Type | Cordless Grass Trimmer |
| Brand | Cotech |
| Model | MOB-LR06-230/C |
| Power Source | 18 V Lithium-ion battery |
| Battery Capacity | 1300 mAh |
| No-Load Speed | 8000 rpm |
| Cutting Diameter | 230 mm |
| Operating Time | 25 minutes |
| Charging Time | 1 hour |
| Weight | 2 kg |
| Protection Class (Trimmer) | III |
| Protection Class (Charger) | II |
| Sound Pressure Level | 77.6 dB(A) (K=3 dB) |
| Sound Power Level | 94 dB(A) (K=3 dB) |
| Vibration Level | 6.550 m/s² (K=1.5 m/s²) |
| Telescopic Shaft | Adjustable length |
| Cutting Angle Adjustment | Yes, 3 fixed positions |
| Line Feed System | Bump feed automatic line feeding |
| Safety Features | Trigger lockout, overload protection, automatic shutoff |
| Recommended Use | Domestic gardens |
| Charger Input | 240 V, 50 Hz |
| Charger Output | 21 V, 1000 mA |
Frequently Asked Questions - MOB-LR06-230/C Cotech
User questions about MOB-LR06-230/C Cotech
0 question about this device. Answer the ones you know or ask your own.
Ask a new question about this device
Download the instructions for your Lawn mower in PDF format for free! Find your manual MOB-LR06-230/C - Cotech and take your electronic device back in hand. On this page are published all the documents necessary for the use of your device. MOB-LR06-230/C by Cotech.
USER MANUAL MOB-LR06-230/C Cotech
Read the entire instruction manual carefully and make sure that you fully understand it before you use the equipment. Keep the manual for future reference.
Viktig information:
natural_image
Illustration of a long-hand tool with a curved handle and base, shown in grayscale (no text or symbols)18 V Grass Trimmer
ART.NO 18-4371 MODEL MOB-LR06-230/C-UK 31-1036 MOB-LR06-230/C
Please read the entire instruction manual before using the product and save it for future reference.
We reserve the right for any errors in text or images and any necessary changes made to technical data.
If you have any questions regarding technical problems please contact Customer Services.
Safety
General Safety Requirements – EN 60745-1
Warning!
Read all the instructions. Failure to adhere to the following instructions may lead to electric shocks, fires and/or serious injury. The term “power tools” in the warning text below refers to your handheld mains operated or battery operated tool.
SAVE THESE INSTRUCTIONS!
1) Work area
a) Keep the work area clean and well illuminated. Cluttered and poorly lit areas invite accidents.
b) Do not use power tools in explosive environments, e.g. near flammable liquids, gases or dust. Power tools generate sparks that can easily ignite dust or fumes.
c) Keep children and other bystanders away from the area where you are using the power tool. Distractions can make you lose control.
2) Electrical safety
a) The power tool's plug must fit correctly into the wall socket. Never modify the plug in any way. Never use an adaptor together with earthed power tools. Unmodified plugs and suitable wall sockets decrease the risk of electric shock.
b) Avoid physical contact with earthed objects, such as pipes, radiators, ovens or refrigerators. There is an increased risk of receiving an electrical shock if your body is earthed.
c) Do not expose the power tool to rain or other wet conditions. If water gets inside a power tool it increases the risk of electric shock.
d) Do not abuse the lead. Never use the lead to carry the tool or pull the plug from the wall socket. Keep the lead away from heat, oil, sharp edges and movable parts. Damaged or tangled leads increase the risk of electric shock.
e) When using power tools outdoors, use an extension lead that is suitable for this purpose. Use of an extension lead designed for outdoor use decreases the risk for electric shock.
f) If for some reason you must use a power tool in a wet environment, always connect it to the mains via an earth-fault circuit breaker such as an RCD (residual current device). Using an RCD significantly reduces the chances of you receiving an electric shock.
3) Personal safety
a) Pay attention to your actions and use common sense when using power tools. Never use power tools if you are tired or under the influence of drugs, alcohol or medication. One moment of inattention while using a power tool may result in serious injury.
b) Use protective equipment. Always wear safety glasses. Using protective clothing such as dust masks, non-slip safety shoes, helmets and ear defenders when needed decreases the risk of injury.
c) Avoid accidental starts. Make sure that the power switch is set to OFF before plugging the tool into a wall socket. Never carry a power tool with your finger on the trigger and never connect the power tool to a wall socket when the switch is set to ON, since it may result in injury.
d) Remove all service tools/keys before switching on the power tool. A service tool left on a moving part of the power tool may result in injury.
e) Do not overreach. Make sure you stand steady and well balanced at all times. This enables you to have more control in case of unexpected events.
f) Wear suitable attire. Do not wear loose-fitting clothing or jewellery. Keep hair, clothes and gloves away from moving parts. Loose-fitting clothes, jewellery or long hair could become caught in moving parts.
g) If equipment for dust extraction or collection is available, make sure that it is connected and used properly. Using technical aids may decrease dust related hazards.
4 Use and maintenance of power tools
a) Do not force the power tool. Use a power tool suitable for the work you are about to perform. The proper power tool will perform the task better and safer if used at the correct feed rate.
b) Never use the power tool if the power switch does not switch the tool on and off properly.
All power tools that cannot be controlled by the power switch are dangerous and must be repaired.
c) Unplug the lead from the wall socket before making any adjustments, changing accessories or storing the power tool. These precautions reduce the risk of the power tool starting unexpectedly.
d) Store any power tools that are not being used out of children's reach. Do not allow people who are unfamiliar with the tool or its functions to operate the tool. Power tools can be dangerous if they fall into the hands of inexperienced users.
e) Maintaining power tools. Check for any incorrect settings, parts that catch, broken parts or anything else which may cause the power tool to malfunction. If something is damaged it must be repaired before use. Many accidents are caused by poorly maintained power tools.
f) Keep tools sharp and clean. Properly maintained cutting tools with sharp blades are less likely to bind and are easier to control.
g) Use the power tool, accessories and similar according to the instructions and in an appropriate way suitable for the type of power tool used. Also take into consideration your work environment and the type of work to be done. Using the power tool for a purpose other than that for which it is intended could result in a dangerous situation.
5) The use and maintenance of cordless power tools
a) Charge the battery in charger recommended by the manufacturer.
b) Remove the battery from the tool before cleaning or servicing.
c) The tool is supplied with a battery from the manufacturer. Do not use any other battery.
d) If handled incorrectly, battery fluid can leak from the battery. If the fluid comes into contact with skin; rinse the area with water. If the fluid comes into contact with your eyes, consult a doctor.
e) Batteries should be kept in a safe place when they are not in use. Keep coins, keys, nails and other metal objects away from the terminals of the battery.
6) Service
a) Repairs and service should only be performed by qualified tradesmen, and only with original spare parts. This guarantees that the safety of the power tool is maintained.
Specific Safety Instructions for Grass Trimmers
- This product must not be used by anyone (including children) suffering from physical or mental impairment. This product should not be used by anyone that has not read the instruction manual unless they have been instructed in its use by someone who will take responsibility for their safety.
- Never let children play with the product.
• Always wear sturdy footwear and long trousers when operating the product. - Keep anyone standing close by at a safe distance from the grass trimmer.
- Keep children and pets out of the work area.
- Before starting to cut, check the area for foreign objects which could damage the trimmer line.
• Always hold the grass trimmer firmly. Hold it in both hands. - Never attach metal cutting blades to this grass trimmer.
- Keep the motor's air vents free from grass and leaves.
- The trimmer line will continue to rotate after the motor has been turned off. Wait until the line has completely stopped before servicing.
- Keep your hands and feet away from the rotating trimmer line.
- Use only original trimmer line, never use metal trimmer line.
- If the blade is clogged with grass, first remove the battery before cleaning the blade. Use a blunt instrument, never your fingers.
Grass trimmer safety symbol explanation

General hazard warnings.

Read the instruction manual.

Use protective eyewear and hearing protection.

Do not expose the grass trimmer to rain or moisture.

Keep all persons or animals at a safe distance from the machine.
Product description
Cordless 18 V lithium-ion grass trimmer for domestic gardens.

- Trimmer line guard
- Trimmer head with motor ventilation slits
- Trimmer head pivot button
- Connection between trimmer head and telescopic shaft
-
Telescopic shaft
-
Height adjuster
- Trigger
- Trigger lockout button
- Battery
Assembly
Note! Remove the battery before assembling the grass trimmer.
Trimmer line guard
-
Make sure that the guard locates in the slots on the trimmer head.
-
Attach the line guard to the trimmer head using the two provided screws. Be careful not to cut yourself on the sharp edge in the corner designed for cutting the trimmer line if it is too long.

natural_image
Abstract geometric diagram with concentric circles and irregular shapes (no text or symbols)Trimmer head
Make sure that no dirt finds its way into the end of the telescopic shaft or the trimmer head shaft as they contain the electrical connectors between the battery and the motor.
-
Slot the telescopic shaft into the trimmer head. It will only fit in one way.
-
Twist the locking ring to lock the shaft.

natural_image
Technical illustration of a mechanical component with three views: top, side, and bottom (no text or symbols)Charging
Temperature range for charging and storing the battery: 0–40 °C.
- Depress the battery release catch and slide the battery out of the tool.
- Insert the battery into the charger.
- Plug the charger's mains adaptor into a wall socket.
- The LED on the mains adaptor will shine red during charging and green when the battery is charged.
- After charging, replace the battery into the tool and push it in until it clicks.
Note!
- The lithium-ion battery has a built-in electronic deep discharge protection which means that it will not work at reduced power. It works at full power until the protection switches off the current because the battery needs charging. The tool will then switch off automatically. Do not continue to press the trigger after the tool has automatically switched off as this can damage the battery.
- The battery also has a built-in electronic overload protection. If the tool is put under too much pressure, the electronics automatically cut the power and the tool stops. Release the trigger and wait a few seconds before switching the trimmer on again.
- The lithium-ion battery has no memory which means that it can be charged at any time regardless of battery level.
- Charge the battery for at least 6 hours the first and second time it is charged.
- For long-term storage the battery should be fully charged at least every 6 months.
Operation
- Adjust the length of the telescopic shaft to suit your height.

-
Adjust the cutting angle by pushing in the pivot button (3) on the side of the trimmer head.
-
There are three fixed positions.
-
Press and hold in one of the trigger lockout buttons (8) on the rear handle and then press the trigger (7) to switch the trimmer on.
-
New trimmer is fed out of the spool by bumping the trimmer head on the ground when the trimmer is on full power. The line is cut to the correct length by the knife on the line guard.

natural_image
Three articulated arms with segmented legs, arranged in a triangular pattern (no text or symbols visible)Care and maintenance
Note Always remove the battery before cleaning, adjusting or transporting the tool.
Changing the trimmer line spool

natural_image
Mechanical component diagram showing a spring attached to a housing (no text or symbols)
natural_image
3D rendered mechanical component with cylindrical body and mounting flanges (no visible text or symbols)
natural_image
3D rendered mechanical component with curved lines and a small label (no text or symbols visible)- Remove the cover and spool by holding in the snap locks (one on each side) and pulling the cover and spool away from the mount.
- Install a new spool and make sure that the tabs ands slots line up so that the spool goes all the way to the bottom of the cover.
- Refit the cover and spool by holding in the snap locks (one on each side), lining the tabs on the cover up with the slots in the mount and pushing down. Make sure that the spring is positioned correctly and that the cover clicks into place.
-
Push in the button in the middle of the spool and pull out some trimmer line if necessary. If too much line is pulled out it will be cut off by the knife on the edge of the line guard.
-
Regularly check that grass and twigs have not built up around the line spool.
- Regularly check that the on/off switches and safety lock are undamaged and work correctly.
- Clean the exterior of the tool with a soft brush or cloth.
- Do not use any water, solvents or polishes.
- Regularly remove all dirt, especially from around the motor's ventilation slits.
- Store the tool in a safe, dry place out of the reach of children.
- Do not store the battery in temperatures below zero.
Troubleshooting guide
| The tool does not start. • The battery is discharged or incorrectly fitted. | |
| Poor battery operating time. • The battery is not fully charged.• The battery needs replacing. | |
| The battery does not charge. • The battery is not correctly inserted into the charger.• The battery or charger contacts are dirty.• The mains adaptor is not plugged in correctly.• Check to see if there is power at the wall socket.• The charger or its cable is defective.• The mains adaptor is defective.• The battery needs replacing. |
Disposal
Follow local ordinances when disposing of this product.
If you are unsure how to proceed, contact your local authority.
Specifications
Trimmer
Battery 18 V/1300 mAh li-ion
Protection class III
No-load speed 8000 rpm
Operating time 25 min
Cutting diameter 230 mm
Noise level LpA: 77.6 dB(A) K: 3 dB
LwA: 94 dB(A) K: 3 dB
Vibration 6.550 m/s ^2 K: 1.5 m/s ^2
Weight 2 kg
Charger
Input voltage 240 V, 50 Hz
Input current 800 mA
Output voltage 21 V
Output current 1000 mA
Protection class ||
Charging time 1 hour
Grästrimmer 18 V
ART.NR 18-4371 MODELL MOB-LR06-230/C-UK 31-1036 MOB-LR06-230/C
natural_image
Abstract geometric diagram with concentric circles and irregular shapes (no text or symbols)Trimmerhuvud
natural_image
Two technical illustrations of a mechanical component, one showing a cylindrical part and the other a circular housing (no text or symbols)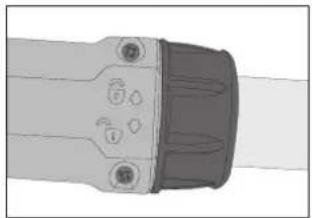
natural_image
Close-up of a mechanical component with circular features and a central knob (no text or symbols visible)Laddning
natural_image
Three articulated arms with segmented legs, arranged in a triangular pattern (no text or symbols visible)natural_image
Mechanical component diagram showing a spring attached to a cylindrical part (no text or symbols)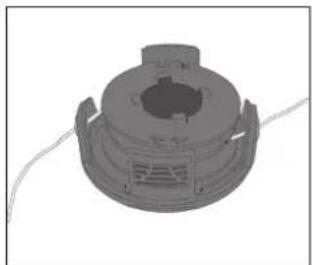
natural_image
3D rendered mechanical component with cylindrical body and mounting flange (no visible text or symbols)
natural_image
Abstract grayscale illustration of a mechanical component with curved lines and layered surfaces (no text or symbols)ART.NR. 18-4371 MODELL MOB-LR06-230/C 31-1036 MOB-LR06-230/C-UK
Les brukerveiledningen nøye før produktet tas i bruk, og ta vare på den for framtidig bruk.
natural_image
Abstract geometric diagram with concentric circles and irregular shapes (no text or symbols)Trimmehode
Påse at ingen fremmedlegemer kommer i kontakt med enden på teleskopskaftet eller ned i trimmerhodets skaft. Det er der kontakten mellom batteri og gresstrimmerens motor er.
natural_image
Two technical illustrations of a mechanical component, one showing a cylindrical part and the other a circular component (no text or symbols visible)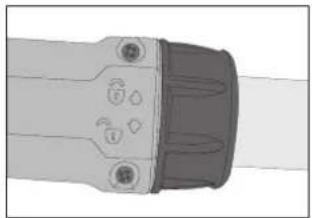
natural_image
Close-up of a mechanical component with circular features and mounting holes (no text or symbols visible)Lading
natural_image
Diagram of a three-legged pole-mounted device with adjustable arms and legs (no text or symbols)natural_image
Mechanical component diagram showing a spring attached to a housing (no text or symbols)
natural_image
3D rendered mechanical component with cylindrical body and flanged ends, no visible text or symbols
natural_image
Abstract grayscale illustration of a mechanical component or device (no text or symbols visible)Spenning inn 240 V AC, 50 Hz
TUOTENRO 18-4371 MALLI MOB-LR06-230/C-UK 31-1036 MOB-LR06-230/C
natural_image
Abstract geometric diagram with concentric circles and irregular shapes (no text or symbols)natural_image
Two technical illustrations of a mechanical component, one showing a cylindrical part and the other a circular component (no text or symbols visible)
natural_image
Close-up of a mechanical component with mounting holes and a curved handle (no visible text or symbols)Lataaminen
natural_image
Three articulated arms with segmented legs, arranged in a triangular arrangement (no text or symbols visible)Huolto ja ylläpito
natural_image
Mechanical component diagram showing a spring attached to a cylindrical housing (no text or symbols)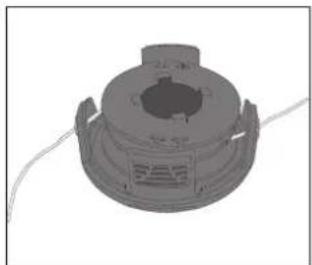
natural_image
3D rendered mechanical component with cylindrical body and mounting flanges (no visible text or symbols)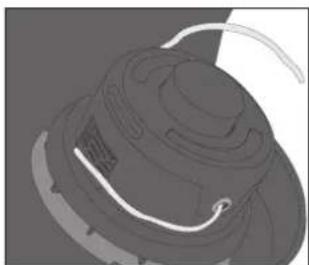
natural_image
3D rendered mechanical component with curved internal lines and a small circular mark (no text or symbols)Declaration of Conformity
CE
Hereby, Clas Ohlson AB, declares that the machinery:
Grass Trimmer Cotech
Art. no: 18-4371 Model: MOB-LR06-230/C-UK
Art. no: 31-1036 Model: MOB-LR06-230/C
Complies with the provisions of the following Directives:
2006/42/EC MACHINERY DIRECTIVE
2004/108/EC EMC DIRECTIVE
Complies with the provisions of the following Harmonized Standards:
EN 60745-1:2009
EN ISO 10517:2009
EN 786/A2:2009
EN 55014-1:2006
EN 55014-2/A1:2001
EN 61000-6-3:2007
EN 62233:2008
EN 60335-1:2002+A11:2004+A1:2004+A12:2006+A2:2006+A13:2008
EN 60335-2-29:2004
Insjön, Sweden, February 2011

Klas Balkow President
Clas Ohlson, 793 85 Insjön, Sweden
CO TECH®
SVERIGE
KUNDTJÄNST Tel: 0247/445 00
Fax: 0247/445 09
E-post: kundtjanst@clasohlson.se
INTERNET www.clasohlson.se
BREV Clas Ohlson AB, 793 85 INSJÖN
NORGE
KUNDESENTER Tlf.: 23 21 40 00
Faks: 23 21 40 80
E-post: kundesenter@clasohlson.no
INTERNETT www.clasohlson.no
POST
Clas Ohlson AS, Postboks 485 Sentrum, 0105 OSLO
SUOMI
ASIAKASPALVELU Puh.: 020 111 2222
For consumer contact, please visit www.clasohlson.co.uk and click on customer service.
INTERNET www.clasohlson.co.uk

- V Grass Trimmer
- Safety
- General Safety Requirements – EN 60745-1
- Warning!
- SAVE THESE INSTRUCTIONS!
- 1) Work area
- 2) Electrical safety
- 3) Personal safety
- Use and maintenance of power tools
- 5) The use and maintenance of cordless power tools
- 6) Service
- Specific Safety Instructions for Grass Trimmers
- Grass trimmer safety symbol explanation
- Product description
- Assembly
- Trimmer line guard
- Trimmer head
- Charging
- Note!
- Operation
- Care and maintenance
- Changing the trimmer line spool
- Troubleshooting guide
- Disposal
- Specifications
- Trimmer
- Charger
- Grästrimmer 18 V
- Trimmerhuvud
- Laddning
- Trimmehode
- Lading
- Lataaminen
- Huolto ja ylläpito
- Declaration of Conformity
- CE
- Grass Trimmer Cotech
- CO TECH®
- SVERIGE
- NORGE
- SUOMI
Brand : Cotech
Model : MOB-LR06-230/C
Category : Lawn mower