
C15-LC800SNT - Television HITACHI - Free user manual and instructions
Find the device manual for free C15-LC800SNT HITACHI in PDF.


| Brand | Hitachi |
| Model | C15-LC800SNT |
| Product Type | Television |
| Screen Size | 15 inches (38 cm) |
| Display Resolution | 1366 x 768 pixels (HD) |
| Aspect Ratio | 16:9 |
| Brightness | 250 cd/m² |
| Contrast Ratio | 1000:1 (typical) |
| Viewing Angle | 178° / 178° |
| Input Ports | HDMI, VGA, Composite, USB |
| Audio Output | Built-in speakers (2 x 5W) |
| Power Consumption | 30W (typical) |
| Standby Power | < 0.5W |
| Power Supply | AC 100-240V, 50/60Hz |
| Dimensions (W x H x D) with Stand | 355 x 265 x 150 mm |
| Weight (with Stand) | 2.8 kg |
| VESA Mount Compatible | Yes (75 x 75 mm) |
| Cleaning Instructions | Wipe with soft dry cloth; avoid liquids |
| Safety Features | Ventilation slots, anti-tip strap recommended |
| Spare Parts Availability | Contact Hitachi authorized service centers |
Frequently Asked Questions - C15-LC800SNT HITACHI
User questions about C15-LC800SNT HITACHI
0 question about this device. Answer the ones you know or ask your own.
Ask a new question about this device
Download the instructions for your Television in PDF format for free! Find your manual C15-LC800SNT - HITACHI and take your electronic device back in hand. On this page are published all the documents necessary for the use of your device. C15-LC800SNT by HITACHI.
USER MANUAL C15-LC800SNT HITACHI
May we take this opportunity to thank you for purchasing this TFT-LCD TV/monitor.
We strongly recommend that you read the safety and operation instructions thoroughly before operating your TFT-LCD TV/monitor. FOLLOW ALL THE INSTRUCTIONS AND WARNINGS on your TFT-LCD TV/monitor and in this manual.
Sometimes the LCD TV/monitor may have some tiny red, green, blue, white or black spots. Please note that this is normal and does not affect the performance of the LCD TV/monitor.
Trademark Information
BBE®
BBE and BBE Symbol are trademarks of BBE Sound, Inc. and are licensed by BBE sound, Inc. under USP4638258, 5510752 and 5736897.
TABLE OF CONTENTS
IMPORTANT SAFETY INSTRUCTIONS 5
CHECKING ACCESSORIES 7
LOCATION AND FUNCTION OF CONTROLS 8
Remote controller 8
Front panel controls 10
INSTALLATION AND CONNECTION 11
Battery Installation 11
DC adapter installation 11
Connecting your LCD TV/monitor 12
BASIC OPERATIONS 13
On and standby 13
Mute function 13
TV/VIDEO selection 13
Menu selection 13
TV system selection 13
SETUP OF TV STATIONS 14
Menu setting 14
Picture 14
Tuning 15
Sound 17
Custom 17
CONNECTION OF EXTERNAL EQUIPMENT 18
Picture 18
Sound 18
Custom 18
TABLE OF CONTENTS
CONNECTION OF PC 19
BRIGHTNESS 19
CONTRAST 20
CLOCK 20
PHASE 21
OSD(on-screen-display position) 21
AUTO (auto adjustment) 22
COLOR TEMP (temperature) 22
HORIZONTAL POSITION 23
VERTICAL POSITION 23
INFORMATION 24
RESET 24
EXIT 24
SOUND ADJUSTMENT 25
SOUND menu 25
Sound modes 26
NICAM/A2 Stereo reception(optional) 26
TELETEXT FUNCTION (OPTIONAL) 27
Displaying Teletext 27
Page selection 27
Mix mode 27
HOLD 27
INDEX 27
CANCEL 28
Enlarging text 28
Reveal mode 28
SUBPAGE (optional) 28
COLOR buttons (Red, Green, Yellow, Cyan) 28
TROUBLESHOOTING 29
SPECIFICATIONS 30
DISPLAY MODES 31
IMPORTANT SAFETY INSTRUCTIONS
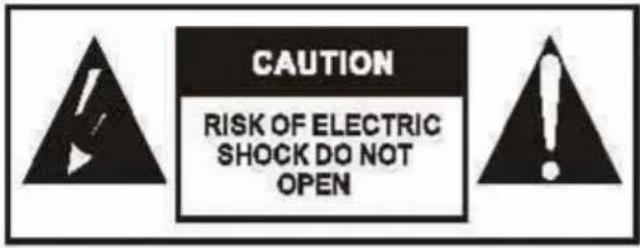
TO REDUCE THE RISK OF ELECTRIC SHOCK, DO NOT REMOVE COVER. NO USER-SERVICEABLE PARTS INSIDE. REFER SERVICING TO QUALIFIED SERVICE PERSONNEL.

This symbol indicates "dangerous voltage" inside the product that presents a risk of electric shock or personal injury.

This symbol indicates important instructions accompanying the product.
Before connecting the AC power cord to the DC adapter outlet, make sure the voltage designation of the DC adapter corresponds to the local electrical supply. If you are unsure of your power supply, ask your local power company.
Never insert objects of any kind into the cabinet openings of the liquid crystal display (LCD) TV/monitor; doing so may result in a fire or electric shock.
To avoid electric shock, never touch the Inside of the LCD TV/monitor. Only a qualified technician should open the case of the LCD TV/monitor.
Never use your LCD TV/monitor if the power cord has been damaged. Do not allow anything to rest on the power cord, and keep the cord away from areas where people can trip over it.
Be sure to hold the plug, not the cord, when disconnecting the LCD TV/monitor from an electric socket.
Openings in the LCD TV/monitor cabinet are provided for ventilation. To prevent overheating, these openings should not be blocked or covered. Also, avoid using the LCD TV/monitor on a bed, sofa, rug, or other soft surface. Doing so may block the ventilation openings in the bottom of the cabinet. If you put the LCD TV /monitor in a bookcase or some other enclosed space, be sure to provide adequate ventilation.
Do not expose the LCD TV/monitor to extreme temperature conditions or to extreme humidity conditions.
IMPORTANT SAFETY INSTRUCTIONS
Do not expose the LCD TV/monitor to dripping or splashing water or use it near water (In kitchens, near swimming pools, etc.). If the LCD TV/monitor accidentally gets wet, unplug it and contact a qualified service personnel immediately.
Do not place the LCD TV/monitor on an unstable cart, stand, tripod, bracket, table or floor etc. It may be damaged if dropped, hit or scratched. Do not clean the surface with keton-type materials (e.g., Acetone), ethyl alcohol, toluene, ethyl acid, methyl, or chloride etc. as these chemicals may damage the panel.
Place your LCD TV/monitor near an easily accessible AC outlet. Do not overload wall outlets and extension cords as this may result in fire or electric shock.
If the LCD TV/monitor has been dropped or damaged, unplug it from the wall outlet and refer servicing to a qualified service personnel.
In order not to damage the parts in the set, unplug and remove the antenna connection during lightning.
Avoid any kind of impact to the LCD TV/monitor. Be special careful not to damage the screen face.
If your LCD TV/monitor does not operate properly, in particular, if there are any unusual sounds or smells coming from it. Unplug it immediately and contact a qualified service personnel.
High temperature may cause problems to your LCD TV/monitor. Do not place it in direct sunlight, and keep it away from heaters, stoves, fireplaces, and other sources of heat.
- Unplug the LCD TV/monitor when it is going to be left unused for an extended period of time.
To reduce the risk of fire or electric shock, and annoying interference, use the recommended accessories only.
If the LCD TV/monitor does not work properly even after you have refer to the TROUBLESHOOTING section, unplug the set and contact a qualified service personnel. Do not attempt to repair it yourself.
- Unplug your LCD TV/monitor from the AC outlet before any service.
- Ensure that the qualified service personnel uses authorized replacement parts or their equivalents. Unauthorized parts may cause fire, electrical shock, or other hazards.
After any service or repair, ensure that the qualified service personnel performs safety checks to certify that your TFT-LCD TV/monitor is in safe operating order.
CHECKING ACCESSORIES
Please check and identify the supplied accessories.
 Operational Manual Operational Manual | 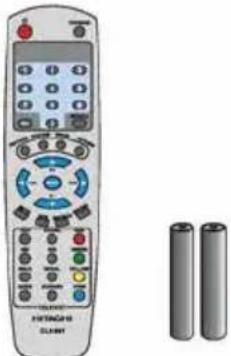 Remote Controller/Batteries (AAA X 2) Remote Controller/Batteries (AAA X 2) |
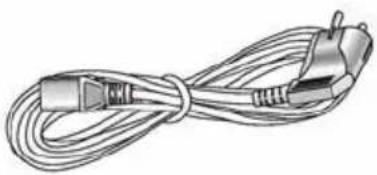 Power Cord Power Cord | 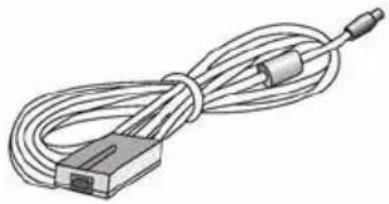 AC-DC Adapter AC-DC Adapter |
LOCATION AND FUNCTION OF CONTROLS
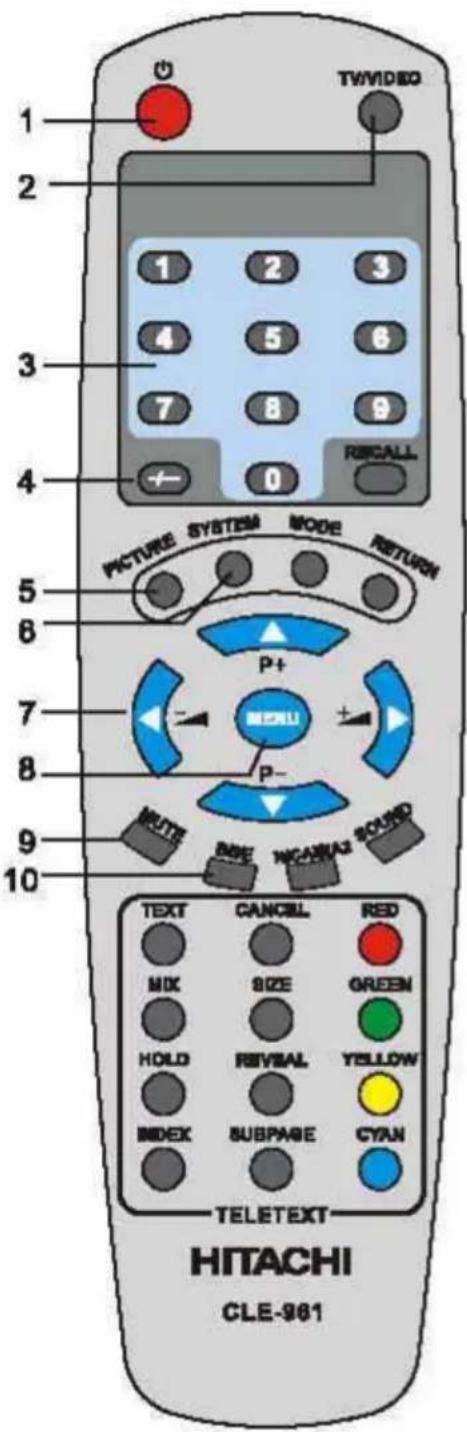
All the functions can be controlled with the remote controller. Some functions can also be adjusted with the buttons on the front panel of the set.
Remote controller
1. Ⓧ (STANDBY)
To switch on the LCD TV/monitor when at standby mode or vice versa.
2. TV/VIDEO
To select TV, AV (Video/S-Video/YUV) or PC monitor mode.
3. NUMBER BUTTONS
To directly select program number.
4. ONE/TWO-DIGIT
To select one or two-digit program number Input options.
5. PICTURE
To adjust picture control (brightness/contrast/color).
6. SYSTEM
To adjust color or sound system.
7. ◀/▶ (VOLUME UP/DOWN)
To increase or decrease the volume. To adjust menu settings.
▲/▼ (PROGRAM UP/DOWN)
To select the program in ascending or descending order. To select a menu item.
8. MENU
To enter or exit from the menu(TV/AV mode).
To accept your selection (PC mode).
9. MUTE
To switch on or off sound mute.
10.BBE
To switch BBE on or off.
LOCATION AND FUNCTION OF CONTROLS
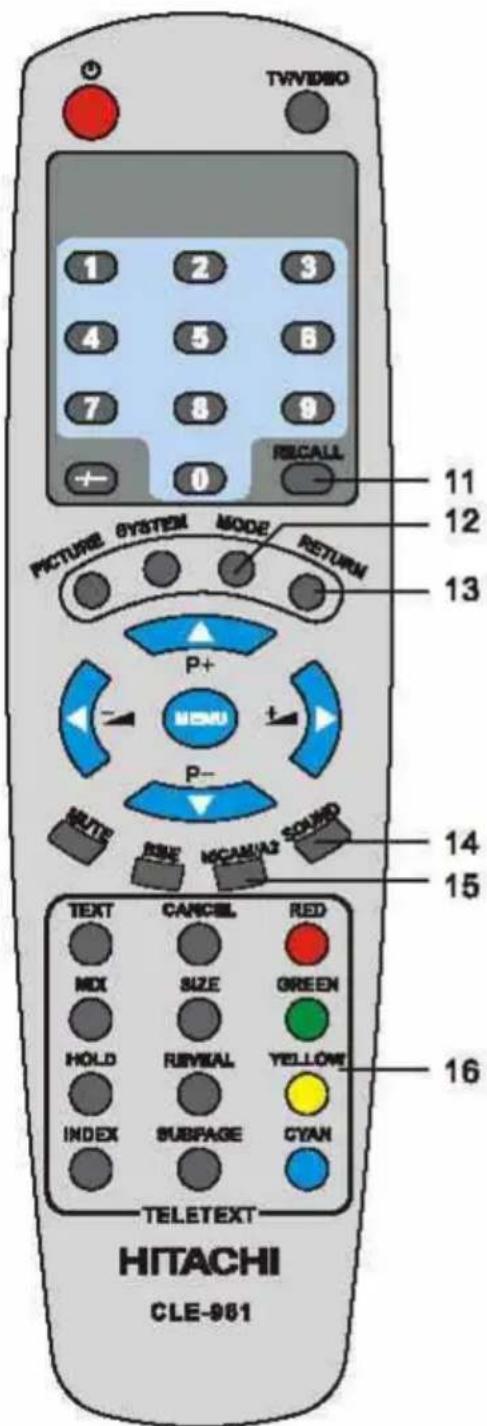
11. RECALL
To display setup information of channel.
12. MODE
To select the picture mode (USER/SOFT/DYNAMIC/STANDARD).
13. RETURN
To return to previously selected program number.
14. SOUND
To select the sound mode (HALL/CHURCH/STEREO/WIDE)
15. NICAM/A2
To switch between NICAM, A2 and mono sound output.
16. TELETEXT BUTTONS (OPTIONAL)
These buttons are used for certain models with Teletext functions only. For further details, refer to the TELETEXT FUNCTION.
LOCATION AND FUNCTION OF CONTROLS
Front panel controls
This TFT-LCD TV/monitor allows you to easily adjust the characteristics of the image being displayed. While you use these buttons to adjust the controls, the OSD (on-screen-display) will show you their numeric values as they change.
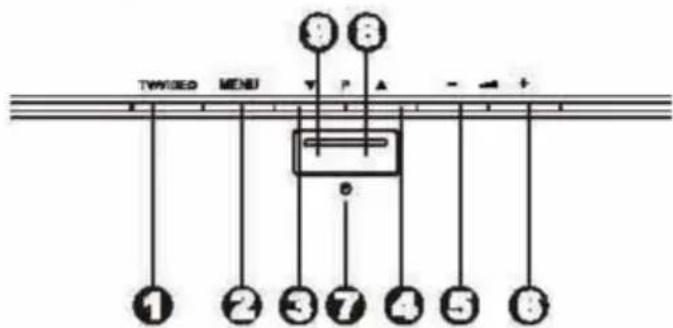
- TV/VIDEO: Select TV, AV (Video/S-Video/YUV) or PC monitor mode.
- MENU : Enter or exit from the menu
- CH- : When you watch the TV program, push this button to decrease channel number. In the main-menu, push this button to select the downward menu item.
- CH+ : When you watch the TV program, push this button to increase channel number. In the main-menu, push this button to select the upward menu item.
- VOL- : Decrease/adjust the values of the selected menu item, or decrease the level of audio volume.
- VOL+ : Increase/adjust the values of the selected menu item, or increase the level of audio volume.
- POWER ⏻: Switch on the LCD TV/monitor when at standby mode or vice versa.
- POWER INDICATOR: When LCD TV/monitor is in standby mode, it will light up in green. When LCD TV/monitor is power on, it will not light up.
- REMOTE SENSOR: Infrared sensor for the remote controller.
Note:
If there is no signal input from TV/AV and PC for 15 minutes and 20 seconds respectively, the LCD TV/monitor will switch to standby mode automatically. The power indicator will light up in green. If you want to switch on the LCD TV/monitor again, please press the power button on the TV or ⏻ button on the remote controller.
INSTALLATION AND CONNECTION
Battery Installation
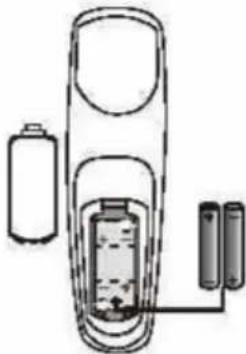
Insert the batteries while observing the correct (+) and (-) polarities as illustrated below.
natural_image
Diagram of a battery cell with two batteries and one connected to a power outlet (no text or labels)About the batteries
If the remote control unit fails to work even when it is operated near the LCD TV/monitor, please replace the batteries.
Use size UM-4(AAA) batteries.
Notes:
Do not use rechargeable (NI-Cd) batteries.
Do not attempt to recharge, short circuit, disassemble, heat or throw the batteries into the fire.
Do not drop, step on or cause any impact to the remote control unit. This may damage it, resulting malfunction.
Do not mix old and new batteries.
If the remote control unit is not going to be used for a long time, remove the batteries.
Caution
Keep batteries out of children's reach. If batteries are swallowed, contact a physician immediately.
DC adapter installation
- Be sure to use the power cord and DC adapter included in the accessories.
Usage of DC adapters other than specified may cause malfunctions.
INSTALLATION AND CONNECTION
Connecting your LCD TV/monitor
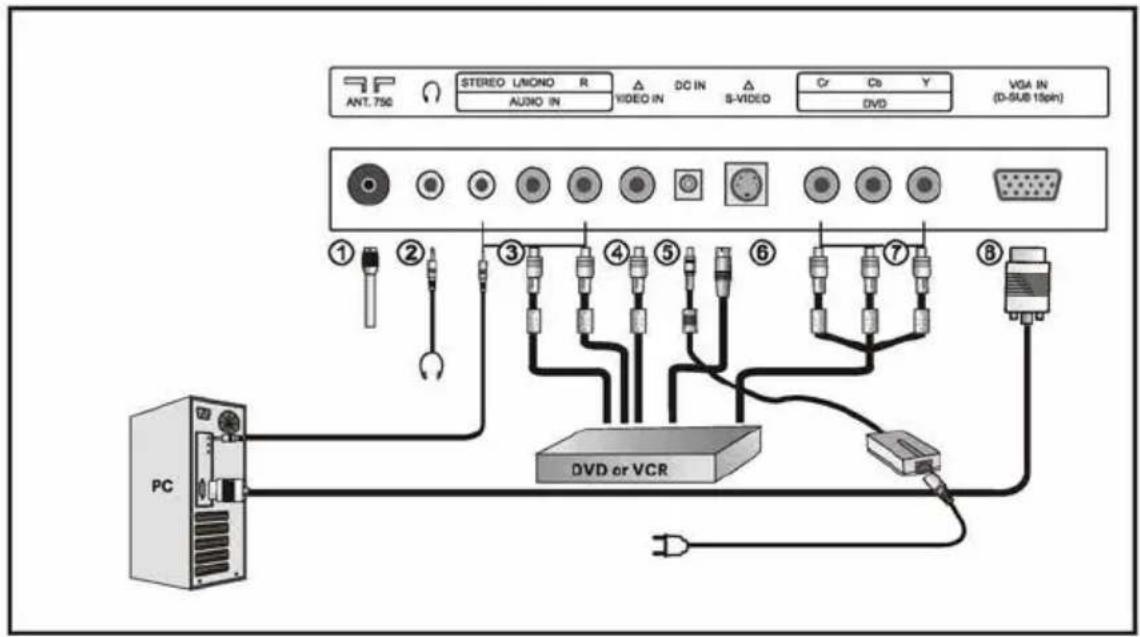
- Antenna Input Socket (75 Ohm)
- Headphone Jack
- AUDIO IN Terminals
- VIDEO IN Terminals
- DC IN Terminal
- S-VIDEO Terminal
- Y/Cb/Cr (YUV) Terminals
- VGA IN (D-SUB 15 Pin) Terminal
Note:
- For Australia only-Install an external aerial conforming to AS 1417.1 for safety purpose.
- Connect the power cord to DC adapter and the adapter jack to the DC IN terminal on the back of your LCD TV/monitor (15":12V, 20":19V).
- If any monaural equipment is to be connected to the LCD TV/monitor, connect its audio output cable to the L/MONO terminal.
Precautions when connecting to other equipment
- When using external equipment with this LCD TV/monitor, please read the instruction manual of the external equipment.
- Switch off all power supplies to the equipment and LCD TV/monitor before connection.
- Always ensure that the input and output terminals are correctly connected.
BASIC OPERATIONS
On and standby
- Press the power button on the front panel of the unit to switch it on or to standby mode.
- If the unit is in standby mode, press the Ⓐ button on the remote controller to switch it on.
- Press the Ⓐ button on the remote controller, the unit will revert to standby mode.
Note:
If, while the unit is switched on, the mains plug is disconnected, the unit will switch to standby when the mains plug is replaced in the mains power socket again.
Mute function
Press the MUTE button. The sound is switched off and the icon 📀 appears on screen. You can cancel it by pressing the MUTE button again.
TV/VIDEO selection
Press the TV/VIDEO button repeatedly, you can select TV, AV (Video/S-Video/YUV) or PC mode.
Menu selection
Press the MENU button to display each menu.
Note: Different menu will appear for TV, AV (Video/S-Video/YUV) or PC mode.
TV system selection
SYSTEM button allows you to select your desired color system and sound system.
- Repeatedly press SYSTEM button to select system. Press this button once, the color system will display on the screen. Press the button again, the sound system will display on the screen.
- Press ◀/▶ button to select a system mode you desired. In color system mode, you can select PAL, SECAM or NTSC mode according to your signal received. After you selected the color system, you can press SYSTEM button again to select a corresponding sound system. In the sound system, you can select I, BG, DK and M.
SETUP OF TV STATIONS
Menu settings
When in TV mode, press the MENU button on the front panel or remote controller to enter the main-menu.
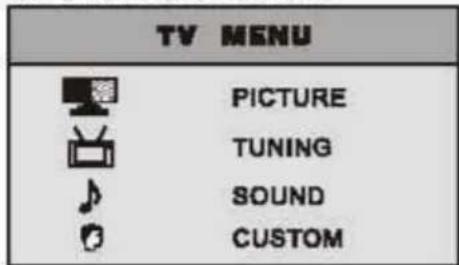
Press ▲ /▼ button to select the item. Press ◀ /▶ button to confirm the selection and enter its sub-menu.
Picture
When you select "PICTURE" and press ◀/▶ button, the following screen will appear:
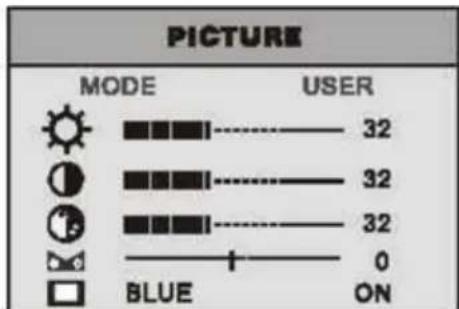
4 types of picture modes are available - USER, SOFT, DYNAMIC and STANDARD. Use ◀/▶ to select your desired picture mode. Use ▲/▼ button to select the item which you want to adjust and ◀/▶ button to adjust. SOFT, DYNAMIC and STANDARD are factory preset picture modes. If you want to adjust any items (eg. Brightness, Contrast etc.) in any of these modes, it will be store In the USER mode.
Note: You may access these settings directly by pressing the PICTURE or MODE buttons on the remote controller too.
| Icon | Name | Description |
 | Brightness | Adjust the luminance of the display. |
 | Contrast | Adjust the difference between the light and dark areas. |
| [655W] | Color | Adjust the chrominance saturation. |
 | Tint | Adjust the tone of color when your system is in NTSC.Note: For other system, the Icon of TINT will not appear on the menu. |
 | Blue | Select the blue on or off. If on, the screen background will turn blue at very weak or no signal condition. |
SETUP OF TV STATIONS
Tuning
In the main-menu, use ▲/▼ button to select "TUNING", and press ◀/▶ button to enter into the "TUNE MENU". The following screen will appear:
| TUNE MENU |
| AUTO |
| MANUAL |
| SORT |
Press ▲/▼ button to select "AUTO" and press ◀/▶ button to enter into the "AUTO SEARCH" menu.
| AUTO | SEARCH |
| START | |
| BAND VHF-L | FIND: 0 |
| ---- | 0% |
| PRESS MENU TO STOP | |
Press ◀/▶ button to start searching. All the TV stations in your area that can be received by the TV set are automatically preset. Band channel numbers and the searching rate of progress (0% to 100%) will display on the menu.
| AUTO | SEARCH |
| PLEASE WAIT ... | |
| BAND VHF-L | FIND: 1 |
| ---- | 1% |
| PRESS MENU TO STOP | |
Note: Before you select "AUTO SEARCH" mode, please select a proper color and sound system according to your local system. (To select color or sound system, please refer to the page that contains TV system selection)
You can select "MANUAL" in "TUNE MENU" to manually search for your desired broadcast stations or fine tune the channels received.
1 Press ▲/▼ button to select "MANUAL" and press ◀/▶ button to enter into the sub-menu.
| MANUAL | TUNE |
| PROGRAM 1 | |
| SEARCH | UP |
| FINE - | + |
| SKIP | OFF |
| SAVE | ? |
SETUP OF TV STATIONS
2 In the "MANUAL TUNE" sub-menu, you can use the ▲/▼ button to select the item, and press ◀/▶ to change it.
| Item | Description |
| PROGRAM | The program number. You have 100 program numbers (0-99) to select. |
| SEARCH | You can use the ◀/▶ button to search up or down for your desired broadcast station. When a channel is found, the search will stop. During searching, the ◀/▶ button will be invalid. |
| FINE | Due to weak signals or a wrong antenna configuration, some of the channels may not be tuned to the best reception condition. Select "FINE" and use the ◀/▶ button to fine tune the selected channel. |
| SKIP | Set the skip function by pressing the ◀/▶ button.When set to "ON", the program number will be skipped when you select channels with the ▲/▼ button. But you can select the skipped channel by pressing the number buttons directly. The channel number will be displayed in red. |
| SAVE | After complete all the settings for "MANUAL TUNE", select "SAVE" and use the ◀/▶ button to change the "?" to "✓" to save your settings.If you want to cancel the setting, you can press the MENU button to return to last menu. |
C "SORT" menu allows you to arrange the channel numbers by exchanging between 2 preset channels. Press ▲/▼ button to select "SORT" and press ◀/► button to enter into the "SORT" sub-menu. The following screen will appear:
| SORT | |
| FROM | 1 |
| TO | 1 |
| STORE | ? |
| DELETE | |
Press ▲/▼ button to select the available items, and use ◀/▶ button to adjust.
SETUP OF TV STATIONS
| Item | Description |
| FROM | Use the ◀/► button to select the channel number that you want to exchange from. |
| TO | Use the ◀/► button to select the channel number that you want to exchange to. |
| STORE | Use the ◀/► button to change "?" to "✓" to save the setting. Press MENU button to exit the setting and return to previous menu. |
| DELETE | Select this item, the current program will be deleted. |
Sound
Regarding the "SOUND" menu, please refer to the page that contains SOUND ADJUSTMENT.
Custom
The "CUSTOM" menu allows you to select the OSD (on-screen-display) language and set the timer.
In the main-menu, press ▲/▼ button to select "CUSTOM" and press ◀/▶ button to enter into the "SETUP" menu.
| SETUP | |
| ENGLISHMIN | |
Select OSD (on-screen-display) language
Press ▲/▼ button to select language icon, and use ◀/▶ button to select the desired language.
Timer setting
"TIMER" function allows you to set the timer to switch the TV from on to standby mode after a preset time.
Press ▲/▼ button to select the timer icon and press ◀/▶ button to select the time intervals: 00, 30, 60, 90 and 120 minutes. When your selection is completed, please press the MENU button to exit.
Note: At the last minute, "1 MIN OFF" will appear on the screen.
CONNECTION OF EXTERNAL EQUIPMENT
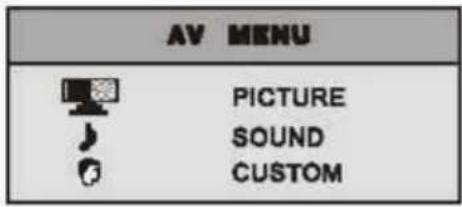
You can connect additional equipment, such as DVD, camcorders etc. to your LCD TV/monitor with the Video, S-Video or YUV terminals available. In the AV mode (Video/S-video/YUV), you can press the MENU button to enter the main-menu.
Picture
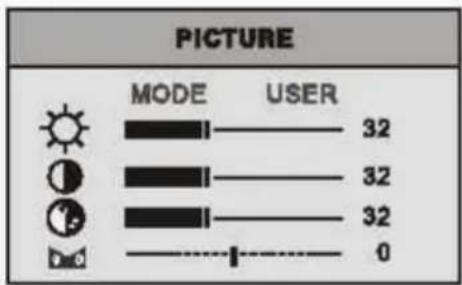
In the main-menu, press ▲/▼ button to select "PICTURE" and press ◀/► button to enter into "PICTURE" sub-menu. You can use the ◀/► button on the front panel or remote controller to select your desired picture mode - USER, SOFT, DYNAMIC and STANDARD. If you want to adjust any items (eg. Brightness, Contrast etc.) in any of these modes, it will be store in the USER mode.
In the AV mode, there are 5 types of color system for selection: AUTO, PAL, NTSC (N3.58/N4.43) and SECAM. The TINT adjustment item is only available in NTSC color system.
Sound
Regarding the "SOUND" menu, please refer to the page that contains SOUND ADJUSTMENT.
Custom
In main-menu, press ▲/▼ button to select "CUSTOM", and press ◀/► button to enter into this sub-menu, use ◀/► button to select the desired language.
Note: If there are no signal Input from the AV terminals (Video/S-Video/YUV), the screen on your TV/monitor will display "VIDEO NO SIGNAL", "S-VIDEO NO SIGNAL" or "YUV NO SIGNAL" respectively.
CONNECTION OF PC
If the LCD TV/monitor is in PC mode, you will have the following adjustable functions. If your LCD TV/monitor is not connected to a computer, the screen will display "PC NO SIGNAL".
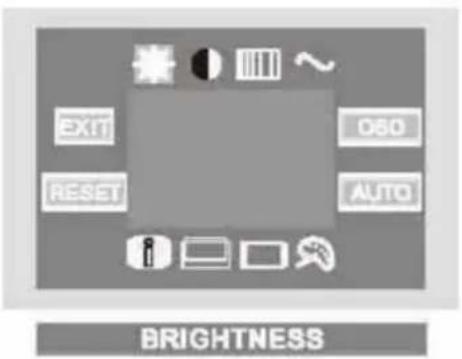
In PC mode, press MENU button to enter into the main-menu. Press ▲/▼ button to select one of these items, and then press the MENU key to enter into the selected sub-menu. The selected item will be highlighted.

BRIGHTNESS
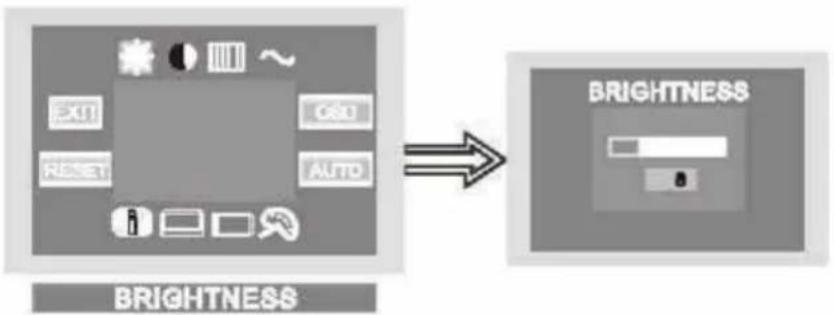
- In the main-menu, press the ▲/▼ button to select the Brightness icon.
- Press the MENU button to enter to the sub-menu.
flowchart
graph LR
    A["Display Panel"] --> B["BRIGHTNESS"]
    style A fill:#f9f,stroke:#333
    style B fill:#bbf,stroke:#333
- Use the ◀/▶ button to adjust the brightness level.
- Press MENU button to exit from this sub-menu.
CONNECTION OF PC
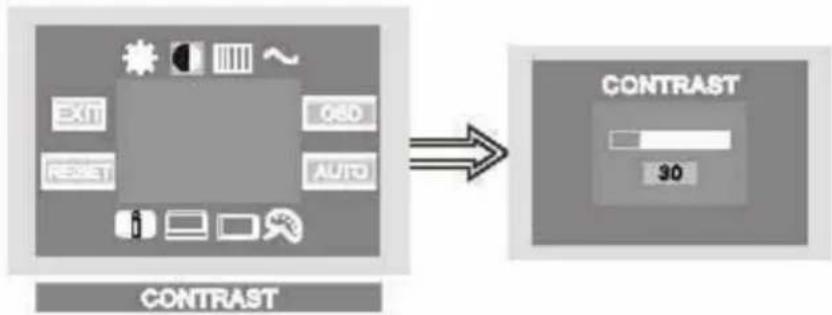
CONTRAST
- In the main-menu, press the ▲/▼ button to select the Contrast icon.
- Press the MENU button to enter to the sub-menu.
flowchart
graph LR
    A["EXIT"] --> B["QSO"]
    C["RESET"] --> D["AUTO"]
    E["Input"] --> F["Output"]
    G["CONTRAST"] --> H["30"]
- Use the ◀/▶ button to adjust the contrast level.
- Press MENU button to exit from this sub-menu.
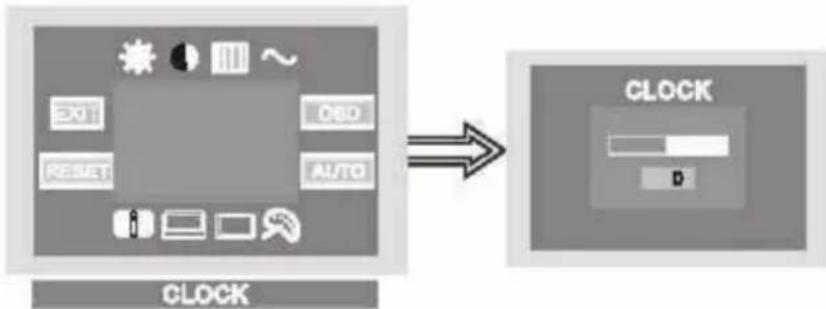
CLOCK
- In the main-menu, press the ▲/▼ button to select the Clock Icon.
- Press the MENU button to enter to the sub-menu.
flowchart
graph LR
    A["201"] --> B["RESET"]
    C["202"] --> D["AUTO"]
    E["CLOCK"] --> F["DSD"]
    G["CLOCK"] --> H["D"]
- Use the ◀/▶ button to remove any vertical interference.
- Press MENU button to exit from this sub-menu.
CONNECTION OF PC
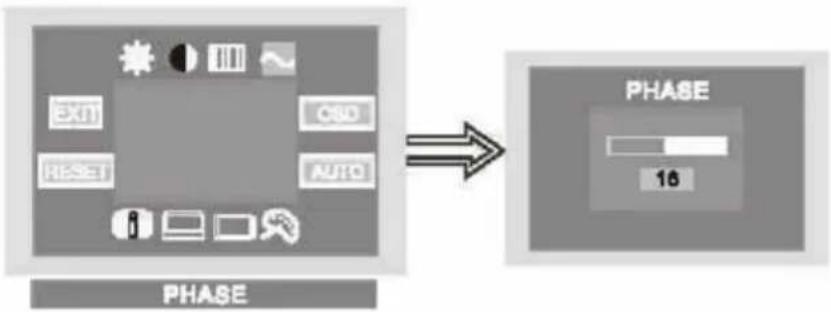
\~ PHASE
- In the main-menu, press the ▲/▼ button to select the Phase icon.
- Press the MENU button to enter to the sub-menu.
flowchart
graph LR
    A["EXIT"] --> B["CSD"]
    C["RESET"] --> D["AUTO"]
    E["PHASE"] --> F["16"]
- Use the ◀/▶ button to remove any horizontal interference.
- Press MENU button to exit from this sub-menu.
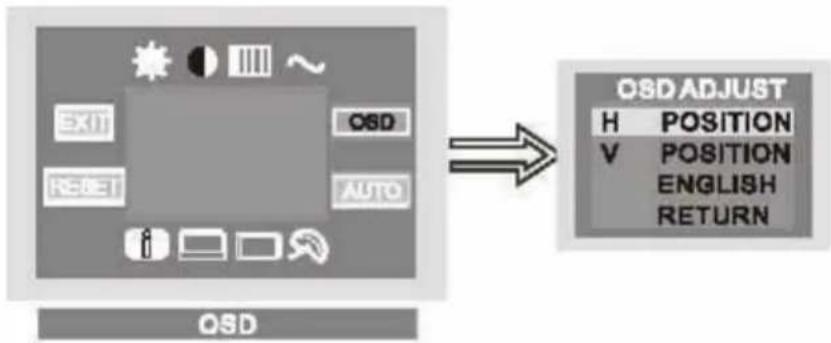
OSD (on-screen-display position)
- In the main-menu, press the ▲/▼ button to select the OSD item.
- Press the MENU button to enter to the sub-menu.
- Use the ▲/▼ button to select the OSD item which you want to adjust and ◀/▶ button to adjust.
flowchart
graph LR
    A["EXIT"] --> B["OSD"]
    C["RESET"] --> D["AUTO"]
    E["OK"] --> F["OK"]
    G["OK"] --> H["OK"]
    I["OK"] --> J["OK"]
    K["OK"] --> L["OK"]
    M["OK"] --> N["OK"]
    O["OK"] --> P["OK"]
    Q["OK"] --> R["OK"]
    S["OK"] --> T["OK"]
    U["OK"] --> V["OK"]
    W["OK"] --> X["OK"]
    Y["OK"] --> Z["OK"]
    AA["OK"] --> AB["OK"]
    AC["OK"] --> AD["OK"]
    AE["OK"] --> AF["OK"]
    AG["OK"] --> AH["OK"]
    AI["OK"] --> AJ["OK"]
    AK["OK"] --> AL["OK"]
    AM["OK"] --> AN["OK"]
    AO["OK"] --> AP["OK"]
    AQ["OK"] --> AR["OK"]
    AS["OK"] --> AT["OK"]
    AU["OK"] --> AV["OK"]
    AW["OK"] --> AX["OK"]
    AY["EXIT"] --> Z
    AZ["RESET"] --> AA
    BA["AUTO"] --> AB
    BB["OK"] --> AC
    BC["OK"] --> AD
    BE["OK"] --> AF
    BF["OK"] --> AG
    BG["OK"] --> AH
    BH["OK"] --> AI
    BI["OK"] --> AJ
    BJ["OK"] --> AK
    BK["OK"] --> AL
    BL["OK"] --> AM
    BM["OK"] --> AN
    BN["OK"] --> AO
    BP["OK"] --> AQ
    BQ["OK"] --> AR
| Item | Description |
| H (horizontal) POSITION | Adjust OSD horizontal position |
| V (vertical) POSITION | Adjust OSD vertical position |
| ENGLISH (or other language) | To select the desired language |
| RETURN | Exit from the sub-menu |
CONNECTION OF PC
AUTO (auto adjustment)
- In the main-menu, press the ▲/▼ button to select the AUTO item.
- Press the MENU button to activate auto adjustment for clock, phase, horizontal and vertical position.
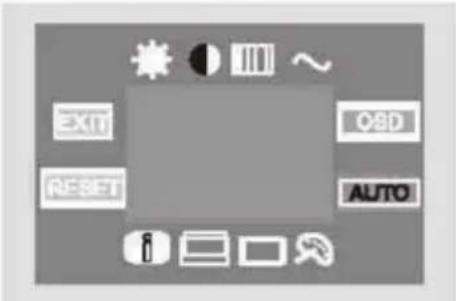
AUTO SET

COLOR TEMP(temperature)
- In the main-menu, press the ▲/▼ button to select the COLOR TEMP icon.
- Press the MENU button to enter to the sub-menu.
- There are three color temperature: 9300, 8700, 6500. After you have selected one of this value, you can press the MENU button to activate it.
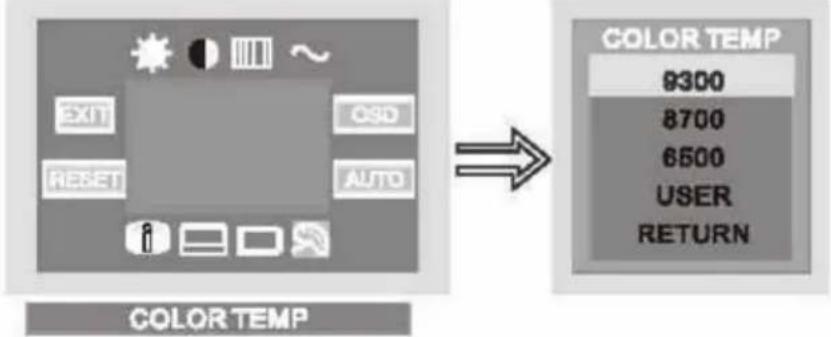
flowchart
graph LR
    A["EXIT"] --> B["CSD"]
    C["RESET"] --> D["AUTO"]
    E["+"] --> F["+"]
    G["□"] --> H["□"]
    I["×"] --> J["×"]
    K["→"] --> L["COLOR TEMP"]
    L --> M["9300"]
    L --> N["8700"]
    L --> O["6500"]
    L --> P["USER"]
    L --> Q["RETURN"]
- To select a new Color TEMP value, press ▲/▼ button to select "USER". Press MENU button to enter "USER" sub-menu to make adjustment. After adjustment, select "RETURN" to exit.
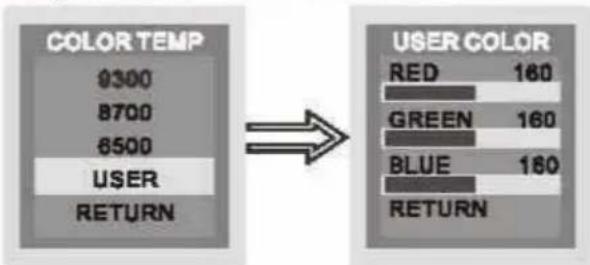
other
| COLOR TEMP | 9300 | 8700 | 6500 | USER | | ---------- | ---- | ---- | ---- | ---- | | RETURN | | | | | | USER COLOR | RED | GREEN | BLUE | RETURN | | | 160 | 160 | 160 | |CONNECTION OF PC

HORIZONTAL POSITION
- In the main-menu, press the ▲/▼ button to select the Horizontal position icon.
- Press the MENU button to enter to the sub-menu.
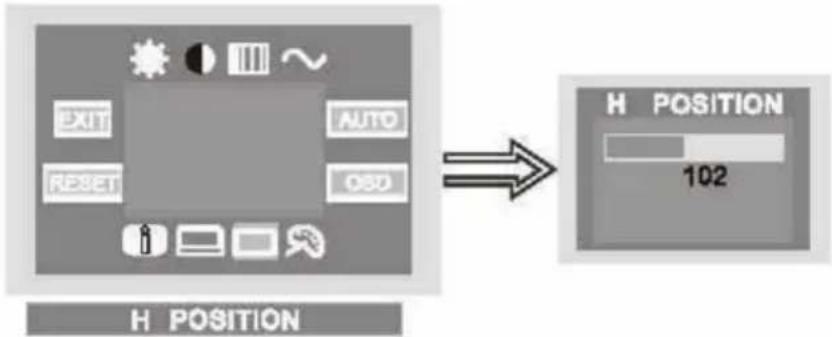
flowchart
graph LR
    A["EXIT"] --> B["AUTO"]
    C["RESET"] --> D["OSD"]
    E["State Indicator"] --> F["H POSITION"]
    G["State Indicator"] --> H["H POSITION"]
    I["State Indicator"] --> J["H POSITION"]
    K["State Indicator"] --> L["H POSITION"]
- Press the ◀/▶ button to adjust the horizontal position.
- Press MENU button to exit from this sub-menu.

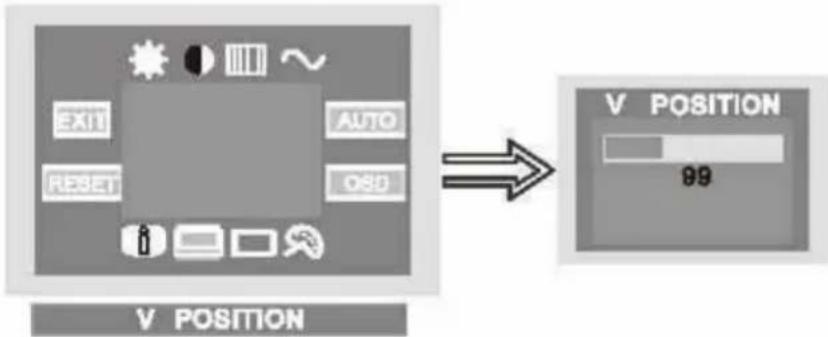
VERTICAL POSITION
- In the main-menu, press the ▲/▼ button to select the vertical position icon.
- Press MENU button to enter to the sub-menu.
flowchart
graph LR
    A["EXIT"] --> B["AUTO"]
    C["RESET"] --> D["OSD"]
    E["V POSITION"] --> F["V POSITION"]
    F --> G["99"]
- Press ◀/▶ button to adjust the vertical position.
- Press MENU button to exit from this sub-menu.
CONNECTION OF PC

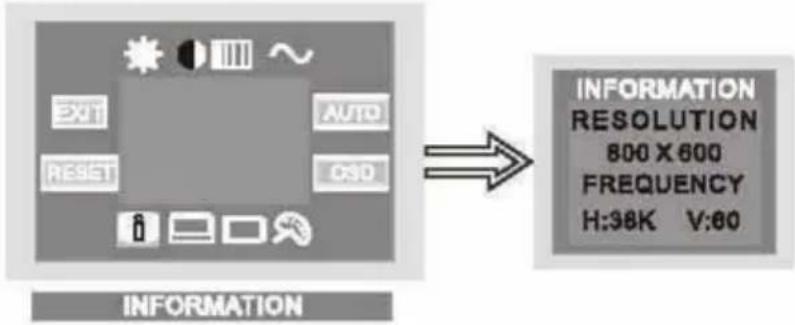
INFORMATION
- In the main-menu, press the ▲/▼ button to select the information icon.
- Press the MENU button to activate this function.
- The screen will display the information of the resolution, horizontal frequency and vertical frequency.
flowchart
graph LR
    A["EXIT"] --> B["RESET"]
    B --> C["AUTO"]
    C --> D["CSD"]
    D --> E["INFORMATION RESOLUTION 800 X 600 FREQUENCY H:38K V:60"]
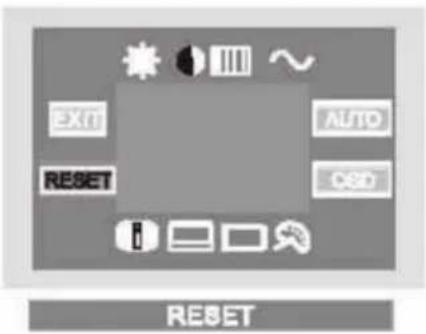
RESET
Reset function allows you to return all the settings to the factory default values.
- Press the ▲/▼ button to select this Item.
- Press the MENU button to reset all the current settings to factory default values.
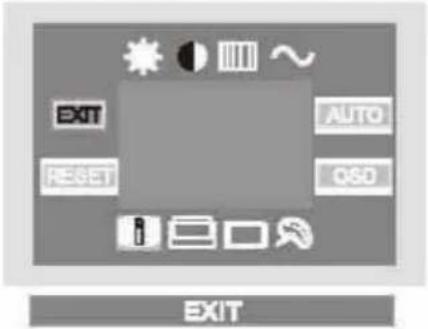
EXIT
If you want to exit from the main-menu, please press the ▲/▼ button to select this item, and press the MENU button to confirm the selection.
SOUND ADJUSTMENT
SOUND menu
The "SOUND" menu allows you to adjust the BALANCE, BASS, TREBLE or BBE LEVEL in the SOUND menu.
In TV/AV mode (except PC mode), press MENU button to display the main-menu. Press ▲/▼ button to select "SOUND", and press ◀/▶ button to enter to the sub-menu.
| SOUND | |
| BALANCE | 0 |
| BASS | 0 |
| TREBLE | 0 |
| BBE LEVEL | 0 |
| BBE | OFF |
Use the ▲/▼ button to select the item that you want to adjust and press ◀/▶ button to adjust.
BALANCE: Adjust the ratio of the left and right speaker sound level.
BASS: Increase/decrease the level of the lower-pitched sounds.
TREBLE: Increase/decrease the level of the higher-pitched sounds.
BBE LEVEL: Adjust the level of the BBE sound effect.
BBE: Turn the BBE sound effect on or off. This function can be set by pressing BBE button on remote controller too.
Note:
BBE button on the remote controller can be use in all TV, AV and PC modes.
BBE sound technology enhances speech intelligibility and restores the dynamic range of musical passages to provide outstanding natural sound.
SOUND ADJUSTMENT
Sound modes
In all modes (TV/AV/PC), you can repeatedly press SOUND button to change the sound mode. 4 types of sound modes are available- HALL, CHURCH, STEREO and WIDE. You can select the type of sound effect which you desire.
NICAM/A2 Stereo reception (optional)
If you are able to receive program with NICAM/A2 STEREO signal, you should be able to receive NICAM/A2 STEREO sound.
- When NICAM/A2 STEREO is received, you can select NICAM/A2 STEREO or FM MONO by using the NICAM/A2 button on the remote controller. If the stereo signal is weak, it will be switched to FM MONO automatically. (When NICAM/A2 STEREO is received, the Icon 00 will appear on the screen.)
- When NICAM/A2 STEREO DUAL is received, you can select NICAM DUAL I, NICAM DUAL II or A2 STEREO DUAL I, DUAL II or MONO by using the NICAM/A2 button on the remote controller. When FM MONO is selected the icon ▽ will appear on the screen. (When NICAM/A2 STEREO DUAL is received, the icon I/II will appear on the screen.)
Note:
- The NICAM/A2 STEREO function can only be set in TV mode.
- In the event of a poor NICAM transmission or a missing input signal, the device will automatically switch to the reserve FM (BG, I,D/K) Mono sound signal.
TELETEXT FUNCTION (OPTIONAL)
Teletext is an optional function, therefore only certain models can receive the teletext broadcast.
Teletext is a free broadcast service by most TV stations which gives up-to-the-minute information on news, weather, television program, share prices and many other topics.
Displaying Teletext
- Select a TV station with teletext signal.
- Press the TEXT button to enter Teletext mode.
- Press the TEXT button again to return to the normal TV mode.
Page selection
- Enter the desired page number (three digit) using the number buttons. If you press a wrong number during input, you must complete the three digit number and then re-enter the correct page number.
- The ▲/▼ button can be used to select the preceding or following page.
Mix mode
This function enables you to superimpose the Teletext page over the TV program.
- When a page is displayed, press the MIX button. The TV picture will appear with the TEXT page.
- Press the MIX button again to return to the normal Text mode.
HOLD
You can press the HOLD button to hold a page, and press this button again to release the page.
INDEX
Press the INDEX button to go to the main Index page directly.
You may enter the main index page number directly using the number buttons.
TELETEXT FUNCTION (OPTIONAL)
CANCEL
If you want to watch TV, but not cancel the TELETEXT mode completely, press the CANCEL button. When the last selected page is updated, the page number will appear at the top of the TV screen. Press the TEXT or CANCEL button to reveal the page.
Enlarging text
When a page is displayed, you can double the size of the text to make it easier to read.
- Press the SIZE button to enlarge the top half of the page.
- Press the SIZE button again to enlarge the bottom half of the page.
- Press this button once more to return to the normal display.
Reveal mode
You can display concealed teletext information (eg. answer to puzzles or riddles etc.) by pressing this button. Press this button again to remove the information from the display.
SUBPAGE (optional)
Some Teletext pages may contain several subpages which are automatically paged in a certain cycle by the TV station.
- You can go directly to a certain subpage by pressing the SUBPAGE button and select the page number with the number buttons. Enter the subpage number (eg.0003) for the third subpage.
- Press SUBPAGE button again to exit the subpage mode.
- Press the TEXT button to return to the normal TV mode.
COLOR buttons (Red, Green, Yellow, Cyan)
Press these buttons to access directly to the corresponding color pages displayed at the lower part of the Teletext screen.
TROUBLESHOOTING
Before calling the service personnel, please check the following troubleshooting guide. If any problem still persists, unplug the TV set and call for servicing.
- Troubleshooting -- Image
| Problem | Suggested Actions |
| Screen is black and power indicator is off | ■ Ensure that the power cord is firmly connected and the LCD TV/monitor is on. |
| "No signal" message | ■ Ensure that the signal cable is firmly connected to the PC or video sources.■ Ensure that the PC or video sources are switched on. |
| For PC mode, Image is not stable and may appear to vibrate | ■ Check that the display resolution and frequency from your PC or video board is a valid mode for your LCD TV/monitor.These Information can be obtained from the PC: Control Panel→Display→Settings. |
| ■ If the setting is not correct, use your computer utility program to change the display settings. | |
| NOTE: Your monitor supports multiscan display function within the following frequency domain: | |
| ■ Horizontal frequency: 30 KHz~70 KHz■ Vertical frequency: 56 Hz~75 Hz■ Maximum refresh rate: 1024X768 @ 75Hz (15")800X600 @ 75Hz (20") |
- Troubleshooting -- Audio and TV
| Problem | Suggested Actions |
| The TV/monitor does not turn on | ■ Be sure the power cord is plugged in. |
| No sound | ■ Ensure that the audio cable is firmly connected to both the audio-in port on your monitor and the audio-out port on your sound card. |
| ■ Check the volume level. | |
| Sound level is too low | ■ Check the volume level |
| ■ If the volume is still too low after setting the volume level to its maximum, check the volume control on the computer sound card or software program. | |
| Snowy picture | ■ The aerial antenna may be broken or disconnected. |
| Remote controller does not work | ■ The battery in the remote controller may be exhausted.■ The battery may be improperly installed.■ Check that there is no obstruction between the remote controller and the remote (Infrared) sensor.■ Ensure that there is no strong light shining on the remote controller's Infrared sensor. |
SPECIFICATIONS
| Panel | Size | 15" Diagonal (15")20.1" Diagonal (20") |
| Display Size | 304.1(H)X228.1(V)mm (15")408 (H) X 306 (V) mm (20") | |
| Type | TFT color | |
| Pixel pitch | 0.297(H)X0.297(V)mm(15")0.51 (H) X 0.51 (V) mm (20") | |
| Viewing Angle | 80 / 80 / 80 / 80 (Depending on the panel manufacturer, the viewing angle may be different from this spec.) | |
| Frequency | Horizontal | 30~70KHz |
| Vertical | 56-75Hz | |
| Display color | 262, 144 | |
| Display Resolution | Optimum Mode | 1024 X 768 @ 70Hz (15") |
| Maximum Mode | 800 X 600 @ 70Hz (20")1024 X 768 @75Hz (15")800 X 800 @ 75Hz (20") | |
| Input Signal | Sync. | H/V Separate, TTL, P. or N.H/V Composite, TTL, P. or N.Sync-on-green 0.3 Vp-p, N.1 Vp-p @ 75 ohm0.7Vp-p @ 75ohm |
| Video signal | ||
| RGB signal | ||
| TV, Video | Color system | PAL/SECAM/NTSC |
| Sound system | DK, I, BGH, M | |
| Video format | CVBS, S-VHS or Y/Cr/Cb | |
| Power Supply | Input | AC 100~240 Vrms (50Hz / 60Hz) |
| Output (Adapter) | DC 12V/4A (15")DC 19V/4.74A (20") | |
| Power consumption | Typical | 36W (15") |
| Power Saving | 60W (20")<3W | |
| Dimensions (WxHxD) [mm] | 395 X 402 X 210 (15")552 X 448.5 X 210 (20") | |
| Weight (Kg) | 5.7(15")9 (20") | |
| Environmental Considerations | Operating Temperature | 50°F to 104°F (10°C to 40°C) |
| Operating Humidity | 10% to 80% | |
| Storage Temperature | 13°F to 113°F (-25°C to 45°C) | |
| Storage Humidity | 5% to 95% | |
| Audio Characteristics | Audio Input | RCA Jack RED(R) White(L),0.5 ± 0.3Vrms |
| Frequency | RF: 100Hz~12KHz (at ± 3dB)AV: 100Hz~13KHz (at ± 3dB) | |
| Response | ||
DISPLAY MODES
| 15" Incoming display mode (Input) | ||||
| Resolution | Horizontal Frequency (KHz) | Vertical Frequency (Hz) | Pixel Frequency (MHz) | Comment |
| 640 × 350 | 31.47 (P) | 70.08 (N) | 25.17 | DOS |
| 720 × 400 | 31.47 (N) | 70.08 (P) | 28.32 | DOS |
| 640 × 480 | 31.47 (N) | 60.00 (N) | 25.18 | DOS |
| 640 × 480 | 37.86 (N) | 72.08 (N) | 31.50 | VESA |
| 640 × 480 | 37.50 (N) | 75.00 (N) | 31.50 | VESA |
| 800 × 600 | 35.16 (P) | 56.25 (P) | 36.00 | VESA |
| 800 × 600 | 37.88 (P) | 60.32(P) | 40.00 | VESA |
| 800 × 600 | 48.08 (P) | 72.19 (P) | 50.00 | VESA |
| 800 × 600 | 46.87 (P) | 75.00 (P) | 49.50 | VESA |
| 1024 × 768 | 48.36(N) | 60.00(N) | 65.00 | VESA |
| 1024 × 768 | 56.48 (N) | 70.10 (N) | 75.00 | VESA |
| 1024 × 768 | 60.02 (P) | 75.00 (P) | 78.75 | VESA |
| 20" Incoming display mode (Input) | ||||
| Resolution | Horizontal Frequency (KHz) | Vertical Frequency (Hz) | Pixel Frequency (MHz) | Comment |
| 640 × 350 | 31.47 (P) | 70.08 (N) | 25.17 | DOS |
| 720 × 400 | 31.47 (N) | 70.08 (P) | 28.32 | DOS |
| 640 × 480 | 31.47 (N) | 60.00 (N) | 25.18 | DOS |
| 640 × 480 | 37.86 (N) | 72.08 (N) | 31.50 | VESA |
| 640 × 480 | 37.50 (N) | 75.00 (N) | 31.50 | VESA |
| 800 × 600 | 35.16 (P) | 56.25 (P) | 36.00 | VESA |
| 800 × 600 | 37.88 (P) | 60.32(P) | 40.00 | VESA |
| 800 × 600 | 48.08 (P) | 72.19 (P) | 50.00 | VESA |
| 800 × 600 | 48.87 (P) | 75.00 (P) | 49.50 | VESA |
- Modes, which are not listed in the above table, may not be supported. For an optimal picture it is recommended to choose a mode listed in the table.
- For 15" model, there are 12 types of incoming display modes compatible with Windows as shown in the table above.
- For 20" model, there are 9 types of incoming display modes compatible with Windows as shown in the table above.
- Sometimes, the image may be disrupted due to the frequency standard from the VGA card. However, this is not an error. You may improve this situation by activating the automatic adjustment or by manually changing the phase and the clock settings in the menu.
- If you switch off the TV/monitor, Interference lines may occur on your screen. Please note that this is normal.
- To extend the service life of the product, we recommend that you use your computer's power management function.
Note:
- Design and specifications are subject to change without notice.
- Weight and dimensions shown are approximate values only.
- Trademark Information
- TABLE OF CONTENTS
- IMPORTANT SAFETY INSTRUCTIONS 5
- CHECKING ACCESSORIES 7
- LOCATION AND FUNCTION OF CONTROLS 8
- INSTALLATION AND CONNECTION 11
- BASIC OPERATIONS 13
- SETUP OF TV STATIONS 14
- CONNECTION OF EXTERNAL EQUIPMENT 18
- CONNECTION OF PC 19
- SOUND ADJUSTMENT 25
- TELETEXT FUNCTION (OPTIONAL) 27
- TROUBLESHOOTING 29
- SPECIFICATIONS 30
- DISPLAY MODES 31
- IMPORTANT SAFETY INSTRUCTIONS
- CHECKING ACCESSORIES
- LOCATION AND FUNCTION OF CONTROLS
- Remote controller
- Ⓧ (STANDBY)
- TV/VIDEO
- NUMBER BUTTONS
- ONE/TWO-DIGIT
- PICTURE
- SYSTEM
- ◀/▶ (VOLUME UP/DOWN)
- ▲/▼ (PROGRAM UP/DOWN)
- MENU
- MUTE
- 10.BBE
- RECALL
- MODE
- RETURN
- SOUND
- NICAM/A2
- TELETEXT BUTTONS (OPTIONAL)
- Front panel controls
- Note:
- INSTALLATION AND CONNECTION
- Battery Installation
- About the batteries
- Notes:
- Caution
- DC adapter installation
- Connecting your LCD TV/monitor
- Precautions when connecting to other equipment
- BASIC OPERATIONS
- On and standby
- Mute function
- TV/VIDEO selection
- Menu selection
- TV system selection
- SETUP OF TV STATIONS
- Menu settings
- Picture
- Tuning
- Sound
- Custom
- Select OSD (on-screen-display) language
- Timer setting
- CONNECTION OF EXTERNAL EQUIPMENT
- CONNECTION OF PC
- BRIGHTNESS
- CONTRAST
- CLOCK
- \~ PHASE
- OSD (on-screen-display position)
- AUTO (auto adjustment)
- COLOR TEMP(temperature)
- HORIZONTAL POSITION
- VERTICAL POSITION
- INFORMATION
- RESET
- EXIT
- SOUND ADJUSTMENT
- SOUND menu
- Sound modes
- NICAM/A2 Stereo reception (optional)
- TELETEXT FUNCTION (OPTIONAL)
- Displaying Teletext
- Page selection
- Mix mode
- HOLD
- INDEX
- CANCEL
- Enlarging text
- Reveal mode
- SUBPAGE (optional)
- COLOR buttons (Red, Green, Yellow, Cyan)
- TROUBLESHOOTING
- DISPLAY MODES
Brand : HITACHI
Model : C15-LC800SNT
Category : Television