
NVR-TAB7D S5 - Tablet NEVIR - Free user manual and instructions
Find the device manual for free NVR-TAB7D S5 NEVIR in PDF.


| Product Type | Tablet |
| Brand | Nevir |
| Model | NVR-TAB7D S5 |
| Screen Size | 7 inches |
| Screen Resolution | 1024 x 600 pixels |
| Processor | Quad-core 1.3 GHz |
| RAM | 1 GB |
| Internal Storage | 8 GB (expandable via microSD) |
| Operating System | Android (likely version 8 or later) |
| Battery Capacity | 3000 mAh |
| Weight | Approximately 300 g |
| Dimensions | 190 x 115 x 10 mm |
| Connectivity | Wi-Fi 802.11 b/g/n, Bluetooth 4.0 |
| Ports | Micro USB, 3.5 mm headphone jack |
| Camera | Front 0.3 MP, Rear 2 MP |
| Features | Touchscreen, accelerometer, speaker, microphone |
| Maintenance | Clean with soft dry cloth; avoid liquids and abrasive cleaners |
| Safety | Do not expose to water or extreme temperatures; do not disassemble |
| Spare Parts & Repairability | Contact authorized service center for repairs; battery not user-replaceable |
Frequently Asked Questions - NVR-TAB7D S5 NEVIR
User questions about NVR-TAB7D S5 NEVIR
0 question about this device. Answer the ones you know or ask your own.
Ask a new question about this device
Download the instructions for your Tablet in PDF format for free! Find your manual NVR-TAB7D S5 - NEVIR and take your electronic device back in hand. On this page are published all the documents necessary for the use of your device. NVR-TAB7D S5 by NEVIR.
USER MANUAL NVR-TAB7D S5 NEVIR
natural_image
Close-up of a lion's face with open mouth and tongue, displayed on a tablet device (no text or symbols visible)Manualdeusuario
Contenido
Resumen....3
Prefacio....3
1.2.5 Reiniciareldispositivo
1.2.13Operarporlapantalla
natural_image
Close-up of a lion's face showing its open mouth and tongue, displayed on a tablet device (no text or symbols visible)USERMANUAL
TableofContents
1OVERVIEW
1.1 AppearanceandKeys
1.2BasicOperation
1.2.1SwitchOn
1.2.2 Unlockthescreen
1.2.3Lockthescreen
1.2.4SwitchOff
1.2.5 Batterycharging
1.2.6Switchinputmethods
1.2.7 Use TF-Card
1.2.8 Connected to the computer
1.2.9Browsethefileinthedevice
1.2.10Startupprograms
1.2.11Closeprograms
1.2.12Screenoperation
1.2.13 Homescreen
1.2.14 Screengestures
1.2.15 Security setting
1.2.16Displaysetting
1.2.17 WirelessAndNetworkSettings
1.3 Technical specifications
Thanks very much for purchasing our MID product! Before using this product, please read the manual carefully. We will consider that you have read this manual when you use this product
The functions information of this manual is subject to the product itself; we will keep developing new functions. The information in this manual is subject to change without any prior notice
The Company will not be responsible for any loss of personal data and damage caused by incorrect operation of software/Hardware, artificial damages, replacement of batteries or any other accident. To avoid loss of your data, please backup your data to your computer at any time.
We cannot control any dispute from users' misunderstanding or incorrect operation against the manual, the Company will not take any relevant responsibility for any accidental loss potentially occurring in the process of using this manual.
Please do not repair it by yourself, otherwise, we will not provide you with after-sale service.
Preface
DearCustomers,
Thanks very much for purchasing our product! This device is built-in high performance Wifi receiver module, supporting external 3G USB-DONGLE wireless network card, turning on the broadband wireless networks, breaking through the restraint of network cable; it will bring you into the portable media player world and fulfill your entertainment needs. It also support picture browsing, E-book Reader, games, online chat and other functions, various settings will fully show your individuality.
SafetyNotices
Please do not let the player fall or rub or compact with hard objects during using, or it may cause surface scratch of the player, battery loose, data lose or damages of other hardware.
Never let this product expose to the humid environment or rain as the water leaked into may disable it to the extentbeyondmaintenance.

You are recommended not to use the headset with large volume continuously, please adjust the volume to the size of appropriate security and control the using time to avoid the damage to your hearing, as excessive volume will cause permanent hearing damage.
Pleasedonotcutoffthepowerabruptlyduringsoftwareupdateanddownload,oritmaycausedatelossand systemerror.
Please don't turn on the device where the wireless equipment is forbidden or when the usage of the device will causeinterferenceanddanger.Pleaseobserveanyrelevantrestrictions.
Please use original accessories and batteries, do not use incompatible products.
Pleasedon'tusethedeviceingasstationornearbythefuelandchemicals.
Please don't use this product when you are driving or walking in the street, or it may cause an accident.
PleasedonotscrapetheTFTscreen,itmaybedamagedandcannotbedisplayanything.
Nevercleanthedevicewithanychemicalsanddetergent,oritwil ldamagethepr oductsurfaceandcorrodethe spraypaint.
PackingList
| NoComponentsQuantity | |
| 1MIDDevice1 | |
| 2USBCable1 | |
| 3UserManual1 | |
| 4Adapter1 | |
| 5WarrantyCard1 |
Attention: Accessories are subject to the real products and change without notice.
1Overview
1.1 Appearance and Keys
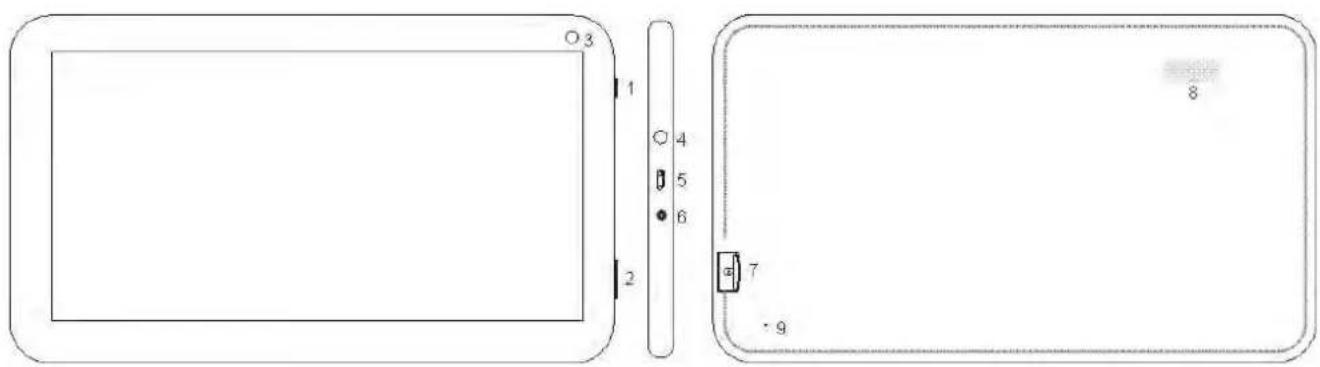
| Symbol | Name | Description |
| 1 | Power | Press shortly to enter sleeping/waking up mode, press long to switch ON/OFF |
| 2 | Volume+/Volume | Press theleftsideofthekeyshortlyisreducevolumefunctionPresstherightsideofthekeyshortlyisincreasevolumefunction |
| 3 | FrontCamera | 0.3MegapixelCamera |
| 4 | Earphonejack | Stereo |
| 5 | MicroUSBport | ConnectwithPC |

| 6ChargerPort | Toavoiddamaging,recommenduseofthespecialchargingequipment |
| 7TFCardTFCardSlot | |
| 8SpeakerBuilt-inSpeaker | |
| 9ResetResetkey |
1.2 Basic Operation
1.2.1SwitchOn
When the device is in the OFF mode, press and hold "Power" key for 3 seconds to enter the Android startup progressbar, then you can enter to the system desktop.
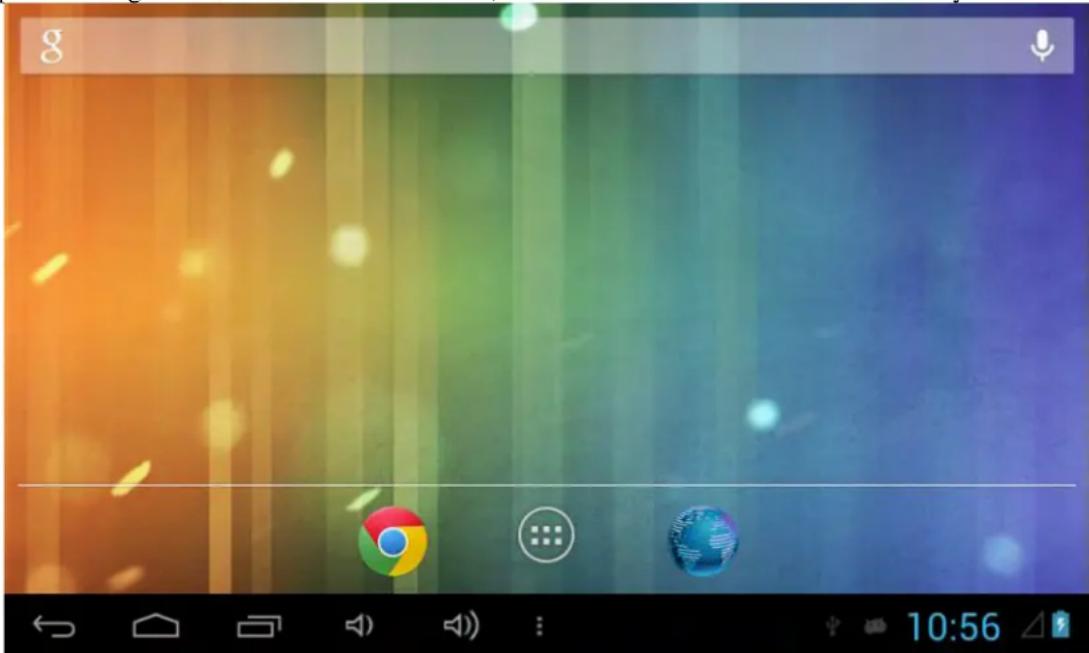
1.2.2 Unlockthescreen
Pleasepressanddragthe icon to the, then the LCD will unlocked automatically
1.2.3Lockthescreen
When the device is in the ON mode, press the “POWER” key shortly, the system will lock the screen and enter the save power mode. Then the screen is OFF but the system will still operational.
1.2.4SwitchOff
When the device is in the ON mode, press and hold the “POWER” key for 3 seconds, the screen will display the power off interface, choose the power off item to confirm, the system will shut automatically.
1.2.5 Battery Charging
Insert the micro port of the battery adapter into 220V AC slot on the device, and connect the other side with the power socket. Then, you can charge the device.
[Note] This device is not recommended to use USB interface to charge, please must use the special power adapter for charging. You should charge the battery for at least 8-12 hours to make sure the battery is fully charged at the first time. On charge the Power indicating lamp of the device is in high light blue color, the
desktopiconofthebattery

keep rolling which shows it is connected to the device.
1.2.6SwitchInputMethods
The device support handwriting, number, letter, pinyin etc. switching follow:
Click any text input area of the working program interface, it will popping input keyboard interface, as shown below:

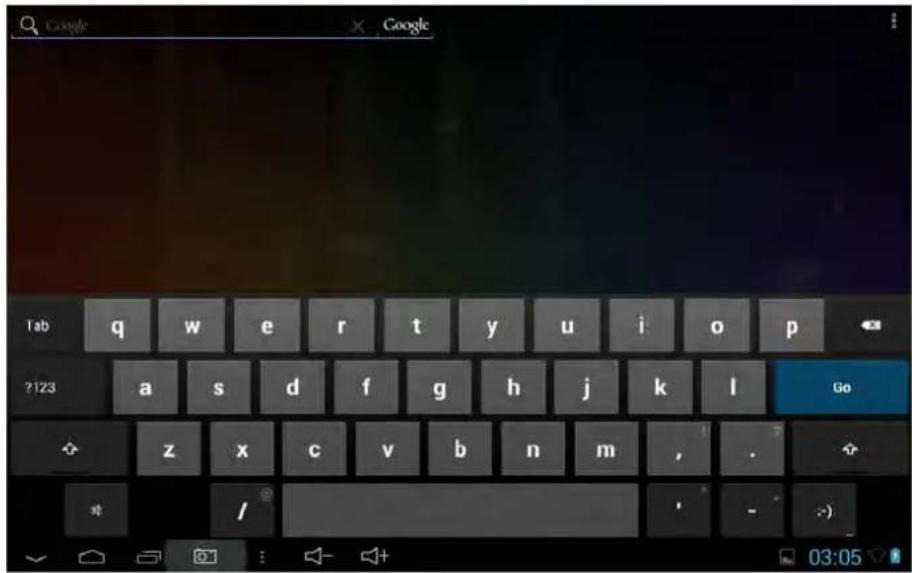
Press , then it will popping "Input Method" switch interface, as shown below:
| Input options |
| Input languages |
| Android keyboard settings |
Select the input method you want here.
[Noted] After newly install input method, you should "Settings>Language & input>KEYBOARD & INPUT METHODS", thenyoucanuse.
1.2.7 UseT-FlashCard
InsertT-FLASHcard(Cardnotincluded)
Insert the T-Flash card into the slot in direction of the device's bottom shell until you hear a sound of click. Browsefilesinthememorycard
In this MID device, you can view and use the needed files in catalogue of "MENU">"File manager">"SD Card".
1)RemoveT-Flashcard
Close all open files from the T-Flash, then enter into "MANU>"SETTINGS">"TF card and & device storage", click "Unmount SD card", System will prompt that TF card was removed safely. Tap with your fingertips to the pop-upT-FlashCard.
[Note] Do not insert the T-FLASH card by force; this card can only be applied in one direction
2) Do not remove the TF card before Unmounted it, or the card may be damaged.
3) If the memory card is write-protected, data will not be formatted and written, please remove the write protection before such operations.
4) Major brands memory card is recommended to avoid the card is not compatible to this device.
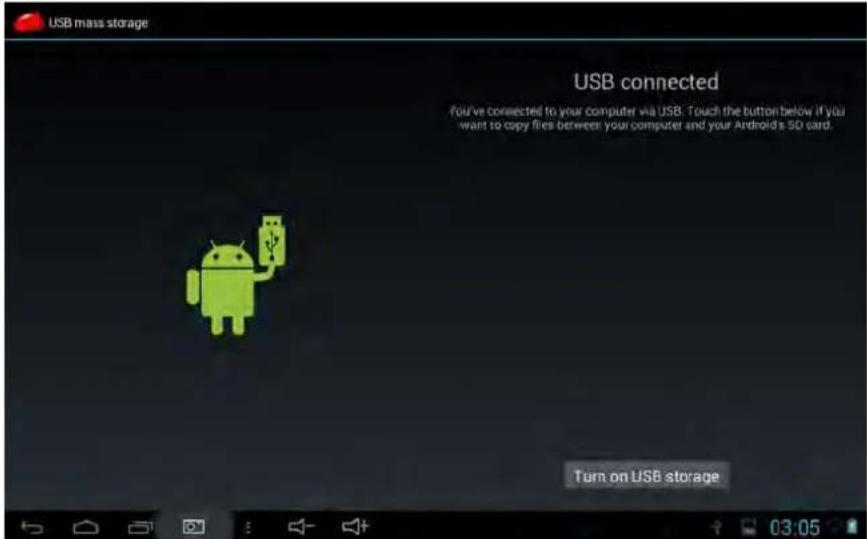
1.2.8ConnectedtotheComputer
One end the data line connect to the computer, the other end connect the USB port of the device, select

"Settings > Developer options > USB debugging", the device will connect with computer, and you can copy filestothedevice.
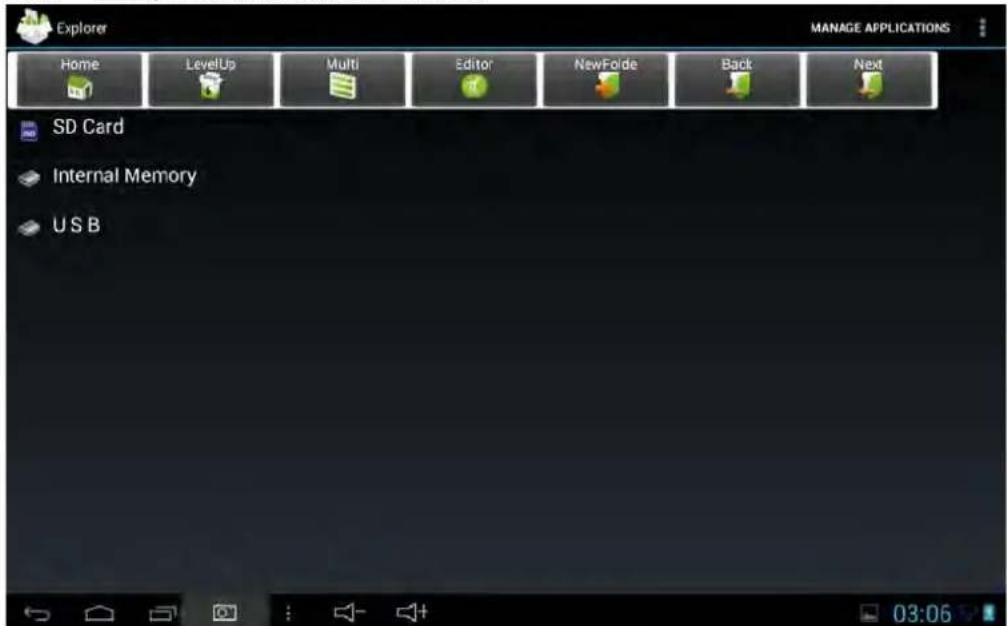
1.2.9 Browsethefileinthedevice
Click"Explorer"

Youcanseethefilesinthedevice
1.2.10 Startup Programs
Click all the application icon you want to start and it can switch on.
1.2.11ClosePrograms
Presstheicon continuously or the “ESC” key, the device will close the active program. You can also use the corresponding function in the management currently running applications to close the program
1.2.12ScreenOperation
4 Zoom in and zoom out: In applications which support zoom gestures, such as photo, IE browser, mail and map etc. you can zoom in or out the screen contents by opening or closing your two fingers.
- Rolling: In applications which support rolling gestures, such as photo, IE browser, mail and map etc. you can scroll the screen contents by sliding your fingers on the screen. If you want to stop the rolling screen, you just

needtotouchit.
1.2.13 HomeScreen
6.Switchhomescreen
In the home state, you can change the home interface by sliding your fingers on the screen quickly.
7.CustomHomeScreen
Press the blank area on the home screen interface for a few seconds, it will appear “Choose wallpaper from” menu, then you can set the home screen.
8.Move application icons in screen
Press the icons of applications you need to move for several seconds, it will enter into the moving model (the icon of application will be turn big), then drag the icon to desired position directly.
9.Move application icons screen to screen
Press the icons of applications you need to move for several seconds, and you can drag the icon to the left side or rightside.
10.Deleteapplications
Press the icon of application you need to remove for several seconds, drag the icon to “×” (when the icon was turn big, the bottom of screen will appear “×”, then you can delete the application.
1.2.14ScreenGestures
1)Click
When you need to input by the on-screen keyboard, you just need to select applications or press the button on the screen, then click the items..
2)Press
When you want to start the available options of a project(such as web page link), you only need to press the project.
3) Slide
Sliding on the interface with your fingers to make vertical or horizontal dragging action
4)Drag
Before you start dragging, you must press the items with your fingers, and can not let fingers leave the screen before dragging to the desired position
5) Rotation
You can set the unlock pattern, each time you open or wake your MID device, you must draw pattern to unlock the screen. In “Settings>Security>Screen lock”, it support many unlock ways. “Slide,Face Unlock,Pattern,PIN,Password”.
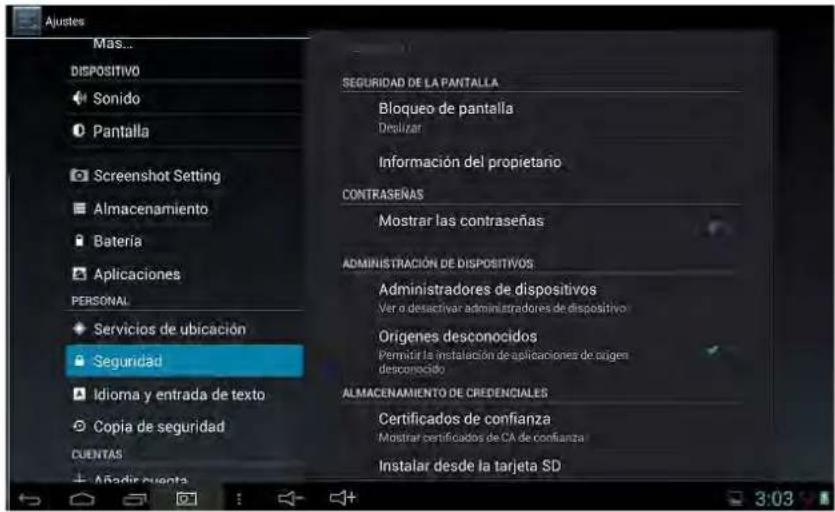
Ifusethe"pattern",asbelow:
A) you must ensure the four-point connection when you draw the unlock pattern.
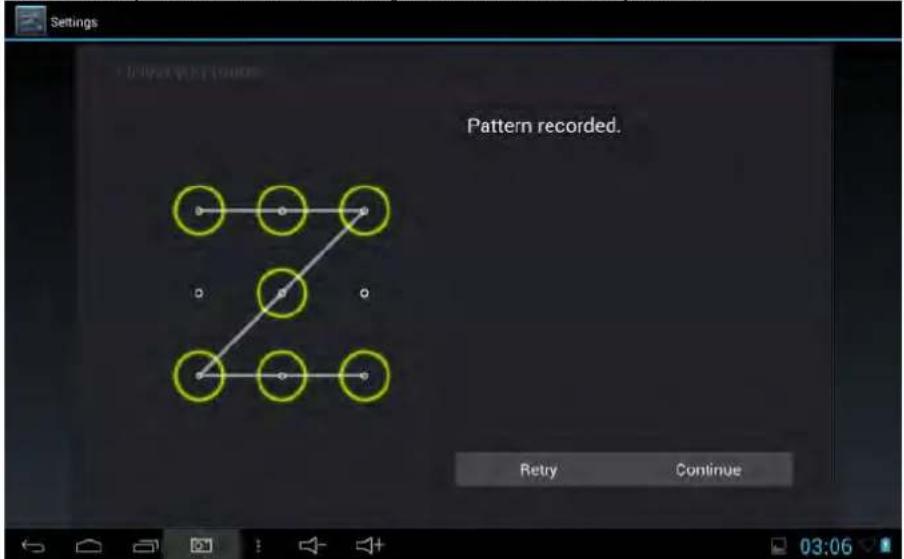
B) click "Continue" and draw again to confirm it
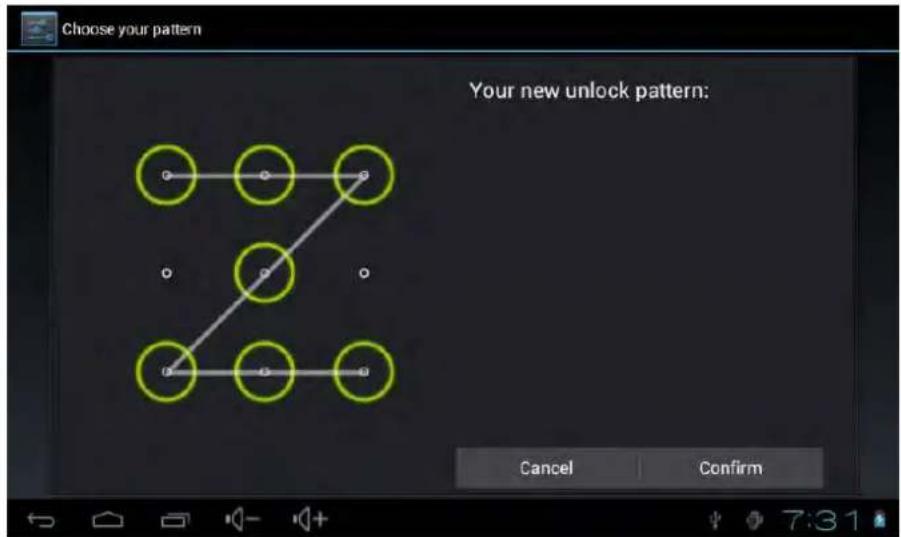
C) Click "confirm" to complete unlock pattern designing.
D) Each time you open or wake your MID device, you must draw pattern to unlock the screen.
1.2.16DisplaySetting
Click "Settings > Display", you can set the brightness, wallpaper, Auto rotate screen, sleep, font size of the screen.
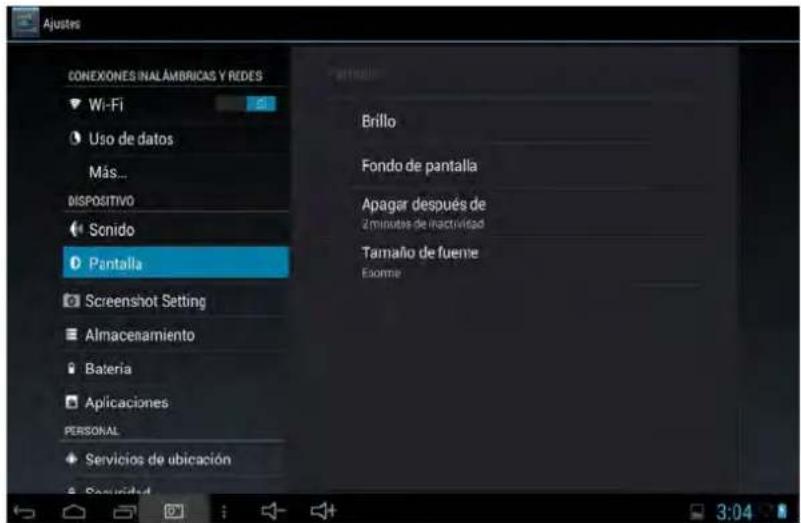
1.2.17 WirelessAndNetworkSettings
A) Use WiFi
Click "Settings>Wi-Fi", turn on the wifi, the device will find available wireless network in the right interface.
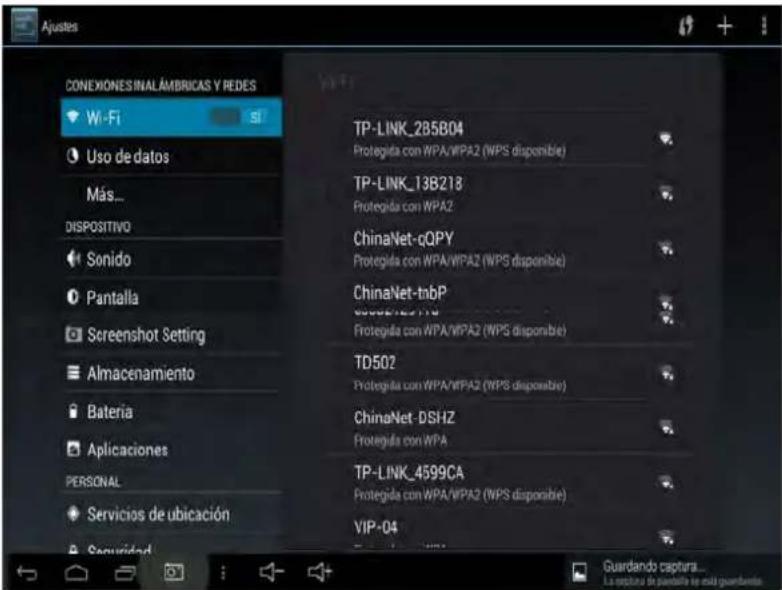
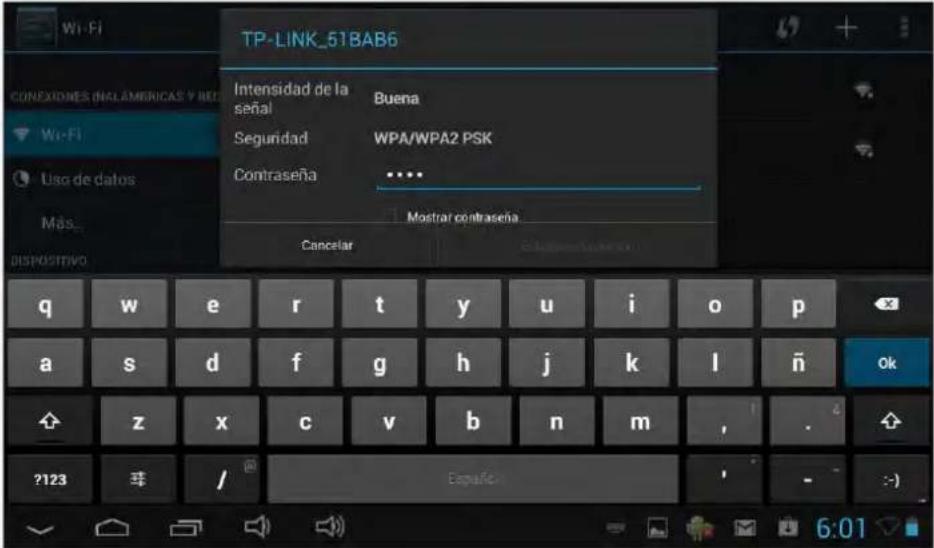
Select the desired wireless network, the system will directly connect the network or popup the password input window according to network access security settings. Please consult your wireless network administrator for thepassword.
1.3 Technical specifications
| MODELNVR-TAB7DS5(4GB) | ||
| Size193*110*11mm | ||
| Weight0.29KG | ||
| TNDisplay7inch800*480 | ||
| PCInterfaceHighspeedMicroUSB | ||
| OSAndroid4.2 | ||
| HardDriveCapacity4GB | ||
| SystemMemory512MB | ||
| CapacityExpansionT-Flashkart32GB(max) | ||
| MusicFunction | Format | MP3、WMA、WMV、OGG、APE etc |
| 20Hz-20KHz | ||
| VideoFunction | Format | MKV、AVI、RM、MP4etc. |
| Max.resolutions1920x1080 | ||
| Screen Ratio | 4: 3、16: 9、full screen for optional | |
| PhotoBrowse | JPG、BMP、JPEG、GIFetc. | |
| WIFI | Support | 802.11b/g/n |
| Transmissionrate | Max54Mbps | |
| WorkFrequency2.4GHz | ||
| Camera Function | Front0.3MP | |
| WorkingTemperature | -5-40°C | |
| Languages | Simplified Chinese、Traditional Chinese, English,、Japanese、French、German、Spanish,etc | |
Declaration of CE Conformity

According to Waste of Electrical and Electronic Equipment (WEEE) directive, WEEE should be separately collected and treated. If at any time in future you need to dispose of this product please do NOT dispose of this product with household waste. Please send this product to WEEE collecting points where available.
In order to fulfill ruling UNE EN-60335, we indicate that if the flexible wire is damaged, it can only be substituted by a technical service recognized by NEVIR, S.A., as per special tooling is required
- Contenido
- Reiniciareldispositivo
- 1.2.13Operarporlapantalla
- TableofContents
- 1OVERVIEW
- Preface
- SafetyNotices
- Appearance and Keys
- Basic Operation
- 1.2.1SwitchOn
- Unlockthescreen
- 1.2.3Lockthescreen
- 1.2.4SwitchOff
- Battery Charging
- 1.2.6SwitchInputMethods
- UseT-FlashCard
- InsertT-FLASHcard(Cardnotincluded)
- 1)RemoveT-Flashcard
- 1.2.8ConnectedtotheComputer
- Browsethefileinthedevice
- Startup Programs
- 1.2.11ClosePrograms
- 1.2.12ScreenOperation
- HomeScreen
- 6.Switchhomescreen
- 7.CustomHomeScreen
- 8.Move application icons in screen
- 9.Move application icons screen to screen
- 10.Deleteapplications
- 1.2.14ScreenGestures
- 1)Click
- 2)Press
- 3) Slide
- 4)Drag
- 5) Rotation
- 1.2.16DisplaySetting
- WirelessAndNetworkSettings
- A) Use WiFi
- Declaration of CE Conformity
Brand : NEVIR
Model : NVR-TAB7D S5
Category : Tablet