NVR-TAB7 S4 - Tablet NEVIR - Free user manual and instructions
Find the device manual for free NVR-TAB7 S4 NEVIR in PDF.

| Product Type | Tablet |
| Brand | Nevir |
| Model | NVR-TAB7 S4 |
| Display Size | 7 inches |
| Display Resolution | 1024 x 600 pixels |
| Processor | Quad-core 1.3 GHz |
| RAM | 1 GB |
| Internal Storage | 16 GB |
| Expandable Storage | microSD up to 32 GB |
| Operating System | Android (version varies) |
| Battery Capacity | 3000 mAh |
| Dimensions (W x H x D) | 191 x 111 x 10 mm |
| Weight | 300 g |
| Connectivity | Wi-Fi 802.11 b/g/n, Bluetooth 4.0 |
| Camera (Rear) | 2 MP |
| Camera (Front) | 0.3 MP |
| Ports | Micro USB, 3.5 mm headphone jack |
| Sensors | G-sensor |
| Charging Time | Approximately 4 hours |
| Standby Time | Up to 200 hours |
| Cleaning Instructions | Use a soft, dry cloth. Avoid liquids and abrasive cleaners. |
| Safety Warnings | Do not expose to extreme temperatures or moisture. Do not disassemble. |
| Spare Parts Availability | Battery, screen, charger available from authorized service centers. |
Frequently Asked Questions - NVR-TAB7 S4 NEVIR
User questions about NVR-TAB7 S4 NEVIR
0 question about this device. Answer the ones you know or ask your own.
Ask a new question about this device
Download the instructions for your Tablet in PDF format for free! Find your manual NVR-TAB7 S4 - NEVIR and take your electronic device back in hand. On this page are published all the documents necessary for the use of your device. NVR-TAB7 S4 by NEVIR.
USER MANUAL NVR-TAB7 S4 NEVIR
natural_image
Close-up of a lion's face with open mouth and intense teeth, displayed on a tablet screen (no text or symbols visible)MANUAL DEL USUARIO.
Contenidos
Contenidos.
text_image
Tuesday June 12, 2012 1:59 ACT_AP 0% USB debugging connected Select to disable USB debugging. USB connected Select to copy files to/from your computer.text_image
2:59 Tue, June 12 Charging, 0%text_image
APPS WIDGETS SHOP Browser Calculator Calendar Camera Clock Downloads Email ES File Explorer ES Task Manage Gallery Messenger Music News & Weathertext_image
i App info 3:06Zoom
text_image
Settings SCAN ADD NETWORK WIRELESS & NETWORKS Wi-Fi OFF Data usage More... DEVICE Sound Display USB mode To see available networks, turn Wi-Fi on. 3:16WIFI internet inalámbrico

text_image
Settings SCAN ADD NETWORK WIRELESS & NETWORKS Wi-Fi ON Data usage More... DEVICE Sound Display Usb mode TP-LINK_02 Secured with WPA/WPA2 (protected network available) shnetworks Secured with WPA/WPA2 MVSTREAM2 Secured with WPA2 (protected network available) ACT_AP Secured with WPA/WPA2 (protected network available) 3:22Wifi:
text_image
Settings Data usage More... DEVICE Sound Display Usb mode Storage Battery Brightness Wallpaper Auto-rotate screen Sleep After 5 minutes of inactivity Font size Normal Enable HDMItext_image
Settings Battery Apps PERSONAL Accounts & sync Location services Security Language & input Backup & reset ON ADD ACCOUNTSeguridad
text_image
Settings Apps PERSONAL Accounts & sync Location services Security Language & input Backup & reset SYSTEM Date & time SCREEN SECURITY Screen lock Slide Owner info PASSWORDS Make passwords visible DEVICE ADMINISTRATION Device administrators View or deactivate device administrators 3:41PANTALLA
text_image
Settings Accounts & sync Location services Security Language & input Backup & reset SYSTEM Date & time Accessibility Language English (United States) Spelling correction Personal dictionary KEYBOARD & INPUT METHODS Default 谷歌拼音输入法 Android keyboard English (US) 3:44text_image
Settings Security Language & input Backup & reset SYSTEM Date & time Accessibility { } Developer options About tablet SERVICES No services installed SYSTEM Large text Auto-rotate screen Speak passwords Touch & hold delay Short 3:54text_image
Available Memory: 111M (Battery: 0s ES File Explorer Ignore/Show Switch To Kill it! Uninstall Clear cache/Force stopMúsica:
text_image
00:26 1:30:20 3:16| Adelante | |
| Retroceso | |
| Adelantar rapidamente | Presione levemente , presione una vez para ajustar a 1/2/4/8/16/32 de velocidad. |
| Retroceder rapidamente | Presione levemente, presione una vez para ajustar uma vez 1/2/4/8/16/32 levemente para voltar ao modo |
| Localizacion detiempo o escena | Arraste la barra de progreso |
 | Pantalla completa |
text_image
June 2012 SUN 10 MON 11 TUE 12 WED 13 THU 14 FRI 15 SAT 16 11 AM 12 PM 1 2 3 11:02natural_image
Close-up of a lion's face showing its open mouth and tongue out (no text or symbols visible)MANUAL DE USO.
Conteúdos.
Conteúdos.
text_image
Tuesday June 12, 2012 1:59 ACT_AP 0% USB debugging connected Select to disable USB debugging. USB connected Select to copy files to/from your computer.Icones de status
text_image
2:59 Tue, June 12 Charging, 0%text_image
APPS WIDGETS SHOP Browser Calculator Calendar Camera Clock Downloads Email ES File Explorer ES Task Manage Gallery Messenger Music News & Weathertext_image
i App info 3:06Aproximar ou diminuir o zoom
text_image
Settings SCAN ADD NETWORK WIRELESS & NETWORKS Wi-Fi OFF Data usage More... DEVICE Sound Display Usb mode to see available networks, turn Wi-Fi on. 3:16text_image
Settings SCAN ADD NETWORK WIRELESS & NETWORKS Wi-Fi ON Data usage More... DEVICE Sound Display Usb mode TP-LINK_02 Secured with WPA/WPA2 (protected network available) shnetworks Secured with WPA/WPA2 MVSTREAM2 Secured with WPA2 (protected network available) ACT_AP Secured with WPA/WPA2 (protected network available) ChinaNet-15text_image
Settings Data usage More... DEVICE Sound Display USB mode Storage Battery Brightness Wallpaper Auto-rotate screen Sleep After 5 minutes of inactivity Font size Normal Enable HDMItext_image
Settings Battery Apps PERSONAL Accounts & sync Location services Security Language & input Backup & reset ON ADD ACCOUNTSegurança.

text_image
Settings Apps PERSONAL Accounts & sync Location services Security Language & input Backup & reset SYSTEM Date & time SCREEN SECURITY Screen lock Slide Owner info PASSWORDS Make passwords visible DEVICE ADMINISTRATION Device administrators View or deactivate device administrators 3:41Segurança da tela:
text_image
Settings Accounts & sync Location services Security Language & input Backup & reset SYSTEM Date & time Accessibility Language English (United States) Spelling correction Personal dictionary KEYBOARD & INPUT METHODS Default 谷歌拼音输入法 Android keyboard English (US) 3:44text_image
Settings Security Language & input Backup & reset SYSTEM Date & time Accessibility { } Developer options About tablet SERVICES No services installed SYSTEM Large text Auto-rotate screen Speak passwords Touch & hold delay Short 3:54text_image
Available Memory: 111M | Battery: 0s ES File Explorer Ignore/Show Switch To Kill it! Uninstall Clear cache/Force stopMúsica:
text_image
00:26 1:30:20 3:16text_image
June 2012 SUN 10 MON 11 TUE 12 WED 13 THU 14 FRI 15 SAT 16 11 AM 12 PM 1 2 3natural_image
Close-up of a lion's face showing its open mouth and tongue out, with no visible text or symbols.USER'S MANUAL.
Contents
Safety instructions....26
Overview....31
Appearance and button....31
Basic Functions....31
Key....32
Status Icons ....33
Preparation 33
Use Micro SD card 33
Charge the battery....34
Power ON/OFF/Standby....34
Setting....36
Application Software....43
ES file browser....43
Music 44
Video....45
Internet....47
Online....47
Picture....48
E-books....48
Email....48
Calendar 48
Troubleshooting.... 49
Safety instructions
Read these safety instructions before using your device and store them for possible future reference. Always follow these basic safety precautions when using your Mobile device. This reduces the risk of fire, electric shock, and injury.
- Do not expose this product to rain or moisture.
- Keep the device out of direct sunlight and heat sources.
- Protect the power cord. Route power cords so that they are not likely to be walked on or pinched by items placed on or against them. Pay particular attention to the point where the cord attaches to the device.
- Only use the AC adapter included with the device. Using any other power adapter voids your warranty.
- Do not remove the cover. There are no user-serviceable parts inside.
- If the charger cord is damaged, have it repaired by the manufacturer, its service or a similarly qualified person in order to avoid any hazard.
- The charger is not intended for use by persons (including children) with reduced physical, sensory or mental capacity. Persons who have not read the manual, unless they have received explanations by a person responsible for their safety and supervision should not use this unit.
● Children should be monitored to ensure that they do not play with the charger.
● The charger should always be readily accessible.
● The device should not be exposed to dripping or splashing water.
● No objects filled with liquids such as vases shall be placed on the device.
● Always leave a minimum distance of 10 cm around the unit to ensure sufficient ventilation.
● Naked flame sources, such as candles, should not be placed on top of the device.
● The device is intended for use only in a temperate climate.
● CAUTION: Danger of explosion if battery is incorrectly replaced or not replaced by the same type or equivalent.
- The battery should not be exposed to excessive heat such as sunshine, fire or similar.
● Different types of batteries, new and used batteries should not be mixed.
● The battery must be installed according to the polarity.
- If the battery is worn, it must be removed from the product.
- The battery must be disposed of safely. Always use the collection bins provided (check with your dealer) to protect the environment.
Clean your Device
Treat the screen gently. To clean fingerprints or dust from the screen, we recommend using a soft, non-abrasive cloth such as a camera lens cloth.
If the charger cord is damaged, have it repaired by the manufacturer, its service or a similarly qualified person in order to avoid any hazard.
The charger is not intended for use by persons (including children) with reduced physical, sensory or mental capacity. Persons who have not read the manual, unless they have received explanations by a person responsible for their safety and supervision should not use this unit.
Children should be monitored to ensure that they do not play with the charger.
The charger should always be readily accessible.
The device should not be exposed to dripping or splashing water.
No objects filled with liquids such as vases shall be placed on the device.
Always leave a minimum distance of 10 cm around the unit to ensure sufficient ventilation.
Naked flame sources, such as candles, should not be placed on top of the device.
The device is intended for use only in a temperate climate.
CAUTION: Danger of explosion if battery is incorrectly replaced or not replaced by the same type or equivalent.
The battery should not be exposed to excessive heat such as sunshine, fire or similar.
Different types of batteries, new and used batteries should not be mixed.
The battery must be installed according to the polarity.
If the battery is worn, it must be removed from the product.
The battery must be disposed of safely. Always use the collection bins provided (check with your dealer) to protect the environment.
SWITCH OFF IN RESTRICTED AREAS
Turn off the power when the use of the mobile device is not authorized or when it may cause interference or danger, for example; on board an aircraft, near medical equipment, fuel, chemicals or blasting sites.
ROAD SAFETY COMES FIRST
Check the current laws and regulations in the area where you drive, regarding the use of mobile devices such as this mobile device.
- Do not hold this mobile device while driving
• Concentrate fully on the driving - Radio Frequency (RF) can affect certain electronic systems in your car, such as the audio-stereo system or security equipment.
- An airbag inflates with great force. Do not store the mobile device or any of its accessories in the area above the bag or in its deployment area.
INTERFERENCE
All wireless devices are susceptible to interference which can affect their performance.
AUTHORISED PERSONNEL
Only qualified personnel are authorized to install or repair this product
ACCESSORIES
Only use batteries, chargers and other accessories which are compatible for this device. Do not connect incompatible products.
KEEP YOUR DEVICE DRY
Your device is not water proof. Keep it dry.
CHILDREN
Keep the mobile device in a safe place out of the reach of young children. Your mobile device contains small pieces which can present a choking hazard.
Precautions for use
This mobile device conforms to guidelines for exposure to radio frequency.
Your mobile device is a radio transmitter and receiver. It was designed to meet the limits recommended by international guidelines on the exposure to radio-waves. These guidelines were developed by an independent scientific organisation, the ICNIRP, and include safety margins designed to assure the protection of all, regardless of their age or state of health.
The recommendations on exposure guidelines for mobile devices employ a unit of measure, known as the Specific Absorption Rate or SAR. The SAR limit, as defined in the ICNIRP recommendations is 2.0 watts/kilogram (W/Kg) averaged over 10 grams of cellular tissue.
In tests to determine the SAR the device is used in positions of standard operation at its highest certified power level in all tested frequency bands. The actual SAR level of a device in use can be less than the maximum value because the device is designed to only use the power necessary to reach the network. This value changes depending on a number of factors such as the distance from a network base station.
Radio Frequency Interference
Radio frequency emissions from electronic equipment can interfere with other electronic equipment and can cause malfunctions. Although this mobile device has been designed, tested and manufactured in accordance with the EU regulations on radio frequency emissions, the mobile device's wireless transmitter and electrical circuits can cause interference with other electronic equipment. We recommend that you take the following precautions:
Plane : Wireless equipment can cause interference in aircraft.
- Turn off the mobile device before boarding a plane
- Do not use on the runway without the crew's permission.
Vehicles : Telephone radio- frequency emissions can affect a motor vehicle's electronic systems. With regards to your vehicle, check with the manufacturer or dealer.
Medical Implants :
To avoid any interference with the medical device, manufacturers of medical devices recommend a minimum distance of 15cm between wireless equipment and a medical implant such as a pacemaker or defibrillator. The following is recommended to people who have such devices:
- Always keep the wireless device at a distance of over 15cm from the medical device.
- Do not carry the wireless device in a breast pocket.
- Hold the wireless device at the ear opposite the medical device
- Turn off the wireless device if there is any suspicion of interference occurring.
- Follow the instructions provided by the manufacturer of the medical implant.
If you are fitted with a medical implant and have any questions regarding the use of wireless equipment, consult your doctor.
Hearing :
Warning: If you use headphones there is a risk of not being able to hear outside sounds clearly. Do not use headphones if there is a risk of endangering your safety.
Some wireless devices can interfere with the proper functioning of hearing aids.
Other medical devices :
Radio transmitting equipment, including wireless devices such as this mobile device, can interfere with the operation of inadequately protected medical equipment. Consult a doctor or the manufacturer of the medical equipment to see if the equipment is adequately protected from external Radio Frequency energy. Turn your device off in places where regulations apply, especially in hospitals.
Health Facilities :
Hospitals and health facilities may be using equipment that is particularly sensitive to external radio-frequency emissions. Turn your mobile device off when staff or signs tell you to.
Blasting sites and identified areas :
Switch off your equipment in zones where the atmosphere is potentially explosive. Follow all official instructions. Sparks in such areas could cause an explosion or fire, resulting in serious bodily injury or death. Switch off your device in gas stations, especially near the gas pumps. Carefully observe instructions on use in fuel depots, storage and distribution areas, at chemical plants or in areas where explosives are used.
Areas with a potentially explosive atmosphere are often, but not always clearly marked. These include areas where it is normally advisable to switch off engines, the area below deck on boats, faculties where chemicals are transferred or stored and areas where the air contains chemicals or particles such as grain, dust or metallic powder. Check with the manufacturers of vehicles that use LPG (such as butane or propane) if the device can be used safely in their vicinity.
All our mobile devices conform to international standards and regulations, and where appropriate national recognition, to limit the exposure of users to electro magnetic
fields. These standards and regulations were adopted after extensive scientific research. This research does not link the use of mobile phones with any adverse effects on health if the equipment is used in accordance to standards and regulations.
However, if you want to reduce the levels of exposure to radio frequency radiation you can limit your time using the mobile device in wireless mode because the length of time is a contributing factor to the exposure received by a person. Similarly, keeping the mobile device away from the body is another factor, as exposure levels lessen dramatically with distance.
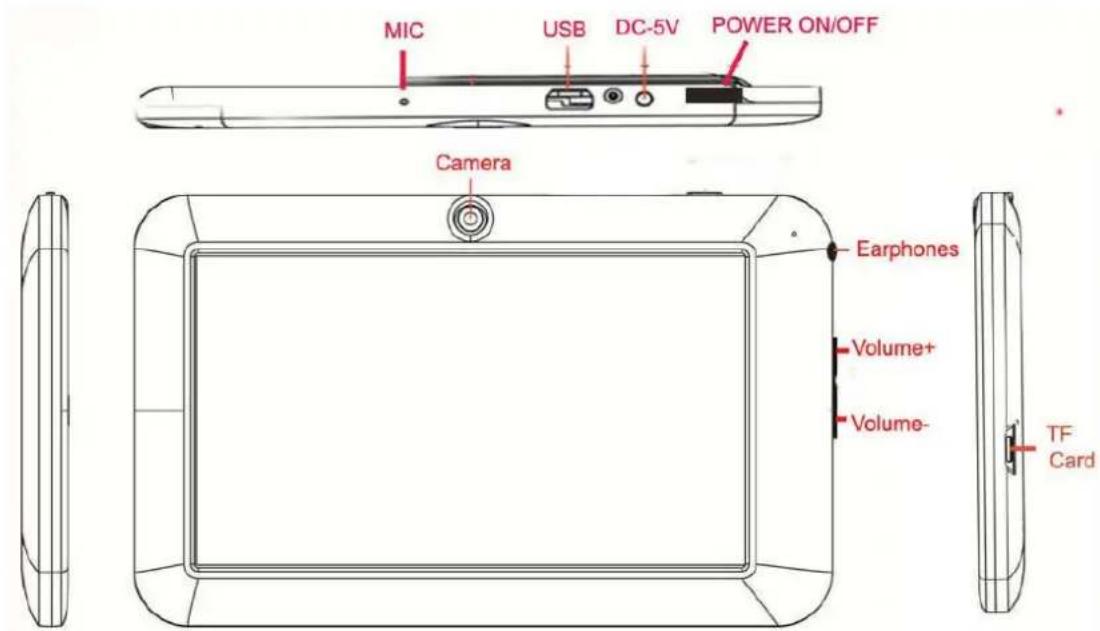
Appearance and button:
text_image
MIC USB DC-5V POWER ON/OFF Camera Earphones Volume+ Volume- TF CardKey
| 1.Key | ||
| No. | Name Function Definition | |
| 1 | Power | (1) long press to turn on/turn off the player (entering power off interface prompt)(2) short press to turn on/turn off the screen, entering lock screen standby mode. |
| 2 | Vol+/ Vol- | Increase/decrease volume short-cut key, short press to increase/decrease one frame volume; long press to increase/decrease volume continuously. |
| 3 | Back key Turn back to previous menu interface | |
| 4 | Home key Turn back to main interface | |
| 5 | Menu/Hold key | In the state of power on and standby, short press this key to unlock the screen(Hold key)In normal standby mode or software running state, short press the key popup to the corresponding menu(Menu key) |
2. Touch operation
| No. | Name Function Definition | |
| 1 | Short press | It indicates the press time shorter than 1.2s, it mainly used in selecting menu, confirm and etc. |
| 2 | Long press It indicates the press time longer than 1.2s. | |
| 3 | Slide/Drag operation | It belongs to identify the touch trace direction. Mainly used in picture/page turning/drag and etc. |
| 4 | Handwriting identification | It mainly used in inputting characters/symbol. |
| 5 | Virtual key | It belongs to virtual keyboard. |
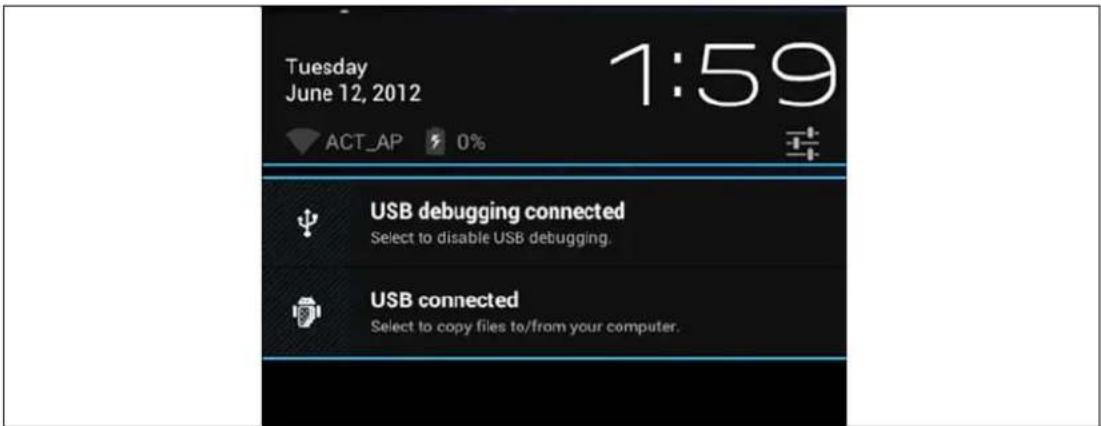
Status Icons
text_image
Tuesday June 12, 2012 1:59 ACT_AP 0% USB debugging connected Select to disable USB debugging. USB connected Select to copy files to/from your computer.On the bottom of screen status bar, there are three operation icons on the left side:
| Status icons Implication | |
| Back up soft key [KSGA] | Turn back to previous interface, its function is similar to BACK key |
Home soft key  | Back to main interface, its function is the same as HOME key. |
Shortcut key  | List the common applications and its thumbnail, then click to enter directly. |
The icons on the right side display the current state information of MID:
| Status icons Implication | |
USB connecting state | Display the USB connecting status |
USB debugging state | Display whether it connected the USB debugger. |
SD card connecting state | It prompts when SD card was pulled out. |
Time  | Display current time |
Wi-Fi  | MID has join up the internet via Wi-Fi. the more the signal, the stronger the signal is |
Battery  | Showing the volume of battery or charging state. |
Preparation
Use Micro SD card
This unit support Micro SD Card(TF card) up to 32GBB.
Plug-in: face the front side (the side with prints) Micro SD card upwards (the direction in which the machine's display screen faces) and connect it with the machine by plugging it with slight force into the card slot of the machine. Now the machine can play the files in the card.
Plug-out: push Micro SD card inwards slightly, it will spring back for certain length, and then take it out.
Charge the battery
The battery must fully charge up before you start to use it. You can charge the unit by connect it to a USB port of PC or the attached adapter.
When unit used for a certain period, the battery is going to low electricity, the battery icon show low battery, it is the time to charge up the battery again. If you don't charge up the battery, then the unit will turn of automatically, After the unit charge up again, unit will working perfectly.
Power ON/OFF/Standby
POWER ON: Pressing Power key to turn on the unit.
POWER OFF: During display the main interface page, Pressing Power button for 5s to turn off the unit, then click "YES", the unit will power off.
POWER SAVING STANDBY: During power on, pressing Power key to enter power saving standby mode, press Power key again back to normal mode.
Basic Function
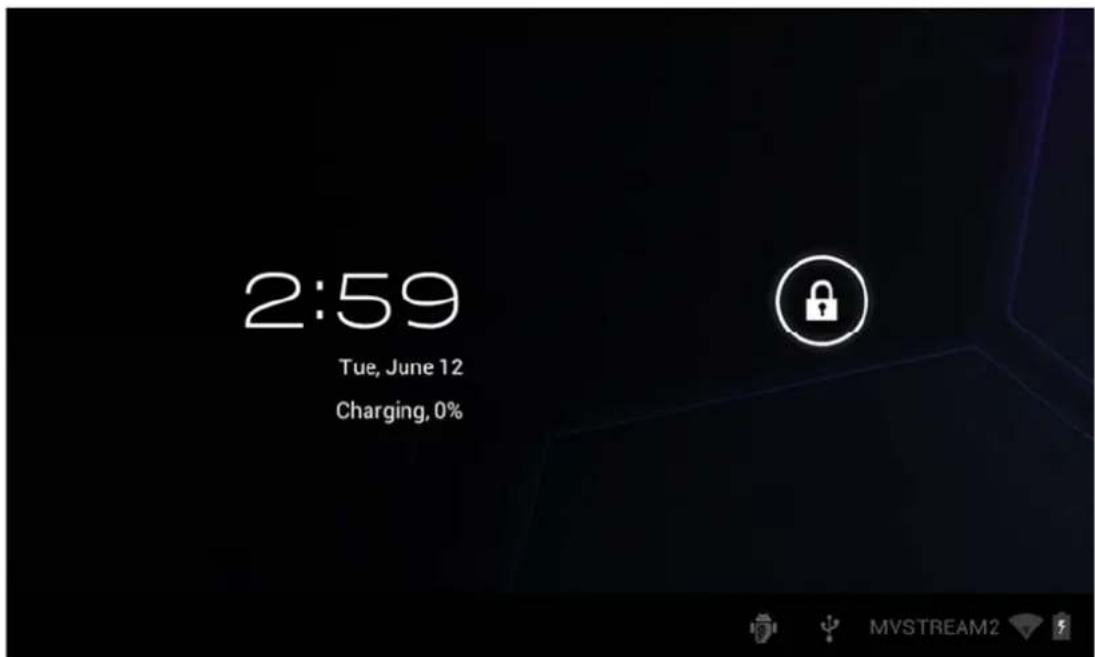
Main screen
After power on, the unit is locked, tap Menu key to unlock.
text_image
2:59 Tue, June 12 Charging, 0%Switch to other main screens: slide the screen leftward/rightward, it supports totally five main screens.
Switch to the first main screen: Tap the HOME icon on the status bar or HOME key on the player.
Main menu
Click the icon on the upper right side of main screen, and the main menu popped up. All the applications listed on the main menu, you can drag the screen leftward or rightward to check.

text_image
APPS WIDGETS SHOP Browser Calculator Calendar Camera Clock Downloads Email ES File Explorer ES Task Manag Gallery Messenger Music News & WeatherOpen or switch the applications
Select a program; tap its icon to start the application. Tap the HOME icon or HOME key to return to the main screen.
User defined screen (main screen manage)
Long pressing a certain application icon on the main screen, it can realize the main screen function of adding shortcut to it.
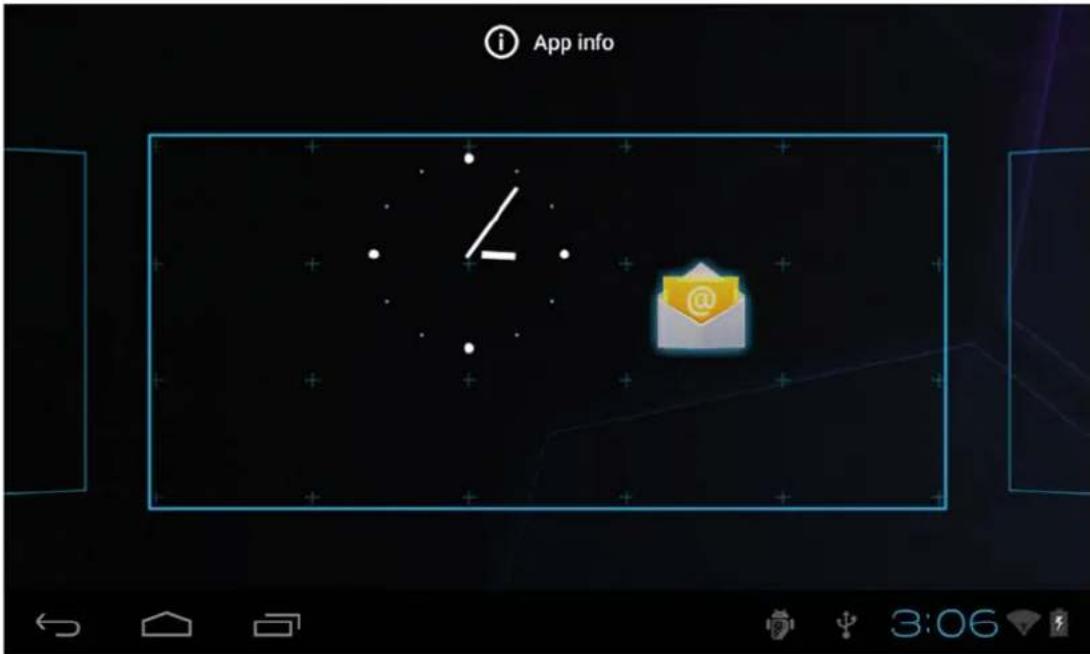
text_image
i App info @Zoom in or zoom out
When you view the pictures、webpage、emails or maps, zoom in or zoom out the frame by the gesture is supported. When you slide openly on screen by your two fingers, the frame will be zoomed in one stage; when you slide closely, the frame will be zoomed out one stage.
Watch the MID horizontal or vertical
This DEVICE supports to watch the screen horizontal or vertical when you turn it. And the contents will be changed while turning to adapt the display screen.
Input TXT
When you need to input, the keyboard will be appeared. And in this time, on the lower right side of screen, soft keyboard icon will appear. When you click it, the selecting menu of input will appear. As following figure:
Setting
Setting allows you to set applications, setting date and time, configuration network connection and etc.
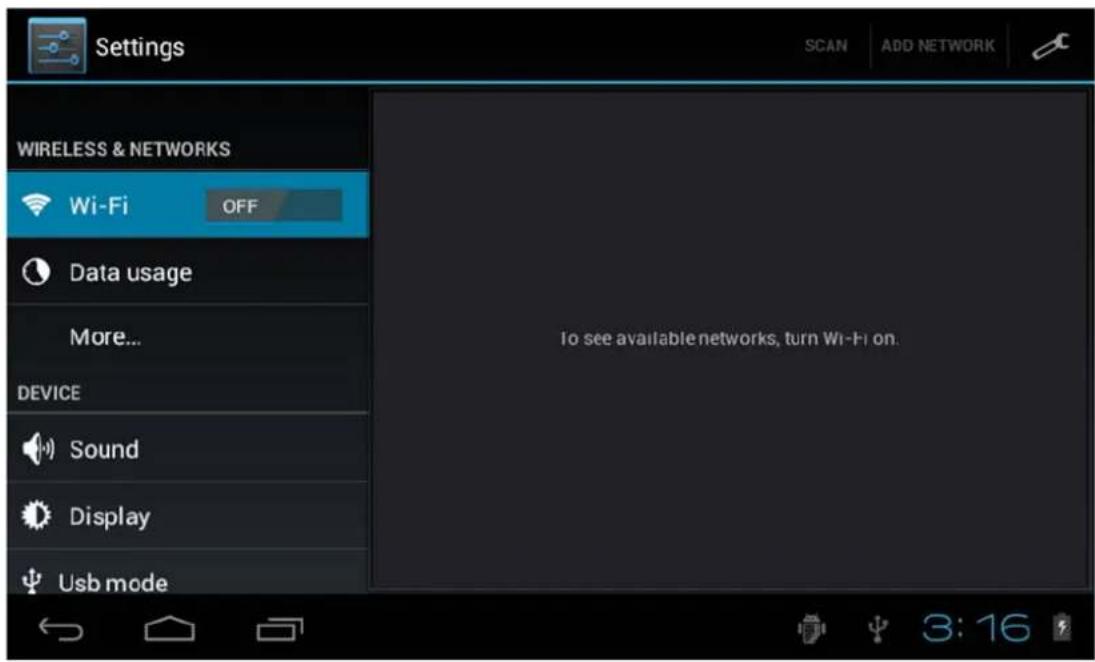
text_image
Settings SCAN ADD NETWORK WIRELESS & NETWORKS Wi-Fi OFF Data usage More... DEVICE Sound Display USB mode To see available networks, turn Wi-Fi on. 3:16Wireless and Network
It determines whether you connect internet by Wi-Fi.
Wi-Fi:
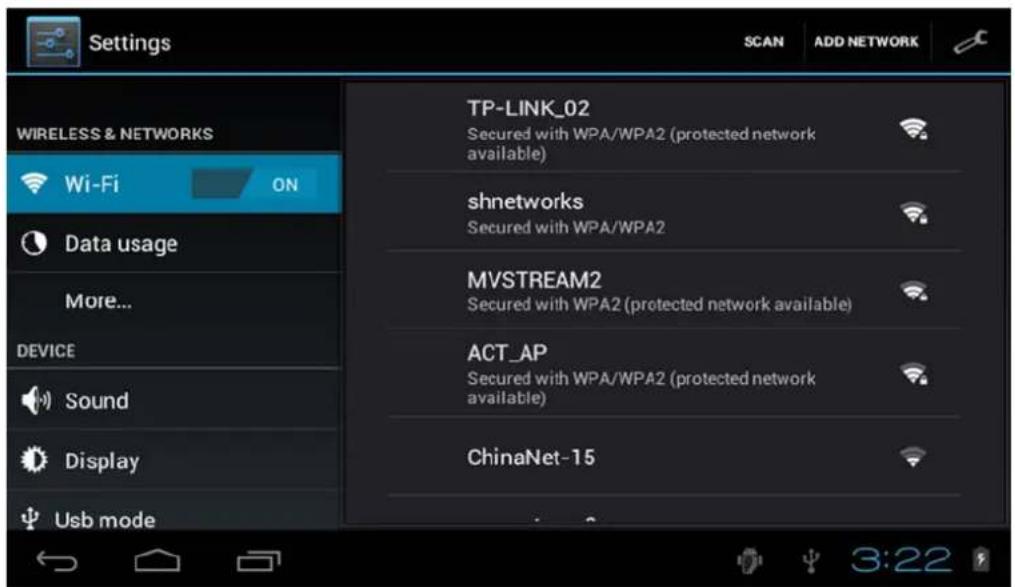
text_image
Settings WIRELESS & NETWORKS Wi-Fi ON Data usage More... DEVICE Sound Display USB mode TP-LINK_02 Secured with WPA/WPA2 (protected network available) shnetworks Secured with WPA/WPA2 MVSTREAM2 Secured with WPA2 (protected network available) ACT_AP Secured with WPA/WPA2 (protected network available) ChinaNet-15Join Wi-Fi network: click "open", MID detects the network within communication range for a while, then choosing a network, if it needs, inputting password.
After MID connects to some Wi-Fi network, the right side of screen status bar display signal intensity, the more the cell is, the stronger the signal is.

Once joining a Wi-Fi network manually, when the network is within communication range, MID will join this network automatically. If there are multiple networks used before are within communication range, then MID will join the last used network. click "OFF" to turn off the Wi-Fi.
(2)More:
Set "Airplane mode"、"VPN"、"mobile network" and so forth.

text_image
Settings WIRELESS & NETWORKS Wi-Fi ON Data usage More... DEVICE Sound Display Usb mode Airplane mode VPN 3:24Display

text_image
Settings Data usage More... DEVICE Sound Display USB mode Storage Battery Brightness Wallpaper Auto-rotate screen Sleep After 5 minutes of inactivity Font size Normal Enable HDMI 3:33Brightness: set the brightness of screen.
Wallpaper: we can choose wallpaper from the live wallpaper, picture library and normal wallpaper.
Auto-rotate screen: when MID is rotated, whether the image will be rotated at the same time to adapt watching.
【Notice】: In order to display well, the rotation will be forbidden when some applications or games is running.
Sleep: Setting that if there is no operation in a span
(15s/30s/1min/2min/5min/10min/30min), MID will sleep automatically, and the display backlight will be auto off to save battery.
Font size: setting displayed font size(small/normal/big/oversize).
Accounts and synchronization
Manage accounts and synchronize information. Tap "ADD ACCOUNT" on the upper right side of screen, company account, or email account.
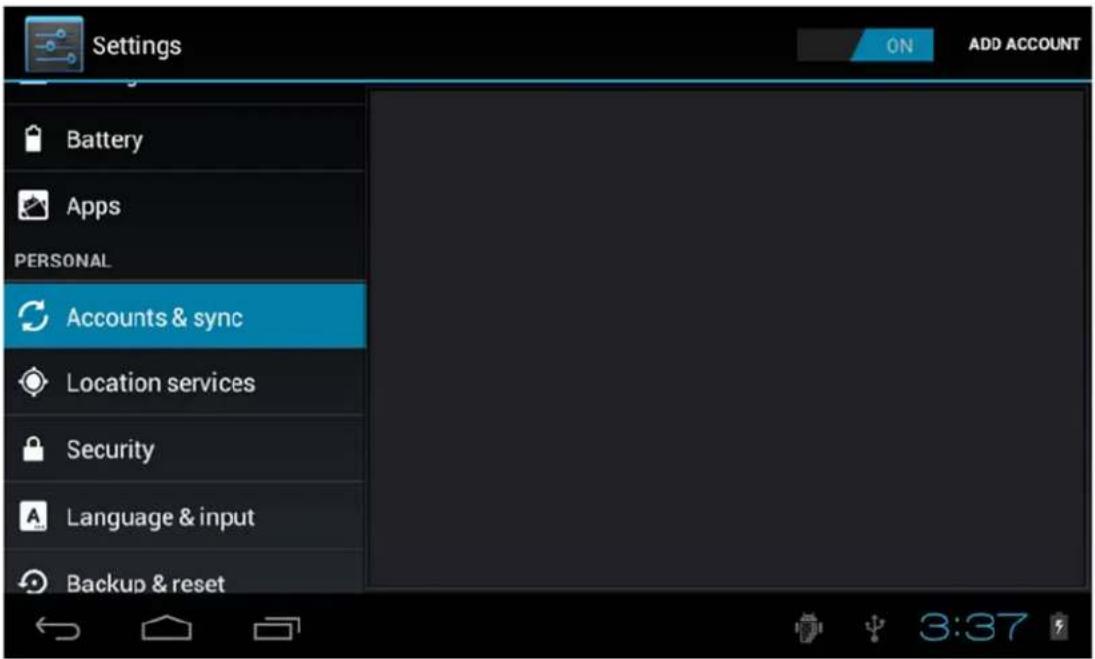
text_image
Settings Battery Apps PERSONAL Accounts & sync Location services Security Language & input Backup & reset ON ADD ACCOUNTSecurity

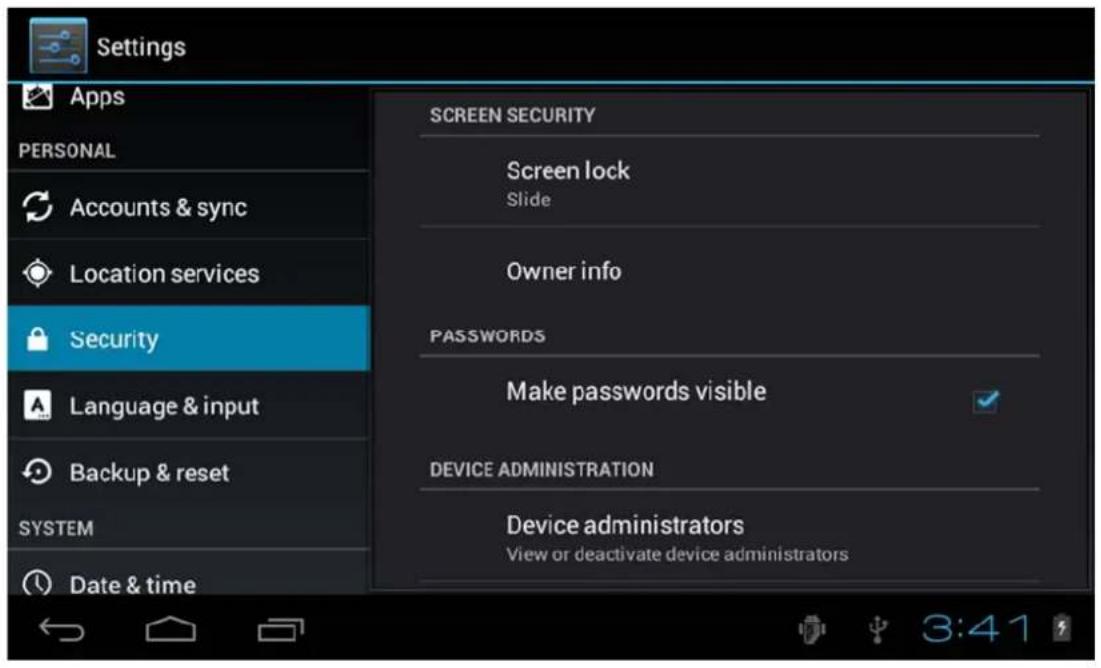
text_image
Settings Apps PERSONAL Accounts & sync Location services Security Language & input Backup & reset SYSTEM Date & time SCREEN SECURITY Screen lock Slide Owner info PASSWORDS Make passwords visible DEVICE ADMINISTRATION Device administrators View or deactivate device administrators 3:41Screen security:
(1) screen lock: Choose the unlock mode using when screen lock.
(2) owner information: Set the owner information which displayed when the screen lock.
Encryption:
Set the number PIN or password which you need input to decode the tablet each time.
SIM card lock: Set SIM lock.
Password: Whether display characters when you input password.
Device administration:
(1) Device administrator: View or deactivate device administrators.
(2) Unknown sources: Whether this option setting permits installing the applications which don't purchase from Android market.
Evidence storage:
(1) Confidential evidence: Display confidential CA certification.
(2) Install from SD card: Install certification from SD card.
(3) Clear evidence: Delete all certifications.
Language and input

text_image
Settings Accounts & sync Location services Security Language & input Backup & reset SYSTEM Date & time Accessibility Language English (United States) Spelling correction Personal dictionary KEYBOARD & INPUT METHODS Default 谷歌拼音输入法 Android keyboard English (US) 3:44Language: Choose the language which screen displayed.
Spelling correction: Input characters whether open correction.
Personal dictionary: Click the "ADD" button on the upper right side of screen; you can add vocabularies to create your own dictionary.
Keyboard and input: this option list the input installed in MID, you can do some related setting to each input.
(1) Default: Setting when a character input box appeared, it is default input.
(2) Android keyboard: Offer the setting of android English input.
(3) Japanese IME: Offer the setting of android Japanese input.
Accessibility

text_image
Settings Security Language & input Backup & reset SYSTEM Date & time Accessibility { } Developer options About tablet SERVICES No services installed SYSTEM Large text Auto-rotate screen Speak passwords Touch & hold delay Short 3:54Set whether use oversize font、autorotation screen、password display、touch and press delay、install webpage script.
Application Software
ES file browser
Tap 📄, you can browse file on MID and SD card by ES file browser. Tap 📄 or to switch from MID device and SD card.
Select multiple files(folders): tap 📄 slightly, then choose file.
Search a certain file(folder): tap slightly, screen display as follows. You can search by path or by file (folder).
Tap slightly; it can change file's arrangement. It also can arrange by list/icon.
Edit files/folders: press setting slightly, select operation from popup menu, you can cut、copy、rename、delete、select all and etc of selecting file.
You can also create new files/folders by
If it needs to set file browser, please press setting key to select setting.
You can also switch to task manager by
You can backup apps、uninstall them、create shortcut of them and etc via app manager. You can press menu key slightly, and popup setting menu.
Also you can long press a certain app, popup operation menu.
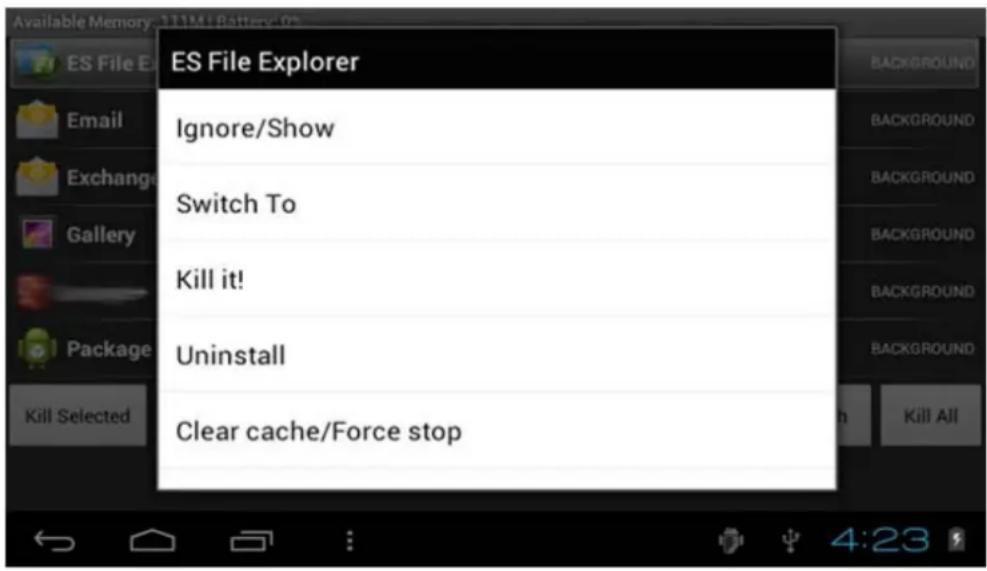
text_image
Available Memory: 111MI Battery: 0s ES File Explorer Ignore/Show Switch To Kill it! Uninstall Clear cache/Force stopMusic
:
Tap under the music library, all the music file listed separately on the folder of "Artists", "Albums", "Songs", "Genre".
Search music: Press Menu key slightly, enter into setting—search, input the music that you need and search in the library.
Shuffle: Press Menu key slightly, enter into setting—shuffle, and choose the music from library to play.
Default state will play on the basis of play list. You can create or edit the play list by your own love.
Note: If you delete the music from the play list, this file will not be deleted from disc.
Click any category to enter the list.
Play music: click the music name slightly.
You can play the music when you use the other applications. Such as: while browse pictures/read txt/surf the internet, while listen to music. When it is playing music background, upper left side of status bar displays, pressing and dragging downward, the screen displays as follows, click the music and back to music playing interface.
Video
Tap

le video library.
Play video: Tap the select video and wait a minute, after analysis, press to play. If the video has been played last time, it will ask about whether playing from the breakpoint. It means that playing from the point that you exit.
If you need to update the video file list, press menu key slightly and choose to update.
If you want to search the file you need, please press menu key slightly, choose to search, you can find the file in MID RAM or SD card(if the card has plugged in).
When the video play, the screen display as follows:

text_image
Video display mode: full screen, scale, original size Progress bar---- 00:26 1:30:20 PRE Fast Backward Fast Forward NEXT Play mode: sequence play, repeat current video, all loop play| Play the next file | press ➗ slightly |
| Play the previous file | Press ← slightly |
| Fast Forward | Press ➗ slightly, press once to adjust once, 1/2/4/8/16/32 time speed, in circulation, press ⏻ slightly back to normal play mode. |
| Fast Backward | Press ← slightly, press once to adjust once, 1/2/4/8/16/32 time speed, in circulation, press ⏻ slightly back to normal play mode. |
| Drag the video to any time point | Drag the progress bar |
| Video display mode | Press ⏻ slightly, full screen, scale, original size |
| Play mode | Press ➗ slightly, sequence play, repeat current video, all loop play |
If you want to output the video in MID to TV side, you can use the HDMI cable to connect MID to the TV's HDMI input side when the video is playing. At this time, the video frame auto switches to TV, MID screen only display the operating control interface.
Internet
Before you surfing the internet, ensure your unit has been connected to Wi-Fi. You can surf the internet by android attached browser.
Click "browser" below main menu, entering homepage.
Open the webpage: input the URL on address bar, click "forward" button on the lower right side of soft keyboard to enter website. You can check it horizontally or vertically, the webpage will be auto adjust to adapt the screen.
You can scroll the webpage by drag screen upward, downward, leftward or rightward. The zoom bar will be activated if you touch the screen slightly. And zooming in or zooming out current webpage to check.
Online
It supports online video play.
If you need to use online playing, unit must connects with Wi-Fi.
Select a network video media from the main menu, click and enter its homepage directly, and you can watch the video you like.
Press Menu key, menu options popup, it can turn back to main menu, or add the current URL as bookmark, or set the screen scaling size.
Touch screen slightly when the video play, it also can activate the zoom bar, and adjust the video size.
Picture
Click the picture library, starting to browse picture. All pictures list on the basis of their deposit route.
E-books
Click your storage e-books in MID or SD card by ES file browser:
Click a certain e-book file among those, program will prompt selecting one way to open:
Email :You can send or receive email by MID.
Click Email , then start to send email.
Calendar
Click calendar, opening Calendar.

text_image
June 2012 SUN 10 MON 11 TUE 12 WED 13 THU 14 FRI 15 SAT 16 11 AM 12 PM 1 2 3 11:02Change schedule: click that day schedule, enter the schedule time period on above picture, long press the schedule time period, you can view/edit/delete/create it.
Troubleshooting
- The device won't start: This may happen if your battery is empty. Connect the supplied power cord to the Tablet PC Power connector and to a wall outlet. Then press the Power button to start the device. The Power status indicator, on the left side of the device will turn on.
- The device won't shutdown: If the Tablet PC cannot be shutdown via the Start menu > Shutdown item, you can force the device to shut down by holding the Power button until the system turns off.
-
The device freezes while using an application : you can select Start Task Manager. Under the Applications tab, select the application you are having problems with, and click on End Task. If this does not work, you can try to force the Tablet PC to shut down by holding the Power button more than 10 Seconds until the system turns off.
-
The Tablet PC has problems connecting to the Internet :
First of all, verify that your modem or router is on and functioning correctly. Also check that there is a WiFi connection (Icon in the system tray, in the bottom right corner of the screen) or that the Tablet PC detects a WiFi signal (Icon). Make sure that the WiFi module is turned on.
Also try to bring your Tablet PC closer to the modem/router to make sure that it is not a reception problem. Verify that the key (WEP, WPA, WPA2, etc.) you entered on the Tablet PC is the same as the one configured on your WiFi modem/router. You can also try connecting to the WiFi using a friend's laptop to see if it is your WiFi modem/router or Tablet PC that is causing the problem. For more details, check the documentation that came with your modem/router.
Reboot: Press and hold the power key more than 10 seconds, the available to Restarts the device "
Specification
Touch panel 7" Capacitive multi point
Android 4.0
Resolution 800 x 480
CPU: - 1.2 GHz
Storage 4GB Nand flash +512MB DDR III
Micro card reader : Max 32GB
USB port 2.0
Digital camera 0,3 Mp
WIFI 802,11b/g/n
Supported formats :
Picture file : jpeg, jpg, bmp, gif, png
Audio : mp3, mp2, wma, wav, flac, ogg, aac, 3gp
Video : rmvb, mkv, wmv, mov, mp4, pmp, mpeg, mpg, flv, 3gp, mpg, 264
Accessories :
Main adaptor AC240V / DC5V1.5A ;
User manual; Usb cable
Declaration of CE Conformity

This symbol on the product or on the container indicates that this product cannot be eliminated with the general waste. The user is responsible for eliminating this kind of waste by throwing them away at a “recycling point” specifically for electrical and electronic waste. Selective collection and electrical equipment recycling contribute to preserve natural resources and warrant waste recycling to protect environment and health. In order to receive further information about electrical and electronic waste collecting and recycling, contact your Local Council, the service of household waste or the establishment where the product was acquired.

At full volume, prolonged listening to the portable audio device may damage the user's hearing.
For warranty information and technical support, please visit www.nevir.es
Product features, specifications and appearances are subject to change without notice
PLEASE INCLUDE ALL THE DIRECTIVES THAT APPLY FOR THIS MODEL
PLEASE INCLUDE ALL THE DIRECTIVES THAT APPLY FOR THIS MODEL