EG-PM1W-001 WiFi - Uncategorized EnerGenie - Free user manual and instructions
Find the device manual for free EG-PM1W-001 WiFi EnerGenie in PDF.

User questions about EG-PM1W-001 WiFi EnerGenie
0 question about this device. Answer the ones you know or ask your own.
Ask a new question about this device
Download the instructions for your Uncategorized in PDF format for free! Find your manual EG-PM1W-001 WiFi - EnerGenie and take your electronic device back in hand. On this page are published all the documents necessary for the use of your device. EG-PM1W-001 WiFi by EnerGenie.
USER MANUAL EG-PM1W-001 WiFi EnerGenie
natural_image
White energy plug with 'energenie' branding and a circular socket (no additional text or symbols visible)USER MANUAL
HANDBUCH
HANDLEIDING
MANUEL DESCRIPTIF
text_image
Image displaying a set of national flags including the European Union, Germany, Switzerland, Austria, Netherlands, Belgium, Luxembourg, France, Russia, and Ukraine.- Do not plug several sockets in line
- Do not use if covered
- De-energized only if power plug is unplugged
- NEVER connect appliances which do not allow unattained operation!

text_image
CE RoHS MADE IN CHINA1. Introduction
Thank you for your purchase of this EnerGenie WiFi smart home socket. Your EG-PM1W-001 is an advanced power socket with smart power management features. You can control the socket via your local WiFi network, the internet, or the PowerMan app.
Because you can control the smart socket via several different interfaces (power manager interface with secure data transfer, embedded webserver and energenie.com cloud service), it can be integrated into most smart home solutions.
With your free personal user account at our EnerGenie.com cloud server, you can manage your EG-PM1W-001 from all over the world with any internet browser. With your free user account, you also get access to our free PowerMan app for controlling the EG-PM1W-001 (available for iOS and Android smartphone or tablets).
The EG-PM1W-001 also has a WiFi repeater function, which enables it to extend the range of your home or office WiFi network.
The smart socket can be switched on/off manually, via a timer schedule, or by different programmable events. The timer schedule is stored inside the device itself (hardware schedule only), so the smart socket does not need any network connection to execute the timer schedule.
1.1. Features
- Intelligent programmable WiFi power socket with built-in WiFi-repeater function
- Switch connected devices on or off with your computer, tablet or smart phone
• Fully featured programmable timer schedule possibilities - Link on/off switching of the socket to certain software events or Windows start-up/shutdown
- Easy access from any computer within your home network (via your Internet browser)
- With your free EnerGenie.com user account you will get easy worldwide access to your EG-PM1W-001, via internet or the free PowerMan app
- Built-in 300 Mbps WiFi-repeater for improved range of your wireless network
1.2. Specifications
• High-speed 300Mbps WiFi 802.11 b/g/n interface
• WLAN repeater mode
• Input voltage: up to 250 VAC, 50 – 60 Hz
• Maximum load current: 16 A
energenie
EG-PM1W-001 WIFI SMART HOME SOCKET
• Maximum power consumption: 2.5 W
• Hardware schedule features:
- Maximum number of independent hardware schedule events – 45 per socket
○ Time setting accuracy in seconds
○ Combine repeating and one time events
- Timer accuracy: less than 2 seconds error per day provided that power is always present. Otherwise there can be an additional error of up to 2 seconds for each time the device is turned off.
- Indoor use only
• Dimensions: 135 x 92 x 78 mm
• Net weight: 0.35 Kg
1.3. Hardware requirements
- Local area network with WLAN router
- Any Internet-enabled computer connected to the local area network
- Computer running Windows® 2000/XP/7/8 is required for using the Power Manager software (use of this software is not compulsory)
1.4. Package contents
- EG-PM1W-001
- User manual and Quick installation guide
• CD with Power Manager software for Windows
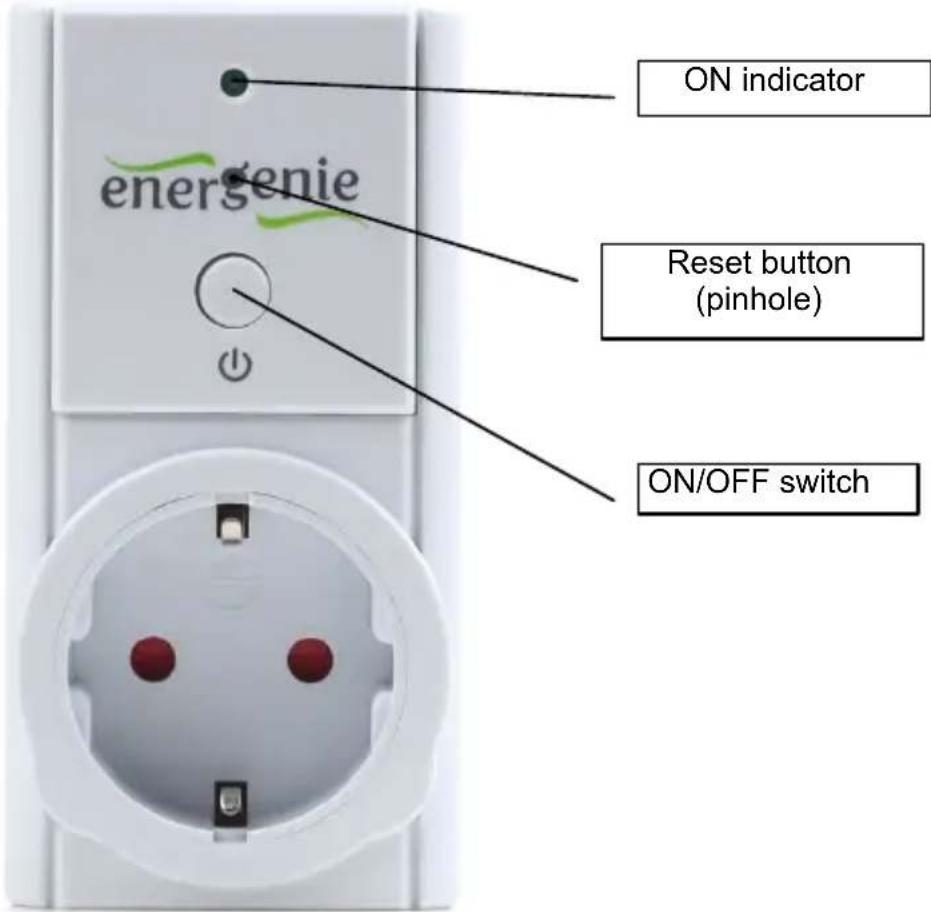
2. Indicators and controls of EG-PM1W-001
Figure # 1
text_image
ON indicator energie Reset button (pinhole) ON/OFF switchAll brands and logos are registered trademarks of their respective owners
- ON/OFF switch – toggles the socket output between on and off
- ON indicator – shows a light if the socket is ON, otherwise the socket is OFF.
- Reset button (pinhole) – when pressed and held for 5 seconds, the socket's WLAN configuration reverts to its default settings (See default settings list in p.4.5).
3. Installation
- It is strongly recommended to avoid installing the device in damp or wet places.
- EG-PM1W-001 should be connected to the European AC wall socket of the standard DIN 49 440.
3.1. Easy setup of the EG-PM1W-001 with the PowerMan app
- Connect your EG-PM1W-001 to the power socket and wait around 20 seconds for socket initialization.
- Press the reset button in the pinhole on the front using a blunt narrow pin (e.g paperclip) and keep pressed for 5 seconds to reset the EG-PM1W to the defaults. Wait another 20 seconds for socket initialization.
- Meanwhile download and install the free PowerMan app on your smartphone or tablet PC:
For iPhone 4 (or higher) : https://itunes.apple.com/ru/app/powerman/id486183471

text_image
QR code image containing encoded data, no visible human-readable text- For Android OS 2.1.x (or higher): https://play.google.com/store/apps/details?id=peacemaker.energeniepowermanager

text_image
QR code image containing encoded data, no visible human-readable text- Create your free user account on energenie.com cloud server by following the instructions in the app itself, or sign in to your existing account.
- Add the new EG-PM1W device by following the instructions in the app itself.
3.2. Setting up the EG-PM1W-001 as an Access Point (using web browser)
- Connect your EG-PM1W-001 to the power socket and wait around 20 seconds for socket initialization.
- Your EG-PM1W-001 can now be switched on and off by means of the ON/OFF switch. If the ON indicator is green, this means that the socket is now live and connected to the power supply.
-
Open up a web browser in your WiFi-enabled computer or smartphone.
• To connect to the EG-PM1W-001 WiFi network: -
Connect to the network with SSID "EG-PM1W_xxxxxx", where "xxxxxx" is last 6 digits of the EG-PM1W-001 MAC address.
○ No password is needed to connect. - Ensure that the option Get the IP address automatically is enabled on your PC.
- Go to http://egsetup.net (or http://10.10.10.254) in your browser.
- Input login "admin", password "admin" in the login page (see Figure #2) and click Sign In. You should now be connected, and able to
manage the EG-PM1W-001 via the web interface. Initially, the EG-PM1W-001 is in “access point” mode. If you want to change to “repeater” mode follow the steps described in the following section (3.2).
3.3. Setting the WiFi repeater mode (using web browser)
- Log into the EG-PM1W-001 web interface, as described in section 3.2.
- Select Wireless Network in the left menu (see Figure #3).
- If it is required by the WLAN network configuration, choose Static IP for the Network type setting and fill in the IP address, mask, gateway, DNS manually, otherwise select the DHCP Client option to allow the network to assign the IP address automatically. The DHCP Client option is suitable for most users.
- Click Site survey.
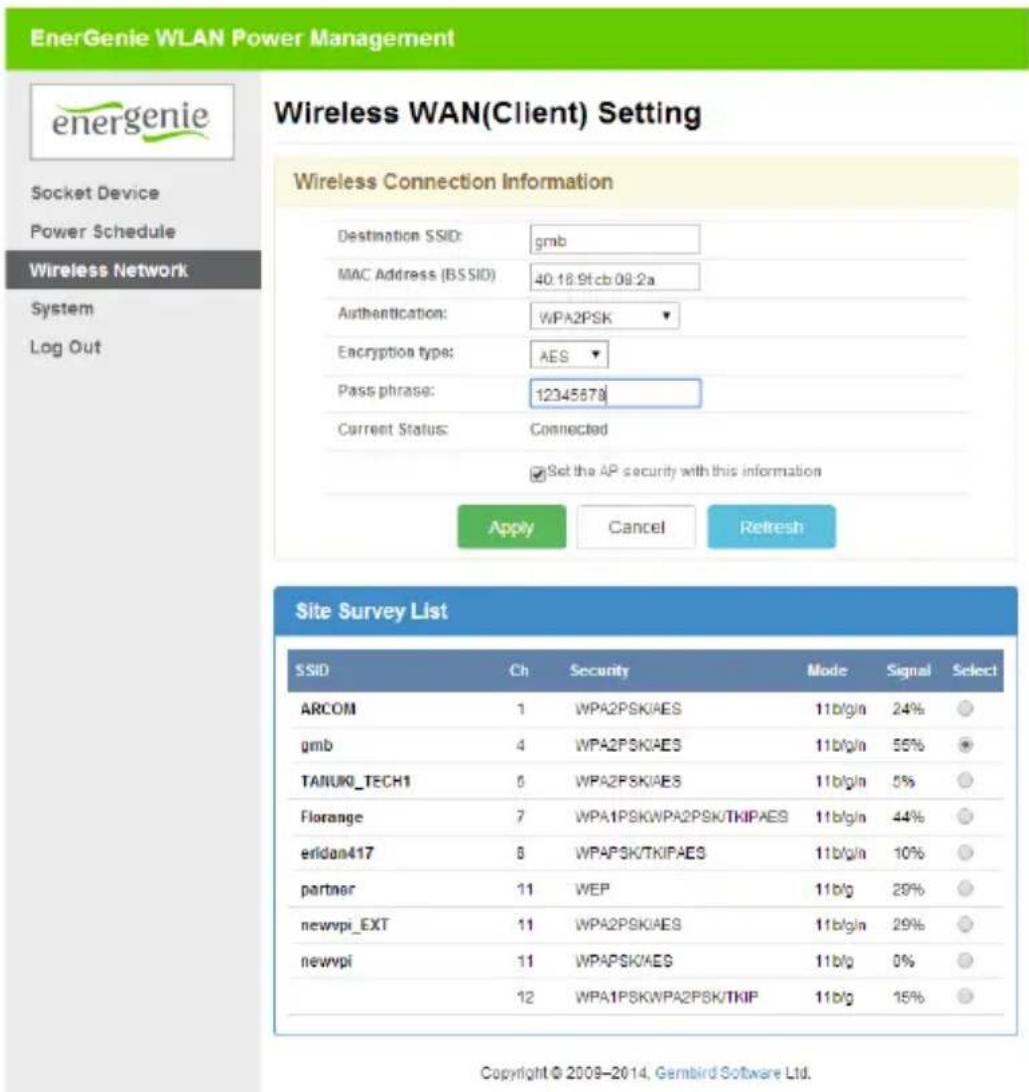
- In the "Wireless WAN (Client) Setting" page select the SSID of your network, and enter your Passphrase (see Figure #4).
- In order to ensure that the repeater network is secure, and to allow for seamless roaming between the host and repeater's network, it is recommended to use the same encryption type and password of the host WLAN network. In this case, leave Set the AP security with this information option checked.
- Click “Apply”. At this point, the EG-PM1W-001 should be in WiFi repeater mode. The default SSID is “EG-PM1W_xxxxxx”. You can change the repeater’s SSID to the SSID of your host network, WiFi channel, or encryption type and password in the Wireless Network page.
3.4. Power Manager software installation for Windows PC
- Before setting up the Power Manager software, you need to configure the access to the EG-PM1W-001 web interface (see sections 3.1 - 3.2).
- Insert the Power Manager CD into the PC CD-ROM drive and run setup.exe. If your laptop does not have CD-ROM player, just download the latest software from www.energenie.com and run the installer package.
- In order to connect the EG-PM1W-001 with the Power Manager software, you need the IP, PM port and PM password settings. You can find the IP in the Wireless Network page in the web interface. You can also find the IP by using the LAN find utility in the Power Manager software. The PM port and PM password need to be set in advance in the System page. Usually the PM port value is 5000. The password shall contain between 1 and 8 characters.
- In Power Manager, Select Device->Add device from the main menu. Enter the device name, IP address, PM port, PM password, and then click OK. After a few seconds, the EG-PM1W-001 icon will 12
All brands and logos are registered trademarks of their respective owners
appear in the main window and the connection status will turn green. EG-PM1W-001 is now connected and can be managed. Note, antivirus or firewall software may block connection to the EG-PM1W-001. Please, configure your antivirus/firewall to allow connections to the IP address and port of your EG-PM1W-001.
3.5. Setting up the EG-PM1W-001 for use with the EnerGenie.com free user account
- Log into the EG-PM1W-001 web interface and go to the Socket page.
- Click Register. The energenie.com login page will be opened in a new browser window.
- Click New account or login to your existing account. Complete the form in newly opened page. After clicking Register, a new page with your EG-PM1W-001 device will appear. Click the device icon to open the device page from where you may control the device.
- Return to the Socket page and click Activate. Wait a few seconds until the status under the button shows “Connected and Activated”. The EG-PM1W-001 can now be managed via your user’s account on EnerGenie.com.
4. The web server
All brands and logos are registered trademarks of their respective owners
Your EG-PM1W-001 is equipped with a web-server which allows managing the device using any web browser such as Internet Explorer, Firefox, Chrome, etc.
4.1. Web-server login
To access the web-server of the EG-PM1W-001, just open Internet Explorer (or other browser) and input http://egsetup.net or the IP address of your EG-PM1W-001 (for example http://192.168.1.241). The login page will then be displayed (see Figure #2).
Javascript must be enabled in your Internet Explorer (or other browser) settings.
Figure # 2

text_image
energenie Username Password Sign inThe default login is: username: admin password: admin
All brands and logos are registered trademarks of their respective owners
It is recommended to change the password on the System page after the first login. After successfully logging in, you will arrive at the Socket page
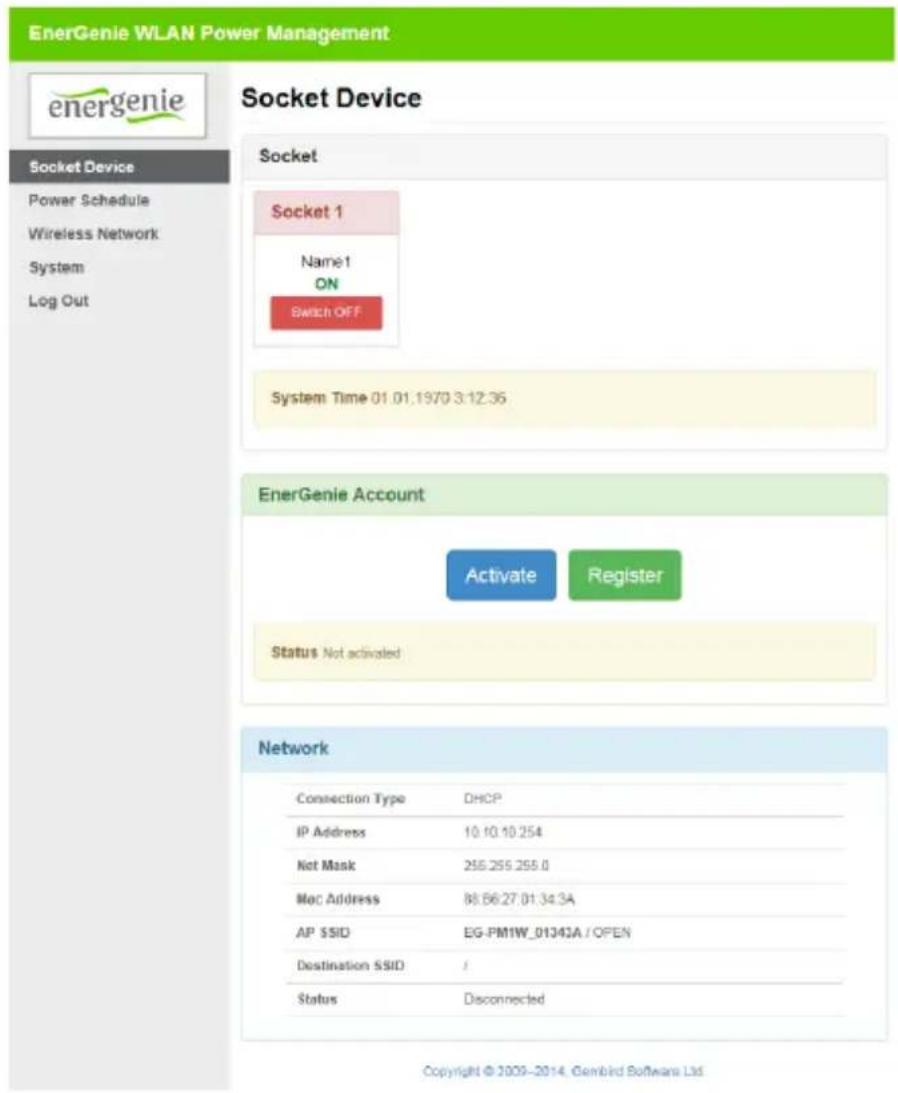
4.2. Socket
Through the Socket page (see Figure #3) you will be able to see the status of your manageable socket and switch the socket on and off manually.
The system time shows the time currently set on the device. It is used for the execution of the time schedule.
The Network section shows you the current WLAN network settings and status.
The Socket page also allows you to set up how the EG-PM1W-001 can be accessed and managed over the internet via EnerGenie.com when there is no static external IP address. Through the EnerGenie.com interface, it is possible to switch the device on and off, as well as set or check the time schedule. Setting up this free service is described in section.3.4 .
Figure # 3
text_image
EnerGenie WLAN Power Management energenie Socket Device Socket Socket 1 Name:1 ON Switch OFF System Time 01.01.1970 3:12:36 EnerGenie Account Activate Register Status Not activated Network Connection Type DHCP IP Address 10.10.10.254 Not Mask 255.255.255.0 Mac Address 88.66.27.01.34.3A AP SSID EG-PM1W_01343A / OPEN Destination SSID / Status Disconnected Copyright © 2009-2014, Genbird Software Ltd.All brands and logos are registered trademarks of their respective owners
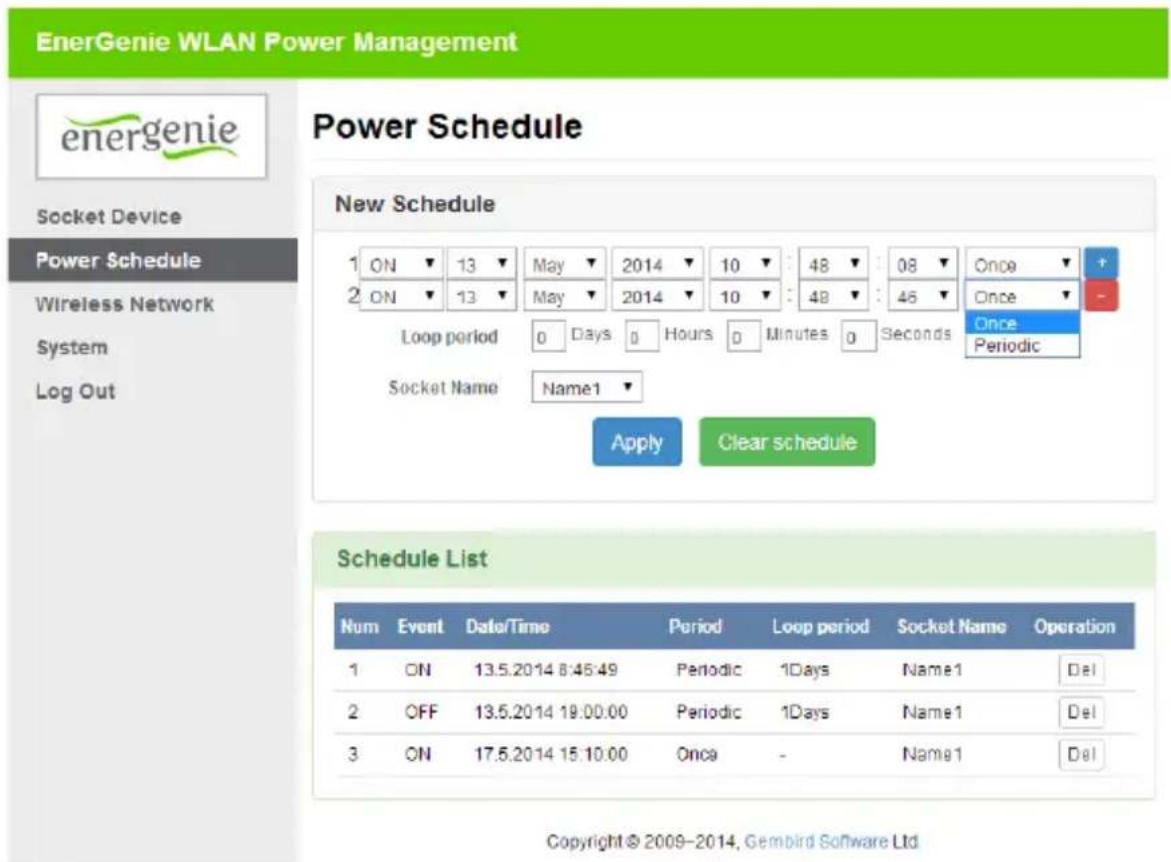
4.3. Power Schedule
On the Power Schedule page (see Figure #4) it is possible to set up the time schedule for switching the socket ON or OFF. You can add or remove up to 45 schedule events (use + and – buttons). For each event, you can set the date and time when it occurs and select whether it is executed only once or periodically. The entire schedule can be cleared by clicking the Clear schedule.
Although the hardware schedule is saved when the device is powered off, the local time will be reset. Therefore, for proper schedule execution after powering off, selecting the NTP enable option is highly recommended (it is enabled by default). Otherwise the local time will need to be restored manually after each “Power Off” event.
Figure # 4
text_image
EnerGenie WLAN Power Management energenie Power Schedule Socket Device Power Schedule Wireless Network System Log Out New Schedule 1 ON ▼ 13 ▼ May ▼ 2014 ▼ 10 ▼ : 48 ▼ : 08 ▼ Once ▼ 2 ON ▼ 13 ▼ May ▼ 2014 ▼ 10 ▼ : 48 ▼ : 46 ▼ Once ▼ Loop period 0 Days 0 Hours 0 Minutes 0 Seconds Once Periodic Socket Name Name1 Apply Clear schedule Schedule List Num Event Date/Time Period Loop period Socket Name Operation 1 ON 13.5.2014 8:45:49 Periodic 1Days Name1 Del 2 OFF 13.5.2014 19:00:00 Periodic 1Days Name1 Del 3 ON 17.5.2014 15:10:00 Once - Name1 Del Copyright © 2009-2014, Gembird Software Ltd4.4. Wireless Network Settings
On the Wireless Network page (see Figure #5) you can set up the EG-PM1W-001 IP and WLAN settings. In the Basic Network section, you can
All brands and logos are registered trademarks of their respective owners
choose whether to connect automatically through DHCP or provide a static IP address. In the Wireless AP (Access Point) section, you can configure the WLAN network settings assigned to EG-PM1W-001. Newly chosen settings will be implemented after clicking Apply.
These settings also work when the device is in Repeater mode provided that a connection to the host AP is established. To set up this connection, click Site survey. In the new page select the SSID option corresponding to the host AP from the list. You can rescan SSIDs by clicking Refresh. The security settings for the repeater should usually be the same as those for the host AP. To copy these settings from the host AP, leave the Set the AP security with this information option checked. When selected, input the pass phrase and click Apply. The EG-PM1W-001 will connect to that host AP. You will then need to reconnect your client to the EG-PM1W-001 SSID.
Figure # 5
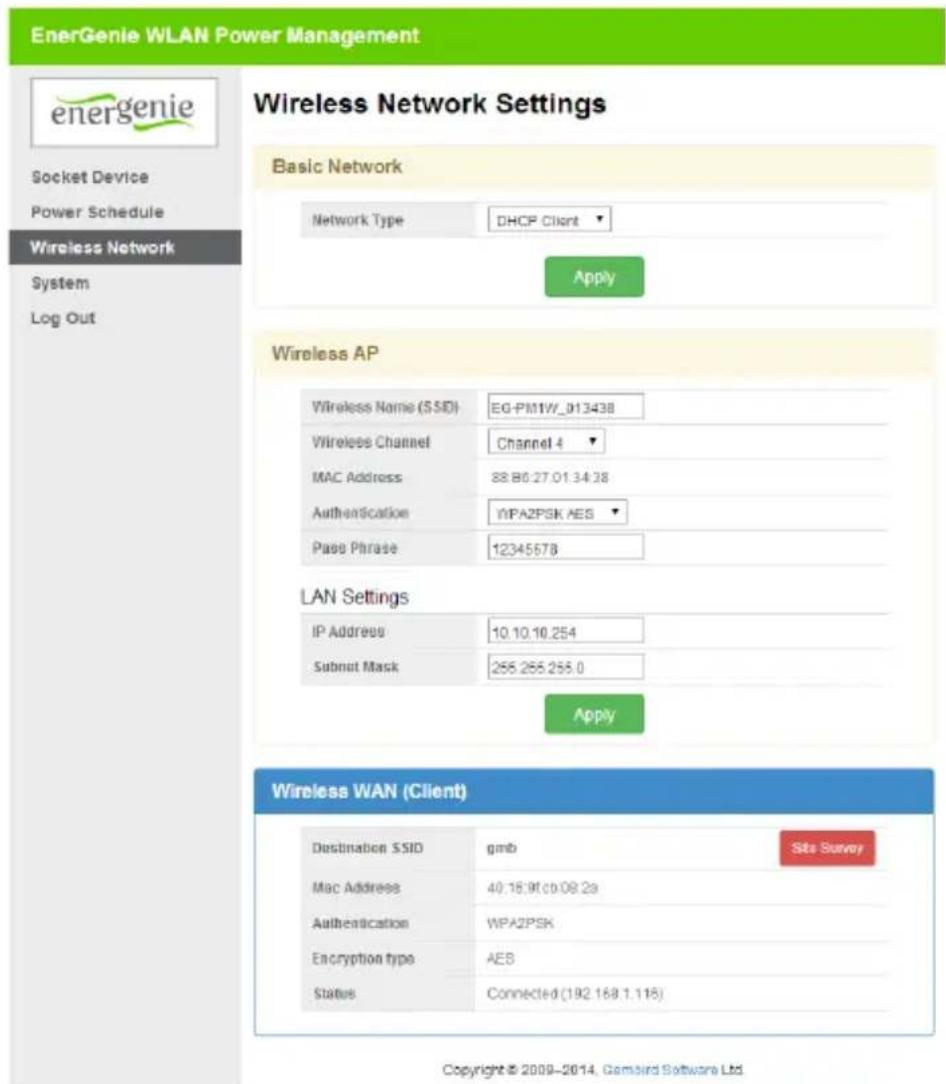
text_image
EnerGenie WLAN Power Management energenie Socket Device Power Schedule Wireless Network System Log Out Wireless Network Settings Basic Network Network Type DHCP Client Apply Wireless AP Wireless Name (SSID) EG-PM1W_013438 Wireless Channel Channel 4 MAC Address 88.86.27.01.34.38 Authentication WPA2PSK AES Pass Phrase 12345678 LAN Settings IP Address 10.10.10.254 Subnut Mask 255.255.255.0 Apply Wireless WAN (Client) Destination SSID gmb Site Survey Mac Address 40.16.91.00.08.23 Authentication WPA2PSK Encryption type AES Status Connected (192.168.1.115) Copyright © 2009-2014, Gambird Software Ltd.All brands and logos are registered trademarks of their respective owners
Figure # 6
text_image
EnerGenie WLAN Power Management energenie Socket Device Power Schedule Wireless Network System Log Out Wireless WAN(Client) Setting Wireless Connection Information Destination SSID: gmb MAC Address (BSSID) 40.18.9t cb 08:2a Authentication: WPA2PSK Encryption type: AES Pass phrase: 12345678 Current Status: Connected ✓ Set the AP security with this information Apply Cancel Refresh Site Survey List SSID Ch Security Mode Signal Select ARCOM 1 WPA2PSK/AES 11b/g/n 24% ○ gmb 4 WPA2PSK/AES 11b/g/n 55% ○ TANUKO_TECH1 6 WPA2PSK/AES 11b/g/n 5% ○ Florange 7 WPA1PSKWPA2PSK/TKIPAES 11b/g/n 44% ○ eridan417 8 WPAPSK/TKIPAES 11b/g/n 10% ○ partner 11 WEP 11b/g 29% ○ newvpi_EXT 11 WPA2PSK/AES 11b/g/n 29% ○ newvpi 11 WPAPSK/AES 11b/g 0% ○ 12 WPA1PSKWPA2PSK/TKIP 11b/g 15% ○ Copyright © 2008-2014, Gembird Software Ltd.All brands and logos are registered trademarks of their respective owners
4.5. System
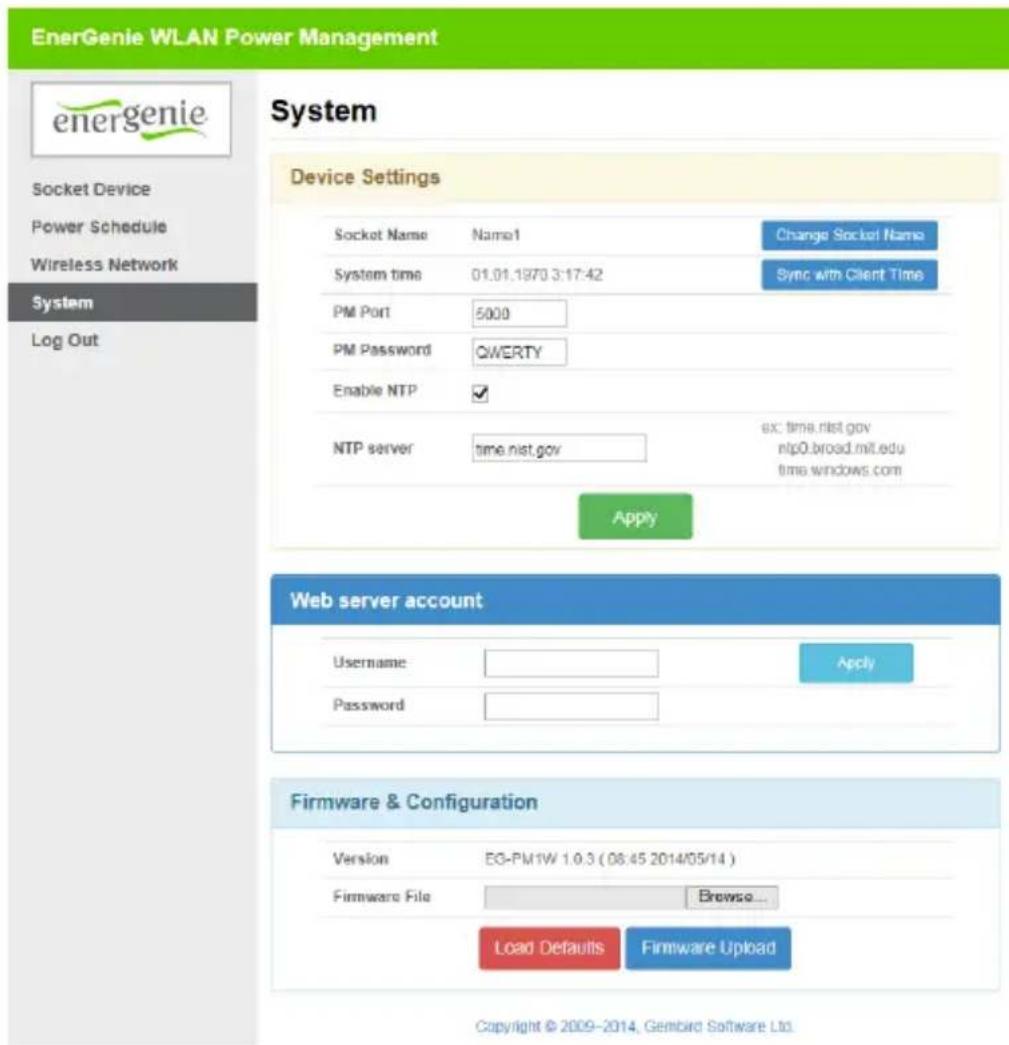
On the System page you can change the socket name, web-server login data, time (set it automatically using the NTP server or manually using the client computer), Power Manager interface TCP port and password (for accessing by Power Manager software), update the firmware and reset the configuration to the default values (works in the same way as the hardware Reset button).
The socket name should refer to the device which is attached to this socket. For example, if the socket is connected to the TV, then the socket name should be set to "TV".
Before the EG-PM1W-001 schedule can be set up, the internal clock must be correct. Click Sync with Client Time to copy the time from the client computer used to access the web server. Alternatively, if the option Enable NTP is set (it is set by default) then the time will be taken from the NTP server. The device will try to connect with the server every 18 hours. The first synchronization takes place in 15 seconds after clicking Apply.
For NTP time correction to work properly the device should have access to the Internet and have a proper DNS server setting.
A password may be set to control access to the Power Manager software. The password should be between 1 and 8 characters
The Power Manager software needs an open port to access the EG-PM1W-001. By default, port 5000 is used, but this can be changed to any other port except for port 80 which is always occupied by the web server.
Don't forget to click Apply to save your settings.
All brands and logos are registered trademarks of their respective owners
Clicking Load defaults resets the WLAN configuration settings to the default values.
Default settings:
All time schedules cleared
Network type (in Repeater mode): DHCP client
Wireless Name (SSID): "EG-PM1W_xxxxxx", where "xxxxxx"
are the last 6 digits of the EG-PM1W-001 MAC address.
Wireless Channel: 6
Authentication: NO SECURITY
IP address: 10.10.10.254
Subnet mask: 255.255.255.0
Socket Name: Name1
System time: 1.1.1970 00:00:00
PM port: absent
PM password: absent
Enable NTP: disabled
NTP server: time.nist.gov
Username: admin
Password: admin
Figure # 7
text_image
EnerGenie WLAN Power Management energenie System Socket Device Power Schedule Wireless Network System Log Out Device Settings Socket Name Namal Change Socket Name System time 01.01.1970 3:17:42 Sync with Client Time PM Port 5000 PM Password QWERTY Enable NTP ✓ NTP server time.nist.gov ex: time.nist.gov ntp0.broad.mit.edu time.windows.com Apply Web server account Username Apply Password Firmware & Configuration Version EG-PM1W 1.0.3 (08:45 2014/05/14) Firmware File Browse... Load Defaults Firmware Upload Copyright © 2009-2014, Gembird Software Ltd.All brands and logos are registered trademarks of their respective owners
4.7. Web-server logout
Having finished working with EG-PM1W-001, choose Log Out in the main menu. If you don't do this, you will be logged out automatically after 6 minutes of inactivity. While you are logged into the web server, it can be accessed from any other computer. In the meantime the Power Manager software can still access the EG-PM1W-001.
5. EnerGenie.com device interface
With your free personal account from EnerGenie.com you will be able to access your EG-PM1W-001 from anywhere in the world using any internet-enabled device (desktop PC, laptop, smartphone etc). See section 3.4 on how to register your EG-PM1W-001 on the server and set up the connection.
5.1. Logging in
To login into your EnerGenie.com account just open the webpage www.energenie.com/user in your internet browser and enter your login and password in the login window (see Figure #8).
Figure # 8

text_image
Login Password Remember me LoginNew account
Forgot Password
Check Remember me for automatic login in the future (the website will then save a cookie on your computer). If you lose your password, click the Forgot Password button.
5.2. Device management page
After a successful login you will see the list of your registered devices and their corresponding sockets.
All brands and logos are registered trademarks of their respective owners
Figure # 9
EG-PM1W

Last seen online: 15-May-2014 22:17:24
IP: 85.113.223.23
MAC: 88-B6-27-01-34-3A
Device web-interface: 192.168.1.112
Refresh
Socket1
ON

Delete device
This page will automatically update itself and will show you the time when your device was last seen online (the last time the device communicated with the server) and the status of each socket.
All brands and logos are registered trademarks of their respective owners
Click your device name to change the device name.
Click the socket name to change it and show the time schedule on socket. You can also set the time schedule from here.
Click the On/Off buttons to switch the socket on or off. Note that these actions can only be properly executed if the device is switched on, connected to the internet and activated.
The Last seen online status information lets you check if the device keeps communicating with the server.
6. Power Manager software
The Power Manager software is designed to support not only EG-PM1W-001 but also other power management family products (please visit www.energenie.com).
Figure # 10
text_image
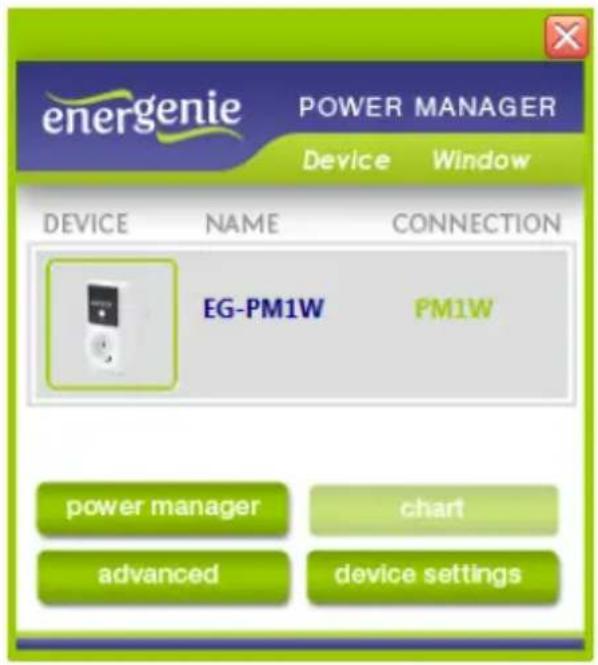
energenie POWER MANAGER Device Window DEVICE NAME CONNECTION EG-PM1W PM1W power manager chart advanced device settings6.1. Managing EG-PM1W-001
Install the Power Manager software and follow the instructions in section 3.3 to connect the EG-PM1W-001.
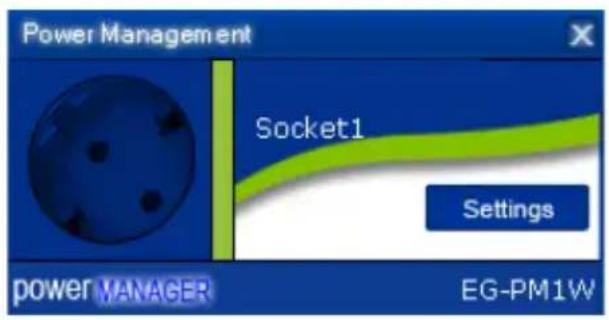
Click the socket icon in the device list window (see Figure #10). A device control panel will appear (see Figure #11).
All brands and logos are registered trademarks of their respective owners
Figure # 11
text_image
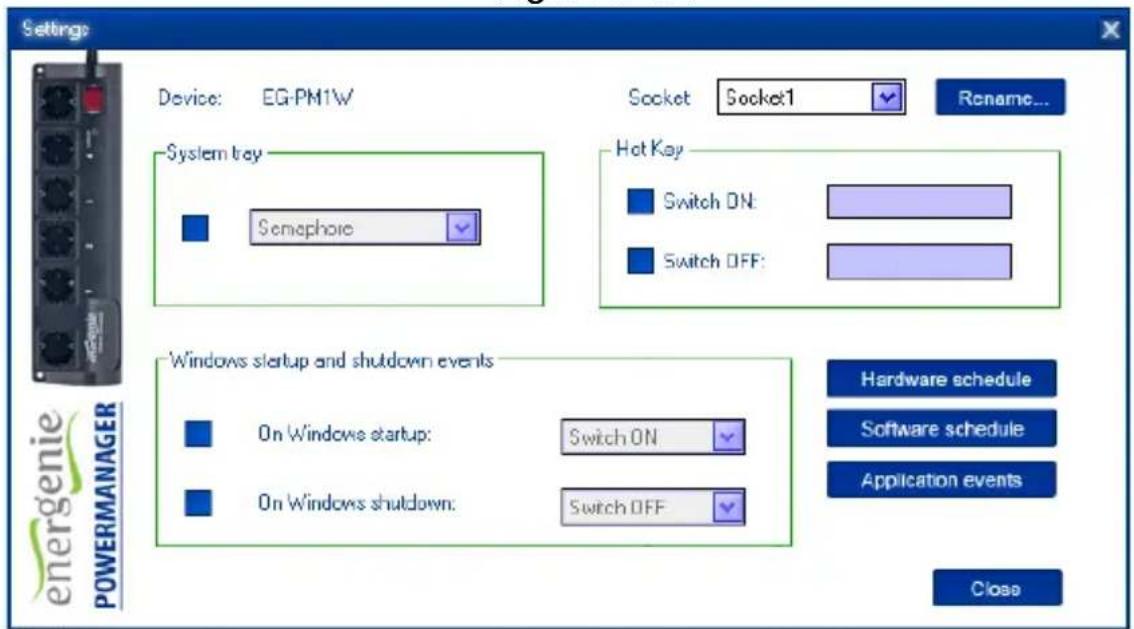
Power Management Socket1 Settings power MANAGER EG-PM1WThe panel will show the status of each socket (green for on, red for off). Each socket can be toggled on or off by double-clicking on it. Clicking on the Settings button will display the Settings dialog box (see Figure #12).
Figure # 12
text_image
Settings Device: EG-PM1W Socket Socket1 Rename... System tray Semaphore Hot Key Switch ON: Switch OFF: Windows startup and shutdown events On Windows startup: Switch ON On Windows shutdown: Switch OFF Hardware schedule Software schedule Application events Close energenie POWERMANAGERAll brands and logos are registered trademarks of their respective owners
- The device and socket can be renamed (for example Printer or Scanner) by clicking Rename.
- Check the System tray checkbox if you want to put the icon of the socket into the system tray. You can choose the icon from drop down list box. This icon will provide a fast method for controlling the device connected to the socket, such as switching it on or off or checking the status.
- You can also assign a hot key to switch the socket on/off. Check Switch ON and/or Switch OFF and specify the hot keys
- To switch the socket on/off on Windows startup (wake up), check On Windows startup and choose the required action
- To switch the socket on/off on Windows shutdown (sleep), check On Windows shutdown and choose the required action
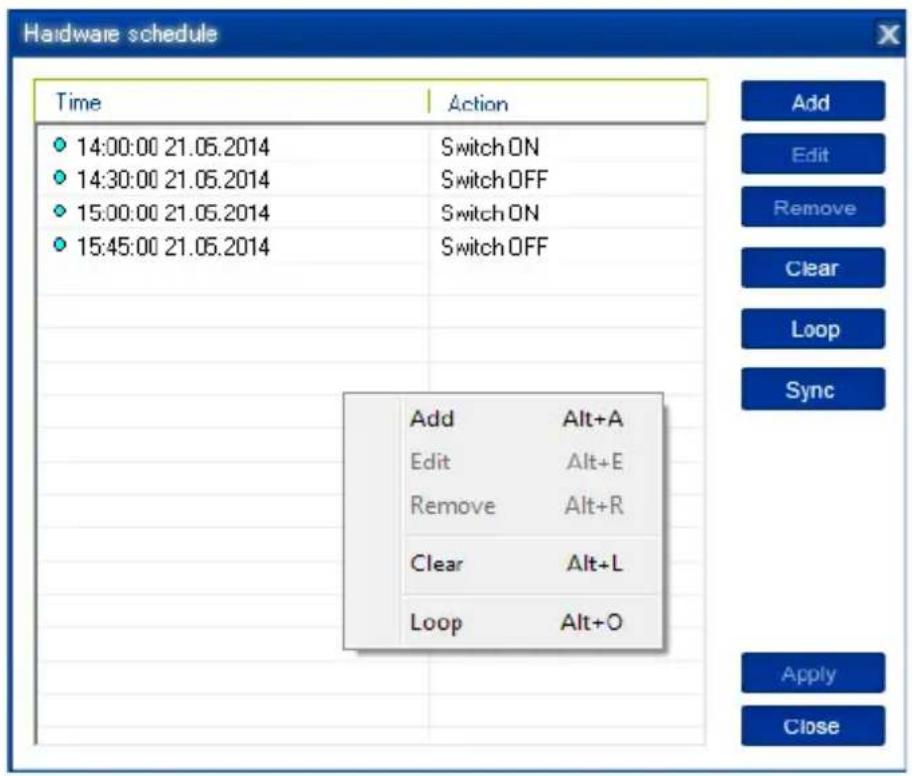
6.2. Setting up the hardware schedule
Using the Hardware schedule button available from the Settings window you can create the hardware timer schedule (see Figure #13). To add a new record, click the Add button.
Figure # 13
text_image
Hardware schedule Time Action 14:00:00 21.05.2014 Switch ON 14:30:00 21.05.2014 Switch OFF 15:00:00 21.05.2014 Switch ON 15:45:00 21.05.2014 Switch OFF Add Alt+A Edit Alt+E Remove Alt+R Clear Alt+L Loop Alt+O Add Edit Remove Clear Loop Apply Close Add Edit Remove Clear Loop Apply CloseAll brands and logos are registered trademarks of their respective owners
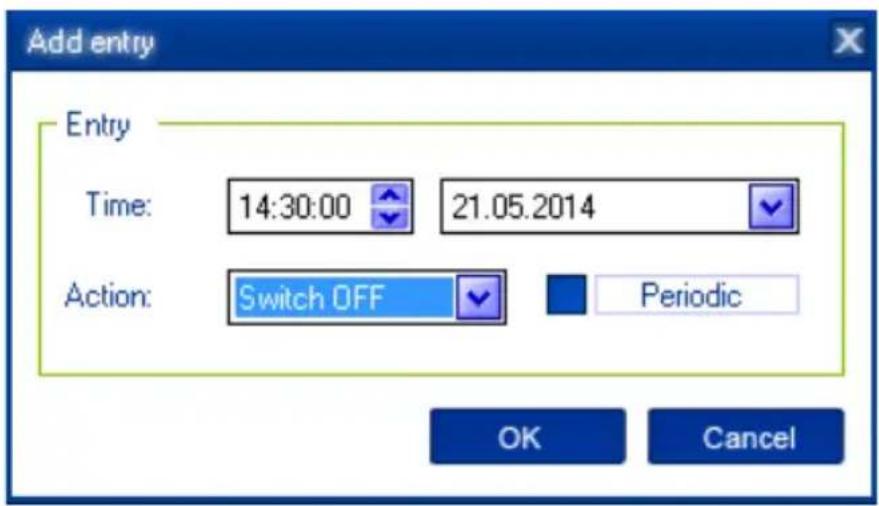
- In the window which appears, specify the required time and the action.
Figure # 14
text_image
Add entry Entry Time: 14:30:00 21.05.2014 Action: Switch OFF Periodic OK Cancel- To edit the record, select it and click the Edit button or just double click on the entry (see Figure #13). An Edit entry window will appear
- To remove the record, select it and click Remove (see Figure #13). You can select multiple entries using the Ctrl and Shift keys. You can also remove all entries from the schedule by clicking Clear (see Figure #13)
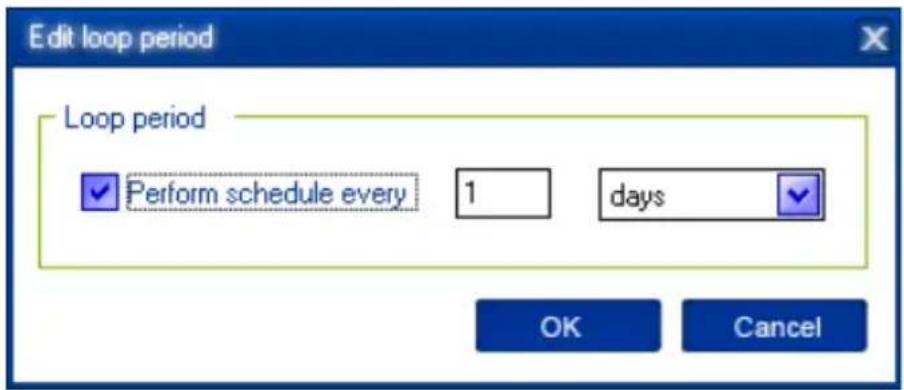
- To repeat your event (for example if you want to perform the same events every day) Click Loop, (see Figure #13) and specify the loop time period in the Edit loop period window (see Figure #15).
Figure # 15
text_image
Edit loop period Loop period Perform schedule every 1 days OK Cancel- After the schedule record has been created, click Apply (see Figure #13) to save the hardware timer schedule changes. Any incorrect entries will be highlighted and an error message will appear. After correcting all the errors, click Apply again.
- Click Sync (see Figure #13) to synchronize the device timer with the PC's internal clock. Note that after synchronization, any past entries will be removed from the schedule.
The above actions can also be performed through the pop-up menu which appears when you right-click over the event line in the table (see Figure #13).
The hardware schedule keeps running even when the device is powered off. However it is not recommended to leave the device powered off for longer than 1 week, as the built-in battery might become discharged. In this
All brands and logos are registered trademarks of their respective owners
case the internal clock of the device would be reset and as result some schedule events would not be executed. The sockets would also forget their previous status (they will be switched on). Leave the device switched on for one day to fully charge the battery.
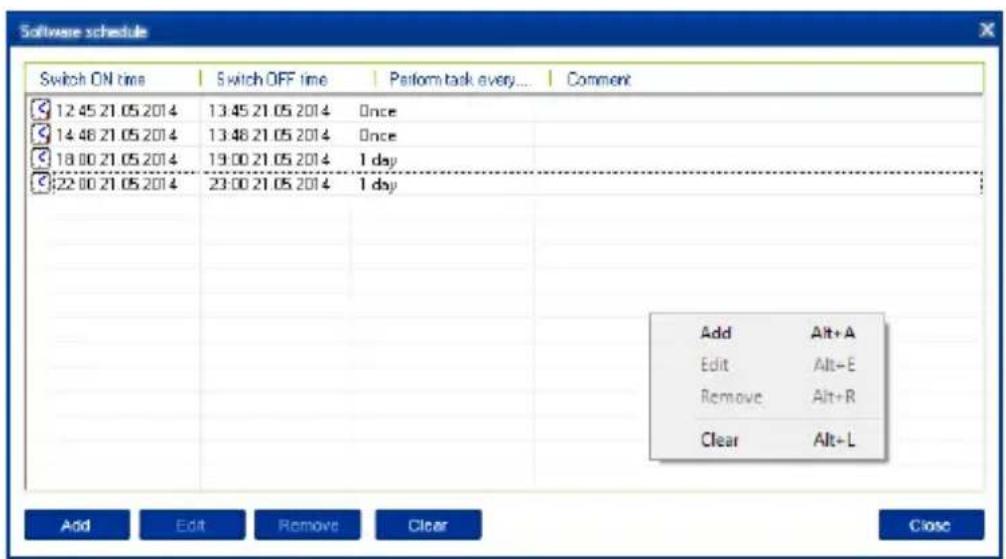
6.3. Setting up software schedule
Clicking Software schedule in the the Settings window you can create the software timer schedule (see Figure #16).
The software timer schedule will only be executed if the managing computer is on and the Power Manager is launched.
Figure # 16
text_image
Software schedule Switch ON time Switch OFF time Perform task every... Comment 12:45 21:05 2014 13:45 21:05 2014 Once 14:48 21:05 2014 13:48 21:05 2014 Once 18:00 21:05 2014 19:00 21:05 2014 1 day 22:00 21:05 2014 23:00 21:05 2014 1 day Add Alt+A Edit Alt=E Remove Alt+R Clear Alt=L Add Edit Remove Clear CloseAll brands and logos are registered trademarks of their respective owners
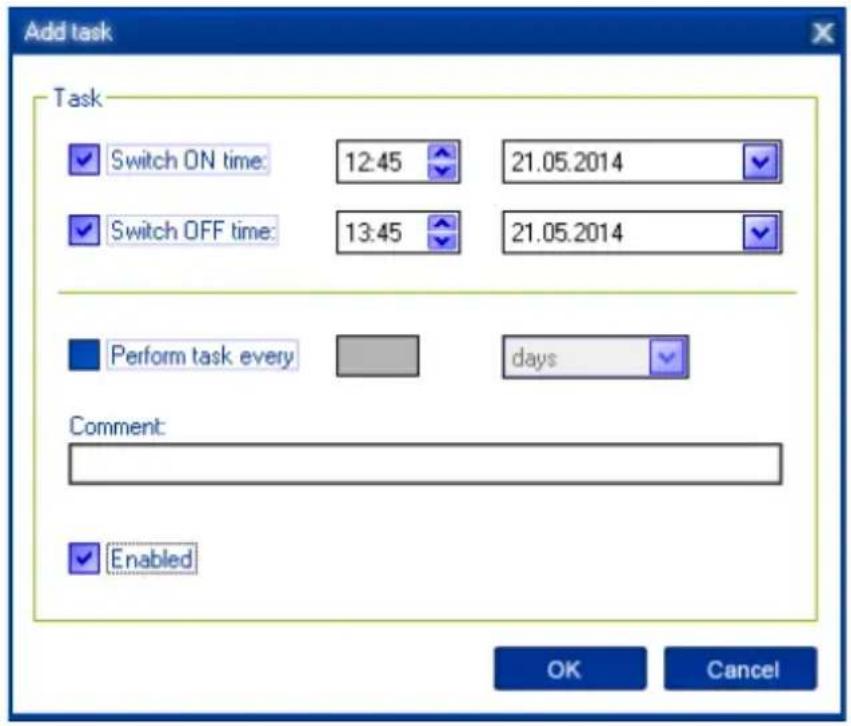
- To add a new task, click the Add button. The Add task window will appear (see Figure #17)
Figure # 17
text_image
Add task Task ✓ Switch ON time: 12:45 21.05.2014 ✓ Switch OFF time: 13:45 21.05.2014 Perform task every days Comment: ✓ Enabled OK CancelIn the Add task window, check Switch ON time and/or Switch OFF time and specify the time to switch the socket on and/or off. If you want the same event to be performed periodically, check Perform task every
All brands and logos are registered trademarks of their respective owners
and specify the time interval. You can also add remarks about the task in the Comment field. To enable or disable the task, check or uncheck Enabled.
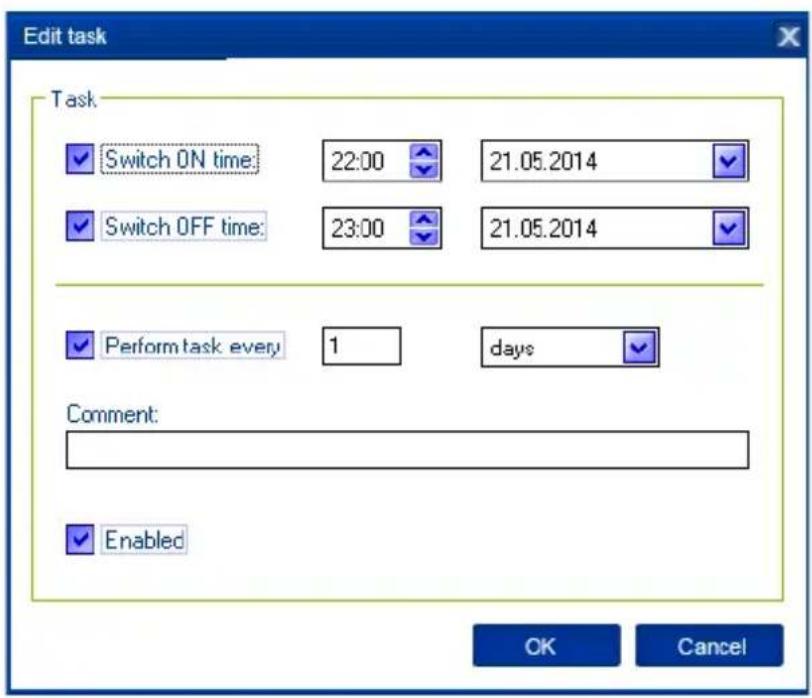
- To edit the task, select it (see Figure #16) and click the Edit button or just double click on the task. The Edit task window will appear (see Figure #18)
Figure # 18
text_image
Edit task Task ✓ Switch ON time: 22:00 21.05.2014 ✓ Switch OFF time: 23:00 21.05.2014 ✓ Perform task every 1 days Comment: ✓ Enabled OK CancelAll brands and logos are registered trademarks of their respective owners
energenie
EG-PM1W-001 WIFI SMART HOME SOCKET
- To remove the task, select it and click Remove (see Figure #16). You may select multiple tasks using Ctrl and Shift keys. You can also remove all tasks by clicking Clear.
The above actions can also be performed through the pop-up menu which appears when you right-click over a task in the table (see Figure #13).
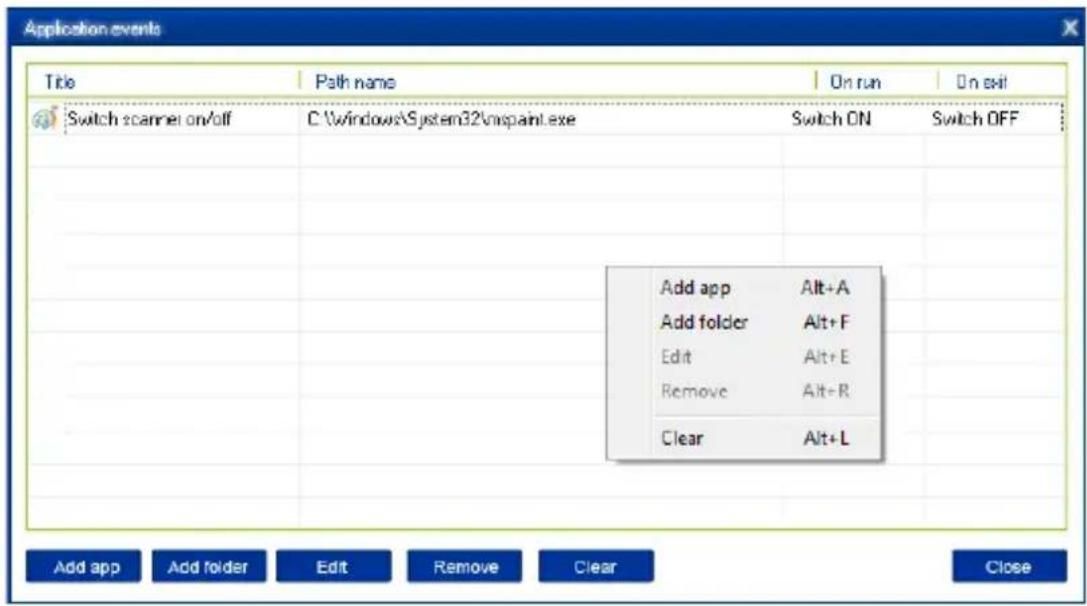
6.4. Setting up application events
Using the Application events window you can specify the socket events when a certain application is launched or closed. You can also associate switching the sockets off or on with the placement and removal of particular files in certain folders.
To use this feature, click Application events under Settings (Figure #12). The following window will appear (see Figure #19).
All brands and logos are registered trademarks of their respective owners
Figure # 19
text_image
Application events Title Path name On run On exit Switch scanner on/off C:\windows\System32\nspaint.exe Switch ON Switch OFF Add app Alt+A Add folder Alt+F Edit Alt+E Remove Alt+R Clear Alt+L Add app Add folder Add Edit Remove Clear Close- To add a new program event, click Add app. The Add program event dialog will appear (see Figure #20).
All brands and logos are registered trademarks of their respective owners
Figure # 20
Specify the application title and path to it using the Browse (...) button or by manually entering the Title and Path name fields. If you use the Browse (...) button you can also select a shortcut to the application. In this case the application title and path name will be taken automatically via the shortcut if possible. After you have specified the application, check On run and/or On exit and choose the event (switch on or off).
All brands and logos are registered trademarks of their respective owners
The On run event will take place when the first window of the selected application is opened. The On exit event will take place when the last window of the application is closed.
Setting up application events in this way allows your device to operate as an advanced standby-killer. For example, your scanner can be switched on or off whenever Photoshop is started or closed.
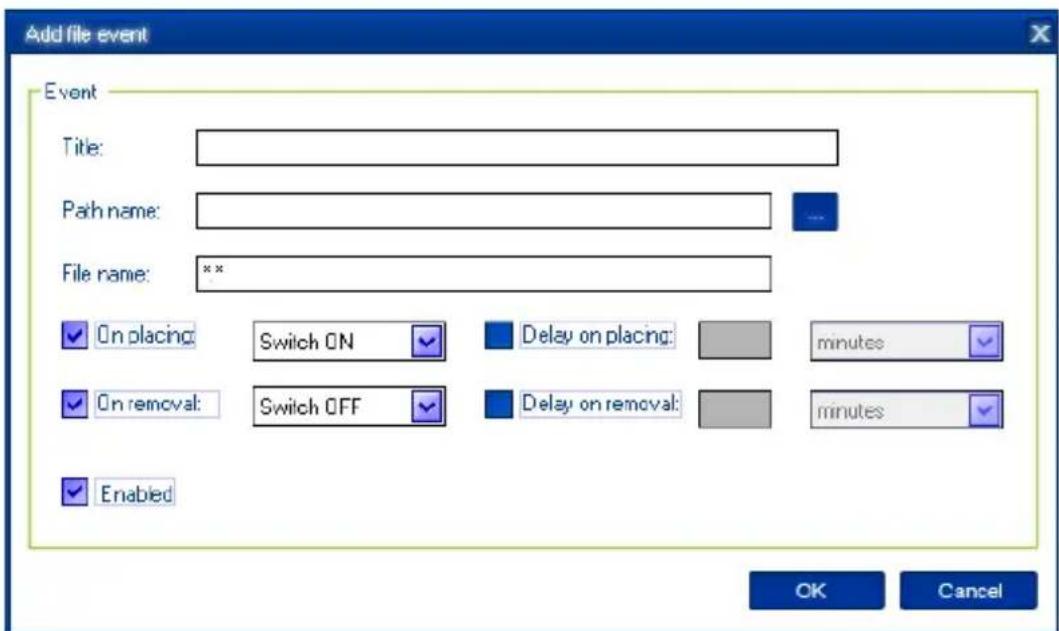
- To add a new file event, click Add folder (see Figure #19). The Add file event window will appear (see Figure #21).
Figure # 21
text_image
Add file event Event Title: Path name: File name: *** On placing: Switch ON Delay on placing: minutes On removal: Switch OFF Delay on removal: minutes Enabled OK CancelAll brands and logos are registered trademarks of their respective owners
Specify the path to the folder you would like to monitor using the Browse (...) button or typing it manually in the Path name field. The wild card characters * and ? can be used to select a group of files. Check On placing and/or On removal and select the event and delay.
The On placing event will take place when the first file matching the specified file name is placed into the specified folder. The On removal event will take place when the last file matching the specified file name is removed from the specified folder.
Setting up file events in this way allows your device to operate as an advanced standby-killer. For example, your printer can be turned on before printing and turned off after printing by checking whether there are any files in the print queue. Use the Add folder button to assign c:\windows\system32\spool\printers folder to switch your printer on whenever you start printing and to switch it off again afterwards.
If you have several printers connected to the same computer, we suggest moving the default spool directory of each printer to a separate location.
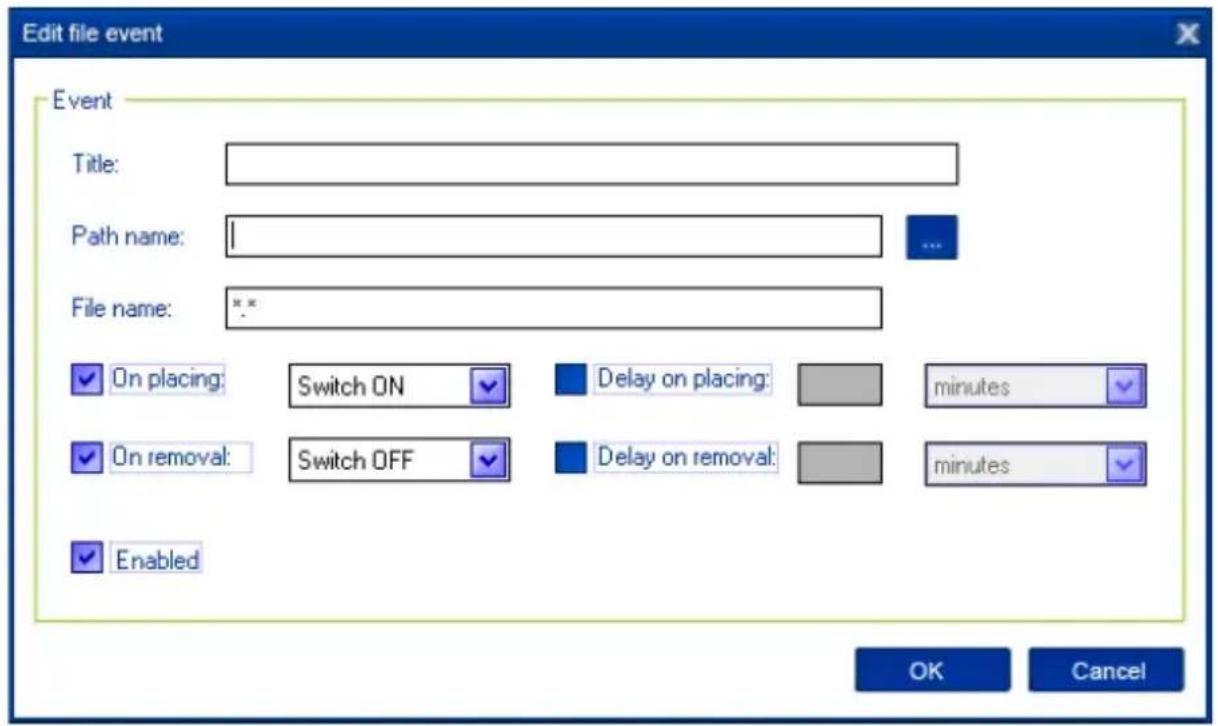
- To edit the event, select it and click Edit, or just double click on the event (see Figure #20). The Edit file event window will appear (see Figure #22)
Figure # 22
text_image
Edit file event Event Title: Path name: File name: On placing: Switch ON Delay on placing: minutes On removal: Switch OFF Delay on removal: minutes Enabled OK Cancel- To remove the event, select it and click Remove (see Figure #20). You can select multiple events using Ctrl and Shift keys. You can also remove all events by clicking the Clear button.
The above actions can also be performed through the pop-up menu which appears when you right-click over an event in the table (see Figure #19).
All brands and logos are registered trademarks of their respective owners
7. Managing EG-PM1W-001 via your own software
To let you switch the sockets on or off from your own applications the following command line interface syntax is supported:
- pm.exe -[on | off] -device name -socket name
- Examples:
- "C:\Program Files\Power Manager\pm.exe" -on -My EnerGenie -Socket1
• "E:\Utils\PM3\pm.exe" -off -My EnerGenie -Table lamp - Execute pm.exe with -info key (pm.exe –info) to get the complete information about the status of the current devices.
For each of the connected devices, the following information will then be provided and placed into Info.ini file in the Power Manager folder:
- DeviceName=
- Socket#name=< the socket name specified by the user>
- Socket#SwitchState=
, where TRUE is when the socket is switched on, or FALSE is when the socket is switched off
All brands and logos are registered trademarks of their respective owners
Example: "C:\Program Files\Power Manager\pm.exe" - info
Each use of this command line option totally overrides the data in Info.ini file.
In order to use these commands, Power Manager must have already been launched.
8. EG-PM1W-001 SDK
For advanced users we offer a software development kit (SDK) to manage the device. For more information, please check the SDK manual in the SDK folder on the supplied CD, or download the latest SDK from www.energenie.com.
9. GNU General Public License - Copyright Notice and Warranty Disclaimer
The product's firmware contains free software; you can redistribute the free software and/or modify it under the terms of the GNU General Public License as published by the Free Software Foundation (version 2 of the License).
The free software is distributed in the hope that it will be useful, but WITHOUT ANY WARRANTY; without even the implied warranty of MERCHANTABILITY or FITNESS FOR A PARTICULAR PURPOSE.
All copyrights are identified in more detail in the free software source code. The free software source code can be at least for a period of three years be requested from Gembird Europe B.V. (mail to: postmaster@gmb.nl) or write to: Wittevrouwen 56, 1358 CD, Almere Haven, The Netherlands)
You should have received a copy of the GNU General Public License along with this program; if not, write to the Free Software Foundation, Inc., 51 Franklin Street, Fifth Floor, Boston, MA 02110-1301, USA.
This product is tested and complies with the essential requirements of the laws of member states concerning R&TTE(1999/5/EC). The CE declaration can be found under www.gembird.eu
natural_image
Simple line drawing of a hand washing a cup with water droplets falling (no text or symbols)
text_image
Safety warning sign showing sun and a person with fever, crossed by a diagonal line
natural_image
Simple line drawing of a hand using a tool to cut a screwdriver into a screwdriver (no text or symbols)
natural_image
Simple line drawing of a hand holding a device with a diagonal line crossing through it, no text or symbols present.47
All brands and logos are registered trademarks of their respective owners
Waste disposal:

Do not deposit this equipment with the household waste. Improper disposal can harm both the environment and human health. For Information about waste collection facilities for used electrical and electronic devices, please contact your city council or an authorized company for the disposal of electrical and electronic equipment.