
THD2021 - FILTRINO - Water filter BOSCH - Free user manual and instructions
Find the device manual for free THD2021 - FILTRINO BOSCH in PDF.
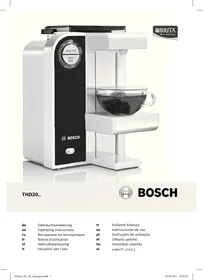


| Product type | Water filter |
| Brand | BOSCH |
| Model | THD2021 - FILTRINO |
| Dimensions (H x W x D) | 290 x 223 x 267 mm |
| Weight (empty) | 2.3 kg |
| Power supply | 220-240 V / 50 Hz |
| Heating power | 1600 W |
| Water tank capacity | 2 liters (without filter) |
| Cord length | 80 cm |
| Adjustable temperatures | Ambient, 70°C, 80°C, 90°C, Very hot (boiling) |
| Adjustable fill quantity | 120, 150, 200, 250, 300 ml |
| Filtration system | BRITA MAXTRA (filter cartridge) |
| Child safety | Yes (blocks hot temperatures) |
| Automatic descaling program | Yes (approx. 10 minutes) |
| Filter replacement indicator | Yes (symbol ) |
| Daily maintenance | Clean water tank, wipe the casing |
| Available spare parts | BRITA MAXTRA filter cartridge, descaling agent (ref. 310967) |
| Customer service | See contact details at the end of the manual |
Frequently Asked Questions - THD2021 - FILTRINO BOSCH
User questions about THD2021 - FILTRINO BOSCH
0 question about this device. Answer the ones you know or ask your own.
Ask a new question about this device
Download the instructions for your Water filter in PDF format for free! Find your manual THD2021 - FILTRINO - BOSCH and take your electronic device back in hand. On this page are published all the documents necessary for the use of your device. THD2021 - FILTRINO by BOSCH.
USER MANUAL THD2021 - FILTRINO BOSCH
Congratulations on purchasing this Bosch appliance.
You have acquired a high-quality product that will bring you a lot of enjoyment.
Check your new appliance for any transport damage.
Dispose of the packaging (and of any old appliance being replaced) in an environmentally responsible manner.
Table of Contents
Safety notes 15 Overview 16 Controls and displays. 16 Using the appliance. 17 Height adjustment 18 Fill quantity 18 Child lock. 19 BRITA MAXTRA water filter system 19 Descaling 22 Maintenance and daily cleaning. 23 Disposal. 23 Guarantee 23 Technical data 23 Simple troubleshooting 24
Safety notes
Please read the operating instructions carefully and keep them for future reference. Please pass on these manuals to the new owner if you sell the appliance.
This appliance is designed for domestic use or for use in non-commercial, household-like environments. Household-like environments include staff areas in shops, offices, agricultural and other small businesses or for use by guests at bed-and-breakfast establishments, small hotels and similar residential facilities.
Danger of electric shock!
- Connect and operate the appliance only according to the type plate specifications.
- Use only if power cord and appliance show no signs of damage. Use indoors at room temperature only and not above 2000 m sea level.
- Use the appliance only in frost-free rooms.
- This appliance is not intended for use by persons (including children) with reduced physical, sensory or mental capabilities, or lack of experience and knowledge, unless they have been given supervision or instruction concerning use of the appliance by a person responsible for their safety.
- Keep children away from the appliance.
- Children should be supervised to ensure that they do not play with the appliance. In the event of malfunction, unplug the appliance immediately. Repairs to the appliance, such as replacing a damaged power cord, may only be carried out by our customer service in order to avoid risks.
- Never immerse the appliance or power cord in water.
- Empty water tank daily and fill only with cool, fresh, non-carbonated water. Do not use chemically softened water.
Risk of scalding
- Keep in mind that with settings between 70°C and 100°C the water will be very hot.
- When drawing water, steam may escape or hot water may splutter from the water outlet.
Risk of suffocation
- Do not allow children to play with packaging material.
Overview
1 on/off switch 2 Water outlet 3 start/stop button 4 temp. set button 5 Display elements
a Water at room temperature b Water at 70°C c Water at 80°C d Water at 90°C e Boiling water f Child lock g Add water / tank missing h Descale
i Replace filter
6 Removable water tank
a Tank lid b Float
7 Filter cartridge 8 Filter holder 9 Cable storage compartment
10 Height adjustment 11 Cup stand
a Drip tray b Cup shelf
Controls and displays
Operating controls
On/off switch
You use the on/off switch to turn the appliance on or completely off. When you switch it on, all nine display items light up briefly. The selected temperature (for example, ) lights up as long as the appliance is switched on.
Note: To save energy, it is recommended to turn the appliance off after each use.
Start/stop button
Press the start/stop button to draw water. To cut off the water supply early, press the button again.
Note: The temperature setting flashes while the machine provides water.
Temp. set button
Press the temp. set button to cycle through and select one of the temperature settings. The selected temperature lights up.
Display elements
| 70°C 80°C 90°C | With the 70°C, 80°C and 90°C settings, the water will be heated to the selected temperature. Examples 70°C – for white tea 80°C – for green tea 90°C – for instant beverages such as hot chocolate or coffee Note: The temperatures at the water outlet can vary by approximately ±5%. |
| At this setting, the water will be boiled. This setting is suitable, for example, for black tea or instant soups. | |
| ↑ | When the ↑ icon lights up, the BRITA MAXTRA filter cartridge should be replaced. You can continue to heat water. For information about replacing the water filter cartridge, see the section titled “BRITA MAXTRA water filter system”. After changing the filter, hold down the start/stop button for at least 5 seconds, ↑ will cease to light. |
| ↓ | The ↓ icon lights up when the water tank needs to be refilled or is missing. Remove the water tank, fill it with fresh, cold water and return it to its correct position. |
| [ ] | The [ ] icon lights up when the appliance needs to be descaled. At this point you can only draw water by pressing the start/stop button two times in succession. Always follow the instructions in the “Descale” section when you descale the appliance. |
| [ ] | The [ ] icon lights up when the child lock is activated. At this point the water heater is deactivated, but you can still draw room-temperature water. To learn more about this setting, read the section titled “Child lock”. |
Using the appliance
General
With this appliance, you can filter water and dispense it at room temperature or heated to specific temperatures.
If you have questions regarding the filter cartridge, contact the BRITA Consumer Service at 0844 742 4800 (toll-free).
Setting up the appliance
Before you use the appliance for the first time, do the following:
Remove film. Unroll or push in the right amount of cable from the cable compartment and plug the cable into a power outlet. Remove the water tank and clean it thoroughly under running water. Insert the filter cartridge as described in the section titled "BRITA MAXTRA water filter system". Fill the water tank up to the max mark with fresh, cold water. Use only non-carbonated drinking water. Replace the water tank and push it firmly downward into place.
Set the on/off switch to on. All display items will light up briefly, and then the icon stays lit. Place a glass or cup holding at least 150 ml on the cup stand under the water outlet. Press the start/stop button to dispense one portion of water to rinse the appliance.
Note: Before using the appliance for the first time or after a long period of non-use, do not drink the first glass of water.
The machine is now ready to use.
Dispensing water
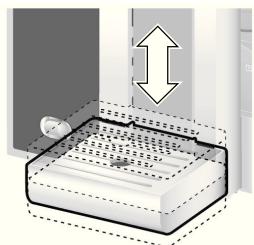
Set the cup stand to the appropriate height for the cup or glass. Place the cup or glass under the water outlet. Press the temp. set button to select the desired temperature. Press the start/stop button. The water will dispense from the outlet. The selected temperature flashes while the water is dispensed.
Height adjustment
The adjustable cup stand lets you adjust the distance between your cup or glass and the water outlet. The lowest setting is suitable for taller glasses and cups. For smaller cups or soup cups you can insert the cup stand into one of the upper openings.
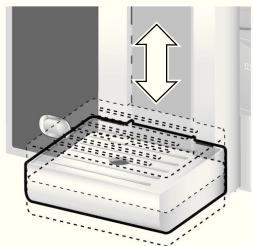
Important: Don't use the appliance without cup stand.
Fill quantity
The appliance ships with a preset fill quantity of 120 ml. You can change this quantity.
To adjust the fill quantity, proceed as follows:
Select any temperature (for example, 90°C). Turn the appliance off with the on/off switch. Press and hold the start/stop button. Turn the appliance on with the on/off switch. The indicator for the currently set fill quantity flashes. Press the temperature set button to select the desired fill quantity:
= approx. 120 ml, 70°C = approx. 150 ml, 80°C = approx. 200 ml, 90°C = approx. 250 ml, □ = approx. 300 ml. Release the start/stop button - the setting is now stored.
Important: To keep the dispensed water from overflowing, make sure that you place a sufficiently large glass or cup under the water outlet.
Note: To change this setting at any time, repeat the above procedure.
Child lock
For safety reasons, this appliance is equipped with a child lock. To activate it, proceed as follows:
Press and hold the temperature set and start/stop buttons simultaneously for at least 5 seconds. The □ and ◇ icons light up. Info: When the child lock is activated, only room-temperature water is available. When you press the temperature set button, the □ flashes; all other settings are blocked.
To deactivate the child lock, proceed as follows:
Press and hold the temperature set and start/stop buttons simultaneously for at least 5 seconds. The icon goes out.
BRITA MAXTRA water filter system
In models equipped with a water filter system, only BRITA MAXTRA water filter cartridges may be used.
BRITA MAXTRA cartridges can be purchased from retailers or directly from Bosch Customer Service. (See the back pages of these instructions for contact information).
The appliance can be used with or without a filter cartridge.
Keep in mind that you will enjoy the benefits of BRITA filtration only if a MAXTRA filter cartridge is installed in the appliance. Tea and coffee also have more aroma when prepared with fresh, BRITA-filtered water. To use the machine without a filter, simply remove the filter holder and the filter cartridge and adjust the machine settings accordingly.
Important: The Filter Yes/No setting controls the filter replacement indicator as well as the descale mode icon.
To change the Filter Yes/No setting, proceed as follows:
Turn the appliance off with the on/off switch. Press and hold the temperature set button. Turn the appliance back on with the on/off switch - the icon flashes. Press the start/stop button to select the Filter Yes/No setting: Yes = lights up or No = does not light up. Release the temperature set button - the setting is now stored, and the most recently selected temperature lights up.
Note: To change this setting at any time, repeat the above procedure.
Important: If you have not used the appliance for a longer period of time (for example, after holiday), remove the filter and install it again after your return following the steps as described in chapter "Preparing and installing the BRITA MAXTRA filter cartridge".
After setting the filter to "yes", the symbol will light after a certain time during operation. The BRITA MAXTRA filter cartridge is exhausted and needs to be changed.
To install a new filter cartridge, proceed as follows:
Preparing and installing the BRITA MAXTRA filter cartridge
Remove the filter cartridge's protective packaging.
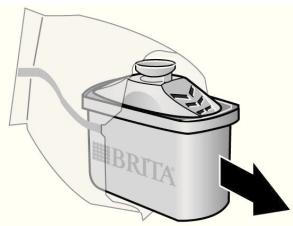
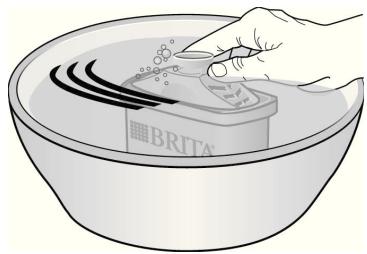
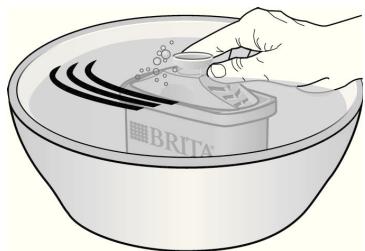
- Immerse the filter cartridge in cold tap water and shake it lightly (for about five seconds) to remove any air bubbles.
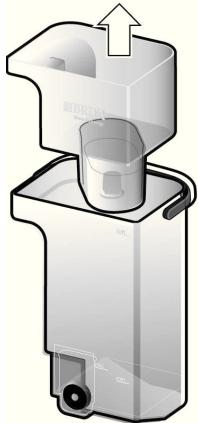
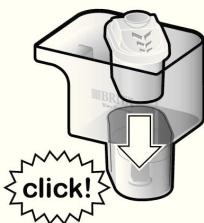
Take the filter holder out of the water tank and firmly insert the cartridge into the holder until you hear a click.

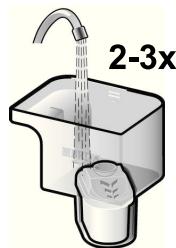
Hold the filter holder under the water tap and fill it with fresh, cold water; let the water run through the BRITA MAXTRA filter cartridge.
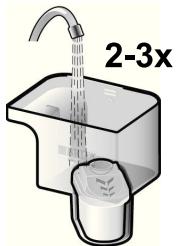
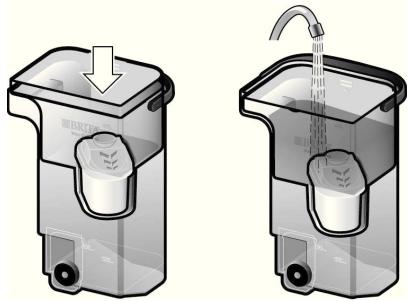
Repeat this procedure two or three times. Place the filter holder with the filter cartridge back into its position in the empty water tank and fill the tank with cold tap water.
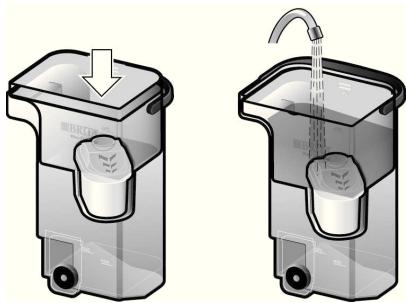
Hold down start/stop button for at least 5 seconds to delete
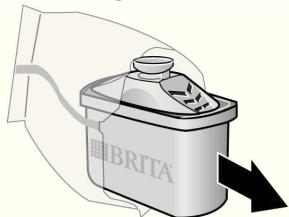
Note: To replace the cartridge, simply pull on the strap attached to the top of the cartridge. When installing a new cartridge, follow the above steps for preparing and inserting a cartridge.
Tip: We recommend you always have a few MAXTRA replacement cartridges handy.
When you purchase a new BRITA MAXTRA cartridge, pay attention to the picture of the BRITA MAXTRA filter cartridge on the package.

Used BRITA MAXTRA water filter cartridges can be disposed of with the regular household garbage. If you have more questions, contact BRITA Consumer Service at 0844 742 4800 (toll-free).
Important information
Always store spare filter cartridges sealed in the original packaging in a shady, cool and dry place. BRITA water filters are designed for use only with municipally treated tap water (note: this water is constantly controlled and according to legal regulations safe to drink) or with water from private supplies which has been tested as safe to drink. If an instruction is received from the authorities that mains water must be boiled, the BRITA filtered water must also be boiled. When the instruction to boil water is no longer in force, the appliance and filter funnel must be cleaned and a new cartridge inserted to ensure any residual contaminants are removed. - Please filter cold tap water only. Clean the appliance and filter funnel regularly. - For certain groups of people (e.g. those with impaired immunity and for babies), it is generally recommended that tap water should be boiled; this also applies to BRITA filtered water. - For hygiene reasons, the MAXTRA cartridge contents are subject to special treatment with silver. A very small amount of silver may be transferred to the water. This transference would be within the World Health Organisation (WHO) guidelines.
During the filtering process, there may be a slight increase in potassium content. However, one litre of BRITA filtered water contains less potassium than e.g. an apple. If you have kidney disease and/or follow a potassium restricted diet, we recommend that you consult your doctor before using a BRITA water filter. - Should your BRITA appliance not be in use for a prolonged period (e.g. holiday), BRITA recommends that you take out the cartridge, discard any water left inside the BRITA water filter and loosely insert the MAXTRA cartridge again. Before using the BRITA water filter again take out the cartridge, clean the appliance and funnel thoroughly and repeat the steps of the instructions for use in chapter: "Preparing and installing the BRITA MAXTRA filter cartridge". BRITA filtered water is dedicated for human consumption. It is a perishable food and as such please consume within 1 to 2 days. - Like each natural product, the consistency of the BRITA MicroporeFilter is subject to natural variances. This can lead to a slight abrasion of small carbon particles into your filtered water, noticeable as black bits. These particles have no negative health effects. If ingested, they will not harm the human body. In case you observe carbon particles, BRITA recommends to flush the cartridge several times or until the black bits disappear. BRITA cannot accept responsibility or liability if you do not respect our recommendations for the use and exchange of the BRITA filter cartridge.
Descaling
Your appliance has an automatic descaling programme. When the icon lights up, run the descaling programme as soon as possible. If the descaling programme is not run as instructed, the appliance may be damaged.
Tip: With very hard, calciferous water, please descale the appliance more often than the symbol is displayed. Even filtered water contains low amounts of calcium carbonate. Press and hold the start/stop button for 10 seconds. The symbol lights up. Now proceed as described under "Running the descaling programme".
Suitable descaling agents are available from Bosch Customer Service (Article No. 310967) or from specialty retailers.
Notes:
Never interrupt the descaling programme.
Never drink any of the liquids used in descaling.
Never use vinegar or vinegar-based products.
Always remove the filter holder and the filter cartridge before starting the descaling programme.
Running the descaling programme
Remove the water tank, pour out any remaining water, and reinsert it. Prepare the descaling solution according to the manufacturer's instructions and pour it into the water tank up to the calc mark. A descaling agent approved especially for this machine is available from Bosch Customer Service (Article No. 310967) or from specialty retailers. - Place a container holding at least 500 ml under the water outlet. Press and hold the temp. set button for at least 3 seconds to start the descaling programme.
The descending programme will now run automatically. The icon flashes while the programme is running. (The programme runs for approx. 10 minutes). The descending solution is pumped through the appliance in multiple phases and then runs into the container until the water tank is almost empty. A small amount of solution is always left in the tank. When the most recently selected temperature icon lights up, the descaling program has finished. Rinse the water tank thoroughly and fill up to the max mark with fresh water. Now select and draw warm water three times to rinse out the appliance. Do not drink this water!
The appliance is now fully operational again, and you can re-insert the filter holder with the BRITA MAXTRA filter cartridge.
Maintenance and daily cleaning
Risk of electric shock
Switch off and unplug the appliance before cleaning.
Never immerse the appliance in water.
Do not use a steam cleaner.
Wipe the housing with a damp soft cloth. Rinse out the water tank with water only. Do not place it in the dishwasher. The lid of the water tank and all parts of the cup shelf can be washed in the dishwasher. Clean water tank daily and refill with fresh water.
Disposal

Dispose of packaging in an environmentally-friendly manner. This appliance is labelled in accordance with the European Directive 2002/96/EG relating to waste electrical and electronic equipment – WEEE. The directive provides the framework for the EU-wide take-back and disposal of end-of-life appliances. Please ask your specialist retailer about current disposal facilities.
Guarantee
The guarantee conditions for this appliance are as defined by our representative in the country in which it is sold. Details regarding these conditions can be obtained from the dealer from whom the appliance was purchased. The bill of sale or receipt must be produced when making any claim under the terms of this guarantee.
Right of modification reserved.
Technical data
| Power connection (voltage/frequency) | 220-240 V / 50 Hz |
| Heater wattage | 1600 W |
| Maximum static pump pressure | 3.3 bar |
| Maximum water tank capacity (without filter) | 2 liters |
| Length of power cable | 80 cm |
| Dimensions (H x W x D) | 290 x 223 x 267 mm |
| Weight, empty | 2.3 kg |
Simple troubleshooting
| Problem | Possible cause | Remedy |
| The appliance is not working and none of the control lights are lighting. | The appliance may have no power supply. | Check the appliance to see if it is connected to the power supply. |
| The machine is running but it is not producing any water. | The water tank is not fitted correctly. | Please check that the water tank is correctly fitted. |
| The water tank was removed during the brewing stage or there is air in the system. | Draw the water once again. | |
| The float in the water tank is stuck. | Clean the water tank and release the float. | |
| It is not possible to set the temperature. | The child-proof lock is activated. | Deactivate the child-proof lock. |
| \( \uparrow \) and \( \Updownarrow \) are both flashing at the same time. There is more water to be drawn. | There has been no hot water drawn for some time. The appliance should be descaled for hygienic reasons. | Set the temperature to 90°C or \( \Updownarrow \) and draw hot water (1 x). \( \Updownarrow \) and \( \Updownarrow \) extinguish; the temperature last set lights up. |
| The water splutters when drawn. | The cup stand is set too low. | Reduce the distance between the water outlet and the cup by raising the cup stand. |
| Build-up of limescale in the water outlet. | Descale the appliance as described in the chapter "Descaling". | |
| The temperature of the water drawn is too low. | The temperature set displays the water temperature directly at the water outlet. | Select a higher temperature. |
| The glass or cup is too cold. | Rinse out the glass or cup with hot water before filling it or draw water first to heat it up. | |
| If you are unable to rectify the problem, please contact Customer Service. | ||
| Water is collecting in the water outlet. | Condensation water may result due to physical properties. | It is normal for condensation to appear, simply wipe it away. |
| The ☑ symbol is lighting even though there is a sufficient amount of water in the water tank. | The float in the water tank is stuck. | Clean the water tank and release the float. |
| ☐ lights up even though a filter has been used. | Even filtered water contains low amounts of calcium carbonate. | Descale the appliance as described in the chapter “Dscaling”. |
| The appliance is making loud “cooking noises” when drawing water. | The filter is set to “yes” (see chapter “BRITA MAXTRA water filter system”) but there is no filter in place. Build-up of limescale in the appliance. | Descale the appliance as described in the chapter “Dscaling”. Finally, programme the correct setting. |
| The used water is particularly calciferous. Build-up of limescale in the appliance. | The appliance must be descaled more often than the ☐ symbol lights up. Follow the instructions outlined in the chapter “Dscaling”. | |
| ☐, ☐ and ☑ are all flashing at the same time, it is not possible to draw any water. | The appliance has a fault. | Disconnect the appliance from the power supply and contact Customer Service. |
| If you are unable to rectify the problem, please contact Customer Service. | ||
Congratulations on purchasing a Bosch production device! You have acquired a high-quality product that will bring you much joy in use.
Check the new device for transport damage.
Dispose of the packaging and used device in accordance with environmental protection requirements.
Contents
Safety instructions.....26
Overview. 27
Control elements
Indicators 28
Using the device 29
Height adjustment. 30
Setting the fill volume.. 30
Child lock
for safety 30
Filter system
BRITA MAXTRA water. 31
Cleaning. 34
Daily cleaning. 35
Maintenance. 35
Warranty terms 35
Technical specifications 35
Troubleshooting minor
problems 36
Safety instructions
Read the operating instructions carefully and follow the instructions in this manual when working. Keep it for future use. If you pass the device to others, please include the instructions with the device.
(Temperature setting)
By pressing the temp. set button (temperature setting), you can select different temperatures. The selected setting lights up.
Indicator elements
Starting operation with the device
Before first use, please note the following:
Remove any existing packaging.
Connect the power cord to the required length from the cable storage compartment and plug the power cord into the outlet.
Remove the water tank and rinse it thoroughly under running water. Insert the filter cartridge as described in the chapter "Filter System - Water Filter MAXTRA". Fill the tank with fresh, cold water up to the MAX mark. Use only still drinking water. Place the water tank back into position, pressing it down until it clicks into place. Set the on/off switch to on. All indicator elements light up briefly, then go out. Place a cup or mug (at least 150 ml) under the water outlet. Press the start/stop button and draw 1 cup of water to rinse the appliance.
Note: On first use or after a longer period of non-use, do not drink the first cup of water.
The appliance is ready for use.
Drawing water
Adjust the cup rest to the appropriate height for the cup or mug. Place the cup or mug under the water outlet. Use the temp. set button to select the desired temperature. Press the start/stop button. Water flows from the outlet, and the indicator for the selected temperature lights up during the water draw.
Height adjustment
By adjusting the height of the cup rest, you can adjust the distance between the cup or mug and the water outlet. The basic setting is intended for taller cups and mugs. For smaller cups or mugs, you can place the cup rest in the corresponding slots of the height adjustment mechanism.
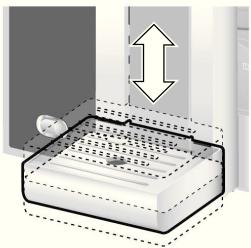
Important: Do not use the appliance without the cup rest.
Setting the fill volume
The default fill volume is 120 ml. This setting can be changed.
To set the fill volume, proceed as follows:
Select any temperature, e.g., 90°C. Turn off the appliance using the on/off switch. Press and hold the start/stop button. Turn on the appliance using the on/off switch. The symbol for the set fill volume flashes.
Using the temp. set button, set the desired fill volume:
= about 120 ml 7 0 ^ ° C = about 150 ml 8 0 ^ ° C = about 200 ml 9 0 ^ ° C = about 250 ml = about 300 ml
The kettle start/stop (start/stop), the setting is saved.
Important: To avoid overflow, fill the vessel with the appropriate capacity.
Note: The setting can be changed at any time; to do this, repeat the process.
Important: By selecting the filter replacement indicator setting, the filter replacement indicator mode is deleted.
Wipe the body with a damp cloth. The water tank can be rinsed with water; do not place it in the dishwasher. The tank lid, water tank, and all parts of the supply can be easily washed in the dishwasher. Daily wipe the water tank and fill with fresh water.
Disposal

Dispose of the packaging using environmentally friendly methods. This device is marked in accordance with European Directive 2002/96/EC on the disposal of old electrical and electronic equipment (WEEE). This directive defines the rules for the collection and disposal of old appliances applicable throughout the EU. You can obtain information about current disposal options from the dealer where you purchased the device.
Warranty conditions
You can get comprehensive information about the warranty service conditions at your nearest authorized service center or at the manufacturer's service center of LLC "VSH ByTovaya Tekhnika", and also find it in the warranty card issued at the time of purchase.
We reserve the right to make changes.
Technical specifications
Ekmeke Rizzi Imai, Su Isitici (Kettle)
86099
70°C = approx. 150ml
80°C = approx. 200ml
90°C = approx. 250ml
□ = approx. 300 ml
▷ Release the start/stop button (on/off), the setting is memorized.
start/stop 5 1c baiall 5
∴ S(ΔACD) = S(ΔCOD) + S(ΔDCE)
BRITA MAXTRA
BRITA MAXTRA
5 5
Yes, all cables are: pia
j p j j j j j j j j (2) No j (a)
e e
.()
(20 (204)Yes/No
i
claoiuijglai jaiy
.()/) on/off
aunbun) temp. set j buaa
ab + d = 3
C110 111
.
jglbeill Jds
bIaI J Say (cai/6u) start/stop
Therefore, the set { (1 + u)/(1 - u), (1 + u)/(1 - u^2) } equals { u/(1 - u), u/(1 - u) }.
The unit vector u-hat is equal to (u-hat). Yes.
g
[ε_(1/2) ∂γ/∂x = 0]
temp. set ∪_j bius jg jill
Therefore, the area of triangle OBC is (1/2) * CO * BC = (1/2) * CD * 5.
i
Therefore, a_5 = 1/2.
a
sii iis
0xcl
Therefore, the area of triangle OBC equals the area of triangle COD plus the area of triangle BOC.
j jll jS l J aI L
Jlll lIy
joo
.《BRITA MAXTRA
E 111111111111111111
b) temp. set j b i p (j/1) start/stop j g (j) j all jg 20 Loglc q y j q j 5
slllbrtta
J 1 BRITA MAXTRA J L BRITA MAXTRA J J BRITA MAXTRA J J J J J J J J J J J J J J J J J J J J J J J J J J J J J J J J J J
a 1234567890000000000000000000000000000000000000000000000000000000000000000000000000000000000000000000000000000
temp. set JJ bc jll Jd j a b 120 70 C j111 150 80 C j111 200 80 C j111 250 90 C j111 300 4 start/stop JJ bc jc gill j .
aIla clll juaia 1iinj:pa4uii aIaI cuiial ll lglil pjj Jc
aill 5g 50 1234567890
Jabj
jll jia xu w jy b y 0a Jai. jbi ydi yj :Jilll c glbll e lii pi yj a jbu) temp. set j bi p (1/2) start/stop jg (j) jubn laglc sly g j . 5d
y elo i jSall no n y:agla jj bia jic. baa a jll oJr Jy jy a (o) temp. set g jy bai all g, 00000000000000000000000000000000000000000000000000000000000
The device has a power switch (on/off) and a start/stop button (start/stop). The switch is used to turn the device on or off. The start/stop button is used to start or stop the operation. The device also has a display that shows the status.
| الإستعمال الإستعمال الإستعمال الإستعمال الإستعمال الإستعمال الإستعمال الإستعمال الإستعمال الإستعمال الإستعمال الإستعمال الإستعمال الإستUTION الإستUTION الإستUTION الإستUTION الإستUTION الإستUTION الإستUTION الإستUTION الإستUTION الإستUTION الإستUTION الإستUTION الإستUTION الإستUTION الإستUTION الإستUTION الإستUTION الإستUTION الإستUTION الإستUTION الإستUTION الإستUTION الإستUTION الإستUTION الإستUTION الإستPTION الإستPTION الإستPTION الإستPTION الإستPTION الإستPTION الإستPTION الإستPTION الإستPTION الإستPTION الإستPTION الإستPTION الإستPTION الإستPTION الإستPTION الإستPTION الإستPTION الإستPTION الإستPTION الإستPTION الإستPTION الإستPTION الإستPTION الإستPTION الإستPTION الإستUTION الإستUTION الإستUTION الإستUTION الإستUTION الإستUTION الإستUTION الإستUTION الإستUTION الإستUTION الإستUTION الإستUTION الإستUTION ال,en. (الإستط頓) (الإستط頓) (ال,en) (ال,en) (ال,en) (ال,en) (ال,en) (ال,en) (ال,en) (ال,en) (ال,en) (ال,en) (ال,en) (ال,en) (ال,en) (ال,en) (ال,en) (ال,en) (ال,en) (ال,en) (ال,en) (ال,en) (ال,en) (ال,en) (ال,en) (ال,en) (ال,en) (ال'en) (ال'en) (ال'en) (ال'en) (ال'en) (ال'en) (ال'en) (ال'en) (ال'en) (ال'en) (ال'en) (ال'en) (ال'en) (ال'en) (ال'en) (ال'en) (ال'en) (ال'en) (ال'en) (ال'en) (ال'en) (ال'en) (ال'en) (ال'en) (ال'en) (ال,en) (ال'en) (ال'en) (ال'en) (ال'en) (ال'en) (ال'en) (ال'en) (ال'en) (ال'en) (ال'en) (ال'en) (ال'en) (ال'en) (ال'en) (ال'en) (ال'en) (ال'en) (ال'en) (ال'en) (ال'en) (ال'en) (ال'en) (ال'en) (ال,en) (ال,en) (ال'en) (ال'en) (ال'en) (ال'en) (ال'en) (ال'en) (ال'en) (ال'en) (ال'en) (ال'en) (ال'en) (ال'en) (ال'en) (ال'en) (ال'en) (ال'en) (ال'en) (ال'en) (ال'en) (ال'en) (ال'en) (ال'en) (ال,en) (ال,en) (ال,en) (ال,en) (ال,en) (ال,en) (ال,en) (ال,en) (ال,en) (ال,en) (ال,en) (ال,en) (ال,en) (ال,en) (ال,en) (ال,en) (ال,en) (ال,en) (ال,en) (ال,en) (ال,en) (ال,en) (ال,en) (ال,en) (ال(en) (ال'en) (ال,en) (ال,en) (ال,en) (ال,en) (ال,en) (ال,en) (ال,en) (ال,en) (ال,en) (ال,en) (ال,en) (ال,en) (ال,en) (ال,en) (ال,en) (ال,en) (ال,en) (ال,en) (ال,en) (ال,en) (ال,en) (ال,en) (ال,en) (ال'en) (ال,en) (ال,en) (ال,en) (ال,en) (ال,en) (ال,en) (ال,en) (ال,en) (ال,en) (ال,en) (ال,en) (ال,en) (ال,en) (ال,en) (ال,en) (ال,en) (ال,en) (ال,en) (ال,en) (ال,en) (ال,en) (ال,en) (ال,en) (ال-en) (ال,en) (ال,en) (ال,en) (ال,en) (ال,en) (ال,en) (ال,en) (ال,en) (ال,en) (ال,en) (ال,en) (ال,en) (ال,en) (ال,en) (ال,en) (ال,en) (ال,en) (ال,en) (ال,en) (ال,en) (ال,en) (ال,en) (ال,en) (ال,en) (ال-en) (ال'en) (ال,en) (ال,en) (ال,en) (ال,en) (ال,en) (ال,en) (ال,en) (ال,en) (ال,en) (ال,en) (ال,en) (ال,en) (ال,en) (ال,en) (ال,en) (ال,en) (ال,en) (ال,en) (ال,en) (ال,en) (ال,en) (ال,en) (ال,en) (ال(en) (ال,en) (ال,en) (ال,en) (ال,en) (ال,en) (ال,en) (ال,en) (ال,en) (ال,en) (ال,en) (ال,en) (ال,en) (ال,en) (ال,en) (ال,en) (ال,en) (ال,en) (ال,en) (ال,en) (ال,en) (ال,en) (ال,en) (ال,en) (ال,en) (ال=en) (ال,en) (ال,en) (ال,en) (ال,en) (ال,en) (ال,en) (ال,en) (ال,en) (ال,en) (ال,en) (ال,en) (ال,en) (ال,en) (ال,en) (ال,en) (ال,en) (ال,en) (ال,en) (ال,en) (ال,en) (ال,en) (ال,en) (ال,en) (ال,en) (ال/en) (ال,en) (ال,en) (ال,en) (ال,en) (ال,en) (ال,en) (ال,en) (ال,en) (ال,en) (ال,en) (ال,en) (ال,en) (ال,en) (ال,en) (ال,en) (ال,en) (ال,en) (ال,en) (ال,en) (ال,en) (ال,en) (ال,en) (ال,en) (ال,en) (ال.En) (ال,en) (ال,en) (ال,en) (ال,en) (ال,en) (ال,en) (ال,en) (ال,en) (ال,en) (ال,en) (ال,en) (ال,en) (ال,en) (ال,en) (ال,en) (ال,en) (ال,en) (ال,en) (ال,en) (ال,en) (ال,en) (ال,en) (ال,en) (ال,en) (ال EN) (EN) |
| [ ] |
| [ ] |
| [ ] |
| [ ] |
| [ ] |
| [ ] |
| [ ] |
| [ ] |
| [ ] |
| [ ] |
| [ ] |
| [ ] |
| [ ] |
| [ ] |
| [ ] |
| [ ] |
| [ ] |
| [ ] |
| [ ] |
| [ ] |
| [ ]] |

.504 5 6
(1/5) start/stop
16) start/stop 2j glb iall jli j
1glsljgds jbs 4 Jgblly Jibcawllp 2
aole o jbi
AE United Arab Emirates,
a
BSH Home Appliances FZE
Round About 13
Plot Nr MO-0532A
Jebel Ali Free Zone - Dubai
Tel.: 04 881 4401
mailto:service-ua@bshg.com
www.bosch-home.com
HEATHERTON, Victoria 3202
Tel.: 1300 368 339
Fax: 1300 306 818
valid only in AUS
mailto:bshau-as@bshg.com
www.bosch-home.com.au
BA Bosna i Hercegovina, Bosnia-Herzegovina
"HIGH" d.o.o
Odobasina 57
71000 Sarajewo
Info-Line: 061 100 905
Fax: 033213513
mailto:delicnanda@@hotmail.com
BE Belgique, Belgie, Belgium
BSH Home Appliances S.A.
LLC "BSH Household Appliances"
Tel.: 495 737 2961
mailto:mok-kdhl@bshg.com
CH Switzerland
BSH Hausgeräte AG
+7 cents/min (VAT 23%)
+17 cents/min (VAT 23%)
FR France
BSH Electroménager S.A.S.
BSH Home Appliances Ltd. Grand Union House Old Wolverton Road Wolverton
Milton Keynes MK12 5PT
To arrange an engineer visit, to order spare parts and accessories or for product advice please visit www.bosch-home.co.uk or call
*Calls from a BT landline will be charged at up to 3 pence per minute. A call set-up fee of up to 6 pence may apply.
GR Greece
BSH Ikiakes Siskeves A.B.E. Central Branch Services 17 km E.O. Athinon-Lamias &
Potamou 20
145 64 Kifisia
Greece - Athens
Tel.: 2104 277 701
Fax: 2104 277 669
North-Greece - Thessaloniki
Tel.: 2310 497 200
Fax: 2310 497 220
South-Greece - Heraklion/Kreta
Tel.: 2810325403
Fax: 2810 324 585
Central-Greece - Patras
Tel.: 2610 330 478
Fax: 2610331832
mailto:cs_gr_helpdesk@bshg.com
www.bosch-home.gr
HK Hong Kong, 香港
BSH Home Appliances Limited
Unit 1 & 2, 3rd Floor
North Block, Skyway House
3 Sham Mong Road
Tai Kok Tsui, Kowloon
Hong Kong
Tel.: 2565 6151
Fax: 2565 6252
mailto:bshhkg.service@bshg.com
HR Hrvatska, Croatia
Andabaka d.o.o.
Gunduliceva 10
21000 Split
Info-Line: 021481403
Info-Fax: 021481402
mailto:servis@andabaka.hr
IE Republic of Ireland
BSH Home Appliances Ltd.
Unit F4, Ballymount Drive
Ballymount Industrial Estate
Walkinstown
Dublin 12
Service Requests.
Spares and Accessories
Tel.: 01450 2655
Fax: 01450 2520
www.bosch-home.cu.uk
IL Israel,
C/S/B Home Appliance Ltd.
Uiel Building
2, Hamelacha St.
Industrial Park North
71293 Lod
Tel.: 089777222
Fax: 089777245
mailto:csb-serv@zahav.net.il
IS Iceland
Smith & Norland hf.
Noatuni 4
105 Revkjavik
Tel.: 05203000
Fax: 0520 3011
www.sminor.is
IT Italia, Italy
LT Lietuva, Lithuania
Senuku prekybos centras UAB
Jonavos g. 62
44192 Kaunas
Tel.: 0372 12146
Fax: 0372 12165
www.senukai.lt
LU Luxembourg
General Serviss Limited
Bullu street 70c
1067 Riga
Tel.: 07424137
mailto:bt@olimpeks.lv
Elkor Serviss
Brivibas gatte 201
1039 Riga
Tel.: 067 0705 20; -36
Fax: 067 0705 24
mailto:domoservice@elkor.lv
www.servisacentrs.lv
MD Moldova
S.R.L. "Rialto-Studio"
str. Liceului 98
2012 Chișinău
Tel./fax: 022 23 81 80
mailto:bosch-md@mail.ru
ME Crna Gora, Montenegro
Elektronika komerc
Ul. 27 Mart br.2
81000 Podgorica
Tel./Fax: 020 662 444
Mobil: 069324812
mailto:ekobosch.servis@t-com.me
MK Macedonia, MaKeDoHnJa
GORENEC
Jane Sandanski 69 lok.3
1000 Skopje
Tel.: 02 2454 600
Mobil: 070 697 463
mailto:gorenec@yahoo.com
MT Malta
Oxford House Ltd.
Notabile Road
Mriehel BKR 14
Tel.: 021 442 334
Fax: 021 488 656
www.oxfordhouse.com.mt
MV Raajeyge Jumhooriyyaa, Maledives
Lintel Investments
Ma. Maadheli, Majeedhee Magu
Malé
Tel.: 0331 0742
mailto:mohamed.zuhuree@
lintel.com.mv
NL Nederland, Netherlands
Unit F 2, 4 Orbit Drive
Mairangi BAY
Auckland 0632
Tel.: 094770492
Fax: 094772647
mailto:bshnz-cs@bshg.com
www.bosch-home.co.nz
PL Polska, Poland
Union Industrial Building
Block A, #01-03
577177 Singapore
Tel.: 6751 5000
Fax: 6751 5005
mailto:bshsgp.service@bshg.com
SI Slovenija, Slovenia
BSH Hišni aparati d.o.o.
Litostrojska 48
1000 Ljubljana
Tel.: 015830887
Fax: 01 583 08 89
4th floor, No. 112 Sec 1
Chung Hsiao E Road
Taipei ROC 100
Tel.: 02 2321 6222
mailto:Bosch@achelis.com.tw
UA Ukraine, Ukraine
LLC "BSH Household Appliances"
Tel.: 044 4902095
www.bosch-home.com
XK Kosovo
NTP GAMA
Rruga Mag Prishtei-Ferizaj
70000 Ferizaj
Tel.: 038 502 448
Fax: 029 021 434
mailto:gama_mm@yahoo.com
XS Srbija, Serbia
15th Road Randjespark
Private Bag X36, Randjespark
1685 Midrand - Johannesburg
Tel.: 086 002 6724
Fax: 086 617 1780
mailto:applianceserviceza@
bshg.com
www.bosch-home.com
b Bosch-infoteam@bshg.com
- TABLE OF CONTENTS
- SAFETY NOTES
- DANGER OF ELECTRIC SHOCK
- OVERVIEW
- CONTROLS AND DISPLAYS
- OPERATING CONTROLS
- ON/OFF SWITCH
- START/STOP BUTTON
- TEMP. SET BUTTON
- USING THE APPLIANCE
- GENERAL
- SETTING UP THE APPLIANCE
- DISPENSING WATER
- HEIGHT ADJUSTMENT
- FILL QUANTITY
- CHILD LOCK
- BRITA MAXTRA WATER FILTER SYSTEM
- PREPARING AND INSTALLING THE BRITA MAXTRA FILTER CARTRIDGE
- IMPORTANT INFORMATION
- DESCALING
- NOTES
- RUNNING THE DESCALING PROGRAMME
- MAINTENANCE AND DAILY CLEANING
- RISK OF ELECTRIC SHOCK
- DISPOSAL
- GUARANTEE
- TECHNICAL DATA
- CONTENTS
- SAFETY INSTRUCTIONS
- (TEMPERATURE SETTING)
- INDICATOR ELEMENTS
- STARTING OPERATION WITH THE DEVICE
- DRAWING WATER
- SETTING THE FILL VOLUME
- WARRANTY CONDITIONS
- TECHNICAL SPECIFICATIONS
- SLLLBRTTA
- JABJ
- AOLE O JBI
- AE UNITED ARAB EMIRATES
- A
- BA BOSNA I HERCEGOVINA, BOSNIA-HERZEGOVINA
- BE BELGIQUE, BELGIE, BELGIUM
- CH SWITZERLAND
- FR FRANCE
- GR GREECE
- HK HONG KONG, 香港
- HR HRVATSKA, CROATIA
- IE REPUBLIC OF IRELAND
- IL ISRAEL
- IS ICELAND
- IT ITALIA, ITALY
- LT LIETUVA, LITHUANIA
- LU LUXEMBOURG
- MD MOLDOVA
- ME CRNA GORA, MONTENEGRO
- MK MACEDONIA, MAKEDOHNJA
- MT MALTA
- MV RAAJEYGE JUMHOORIYYAA, MALEDIVES
- NL NEDERLAND, NETHERLANDS
- PL POLSKA, POLAND
- SI SLOVENIJA, SLOVENIA
- UA UKRAINE, UKRAINE
- XK KOSOVO
- XS SRBIJA, SERBIA
Brand : BOSCH
Model : THD2021 - FILTRINO
Category : Water filter