
TJC-30 - Other Household Appliances Vivax - Free user manual and instructions
Find the device manual for free TJC-30 Vivax in PDF.


| Product Type | Household Dehumidifier |
| Brand | Vivax |
| Model | TJC-30 |
| Dimensions (W x D x H) | 30 x 25 x 20 cm |
| Weight | 4.5 kg |
| Power Supply | 220-240 V, 50 Hz |
| Power Consumption | 500 W |
| Noise Level | ≤ 42 dB(A) |
| Water Tank Capacity | 2.5 L |
| Dehumidification Capacity | 30 L/day (30°C, RH 80%) |
| Functions | Auto defrost, adjustable humidity, continuous drainage |
| Control Type | Electronic with LED display |
| Timer | 1-24 hours |
| Air Filter | Washable pre-filter |
| Maintenance | Clean filter every 2 weeks; empty tank regularly |
| Safety Features | Automatic shut-off when tank full, overheat protection |
| Refrigerant | R-134a |
| Spare Parts Availability | Filters, water tank, remote control available |
| Repairability Index | 7.5/10 |
Frequently Asked Questions - TJC-30 Vivax
User questions about TJC-30 Vivax
0 question about this device. Answer the ones you know or ask your own.
Ask a new question about this device
Download the instructions for your Other Household Appliances in PDF format for free! Find your manual TJC-30 - Vivax and take your electronic device back in hand. On this page are published all the documents necessary for the use of your device. TJC-30 by Vivax.
USER MANUAL TJC-30 Vivax
When using this electrical appliance. Basic safety precautions should always be followed, including the following.
- Read all instructions before operating.
- Always use this appliance on a dry, level surface.
-
To protect against risk of electrical shock, do not immerse cord, plugs, or the appliance in water or other liquid.
-
Children should not be allowed to operate this appliances and close supervision is necessary when this appliance is used around children.
-
This appliance is not intended for use by infirm persons without supervision.
-
Unplug from outlet when not in use, before addition or removal of any parts, and before cleaning.
-
Do not operate any appliance with a damaged cord or plug or after the appliance malfunctions is dropped or damaged in any manner. Return appliance to dealer or authorized service agent for examination, repair or electrical or mechanical adjustment.
-
The use of accessories or attachments not recommended or sold by dealer may cause fire, electric shock or injury.
-
Do not use outdoors.
-
Do not let cored hang over edge of table or counter, or touch hot surfaces.
- Do not use outdoors.
- This appliance is for Household Use Only. Do not use appliance for other than intended use.
- Always turn the appliance off and unplug from the outlet when left unattended or finished using.
-
Check to be sure that the switch is in the off position and the unit is unplugged before assembling.
-
Avoid contacting moving parts.
-
The cutting blades in the strainer basket are sharp. Handle with care.
-
Do not leave unit unattended while in use.
-
Always make sure the juicer is fully assembled and the juicer cover is locked securely in position before the motor is turned on.
-
Be careful, when cleaning the blade and teeth on the filter as these are very sharp.
-
Do not use this appliance if the strainer basket is damaged.
-
Do not push food into the feed tube with your fingers. Always use the food pusher push it down.
- Do not place on or near a hot gas or electric burner, or in a heated oven.
- Do not operate the appliance exceed 3 minute, the appliance need to cool down for not overheating.
SAVE THESE INSTRUCTIONS
HOUSEHOLD USE ONLY
BEFORE FIRST USE
- Read the instructions carefully and keep for future reference
- Remove all packaging.
- Disassemble the juicer (see the Care and Cleaning section). Wash all removable parts to remove and residue left over from the manufacturing process.
DESCRIPTION OF PARTS
- Motor Housing
- Electronic Control Assembly
● 1 low speed
2 High speed
- Locking handle
- 2.0L litre/quart pulp container
- Pulp Chute/Juicer cover
- Food Pusher Assembly
- Juicer Collector Assembly
- Juice Jug Assembly
- Rubber Feet

HOW TO ASSEMBLE THE JUICER
-
Place the Plastic Juice collector assembly on the motor housing with the spout of right hand. facing the direction of the Locking Handle. Swivel until it fits into place.
-
Place the Stainless Steel sieve assembly Firstly Ensure the white dot on blade assembly are Correct match to the white dot on the lower coupling, then, put down the Steel sieve into lower coupling and assemble completely
Twist the Strainer Basket and gently push down Until it is seated in the Juice Collector.
NOTE: The top edge of the Strainer Basket should not be higher than the edge of the Juice Collector when properly installed
- Place the Pulp Chute/Juicer Cover on the top so that the opening of the Pulp Chute is on the side opposite the spout.
4 Lock the Pulp Chute/Juicer Cover into position by raising the Locking Handle until it clicks into the grooves located on both side of the Pulp Chute /Juicer Cover.
NOTE: Push the Locking Handle until it is fully Upright otherwise the Juice will not operate.
-
Align the groove in the Food Pusher with the small protrusion on the Inside of the Feed Tube.
-
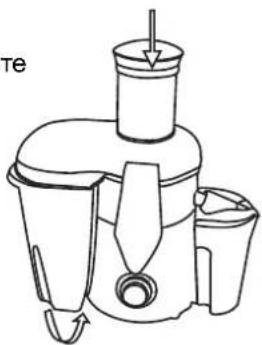
Slide the Pulp Container into position under the Pulp Chute.
-
If the Froth Separator is not in the Juice Jug, Slide between the tabs inside the Juice Jug. If you prefer to have juice with froth then the Froth Separator is not required.
-
Place the Juice Jug or a glass under the spout.

natural_image
Line drawing of a coffee maker with a downward arrow indicating compression (no text or symbols)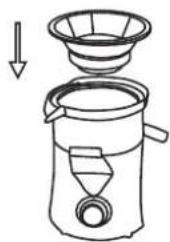
natural_image
Line drawing of a coffee maker with a downward arrow indicating compression or drying (no text or symbols)
natural_image
Line drawing of a coffee maker with a cup and side bowl, no text or symbols present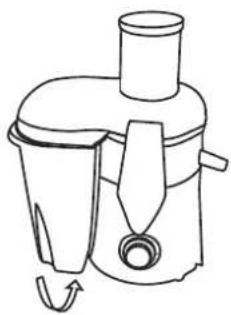
natural_image
Line drawing of a blender with handle and spout (no text or symbols)
natural_image
Line drawing of a blender with two cups and a top handle (no text or symbols)HOW TO PREPARE FRUIT AND VEGETABLES FOR JUICING
- Wash fruits and vegetables.
- Peel fruits that have inedible skins such as citrus fruits, pineapple, melons, papaya, etc.
- Pit all fruits with hard seeds or stones such as peaches, nectarines, cherries, etc.
- Most fruits and vegetables such as apples, carrots and cucumbers will not need to be cut. If the pieces are too big for the Feed Tube, slice the fruit or vegetables before starting to juice.
HOW TO JUICE
- Assemble the juicer. The Juice Jug or a glass can be placed below the pout to collect juice.
- Plug the power cord into a 220-240V power outlet.
- Choose either 'Hi' or 'Lo' speed on the Electronic Control depending on the type of fruit or vegetable that is being juiced. Never put any fruit or vegetables in the juicer until power turned on. Soft fruit or vegetables, such as berries, melons, cucumber, tomatoes, etc, should be juiced on Lo speed. Harder fruit and vegetables such as apples, celery, carrots, etc. should be juiced at 'Hi' speed.
- With the motor running, place food into the feed Tube. Using the Food Pusher, gently guide food down the Feed Tube. To extract the maximum amount of juice, always push the Food Pusher down slowly.
IMPORTANT: DO NOT PLACE HANDS OR FOREIGN OBJECTS DOWN THE FEED TUBE. ALWAYS USE THE FOOD PUSHER
- If the Pulp Container is full it can be emptied during juicing. Turn the Juicer Off and remove the Pulp Container by holding onto the Feed Tub.
- The froth separator in the Juice Jug will eliminate froth being poured into the glass. If you prefer to have juice with froth, simply remove the for the separator attachment from the Juice Jug before juicing.
HELPFUL HINTS
- A small amount of lemon juice can be added to apple juice to prevent browning.
-
Do not use bananas or avocados as they do not contain juice and will clog the juicer.
-
Allow the juicer to run for one minute before turning 'Off' to allow any excess juice to be extract from the pulp.
- A plastic bag can be put in the pulp container for easy clean-up.
- Disassemble the Juicer and rinse off the pulp immediately after juicing. The Strainer Basket/Cutting Blades can be soaked in water to loosen the pulp. Then wash in warm soapy water.
- Wash parts immediately after use to avoid discolouration of the plastic parts which may occur with some fruits and vegetables.
- If juicing herbs or leafy green vegetables process in combination with other fruits or vegetables to yield more juice.
CARE AND CLEANING
How to disassemble the Juicer
IMPORTANT: Before disassembling the Juicer make sure that the Electronic Control is in the Off position, the plug has been removed from the wall outlet and the motor has stopped completely.
- Remove the Food Pusher from the Feed Tube.
-
Remove the Pulp Container by holding onto the Feed Tube and tilting the juicer slightly disengage the Pulp Container.
-
Remove the Juice Jug.
-
Hold the Pulp Chute/Juicer Cover and disengage The Locking Bar from the grooves on the side of The Pulp Chute/Juicer Cover.
-
Lift and remove the Pulp Chute/Juicer Cover.
-
Remove the Plastic Juice Collector and Strainer Basket by placing one hand under the spout and the other under the black plastic edge opposite the spout and lifting upwards. The Stainless Steel Strainer Basket can be removed from the Juice Collector by pushing it up through the hole in the bottom of the Juice Collector.

natural_image
Line drawing of a juice maker with a handle and side cups, showing no text or symbolsNOTE: Be careful when handling the Strainer Basket as the as the cutting blades are very sharp.
How to Clean
- Move the Control Switch to the Off position and wait for
the motor to stop completely.
-
Unplug from the wall outlet.
-
Disassemble the Juicer(see directions on page 8)
- Clean the Pulp Container, Pulp Chute/Juicer Cover, Food Pusher, Plastic Juice Collector, Juice Jug and Froth Separator in warm, soapy water, A mild detergent is recommended. Rinse well and dry thoroughly.
- Hold the Stainless Steel Strainer Basket/Cutting Blades
Under clean running water. Use the cleaning brush included with the Juicer to gently clean away pulp from the filter and cutting blades. Rinse under running water.
Hold the Strainer Basket/Cutting Blades up to the light to ensure that the fine mesh holes are not blocked. If the holes are blocked, soak the Strainer Basket/Cutting Blades in hot water to loosen the pulp and clean with the nylon brush again. Allow to dry on a cloth or paper towel before reassembling the juicer.
- Wipe the Motor Housing with a soft cloth moistened in Warm soapy water.
Technical specifications
Mains voltage: AC220-240V 50H
Power: 700W
VIVAX
home
HR
BiH
CG
Upute za uporabu
Sokovnik
AJ-700
VAŽNE PREDOSTROŽNOSTI
SASTAVLJANJE SOKOVNIKA
natural_image
Line drawing of a blender with a handle and side cups, showing no text or symbolsNAPOMENA: pazite prilikom rukovanja sa filtrom za tekućine jer su oštrice veoma oštre.
Čišćenje uređaja
-
Postavite glavni prekidač u položaj OFF te pričekajte da motor u potpunosti prestane s radom.
-
Isključite uređaj iz strujne utičnice.
-
Rastavite sokovnik (upute za rastavljanje pogledajte na prethodnoj stranici)
-
U toploj sapunastoj vodi operite spremnik za meso, ispust za meso/poklopac sokovnika, gurač hrane, plastični sakupljač soka, posudu za sok i odvajač pjene. Preporuča se uporaba blagog deterdženta. Dobro isperite i temelijito posušite.
-
Filtar od nehrđajućeg čelika / oštrice za rezanje isperite tekućom vodom. Za nježno uklanjanje ostataka mesa sa filtra i oštrica koristite priloženu kist za čišćenje.
SASTAVLJANJE SOKOVNIKA
-
Sa pogledom prema dršci za zaključavanje postavite plastični sakupljač soka na kućište motora sa levkom okrenutim udesno. Zavijte ga dok se ne učvrsti.
-
Postavite filter od nerđajućeg čelika. Prvo poravnajte belu tačku na filteru sa belom tačkom na donjoj spojnici i zatim postavite čelični filter na donju spojnicu i u potpunosti ga učvrstite.
Zavijte filter za tečnost i nežno ga pritisnite dok ne „sedne“ u sakupljač soka.
NAPOMENA: Kada se ispravno instalira gornja ivica filtera za tečnost ne bi smelo da se desi da je viši od ivice sakupljača soka.
- Postavite ispust za meso/poklopac sokovnika na vrh tako da se otvor ispusta za meso nalazi na suprotnoj strani od levka.
natural_image
Line drawing of a rice cooker with a downward arrow indicating compression or cooling (no text or symbols)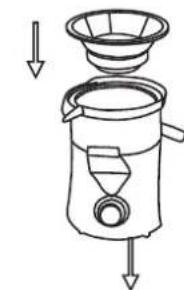
natural_image
Line drawing of a coffee maker with a lid and side cups, showing liquid level (no text or symbols)
natural_image
Line drawing of a kitchen brush with handle and spout (no text or symbols)
natural_image
Line drawing of a blender with handle and spout (no text or symbols)
natural_image
Line drawing of a blender with two cups and a handle, no text or symbols presentPRIPREMA VOĆA I POVRĆA ZA CEĐENJE
- Operite voće i povrće.
- Voće sa nejestivom korom (ananas, banana, lubenica, papaja, itd.) oljuštite.
- Iz voća sa tvrdim semenkama poput breskvi, marelica, trešanja, itd. uklonite koščice.
- Većinu plodova, kao što su jabuka, šargarepa i krastavac, ne treba seći. Ukoliko su komadi preveliki za cev za stavljanje hrane hrane, pre ceđenja nasecite voće ili povrće.
CIJEĐENJE
- Sastavite sokovnik. Za sakupljanje soka pod levak postavite posudu za sok ili čašu.
- Uključite strujni kabl u strujnu utičnicu napona 220-240V.
- Putem glavnog prekidača odaberite visoku ili nisku brzinu, zavisno od vrste voća ili povrća koje se cedi. Nikada ne postavljajte voće ili povrće u sokovnik pre nego što ga uključite. Meko voće ili povrće (bobičasto voće, lubenica, krastavac, paradajz, itd.) bi trebalo da es cedi na niskoj brzini. Tvrđe voće ili povrće (jabuka, celer, šargarepa, itd.) bi trebalo da se cedi na visokoj brzini.
- Sa motorom u pogonu postavite hranu u cev za stavljanje. Guračem hrane lagano gurajte hranu u cev. Za dobijanje maksimalne količine soka hranu uvek stavljajte polako.
VAŽNO: NE GURAJTE RUKE ILI STRANE PREDMETE U CEV ZA STAVLJANJE HRANE. UVEK KORISTITE GURAČ HRANE
-
Ukoliko se posuda za meso napuni, možete tokom ceđenja da je ispraznite. Isključite sokovnik i uklonite posudu za meso držanjem sokovnika za cev za stavlijanje hrane.
-
Odvajač pene u posudi za sok će onemogućiti ulivanje pene u posudu. Ukoliko volite sok sa penom, pre ceđenja jednostavno uklonite odvajač pene iz posude za sok.
KORISNI SAVETI
- Za sprečavanje tamnjenja jabukovog soka, dodajte u sok malu količinu soka od limuna.
- Ne koristite banane ili avokada, jer ne sadrže sok i začepiće sokovnik.
- Ostavite sokovnik da radi 1 minut pre nego što ga isključite, kako bi se iz mesa iscedio sav sok.
- Za jednostavnije čišćenje u posudu za meso je možete da stavite plastičnu kesu.
- Odmah nakon ceđenja, rastavite sokovnik i isperite meso. Filter za tečnost ioštrice za sečenje mogu se potopiti u vodu kako bi se meso spralo. Zatim operite delove sokovnika toplom sapunicom i isperite vodom.
- Delove operite odmah posle upotrebe, kako bi izbegli promenu boje plastičnih delova do koje može doći prilikom ceđenja određenog voća i povrća.
- Ukoliko cedite biljke ili lisnato zeleno povrće, radite to u kombinaciji sa drugim voćem ili povrćem kako bi dobili više soka.
BRIGA I ODRŽAVANJE
Rastavljanje sokovnika
VAŽNO: Pre rastavljanja sokovnika obavezno postavite glavni prekidač u položaj OFF, isključite utikač iz strujne utičnice i sačekajte da motor u potpunosti prestane sa radom.
- Izvadite gurač hrane iz cijevi za umetanje.
-
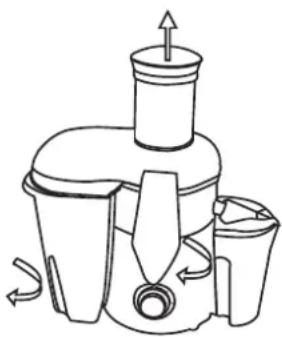
Skinite posudu za meso držanjem uređaja za cev za stavljanje i laganim naginjanjem sokovnika, kako bi se posuda za meso skinula.
-
Skinite posudu za sok.
-
Držeći ispust za meso/poklopac sokovnika, odvojite dršku za zaključavanje od zubaca na stranicama ispusta za meso/poklopca sokovnika.
-
Podignite i skinite ispust za meso/poklopac sokovnika.
-
Skinite plastični sakupljač soka i filter za tečnost postavljanjem jedne ruke ispod levka i druge ispod crne plastične ivice nasuprot levka i podizanjem. Filter od nerđajućeg čelika može da se skine iz sakupljača soka, guranjem kroz otvor na dnu sakupljača soka.
natural_image
Line drawing of a blender with a top handle and side cups, showing no text or symbolsNAPOMENA: pazite prilikom rukovanja sa filterom za tečnost, jer su oštrice veoma oštre.
Čišćenje uređaja
-
Postavite glavni prekidač u položaj OFF i sačekajte da motor u potpunosti prestane sa radom.
-
Isključite uređaj iz strujne utičnice.
-
Rastavite sokovnik (uputstva za rastavljanje pogledajte na prethodnoj stranici)
-
U toploj sapunastoj vodi operite posudu za meso, ispust za meso/poklopac sokovnika, gurač hrane, plastični sakupljač soka, posudu za sok i odvajač pene. Preporučuje se upotreba blagog deterdženta. Dobro isperite i temeljito osušite.
-
Filter od nerđajućeg čelika i oštrice za sečenje isperite tekućom vodom. Za nežno uklanjanje ostataka mesa sa filtera i oštrica koristite priloženu četkicu za čišćenje.
Okrenite filter za tečnost i oštrice za sečenje prema izvoru svetlosti, kako bi proverili da li je fina mrežica negde začepljena. Ukoliko jeste, potopite filter za tečnost i oštrice za sečenje u vruću vodu, kako bi se meso spralo i ponovo očistite priloženom četkicom. Pre sastavljanja sokovnika ostavite ga na krpi ili papirnatoj salveti da se osuši.
- Kućište motora prebrišite mekom krpom nakvašenom toplom sapunastom vodom.
Tehničke specifikacije
Radni napon: AC220-240V 50Hz
Snaga: 700W
VIVAX
home
SLO
Navodila za uporabo
Sokovnik
AJ-700
POMEMBNI VARNOSTNI UKREPI
SESTAVLJANJE SOKOVNIKA
natural_image
Line drawing of a water heater with a downward arrow indicating flow or direction (no text or symbols)
natural_image
Line drawing of a coffee maker with a downward arrow indicating compression or lifting process (no text or symbols)
natural_image
Line drawing of a two-step robotic juice maker with a handle and spout, showing mechanical components without any text or symbols.
natural_image
Line drawing of a blender with three cups and a handle (no text or symbols)PRIPRAVA SADJA IN ZELENJAVE ZA IZTISKANJE
natural_image
Line drawing of a blender with a top handle and side cups, showing internal structure and rotation arrows (no text or symbols)MONTIMI I APARATITIT PËR LËNG
flowchart
graph TD
    A["Raw Material"] --> B["Add Feed into Dish"]
    B --> C["Cut the funnel into Dish with a filter"]
    C --> D["Add a side dish into Dish with a side outlet"]
    D --> E["Ordering a side dish into Dish with a side outlet"]
    E --> F["Final Product"]
PËRGATITJA E PEMËVE DHE PËRDIMIVE PËR SHTRYDHJE
natural_image
Line drawing of a blender with a top handle and side cups, showing no text or symbolsnatural_image
Line drawing of a water heater with a downward arrow indicating flow or direction (no text or symbols)
natural_image
Line drawing of a blender with a lid and handle, showing internal components and a downward arrow (no text or symbols)
natural_image
Line drawing of a blender with three cups and a handle (no text or symbols)POTPIS I PEČAT PRODAVATELJA
- Ovom garancijom garantira
proizvođač proizvoda, preko KIM TEC d.o.o., kao uvoznika i davatelja garancije u Republici Bosni i Hercegovini besplatan popravak istog u skladu s važećim propisima i u skladu s uvjetima opisanim u ovom garantnom listu. Ovom garancijom garantiramo da će predmet ove garancije raditi bez greške uzrokovane eventualnom lošom izradom i lošim materijalom izrade. Svi eventualno nastali kvarovi biti će besplatno otklonjeni u ovlaštenom servisu u garantnom roku.
-
UVJETI GARANCIJE Garantni rok počinje teći od dana kupnje proizvoda i i traje 24 mjeseca za Vivax Home velike kućanske aprate (perilice rublja, hladnjake, perilice posuđa, štednjake, ugradbenu tehniku), a 12 mjeseci za Vlvax home male kućanske aparate (uključujući mikrovalne pečnice, grijalice I radijatore).
-
U slučaju kvara na proizvodu koji je predmet ove garancije, obavezujemo se da ćemo isti popraviti u najkraćem mogućem roku, a najkasnije u roku od 45 dana. Ako se proizvod ne može popraviti ili se ne popravi u roku od 45 dana, biti će zamijenjen novim. Ako popravak proizvoda traje duže od 10 dana, garancija će se produžiti za vrijeme trajanja popravka.
-
Garancija se priznaje samo uz račun o kupnji, te uz ovaj garantni list koji mora biti ispravno popunjen odnosno mora sadržavati datum prodaje, pečat i potpis prodavatelja.
-
Davalac garancije osigurava servis i rezervne dijelove 7 godina od datuma kupnje.
-
GARANCIJA NE OBUHVAĆA
BROJ RAČUNA PRODAVAOCA
POTPIS I PEČAT PRODAVAOCA
- Ovom garancijom
GARANTNI ROK I USLOVI
| DUŽINA TRAJANJA GARANCIJE | ||
| 12 meseci 24 meseća | 36 meseci | |
natural_image
Abstract circuit-like pattern with white branching lines on a gray background (no text or symbols)
IZJAVA O SUKLADNOSTI
Rm, 201, 2/F, Manley Commercial Building, 367-375
Qeen's Road Central, Sheung Wan, Hong Kong
HRN EN 61000-3-3:1997
Potvrda o sukladnosti 21580EMC0801796 izdana od nadležnog tijela :
- KONČAR-Institut za elektrotehniku d.d., Fallerovo šetalište 22, 10002 Zagreb
Declaration of Conformity
We (Manufacturer /Importer)
MS Industrial Limited
(Company name)
Rm, 201, 2/F, Manley Commercial Building, 367-375 Queen's Road Central, Sheung Wan, Hong Kong
(Address)
Declares under our sole responsibility that the product
Product name : Juice extractor
Brand name : VIVAX HOME
Model No. : AJ-700
To which this declaration relates is in conformity with the following standard(s) or other normative document(s)
EN 55014-1:2006
EN 55014-2:1997+A1:2001
■ EN 61000-3-2:2006
■ EN 61000-3-3:1995+A1:2001+A2:2005
EN 60335-1:2002+A11:2004+A1:2004+A12:2006+A2:2006
■ EN 60335-2-14:2003
EN 50366:2003+A1:2006
Following the provisions of EUROPEAN COUNCIL DIRECTIVE: 2004/108/EC AND 2006/95/EC

MMM. vivid.com
VIVAX
home
MMM, vivid.com
- SAVE THESE INSTRUCTIONS
- HOUSEHOLD USE ONLY
- BEFORE FIRST USE
- DESCRIPTION OF PARTS
- HOW TO ASSEMBLE THE JUICER
- NOTE: Push the Locking Handle until it is fully Upright otherwise the Juice will not operate.
- HOW TO PREPARE FRUIT AND VEGETABLES FOR JUICING
- HOW TO JUICE
- IMPORTANT: DO NOT PLACE HANDS OR FOREIGN OBJECTS DOWN THE FEED TUBE. ALWAYS USE THE FOOD PUSHER
- HELPFUL HINTS
- CARE AND CLEANING
- How to disassemble the Juicer
- How to Clean
- Technical specifications
- VIVAX
- home
- Upute za uporabu
- VAŽNE PREDOSTROŽNOSTI
- SASTAVLJANJE SOKOVNIKA
- Čišćenje uređaja
- PRIPREMA VOĆA I POVRĆA ZA CEĐENJE
- CIJEĐENJE
- VAŽNO: NE GURAJTE RUKE ILI STRANE PREDMETE U CEV ZA STAVLJANJE HRANE. UVEK KORISTITE GURAČ HRANE
- KORISNI SAVETI
- BRIGA I ODRŽAVANJE
- Rastavljanje sokovnika
- Tehničke specifikacije
- POMEMBNI VARNOSTNI UKREPI
- SESTAVLJANJE SOKOVNIKA
- PRIPRAVA SADJA IN ZELENJAVE ZA IZTISKANJE
- MONTIMI I APARATITIT PËR LËNG
- PËRGATITJA E PEMËVE DHE PËRDIMIVE PËR SHTRYDHJE
- POTPIS I PEČAT PRODAVATELJA
- GARANTNI ROK I USLOVI
- IZJAVA O SUKLADNOSTI
- Declaration of Conformity
- vivid.com
- MMM, vivid.com
Brand : Vivax
Model : TJC-30
Category : Other Household Appliances