
TGR80XNGU - Water heater GORENJE - Free user manual and instructions
Find the device manual for free TGR80XNGU GORENJE in PDF.


| Product Type | Electric Storage Water Heater |
| Brand | Gorenje |
| Model | TGR80XNGU (TGR 80 X) |
| Capacity (Volume) | 76.1 L |
| Dimensions (H x W x D) | 775 x 605 x 150 mm |
| Weight (Empty / Filled) | 27 kg / 107 kg |
| Power Supply | 230 V ~, 2000 W |
| Protection Class | I |
| Degree of Protection | IP23 |
| Rated Pressure | 0.6 MPa (6 bar) |
| Temperature Setting Range | 10 °C to 65 °C (+5 °C / -0 °C) |
| Eco Mode Temperature | 55 °C |
| Heating Time (10 °C to 65 °C) | 2 h 37 min |
| Energy Efficiency Class | C |
| Annual Electricity Consumption | 1428 kWh |
| Daily Electricity Consumption | 6.698 kWh |
| Mixed Water Volume at 40 °C (V40) | 85 L |
| Declared Load Profile | M |
| Anti-Corrosion Tank | Yes |
| Thermostat Control | Yes, with knob |
| Safety Valve Required | Yes (rated pressure 0.6 MPa, 0.9 MPa, or 1.0 MPa as per label) |
| Installation | Vertical wall mounting, minimum screw diameter 8 mm |
| Connection Type | Closed (pressure) or open (gravity) system |
| Power Cord Specification | H05VV-F 3G 1.5 mm² |
| Maximum Water Temperature (Safety Cut-off) | 130 °C |
Frequently Asked Questions - TGR80XNGU GORENJE
User questions about TGR80XNGU GORENJE
0 question about this device. Answer the ones you know or ask your own.
Ask a new question about this device
Download the instructions for your Water heater in PDF format for free! Find your manual TGR80XNGU - GORENJE and take your electronic device back in hand. On this page are published all the documents necessary for the use of your device. TGR80XNGU by GORENJE.
USER MANUAL TGR80XNGU GORENJE
natural_image
Exterior view of a white cylindrical water heater with a digital display showing 'gorenje' and control buttons (no text-heavy elements)TGR 50-100 XNGU

Instructions for Use 4

Upute za upotrebu 9

Uputstva za upotrebu 14
The appliance may be used by children older than 8 years old, elderly persons and persons with physical, sensory or mental disabilities or lacking experience and knowledge, if they are under supervision or taught about safe use of the appliance and if they are aware of the potential dangers.
Children should not play with the appliance.
Children should not clean or perform maintenance on the appliance without supervision.
⚠️ Installation should be carried out in accordance with the valid regulations and according to the instructions of the manufacturer and by qualified staff.
In a closed, pressurised system of installation, it is obligatory to install a safety valve on the inlet pipe with a rated pressure of 0.6 MPa (6 bar), 0.9 MPa (9 bar) or 1.0 MPa (10 bar) (see the label), which prevents the elevation of pressure in the boiler by more than 0.1 MPa (1 bar) above the rated pressure.
Water may drip from the outlet opening of the safety valve, so the outlet opening should be set to atmospheric pressure.
The outlet of the safety valve should be installed facing downwards and in a non-freezing area.
To ensure proper functioning of the safety valve, the user should perform regular controls to remove limescale and make sure the safety valve is not blocked.
Do not install a stop valve between the water heater and the safety valve, because it will impair the pressure protection of the heater!
Before connecting it to the power supply, the water heater must be filled with water!
The heater is equipped with an additional thermal cut-off for protection in case of failure of the operating thermostat. In this case, however, the temperature of the water in the heater can reach up to 130 °C according to the safety standards. During the water supply installation, the possibility of temperature overloads should be taken into account.
If the heater is to be disconnected from the power supply, please drain any water from the heater to prevent freezing.
⚠️ Please do not try to fix any defects of the water heater on your own. Call the nearest authorised service provider.

Our products incorporate components that are both environmentally safe and harmless to health, so they can be disassembled as easily as possible and recycled once they reach their final life stage.
Recycling of materials reduces the quantity of waste and the need for production of raw materials (e.g. metals) which requires a substantial amount of energy and causes release of harmful substances. Recycling procedures reduce the consumption of natural resources, as the waste parts made of plastic and metal can be returned to various production processes.
For more information on waste disposal, please visit your waste collection centre or the store where the product was purchased.
Dear buyer, thank you for purchasing our product.
Prior to the installation and first use of the electric water heater, please read these instructions carefully.
This water heater has been manufactured in compliance with the relevant standards and tested by the relevant authorities as indicated by the Safety Certificate and the Electromagnetic Compatibility Certificate. The technical characteristics of the product are listed on the label affixed between the inlet and outlet pipes. The installation must be carried out by qualified staff. All repairs and maintenance work within the water heater, e.g. lime removal, must be carried out by an authorised maintenance service provider.
INSTALLATION
The water heater shall be installed as close as possible to the outlets. When installing the water heater in a room with a bathtub or shower, take into account the requirements defined in IEC Standard 60364-7-701 (VDE 0100, Part 701). It has to be fitted to the wall using appropriate wall screws with a minimum diameter of 8 mm. A wall with a poor load-bearing capacity must be properly reinforced where the heater will be installed. The water heater may only be fixed upon the wall vertically.
| A B C | |||
| TGR 50 X | 570 | 405 | 145 |
| TGR 80 X | 775 | 605 | 150 |
| TGR 100 X | 935 | 755 | 160 |
Connection and installation dimensions of the water heater [mm]

CONNECTION TO THE WATER SUPPLY
The water heater connections for the inlet and outlet of water are colour-coded. The inlet of cold water is marked with blue colour, while the hot water outlet is marked with red colour.
The water heater can be connected to the water supply in two ways. The closed-circuit pressure system enables several points of use, while the open-circuit gravity system enables a single point of use only. The mixer taps must also be installed in accordance with the selected installation mode.
The open-circuit gravity system requires the installation of a non-return valve in order to prevent the water from draining out of the tank in the event of the water supply running dry or being shut down. This installation mode requires the use of a cross-flow mixer tap. As the heating of water expands its volume, this causes the tap to drip. The dripping cannot be stopped by tightening it further; on the contrary, the
tightening can only damage the tap.
The closed-circuit pressure system requires the use of pressure mixer taps. For safety reasons the supply pipe must be fitted with a safety valve or alternatively, a valve of the safety class that prevents the pressure in the tank from exceeding the nominal pressure by more than 0.1 MPa (1 bar). The outlet opening on the relief valve must be equipped with an outlet for atmospheric pressure.
The heating of water in the heater causes the pressure in the tank to increase to the level set by the safety valve. As the water cannot return to the water supply system, this can result in dripping from the outlet of the safety valve. The drip can be piped to the drain by installing a catching unit just below the safety valve. The drain installed below the safety valve outlet must be piped down vertically and placed in an environment that is free from the onset of freezing conditions.
In case the existing plumbing does not enable you to pipe the dripping water from the safety valve into the drain, you can avoid the dripping by installing a 3-litre expansion tank on the inlet water pipe of the boiler.
In order to provide correct operation of the safety valve, periodical inspections of the relief valve must be carried out by the user to eliminate any limescale and check if the safety valve is blocked. To check the valve, open the outlet of the safety valve by turning the handle or unscrewing the nut of the valve (depending on the type of the valve). The valve is operating properly if the water comes out of the nozzle when the outlet is open.

flowchart
graph LR
    A["Top Tank"] --> B["Valve"]
    B --> C["Reactor Unit 1"]
    C --> D["Flow Control Unit 2"]
    D --> E["Return Line"]
    E --> F["Valve 3"]
    F --> G["Flow Control Unit 4"]
    G --> H["Return Line"]
    H --> I["Valve 5"]
    I --> J["Return Line"]
    J --> K["Flow Control Unit 6"]
    K --> L["Return Line"]
    L --> M["Valve 7"]
    M --> N["Return Line"]
    N --> O["Flow Control Unit 8"]
    O --> P["Turb"]
    style A fill:#f9f,stroke:#333
    style B fill:#ccf,stroke:#333
    style C fill:#cfc,stroke:#333
    style D fill:#fcc,stroke:#333
    style E fill:#cff,stroke:#333
    style F fill:#ffc,stroke:#333
    style G fill:#ffc,stroke:#333
    style H fill:#ffc,stroke:#333
    style I fill:#ffc,stroke:#333
    style J fill:#ffc,stroke:#333
    style K fill:#ffc,stroke:#333
    style L fill:#ffc,stroke:#333
    style M fill:#ffc,stroke:#333
    style N fill:#ffc,stroke:#333
    style O fill:#ffc,stroke:#333
Closed (pressure) system

flowchart
graph TD
    A["Top Tank"] --> B["Valve"]
    B --> C["Valve T"]
    B --> D["Valve H"]
    C --> E["Flow 3"]
    D --> F["Flow 5"]
    style A fill:#f9f,stroke:#333
    style B fill:#ccf,stroke:#333
    style C fill:#cfc,stroke:#333
    style D fill:#fcc,stroke:#333
    style E fill:#ffc,stroke:#333
    style F fill:#fcc,stroke:#333
Open (non-pressure) system
Legend:
1 - Safety valve
2 - Test valve
3 - Non-return valve
4 - Pressure reduction valve
5 - Closing valve
6 - Checking fitting
7 - Funnel with outlet connection
8 - Expansion tank
H - Cold water
T - Hot water
Between the water heater and safety valve, no closing valve may be built in because it could impede the function of the safety valve.
The heater can be connected to the domestic water supply network without a pressure-reducing valve if the pressure in the network is lower than the nominal pressure. If the pressure in the network exceeds the nominal pressure, a pressure-reducing valve must be installed.
Before connecting it to the power supply, the water heater must be filled with water. When filling the heater for the first time, the tap for the hot water on the mixing tap must be opened. When the heater is filled with water, the water starts to run through the outlet pipe of the mixing tap.
CONNECTING THE WATER HEATER TO THE POWER SUPPLY NETWORK
Z

natural_image
Pure diagram of a circular mechanical component with internal components and arrows, no text or symbols present.Before connecting to the power supply network, install a power supply cord in the water heater, with a min. diameter of 1.5 mm^2 (H05VV-F 3G 1.5 mm ^2 ). To do this, the protective cap must be removed from the water heater.
Connecting the heater to the power supply network must take place in accordance with the standards for electric appliances. To comply with the national installation regulations, an all poles
disconnect switch must be installed between the water heater and the power supply network.
Legend:
1 - Connection terminal
2 - Thermostat and bipolar thermal cut-out
3 - Electric heating element
4 - Pilot lamp
L - Live conductor
N - Neutral conductor
± - Earthing conductor
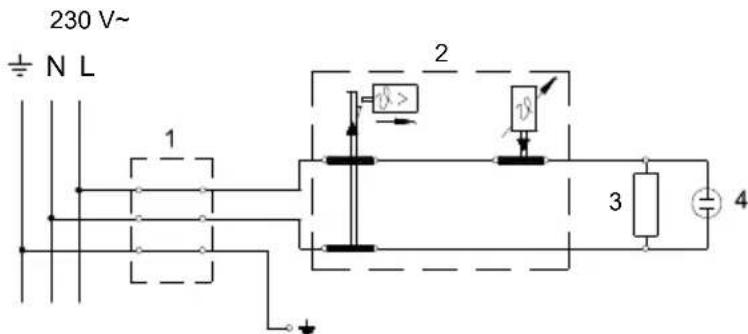
Electric installation
CAUTION: Before any intervention into the interior of the water heater, disconnect it from the power supply network!
After connecting to the water and power supply, the heater is ready for use. By turning the thermostat knob, water temperature can be set between 10 °C and 65 °C +5 °C/-0 °C. We recommend that the knob be set to the position "eco" ensuring the most economic operation of the water heater. This way, the water temperature is maintained at 55 °C while the operation also results in less lime sediment as well as in less heat losses than is the case at higher temperatures. During the operation of an electric heater can hear noise in the water heater. The light indicator shows the operation of the heating element. On the casing of the water heater a bimetal thermometer is mounted, pointing clockwise (to the right) whenever there is hot water in the water heater. The thermometer shows the temperature at the place of installation, while the control knob on the thermostat sets the temperature of water in the bottom part of the heater. As a result these two temperatures may differ. When the water heater is not in use for longer periods of time, it should be protected from freezing by setting the temperature to "*". Do not disconnect the power. Thus the temperature of water is maintained at about 10 °C. Should you choose to disconnect the power, the water heater should be thoroughly drained before the onset of freezing conditions. Water from the heater is drained through the inlet pipe of the heater. For
this purpose, a special fitting (T-fitting) must be mounted between the relief valve and the heater inlet pipe, or a discharge tap. The heater can be discharged directly through the relief valve, by rotating the handle or the rotating valve cap to the same position as for checking the operation. Before discharge, make sure the heater is disconnected from the power supply, and open the hot water on the connected mixer tap. After discharging through the inlet pipe, there is still some water left in the water heater. The remaining water will be discharged after removing the heating flange, through the heating flange opening.
The external parts of the water heater can be cleaned with a mild detergent solution. Do not use solvents and abrasives.
Never try to repair any possible faults of the water heater by yourself, but inform about it the nearest authorised service workshop.
TECHNICAL PROPERTIES OF THE APPLIAN
| Type | TGR 50 X | TGR 80 X | TGR 100 X | |
| Declared load profile | M | M | L | |
| Energy efficiency class ^1) | C | C | C | |
| Water heating energy efficiency (ηwh) ^1) | [%] | 36,0 | 36,0 | 37,1 |
| Annual electricity consumption ^1) | [kWh] | 1427 | 1428 | 2762 |
| Daily electricity consumption ^2) | [kWh] | 6,692 | 6,698 | 12,850 |
| Thermostat temperature settings | "eco" | |||
| Value of "smart" | 0 | 0 | 0 | |
| Volume | [l] | 47,5 | 76,1 | 96,1 |
| Quantity of mixed water at 40 °CV40 ^2) | [l] | 66 | 85 | 131 |
| Rated pressure | [MPa(bar)] | 0,6 (6) | ||
| Weight / Filled with water | [kg] | 21/71 | 27/107 | 31/131 |
| Anti-corrosion of tank | • | • | • | |
| Power of electrical heater | [W] | 2000 | ||
| Voltage | [V~] | 230 | ||
| Protection class | I | |||
| Degree of protection | IP23 | |||
| Heating time from 10 °C to 65 °C | [h] | 1^38 | 2^37 | 3^16 |
1) EU Regulation 812/2013; EN 50440 2) EN 50440
WE RESERVE THE RIGHT TO MAKE CHANGES THAT DO NOT IMPAIR THE FUNCTIONALITY OF THE DEVICE.
The user manual can also be found at our website http://www.gorenje.com.
UPOZORENJA
natural_image
Cross-sectional diagram of a mechanical component with no visible text or symbolsOtvoreni sistem (protočni)
Legenda:
1 - Sigurnosni ventil
2 - Ventil za testiranje
3 - Nepovratni ventil
4 - Ventil za redukciju pritiska
5 - Zaporni ventil
6 - Ispitni nastavak
7 - Cevak sa priključkom na odvod
8 - Ekspanzioni sud
H - Hladna voda
T - Topla voda
Između bojlera i sigurnosnog ventila ne sme da se ugrađuje ventil za zatvaranje vode jer bi se time onemogućilo delovanje sigurnosnog ventila.
Bojler možete da priključite na vodovodnu mrežu objekta bez redukcionog ventila ako je pritisak u mreži niži od nominalnog pritiska. Ako je pritisak u mreži viši od nominalnog pritiska, morate obavezno da ugradite redukcioni ventil.
Pre nego što priključite bojler na električnu mrežu obavezno ga napunite vodom. Prilikom prvog punjenja otvorite slavinu za toplu vodu. Bojler je pun kad iz slavine počne da teče voda.
PRIKLJUČIVANJE NA ELEKTRIČNU MREŽU

natural_image
3D diagram of a mechanical component with arrows indicating direction (no text or symbols)Pre priključivanja na električnu mrežu potrebno je da u bojler ugradite priključnu traku minimalnog preseka od najmanje 1,5 mm ^2 (H05VV-F 3G 1,5 mm ^2 ). Da bi se to učinilo, odvijte zaštitni poklopac na bojleru.
Priključenje bojlera na električnu mrežu mora da se izvrši u skladu sa standardima za postavljanje električne instalacije. Između bojlera i trajne instalacije mora da bude ugrađen uređaj
za odvajanje svih polova od električne mreže u skladu sa nacionalnim instalacionim propisima.
Legenda:
1 - Priključne kleme
2 - Termostat i dvopolni toplotni osigurač
3 - Grejač
4 - Kontrolna svetiljka
L - Faza
N - Neutralni provodnik
± - Uzemljenje
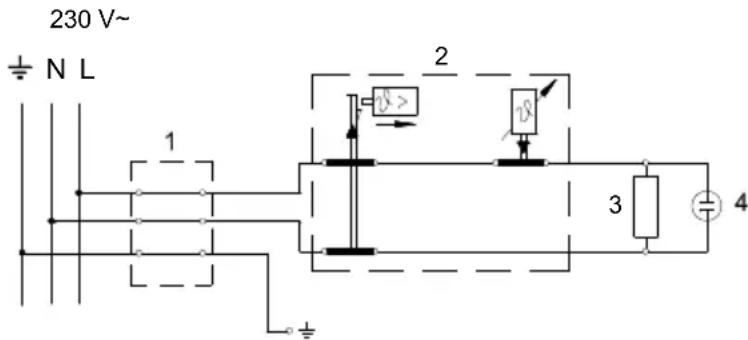
Šema povezivanja električnih provodnika
UPOZORENJE: Pre svake intervencije u unutrašnjosti bojlera obavezno isključite bojler iz električne mreže!
UPOTREBA I ODRŽAVANJE
Posle priključivanja na vodovodnu i električnu mrežu bojler je spreman za upotrebu. Okretanjem dugmeta na termostatu, koji je sa donje strane zaštitnog poklopca, birate željenu temperaturu od 10 °C do 65 °C +5 °C/-0 °C. Preporučuje se podešavanje dugmeta na položaj "eco". Takvo podešavanje je najekonomičnije; pri tome temperatura vode ostaje oko 55 °C, a izdvajanje vodenog kamenca i toplotni gubici biće manji nego kod podešavanja na višu temperaturu. Za vreme rada električnog grejača se može čuti šum u bojleru. Rad električnog grejača pokazuje kontrolna lampica. Bojler sa prednje strane ima bimetalni termometar koji se naginje u smeru kretanja kazaljki na satu kada je u njemu topla voda. Termometar prikazuje temperaturu na mestu ugradnje, dok okretanjem dugmeta na termostatu podešavate temperaturu vode u donjem delu bojlera. Zato ove dve temperature mogu da se razlikuju. Ako nemate nameru da koristite bojler duže vremena, zaštitite njegov sadržaj od smrzavanja tako da ne isključujete električnu energiju, a dugme termostata podesite na položaj "*". Na tom podešavanju će bojler održavati temperaturu vode na približno 10 °C. Ukoliko isključite bojler iz električne mreže, morate da ispustite vodu iz njega zbog opasnosti od smrzavanja vode. Voda iz bojlera se ispušta kroz dovodnu cev bojlera. U tom cilju preporučljivo je prilikom
ugradnje između sigurnosnog ventila i dovodne cevi grejanja namestiti poseban "fiting" (T-deo) ili ispusni ventil. Bojler takođe možete da ispraznite i neposredno kroz sigurnosni ventil pomeranjem ručice, odnosno obrtne kapice ventila u položaj kao prilikom proveravanja rada. Pre pražnjenja isključite bojler iz električne mreže i zatim otvorite ručicu za toplu vodu na priključenoj bateriji za mešanje. Posle pražnjenja vode kroz dovodnu cev, u bojleru ostaje manja količina vode koja ističe prilikom odstranjivanja grejne prirubnice kroz otvor grejne prirubnice.
Kućište bojlera čistite blagim rastvorom praška za pranje. Ne upotrebljavajte razređivače ni gruba sredstva za čišćenje.
Molimo da eventualne kvarove ne popravljate sami nego da o njima obavestite najbližu servisnu službu.
TEHNIČKE KARAKTERISTIKE BOJLERA
| Tip | TGR 50 X | TGR 80 X | TGR 100 X | |
| Određeni profil opterećenja | M | M | L | |
| Razred energetske efikasnosti ^1) | C | C | C | |
| Energetsta efikasnost pri zagrevanju vode (ŋwh) ^1) | [%] | 36,0 | 36,0 | 37,1 |
| Godišnja potrošnja električne energije ^1) | [kWh] | 1427 | 1428 | 2762 |
| Dnevna potrošnja električne energije ^2) | [kWh] | 6,692 | 6,698 | 12,850 |
| Podešavanje temperature termostata | "eco" | |||
| Vrednost "smart" | 0 | 0 | 0 | |
| Zapremina | [l] | 47,5 | 76,1 | 96,1 |
| Količina mešane vode na 40 °C V40 ^2) | [l] | 66 | 85 | 131 |
| Nominalni pritisak | [MPa(bar)] | 0,6 (6) | ||
| Masa/napunjen vodom | [kg] | 21/71 | 27/107 | 31/131 |
| Antikorozivna zaštita kotla | • | • | • | |
| Snaga električnog grejača | [W] | 2000 | ||
| Napon napajanja | [V~] | 230 | ||
| Klasa zaštite | I | |||
| Stepen zaštite | IP23 | |||
| Vreme zagrevanja od 10 °C do 65 °C | [h] | 1^38 | 2^37 | 3^16 |
1) Uredba komisije EU 812/2013; EN 50440
2) EN 50440
ZADRŽAVAMO PRAVO NA PROMENE, KOJE NE UTIČU NA FUNKCIONALNOST APARATA.
Uputstvo za upotrebu je na raspolaganju i na našoj internet strani
http://www.gorenje.com.
VËREJTJE
Sistemi i hapur (pa presion)
Legjenda:
1 - Ventili sigurues
2 - Ventili provues
3 - Ventili jo-kthyes (ireverzibil)
4 - Ventili reduktues i shtypjes
5 - Ventili mbyllës
natural_image
Pure diagram of a circular mechanical component with internal arrows, no text or symbols presentnatural_image
Pure diagram of a mechanical component with no text, numbers, or symbols

- INSTALLATION
- CONNECTION TO THE WATER SUPPLY
- Legend:
- CONNECTING THE WATER HEATER TO THE POWER SUPPLY NETWORK
- UPOZORENJA
- Legenda:
- Između bojlera i sigurnosnog ventila ne sme da se ugrađuje ventil za zatvaranje vode jer bi se time onemogućilo delovanje sigurnosnog ventila.
- PRIKLJUČIVANJE NA ELEKTRIČNU MREŽU
- UPOTREBA I ODRŽAVANJE
- TEHNIČKE KARAKTERISTIKE BOJLERA
- VËREJTJE
- Legjenda:
Brand : GORENJE
Model : TGR80XNGU
Category : Water heater