
MK 94 - Air conditioner ECG - Free user manual and instructions
Find the device manual for free MK 94 ECG in PDF.


| Product Type | Portable Air Conditioner |
| Model | MK 94 |
| Brand | ECG |
| Cooling Capacity | 9000 BTU |
| Energy Efficiency Ratio (EER) | 2.6 |
| Power Supply | 220-240 V ~ 50 Hz |
| Power Consumption (Cooling) | 1050 W |
| Air Flow | 300 m³/h |
| Noise Level | 52 dB(A) |
| Dehumidification Capacity | 1.0 L/h |
| Remote Control | Yes, included |
| Timer | 24-hour programmable |
| Sleep Mode | Yes |
| Fan Speeds | 3 (Low, Medium, High) |
| Dimensions (W x H x D) | 450 x 750 x 380 mm |
| Weight | 28 kg |
| Refrigerant | R410A |
| Drainage Method | Self-evaporation or continuous drain hose |
| Filter Type | Washable mesh filter |
| Filter Cleaning Interval | Every 2 weeks |
| Auto Restart | Yes (after power failure) |
| Child Lock | Yes |
| Operating Temperature Range | 16°C – 35°C |
| Installation Kit Included | Window sealing plate, exhaust hose, adapters |
Frequently Asked Questions - MK 94 ECG
User questions about MK 94 ECG
0 question about this device. Answer the ones you know or ask your own.
Ask a new question about this device
Download the instructions for your Air conditioner in PDF format for free! Find your manual MK 94 - ECG and take your electronic device back in hand. On this page are published all the documents necessary for the use of your device. MK 94 by ECG.
USER MANUAL MK 94 ECG
natural_image
Line drawing of a small electric air conditioner unit (no text or symbols)English
Deutsch
Čeština
Eesti keel
Hrvatski
Bosanski
Latviešu valoda
Slovenčina
Slovenščina
Ελληνικά
MK 94
PORTABLE AIR-CONDITIONER
INSTRUCTION MANUAL
MOBILE KLIMAANLAGE
BEDIENUNGSANLEITUNG
MOBILNÍ KLIMATIZACE
NÁVOD K OBSLUZE
KAASASKANTAV ÖHUKONDITSIONEER
KASUTUSJUHEND
PRIJENOSNI KLIMA UREĐAJ
UPUTE ZA UPORABU
PÄRVIETOJAMS GAISA KONDICIONËTÄJS
ROKASGRĀMATA
MOBILNÁ KLIMATIZÁCIA
NÁVOD NA OBSLUHU
PRENOSNE KLIMATSKE NAPRAVE
NAVODILA
ΦΟΡΗΤΟ ΚΛΙΜΑΤΙΣΤΙΚΟ
ΕΓΧΕΙΡΙΔΙΟ ΟΔΗΓΙΩΝ
A

B

C

SAFETY INSTRUCTIONS
Read carefully and save for future use!
Warning: The safety measures and instructions, contained in this manual, do not include all conditions and situations possible. The user must understand that common sense, caution and care are factors that cannot be integrated into any product. Therefore, these factors shall be ensured by the user/s using and operating this appliance. We are not liable for damages caused during shipping, by incorrect use, voltage fluctuation or the modification or adjustment of any part of the appliance.
To protect against a risk of fire or electric shock, basic precautions shall be taken while using electrical appliances, including the following:
- Make sure the voltage in your outlet corresponds to the voltage provided on the appliance label and that the socket is properly grounded. The outlet must be installed in accordance with applicable electrical codes according to EN.
- Do not operate the device if the cord is damaged. All repairs, including cord replacements, must be carried out at a professional service centre! Do not remove the protective covers from the appliance; there is a risk of electric shock!
- Protect the appliance against contact with water and other liquids to prevent risk of electric shock.
- The appliance is intended for domestic use only! Do not use the appliance outside or in a damp environment or in areas where gas may leak or where contact may occur with explosive gasses. Do not touch the cord or the device with wet hands. There is a risk of electric shock.
- Pay extra attention if you use the appliance near children.
- We recommend that you do not leave the air conditioner plugged in the socket unattended.
-
Place the appliance in vertical position away from other objects (minimum 50 cm) so that you ensure free circulation of air necessary for proper operation. Do not place any objects on the appliance. Never cover the openings of the appliance!
-
Do not use the appliance with timers, remote control systems and similar devices. There is a risk of fire if the appliance is covered or placed in a wrong position.
- Do not use the appliance in hot places (direct sunlight, close to stove, heater, etc.).
- Do not place the appliance on soft surfaces, like a bed or a sofa, etc. It must be placed on a stable and level surface.
- Do not use the device without the air filter or without the grill! Be careful when removing the air filter to prevent an injury.
- If you are installing exhaust hose, make sure that the connection is correct. The hose must not be twisted or deformed.
- Do not direct the flow of air on pets and flowers. Do not spray insecticides or flammable sprays on the device. Do not direct the airflow at stoves, ovens, etc. Protect your skin and eyes from long-term effects of cold air.
- If the device emits an unusual smell or smoke, switch it off immediately and call service.
- Do not turn the appliance on or off by plugging or unplugging the power cord. Turn it off always using the main switch first then you can unplug the power supply cable from the socket!
- Disconnect the cord from the electrical outlet prior to any maintenance. Do not remove the power cord from the outlet by yanking the cord. Unplug the power cord from the outlet by grasping the plug.
- Do not use other than recommended cleaning products.
- Do not allow the power cord to touch hot surfaces or run the cord over sharp edges.
- Do not insert fingers or other objects into the openings of the appliance.
- Use this appliance only in accordance with the instructions in this manual. The manufacturer is not liable for any damage caused by the improper use of this appliance.
- This appliance can be used by children aged 8 years and older and people with reduced physical or mental abilities or lack of experience and knowledge, if they are supervised or have been instructed to use the product in a safe manner and understand the potential dangers. Children shall not play with the appliance. Cleaning and maintenance
by the user must not be done by children unless they are older than 8 years old and under supervision. Children under the age of 8 shall keep away from the appliance and its power supply.
- Do not use the appliance in wet places where a gas leak or contact with an explosive atmosphere could occur. Store the appliance in a room where there are no sources of ignition (e.g. open fire, gas appliance in operation, electric heating system in operation).
- Do not pierce or burn through components containing the coolant.
The air conditioner contains coolant R-290 (propane) natural gas, which is very environmentally friendly but flammable. When installing the appliance, make sure that no part of the cooling circuit is damaged. In case of damage prevent fire and thoroughly air the areas in which the device is located.
Attention: Propane can be odorless
The appliance must be installed, operated and stored in a room with a floor area of more than 4 m^2 .

Warning: ATTENTION, RISK OF FIRE!
Do not immerse in water!
DESCRIPTION OF THE APPLIANCE
Main components [A]
- Handle
- Air intake (left side)
- Control panel
- Slats directing the airflow
- Wheels
-
Warm air exhaust
-
Air intake (right side)
- Remote controller
- Drain plug
- Grille
- Exhaust hose assembly
- Window sealing strip assembly including seal
Front panel [B] and Remote controller [C]
- On/Off switch
Press the button to turn the air conditioner on or off.
- "Sleep" button (night mode)
This button only works in cooling mode. Pressing this button automatically reduces the fan speed to a minimum. However, their speed cannot be manually controlled.
- Fan speed button
Use this button to select high or low air flow speed.
- Up/down buttons to set temperature or time.
Set temperature using these buttons in the cooling mode. In timer mode, you set the on/off time By simultaneously pressing both buttons (on the panel) you can switch between displaying the temperature in Celsius or Fahrenheit.
- Mode selection button
Press the specific button on the remote control to select between cooling, air flow and dehumidification modes.
- Timer button
In standby mode, press to set the time the appliance is switched on. Press the button in the switched-on state to set the switch-off time of the appliance.
- Display showing temperature/time (appliance panel)
This window shows the set temperature and time.
- Remote control sensor (appliance panel)
The sensor receives signals transmitted by remote control.
- Button to switch between Celsius and Fahrenheit scale (remote controller)
Press the button to switch between temperature scales.
PLACEMENT AND INSTALLATION
Placement
Place the appliance on a level floor near a window.
To ensure good air circulation and optimum performance, there should be at least 50 cm of free space around the appliance.

Window seal assembly
Remove dirt from the window frame and sash before installation.
Stick the Velcro around the perimeter of the window frame so that the window can close after the sealing has been attached.


- Mark the center (M) of the window seal (Fig. 1).
-
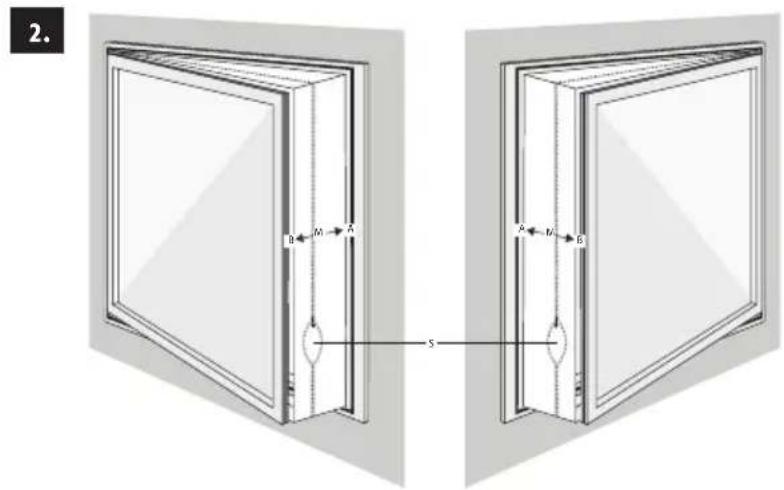
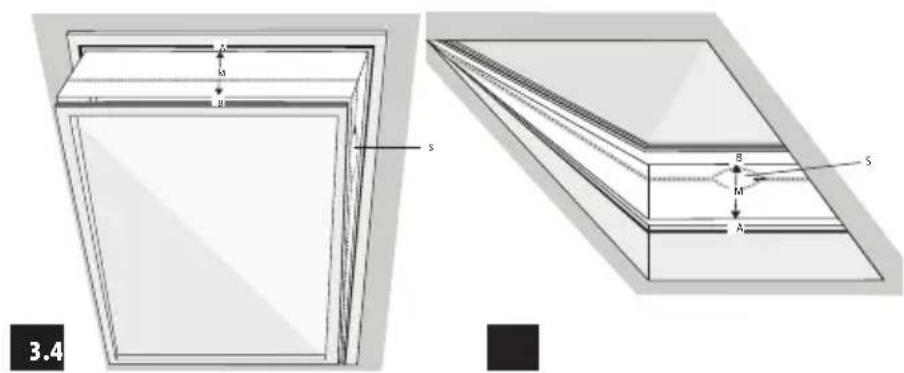
Mark the center of the window frame and sash (Fig. 2-4).
-
figure 2 shows open window
- figure 3 shows tilted out window
-
Figure 4 shows open skylight
-
Attach the Velcro tape to the front of the sash (in most cases 1 cm wide) or to the inner surface of the sash (on which the window handles are attached).
-
First attach side A, then side B, starting from the center and continuing left and right.
- IMPORTANT! When attaching, the point A must be exactly opposite the point B.
-
It is best to open the Velcro in the position marked with «S» and attach the air outlet hose.
-
When closing the window, always be careful not to squash the seal.
• The seal is intended for use with windows with a maximum circumference of 400 cm.
Cleaning and maintenance
The seal can be machine washed at 30 °C
Do not use aggressive cleaners.
Assembly of the sealing strip
- Measure the window size
- Adjust the length of the sealing strip so as to fit the size of the window. After determining the length of the sealing strip, fix the set size using screw Ⓐ.
- Install the strip with fixed length in the window.
- Screw (counterclockwise) the exhaust hose assembly with the round connector to the hot air exhaust on the rear side of the air conditioner Ⓗ.
- Insert the exhaust hose assembly into the window sealing strip with flat neck and secure with screws ©.

Beware of faulty installation:
- Good throughput on the exhaust hose is very important. Incorrect installation affects the performance of the air conditioner.
- Avoid excessive bending of the exhaust hose during installation.
- Ensure smooth airflow through the hose.
Warning:
The length of the exhaust hose was specially designed for this model. Do not replace the hose arbitrarily or extend it since this could easily lead to impaired function or failure of air conditioning.

natural_image
Diagram of a showerhead with a crossed-out nozzle symbol (no text or labels)Note:
Maximum stretched length of the exhaust hose is 1,5 m. Try to keep the length as short as possible during the operation. We recommend that the hose is installed as straight as possible.
Remote controller
Insert batteries into remote control before use:
- Push to remove the cover of the battery compartment.
- Insert two new alkaline batteries. Observe the correct battery polarity as marked in the battery compartment.
- Replace the battery space cover.

natural_image
Technical line drawing of a device casing with internal components and an external housing (no text or symbols)Note:
Use exclusively alkaline batteries in the remote control. Do not use rechargeable batteries or other battery types.
Replace both batteries in the same time. Do not mix old and new batteries or batteries of different types together.
If you do not intend to use the air conditioner for an extended period of time, remove the batteries from the remote control.
Warning:
In the event of battery leakage, wipe the battery compartment so as to prevent corrosion inside the remote control. Be careful. Electrolyte is a caustic substance and can cause skin burns or other health hazards. In case of contact with skin or clothing, rinse the contact place immediately with plenty of water. In case of accidental ingestion, consult a physician.
USING THE APPLIANCE
Note: The operating status in cooling mode depends on the ambient temperature: When the ambient temperature reaches the value selected on the unit, the cooling function is switched off and only the fan continues to operate. If the ambient temperature rises above the set value, the cooling function switches on again.
Cooling and air flow mode
- By default, the air conditioner is in cooling mode when switched on. You can also change the air conditioner in the cooling mode using modes button ⑤. The cooling indicator is on.
• Using the ④ buttons(up and down arrows) set the required temperature in the range 16°C to 30°C. - Press the air speed button ③ to select between low, medium and high air flow speed.
Airflow mode
- Press the mode button ⑤ on the control panel or the proper button ⑤ on the remote control to select airflow mode. The airflow indicator is on.
- Press the air speed button ③ to select between low, medium and high air flow speed.
Dehumidification mode
- Press the mode button ⑤ on the control panel or the proper button ⑤ on the remote control to select dehumidification mode. The dehumidification indicator is on.
- As shown in the picture, remove the plug from the condensation drain ⑨ and insert hose into the outlet. Put the other end of the hose in a suitable container or a sink.
- In dehumidification mode, if the room temperature is above 17^ , the air conditioning compressor will start operating. The operation is then controlled as follows: When the temperature in the room drops below 15^ , the compressor stops. When the temperature rises again above 15^ , the compressor starts again. If the compressor's turn off and on time interval is less than 3 minutes, a three-minute delay is included to protect the compressor from restarting.

natural_image
Line drawing of a portable electric fan with cooling fins and a cup, no text or symbols present- In dehumidification mode, the fan runs implicitly at low speed and the air flow rate cannot be adjusted.
• Temperature cannot be set.
Tip: When using the dehumidifying function remove the exhaust hose from the air conditioner. Otherwise, the dehumidification is not effective or the "FL" alarm is displayed to indicate that the water tank has been filled.
Timer mode
- In the standby mode you can press the timer button ⑥ to set using the arrows ④ time to start the air conditioning (1\~24h). The timer indicator will light up.
- When turned on you can press the timer button ⑥ to set using arrows ④ time to shut off the air conditioning (1\~24h). The timer indicator will light up.
CARE AND MAINTENANCE
Emptying the water tank
The appliance has an automatic water evaporation system. The circulation of condensed water cools the evaporator. This not only increases the efficiency of cooling, but also saves energy.
When the water container is full the display shows message "FL" accompanied by acoustic alarm. The compressor stops working automatically. In this case, water should be poured out. Proceed as follows:
- Disconnect the appliance from power and remove the exhaust hose assembly.
- Place the air conditioner in a suitable place.
- Remove the drain plug and drain the water from the appliance.
- Carefully replace the drain plug.
- Replace the exhaust hose and turn on the air conditioning.
Maintenance
Warning: Turn off the appliance and disconnect it from power before cleaning and maintenance to prevent injury by electric shock!
Cleaning the external surface
- Unplug the power cable from the electrical outlet.
- Wipe it with a fine cloth. Do not use gasoline, thinner or other chemicals for cleaning. These substances can damage the surface of the appliance and deform the plastic parts.
- Protect the appliance from water getting in.
Cleaning the filter
We recommend to clean the filter every 14 days. In case of polluted air, the cleaning frequency should be increased. When the filter is gradually clogged with dust, the efficiency of air conditioning is reduced. When cleaning, do the following:
- Remove the input grid and then the filter as shown.
- Place the filter in a neutral detergent solution or warm water (approx. 40 °C) and allow it to dry in the shade after washing.
- Replace the clean filter back. Turn on the air conditioning and use it as usual.
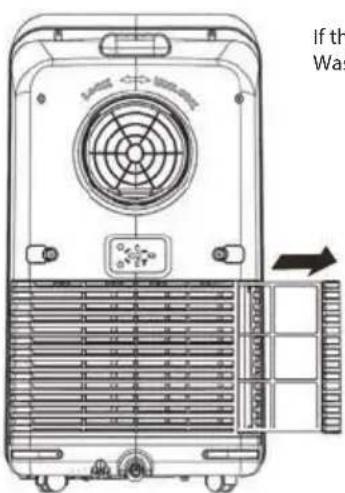
If the filter is not too dirty, you can remove the dust with a vacuum cleaner. Wash heavily soiled filter with warm water.

natural_image
Illustration of a hand spraying particles into a grid on a surface, with no text or symbols present.Notes:
- Do not use excessively hot water (ideal temperature approx. 40 °C) and aggressive cleaners (alcohol, gasoline, thinners) to clean the filter.
- Protect the filter from heat to prevent its deformation and allow it to dry freely.
- Do not operate the appliance without inserted filter.
Seasonal maintenance
If you are not using the appliance for longer time do the following seasonal maintenance:
- Remove the drain plug and drain the water from the appliance.
- Allow the appliance to run in air flow mode for 2 hours until the interior has completely dried.
- Switch off and unplug the appliance.
- Clean the filter and replace it.
- Remove the exhaust hose with accessories and store everything carefully.
- Remove batteries from the remote controller.
- Place the appliance in a plastic bag and store it in a cool, dry place.
Do the following after long term storage of the appliance before using it again:
- Make sure that the filter and drain plug are in place.
- Check the power cord for any damage. Do not use the appliance when it is damaged.
- Insert batteries in the remote control.
- Reinstall all accessories according to the installation instructions.
Common problems and their diagnostics
Intelligent detection of defects
| Error code Diagnosis | |
| E1 Temperature sensor coil defect. | |
| E2 Defect of room temperature sensor | |
| E4 Freeze protection: when the temperature of the coil falls below 0°C, the appliance stops.When the coil temperature rises above 8 °C, the protection is deactivated and normal functions are restored. |
Troubleshooting
| Problem Possible cause | Solution | |
| Air conditioner does not work. | No power Switch on power. | |
| Display shows “FL”. Turn off, drain the water and then turn on again. | ||
| The shut off function by timer is activated. | You can turn the air conditioner back on 3 minutes after turning off. | |
| Insufficient cooling performance of the air conditioner. | Direct sunlight Close the curtains. | |
| Open doors and windows or too many people or heat sources in the room. | Close doors and windows and eliminate heat sources. | |
| Clogged filter Clean or replace the filter. | ||
| Blocked air intake or exhaust. Remove the blockage. | ||
| The air conditioner is too noisy. | The appliance is not level. | Place it on a flat and firm surface and try to avoid vibrations. |
| The compressor does not work. | The heat protection of the compressor was activated. | Wait 3 minutes and restart after cooling. |
TECHNICAL DATA
| Manufacturer ECG | |
| Model MK 94 | |
| Cooling yes | |
| Dehumidification yes | |
| Fan yes | |
| Setting the fan speed 2 speed | |
| On/Off timer 1–24 hrs. | |
| Thermostat 16–30°C | |
| Remote control yes (2× AAA batteries included) | |
| Recommended room size 12–15m | 2 |
| Air flow 290 m3/h | |
| Energy class A | |
| Nominal input power 785 W | |
| Nominal voltage 220–240 V ~ 50 Hz | |
| Noise level | 65 dB (A) |
| Cooling performance 7000 Btu/h | |
| Refrigerant | R290/150 g |
| Output pressure | 2,8 MPa |
| Suction pressure | 0,8 MPa |
| Max. permissible pressure (low) | 1,3 MPa |
| Max. permissible pressure (high) | 3,8 MPa |
| Product weight 21 kg | |
| Product weight including packaging | 25 kg |
| Product dimensions (h × w × d) | 690 × 370 × 350 mm |
| Dimensions including packaging (h × w × d) | 830 × 445 × 375 mm |
WARRANTY: The following situations void the warranty:
Incorrect or inappropriate handling of the device, failure to observe the safety precautions that apply to the appliance, use of force, alteration or repair by a party other than an authorized service center.
Components subject to normal wear and tear are not covered under the warranty.
USE AND DISPOSAL OF WASTE
Wrapping paper and corrugated paperboard – deliver to scrapyard. Packing foil, PE bags, plastic elements – throw into plastic recycling containers.
DISPOSAL OF PRODUCTS AT THE END OF LIFETIME
Disposal of electric and electronic equipment (valid in EU member countries and other European countries with an implemented recycling system)
The represented symbol on the product or package means the product shall not be treated as domestic waste. Hand over the product to the specified location for recycling electric and electronic equipment. Prevent negative impacts on human health and the environment by properly recycling your product. Recycling contributes to preserving natural resources. For more information on the recycling of this product, refer to your local authority, domestic waste processing organization or store, where you purchased the product.
This product complies with EU directives on electromagnetic compatibility and electrical safety.
The instruction manual is available at www.ecg-electro.eu. Changes of text and technical parameters are reserved.

08/05

SICHERHEITSHINWEISE
natural_image
Pure diagram of a mechanical or electrical component with no text, numbers, or symbols
natural_image
Technical line drawing of a portable air conditioner unit with coiled tube and ventilation slots (no text or symbols)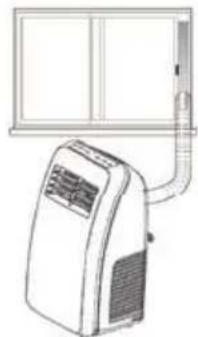
natural_image
Line drawing of an air conditioner unit with a window and ventilation duct (no text or symbols)
natural_image
Line drawing of an air conditioner unit connected to a wall-mounted device (no text or symbols)Falsche Installation:
natural_image
Diagram of a showerhead with a prohibition symbol (no text or labels)Hinweis:
natural_image
Technical line drawing of a device with exploded view and internal components (no text or symbols)Bemerkung:
natural_image
Line drawing of a portable electric fan with cooling fins and a cup beside it (no text or symbols)Timer-Modus
natural_image
Technical line drawing of a portable air conditioner unit with fan and vent, showing internal structure and ventilation slots (no text or symbols)natural_image
Illustration of a hand spraying water onto a grid-patterned surface (no text or symbols)Bemerkungen:
Do not immerse in water! – Neponořovat do vody!
POPIS SPOTŘEBIČE
natural_image
Diagram of a showerhead with a prohibition symbol (no text or labels)Poznámka:
natural_image
Technical line drawing of a device casing with internal components and an external housing (no text or symbols)Poznámka:
natural_image
Line drawing of a vintage portable air purifier with cooling fan and bucket (no text or symbols)Režim časovače
natural_image
Illustration of a hand spraying water onto a grid-patterned surface (no text or symbols)Poznámky:
Hoiatus: TÄHELEPANU, TULEKAHJU OHT!
Do not immerse in water! – Ärge sukeldage vette!
SEADME KIRJELDUS
Põhikomponendid [A]
natural_image
Diagram of a showerhead with a crossed-out nozzle symbol (no text or labels)Märkus:
natural_image
Technical line drawing of a device casing with internal components and an external housing (no text or symbols)Märkus:
natural_image
Line drawing of a vintage portable air purifier with cooling fan and bucket (no text or symbols)natural_image
Technical line drawing of a portable air conditioner unit with fan and vent (no text or symbols)natural_image
Illustration of a hand spraying water onto a grid-patterned surface (no text or symbols)Märkused:
POZOR: OPREZ! OPASNOST OD POŽARA!
Do not immerse in water! – Nemojte uranjati u vodu!
OPIS UREĐAJA

natural_image
Simple line drawing of a rectangular object with a vertical line and dot pattern, no text or symbols present.
natural_image
Technical line drawing of a portable air conditioner unit with cooling fins and ventilation duct (no text or symbols)
natural_image
Line drawing of an air conditioner unit with a window and ventilation duct (no text or symbols)
natural_image
Line drawing of a portable air conditioner connected to a wall-mounted unit (no text or symbols)Obratite pažnju na ispravnost ugradnje:
natural_image
Diagram of a showerhead with a prohibition symbol (no text or labels)Napomena:
Najveća razvijena duljina ispušnog crijeva je 1,5 metara. Nastojte da za vrijeme rada ono bude što je moguće kraće. Preporučujemo da pri ugradnji nastojite crijevo postaviti što je moguće ravnije.
Daljinski upravljač
Prije korištenja daljinskog upravljača potrebno je u njega umetnuti baterije:
- Povucite poklopac pretinca za baterije kako biste ga otvorili.
- Uložite dvije nove alkalne baterije. Obratite pozornost na ispravan polaritet baterija, kao što je označeno u pretincu za baterije.
- Vratite poklopac pretinca za baterije.

natural_image
Technical line drawing of a battery pack with internal components and an external casing (no text or symbols)Napomena:
U daljinskom upravljaču koristite samo alkalne baterije. Nemojte koristiti punjive baterije ili druge vrste baterija. Zamijenite obje baterije. Nemojte umetati kombinaciju starih i novih baterija ili baterija različitih vrsta. Ako klima-uredaj ne namjeravate upotrebljavati određeni dulji period, izvadite baterije iz daljinskog upravljača.
Upozorenje:
natural_image
Line drawing of a portable electric fan with cooling fins and a cup, no text or symbols presentRad prema timeru
natural_image
Technical line drawing of a portable air conditioner unit with fan and vent (no text or symbols)natural_image
Illustration of a hand spraying water onto a grid-patterned surface (no text or symbols)Napomene:
natural_image
Diagram of a showerhead with a prohibition symbol (no text or labels)Piezime.
natural_image
Technical line drawing of a device casing with internal components and exploded view (no text or symbols)Piezime.
natural_image
Line drawing of a portable electric fan with cooling fins and a cup beside it (no text or symbols)natural_image
Illustration of a hand spraying water onto a grid-patterned surface (no text or symbols)Piezīmes:
Výstraha: POZOR, RIZIKO POŽIARU!
Do not immerse in water! – Neponárat do vody!
POPIS SPOTREBIČA
Hlavné komponenty [A]
- Držadlo
- Vstup vzduchu (l'avá strana)
- Ovládací panel
- Lamely usmernenia prúdu vzduchu
- Kolieska
-
Odvod teplého vzduchu
-
Vstup vzduchu (pravá strana)
- Dialkový ovládač
- Vypúštacia zátka
- Mriežka
-
Zostava výfukovej hadice
-
Zostava tesniacej lišty do okna vrátane tesnenia
natural_image
Diagram of a showerhead with a prohibition symbol (no text or labels)Poznámka:
natural_image
Technical line drawing of a device casing with internal components and an external housing (no text or symbols)Poznámka:
natural_image
Line drawing of a vintage portable air purifier with cooling fan and bucket (no text or symbols)Režim časovača
natural_image
Illustration of a hand spraying water onto a grid-patterned surface (no text or symbols)Poznámky:
Svarilo: POZOR, TVEGANJE POŽARA!
Do not immerse in water! – Ne potapljajte v vodo!
OPIS APARATA
Glavni deli [A]
natural_image
Diagram of a showerhead with a prohibition symbol (no text or labels)Opomba:
natural_image
Technical line drawing of a car body panel with exploded view showing internal components (no text or symbols)Opomba:
natural_image
Line drawing of a portable electric heater with fan and bucket (no text or symbols)Način časovnika
Opombe:
natural_image
Pure diagram of a rectangular object with a horizontal bar and a vertical line, no text or symbols present.
natural_image
Technical line drawing of a portable air conditioner unit with coiled tube and ventilation slots (no text or symbols)
natural_image
Line drawing of an air conditioner unit with a mounted panel and ventilation duct (no text or symbols)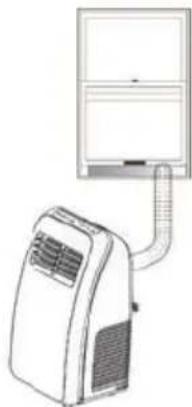
natural_image
Line drawing of a portable air conditioner connected to a wall-mounted unit (no text or symbols)natural_image
Diagram of a showerhead with a crossed-out nozzle symbol (no text or labels)Τηλεχειριστήριο
natural_image
Technical line drawing of a battery pack with internal components and an open casing (no text or symbols)natural_image
Line drawing of a vintage portable air conditioner with cooling fan and bucket (no text or symbols)natural_image
Illustration of a hand pouring liquid onto a grid with a ruler for scale (no text or symbols)Σημειώσεις:
250 69 Klíčany, Czech Rep. e-post: ECG@kbexpert.cz
Hrvatski
K+B Progres, a.s.
U Expertu 91 tel.: +420 272 122 111
250 69 Kličany, Czech Rep. e-mail: informacije@kbprogres.cz
Bosanski
K+B Progres, a.s.
U Expertu 91 tel.: +420 272 122 111
250 69 Klíčany, Czech Rep. e-mail: informacije@kbprogres.cz
Latviešu valoda
K+B Progres, a.s.
U Expertu 91 tel.: +420 272 122 111
250 69 Klíčany, Czech Rep. e-pasts: ECG@kbexpert.cz
Slovenčina

- MK 94
- PORTABLE AIR-CONDITIONER
- MOBILE KLIMAANLAGE
- MOBILNÍ KLIMATIZACE
- KAASASKANTAV ÖHUKONDITSIONEER
- PRIJENOSNI KLIMA UREĐAJ
- PÄRVIETOJAMS GAISA KONDICIONËTÄJS
- MOBILNÁ KLIMATIZÁCIA
- PRENOSNE KLIMATSKE NAPRAVE
- ΦΟΡΗΤΟ ΚΛΙΜΑΤΙΣΤΙΚΟ
- SAFETY INSTRUCTIONS
- Read carefully and save for future use!
- Attention: Propane can be odorless
- DESCRIPTION OF THE APPLIANCE
- Main components [A]
- Front panel [B] and Remote controller [C]
- PLACEMENT AND INSTALLATION
- Placement
- Window seal assembly
- Cleaning and maintenance
- Assembly of the sealing strip
- Beware of faulty installation:
- Warning:
- Note:
- Remote controller
- USING THE APPLIANCE
- Cooling and air flow mode
- Airflow mode
- Dehumidification mode
- Timer mode
- CARE AND MAINTENANCE
- Emptying the water tank
- Maintenance
- Cleaning the external surface
- Cleaning the filter
- Notes:
- Seasonal maintenance
- Do the following after long term storage of the appliance before using it again:
- Common problems and their diagnostics
- USE AND DISPOSAL OF WASTE
- DISPOSAL OF PRODUCTS AT THE END OF LIFETIME
- SICHERHEITSHINWEISE
- Falsche Installation:
- Hinweis:
- Bemerkung:
- Timer-Modus
- Bemerkungen:
- Do not immerse in water! – Neponořovat do vody!
- POPIS SPOTŘEBIČE
- Poznámka:
- Režim časovače
- Poznámky:
- SEADME KIRJELDUS
- Põhikomponendid [A]
- Märkus:
- Märkused:
- OPIS UREĐAJA
- Obratite pažnju na ispravnost ugradnje:
- Napomena:
- Daljinski upravljač
- Upozorenje:
- Rad prema timeru
- Napomene:
- Piezime.
- Piezīmes:
- Do not immerse in water! – Neponárat do vody!
- POPIS SPOTREBIČA
- Hlavné komponenty [A]
- Režim časovača
- OPIS APARATA
- Glavni deli [A]
- Opomba:
- Način časovnika
- Opombe:
- Τηλεχειριστήριο
- Σημειώσεις:
- Hrvatski
- Bosanski
- Latviešu valoda
- Slovenčina
Brand : ECG
Model : MK 94
Category : Air conditioner