USER MANUAL VERSALIO SEB
| Description | P. 28 | To simmer and sauté | P. 34 |
| Before use | P. 29 | Cleaning and Maintenance | P. 36 |
| Instructions | P. 29 | After sales services | P. 38 |
| To fry in deep oil | | Safety Instructions | P. 39 |
| and semi-deep oil | P. 31 | Practical tips | P. 40 |
| Cleaning the frying bowl | P. 33 | Accessories | P. 53 |
INHALTSVERZEICHNIS
In de Versalio oneself.
1 Filter compartment cover
2 Anti-odour filter
3 Timer or handle stopper (depending on model)
4 Lid handle
5 Lid
6 Basket with handle
7 Pouring spout
8 Removable bowl (with non-stick coating)
9 Maximum levels for oil
10 Removable bowl handle
11 Warning: hot surface Do not touch the bowl's handles while the appliance is on
12 Removable cord (depending on model)
13 Control indicator light
14 Adjustable thermostat
15 Carrier handle
16 On-off switch
Wiring instructions
FOR UK ONLY
WARNING: THIS APPLIANCE MUST BE EARTHED.
Important: the wires in this lead are coloured in accordance with the following codes:
Green and Yellow: Earth
Blue: Neutral
Brown: Live
Connect the Green/Yellow wire to the terminal in the plug marked “ E ” (or by the
earth symbol) or coloured Green or coloured Green and Yellow. Connect the Brown wire to the terminal in the plug marked "L" or coloured Red. Connect the Blue wire to the terminal in the plug marked "N" or coloured Black. A 13 amp fuse should be fitted when the appliance is connected to a BS 1362 plug. Seek professional advice if you are unsure of the correct procedure for the above.
Voltage
This appliance is designed to run on 230 - 240 volts only. Check that the mains supply corresponds to that shown on the rating plate of the appliance. If the appliance
is to be used in any country other than that of purchase, it should be checked by an approved Service Dealer. Standards can vary from country to country.
About your factory fitted plug
FOR UK ONLY
(supplied with certain models only)
The lead is already fitted with a plug incorporating a 13 amp fuse. If the plug does not fit your socket outlet, see next paragraph. Should you need to replace the fuse in the plug supplied, a 13 amp approved BS 1362 fuse must be used.
The fuse cover is an important part of the plug. Please ensure that it is always refitted. If you lose this cover please do not use the plug. You may contact TEFAL for a replacement.
If the plug supplied does not fit your socket outlet, it should be removed from the mains lead and disposed of safely. The flexible cord insulation should be stripped back as appropriate and a suitable alternative plug fitted. The replacement plug must be equipped with a 13 amp fuse.
Important: If the electrical cord of this appliance is damaged, it must only be replaced by an authorised Service Dealer. The safety of this appliance complies with the technical regulations and standards in force.
Before use
- Remove the appliance from its packaging and unpack all the accessories.
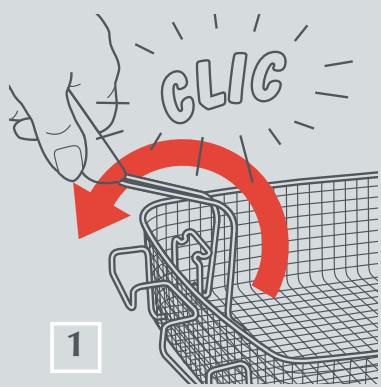
- Turn the basket handle so that it locks into the upright position - Fig. 1
- Remove the basket from the removable bowl.
Take out the documents and the protective film.
Take out the removable bowl.
- Check that there is nothing (packing, paper, etc.) stuck between the removable bowl and the body of the appliance.
- Clean the inside of the removable pan and the basket with a damp sponge and washing-up liquid.
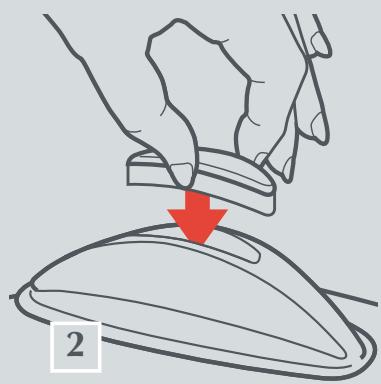
Place the timer in the handle (depending on models)
- The timer is removable and can easily be put into or removed from the handle - Fig. 2
Instructions
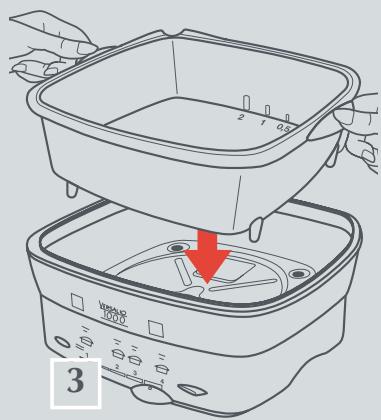
Put the removable bowl in position - Fig. 3
- Introduce the removable bowl in such a way that the four feet of the removable bowl go into the four holes in the metal
plate at the base of the Versalio. If this is not the case, turn the removable bowl through a half-turn (the pouring lip of the removable bowl should be at the back).
Fill the bowl of your fryer with oil/fat
- The 0.5 mark on the removable bowl corresponds to a volume of 0.5 l.
- The 1 mark on the removable bowl corresponds to a volume of 1~l .
- For 1.5 l, fill to halfway between the 1 and 2 marks.
- Never fill beyond the 2 mark inside the removable bowl.
-
Fill the removable bowl with the appropriate quantity of oil for the selected recipe, following the table below.
Always put solid fat directly into the removable bowl: never into the frying basket.
-
Use a vegetable oil or solid vegetable fat (sunflower, groundnut, olive or pip of grape oil.
- If you use solid vegetable fat, cut it into small pieces before putting it into the bowl. Then melt it by plugging in the appliance and setting the thermostat on position 1 (Simmer).
- Never mix solid and liquid fats or different brands.
- Do not mix old and new oil together as this will only spoil the new oil in a short time."
- Check the oil level before each use.
| Cooking method | Simmer | Sauté | Fry 1 | Fry 2 |
| Volume of oil | 1 or more spoonfuls | 1 or more spoonfuls (0,5 l maxi) | 1 to 1.5 l (as chosen) | 2 l |
| Solid fat* | equivalent of a few spoonfuls | equivalent of a few spoonfuls | equivalent of 1 - 3 bread rolls | equivalent of 4 bread rolls |
e. g. cutting vegetable fat into cubes to aid dissolving
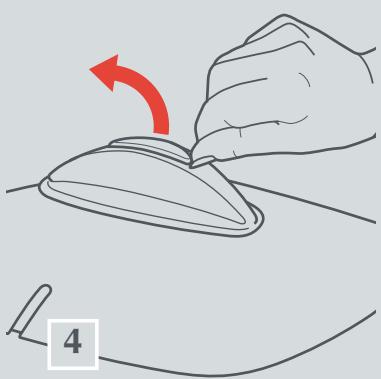
Setting the timer (depending on model)
The timer can be detached from the handle - Fig. 4
- Press on the button either continuously, or by pressing repeatedly to set the time minute by minute.
- Release the button. The time selected is displayed and timing begins.
- The last minute of timing is displayed in seconds.
- In the case of an error, or to delete the selected time, hold the button down for 2 seconds: the timer is automatically reset to zero. Then re-programme as before.
Stopping the timer beep
-
When the cooking time is finished, the timer gives a warning signal consisting of 2 series of 10 times 3 beeps, 20 seconds apart.
-
To stop this signal, simply press on the button.
Warning: the timer indicates the end of cooking, but does not turn the appliance off.
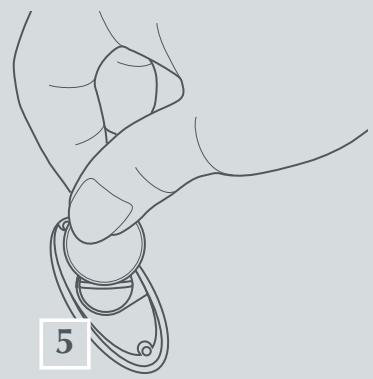
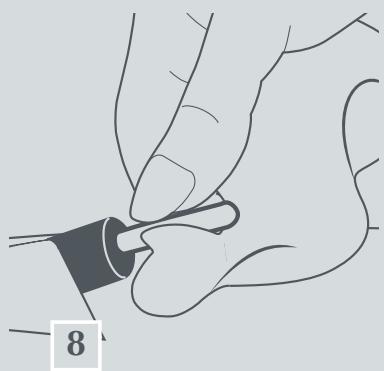
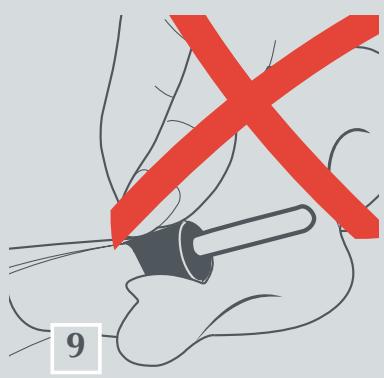
Changing the battery - Fig. 5
- If there is a total or partial loss of the display, the battery needs changing.
- The used battery of the timer should
not be thrown away. When replacing, take it to a specialized collection centre or an approved service centre.
Recommendations
- Never remove the removable bowl whilst the appliance is in use.
-
Use wooden or plastic utensils to stir food, to avoid damaging the pan's non-stick coating.
-
Simmering with water is possible: do not fill above the 2 l mark to avoid boiling over.
- Never use metal utensils.
- Never cut food directly in the removable bowl.
To fry in deep oil and semi-deep oil
CAUTION
Only use the basket when cooking with a large amount of oil (at least level 1), otherwise you risk damaging the appliance.
Preparation of the frying bowl
After putting the oil into the removable bowl, unwind the cord completely and plug in.
- For models with a removable cord: plug the cord into the appliance and then into the mains socket.
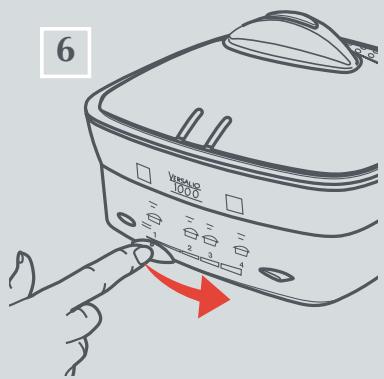
- Set the switch to "1" (on). The indicator lights up.
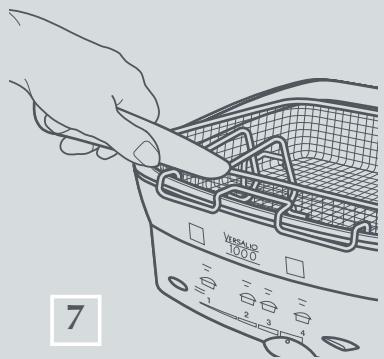
- Remove the lid
- Set the thermostat according to the food you wish to fry - Fig. 6 See the table below for settings.
- Put the lid on.
- Pre-heat the oil. During pre-heating, the indicator light may go out and come on again several times. After approximately 15 minutes, the bowl will have reached the correct temperature and better results will be obtained.
| Frying (1 to 1,5 l) | Frying (2 l) |
| Thermostat position | 3 | 4 |
| On Versalio | | |
Fill the frying basket
- For a light, crisp result, we recommend that you do not put too much food into the basket.
Caution: never fill beyond the maximum level marked on the basket.
Choosing the correct cooking time
- During cooking, the indicator light goes on and off. It only stays lit when the Versalio is heating the oil to reach or maintain the correct temperature.
Refer to the table below and to the re
cipe book supplied with each appliance for cooking times and temperatures. These are, of course, given as an indication only: you can modify and adapt them to suit your taste.
Table of cooking times for chips
| Food | | Quantity | Thermostat position | Time |
| Fresh chips | Safe limit capacity | 1000 g | 4 | 15-16 min. |
| Recommended maximum capacity for the best frying | 550 g | 4 | 10-11 min. |
| Frozen chips | Safe limit capacity | 750 g | 4 | 13-14 min. |
| Recommended maximum capacity for the best frying | 400 g | 4 | 7-8 min. |
Table of cooking times for fresh food
| Food | Quantity | Th. position | Time |
| Potato crisps | 300 g | 4 | 4-6 min. |
| Dauphine potatoes (10-12 p) | 300/350 g | 4 | 9-12 min. |
| Soufflé potatoes | 250 g | 4 | 7-9 min. |
| Chicken croquettes (8-10 p) | 350/400 g | 4 | 8-10 min. |
| Potato croquettes (8-10 p) | 350/400 g | 4 | 8-10 min. |
| Breaded escalopes of veal (2-3 p) | 300 g | 3 | 8-10 min. |
| Fried chicken quarters (8-10 p) | 1,2 kg | 3 | 13-15 min. |
| Chopped pork | 400/500 g | 3 | 5-7 min. |
| Apple doughnuts (7-8 p) | 200/250 g | 3 | 7-9 min. |
| Vegetable fritters (10-12 p) | 250/300 g | 3 | 11-13 min. |
| Fritters (12-15 p) | 200/250 g | 3 | 8-9 min. |
| Sea bream, coley, sole, skate (2 p) | 250/300 g | 3 | 8-9 min. |
| Aubergines “à la napolitaine” (6 p) | 200 g | 3 | 6-8 min. |
| Fried courgettes | 600 g | 4 | 10-12 min. |
Preparation of frozen food
- Un-breaded fish fillets, whole fish, brains, etc.: leave to thaw, then prepare as for fresh products.
- Pre-cooked chips, breaded fish, etc.: cook straightaway without thawing.
Caution: defrost frozen foods according to the manufacturers instructions before frying.
- Wipe and shake frozen food well to remove any small pieces of ice before putting it in the basket.
- Set the thermostat to the position indicated in the tables.
- Reduce quantities by comparison with fresh products. Do not exceed 3/4 of the basket maxi capacity.
Table of cooking times for frozen food
| Food | Quantity | Th. position | Time |
| Noisette potatoes (40 p) | 300 g | 4 | 8-10 min. |
| Potato croquettes (10-12 p) | 350/400 g | 4 | 6-8 min. |
| Breaded cod (10-12 p) | 350/400 g | 4 | 6-8 min. |
| Filleted fish fritters (8-10 p) | 250/300 g | 4 | 6-8 min. |
| Breaded fillets of plaice (3 p) | 280/300 g | 4 | 7-9 min. |
| Fish bites in breadcrumbs (8-10 p) | 250/300 g | 4 | 6-8 min. |
| Prawn fritters (12 p) | 300/350 g | 4 | 5-6 min. |
| Squid fritters (10-12 p) | 220/250 g | 4 | 6-8 min. |
| Apple doughnuts (9 p) | 220/250 g | 4 | 5-6 min. |
| Breaded veal rissoles (10 p) | 300/350 g | 4 | 8-10 min. |
| Breaded pork rissoles (10-12 p) | 300/350 g | 4 | 8-10 min. |
| Beef meatballs (15-18 p) | 450/500 g | 4 | 8-10 min. |
CAUTION
Burnt deposits cause the oil to deteriorate faster, and are a fire risk in the long term.
Setting the timer and stoping the timer beep
(see page 30)
Putting the food into the oil.
Removing the food from the oil
When the selected cooking time is up:
End of cooking
- Once the last frying operation is complete, turn the switch to position "0"
(off), unplug the appliance and leave the oil to cool before putting away.
Unplug the fryer.
Our chef's recommendations
Don't forget that preheating the oil bowl (about 15 minutes) is essential for successful results.
- To cook several consecutive batches of the same food, increase the cooking time slightly after the first batch.
-
In between each cooking operation, check that the oil level is between the minimum and maximum marks.
-
Cut food for frying into small regularly shaped pieces so that they cook evenly.
- Season food after cooking and away from the Versalio to conserve the oil.
- Avoid trying to cook pieces which are too thick and difficult to cook through.
- Dry damp food carefully, especially fresh potatoes, for a crisp result.
Cleaning the frying bowl
-
The lightness, nutritional value and quality of taste of your fried food depends on the good quality of the oil bowl.
-
Clean the oil bowl after every cooking session to conserve its qualities, essential to the health of gourmets, as long as possible.
Remove deposits
After each cooking session, use a skim
ming ladle to remove large deposits and small pieces of food from the oil.
Draining off the oil
To drain off the oil, wait until it has cooled, then remove the removable bowl from the body of the appliance. Tip the removable bowl so that the oil is poured from the lip of the removable bowl.
- Place a sheet of filter paper at the bottom of the basket.
- Hook the basket on the edge of the removable bowl and carefully pour the oil onto the filter paper.
Store the oil
- In a container away from the light.
In the Versalio itself.
Changing the oil


To simmer and sauté
- In addition to its function as a fryer, Versalio can be used to cook by other methods. By resetting the thermostat, you can cook in the same way as with a frying removable bowl or sauté removable bowl.
- Simply note that when you lower the thermostat setting, you must take into account a small delay in the reduction
in temperature, due to the thickness of the base of the removable bowl.
- You can cook with or without the lid, as you wish.
- Without the lid, cooking times should be increased slightly.
- In position 1, or on the "Keep hot" setting, the fat may bubble for short periods occasionally.
| Keep warm | Simmer | Sauté |
| Thermostat position | Button turned fully to the left | 1 | 2 |
| On Versalio | Keep warm | 100° | |
Preparation for cooking
After putting the oil into the removable bowl, unwind the cord completely and plug in.
- Remove the lid
- Set the thermostat to the appropriate setting for the food you wish to cook.
- If using oil, pre-heat in accordance with instructions in the recipe book.
Important:
To use a lesser quantity of oil than that corresponding to level 0.5, leave the thermostat on setting 2 for at least 3 minutes, then increase the temperature.
- Only use the basket when cooking with a large amount of oil (at least level 1), otherwise you risk damaging the appliance.
Setting the timer and stooping the timer beep
(see page 30)
Choosing the correct cooking time
- During cooking, the indicator light goes on and off. It only stays lit when the removable bowl is being heated.
Refer to the table below and to the re
cipe book supplied with each appliance for cooking times and temperatures. These are, of course, given as an indication only: you can modify and adapt them to suit your taste.
Table of cooking times for frozen food
| Food | Quantity | Th. position | Time |
| Onion soup | 1,5 l | 1 | 20 min. |
| Minestrone | 2 l | 1 | 1 h |
| Risotto | 300 g | 2 then 1* | 20 min. |
| Browned potatoes | 800 g | 2 | 20 min. |
| Vegetables Poelee | 800 g | 2 then 1* | 40 min. |
| Salmon | 800 g | 3 | 4 - 6 min. |
| Spanish rice | - | 2 then 1* | 40 min. |
| Breaded cod fillets | 500 g | 2 | 9 - 10 min. |
| Beef Bourguignonne | 1 kg | 2 then 1* | 1 h 30 |
| Chili con carne | 800 g | 2 then 1* | 1 h |
| Breaded escallops | 4 x 150 g | 1 | 15 min. |
| Pork ribs | 4 x 120 g | 2 | 16 min. |
| Chocolate/vanilla biscuit | - | 2 | 35 min. |
- (seal the meat in position 2)
Table of cooking times for frozen food
| Food | Quantity | Th. position | Time |
| Fish fingers (10-12 p) | 300/350 g | 2 | 10 min. |
| Sauté potatoes | 800 g | 3 then 2 | 18 min. |
End of cooking
- Set the switch to position "0" (off).
- Unplug the appliance.
Cleaning and Maintenance
Cleaning the removable bowl
- Only the removable bowl may be immersed. To clean the removable bowl, use warm water, liquid detergent and a sponge. Never use scouring powder or a scourer. If food has been burnt, leave the removable bowl to soak for a little while before washing it.
- Versalio is fitted with a removable bowl with non-stick coating, which can be washed in a dishwasher. In this case, follow the recommendations below carefully.
Take care not to damage the interior coating on the prongs inside the dishwasher when putting in position.
After being washed in the dishwasher several times, we recommend that you wipe the inside of the removable bowl all over with a lightly oiled cloth, to refresh the coating.
The interior can become brown and scratched after the appliance has been used regularly for a long time. This is quite normal and has no unpleasant consequences. TEFAL guarantees that the anti-adhesive surface of this appliance complies with the regulations in force concerning all materials which are in contact with food.
Practical tips
After being washed in the dishwasher several times, white marks may appear on the outside surface of the removable bowl. These do not affect the normal functioning of the appliance. To prevent them, wipe the outside of the remo
vable bowl with a dry cloth every time it is washed.
- To maintain the non-stick qualities of the coating for as long as possible, never cut directly in the removable bowl.
- Replace the removable bowl in its correct position in the appliance.
Precautions
ENGLISH
10
Cleaning other parts of the appliance.
Important: Do not forget to remove the timer and filter before washing the lid by hand or in the dishwasher.
- Clean the outside and the cord with a damp cloth, then dry. Do not use strong or abrasive cleaning products.
- Do not clean the inside of the appliance with water.
- Remove the basket and clean with hot water and washing up liquid.
Note: over a period of time, the inside of the lid may become slightly yellow. This will not affect the correct functioning of your appliance.
- Never plunge the appliance into water, nor in the dish washer. Only the bowl can be immersed.
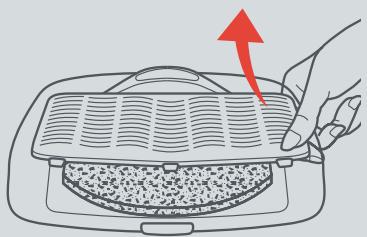
Replacement of the anti-odour filter
Fig. 10 (depending on model)
- The strength of the active carbon filter diminishes gradually, depending on the nature of food fried and frequency of use. We advise you to change this filter after 10 times of use.
- Remove the Versalio lid.
- Unclip the filter cap.
- Remove the filter, throw it away and
clean the inside of the lid and deflector.
- Put the new filter in position, rounded side outwards.
- Replace the filter cap.
Caution: Failure to change the filter could result in an overflow of oil.
- The anti-odour filter, ref. 794428 is available from approved Service Centres and in the shops.
After sales services
(For UK only)
In the unlikely event your appliance should fail within the first 28 days from the date of purchase, your retailer is authorised to exchange it. After 29 days from the date of purchase, for repairs and spares telephone your nearest TEFAL Service Centre on 0845 725 8588, calls charged at local rates. Alternatively you may post your faulty product for repair to the following address:
TEFAL Service Operations,
PF Box 155, Birmingham B1 3DP.
Tel: 0121 200 2740.
TEFAL Ireland,
Gavin Electronics Ltd,
83 Lower Camden Street,
Dublin 2, Southern Ireland.
Tel: 14757109.
Before posting
- Enclose your name, address and details of the fault.
- If you are returning under the guarantee, it must be accompanied by a till receipt as proof of date of purchase.
- If it is outside the guarantee period, please advise our Service Centre of the maximum amount of money you wish to spend to make it operational again.
- If returning a fryer, please empty the oil from the fryer and clean the inside before returning it.
The above details are in addition to a consumer's statutory rights and does not affect those rights in any way.
Replacement accessories and spare parts for your TEFAL appliance such as antic scaling cassettes for irons, filters for deep fat fryers or gaskets for pressure cookers are available from TEFAL stockists or your local Service Centre.
Alternatively you can obtain them by mail order from TEFAL Direct on: 01702 290 089.
When ordering spares you will need to know the model number of your appliance.
Customer Relations
For product information or any other queries please telephone:
0800616413
Protect the environment
Your appliance is designed for many years use. However, when you decide to replace your deep fryer, do not forget that you can contribute towards protecting the environment.
Before throwing your deep fryer away, the
battery should be removed from the timer and taken to a specialized collection centre or an approved service centre.
The approved service centres will take your worn appliances so as to destroy them in accordance with the environmental rules.
Safety Instructions
This appliance is in compliance with current safety rules and conditions and with the following directives :
Electromagnetic Directive 89/336/EEC amended by Directive 93/68/EEC.
Low Voltage Directive 73/23/EEC amended by Directive 93/68/EEC.
- The safety of this appliance complies with regulations and standards in force.
- Do not mix different types of oil in the same frying bowl.
- Check that the voltage of the power supply corresponds to that shown on the appliance (alternating current only).
- Taking into account the diversity of standards in force, if the appliance is used in a country other than that in which it is purchased, get it checked by an approved service agent.
- Use a stable work surface, away from water splashes.
- Do not place the appliance near a source of heat (the plastic insulating casing could be badly damaged)
- Never leave the appliance in use without supervision.
- Keep the appliance out of the reach of children.
- Do not leave the cord hanging down.
Always plug the appliance into an earthed socket.
- Do not unplug the appliance by pulling on the cord.
- Do not fill beyond the maximum level for oil.
- Do not overload the frying basket, especially with frozen food, to avoid any risk of overflow.
- When an electrical heating appliance is used, high temperatures are produced which could cause burns. Despite the high level of thermal protection of the body of the appliance, do not touch any visible metal parts of the bowl.
- The metal handles of the bowl must only be held once the appliance has completely cooled down.
- Do not place your hand directly above the cover of the filter compartment whilst the appliance is in use: the steam escaping is very hot.
- Unplug the appliance if there are any signs of not working properly, after use, and before cleaning or maintenance.
- The oil must be filtered regularly. Pieces of food which break away tend to burn, causing the oil to deteriorate
faster. In the long term they may be a fire risk.
- Renew the oil in accordance with the manufacturer's instructions.
- If the oil does burst into flames, close the lid to extinguish the fire.
- Never try to extinguish the flames with water! Smother with damp cloth!
- Never immerse the body of the appliance in water: the bowl only may be immersed.
- Never use the appliance if: - the appliance or the cord is damaged - the appliance has been dropped or fallen and appears damaged or does not work properly.
In these cases, the appliance must be sent to the nearest approved after-sales Service Centre, since special tools are necessary to make any repairs.
- This appliance is designed for domestic use only. In the case of professional use, inappropriate use or failure to comply with the instructions, the manufacturer takes no responsibility and the guarantee does not apply.
- Unplug the appliance before removing the bowl and do not pug it in again until the bowl has been replaced.
- Never move the appliance with a large amount of hot oil in it (levels 1 and 2).
- If you move the appliance when it contains a small amount of hot oil, touch the plastic insulating casing only, not the metal parts of the bowl.
- Never try to straighten out the terminals of the heating element if they have been damaged. The appliance must be sent to a Service Centre.
- The hot bowl must only be placed on surfaces which resist high temperatures. The best solution is to put it back into the appliance.
Always unplug the appliance before any cleaning operation.
- The metal plate and the components which are fixed to the base of the body of the appliance must always be dry when the appliance is plugged in.
- Never leave any object between the bowl and the base of the appliance.
- Never mix hot oil and water.
CAUTION
Repairs must only be carried out by specialists using spare parts recommended by the manufacturer.
Repairing an appliance yourself could be dangerous. If problems persist, or for any other problem, send the appliance to your nearest approved service centre.
Practical tips
| Problem | Cause | Solution |
| Bad smells given off | ·The anti- odour filter is satu-rated.
·Oil is old.
·The wrong type of oil is being used. | ·Replace it.
·Change it.
·Change it and use vegetable oil specially for frying. |
| Steam escapes from the lid | ·The cover is not closed pro-perty. | ·Put the lid back in position. |
| The oil bowl overflows | ·The anti- odour filter is satu-rated with grease.
·The pan has been filled beyond the maximum level.
·Your basket is out of shape : the base touches the oil when it is in the high posi-tion.
·The oil has suddenly emuli-sified.
·Oil and fat have been mixed. | ·Replace it
·Check the level and remove any excess.
·Get a new basket from your re-tailer or approved service centre.
·Check that the basket is not too full and that the maximum level has not been exceeded.
·Lower the basket very slowly, pausing once or twice.
·Empty and clean the pan and refill it with vegetable oil (mix-tures of oil are very dange-rous). |
| Food does not brown and re-mains soft | ·Food is too thick and contains a lot of water.
·Too much food is cooked at the same time and the frying bowl is no longer at the cor-rect temperature.
·The bowl temperature is insufficient. | ·Extend the cooking time.
·Fry food in small batches (es-pecially frozen food).
·Send your fryer to the nearest approved Service Centre. |
Beschreibung