JU 2100 - Juicer MOULINEX - Free user manual and instructions
Find the device manual for free JU 2100 MOULINEX in PDF.
User questions about JU 2100 MOULINEX
0 question about this device. Answer the ones you know or ask your own.
Ask a new question about this device
Download the instructions for your Juicer in PDF format for free! Find your manual JU 2100 - MOULINEX and take your electronic device back in hand. On this page are published all the documents necessary for the use of your device. JU 2100 by MOULINEX.
USER MANUAL JU 2100 MOULINEX
natural_image
Line drawing of a small electric juice maker with a central handle and side legs (no text or symbols)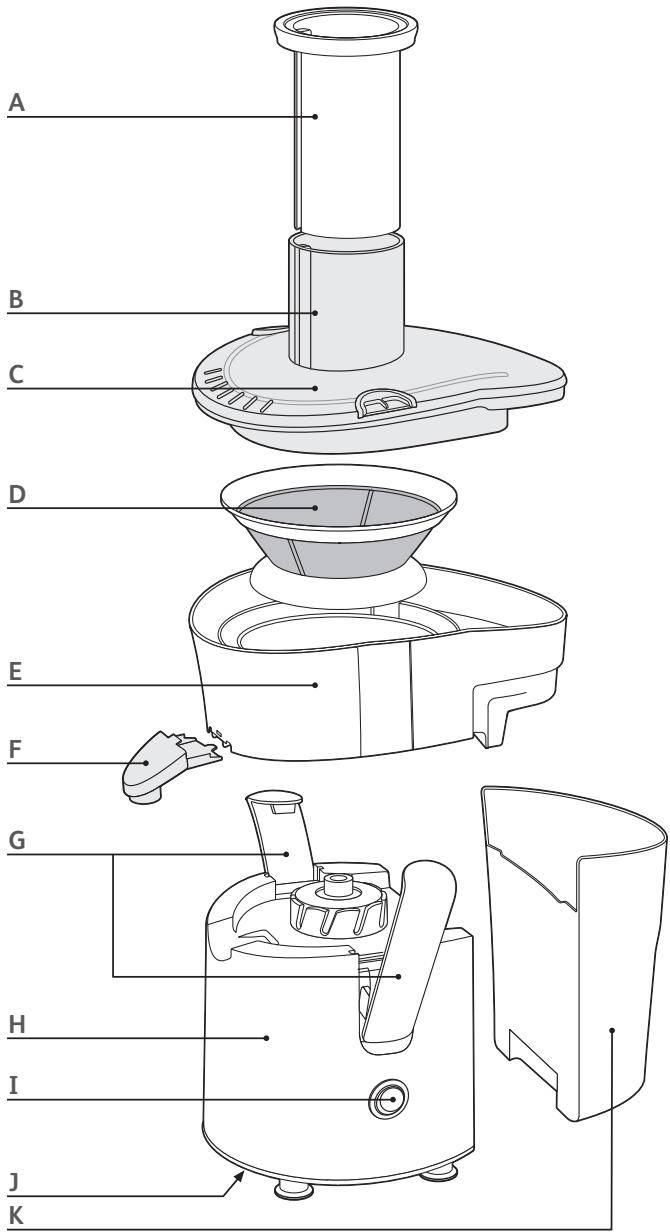
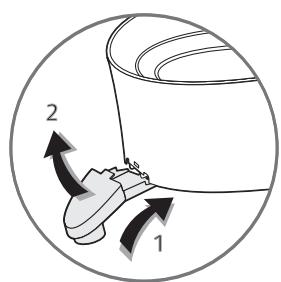
fig.1
natural_image
Mechanical assembly diagram showing a motor or pump component with directional arrows indicating motion (no text or symbols present)fig.2
natural_image
Diagram of a kitchen utensil with a downward arrow indicating a drop, no text or symbols presentfig.3
natural_image
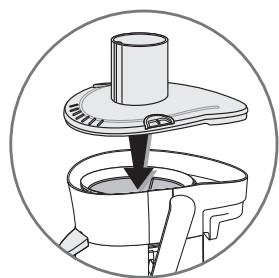
Diagram of a mechanical device with a cylindrical component inserted into a housing, showing internal components and a downward arrow indicating flow or movement (no text or symbols present)fig.4
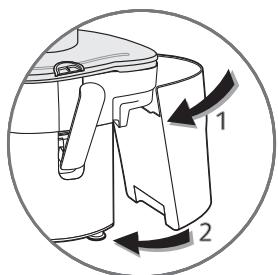
fig.5
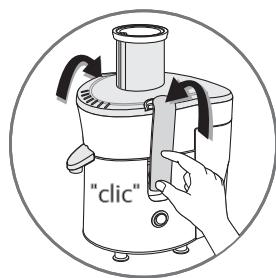
fig.6a
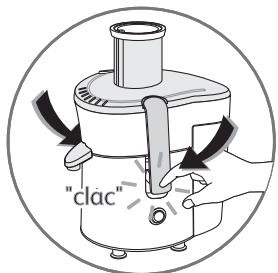
fig.6b
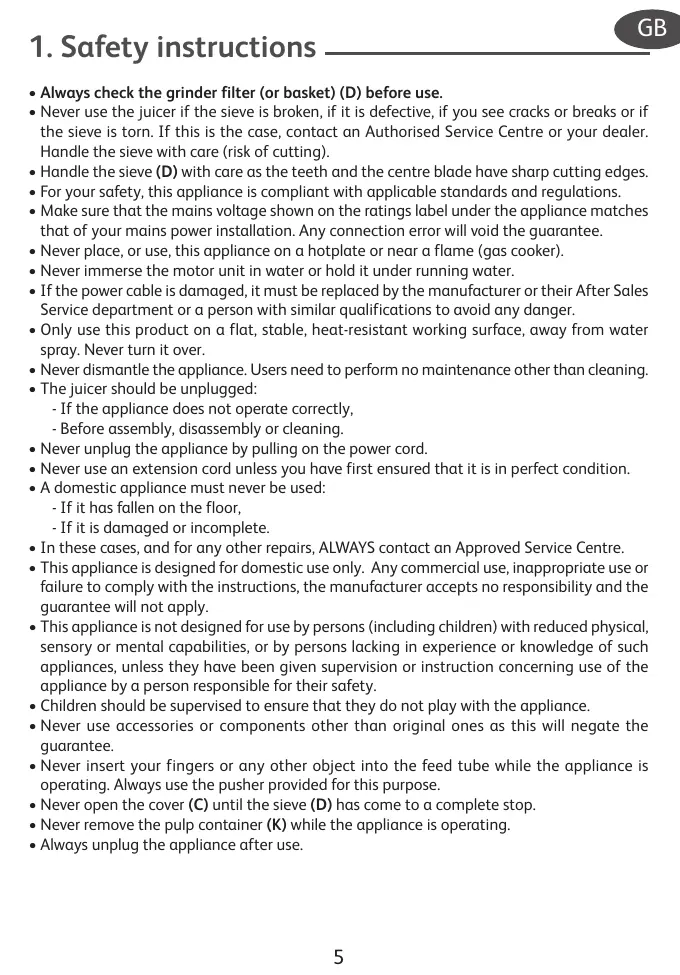
1. Safety instructions
- Always check the grinder filter (or basket) (D) before use.
- Never use the juicer if the sieve is broken, if it is defective, if you see cracks or breaks or if the sieve is torn. If this is the case, contact an Authorised Service Centre or your dealer. Handle the sieve with care (risk of cutting).
- Handle the sieve (D) with care as the teeth and the centre blade have sharp cutting edges.
- For your safety, this appliance is compliant with applicable standards and regulations.
- Make sure that the mains voltage shown on the ratings label under the appliance matches that of your mains power installation. Any connection error will void the guarantee.
- Never place, or use, this appliance on a hotplate or near a flame (gas cooker).
- Never immerse the motor unit in water or hold it under running water.
- If the power cable is damaged, it must be replaced by the manufacturer or their After Sales Service department or a person with similar qualifications to avoid any danger.
- Only use this product on a flat, stable, heat-resistant working surface, away from water spray. Never turn it over.
- Never dismantle the appliance. Users need to perform no maintenance other than cleaning.
• The juicer should be unplugged:
- If the appliance does not operate correctly,
- Before assembly, disassembly or cleaning.
- Never unplug the appliance by pulling on the power cord.
- Never use an extension cord unless you have first ensured that it is in perfect condition.
- A domestic appliance must never be used:
- If it has fallen on the floor,
- If it is damaged or incomplete.
- In these cases, and for any other repairs, ALWAYS contact an Approved Service Centre.
- This appliance is designed for domestic use only. Any commercial use, inappropriate use or failure to comply with the instructions, the manufacturer accepts no responsibility and the guarantee will not apply.
- This appliance is not designed for use by persons (including children) with reduced physical, sensory or mental capabilities, or by persons lacking in experience or knowledge of such appliances, unless they have been given supervision or instruction concerning use of the appliance by a person responsible for their safety.
- Children should be supervised to ensure that they do not play with the appliance.
- Never use accessories or components other than original ones as this will negate the guarantee.
- Never insert your fingers or any other object into the feed tube while the appliance is operating. Always use the pusher provided for this purpose.
- Never open the cover (C) until the sieve (D) has come to a complete stop.
- Never remove the pulp container (K) while the appliance is operating.
• Always unplug the appliance after use.
2. Appliance description
A. Pusher
B. Feed tube
C. Cover
D. Sieve
E. Juice collector
F. Pouring spout
G. Locking clips
H. Motor unit
I. On/Off switch
J. Cord storage
K. Pulp container
3. Safety system
This appliance has a built-in safety system. To start the juicer, the lid (C) must be fully locked by the two locking clips (G).
At the end of the cycle, set the knob (I) to "0" and wait until the sieve has come to a complete stop before removing the cover (C).
4. Before first use
- We recommend that you wash all removable parts (parts A, C, D, E, F, K) before using the appliance for the first time (see Section 7).
- Remove the appliance from its packaging, then place it on a flat, stable, heat-resistant working surface, remove the cover (C) and remove the protective cardboard from the sieve.
5. Starting the appliance
- Place the pouring spout (F) on the juice collector (E) (fig. 1).
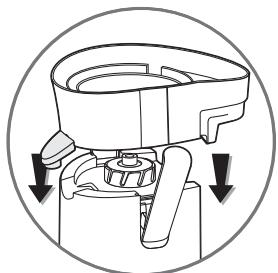
- Place the juice collector (E) on the motor unit (H) (fig. 2).
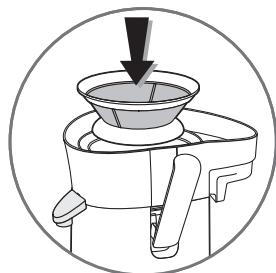
- Place the sieve (D) in the juice collector (E). Make sure that the sieve is correctly fitted onto the drive shaft (fig 3).
- Position the cover (C) on the motor unit (H) (fig 4).
- Place the pulp container (K) on the back of the appliance (fig 5).
- Position the 2 locking clips (G) on the lid (C) (fig. 6a and 6b): first lift the 2 clips (G) until you hear the first "click" (fig. 6a); then press the bottom of each of the 2 clips (G) until you hear another "click", which means they are fully locked (fig. 6b).
- Place a glass under the pouring spout (F) at the front of the appliance.
- Cut the fruit or vegetables into pieces after removing any pips if necessary.
- Plug in the appliance. The cord storage (J) compartment lets you adapt the cord length.
- Start the appliance using the start knob (I).
- Insert fruit or vegetables using the filler (B).
- Use the pusher (A), without forcing, to push the food down. Never use any other utensil. Fruit and vegetables must always be fed into the appliance with the motor running. Never apply excessive pressure to the pusher (A). NEVER PUSH with your fingers, always use the pusher supplied.
- Once you have finished, stop the appliance using the knob (I) and wait until the sieve (D) has come to a complete stop.
- When the pulp container (K) is full or when the flow of juice from the appliance slows, empty the collector and clean the sieve (D).
| Ingredients | Approx. weight (in Kg) | Amount of juice obtained in cl (*)1 glass = 200 ml (approx.) |
| Apples | 1 | 700 |
| Pears | 1 | 600 |
| Carrots | 1 | 550 |
| Cucumbers | 1 (approx two cucumbers) | 600 |
| Pineapple | 1 | 300 |
| Grape | 1 | 450 |
| Tomatoes | 1 | 600 |
| Celery | 1 | 600 |
(*) The quality and quantity of the juice obtained varies considerably depending on the harvest date and the variety of each fruit or vegetable. The amounts of juice shown below are therefore approximate.
6. Tips for use
- Carefully wash the fruit before removing any pips.
- You do not have to skin or peal fruit or vegetables. You should only peal thick skinned fruit (for bitterness): citrus fruits, pineapple (remove the centre part also).
- It is hard to extract juice from bananas, avacados, blackberries, figs, aubergine, raspberries...
- We do not recommend using the juicer for sugar cane and fruit that is too hard or fibrous.
- Choose fruit and vegetables that are ripe and fresh, for they will give you the most juice. This appliance is suited to fruit like apples, pears, oranges, grapes, pomegranates, pineapple, etc... as well as vegetables like carrots, cucumbers, tomatoes, beetroot, celery, etc...
- If you juice fruit that is overripe, the basket may become clogged faster.
Important: All juice must be consumed immediately. This is because juice, in contact with the outside air, will oxidize very quickly and this may change its taste, colour and nutrient content. Apple or pear juice will quickly change to a brown colour. Add a few drops of lemon to the juice and it will take longer to change to brown.
7. Cleaning and maintenance
- All removable parts (parts A, C, D, E, F, K) can be washed in the dishwasher.
- This appliance is easier to clean if it is cleaned immediately after use.
- Never use scouring pads, acetone, alcohol, etc. to clean the appliance.
- The sieve (D) must be treated with care. Avoid incorrect handling that could cause damage to it. Replace your sieve as soon as it shows the first signs of wear or damage.
- Clean the motor unit using a damp cloth.
8. What to do if your appliance does not work?
| PROBLEMS | CAUSES | SOLUTIONS |
| The appliance does not work. | The plug is not plugged in, the switch is not set to "1". | Plug the appliance into a mains outlet with the same voltage and activate the switch. |
| The juice collector (E) is not properly positioned. | Check that the juice collector (E) is properly positioned. | |
| The locking clips (G) are not correctly locked. | Check that the locking clips are correctly locked (Fig. 6 and 6b). | |
| The product smells or is very hot to touch, if smoke is released or an unusual noise heard. | The sieve (D) is not properly positioned. | Check that the sieve (D) is properly positioned. |
| The amount of food processed is excessive. | Let the appliance cool for a few minutes, then reduce the quantities processed. | |
| The juice does not dispense properly. | The pouring spout (F) is missing or incorrectly positioned on the juice collector (E). | Check that the pouring spout (F) is present and correctly positioned. |
| The sieve (D) is saturated. | Clean the sieve (D). | |
| For all other problems or queries, contact your nearest After Sales Service facility. | ||
HELPLINE:
If you have any product problems or queries, please contact our Customer Relations Team first for expert help and advice:
0845 602 1454 - UK
(01) 677 4003 - ROI
or consult our website – www.moulinex.co.uk
9. Electrical or electronic product end of life —
Please help preserve the environment!


i
→
Your appliance contains many materials that can be reused or recycled.
Leave it at a local civic waste collection point.