
Quick-Motion - Exercise bike Ozone - Free user manual and instructions
Find the device manual for free Quick-Motion Ozone in PDF.


| Product Type | Exercise Bike |
| Brand | Ozone |
| Model | Quick-Motion |
| Dimensions (L × W × H) | Approximately 100 × 50 × 130 cm |
| Net Weight | Approximately 35 kg |
| Maximum User Weight | 120 kg |
| Power Supply | Self-powered (integrated generator) or batteries |
| Resistance System | Manually adjustable magnetic brake |
| Resistance Levels | 8 levels |
| Display | LCD screen: time, distance, speed, calories, heart rate (handgrip sensors) |
| Pedals | Non-slip pedals with straps |
| Seat | Adjustable in height and horizontally |
| Handlebars | Height adjustable, with heart rate sensors |
| Stabilizers | Adjustable non-slip feet |
| Transport | Transport wheels at the front |
| Frame Material | Sturdy steel |
| Main Functions | Pedaling, adjustable resistance, performance tracking, cardiovascular training |
| Care and Cleaning | Clean with a soft, dry cloth. Lubricate moving parts every 3 months. |
| Safety | Emergency brake on handlebars, non-slip pedals, reinforced stability |
| Spare Parts Available | Yes, via Ozone customer service |
| Repairability | Repairability index: 7/10 (standard parts) |
| Warranty | 2 years |
Frequently Asked Questions - Quick-Motion Ozone
User questions about Quick-Motion Ozone
0 question about this device. Answer the ones you know or ask your own.
Ask a new question about this device
Download the instructions for your Exercise bike in PDF format for free! Find your manual Quick-Motion - Ozone and take your electronic device back in hand. On this page are published all the documents necessary for the use of your device. Quick-Motion by Ozone.
USER MANUAL Quick-Motion Ozone
natural_image
3D rendered image of a robotic device with visible internal components and mounting brackets (no text or symbols)
natural_image
3D rendering of a mechanical device with internal components and directional arrows indicating motion (no text or symbols)QUICK-MOTION
ISTRUZIONI IT
INSTRUCTIONS EN

1
3
5
6
natural_image
Technical line drawing of a mechanical component with symmetrical features and centerlines (no text or symbols)
natural_image
Illustration of a mechanical tool interacting with a curved mechanical component, showing motion lines (no text or symbols)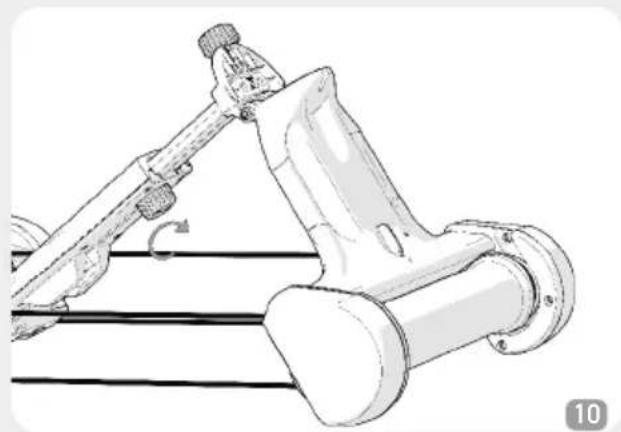
natural_image
Mechanical assembly diagram showing a lever mechanism with rotating components (no text or symbols)
natural_image
Technical line drawing of a mechanical device with two cylindrical components and connecting rods (no text or symbols)
natural_image
Line drawing of a person using a roller on a wooden rolling pin (no text or symbols)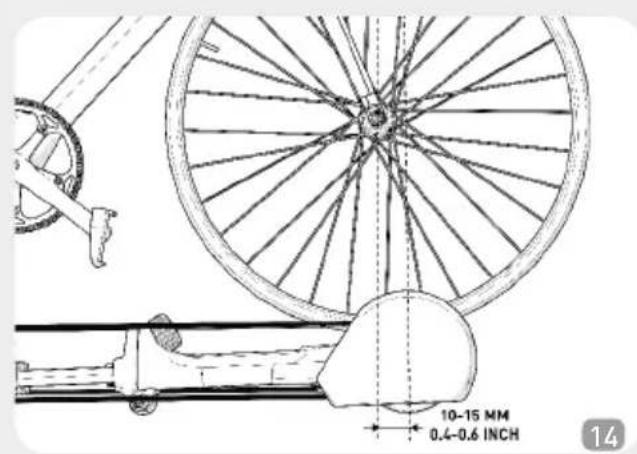

natural_image
Illustration of a hand holding a small object on a cylindrical object with parallel lines (no text or symbols)
natural_image
Mechanical assembly diagram showing a lever mechanism with rotating components (no text or symbols)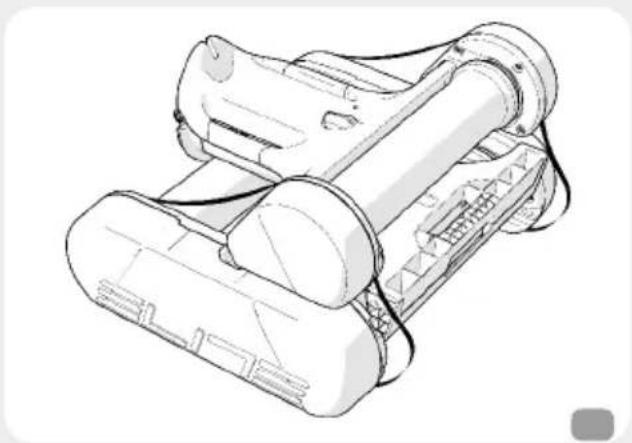
natural_image
Technical line drawing of a mechanical device with no visible text or symbols
natural_image
Line drawing of a mechanical device with no visible text or symbols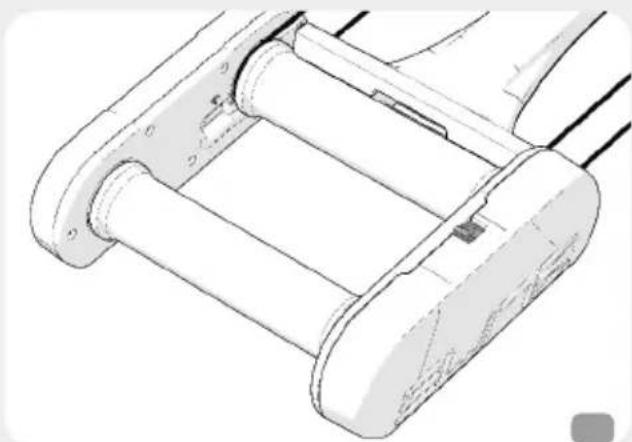
natural_image
Technical line drawing of a mechanical component with cylindrical parts and mounting flanges (no text or symbols)
natural_image
Technical line drawing of a mechanical component with multiple curved and straight sections (no text or symbols)
natural_image
Technical line drawing of a mechanical assembly with no visible text or symbols
natural_image
Technical illustration of mechanical components with a magnified view showing internal structure (no text or symbols)
natural_image
Mechanical assembly diagram showing a lever mechanism with no visible text or symbols
natural_image
Mechanical assembly diagram showing a lever mechanism with no visible text or symbols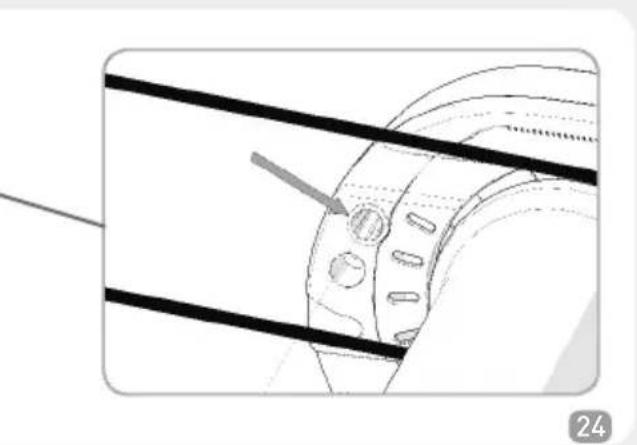
natural_image
Technical diagram of a mechanical component with two parallel lines and a gray arrow pointing to a circular feature (no text or symbols)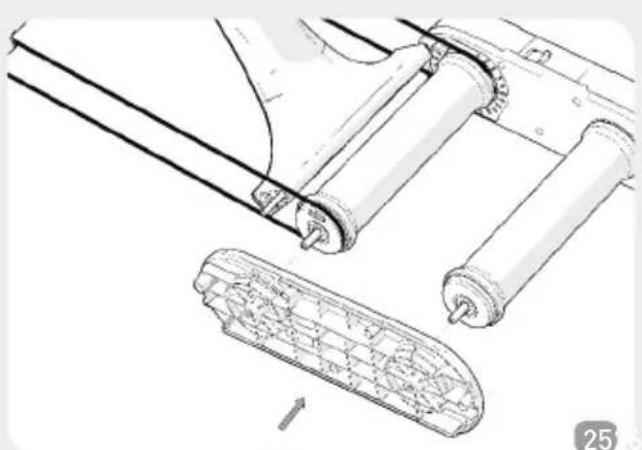
natural_image
Technical line drawing of mechanical components including rollers and a housing (no text or symbols)
natural_image
Technical line drawing of a mechanical component with mounting holes and internal grid structure (no text or symbols)IT - ITALIANO
INTRODUZIONE 9
AVVERTENZE GENERALI DI SICUREZZA 9
DISCLAIMER 9
NOME E LISTA DEI COMPONENTI 10
ASSEMBLAGGIO 10
UTILIZZO 10
SUGGERIMENTI PER UTILIZZARE IL VOSTRO
QUICK-MOTION 10
INFORMATION ON PRODUCT DISPOSAL 18
DECLARATION OF CONFORMITY 39
WARRANTY 41
DE - DEUTSCH
EINLEITUNG 19
INFORMATIONS SUR LA DESTRUCTION DU PRODUIT 28
DÉCLARATION DE CONFORMITÉ 39
GARANTIE 41
ES - ESPAÑOL
INTRODUCCIÓN 29
Thank you for purchasing the Elite Quick-Motion
- The roller is a training tool enabling users to get into top shape for cycling.
Its incorporated magnetic resistance unit featuring three levels offers smoother and more even and gradual resistance which, together with the longitudinal oscillation system, ensures stability and incomparable ease of use suitable for any cycling training need.
- The rollers, of technopolymer material, are specially shaped to guarantee better control of pace.
- High quality cylindrical bearings ensure many years of trouble free and quiet operation.
- The frame of the Quick-Motion is very practical, light, manageable, easy to use and takes up little space.
- In fact, Quick-Motion has a foldable frame that reduces the utilized space by about half when stowed, making it also an excellent choice when being transported.
GENERAL SAFETY WARNINGS
Before using your trainer, carefully read the warnings listed below for your health and safety.
- Before beginning a training programme, undergo a physical examination certifying good health.
- Choose a training level compatible with your physical endurance and the status of your health.
- When using the trainer, select a training program and adjust it so that it is compatible with your fitness level and health.
- If you feel particularly fatigued or sore while exercising, stop using the trainer immediately and consult your doctor.
The above warnings are general and not exhaustive of all the precautions that should be taken for the proper and safe use of the trainer; which is solely the responsibility of the user.
DISCLAIMER
Elite S.r.l. is not liable for any temporary or permanent damage to the physical integrity of the user, whether direct or indirect, resulting from the use of the trainer.

!CAUTION!

- Please be careful when folding or unfolding the hometrainer to avoid injuries.
- The incorrect positioning of the bicycle on the hometrainer might damage the hometrainer.
NAME AND LIST OF COMPONENTS
FRONT ROLLER
1 Rif. A
UPPER KNOB 1 Rif. B
TRANSMISSION BELTS 2 Rif. C
CENTRAL ROLLER 1 Rif. D
CURSOR POSITIONS 1-2-3
1 Rif. E
REAR ROLLER 1 Rif. F
FRONT COUNTER WHEELS 2 Rif. G
LOWER KNOB 1 Rif. H
OSCILLATING WHEELS 4 Rif. I
SAFETY KNOB 1 Rif. L
ASSEMBLY
Your Quick-Motion roller should arrive fully assembled, checked and ready for use.
USE
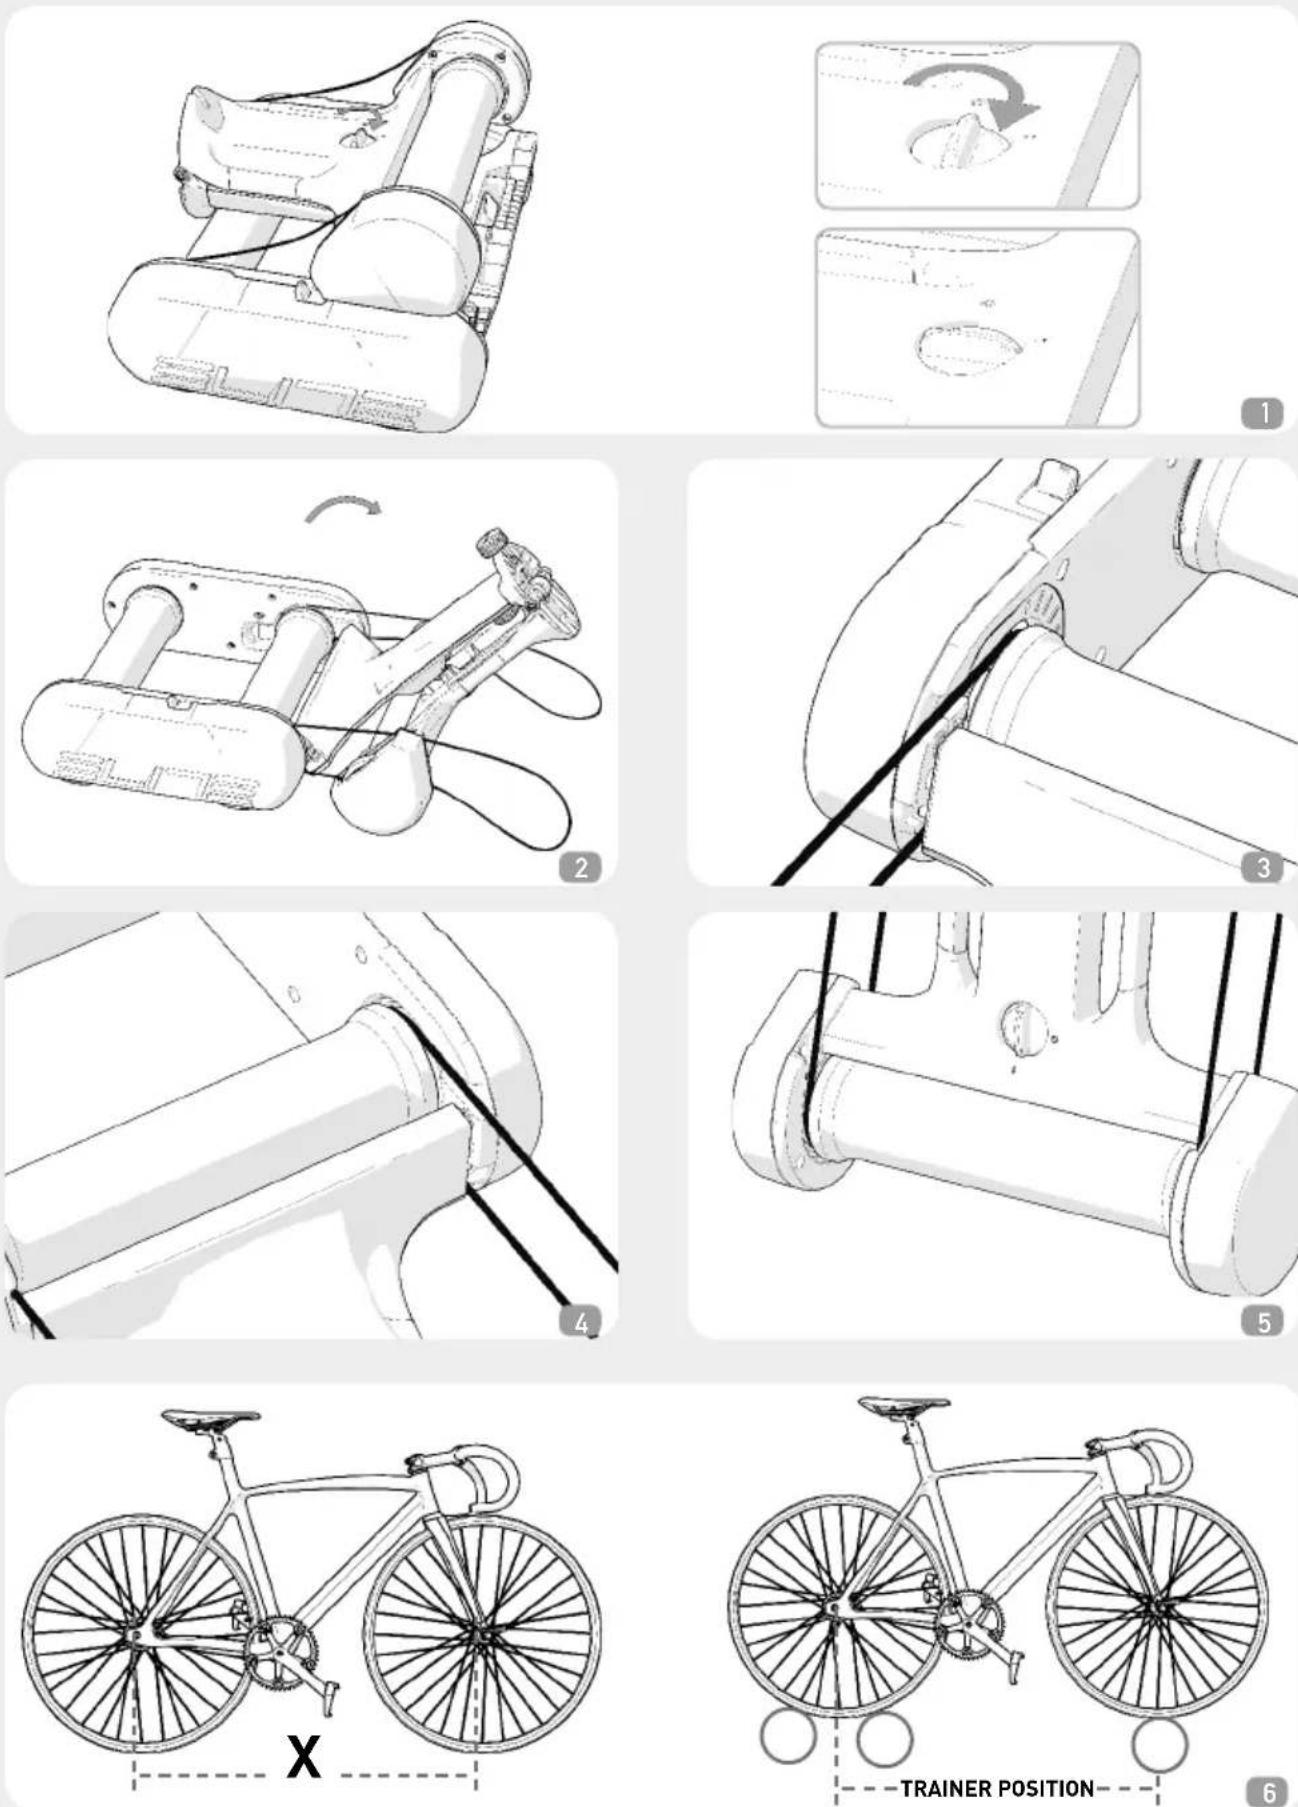
1) Twist the safety switch (Ref. L) to the open position "I" (Pic. 1).
2) Unfold the hometrainer to its open position (Pic. 2).
3) Place the belts (Ref. C) in their 2 front and rear housings, making sure the don't become jammed between the plastic parts (Pic. 3 - Pic.4 - Pic. 5).
4) Before completely unfolding the Quick-Motion, you must adjust the distance between rollers to make it compatible with your bicycle's frame. The adjusting process is conducted as follows:
- measure the distance from center to center between the wheels of the bike being used on the Quick Motion (Pic. 6). This distance is designated as "X".
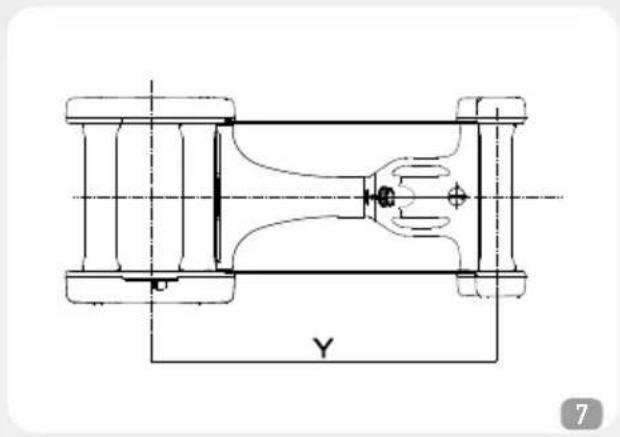
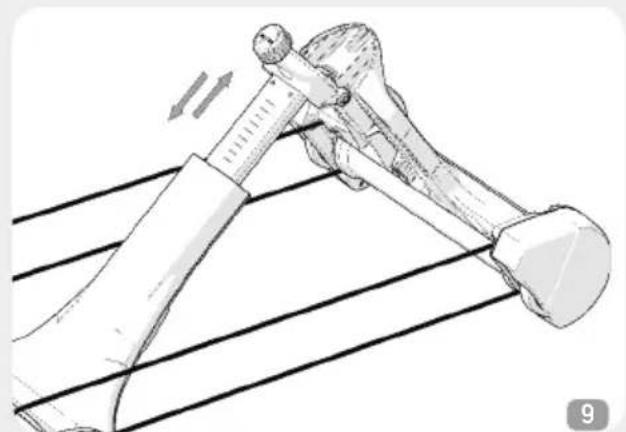
- The hometrainer comes set at a "Y" wheelbase distance of 924mm (37 inches) between the wheels (Pic. 7) and can be adjusted for wheelbases up to 1144mm (45 inches). If your wheelbase is over 924mm (37 inches), use the lower knob (Ref. H) (Pic. 8) and extend the bar to the number closest to dimension "X" according to the graded scale (Pic. 9).

! CAUTION!

Do not unscrew the knob completely!
- Once the correct "X = Y" wheelbase is set, re-tighten the lower knob (Ref. H) (Pic. 10).
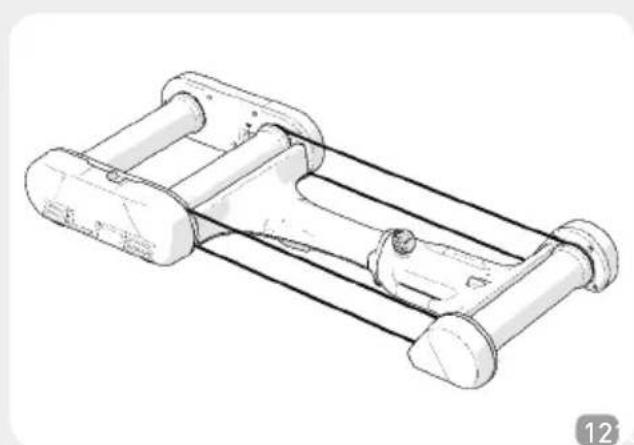
5) To unfold your Quick-Motion completely, grab the front handles with both hands and give a strong push downwards (Pic. 11 and Pic. 12).

! CAUTION !

If the bicycle being used has a wheelbase greater than 1044mm, before using the product, the hometrainer must be opened gradually (until completely opened) to allow the belts to stretch naturally.
6) Lock the unit by using the upper knob (Ref. B) (Pic. 13).
7) The Quick-Motion is now ready for training sessions!

!CAUTION!

For your own safety, set the hometrainer at 10-15mm (0.4 - 0.6 inches) forward of the central axis of the front wheel (Pic. 14). Should the front wheel be positioned too far forward, it might fall out of the hometrainer.
- The incorrect positioning of the bicycle on the hometrainer might damage the hometrainer.
1) For ease of transport or to just reduce clutter when not in use, we suggest folding the frame (Pic. 10 and Pic. 9). Unlock the system by using the upper knob (Ref. B) (Pic. 15). Grab the Quick-Motion by the side of the front edges and fold the hometrainer (Pic. 16 and Pic. 17).

!CAUTION!

- Do not unscrew the knob completely!
- To avoid injuries when folding the hometrainer, be careful of where your hands are placed.
- When transporting the hometrainer, the lower handle must be tightened completely to avoid losing it (Ref. H). Without the knob the wheelbase setting cannot be locked in place.
- Set the safety knob (Ref. L) to the "O" locking position (Pic. 18).
NOTE: The safety handle (Ref. L) only works when the wheelbase adjustment is set to the minimum distance.
2) The rollers work best with tyre that has a smooth tread. If using a mountain bike, to reduce noise and increase stability change the tyre for one with a slick tread.
3) For beginners, position the rollers in an entrance hall, in a doorway or near a stable object, in order to have a support while acquiring the necessary balance.
4) Make sure the Quick-Motion rests on a flat, stable surface.
5) The oscillating system guarantees maximum functionality on a hard surface.
6) The Quick-Motion has 3 resistance levels: "1" minimum resistance, "2" medium resistance, "3" maximum resistance (Fig.19). Select the required resistance level by shifting the slide to the required resistance value. On acquiring greater skill on the rollers, you can also use the bicycle's gears to vary the resistance level.
7) Start pedalling and look ahead, like riding on the road. Even if you would instinctively tend to look at the front wheel, you will keep better balance and pedal "in a straight line" if you concentrate on an object located 2.5 – 4 m. (10-15 feet) in front of you.
8) If you start leaning or shifting to one side of the rollers, correct your position with light steering movements. If you steer too much, you will lose balance or end up over the side of the rollers.
9) Maintaining a high and even pedalling rate will help you keep balance on the rollers, thanks to the gyroscopic effect of the speed of the wheels.
10) At first, pedalling on the rollers will give you the feeling of instability, and moving the handlebar too abruptly or pedalling at too strong a pace may make you lose control. This is the big advantage of the rollers compared to the standard training tools: the rollers will teach you reduce movement of the
upper part of your body and keep a smooth pedalling motion.
11) After gaining confidence with the Quick-Motion, you can vary the resistance level by moving the resistance slider to positions "2" (Fig. 16) or "3".(Fig. 17).
12) Do not use the bicycle brakes to stop. Place a foot on the Quick-Motion frame and allow the bicycle to come to a halt.
13) Do not use the bicycle brakes to stop. Just place your foot above the rear plate opposite the resistance cursor (Ref. E) of the Quick-Motion until the bicycle comes to a halt.
NOTE: to change wheelbase, unfold the roller and loosen the transmission belt by pulling it out.

!CAUTION!

- Before each use, make sure the belts are properly placed in their housings at edges of the rollers. Using the product when the belts are not properly positioned might damage both the belts and the hometrainer.
- When using the hometrainer for prolonged periods of time with bigger bikes or with wheelbases greater than 1044mm, the correct transmission of the belt might not be guaranteed if it's later used with smaller bikes or with wheelbases smaller than 1044mm. The installation of new transmission belts may be required.
CARE AND MAINTENANCE
1) Prolonged exposure to direct sunlight can cause deformation of the technopolymer rollers. Do not use or keep the rollers in places where they are exposed to direct sunlight.
2) Always clean the rollers after use. Only use a damp cloth. Do not use solvents or harsh detergents.
3) If the Quick-Motion is not going to be used for a prolonged period, release the drive belt, bringing it out of its seat, or close it, otherwise the belt's tension could cause early loss of transmission efficiency.
4) The coupled bearings on the roller do not require lubrication and are practically maintenance-free.
5) Periodically check the roller clamping screws, make sure that they are still tight but not so tight as to damage the plastic frame.
6) In case of wear or breakage of the drive belt, re-
place it by proceeding as follows:
- make sure the belts are not tensioned;
- unscrew the screws from the rear left shell, opposite the cursor (Ref. E) (Pic. 20):
- unscrew the wheel block (Ref. I) (Pic. 21);
- remove the internal shell (Pic. 22);
- remove the front block and the rotating spindle (Pic. 23);
- it is now possible to replace the worn-out belt;
- assemble the front body and make sure to place the spindle correctly (Pic. 24);
- assemble the internal shell (Pic. 25);
- assemble the oscillating block (Pic. 26);
- assemble the external shell (Pic. 20).

!CAUTION!

- Make sure belts are correctly positioned before beginning training (Pic. 3 - Pic. 4 - Pic. 5).
7) When beginning or ending your training session, make sure that your feet, the pedals or the wheels do come in contact with the transmission belts.
IMPORTANT
1) Read and follow the enclosed instructions.
2) Keep people, children and animals away from the roller during use, since the moving and rotating parts of the roller and the bicycle can cause damage in case of contact.
3) Before starting training, position the trainer in a dry place, away from potentially hazardous objects (furniture, tables, chairs, etc.) in order to avoid any risk of inadvertent or accidental contact with them.
4) When beginning or ending your training session, make sure that your feet, the pedals or the wheels do come in contact with the transmission belts.
Please use the original hometrainer box if you need to ship it for assistance and / or repairs.
Any damage caused by the use of other packing methods is not covered under the warranty.
NOTE: Please check with ELITE, its distributor or retailer before shipping the hometrainer or one of its components. Shipments without approval will be rejected.
Technical assistance:
Phone 0039 049 5940044
e-mail: info@elite-it.com
INFORMATION ON PRODUCT DISPOSAL
1) WITHIN THE EUROPEAN UNION

This product conforms with European Directives 2002/95/CE, 2002/96/CE and 2003/108/CE.
The crossed bin symbol given on the equipment or on the packaging indicates that at the end of its service life the product must be collected separately from other waste.
Therefore at the end of its useful life the user must take the equipment to an appropriate centre for the differentiated collection of electronic and electrotechnical waste, or return it to the dealer when purchasing a new product of equivalent type.
Adequate differentiated collection for subsequent sending of the scrapped equipment to recycling, treatment and environmentally-friendly disposal can help prevent possible negative consequences for the environment and the health of people and favours the reuse and/or recycling of the materials from which the equipment is made.
Improper disposal of the product by the user could involve penalties as specified by the regulations in force.
2) IN NON-EU COUNTRIES
If you want to dispose of this product, please contact your local authorities and ask them what disposal method applies.
Assistance technique:
Tel. 0039 049 5940044
e-mail: info@elite-it.com
INFORMATIONS SUR LA DESTRUCTION DU PRODUIT
1) EN UNION EUROPEENNE

| VOORROL | 1 | Ref. A |
| BOVENSTE KNOP 1 Ref. B | ||
| DRIJFRIEM 2 Ref. C | ||
| MIDDENROL 1 Ref. D | ||
| SCHUIF STANDEN 1-2-3 1 | Ref. E |
| ACHTERROL 1 Ref. F |
| VOORSTE GLIJWIEL 2 Ref. G |
| ONDERSTE KNOP 1 Ref. H |
| ZWENKWIEL 4 Ref. I |
| VEILIGHEIDSKNOP 1 Ref. L |
ASSEMBLAGE
1) BINNEN DE EUROPESE UNIE
GARANZIA ITALIANO
- In accordance with the law no. 24 of 02/02/2002 and CE directive 1999/44, ELITE s.r.l. guarantees its products and the components used for a period of two (2) years from the date of purchase.
- Warranty is void for defects caused by reasons not chargeable to the manufacturer such as negligence or carelessness whilst using the product, impacts, maintenance done by non-authorised personnel, damage caused by transportation, normal wear. Additionally, warranty is void in case of improper use of the product, wrong observation of instruction, especially the notice concerning installation and use supplied by ELITE s.r.l. for which in any case it is not responsible for eventual direct or indirect damages.
- In case of repaired or replaced product done by the Factory or in one of its authorized Service Centers, ELITE s.r.l. is not responsible for any loss or damage during transportation.
- To take advantage of the warranty service it is necessary to carefully fill in all its parts the "CUSTOMER ASSISTANCE CARD" which needs to accompany, along with the fiscal receipt or other document issued by the Seller which bears the name of the Seller and date selling, the eventual returned product. Warranty is void in case one of these documents are missing.
- All the information supplied by the Purchaser on the "CUSTOMER ASSISTANCE CARD" will be handled in accordance with the rules of the law no. 675 of 31/12/1996.
- In case there is, along with the documentation supplied with the product, a technical drawing of the product itself, indicate the defective or malfunctional part by signing on the correspondant number. The drawing needs to be attached to the "CUSTOMER ASSISTANCE CARD".
- ELITE s.r.l. reserves the right to apply technical and aesthetic modifications to its products without obligation of notice.
GARANTIE DEUTSCH
In case of defect contact the distributor in your country.

ELITE srl - 35014 Fontaniva (PD) - ITALY - Tel. +39 049 594 0044
e-mail: contatto@elite-it.com
elite-it.com
CE

- QUICK-MOTION
- IT - ITALIANO
- DE - DEUTSCH
- ES - ESPAÑOL
- Thank you for purchasing the Elite Quick-Motion
- GENERAL SAFETY WARNINGS
- DISCLAIMER
- !CAUTION!
- NAME AND LIST OF COMPONENTS
- ASSEMBLY
- USE
- CARE AND MAINTENANCE
- IMPORTANT
- Technical assistance:
- INFORMATION ON PRODUCT DISPOSAL
- 1) WITHIN THE EUROPEAN UNION
- 2) IN NON-EU COUNTRIES
- INFORMATIONS SUR LA DESTRUCTION DU PRODUIT
- 1) EN UNION EUROPEENNE
- ASSEMBLAGE
- 1) BINNEN DE EUROPESE UNIE
- GARANZIA ITALIANO
- GARANTIE DEUTSCH
Brand : Ozone
Model : Quick-Motion
Category : Exercise bike