
NPB-250A - CD Player Naxa - Free user manual and instructions
Find the device manual for free NPB-250A Naxa in PDF.


| Product Type | Portable MP3/CD Player with FM Radio & USB/SD/MMC |
| Model | NPB-250A |
| Brand | Naxa |
| Power Supply | 8 x C batteries (UM-2 or equivalent) or AC/DC adapter (included) |
| Disc Compatibility | CD-DA, MP3-CD |
| Radio Bands | FM (with telescopic antenna) |
| External Storage | USB port (2.0), SD/MMC card slot |
| Audio Input | AUX IN (3.5mm) |
| Headphone Output | 3.5mm stereo phones jack |
| Speakers | Built-in (stereo) |
| Display | LCD with track info, mode indicators |
| Playback Modes | Repeat (single, all, album/dir), Random, Intro, Program (up to 20 tracks for CD, 99 for MP3) |
| Controls | Power, Source, Play/Pause, Stop, Skip/Search, Volume, Tuning, Mode/Prog, +10/Album |
| Dimensions | Approx. 350 x 200 x 250 mm (estimated based on typical boombox) |
| Weight | Approx. 2.5 kg (without batteries) |
| Safety Features | Polarized plug, laser warning (Class 1), FCC Part 15 compliant |
| Warranty | Refer to manufacturer; user manual includes safety instructions |
| Cleaning | Unplug before cleaning; use damp cloth; do not use liquid cleaners |
| Accessories Included | AC/DC adapter, FM antenna, user manual (English) |
Frequently Asked Questions - NPB-250A Naxa
User questions about NPB-250A Naxa
0 question about this device. Answer the ones you know or ask your own.
Ask a new question about this device
Download the instructions for your CD Player in PDF format for free! Find your manual NPB-250A - Naxa and take your electronic device back in hand. On this page are published all the documents necessary for the use of your device. NPB-250A by Naxa.
USER MANUAL NPB-250A Naxa
natural_image
Line drawing of a portable electronic device with front panels and control buttons (no text or symbols)Please read and follow these instructions before using your unit.

The lightning flash with arrowhead symbol, within an equilateral triangle, is intended to alert the user to the presence of uninsulated "dangerous voltage" within the product's enclosure that may be of sufficient magnitude to constitute a risk of electric shock to persons.
CAUTION
RISK OF ELECTRIC SHOCK DO NOT OPEN
WARNING: TO REDUCE THE RISK OF ELECTRIC SHOCK, DO NOT REMOVE COVER (OR BACK). NO USER-SERVICEABLE PARTS INSIDE. REFER SERVICING TO QUALIFIED SERVICE PERSONNEL.

The exclamation point within an equilateral triangle is intended to alert the user to the presence of important operating and maintenance (servicing) instructions in the literature accompanying the appliance.
WARNING:
TO AVOID THE RISK OF ELECTRICAL SHOCK, ALWAYS MAKE SURE THE PRODUCT IS UNPLUGGED FROM THE ELECTRICAL OUTLET BEFORE RELOCATING, SERVICING, OR CLEANING IT.
Read and follow all instructions. Keep these instructions for future reference.
Heed all warnings.
Do not use this product near water.
Do not ceiling- or wall-mount the product.
Do not block any ventilation openings. Install the product in accordance with the operating instructions.
Do not install the product near heat sources, such as radiators, heat registers, stoves, or other apparatus (including amplifiers) that produce heat.
Protect the power cord from being walked on or pinched, particularly at plugs, convenience receptacles, and the point where they exit the product.
Do not use attachments not recommended or sold by the product manufacturer, as a risk of fire, electrical shock, or serious personal injury may result.
- Unplug the product during lightning storms or when unused for long periods of time.
Do not expose the product to dripping or splashing water.
Do not place objects filled with liquid (i.e., vases) on the product.
Do not place in or expose the product to direct sunlight, extreme heat, humid or dusty locations.
Never operate this product if it has a damaged Power Cord or plug, is not working properly, has been dropped, damaged, or exposed to moisture, water or other liquids. Do not attempt to examine or repair this product yourself. Return the product to a service center for examination and repair.
SAFETY INSTRUCTIONS
THESE IMPORTANT SAFETY INSTRUCTIONS ARE INCLUDED, AS APPLICABLE TO THE APPLIANCE, CONVEYING TO THE USER THE INFORMATION ITEMIZED BELOW
- Read Instructions - All the safety and operating instructions should be read before the appliance is operated.
Retain Instructions
@nitarepodnaytefasehT-
instructions should be retained for future reference.
- Heed Warnings - All warnings and cautions on the appliance and in the operating instructions should be adhered to.
- Follow Instructions - All operating and use instructions should be followed.
Water and Moisture
desgebtondluohs
near water, e.g. near a bathtub, washbowl, kitchen sink, laundry tub, in a wet basement, or near a swimming pool or the like.
Wall or Ceiling Mounting
.6 ebtondluohsecna
mounted to a wall or ceiling.
- Ventilation - The appliance should be situated so that its location or position does not interfere with its proper ventilation. For example, the appliance should not be situated on a bed, sofa, rug or similar surface that may block the ventilation openings, or placed in a built-in installation, such as a bookcase or cabinet, that may impede the flow of air through the ventilation openings.
- Heat - The appliance should be situated away from heat sources such as radiators, heat registers, stoves, or other appliances (including amplifiers) that produce heat.
- Power Sources - The product should be operated only with the type of power supply indicated on the marking label. If you are not sure of the type of power supply to your home, consult your product dealer or local power company. For products intended to operate from battery power, or other sources, refer to the operation instructions.
Grounding Polarization
.01deppiuqeebyam
with a polarized alternating current line plug (a plug having one blade wider than the other). This plug will fit into the power outlet only one way this is a safety feature. If you are unable to insert the plug fully into the outlet, try reversing the plug. If the plug should still fail to fit, contact your electrician to replace your obsolete outlet. Do not defeat the safety purpose of the polarized plug.
- Power-Cord Protection - Power supply cords should be routed so that they are not likely to be walked on or pinched by items placed upon or against them, paying particular attention to cords at plugs, convenience receptacles, and the point where they exit from the appliance.
- Cleaning - Unplug this product from the wall outlet before cleaning. Do not use liquid cleaners or aerosol cleaners. Use a damp cloth for cleaning.
- Nonuse Periods - The power cord of the appliance should be unplugged from the outlet when left unused for a long period of time.
Object and Liquid Entry
.41 tahtosnekatebdl
objects do not fall and liquids are not spilled into the product case through product openings.
- Damage Requiring Service - Unplug this product from the wall outlet and take it to qualified service personnel under the following conditions.
a) When the power-supply cord or plug is damaged.
b) If liquid has been spilled into, or objects have fallen into the product.
c) If the product has been exposed to rain or water.
d) If the product does not operate when used according to the operating instructions.
Adjust only those controls that are covered by the operating instructions as an improper adjustment of other controls may interfere with the product's normal operation.
e) If the product has been dropped or damaged in any way.
f) When the product exhibits a distinct change in performance - this indicates a need for service.
-
Servicing - The user should not attempt to service the product beyond that described in the operating instructions. All servicing should be referred to qualified service personnel.
-
Power Lines - An outside antenna system should not be located in the vicinity of overhead power lines, or other electric light or power circuits, or where it can fall into such power lines or circuits. When installing an outside antenna system, extreme care should be taken to keep from touching power lines or circuits as contact with them might be fatal.
Outdoor Antenna Grounding
connected to the receiver, be sure the antenna system is grounded so as to provide some protection against voltage surges and built up static. Section 810 of the National Electrical Code ANSI/NEFA 70 provides information with respect to proper grounding of the mast and supporting structure, grounding conductress, location of antenna-discharge unit, size of grounding electrodes, and requirements for the grounding electrode (see figure).
- Cleaning - Unplug this product from the wall outlet before cleaning. Do not use liquid cleaners or aerosol cleaners. Use a damp cloth for cleaning.
- Lightning - For added protection for this product during a lightning storm, or when it is left unattended and unused for long periods of time, unplug it from the wall outlet and disconnect the antenna or cable system. This will prevent damage to the product due to lightning power-line surges.
- Safety Check - Upon completion of any service or repairs to this product, ask the service technician to perform safety checks to determine that the product is in proper operation condition.
- Overloading - Do not overload wall outlets, extension cords, or integral convenience receptacles as this can result in a risk of fire or electric shock.
EXAMPLE OF ANTENNA GROUNDING AS PER NATIONAL ELECTRICAL CODE

NEC NATIONAL ELECTRICAL CODE Dot not apply oil or petroleum products to this product.
CAUTION
Invisible laser radiation will be emitted when the product is open and interlocks are defeated. Do not defeat the safety interlocks.
GRAPHIC SYMBOLS WITH SUPPLEMENTARY MARKINGS ARE LOCATED ON THE BOTTOM OF THE UNIT.
USE OF ANY CONTROLS OR ADJUSTMENTS OR PERFORMANCE OF PROCEDURES OTHER THAN THOSE HEREIN SPECIFIED MAY RESULT IN HAZARDOUS RADIATION EXPOSURE.
WARNING:
This product contains lead, a chemical known to the siannet State of California to cause cancer and birth defects or is other reproductive harm. Wash your hands after handling.
CAUTION:
This product is equipped with a polarized plug (one blade is wider than the other blade) as a safety feature to reduce the risk of electrical shock. This plug will fit into a polarized outlet only one way. This is a safety feature. If you are unable to insert the plug into the electrical outlet, try reversing the plug. If the plug still does not fit, contact a qualified electrician. Never use the plug with an extension cord unless the plug can be fully inserted into the extension cord. Do not alter the plug. Do not attempt to defeat the safety purpose of the polarized plug.
IMPORTANT INFORMATION REQUIRED BY THE FCC
This device complies with Part 15 of the FCC Rules. Operation is subject to the following two conditions: (1) this device may not cause harmful interference; and (2) this device must accept any interference received, including interference that may cause undesirable operation.
NOTE: This equipment has been tested and found to comply with the limits for a Class B digital device, pursuant to Part 15 of the FCC Rules. These limits are designed to provide reasonable protection against harmful interference in a residential installation. This equipment generates, uses and can radiate radio frequency energy and, if not installed and used in accordance with the instructions, may cause harmful interference to radio communications. However, there is no guarantee that interference will not occur in a particular installation. If this equipment does cause harmful interference to radio or television reception, which can be determined by turning the equipment off and on. The user is encouraged to try to correct the interference by one or more of the following measures:
• Reorient or relocate the receiving antenna.
- Increase the separation between the equipment and receiver.
- Connect the equipment into an outlet on a circuit different from that to which the receiver is connected.
- Consult the dealer or an experienced radio/TV technician for help.
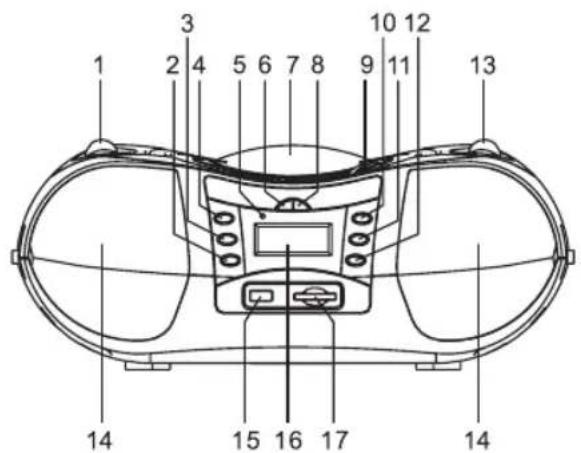
OVERVIEW OF THE PLAYER

natural_image
Technical line drawing of a mechanical device with labeled component 18 (no text or symbols beyond label)

natural_image
Technical line drawing of a mechanical device with labeled parts (no text or symbols present)LOCATION OF CONTROLS
- VOLUME CONTROL
- SKIP DN/CH- BUTTON
- SKIP UP/CH+ BUTTON
- PLAY/PAUSE BUTTON
- STANDBY INDICATOR
- +10/ALBUM BUTTON
- CD DOOR
- PROG/MEM/MODE BUTTON
- CD DOOR OPEN AREA
- STOP BUTTON
- SOURCE BUTTON
- POWER BUTTON
- TUNING CONTROL
-
SPEAKERS
-
USB PORT
- LCD DISPLAY
- SD/MMC CARD SLOT
- PHONES JACK
- AUX JACK
- FOLDING HANDLE
- BATTERY COMPARTMENT
- FM TELESCOPIC ANTENNA
- DC IN JACK
FAMILIARIZE WITH THE DISPLAYED CONTENTS IN THE LCD

- "PROG" shows during Programming and in programmed play.
- "RANDOM" shows when in RANDOM playback.
- "INTRO" shows when in INTRO playback.
- English Text display. The information of the current track is displayed scrolling forward in MP3 playback.
- "MP3" shows when the disc played is an MP3-CD.
- "CD" shows when the disc played is a CD-DA.
- "REPT" shows when in various repeat modes.
- "1" shows together with "REPT" when in single track repeat mode.
- "DIR" shows together with "REPT" when in album repeat mode.
- "ALL" shows together with "REPT" when in all tracks repeat mode.
- This shows when the player reads data from USB data traveller.
- This shows when player reads data from SD/MMC card.
- This figure is the album number.
- This figure is track number of the current album on a MP3 disc or the current track number on a CD disc.
- This figure is the elapsed minutes of the track played.
- This figure is the elapsed seconds of the track played.
POWER SUPPLY
BATTERY OPERATION
- Remove the battery compartment cover gently.
- Install 8 x 'C' size batteries (UM-2 or equivalent) while observing the correct polarities.
- Replace the battery compartment cover.
NOTE:
● Leaking batteries may damage the battery cabinet and the player as a whole, so they should be removed from the cabinet when becoming flat or when the player is not to be played on batteries for some time.
- The AC/DC adapter must be detached from the DC IN jack of the player for battery operation.
Plug the supplied adapter to the DC IN jack on the unit and to the main power.
TO PLAY THE RADIO
- The standby indicator will light up once the unit is connected to the main power. Press the STANDBY button to turn the unit on (the standby indicator will be off)
- Press the SOURCE button repeatedly to switch the unit on the TUNER(FM radio) mode.
-
To launch the auto-searching, Rotate and hold the TUN+/- several seconds and for shortly to tune the radio stations manually
-
When you are receiving an FM broadcast, fully extend the TELESCOPIC ANTENNA and rotate it for the best reception.
- Adjust the volume level to a comfortable listening level.
- Press the STANDBY button to turn off the unit.
STORE YOUR FAVORITE RADIO STATION:
- During listen to FM Radio, Press MODE/PROG/MEM button to store the current station as a preset station. The Preset NO will flash on the LCD display.
- Press CH-/CH+ button repeatedly to select the corresponding memory NO fromP01 - P20 to store it
- Press MODE/ PROG/MEM button to confirm your selection .
- Repeat above steps to store other stations.
- During listen to FM Radio, Repeatedly Press CH+/CH- button to recall your preset station
STEREO PHONES JACK
A stereo phones jack has been provided on the side of the player so that you can listen without disturbing others. To use this jack, plug in the headphones/ earphones (NOT INCLUDED) and adjust the VOLUME control to a preferred level.
When external headphones/earphones are connected, the speakers will be muted. NOTE:
HANDLING AND MAINTENANCE OF A DISC
Follow the instructions below to handle and maintain your disc in order that long time and trouble free performance can possibly be obtained:
- Ensure not to caress the rain bow side of the disc; handle the disc by the edge.
- Long time exposure to sunshine, high temperatures and humidity will damage the disc. And keep storage area clean.
- Avoid sticking labels on both sides of a disc. Writing with pointed articles on the disc should be strictly avoided.
- Clean the disc wiping the centre and then working out to the edge with a dry & soft cloth or a disc brush. Avoid any cleansing lotion or chemical eradicator.
- Store them in their cases when they are not to be used.
LOAD A DISC
- Open the CD door by the Door open area.
- Load a disc on the disc tray with the label side facing up.
- Close the CD door.
PLAY A DISC
- Press the STANDBY button to turn the unit on (the standby indicator will be off).
- Press the SOURCE botton repeatedly to switch to CD mode.
- Follow the steps above toload a disc.
- The player begins reading disc immediately the CD door is closed, "READING" shows in the LCD.
- When the disc is successfully read, TOC (total of contents) shows in the LCD and playback follows with the first track.
- Press Play/Pause button once to Pause music playback, the elapsed time of the current track flashes and "PAUSE" appears on the bottom of the LCD to indicate the player in Pause mode; Press PLAY/PAUSE button again to resume playback. press Stop button to Stop playback. The LCD shows the TOC again.
SKIP TRACKS AND SEARCH FOR A SPECIFIC POINT TO PLAY
- Press once the SKIP/SEARCH up button in music play to skip to the next track. To skip to a specific track ahead, press this button several times.
- Press once the SKIP/SEARCH down button in music play to skip to the previous track. To skip to a specific track at back, press this button several times.

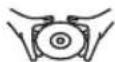
HANDLEDISCONLYASSHOWN
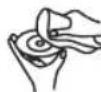
CLEANFROMCENTERTOEDGE

DONOTSTORENEARHEAT
- Press and hold the SKIP/SEARCH up button in music play to search up at quick rate for a specific point to play.
- Press and hold the SKIP/SEARCH down button in music play to search down at quick rate for a specific point to play.
- Press +10 /ALBUM button once in play to skip to the track 10 tracks ahead, twice to skip to the track 20 tracks ahead. You can reach the last track of the disc using this button.
REPEAT A SINGLE TRACK
To repeat a preferred track in playback, press MODE button once, the corresponding icon of repeat single track shows in the LCD. Then select the preferred track using SKIP/SERCH buttons or +10/ALBUM button. The player will repeat the chosen track until you press STOP button.
REPEAT ALL TRACKS
To repeat all tracks, press MODE button twice in play mode, the corresponding icon of repeat all tracks shows in the LCD. The player will repeat all tracks until you press STOP button.
INTRODUCTION PLAY
Introduction play is that the first ten seconds of each track are played in a sequential order. Press MODE button three times to enter this mode during play, the icon of introduction play shows in the LCD. Press MODE button to exit Introduction play mode and normal music play resumes. Press SKIP/SEARCH up button in Introduction mode to begin Introduction play from the next track immediately after the current track. Press SKIP/SEARCH down button in Introduction mode to begin Introduction play from the current track.
RANDOM PLAY
Random play is that tracks on the disc are played by the player at random. Press MODE button four times to enter this mode during play, the icon of random play shows in the LCD. Tracks on the disc will be selected at random for playback and the player stops automatically after all tracks are played. You may press STOP button to exit random play mode and press PLAY/PAUSE button to resume normal playback.
PROGRAMMED PLAY
Programmed play is that tracks on the disc can be edited for playback in a preferred order with the use of PROGRAM button.
In CD stop mode, press PROGRAM/EQ button once, "PROG" shows in the LCD with a flickering track number and the program sequence indication "P-01", select the first track to be programmed using SKIP/SEARCH buttons or +10/ALBUM button, and press PROGRAM button again to store and advance to the next programming step. The program sequence indication changes to "P-02" waiting for your next input.
Repeat the steps above to program more tracks. A maximum of 20 tracks can be programmed in memory in a preferred order.
Press PLAY/PAUSE button to begin programmed play in the preferred order after you are done with programming. The player stops automatically after all programmed tracks are played.
You may press STOP button to terminate programmed playback. In program stop mode, press STOP button again to clear the programming; press PLAY/PAUSE button to begin the programmed playback with the programming order identical with the previous one done.
MP3-CD PLAYBACK
This player is capable of MP3-CDs. It takes longer time for this player to read an MP3-CD than it does CD-DA. Wait patiently while it is reading.
After an MP3-CD is successfully read, the total number of albums and tracks shows in the LCD together. And a second later, playback begins from the first track of the first album with the icon of "MP3" showing on the screen.
SKIP TRACKS AND SEARCH FOR A SPECIFIC POINT TO PLAY
-
Press once the SKIP/SEARCH up button in music play to skip to the next track. To skip to a specific track ahead, press this button several times.
-
Press once the SKIP/SEARCH down button in music play to skip to the previous track. To skip to a specific track at back, press this button several times.
- Press and hold the SKIP/SEARCH up button in music play to search up at quick rate for a specific point to play.
- Press and hold the SKIP/SEARCH down button in music play to search down at quick rate for a specific point to play.
- Press +10/ALBUM button once in play to skip to the track 10 tracks ahead, twice to skip to the track 20 tracks ahead. You can reach the last track of the disc using this button.
- Hold the +10/ALBUM button once during MP3 playback, the album number flashes; select the desired album using the SKIP/SEARCH buttons or the +10/ALBUM button; confirm this album selection by holding +10/ALBUM button again, the track number "000" flickers for your input; select the desired track of the chosen album using the SKIP/SEARCH button or +10/ALBUM button. Finally, press PLAY/PAUSE button again to begin playing this chosen track.
REPEAT A SINGLE TRACK
To repeat a preferred track in playback, press MODE button once, the corresponding icon of repeat a single track shows in the LCD. Then select the preferred track using SKIP/SERCH buttons or +10/ALBUM button. The player will repeat the chosen track until you press STOP button.
REPEAT ALL TRACKS
To repeat all tracks, press MODE button twice in play mode, the corresponding icon of repeat all tracks shows in the LCD. The player will repeat all tracks until you press STOP button.
REPEAT AN ALBUM
To repeat a preferred album in playback, press MODE button thrice, the corresponding icon of repeat a album shows in the LCD. Then select the preferred album using +10/ALBUM button and SKIP/SERCH buttons. The player will repeat the chosen album until you press STOP button.
INTRODUCTION PLAY
Introduction play is that the first ten seconds of each track are played in a sequential order. Press MODE button four times to enter this mode during play, the icon of introduction play shows in the LCD. Press SKIP/SEARCH up button in Introduction mode to begin Introduction play from the next track immediately after the current track. Press SKIP/SEARCH down button in Introduction mode to begin Introduction play from the current track. Press MODE button once more to exit introduction and return to normal playback from the track the unit plays.
RANDOM PLAY
Random play is that tracks on the disc are played by the player at random. Press MODE button five times to enter this mode during play, the icon of random play shows in the LCD. Tracks on the disc will be selected at random for playback and the player stops automatically after all tracks are played. You may press STOP button to exit random play mode and press PLAY/PAUSE button to resume normal playback.
PROGRAMMED PLAY
Programmed play is that tracks on the disc can be edited for playback in a preferred order with the use of PROGRAM button. In MP3 stop mode, press PROGRAM button once, "PROG" shows in the LCD with a flickering album number and the program sequence indication "P-01"; select the album number to be programmed using SKIP/SEARCH buttons or +10/ALBUM button, and press PROGRAM button again to store; the track number flickers waiting for your selection. Choose the desired track with SKIP/SEARCH buttons or +10 /ALBUM button. Press PROGRAM button again to confirm the first programming and advance to the next programming step. The program sequence indication changes to "P-02" waiting for your next input. Repeat the steps above to program more tracks. A maximum of 99 tracks can be programmed in memory in a preferred order. Press PLAY/PAUSE button to begin programmed play in the preferred order after you are done with programming. The player stops automatically after all programmed tracks are played. You may press STOP button to terminate programmed playback. In program stop mode, press STOP button again to clear the programming; press PLAY/PAUSE button to begin the programmed playback with the programming order identical with the previous one done.
EXTERNAL MEMORY MEDIA OPERATION (USB,MMC/SD)
Prepare the player for external memory media operation Insert a USB data traveller into the USB port OR insert a MMC/SD card into the card slot; Repeatedly press SOURCE button to select USB or CARD mode
IMPORTANT NOTE:
This product supports most common MP3 interface but we cannot guarantee 100%, because there are too many formats that continue changing in the market.
VARIOUS PLAY MODES
SKIPPING TRACKS AND SEARCHING BETWEEN TRACKS
Press SKIP UP button once to skip the current track and play the next track, press this button continuously to go to corresponding tracks ahead; Press SKIP DOWN button once to skip the current track and go back to the previous track, press this button continuously to go back to corresponding tracks at back. Press and hold SKIP buttons to initiate high-rate scanning between tracks; release one of them to begin playback of music at normal speed.
REPEAT MODES
Press MODE button once in play mode to repeat the current track; the LCD shows the icon for single track repeat. Press MODE button twice in play mode to repeat tracks on stored on this storage media (USB/MMC card) as a whole; the LCD shows the icon for all tracks repeat. Press MODE button thrice to repeat tracks in the current folder as a whole; the LCD shows the icon for DIR repeat.
INTROSCAN PLAY
Press MODE button for the fourth time in play mode to activate introscan playback immediately; the player will pick up tracks for playback of the first 10 seconds of each track in a sequential order after PLAY/PAUSE button is pressed. You may press MODE button once again to exit introscan play mode and return to normal playback from the track it's arrived at.
RANDOM PLAY
Press MODE button for the fifth time in play to activate random playback immediately; the player will pick up tracks in a random sequence for playback after PLAY/PAUSE button is pressed. You may press STOP button to exit random play mode and press PLAY/P AUSE button to resume normal playback.
AUXILIARY IN
Your player can be used as a power amplifier to playback the programs from portable radio, TV set or MP3 player or whatever provided this appliance is so designed that audio signal may be produced through a LINE-OUT jack or the like.
Observe the following steps to connect the player to another appliance:
- Press STANDBY button once to power on unit.
- Repeatedly press SOURCE button to select AUX mode.
- Connect the your device to the player's AUX in jack with an audio cable (not supplied).
- Power on the your device and begin play.
IMPORTANT SAFETY INSTRUCTIONS
- The apparatus shall not be exposed to dripping or splashing and that no objects filled with liquids, such as vases, shall be placed on the apparatus.
- When the mains plug or an appliance coupler is used as the disconnect device, the disconnect device shall remain readily operable. To be completely disconnected the power input, the mains plug of the apparatus or the appliance coupler shall be disconnected from the mains completely.
- No naked flame sources, such as lighted candles, should be placed on the apparatus.
- Minimum distances 2.0cm around the apparatus for sufficient ventilation. The ventilation should not be impeded by covering the ventilation openings with items, such as newspapers, table-cloths, curtains, etc.
- The use of apparatus is in tropical and/or moderate climates.
- Attention should be drawn to the environmental aspects of battery disposal.
- CAUTION: Danger of explosion if battery is incorrectly replaced. Replace only with the same or equivalent type.
- Battery shall not be exposed to excessive heat such as sunshine, fire or the like.
- The marking plate is located at the back of the apparatus.
MANUAL DE OPERACIÓN
REPRODUCTOR DE MP3/CD CON RADIO STEREO FM Y INTRADA DE USB/SD/MMC

natural_image
Line drawing of a portable electronic device with front panels and control buttons (no text or symbols)FAVOR DE LEER ESTE MANUAL COMPLETAMENTE ANTES DE OPERAR ESTE PRODUCTO. CONSERVAR ESTE MANUAL PARA FUTURAS REFERENCIAS
natural_image
Technical line drawing of a mechanical device with labeled component '18' (no text or symbols beyond label)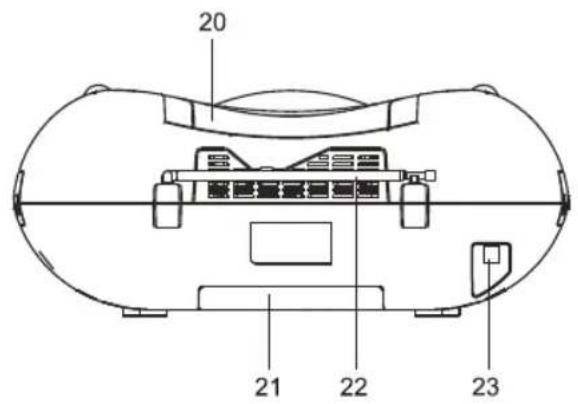

natural_image
Technical line drawing of a mechanical device with labeled component 19 (no text or symbols beyond label)


- CAUTION
- RISK OF ELECTRIC SHOCK DO NOT OPEN
- WARNING:
- SAFETY INSTRUCTIONS
- Retain Instructions
- Water and Moisture
- Wall or Ceiling Mounting
- Grounding Polarization
- Object and Liquid Entry
- Outdoor Antenna Grounding
- CAUTION:
- IMPORTANT INFORMATION REQUIRED BY THE FCC
- OVERVIEW OF THE PLAYER
- LOCATION OF CONTROLS
- POWER SUPPLY
- BATTERY OPERATION
- NOTE:
- TO PLAY THE RADIO
- STORE YOUR FAVORITE RADIO STATION:
- STEREO PHONES JACK
- HANDLING AND MAINTENANCE OF A DISC
- LOAD A DISC
- PLAY A DISC
- SKIP TRACKS AND SEARCH FOR A SPECIFIC POINT TO PLAY
- REPEAT A SINGLE TRACK
- REPEAT ALL TRACKS
- INTRODUCTION PLAY
- RANDOM PLAY
- PROGRAMMED PLAY
- MP3-CD PLAYBACK
- REPEAT AN ALBUM
- EXTERNAL MEMORY MEDIA OPERATION (USB,MMC/SD)
- IMPORTANT NOTE:
- VARIOUS PLAY MODES
- SKIPPING TRACKS AND SEARCHING BETWEEN TRACKS
- REPEAT MODES
- INTROSCAN PLAY
- AUXILIARY IN
- IMPORTANT SAFETY INSTRUCTIONS
- MANUAL DE OPERACIÓN
Brand : Naxa
Model : NPB-250A
Category : CD Player