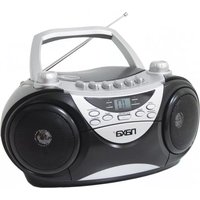
NPB-241 - CD Player Naxa - Free user manual and instructions
Find the device manual for free NPB-241 Naxa in PDF.


| Product Type | Portable CD Player |
| Brand | Naxa |
| Model | NPB-241 |
| Category | CD Player |
| Dimensions (WxHxD) | 14.0 x 2.5 x 14.0 cm |
| Weight | 0.2 kg |
| Power Supply | 3V DC (2 x AA batteries) or AC adapter (optional) |
| Power Consumption | 3W |
| Disc Format | CD, CD-R, CD-RW |
| Playback Modes | Play, Pause, Skip, Search, Repeat (1/All), Random, Program |
| Anti-skip Protection | Electronic anti-skip (approx. 10 seconds) |
| Audio Output | Stereo headphone jack (3.5mm), built-in speaker |
| Headphone Jack | 3.5mm stereo |
| Display | LCD with track number and play status |
| Cleaning | Wipe with dry cloth; clean lens with lens cleaner |
| Safety Precautions | Do not expose to moisture; no user-serviceable parts inside |
| Spare Parts | Batteries, AC adapter (sold separately) |
| Compatibility | Standard audio CDs, CD-R/RW discs |
| Certification | CE, FCC |
Frequently Asked Questions - NPB-241 Naxa
User questions about NPB-241 Naxa
0 question about this device. Answer the ones you know or ask your own.
Ask a new question about this device
Download the instructions for your CD Player in PDF format for free! Find your manual NPB-241 - Naxa and take your electronic device back in hand. On this page are published all the documents necessary for the use of your device. NPB-241 by Naxa.
USER MANUAL NPB-241 Naxa
Portable CD Player with AM/FM Stereo Radio
MODEL: NPB-241

natural_image
Black and white Naxa portable radio with analog dials and speaker grille (no visible text or symbols on device body)IMPORTANT: Please read before using and retain for future reference.
IMPORTANT NOTES
INTRODUCTION
- Thank you for buying our product.
- Please read through these operating instructions, so you will know how to operate your equipment properly. After you finished reading the instructions manual, put it away in a safe place for future reference.
WARNING
To prevent fire or shock hazard, do not expose this appliance to rain or moisture. To avoid electrical shock, do not open the cabinet; refer servicing to qualified personnel only.
CAUTION
Use of controls or adjustment or performance of procedures other than those specified herein may result in hazardous radiation exposure.
DANGER
Invisible laser radiation when open and interlock failed or defeated. Avoid direct exposure to beam.
CLASS 1 LASER PRODUCT LUOKAN 1 LASERLAITE KLASS 1 LASERAPPARAT
This Compact Disc player is classified as a Class 1 LASER PRODUCT.
THE CLASS 1 LASER PRODUCT label is located on the rear exterior.
NOTE: The manufacturer is not responsible for any radio or TV interference caused by unauthorized modifications could void the user's authority to operate the equipment.
- Avoid installing the unit in locations described below:
- Places exposed to direct sunlight or close to heat radiating appliance such as electric heaters, on top of other stereo equipment that radiate too much heat.
- Places locking ventilation or dusty places.
- Places subject to constant vibration.
- Humid or moist places.
- Operate turning controls and switches as instructed in manual.
- Before turning on the power for the first time, make sure that the power cord is properly installed.
- Store your tapes or CD in a cool area to avoid damage from heat.
CAUTION: TO REDUCE THE RISK OF ELECTRIC SHOCK, DO DOT REMOVE COVER (OR BACK). NO USER SERVICEABLE PARTS INSIDE, REFER SERVICING TO QUALIFIED SERVICE PERSONNEL.
WARNING: Remove batteries if exhausted or if they will not be used again for a long period.
The incorrect use of batteries can cause electrolyte leakage and will corrode the compartment or cause the batteries to burst, therefore:
Do not mix battery types, e.g. alkaline with zinc carbonate.
When inserting new batteries, replace all batteries at the same time.
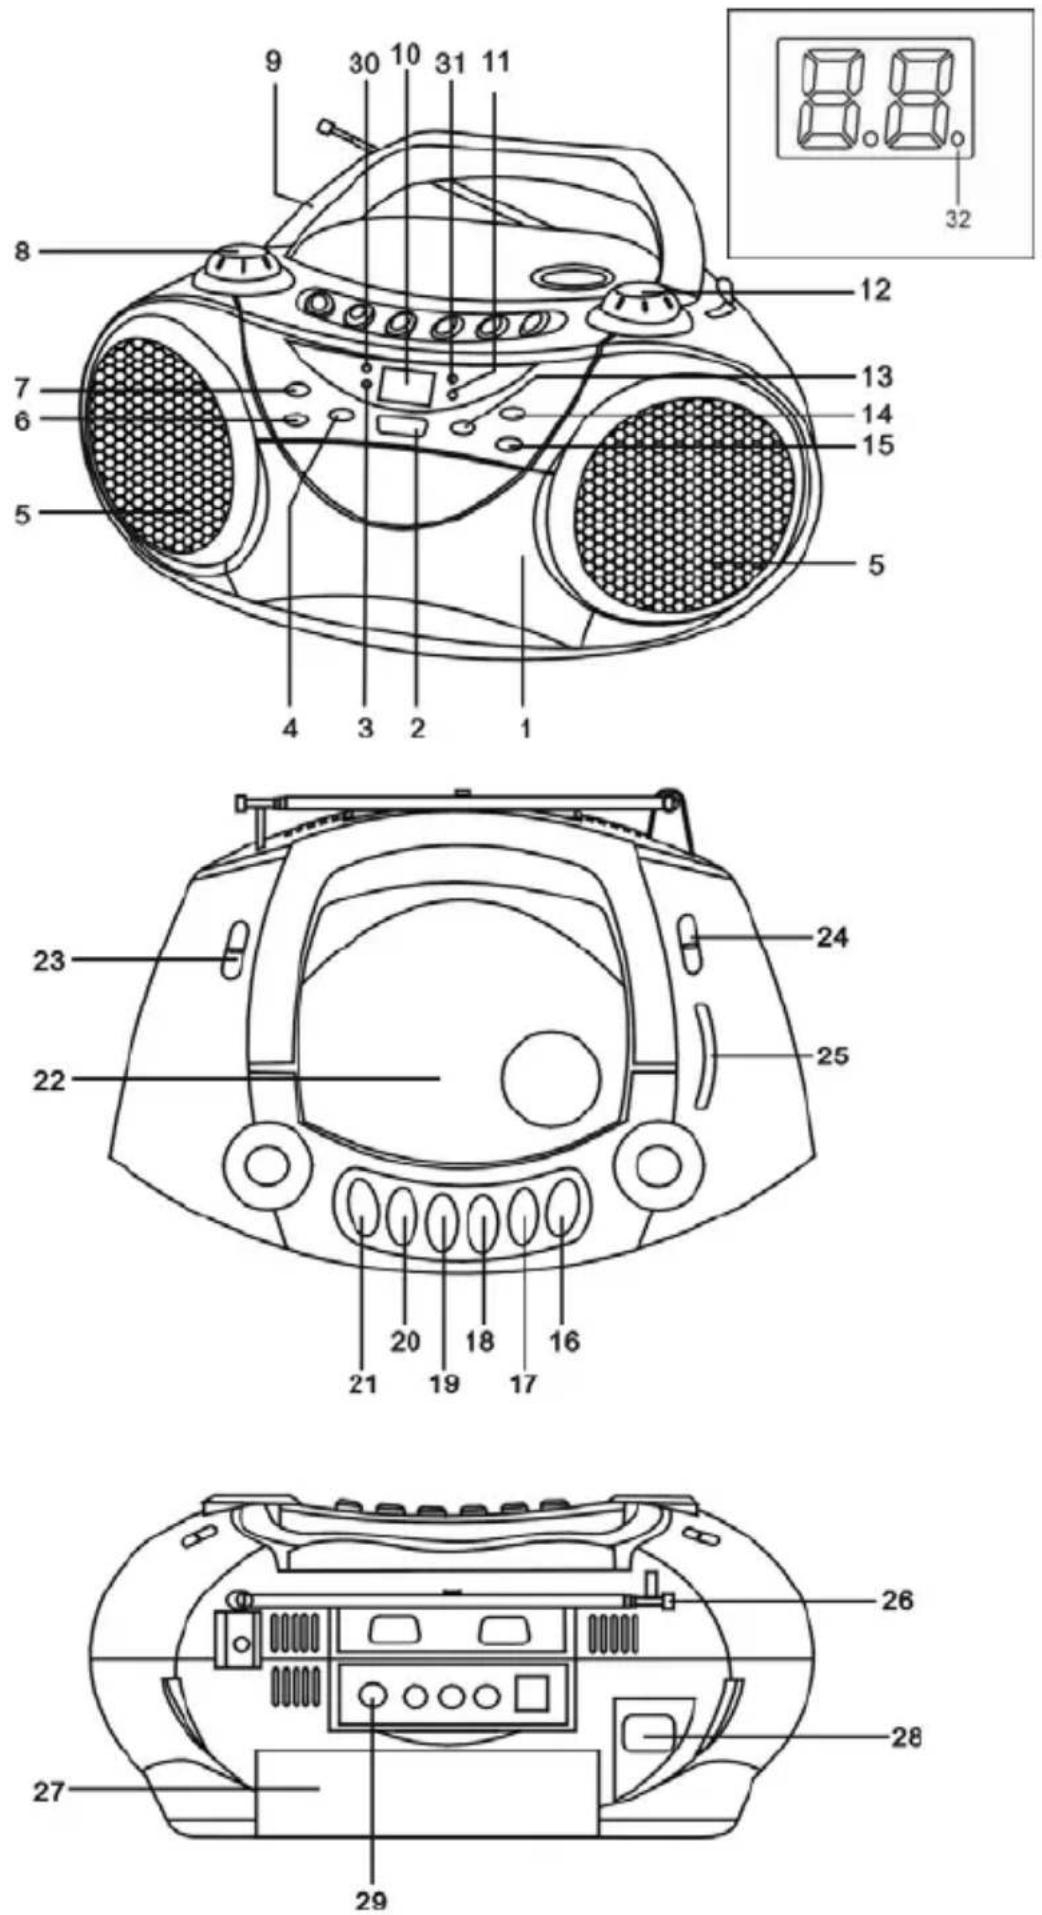
NAMES OF CONTROLS
- CASSETTE COMPARTMENT
- CD PLAYER/PAUSE BUTTON
- CD PROGRAM INDICATOR
- CD SKIP/SEARCH BACK BUTTON
- SPEAKERS
- CD RANDOM BUTTON
- CD STOP BUTTON
- VOLUME CONTROL
- FOLDING HANDLE
- LED DISPLAY
- CD REPEAT INDICATOR
- TUNING CONTROL
- CD SKIP/SEARCH NEXT BUTTON
- CD PROGRAM BUTTON
- CD REPEAT BUTTON
- CASSETTE RECORD KEY
- CASSETTE PLAY KEY
- CASSETTE REWIND KEY
- CASSETTE FAST FORWARD KEY
- CASSETTE STOP/EJECT KEY
- CASSETTE PAUSE KEY
- CD COMPARTMENT
- FUNCTION SWITCH
- BAND SWITCH
- DIAL SCALE
- FM TELESCOPIC ANTENNA
- BATTERY COMPARTMENT
- AC SOCKET
- AUX IN JACK
- POWER INDICATOR
- FM STEREO INDICATOR
- CD PLAY/PAUSE INDICATOR
INTRODUCTION
- Thank you for purchasing this product.
- Please read through these operating instructions, so you will know how to operate your equipment properly. After you finished reading the instructions manual, put it away in a safe place for future reference.
- Do not block the ventilation openings or holes.
- Do not place any naked flame sources, such as lighted candles, on the apparatus.
- When discarding batteries, environmental problems must be considered and local rules or laws governing the disposal of these batteries must be followed strictly.
- Invisible laser radiation when open and interlock failed or defeated. Avoid direct exposure to beam.
● To prevent fire or shock hazard, do not expose this appliance to rain or moisture.
CAUTION:
Note:
The manufacturer is not responsible for any radio or TV interference caused by unauthorized modifications could void the user's authority to operate the equipment.
POWER SOURCE
This unit is designed to be operated on AC/DC.
AC OPERATION
Plug the smaller end of AC power cord into AC jack on unit and the other bigger end into household AC wall outlet. The batteries will be automatically disconnected.
DC OPERATION
Open the BATTERY COMPARTMENT DOOR. Install 6 pcs UM-1/D size batteries (not included) into compartment. Please follow correct polarities as indicated.
CAUTION
- Remove batteries if they are exhausted or long time use.
● Batteries contain chemical substances, so they should be disposed of properly.
BASIC FUNCTION
SWITCHING ON THE UNIT
Set the FUNCTION switch to CD/AUX or RADIO. The power indicator illuminates.
TO ADJUST VOLUME
Rotate the VOLUME CONTROL clockwise or anticlockwise to increase or decrease volume.
USING THE RADIO
TUNING IN RADIO STATIONS
- Move the FUNCTION switch to RADIO position.
- Slide the BAND switch to select the desired wave band: AM, FM, FM ST..
- Tune to desired station by rotating the TUNING KNOB.
- Adjust VOLUME CONTROL to desired volume level.
-
Extend TELESCOPIC ANTENNA to its full length if you are listening to FM broadcasting.
Gently rock the unit back and forth to get the best reception when you are listening to AM programme, or place the unit in an open location.
Note: The FM STEREO indicator will be on when you are receiving FM stereo programme. -
Turn off the radio by switching the FUNCTION switch to "TAPE" position
USING THE CASSETTE
UNDERSTANDING THE BUTTONS
RECORD - Press to record from the radio or CD player.
PLAY - Press to play cassettes.
REWIND - From stop mode, press to rewind the tape toward the beginning.
F.FWD - From stop mode, press to advance the tape toward the end.
STOP/EJ. - Press to stop current tape activity or to open the cassette compartment door when no buttons are active.
PAUSE - Press to interrupt tape play or record mode. Press the second time to resume tape play or tape record mode.
PLAYING A CASSETTE TAPE
- Slide the FUNCTION switch to TAPE position.
- Press STOP/EJ. Key to open the cassette compartment door.
- Insert cassette tape into the compartment with the open edge facing up and the full reel on the right.
- Close the door securely.
- Press REWIND or F.FWD to move tape to the desired starting point.
- Press PLAY key to begin playing the tape.
- Adjust the volume to your desired listening level.
AUTOMATIC STOP FEATURE
When the cassette deck is operating in play or record mode and the end of the tape is reached, the unit automatically shuts itself off and returns all buttons to the off position.
- Load a blank tape into the tape compartment and close the door.
- Set the FUNCTION switch to RADIO; Tune to required station by rotating the TUNING KNOB.
- Press RECORD key to begin recording. RECORD key and PLAY key go down simultaneously.
- Press STOP/EJ. Key to end recording.
- To hear what you recorded, follow instructions in PLAYING A CASSETTE TAPE.
NOTE: PAUSE FOR A MOMENT - Using the PAUSE key on the cassette deck instead of the STOP/EJ. Key to momentarily interrupt recording gives you a much clear recording. Press PAUSE key again to resume recording.
RECORDING FROM CD
- Insert a blank cassette tape into the tape compartment.
- Slide the FUNCTION switch to CD/AUX position.
- Load a CD and select the desired track you want to record.
- Press CD PLAY/PAUSE button to start playback. Press RECORD key to begin recording. RECORD key and PLAY key go down simultaneously.
- Press PAUSE key to interrupt or edit recording. Press it again to resume recording.
- Press STOP/EJ. Key to end recording.
- To hear what you recorded, follow instructions in PLAYING A CASSETTE TAPE.
TYPES OF CASSETTE
Use only good quality cassettes (IEC TYPE 1) for making recordings. May be used to replay other types of cassette but is unable to make proper recording on these more specialized tapes.
The use of C120 cassettes is NOT recommended in this machine.
PROTECTING RECORDING
Normally, anything recorded on the tape is automatically erased when new recording is made. It is possible to protect your recording from accidental erasure by removing the tabs found on the rear of the cassette.

natural_image
Illustration of a cassette tape being inserted into a slot, showing magnified detail (no text or symbols)ERASE TAB FOR SIDE "A"
When the cassette is held with the recorded side upper-most and exposed tape facing the front, the protective tab will be found on the left rear of the cassette.
All pre-recorded cassette are protected in this way to prevent accidental erasure of the commercial recording. "Protected" cassette will prevent the record button from being operated. If at any time you attempt to record and find that this button will not depress, never force the mechanism or it may be damaged. Check that a cassette has been loaded and that tab has not been removed. Recording on a cassette from which the tabs have been removed can be done by covering the tab openings with a piece of adhesive tape.
CARE OF CASSETTE MECHANISM
Gently clean the tape head and pinch wheel/capstan assemblies after every 10 hours of using the unit. A range of cassette care products are available.

The erase head and record/play head and the surface of the pinch roller are delicate and must not be touched with metal objects such as screwdrivers. You may find it easier to clean the assembly by pressing the PLAY button to bright head and pinch roller into view. Be sure to press the STOP button after cleaning the mechanism.
Damage to the pinch wheel can occur if the unit is left in PLAY mode with the power switch off. Under no circumstances should you attempt to lubricate any part of the machine.
USING THE CD
Discs for Playback
This system can playback all digital audio CD, finalized digital audio CD-Recordable (CD-R) discs, finalized digital audio CD-Rewritable (CD-RW) discs, CD-DA format digital audio CD, finalised digital audio CD-R/CD-RW discs.
LOADING A DISC
- Set the FUNCTION switch to CD/AUX position.
- Open the CD door by pressing CD door up lower right corner.
- Place an audio CD into the disc tray with the label side facing up.
- Close the CD door, the total number of tracks will appear in the display after several seconds.
- To remove the CD, lifting CD door up to open CD compartment lid, grasp the CD by its edges, and carefully take it out.
Note:
- To ensure good system performance, wait until the disc tray completely reads the disc before proceeding.
- If no disc loaded into the compartment, or the disc is place upside down or unreadable, the display will show "NO".
PLAYING A DISC
- Press CD PLAY/PAUSE button to start playback. The playback starts from track 1, the CD PLAY/PAUSE indicator inside the right lower corner of the display illuminates.
- To interrupt playback, press the CD PLAY/PAUSE button. The CD PLAY/PAUSE indicator flashes on and off.
- To resume playback, press the CD PLAY/PAUSE button again, the CD PLAY/PAUSE indicator becomes steady on the display.
- To stop playback, press the CD STOP button, the total number of tracks appears in the display.
SELECTING A DESIRED TRACK/PASSAGE
To select a desired track
- Press CD SKIP/SEARCH FORWARD (NEXT)/BACKWARD button repeatedly in stop mode or during playing until the desired track appears on the display.
- Press CD PLAY/PAUSE button to start play.
To search for a particular passage during playback (track scanning at high speed)
Press and hold CD SKIP/SEARCH BACKWARD/FORWARD button to scan the current playing track at high speed until desired point (passage), then release the button.
Playback will start again from this point.
PROGRAM TRACKS
Program tracks of disc are possible when playback is stopped. Up to CD 20 tracks can be stored in the memory in any order.
- Press "PROGRAM" button, display will show "0 1" and flashing, Program indicator will light up and flash.
- Press CD SKIP/SEARCH FORWARD/BACKWARD button to select a track number.
- Press the "PROGRAM" button to store the track number, display will show "1".
- “02” flashes again. Repeat step (3) to (4) to program other desired tracks.
- Press "PROGRAM" button once more after 20 track in programmed and all the programmed track numbers will be shown one by one
- Press CD PLAY/PAUSE button, playback will start from the first programmed track.
- You can press CD SKIP/SEARCH FORWARD/BACKWARD button to select the track number in memory.
- Press the STOP button to stop program playback.
To Erase the Memory (Program)
To clear the program, you may have two ways:
- Press CD STOP button when the disc stopped, or
- Open the CD compartment lid, program will be erased.
REPEAT
You can play one track or all tracks on the disc repeatedly.
To Repeat a Single Track
- Press CD REPEAT button once in play, CD REPEAT indicator will flashes on and off. The current track will be played over and over again till you press STOP button.
- To cancel repeat play, press CD REPEAT button twice. CD REPEAT indicator disappears.
To repeat all the Tracks
- Press CD REPEAT button twice in play, CD REPEAT indicator becomes steady on, all tracks on the disc will be played over and over again till you press STOP button.
- To cancel repeat play, press CD REPEAT button once. CD REPEAT indicator disappears.
Note: Repeat function also can be done in stop mode.
RANDOM PLAY
Press the CD RANDOM button in Play/Stop mode, the current track number and “- - ” will flashing again and again. And then press the CD PLAY/PAUSE button. Playback will start from any one track (not in the order of the disc). To cancel the RANDOM, press the RANDOM button again.
SPECIFICATIONS
GENERAL
Power Requirement AC 127V \~ 60Hz
DC 9V U M-1 x 6 PC S
Power consumption
AC
15
Watts
Weight
Approx.
2.2
kg
Dimensions
Approx. 300mm (W) x 235mm (D) x 155mm (H)
Operation temperature
^ C +5 +35 ^ C
RECEIVER SECTION
Receiving Bands
AM/FM
Tuning Range
AM
530
1600
FM 88 - 108 MHz
COMPACT DISC SECTION
Optical Pickup
3
Beam
Laser
Frequency Response
100Hz
-
16KH
Z
CASSETTE SECTION
Recording System 2 Tracks 2 Channel (Stereo)
Bias System
DC
Bias
Frequency Response 125 - 6.3 K Hz
Wow and
0.35%
WRMS
(JIS)
AUDIO SECTION
Power output
Maximum
1.2
Watts
x
2
ACCESSORIES
Instruction
1
A
C
C
0
r
d
1
Note: Specifications are subject to change for continuous improvement, therefore, we reserve the rights to those modifications without prior notice.
ESD Remark:
In case of malfunction due to electrostatic discharge, just reset the product (reconnect of power source may be required) to resume normal operation.



- Portable CD Player with AM/FM Stereo Radio
- MODEL: NPB-241
- IMPORTANT NOTES
- INTRODUCTION
- WARNING
- CAUTION
- DANGER
- NAMES OF CONTROLS
- CAUTION:
- Note:
- POWER SOURCE
- AC OPERATION
- DC OPERATION
- BASIC FUNCTION
- SWITCHING ON THE UNIT
- TO ADJUST VOLUME
- USING THE RADIO
- TUNING IN RADIO STATIONS
- USING THE CASSETTE
- UNDERSTANDING THE BUTTONS
- PLAYING A CASSETTE TAPE
- AUTOMATIC STOP FEATURE
- RECORDING FROM CD
- TYPES OF CASSETTE
- PROTECTING RECORDING
- CARE OF CASSETTE MECHANISM
- USING THE CD
- Discs for Playback
- LOADING A DISC
- PLAYING A DISC
- SELECTING A DESIRED TRACK/PASSAGE
- To select a desired track
- To search for a particular passage during playback (track scanning at high speed)
- PROGRAM TRACKS
- To Erase the Memory (Program)
- REPEAT
- To Repeat a Single Track
- To repeat all the Tracks
- RANDOM PLAY
- SPECIFICATIONS
- GENERAL
- RECEIVER SECTION
- COMPACT DISC SECTION
- CASSETTE SECTION
- AUDIO SECTION
- ACCESSORIES
- ESD Remark:
Brand : Naxa
Model : NPB-241
Category : CD Player