Relax Model 2010 - Fitness Equipment Joy Sport - Free user manual and instructions
Find the device manual for free Relax Model 2010 Joy Sport in PDF.


| Product Type | Massage Chair (Fitness Equipment) |
| Model | Relax Model 2010 |
| Brand | Joy Sport |
| Dimensions (L x W x H) | 75 x 65 x 110 cm |
| Weight | 45 kg |
| Power Supply | AC 220-240V, 50/60 Hz |
| Power Consumption | 120 W |
| Main Functions | Shiatsu Massage, Kneading, Tapping, Heating, Zero Gravity Recline |
| Number of Massage Programs | 6 automatic programs |
| Massage Zones | Neck, Back, Lumbar, Thighs, Calves |
| Adjustable Positions | Reclining backrest, adjustable footrest |
| Remote Control | Wired remote with LCD display |
| Material | PU Leather, Steel frame |
| Safety Features | Overheat protection, automatic shut-off after 15 minutes, child lock |
| Cleaning & Maintenance | Wipe with a damp cloth using mild soap; do not use abrasive cleaners |
| Spare Parts Availability | Replacement cushions, remote control, power cord available via service centers |
| User Capacity | Up to 150 kg |
| Certifications | CE, RoHS |
| Warranty | 2 years |
Frequently Asked Questions - Relax Model 2010 Joy Sport
User questions about Relax Model 2010 Joy Sport
0 question about this device. Answer the ones you know or ask your own.
Ask a new question about this device
Download the instructions for your Fitness Equipment in PDF format for free! Find your manual Relax Model 2010 - Joy Sport and take your electronic device back in hand. On this page are published all the documents necessary for the use of your device. Relax Model 2010 by Joy Sport.
USER MANUAL Relax Model 2010 Joy Sport
natural_image
Black and white photo of a standard treadmill with control panel and side arm (no visible text or symbols)Joy Sport Importeur
Fitness-Import
Timmermannsweg 46
5813 AP Ysselsteyn (LB)
info@joysport.nl
www.joysport.nl
Geachte klant,
5813 AP Ysselsteyn (LB)
info@joysport.nl
www.joysport.nl
Voltage:220V(50HZ of 60HZ)
Snelheid: 0.8--16(km/h)
Afstandsinstelling: 0000.000—9999.999(km)
Tijdsinstelling: 00:00--99:59(min:sec)
3 INTRODUCTIE
natural_image
Close-up of a hand operating a treadmill frame with a curved handle (no visible text or symbols)
natural_image
Close-up of hands assembling a mechanical component (no visible text or symbols)natural_image
Close-up of a hand using a tool to connect wires on a mechanical component (no visible text or symbols)natural_image
Technical illustration of a mechanical device with an inset close-up showing internal components (no text or symbols visible)-
Weerstand: Controleer af en toe de weerstand tussen band en plaat. De band moet met de voet op de plaat gedraaid kunnen worden.
-
Adjust flab or tight belt All running belt are adjusted before the treadmill leaving the factory or after assembling, but after a period of time of use, the belt will become flab, for example: the user will have a feeling of stop when they are using it. When this kind of phenomenon appears, adjust the running belt adjustable bolts clockwise and make the two sides equable, adjust them semicycle once This circumstance is out of guarantee to keep it good repair. The user adjusts it by oneself, the flabby belt will cause slippage between belt and roller, but more tightly belt perhaps harms the motor, roller and itself.
9. Stellen loopband.
natural_image
Pure mechanical diagram showing two vertical supports with rotational arrows, labeled 'c图' (Figure 3), no text or symbols beyond the label.natural_image
Black and white photo of a standard treadmill with adjustable arms and control panel (no visible text or symbols)Joy Sport Importer
Fitness-Import
Timmermannsweg 46
5813 AP Ysselsteyn (LB)
info@joysport.nl
www.joysport.nl
Dear customer,
We want to thank you for having chosen a JOY SPORT product, and wish you a lot of fun and success during training with your JOY SPORT exercisers.
Please note and follow the enclosed safety and assembly instructions carefully.
If you have questions please do not hesitate to contact us.
Guarantee,
This guarantee covers all manufacturing and material flaws on JOY SPORT products purchased from an authorized JOY SPORT dealer for a period of 12 months from purchase.
If you wish to make a claim under the guarantee, JOY SPORT shall be entitled to repair or replace the defective unit or part at its discretion.
The owner of the unit must pay for the transport costs and any dealer's workshop costs.
To make a claim under the guarantee, take your guarantee card to your dealer.
The dealer will then take the necessary action.
If this is not possible, contact your national JOY SPORT importer.
The following are not covered by the guarantee: normal wear and tear and the consequences of improper treatment or damage caused by the purchaser or third persons and faults which are due to other circumstances.
Claims may not be made under the guarantee if modifications have been made to the original construction or equipment or if JOY SPORT original parts were not used to repair the unit.
In no event the manufacturer shall be liable for incidental or consequential losses, damages or expenses in connection with exercise products.
Fitness-Import
Timmermannsweg 46
5813 AP Ysselsteyn (LB)
info@joysport.nl
www.joysport.nl
SAFETY CONSIDERATION
Special Warning: The treadmill must be folded and locked before moving or carrying it, don't touch the safe lock when you carry the treadmill. Carrying machine is strictly prohibited as it is unfolded or unlocked. Attention: Please read this manual carefully before you use this treadmill and notice the follows:
The treadmill should be put inside of room and avoid aquosity, water on the treadmill is prohibited and any object is forbidden to be put on or inserted into treadmill.
The ground should be level, confirm it is steady to put the treadmill, all feet must land before use.
The plug must land, try hard to avoid using other electric apparatuses on the same supply line.
Wear sportswear and appropriate sports shoes while using the treadmill, barefeet is forbidden while using the machine.
Do not allow two or more persons on the treadmill at the same time, and the machine's biggest supporting value is 150kg.
Do not start the machine when you are standing on the running belt, you should stand on the regulars and grip the armrests before doing exercises. You can exercises on the machine when it is started normally.
At you feel incompatibility any or have abnormal condition in using, press STOP or pull out SAFE KEY or adopt the emergency method: While you are griping the handles and shoring up the body, put your feet on the regulars, and get off the treadmill from one side.
The sensor of heart rate is not a medical apparatus, a lot of reasons can be caused and measured inaccurately, it is only for reference to measure the result.
The heart disease patient should not use the treadmill alone, and should not use the automatic speed change function, either.
Please confirm the speed according to your physical condition. The patient
should use the machine under the direction of the doctor.
Please shut off the treadmill power in time after finishing using it.
● The treadmill should be laid in the comparatively spacious place, forbid put
ting incidentals around, guarantee that there is the security area of 2m *1m.
The children should not use the machine alone, they should under the ward of the adult if they want to use.
Please pluck the power cord and put it on the place where the children can
not find, in order to avoid the children starting the machine accidentally.
Overload operation will cause the motor and controller become damaged, and make the bearing, the running board and the running board ageing quickly, so we must avoid long time overload operation.
The dust covered on the sensor will affect its sensitivity, so we must reduce the dust in our house.
Static electricity will disturb the operation of the electricity table, even damage it, so we must keep the room wet in winter.
Do not touch any parts which are moving
The runner must keep the body center of gravity on the forward 1/3 or 1/2 part of the running belt when running. If we do this, we will operate the electricity table easily. The location of the runner must near the front of the machine to avoid dangerous.
Long hair user should tie the hair to avoid the accidents occur when we are running.
TECHNOLOGICAL DATA
HORSE POWER:2.5HP PEAK 3HP
Input Voltage:220V(50HZ or 60HZ)
Speed scope:0.8--16(km/h)
Distance scope:0000.000—9999.999(km)
Time scope:00:00--99:59(min:sec)
THE INTRODUCTION OF THE PRODUCT
This a kind of luxury home use motorized treadmill. It possesses the functions as follows:
- With three kinds of manual programs and five kinds of automatic variable speed running programs.
1 With measuring heart and adjusting speed function by griping.
2 With four direct speed keys to choose.
INSTALLATION GUIDE:
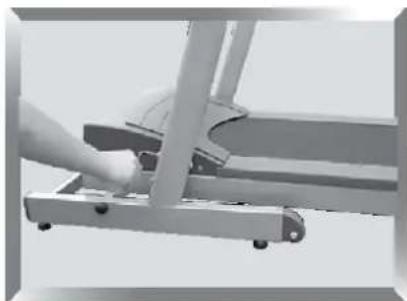
ASSEMBLE STEPS: 1 Stop key
natural_image
Close-up of a hand operating a metal frame with a curved handle (no text or symbols visible)
natural_image
Close-up of hands adjusting a cable or connector (no visible text or symbols)- Insert the connect line with the outlet of mainframe, and then tighten the poling and main frame with panhead bolt with M8×16.

natural_image
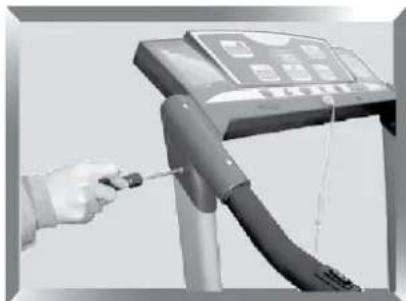
Close-up of a hand holding a cable with a small electronic component (no visible text or symbols)- Connect the electronic meter and armrest with self-tapping bolts M4×12.
- Plug the air outlet into electronic meter, connect pulse sensor and the plug of speed sensor. (Note: Must aim at the gap of the plug, then plug it tightly.)
natural_image
Hand using a tool to lift a flexible electronic device (no visible text or symbols)- Fix the covers of gage stand with bolts M4×12.
THE PARTS NAME&FUNCTION OF CONTROL METER

1 When the treadmill is working, first press of this key will make the machine stop running, keep all the data; Second press of this key will make all the data become zero.
2 Start key When the treadmill is in stop state, the treadmill begins to work if we press this key; When the machine is in set state, press this key, all the revised data is confirmed and the machine begins to work.
3 Setup key Make the electronic monitor enter manual program forms or automatic program agility run forms.
4 Jack of safe key
The treadmill will stop working when you pull out the safe key.
5 Slow key When the machine runs, press this key, the speed will become slow; in setup state, press this key, the amended data will decrease.
6 Fast key
When the machine runs, press this key, the speed will become fast; in setup state, press this key, the amended data will increase.
7 Four kinds of speed direct choose keys: We can directly choose the speed that is suitable for us.
8 Window of calorie
-
Window of pulse
-
Window of time
-
Window of speed
-
Window of distance
1 Timing switch
2 Handle pulse sensor
DEBUGGING GUIDE
1 After finish assembling, insert safe key and pulse sensor into the corresponding jack. 2 Before start, checking whether the voltage is normal, 3-core cable has a good earth and pull the running belt to check whether it moves well and if there is exceptional noise. 3 Switch on the power and then all data in the windows should be zero, the running belt is at rest state, press start key, the belt will run at lower speed of 0.8km/h, here observing if every part of treadmill is normal. 4 Press ‘fast’ key and ‘slow’ key to check whether they are normal. 5 Press ‘stop’ key to check whether the machine stop running normally.
FOLD OPERATION

natural_image
Exterior view of a treadmill with a close-up inset showing internal components (no text or symbols visible)Tread the fold locking switch, and set down the main frame slowly.
OPERATING GUIDE
-
Switch on power: Insert three poles plug into socket (note: it must have a complete earthing); and insert safe key, then switch on power, the monitor will moo, and all data become zero, here the treadmill is in stop state.
-
Direct start: Press start key when the treadmill is in stop state and all showed data are zero, it run at the lowest speed; press fast key, the speed will increase; press slow key, the speed will decrease.
-
Program start: Press the program setup key continuously, there are 8 kinds of programs to choose: the former three ones need manual programs, the other 5 kinds (P1-P5) are automatic programs. Under the first and second form are time and distance setup, press the slow and fast key to amend the aim data of time and distance when the relevant windows flicker (if the aim data is zero, the data is not set), if we press the start key, the set data will be accepted, and will be decreased after starting the machine, the console will be moo when the data become zero, then the data will be increased. Under the third form is pulse control speed setup: at this time, the pulse window begin to flicker, the aim data is 100 times per minute, the data of speed is 2.8km/h, press slow and fast key can amend the aim data of pulse(if the pulse aim data is not changed, it will be considered that this function is not set). At this time, press the start key, the data will be accepted and adjust the speed according to compare the runner's pulse with set pulse, thereby make the runner's fact pulse keep on the aim data. Note: many factors influence the testing of pulse, so the testing data is for reference only. The max speed of this mode is 6km/h, and there is no use of direct speed choice key. The scale of pulse control speed is from 50 times per minute to 160 times per minute. Under the condition of pulse control speed is not set, if one or two of time ad distance is set, after starting can speed up, speed down and use the direct speed choice key;
Under the condition of pulse control speed is set, if one or two of time ad distance is set, after starting can use fast key speed up to 6km/h and can't use the direct speed choice key.
P1-P5 is automatic program forms, sporters can choose the form of motion fit for themselves according to icons. Press the start key, the treadmill begin to run, the speed will change automatically according to chosen form every 200 metres.
- Slow and fast key It is manual adjust speed keys, we can change the speed by pressing the two keys. The handle adjust speed switch has the same function as this.
5 Pause and stop During treadmill runs, first press stop key, the treadmill will stop and keep all data, if here press start key, the treadmill will run as per original state; if press stop key in second time, all data in the windows will become to zero.
6 Handle pulse sensor Two hands hold the pulse sensor, pulse window display the instant pulse. (The data has definite differences according to individual habitus, this data is only for reference.)
- Overall mileage window: Press the ‘SET’ key exceeds 3 seconds when the machine is in the stop state. The overall mileage will be appeared in the time and distance windows, showing the distance scope of 0000.000---9999.999km, press ‘stop’ key to exit.
DAILY MAINTENCE
-
Running board and running belt
-
Brief: motorized treadmill use imported running belt, it's with lower friction coefficient, higher intensity of tension, the running board is specially with double shock absorption system, it's special smoothness and abrasion prevention.
-
Clean Keep cleanness of treadmill, it can prolong treadmill's life, please usually clean the exposed running board both side of the running belt and foot board. Clean the running belt by dipped soap water; please note not to let water flow into machine and under the running belt.
-
Lubricating The running board/belt must be lubricated by special lubrication after a period of use, suggestion: Treadmill works no more than 3 hours every week. It's lubricated one time every half of year. Treadmill works 3 to 6 hours every week. It's lubricated one time every 3 months. Treadmill works more than 6 hours every week. It's lubricated one time every month. Superfluous lubrication is not ok, it's not good with more lubrication, please remember: reasonable lubricating is a important factor for prolonging treadmill's life!
-
Clean Please eliminate the dust regularly after a period of use, to keep the power panel and the head of the sensor clean.
-
Evaluation of friction The friction between running belt and board will be increased as dust or reduced lubrication, this perhaps can harm motor, controller increased friction is with following character:
(1) When shut off power of treadmill, the running belt can't be moved or it's difficult for user to move by foot.
(2) Causing harm of motor of controller, open circuit and the fuse blows.
- Adjust flab or tight belt All running belt are adjusted before the treadmill leaving the factory or after assembling, but after a period of time of use, the belt will become flab, for example: the user will have a feeling of stop when they are using it. When this kind of phenomenon appears, adjust the running belt adjustable bolts clockwise and make the two sides equable, adjust them semicycle once This circumstance is out of guarantee to keep it good repair. The user adjusts it by oneself, the flabby belt will cause slippage between belt and roller, but more tightly belt perhaps harms the motor, roller and itself.
6. Adjust slanted running belt
All running belt are adjusted before the treadmill leaving the factory, but after a period of time of using, the belt will become slanting, it may caused by the following reasons:
(1) The engine frame is not steady.
(2) The user's feet are not in the middle of the running belts when they are using it.
(3) The force on the feet is not even. If the running belt is slanted by the user, it can return to normal after running without anyone for a few minutes.
If the running belt can not return to normal by itself, we can adjust the running belt regulator with the inner hexagon spanner, adjust it semicycle once. If the running belt is near the left side, adjust the left bolt clockwise or adjust the right bolt counter clockwise.(look at picture a) If the running belt is near the right side, adjust the right bolt clockwise or adjust the left bolt counter clockwise.(look at picture b)
7 Adjust flab or tight belt After a period of using, the running belt will become a little longer and give us some feeling of stopping when we are running. When this kind of phenomenon appears, adjust the running belt adjustable bolts clockwise and make the two sides equable, adjust them semicycle once.(look at picture c).Continue to do this until the running belt is not skid or slanted. The adjustment should not exceed 2---3circles every time, and it should not too tight, avoiding the running belt damaged permanently.

natural_image
Pure mechanical diagram showing two vertical supports with rotational arrows below, labeled 'c图' (Figure c), no text or symbols beyond the label.8. Adjust motor belt
All motor belts are adjusted before the treadmill leaving the factory, but after a period of time of use, the belt will become flab, the users adjust it by oneself.

Adjusting steps:
1 Loosen the screw of the motor.
2 Turn the adjustment screw in order with spanner.
3 Adjust it until the belt doesn't slip.
4 After adjusting, locking all the bolts.
LIST OF ITEM IN THE PACKAGE:
| NO | DESCRIPTION UNIT QUANTITY | ||
| 1 | Mainframe SET 1 | ||
| 2 | Poling SUIT 1 | ||
| 3 | Electrical Head PC 1 | ||
| 4 | Panhead Bolt M8×16 PC 4 | ||
| 5 | Self-tapping Screw M4×12 PC 6 | ||
| 6 | Plastic Lump PCS 2 | ||
| 7 | Safety Switch PC 1 |
| 8 Special Purpose Tools SUIT 1 | ||
| 9 Specification PAD 1 | ||
| 10 Silicon Oil BOTTLE 1 |
COMMON FAULT AND THE PROCESSING METHOD
| Fault Symptom Possible Causes | Solution | |
| When turning on switch power, the treadmill can not display when the electric power is connected. | 1. The attaching plug is not inserted well. 2 .The electrical head's attaching plug is not inserted well. | 1. Insert it again. 2. Connect it once more. |
| All the display windows ficker. | The safety switch is not settled well or damaged. | Put the safety switch on the correct place or mend it. |
| It stops by itself when it is working. And all the displays are normal. | The automatic system protection. | 1. Press the ‘STOP’ key, then start it. 2 .Turn off the power switch, and start it in one minute. |
| The running belt can not work normally, and it has buzz, with displaying normally. | The enter voltage is too low. | Please input the voltage according to the demand. |
| It is regular when it is running by itself ,and disordered when someone walking on it. | Check whether the running belt is too loose. | Please adjust the running belt according to the right method. |
| It can not display normally or can not display. | The electrical head can not work because of the external disturbance . | Turn off the power switch, then turn on it in one minute. |
Because of some reasons, the technical parameter may has a little difference. So we can not take it as criterion to measure our state of health, all the data is just as a reference.
Please forgive our not informing the change because of the innovation of the technique.
Please cut off the power immediately and contact with our agents when there is special fault symptom. We will provide you the best service in time.
APPENDIX:PULSE LEVEL TABLES


heatmap
Woman | Age (Year) | Pulse (T/M) | Time(Minute) | Pulse (T/M) | |---|---|---|---| | Low | 120 | 10 | 12 | | Low | 140 | 12 | 14 | | Low | 160 | 14 | 16 | | Low | 180 | 16 | 18 | | Low | 200 | 18 | 20 | | Low | 220 | 20 | 22 | | Normal | 120 | 10 | 12 | | Normal | 140 | 12 | 14 | | Normal | 160 | 14 | 16 | | Normal | 180 | 16 | 18 | | Normal | 200 | 18 | 20 | | Normal | 220 | 20 | 22 | | High | 120 | 10 | 12 | | High | 140 | 12 | 14 | | High | 160 | 14 | 16 | | High | 180 | 16 | 18 | | High | 200 | 18 | 20 | | High | 220 | 20 | 22 | The chart is a heatmap with rows labeled 'Age (Year)' and columns labeled 'Time(Minute)'. The legend indicates 'Low' to 'High' pulse intensity. The values in the heatmap are estimated based on the grid cells.
heatmap
Man | Time (Minute) | Pulse (TM) | Pulse (TM) | | :--- | :--- | :--- | | 8 | 220 | Low | | 10 | 200 | Little low | | 12 | 180 | Normal | | 14 | 160 | Little high | | 16 | 140 | High | | 18 | 120 | High | | 20 | 100 | High | | 22 | 80 | High |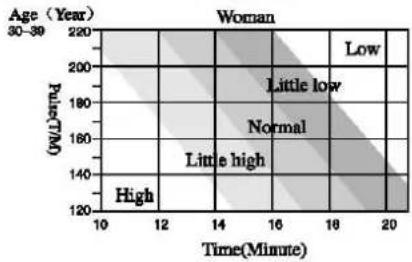
heatmap
Age (Year) Woman 30-39 Time(Minute) 220 200 180 160 140 120 10 Age (Year) Woman Low Little low Normal Little high High Time(Minute) 16 18 20 10 Age (Year) Woman Low Little low Normal Little high High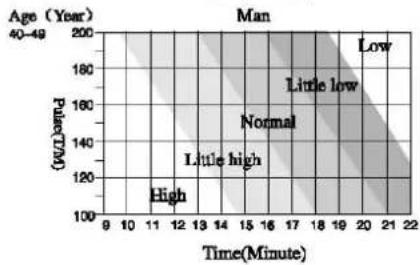
scatter
| Time(Minute) | Pulse(TM) | Category | | ------------ | --------- | ------------ | | 10 | 100 | High | | 12 | 120 | High | | 14 | 140 | Little high | | 16 | 160 | Little high | | 18 | 180 | Normal | | 20 | 200 | Low | | 22 | 200 | Low |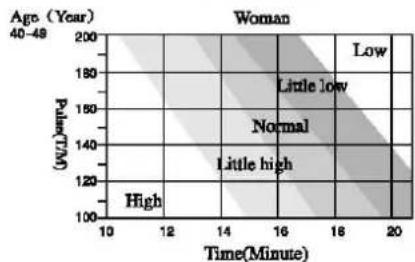
heatmap
Woman | Age (Year) | Time(Minute) | Frequency | |---|---|---| | 40-49 | 10 | High | | 40-49 | 12 | High | | 40-49 | 14 | High | | 40-49 | 16 | High | | 40-49 | 18 | High | | 40-49 | 20 | High | | 40-49 | 20 | Low | | 40-49 | 20 | Normal | | 40-49 | 20 | Little low | | 40-49 | 20 | Little high | | 40-49 | 20 | High |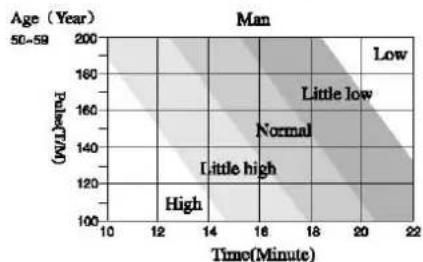
scatter
Man | Age (Year) | Relative Frequency (%) | Time (Minute) | |---|---|---| | Low | 160 | 18 | | Little low | 150 | 17 | | Normal | 145 | 16 | | Little high | 120 | 13 | | High | 100 | 12 |

heatmap
Man | Age (Year) | Pulse (70h) | Time (Minute) | Pulse (70h) | |---|---|---|---| | 60+ | 200 | 10 | 100 | | 60+ | 180 | 12 | 120 | | 60+ | 160 | 14 | 140 | | 60+ | 140 | 16 | 160 | | 60+ | 120 | 18 | 180 | | 60+ | 100 | 20 | 200 | | Low | 200 | 22 | 100 | | Low | 180 | 18 | 120 | | Low | 160 | 16 | 140 | | Low | 140 | 14 | 160 | | Low | 120 | 12 | 180 | | Low | 100 | 10 | 200 | The chart displays a heatmap with rows labeled 'Low' to 'High' and columns labeled 'Time(Minute)' to 'Age'. The color scale indicates 'Low' to 'High' in the top-right corner. The legend is embedded as a legend entry for the heatmap.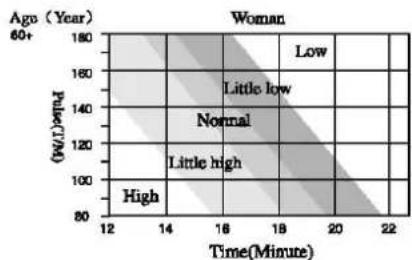
heatmap
Woman | Age (Year) | Time(Minute) | Pulse(TM) | Pulse(TM) | |---|---|---|---| | 60+ | 12-14 | 80 | 180 | | 60+ | 14-16 | 100 | 160 | | 60+ | 16-18 | 120 | 140 | | 60+ | 18-20 | 140 | 120 | | 60+ | 20-22 | 160 | 100 | | 60+ | 22-24 | 180 | 80 | Low: 180, Low: 160, Low: 140, Low: 120, Low: 100, Low: 80 Little low: 180, Normal: 160, Normal: 140, Normal: 120, Normal: 100, Normal: 80 High: 180, High: 160, High: 140, High: 120, High: 100, High: 80 Middle: 180, Middle: 160, Middle: 140, Middle: 120, Middle: 100, Middle: 80 Right side of the grid: Low: 180, Low: 160, Low: 140, Low: 120, Low: 100, Low: 80 The chart displays a diagonal gradient from top-left to bottom-right. The color scale indicates pulse duration in minutes.Note: The pulse testing numeral value is for reference only, if the pulse is a little high, adjusting it by pulse control; speed function of this machine.
The numeral value can choose from the chart according to age and exercise time.
- Joy Sport Importeur
- Geachte klant,
- INTRODUCTIE
- Stellen loopband.
- Joy Sport Importer
- Dear customer,
- Guarantee,
- SAFETY CONSIDERATION
- TECHNOLOGICAL DATA
- THE INTRODUCTION OF THE PRODUCT
- INSTALLATION GUIDE:
- ASSEMBLE STEPS: 1 Stop key
- THE PARTS NAME&FUNCTION OF CONTROL METER
- DEBUGGING GUIDE
- FOLD OPERATION
- OPERATING GUIDE
- DAILY MAINTENCE
- Adjust slanted running belt
- Adjust motor belt
- Adjusting steps:
- LIST OF ITEM IN THE PACKAGE:
- COMMON FAULT AND THE PROCESSING METHOD
Brand : Joy Sport
Model : Relax Model 2010
Category : Fitness Equipment