SOM-6833N8-S8A1 - Motherboard Advantech - Free user manual and instructions
Find the device manual for free SOM-6833N8-S8A1 Advantech in PDF.

| Product Type | COM Express Type 6 Basic Module |
| Dimensions | 125 mm x 95 mm |
| Weight | Approx. 100 g |
| Power Supply | 12V DC, 60W typical |
| CPU | Intel Core i7 vPro (8th Gen) |
| Memory | 2x DDR4 SO-DIMM, up to 32GB |
| Storage | 1x SATA III, 1x M.2 Key M (NVMe) |
| Ethernet | 2x Gigabit Ethernet (Intel i210) |
| USB Ports | 4x USB 3.0, 2x USB 2.0 |
| Display Interfaces | VGA, LVDS, 2x DP++ (via carrier) |
| Expansion | PCIe x16, PCIe x4, LPC, SMBus |
| Operating Temperature | 0°C to 60°C |
| Certifications | CE, FCC, RoHS |
| Maintenance | Clean with a soft, dry cloth; avoid liquids |
| Safety Precautions | Handle with ESD protection; disconnect power before servicing |
| Spare Parts & Repairability | Contact Advantech support for replacement modules; no user-serviceable parts |
| General Information | Designed for embedded and industrial applications |
Frequently Asked Questions - SOM-6833N8-S8A1 Advantech
User questions about SOM-6833N8-S8A1 Advantech
0 question about this device. Answer the ones you know or ask your own.
Ask a new question about this device
Download the instructions for your Motherboard in PDF format for free! Find your manual SOM-6833N8-S8A1 - Advantech and take your electronic device back in hand. On this page are published all the documents necessary for the use of your device. SOM-6833N8-S8A1 by Advantech.
USER MANUAL SOM-6833N8-S8A1 Advantech
natural_image
Illustration of four electronic circuit boards with white outlines on a purple background, no text or symbols present.SOM-6833
CPU Computer on Module
Copyright
The documentation and the software included with this product are copyrighted 2024 by Advantech Co., Ltd. All rights are reserved. Advantech Co., Ltd. reserves the right to make improvements in the products described in this manual at any time without notice. No part of this manual may be reproduced, copied, translated, or transmitted in any form or by any means without the prior written permission of Advantech Co., Ltd. The information provided in this manual is intended to be accurate and reliable. However, Advantech Co., Ltd. assumes no responsibility for its use, nor for any infringements of the rights of third parties that may result from its use.
Acknowledgments
AMD is a trademark of AMD Corporation.
Microsoft Windows and MS-DOS are registered trademarks of Microsoft Corp.
All other product names or trademarks are properties of their respective owners.
Product Warranty (2 Years)
Advantech warrants the original purchaser that each of its products will be free from defects in materials and workmanship for two years from the date of purchase.
This warranty does not apply to any products that have been repaired or altered by persons other than repair personnel authorized by Advantech, or products that have been subject to misuse, abuse, accident, or improper installation. Advantech assumes no liability under the terms of this warranty as a consequence of such events.
Because of Advantech's high quality-control standards and rigorous testing, most customers never need to use our repair service. If an Advantech product is defective, it will be repaired or replaced free of charge during the warranty period. For out-of-warranty repairs, customers will be billed according to the cost of replacement materials, service time, and freight. Please consult your dealer for more details.
If you believe your product to be defective, follow the steps outlined below.
-
Collect all the information about the problem encountered. (For example, CPU speed, Advantech products used, other hardware and software used, etc.) Note anything abnormal and list any onscreen messages displayed when the problem occurs.
-
Call your dealer and describe the problem. Please have your manual, product, and any helpful information readily available.
-
If your product is diagnosed as defective, obtain a return merchandise authorization (RMA) number from your dealer. This allows us to process your return more quickly.
-
Carefully pack the defective product, a completed Repair and Replacement Order Card, and a proof of purchase date (such as a photocopy of your sales receipt) into a shippable container. Products returned without a proof of purchase date are not eligible for warranty service.
-
Write the RMA number clearly on the outside of the package and ship the package prepaid to your dealer.
Part No. 2006683300 Edition 1
Printed in Taiwan April 2024
Declaration of Conformity
CE
This product has passed the CE test for environmental specifications when shielded cables are used for external wiring. We recommend the use of shielded cables. This type of cable is available from Advantech. Please contact your local supplier for ordering information.
Test conditions for passing also include the equipment being operated within an industrial enclosure. In order to protect the product from damage caused by electrostatic discharge (ESD) and EMI leakage, we strongly recommend the use of CE-compliant industrial enclosure products.
FCC Class B
This equipment has been tested and found to comply with the limits for a Class B digital device, pursuant to part 15 of the FCC Rules. These limits are designed to provide reasonable protection against harmful interference in a residential installation. This equipment generates, uses, and can radiate radio frequency energy and, if not installed and used in accordance with the instruction manual, may cause harmful interference to radio communications. However, there is no guarantee that interference will not occur in a particular installation. If this equipment does cause harmful interference to radio or television reception, which can be determined by turning the equipment off and on, the user is encouraged to try to correct the interference by one or more of the following measures:
■ Reorient or relocate the receiving antenna.
■ Increase the separation between the equipment and receiver.
■ Connect the equipment into an outlet on a circuit different from that to which the receiver is connected.
- Consult the dealer or an experienced radio/TV technician for assistance.
FM
This equipment has passed FM certification. According to the National Fire Protection Association, work sites are categorized into different classes, divisions, and groups based on hazard considerations. This equipment is compliant with the specifications for Class I, Division 2, Groups A, B, C, and D indoor hazards.
Technical Support and Assistance
- Visit the Advantech website at www.advantech.com/support to obtain the latest product information.
- Contact your distributor, sales representative, or Advantech's customer service center for technical support if you need additional assistance. Please have the following information ready before calling:
– Product name and serial number
– Description of your peripheral attachments
– Description of your software (operating system, version, application software, etc.)
– A complete description of the problem - The exact wording of any error messages
Warnings, Cautions, and Notes
Warning! Warnings indicate conditions that could cause personal injury if not observed!

Caution! Cautions are included to help prevent hardware damage and data loss. For example,

"Batteries are at risk of exploding if incorrectly installed. Do not attempt to recharge, force open, or heat the battery. Replace the battery only with the same or equivalent type as recommended by the manufacturer. Discard used batteries according to the manufacturer's instructions."
Note! Notes provide additional and/or optional information.

Document Feedback
To assist us with improving this manual, we welcome all comments and constructive criticism. Please send all feedback in writing to support@advantech.com.
Safety Precautions - Static Electricity
Follow these simple precautions to protect yourself from harm and the products from damage.
To avoid electrical shock, always disconnect the power from the PC chassis before manual handling. Do not touch any components on the CPU card or other cards while the PC is powered on.
- Disconnect the power before making any configuration changes. A sudden rush of power after connecting a jumper or installing a card may damage sensitive electronic components.
Safety Instructions
- Read these safety instructions carefully.
- Retain this user manual for future reference.
- Disconnect the equipment from all power outlets before cleaning. Use only a damp cloth for cleaning. Do not use liquid or spray detergents.
-
For pluggable equipment, the power outlet socket must be located near the equipment and easily accessible.
-
Protect the equipment from humidity.
-
Place the equipment on a reliable surface during installation. Dropping or letting the equipment fall may cause damage.
-
The openings on the enclosure are for air convection. Protect the equipment from overheating. Do not cover the openings.
-
Ensure that the voltage of the power source is correct before connecting the equipment to a power outlet.
-
Position the power cord away from high-traffic areas. Do not place anything over the power cord.
-
All cautions and warnings on the equipment should be noted.
-
If the equipment is not used for a long time, disconnect it from the power source to avoid damage from transient overvoltage.
-
Never pour liquid into an opening. This may cause fire or electrical shock.
-
Never open the equipment. For safety reasons, the equipment should be opened only by qualified service personnel.
-
If any of the following occurs, have the equipment checked by service personnel:
– The power cord or plug is damaged.
– Liquid has penetrated the equipment.
– The equipment has been exposed to moisture.
- The equipment is malfunctioning, or does not operate according to the user manual.
– The equipment has been dropped and damaged.
– The equipment shows obvious signs of breakage.
-
Do not leave the equipment in an environment with a storage temperature of below -20^ ( -4^ ) or above 60^ ( 140^ ) as this may damage the components. The equipment should be kept in a controlled environment.
-
CAUTION: Batteries are at risk of exploding if incorrectly replaced. Replace only with the same or equivalent type as recommended by the manufacturer. Discard used batteries according to the manufacturer's instructions.
-
In accordance with IEC 704-1:1982 specifications, the sound pressure level at the operator's position should not exceed 70 dB (A).
DISCLAIMER: This set of instructions is given according to IEC 704-1. Advantech disclaims all responsibility for the accuracy of any statements contained herein.
Contents
Chapter 1 General Information ....1
1.1 Introduction .... 2 Table 1.1: Acronyms.... 3
1.2 Functional Block Diagram .... 4 1.3 Product Specifications.... 5
1.3.1 Compliance....5 1.3.2 Feature List....5 Table 1.2: Feature List....5
1.3.3 Processor System....6 Table 1.3: Processor System ....6
1.3.4 Memory....6
1.3.5 Graphics/Audio....6
Table 1.4: Graphics/Audio....6
1.3.6 Expansion Interface .... 7 Table 1.5: PCIe x1.... 7
1.3.7 Serial Bus....7
1.3.8 I/O .... 7 Table 1.6: USB 3.2 (USB Hub).... 8 Table 1.7: USB 3.2 (No USB Hub).... 8 Table 1.8: USB 2.0 (USB Hub).... 8 Table 1.9: USB 2.0 (No USB Hub).... 8 Table 1.10: BIOS.... 9
1.3.9 Power Management.... 11
1.3.10 Environment.... 11
1.3.11 MTBF.... 12
1.3.12 OS Support.... 12
1.3.13 Advantech iManager.... 12
1.3.14 Power Consumption.... 12
Table 1.11:Power Consumption Table (Watts).... 12
1.3.15 Selection Guide w/ P/N.... 13 Table 1.12:Selection Guide w/ P/N.... 13 1.3.16 Packing List.... 13 Table 1.13:Packing List.... 13
1.3.17 Development Board .... 13 Table 1.14: Development Board.... 13 1.3.18 Optional Accessory.... 13 Table 1.15: Optional Accessory.... 13
1.3.19 Schematic Checklists.... 13
Chapter 2 Mechanical Information .....15
2.1 Board Information.... 16 Figure 2.1 Board Chip ID – Front.... 16 Figure 2.2 Board Chip ID – Rear.... 17
2.2 Mechanical Diagrams.... 18 Figure 2.3 Board Mechanical Diagram – Front.... 18 Figure 2.4 Board Mechanical Diagram – Rear.... 18 Figure 2.5 Board Mechanical Diagram – Side1.... 19
2.3 Assembly Diagram.... 20 Figure 2.6 Assembly Diagram.... 20 2.4 Assembly Diagram.... 21 Figure 2.7 CPU Height and Tolerance.... 21
Chapter 3 AMI BIOS.... 23
3.1 Introduction ...... 24
Figure 3.1 Setup Program Initial Screen 24
3.2 Entering Setup 24
3.3 Main Setup.... 25
Figure 3.2 Main Setup Screen.... 25
3.4 Advanced BIOS Features Setup.... 26
Figure 3.3 Advanced BIOS Features Setup Screen.... 26
3.4.1 CPU Configuration.... 27
Figure 3.4 CPU Configuration 27
3.4.2 Power & Performance.... 28
Figure 3.5 Power & Performance 28
Figure 3.6 CPU - Power Management Control.... 29
Figure 3.7 Config TDP Configurations.... 30
Figure 3.8 GT - Power Management Control .... 31
3.4.3 PCH-FW Configuration.... 32
Figure 3.9 PCH-FW Configuration.... 32
Figure 3.10 Firmware Update Configuration 33
3.4.4 Trusted Computing 34
Figure 3.11 Trusted Computing.... 34
3.4.5 ACPI Settings 35
Figure 3.12ACPI Settings.... 35
3.4.6 Embedded Controller.... 36
Figure 3.13Embedded Controller 36
Figure 3.14 Serial Port 1 Configuration 37
Figure 3.15 Serial Port 2 Configuration 38
Figure 3.16 Hardware Monitor.... 39
3.4.7 Serial Port Console Redirection.... 40
Figure 3.17 Serial Port console Redirection.... 40
3.4.8 USB Configuration.... 41
Figure 3.18USB Configuration.... 41
3.4.9 OEM Configuration 42
Figure 3.19OEM Configuration.... 42
3.4.10 Network Stack Configuration 43
Figure 3.20Network Stack Configuration.... 43
3.4.11 Compatibility Support Module Configuration 44
Figure 3.21 Compatibility Support Module Configuration...... 44
3.5 Chipset Setup 45
Figure 3.22Chipset Setup.... 45
3.5.1 System Agent (SA) Configuration.... 46
Figure 3.23System Agent (SA) Configuration 46
Figure 3.24Memory Configuration.... 47
Figure 3.25Graphics Configuration.... 48
Figure 3.26LCD Control.... 49
3.5.2 PCH-IO Configuration.... 50
Figure 3.27PCH-IO Configuration 50
Figure 3.28PCI Express Configuration.... 51
Figure 3.29PCI Express Root Port 2 52
Figure 3.30PCI Express Root Port 3 53
Figure 3.31PCI Express Root Port 4 54
Figure 3.32PCI Express Root Port 7 55
Figure 3.33PCI Express Root Port 9 56
Figure 3.34PCI Express Root Port 10 57
Figure 3.35USB Configuration.... 58
Figure 3.36 Security Configuration.... 59
Figure 3.37HD Audio Subsystem Configuration Settings...... 60
Figure 3.38Seriallo Configuration.... 61
Figure 3.39 Serial IO I2C2 Settings.... 62
Figure 3.40SCS Configuration....63
3.6 Security Chipset.... 64
Figure 3.41 Security Chipset 64
3.6.1 Secure Boot 65
Figure 3.42 Secure Boot....65
3.7 Boot Setup 66
Figure 3.43Boot Setup....66
3.8 Save & Exit....67
Figure 3.44Save & Exit....67
Chapter 4 S/W Introduction & Installation .....69
4.1 Software Introduction ...... 70
4.2 Driver Installation 70
4.2.1 Windows Driver Setup 70
4.2.2 Other OS....70
4.3 Advantech iManager 71
Appendix A Pin Assignment 73
A.1 SOM-6833 Pin Assignment....74
Table A.1: SOM-6833 Pin Assignments 74
Appendix B Watchdog Timer 79
B.1 Programming the Watchdog Timer 80
Table B.1: Programming the Watchdog Timer.... 80
Appendix C Programming GPIO ....81
C.1 GPIO Register....82
Table C.1: GPIO Register 82
Appendix D System Assignments ......83
D.1 System I/O Ports....84
Table D.1: System I/O Ports 84
D.2 Interrupt Assignments 85
Table D.2: Interrupt Assignments.... 85
D.3 1st MB Memory Map....95
Table D.3: 1st MB Memory Map 95
Chapter 1
General Information
This chapter gives background information on the SOM-6833 CPU Computer on Module.
Sections include:
Introduction
Functional Block Diagram
Product Specifications
1.1 Introduction
SOM-6833 series devices conform to COMe R3.1 specifications and are equipped with 12th Gen Intel® Core™ (Alder Lake) processors, which include the i3, N-series and Atom® x7000E series platforms. SOM-6833 is designed for up to 8 CPU cores and yields 60% better CPU performance and improved graphics processing when compared with previous models.
This product supports up to 16GB DDR5 4800MT/s RAM, with IBECC across all SKUs. In addition, it's equipped with onboard eMMC up to 64GB to ensure product stability. Advantech's design supports multiple I/O and display connections including GbE LAN with TSN, one CAN interface, and support for up to 3 independent 4K displays. In addition, the TSN controller enhances communication accuracy. SOM-6833 also provides considerably faster I/O compared to its predecessors. It includes four USB 3.2 Gen2 (10 GT/s) with a USB hub and five PCIe Gen3 (8.0 GT/s), and two SATA 3 connections.
Advantech iManager was developed to satisfy a lot of embedded application requirements including a multi-level watchdog timer, voltage and temperature monitoring, thermal protection and mitigation through processor throttling, LCD backlight on/off and brightness control, and embedded storage for customized data. When combined with Advantech WISE-PaaS/RMM, it enables remote monitoring and control of devices over the Internet, simplifying maintenance tasks. All Advantech COMe modules integrate with iManager and WISE-PaaS/RMM, offering added value for customer applications.
Due to its exceptional performance, low power consumption in embedded platforms, and versatile array of extensions and I/O interfaces, SOM-6833 is well-suited for wireless application design, thermal sensitive design, graphics/media-intensive design, and I/O-intensive applications.
Table 1.1: Acronyms
| Term Definition | |
| AC'97 Audio CODEC (Coder-Decoder) | |
| ACPI | Advanced Configuration Power Interface - standard for implementing power-saving modes in PC-AT systems |
| BIOS | Basic Input Output System - firmware in PC-AT systems that is used to initialize system components before handing control over to the operating system |
| CAN | Controller-area network (CAN or CAN bus) is a vehicle bus standard designed to allow microcontrollers to communicate with each other within a vehicle without a host computer |
| DDI Digital Display Interface - this includes DisplayPort, HDMI/DVI, and SDVO | |
| EAPI | Embedded Application Programmable InterfaceSoftware interface for COM Express® for specific industrial functions- System information- Watchdog timer-I ^2 C Bus- Flat-panel brightness control- User storage area- GPIO |
| GbE Gigabit Ethernet | |
| GPIO General Purpose Input Output | |
| HDA | Intel® High Definition Audio (HD Audio) refers to the specification released by Intel in 2004 for delivering high definition audio that is capable of playing back more channels at higher quality than AC'97 |
| I^2C | Inter Integrated Circuit - 2 wire (clock and data) signaling scheme allowing communication between integrated circuits, primarily used to read and load register values |
| ME Management Engine | |
| PC-AT | "Personal Computer - Advanced Technology" - an IBM trademark term used to refer to Intel-based personal computers in the 1990s |
| PEG PCI Express Graphics | |
| RTC | Real-Time Clock - a battery backed circuit in PC-AT systems that keeps system time and date as well as certain system setup parameters |
| SPD | Serial Presence Detect - refers to serial EEPROM on DRAMs that has DRAM Module configuration information |
| TPM | Trusted Platform Module: chip to enhance the security features of a computer system |
| UEFI Unified Extensible Firmware Interface | |
| WDT Watchdog Timer | |
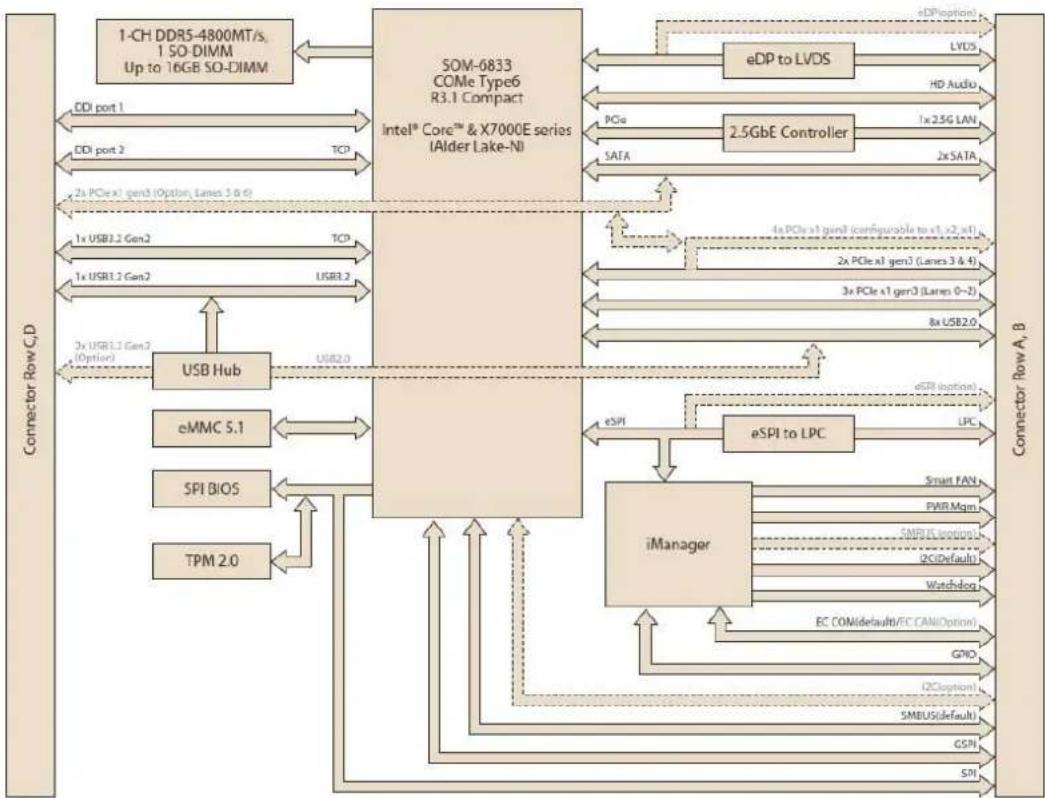
1.2 Functional Block Diagram
flowchart
graph TD
    A["1-CH DDR5-4800MT/s, 1 SO-DIMM<br>Up to 16GB SO-DIMM"] --> B["SOM-6833 COMe Type6<br>R3.1 Compact<br>Intel® Core™ & X7000E series (Alder Lake-Ni)"]
    B --> C["eDP to LVDS"]
    C --> D["LDOS"]
    D --> E["HD Audio"]
    B --> F["2.5GbE Controller"]
    F --> G["1x2.5G LAN"]
    B --> H["SATA"]
    H --> I["2x SATA"]
    B --> J["USB Hub"]
    J --> K["USB2.0"]
    J --> L["eMMC 5.1"]
    L --> M["SPI BIOS"]
    M --> N["TPM 2.0"]
    B --> O["iManager"]
    O --> P["eSPI to LPC"]
    P --> Q["LPC"]
    B --> R["4x PCIe x1 gen2 (configurable to x1 >2, x1)"]
    R --> S["2x PCIe x1 gen3 (Lanes 3 & 4)"]
    R --> T["3x PCIe x1 gen3 (Lamp 0-2)"]
    R --> U["8x USB2.0"]
    B --> V["eSPI"]
    V --> W["iManager"]
    W --> X["Smart FAN"]
    W --> Y["PWR Mqm"]
    W --> Z["SMPJ Wireless"]
    W --> AA["2CDefault"]
    W --> AB["Watchdog"]
    W --> AC["EC COMI default/EC CANI option"]
    W --> AD["GPIO"]
    W --> AE["(2C option)"]
    W --> AF["SMBUS(default)"]
    W --> AG["GSP"]
    W --> AH["STI"]
1.3 Product Specifications
1.3.1 Compliance
PICMG COM.0 (COM Express) Revision 3.1
■ Basic Size - 95 x 95 mm (3.7 x 3.7 in)
■ Pin-out Type 6 compatible
1.3.2 Feature List
| Table 1.2: Feature List | |||||
| Feature Type | Connector Row | Feature | Type 6 Definition | SOM-6833 | |
| Max. Min. | |||||
| Display | A-B LVDS Channel A (18-/24-bit) 1 0 1 | ||||
| A-B LVDS Channel B (18-/24-bit) 1 0 1 | |||||
| A-B eDP (muxed on LVDS Channel A) 1 0 1 | |||||
| A-B VGA 1 0 0 | |||||
| Expansion | A-B PCI Express x1 6 1 6 | ||||
| A-B LPC 1 1 1 | |||||
| Serial | A-B SMBus | 1 1 1 | |||
| A-B I2C Bus | 1 1 1 | ||||
| A-B Serial Port | 2 0 2 | ||||
| A-B CAN bus (muxed on SER1) | 1 0 1 | ||||
| I/O | A-B LAN Port 0 (Gigabit Ethernet) | 1 1 1 | |||
| A-B SATA | 4 1 2 | ||||
| A-B USB 2.0 | 8 4 8 | ||||
| A-B USB Client | 1 0 0 | ||||
| A-B HD Audio | 1 0 1 | ||||
| A-B SPI Bus | 2 1 1 | ||||
| A-B General Purpose I/O (GPIO) | 8 8 8 | ||||
| A-B SDIO (muxed on GPIO) | 1 0 0 | ||||
| A-B Watchdog Timer Output | 1 0 1 | ||||
| A-B Speaker Out | 1 1 1 | ||||
| A-B External BIOS ROM Support | 2 0 1 | ||||
| A-B Power Button Support | 1 1 1 | ||||
| A-B Power Good | 1 1 1 | ||||
| A-B VCC_5V_SBY Contacts | 4 4 4 | ||||
| A-B Sleep | 1 0 1 | ||||
| A-B Thermal Protection | 1 0 1 | ||||
| A-B Lid Input | 1 0 1 | ||||
| A-B Battery Low Alarm | 1 0 1 | ||||
| A-B Suspend/Wake Signals | 3 0 3 | ||||
| A-B Fan PWM/Tachometer | 2 0 2 | ||||
| A-B Trusted Platform Modules | 1 0 1 | ||||
| A-B RSMRST_OUT# | 1 1 1 | ||||
| A-B GP_SPI | 1 0 1 | ||||
| Display | C-D | Digital Display Interfaces 1 - 3 | 3 | 0 | 2 |
| I/O | C-D PEG (PCI Express x16) 1 0 0 | ||||
| C-D PCI Express x1 2 0 1 | |||||
| C-D USB 3.0 4 0 4 | |||||
| C-D Rapid Shutdown 1 0 1 | |||||
1.3.3 Processor System
| Table 1.3: Processor System | |||||
| CPU Std. Freq. Max. Turbo Freq. Core | Cache (MB) | TDP(W) | |||
| I3-N305 | 1.0/1.8 GHz | 3.8 GHz | 8 | 6 | 9/15W |
| N97 | 2.0 GHz | 2.9 GHz | 4 | 6 | 12W |
| N200 | 1.0 GHz | 3.2 GHz | 4 | 6 | 6W |
| N50 | 1.0 GHz | 3.4 GHz | 2 | 6 | 6W |
| Atom x7425E | 1.5 GHz | 2.7 GHz | 4 | 6 | 12W |
| Atom x7211E | 1.0 GHz | 2.9 GHz | 2 | 6 | 6W |
1.3.4 Memory
There is one memory socket on the SOM-6833 top side. It supports a maximum 16GB capacity with a 262-pin SODIMM socket.
1.3.5 Graphics/Audio
Graphics Core: Intel® UHD Graphics for 12th Gen Intel® Processors supports AVC, MPEG-2, HEVC, and VP9
DirectX 12.1, OGL4.6, OCL3.0, and MPEG2, HEVC/H265, VC1/WMV9 HW decode/encode/transcode acceleration.
| Table 1.4: Graphics/Audio | |||
| CPU | Graphics Core | Base Freq. | Max Freq. |
| I3-N305 | Gen12 UHD Graphics | 1.0 GHz | 1.25 GHz |
| N97 | Gen12 UHD Graphics | 850 MHz | 1.20 GHz |
| N200 | Gen12 UHD Graphics | 450 MHz | 750 MHz |
| N50 | Gen12 UHD Graphics | 600 MHz | 750 MHz |
| Atom x7425E | Gen12 UHD Graphics | 800 MHz | 1.00 GHz |
| Atom x7211E | Gen12 UHD Graphics | 600 MHz | 1.00 GHz |
1.3.6 Expansion Interface
1.3.6.1 PCIe x1
PCI Express x1: Supports by default 5 x PCIe x1 compliant with PCIe Gen3 (8.0 GT/s) specifications, configurable to PCIe x4 or PCIe x2. Several configurable combinations may need BIOS modifications. Please contact Advantech sales or FAE for more details.
| Table 1.5: PCIe x1 | |||||||||
| Type 6 | Row A,B | Row C,D | |||||||
| P0 | P1 | P2 | P3 | P4 | P5 | P6 | P7 | ||
| Default | Config | X1 | X1 | - | - | X1 | X1 | X1 | NA |
| Option 1 | X4 | X1 | X1 | X1 | NA | ||||
| Option 2 | X2 | - | - | X1 | X2 | NA | |||
Note.
- “-” represents SATA#0 and SATA #1.
- If the configuration is PCIe x4, there will be no SATA function.
1.3.6.2 LPC
Supports the Low Pin Count (LPC) 1.1 specification, without DMA or bus mastering. Enables connection to Super I/O, embedded controller, or TPM. 25MHz LPC clock.
1.3.7 Serial Bus
1.3.7.1 SMBus
Supports the SMBus 2.0 specification.
1.3.7.2 I ^2 C Bus
Supports I²C bus 7-bit and 10-bit address modes. It supports standard mode up to 100 Kb/s and fast mode up to 400 Kb/s.
1.3.8 I/O
1.3.8.1 Gigabit Ethernet
Ethernet: Intel® I226 Gigabit LAN supports 10/100/1000 Mbps and 2.5 Gbps.
1.3.8.2 SATA
Supports 2 x SATA Gen3 (6.0 Gb/s) ports, backward compliant to SATA Gen2 (3.0 Gb/s) and Gen1 (1.5 Gb/s). The maximum data rate is 600 MB/s. It supports AHCI 1.3.1 mode (it does not support IDE mode).
1.3.8.3 USB 3.2 / USB 2.0
COM-Express supports USB 3.0, but SOM-6833 supports 2 x USB 3.2 Gen2 (10 Gbps) ports, optional expansion to 4 ports by USB hub and 8 x USB 2.0 (480 Mbps) ports which are reverse compatible to USB 1.x. For USB 3.2, this product supports LPM (U0, U1, U2, and U3) for power efficiency.
Notice: To achieve USB 3.2 Gen2 performance, Advantech strongly recommends using a certified cable.
1.3.8.4 USB 3.2 (USB Hub)
| Table 1.6: USB 3.2 (USB Hub) | ||||
| Type 6 P0 P1 P2 | P3 | |||
| SoC TCP NA NA | NA | |||
| USB Hub NA P1 | P2 P3 | |||
| Type 6 USB_OC#01 | ||||
| SoC USB_OC# USB_OC0# | ||||
1.3.8.5 USB 3.2 (No USB Hub)
| Table 1.7: USB 3.2 (No USB Hub) | ||||
| Type 6 P0 P1 NA | NA | |||
| SoC TCP P0 NA | NA | |||
| Type 6 USB_OC#01 | ||||
| SoC USB_OC# USB_OC0# | ||||
1.3.8.6 USB 2.0 (USB Hub)
| Table 1.8: USB 2.0 (USB Hub) | ||||||||
| Type 6 | P0 | P1 | P2 | P3 | P4 | P5 | P6 | P7 |
| SoC | P0 | NA | NA | NA | P4 | P5 | P6 | P7 |
| USB Hub | NA | P1 | P2 | P3 | NA | NA | NA | NA |
| Type 6 | OC_01 | OC_45 OC_67 | ||||||
| SoC USB_OC# | OC_0# | OC_2# OC_3# | ||||||
1.3.8.7 USB 2.0 (No USB Hub)
| Table 1.9: USB 2.0 (No USB Hub) | ||||||||
| Type 6 | P0 | P1 | P2 | P3 | P4 | P5 | P6 | P7 |
| SoC | P0 | P1 | P2 | P3 | P4 | P5 | P6 | P7 |
| Type 6 | OC_01 | OC_45 OC_67 | ||||||
| SoC USB_OC# | OC_0# | OC_2# OC_3# | ||||||
1.3.8.8 SPI Bus
Supports BIOS flash only. The SPI clock can be 20MHz, with capacity up to 128Mb.
1.3.8.9 GPIO
8 programmable general purpose input or output (GPIO).
1.3.8.10 Watchdog Timer
Supports multi-level watchdog time-out output. Provides 1-65535 levels, from 100 ms to 109.22 minute intervals.
1.3.8.11 Serial Ports
2 x 2-wire serial port (Tx/Rx) supports 16550 UART compliance.
■ Programmable FIFO or character mode
■ 16-byte FIFO buffer on transmitter and receiver in FIFO mode
Programmable serial interface characteristics: 5-, 6-, 7-, or 8-bit character
■ Even, odd, or no parity bit selectable
■ 1, 1.5, or 2 stop bit selectable
■ Baud rate up to 115.2K
1.3.8.12 TPM
Supports TPM 2.0 module by default.
1.3.8.13 Smart Fan
Supports 2 Fan PWM control signals and 2 tachometer inputs for fan speed detection. There is 1 provided on the module via the connector and the other is on the carrier board following PICMG COM Express R3.1 specifications.
1.3.8.14 BIOS
The BIOS chip is on the module by default. Users can place the BIOS chip on the carrier board with appropriate design and jumper settings as shown in BIOS_DIS#[1:0].
| Table 1.10: BIOS | ||
| BIOS_DIS#0 BIOS_DIS#1 | Bootup Destination/Function | |
| Open | Open | Boot from Module's SPI BIOS |
| Open | GND | SPI_CS0# to Carrier Board, SPI_CS1# to Module |
| GND | GND | SPI_CS0# to Module, SPI_CS1# to Carrier Board |
Note: If system COMS is cleared, Advantech strongly suggests going to the BIOS setup menu and loading the default settings on the first bootup.
The standard module has a GPIO button. BIOS settings will be kept without an RTC coin battery. If you need to restore to the BIOS default settings, follow the steps below:
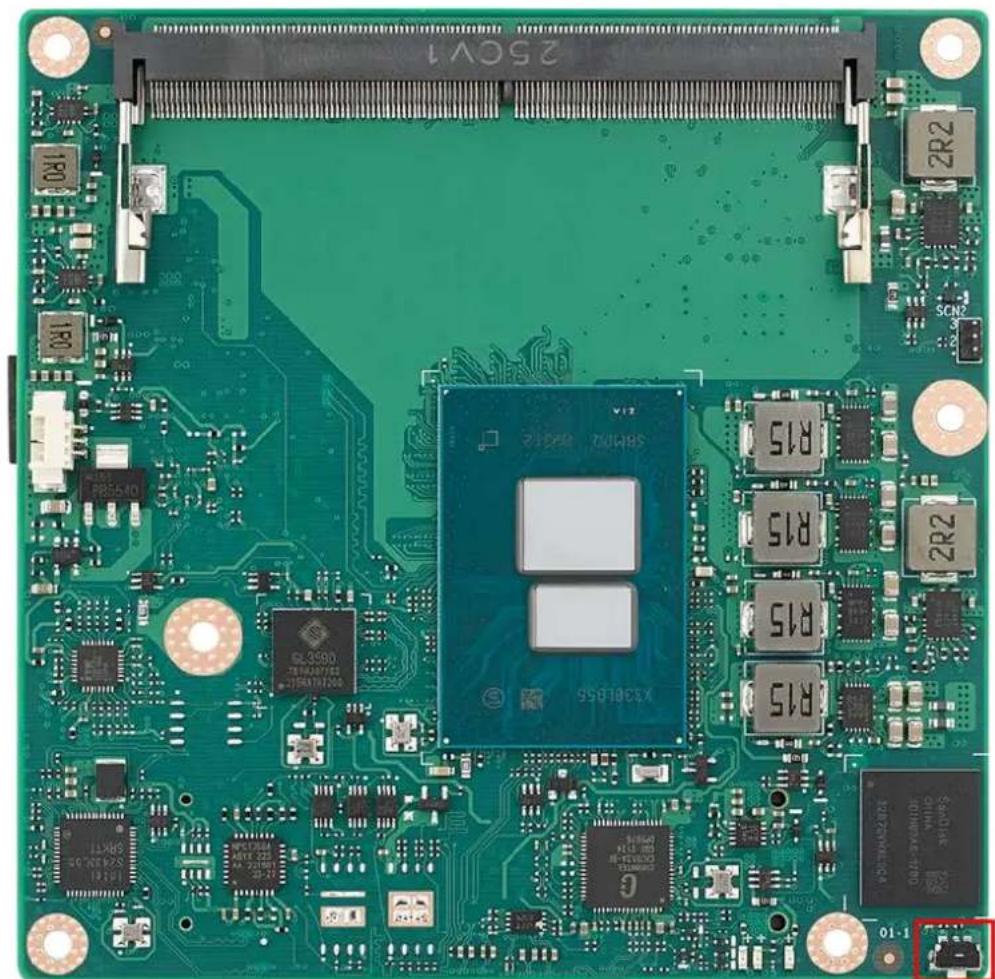
natural_image
Close-up of a green printed circuit board with integrated circuits and connectors (no readable text or symbols)- Remove the coin battery.
- Press and hold the Clear Module COMS button.
- Turn on the power supply.
- The system will boot up a few times.
- BIOS will load the default settings.
1.3.9 Power Management
1.3.9.1 Power Supply
The device supports both ATX and AT power modes. VSB is for suspended power and is optional if not required for standby (suspend-to-RAM). The RTC battery may be optional if date/timekeeping is not required.
■ VCC: 8.5V (9V-5%) - 20V (19V+5%)
■ VSB: 5V +/- 5% (suspend power)
■ RTC Battery Power: 2.0V – 3.3V
1.3.9.2 PWROK
Power-OK from the main power supply. A high value indicates the power level is good. This signal can be used to postpone module startup, allowing carrier-based FPGAs or other configurable devices time to be programmed.
1.3.9.3 Power Sequence
According to PICMG COM Express COM.0 R 3.1 specifications.
1.3.9.4 Wake Event
Various wake event support allows users to adjust settings for different scenarios.
■ Wake-on-LAN (WOL): Wake to S0 from S3/S4/S5
USB Wake: Wake to S0 from S3
■ PCIe Device Wake: depends on user inquiry and may need customized BIOS
■ LPC Wake: depends on user inquiry and may need customized BIOS
1.3.9.5 Advantech S5 ECO Mode (Deep Sleep Mode)
Advantech iManager provides additional features allowing the system to enter a very low suspended power mode – S5 ECO mode. In this mode, the module will cut all power, including suspended and active power to the chipset, and keep an on-module controller active. Only power under 50mW will be consumed, meaning user battery packs will last longer. While this mode is enabled in the BIOS, the system (or module) only allows power button boot instead of other methods such as WOL.
1.3.10 Environment
1.3.10.1 Temperature
■ Operating: 0 \~ 60°C (32 \~ 140°F)
■ Storage: -40 \~ 85°C (-40 \~ 185°F)
1.3.10.2 Humidity
■ Operating: 40°C @ 95% relative humidity, non-condensing
■ Storage: 60°C @ 95% relative humidity, non-condensing
1.3.10.3 Vibrations
IEC60068-2-64: Random vibration test under operation mode, 3.5 Grms.
1.3.10.4 Drop Test (Shock)
Federal Standard 101 Method 5007 test procedure with standard packing.
1.3.10.5 EMC
CE EN55022 Class B and FCC Certifications: validated with standard development boards in the Advantech chassis.
1.3.11 MTBF
Please refer to the Advantech SOM-6833 Refresh Series Reliability Prediction report on the website: Link: http://com.advantech.com
1.3.12 OS Support
The mission of Advantech Embedded Software Services is to "Enhance quality of life with Advantech platforms and Microsoft Windows Embedded technology." We enable Windows Embedded software products on Advantech platforms to more effectively support the embedded computing community. Customers are freed from the hassle of dealing with multiple vendors (hardware suppliers, system integrators, embedded OS distributors) for projects. Our goal is to make Windows Embedded software solutions easily and widely available to the embedded computing community.
To install drivers, please connect to the website http://support.advantech.com.tw to download the setup file.
1.3.13 Advantech iManager
iManager supports APIs for GPIO, smart fan control, multi-stage watchdog timer, temperature sensor, and hardware monitoring. It follows PICMG EAPI 1.0 specifications with backward compatibility.
1.3.14 Power Consumption
| Table 1.11: Power Consumption Table (Watts) | ||||||
| VCC=12V, VSB=5V | Active Power Domain | Suspend Power Domain | Mechanical Off | |||
| Power State | S0 Max. Load | S0 Burn-in | S0 Idle | S5 | S5 Deep Sleep | RTC ( A ) |
| SOM-6833N8-S8A1 | 43.14 | 21.11 | 5.77 | 0.77 | 0.43 | 5.56 |
Hardware Configurations:
- MB: SOM-6833N8-S8A1
- DRAM: 16GB DDR5 3200MHz x 1pc
- Carrier board: SOM-DB5830-00A3
Test Condition:
- Test temperature: room temperature (about 25°C)
- Test voltage: rated voltage DC +12.0V
- Test loading:
– Maximum load mode: According to Intel thermal/power test tools
- Burn-in mode: Burn-in test V8.1 Pro (1023) for 64-bit Windows. (CPU, RAM, 2D & 3D Graphics and Disk with 100% )
– Idle mode: DUT power management off and not running any programs
- OS: Windows 10 Enterprise
1.3.14.1 Performance
To compare performance or benchmark data with other modules, please refer to the "Advantech COM Performance & Power Consumption Table."
1.3.15 Selection Guide w/ P/N
Table 1.12: Selection Guide w/ P/N
| CPU CPU Core CPU TDP GFX HFM EMMC LVDS/eDP IBECC TSN | USB Hub | Thermal Solution | Operating Temp. | ||||||||
| SOM-6833N8-S8A1 | i3-N305 | 8 | 9/15W | 1.0GHz | 128GB | LVDS | Yes | N/A | YES | Passive | 0 ~ 60°C |
| SOM-6833A4-S5A1 | x7425E | 4 | 12W | 800MHz | 64GB | LVDS | Yes | N/A | YES | Passive | 0 ~ 60°C |
| SOM-6833N4-U0A1 | N97 | 4 | 12W | 850MHz | 32GB | LVDS | Yes | N/A | N/A | Passive | 0 ~ 60°C |
| SOM-6833N4-S0A1 | N200 | 4 | 6W | 450MHz | NA | LVDS | Yes | Yes | N/A | Passive | 0 ~ 60°C |
| SOM-6833N2-S0A1 | N50 | 2 | 6W | 600MHz | NA | eDP | Yes | N/A | N/A | Passive | 0 ~ 60°C |
1.3.16 Packing List
Table 1.13: Packing List
| Part No. | Description | Quantity |
| - | SOM-6833 COM module | 1 |
| 1970005894N001 | Heatspreader for SOM-6833 | 1 |
1.3.17 Development Board
Table 1.14: Development Board
| Part No. | Description |
| SOM-DB5830-00A3 | COMe Devel. Board COMe R3.1 Type 6 pin-out (LVDS) 0 ~ 60°C |
| SOM-DB5830A-00A3 | COMe Devel. Board COMe R3.1 Type 6 pin-out (eDP) 0 ~ 60°C |
1.3.18 Optional Accessory
Table 1.15: Optional Accessory
| Part No. | Description |
| 1960048815N001 | Semi-Heatsink |
1.3.19 Schematic Checklists
Advantech provides useful checklists for schematic design and layout routing. In the schematic checklist, it will specify details of each pin's electrical properties and how to connect it for different user scenarios. In the layout checklist, it will specify the layout constraints and recommendations for trace length, impedance, and other necessary information for design.
Please contact your nearest Advantech branch office to obtain design documents and for further support.
Chapter 2
Mechanical Information
This chapter gives mechanical information for the SOM-6833 CPU Computer on Module.
Sections include:
Board Information
■ Mechanical Diagrams
Assembly Diagrams
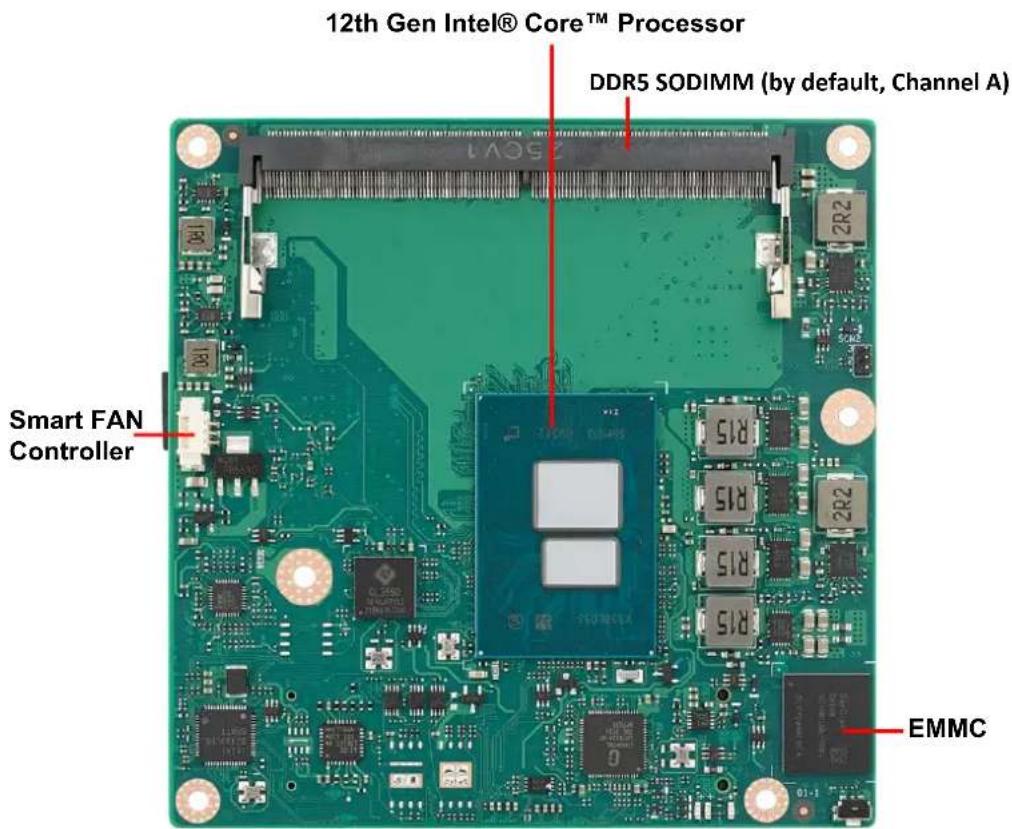
2.1 Board Information
The figures below indicate the main chips on the SOM-6833 Computer-on-Module. Please be aware of these positions when designing a carrier board to avoid mechanical interference. Also be aware of thermal contacts for best thermal dissipation.
text_image
12th Gen Intel® Core™ Processor DDR5 SODIMM (by default, Channel A) Smart FAN Controller EMMCFigure 2.1 Board Chip ID – Front

text_image
080V8 94V-8 23X8 CQC1200105746B SOM-6833Rev.A1 19A60683300-01 MADE IN TAIWAN ADVANTECH CE FC 10 Com Express Connector (C-D) Com Express Connector (A-B)Figure 2.2 Board Chip ID – Rear
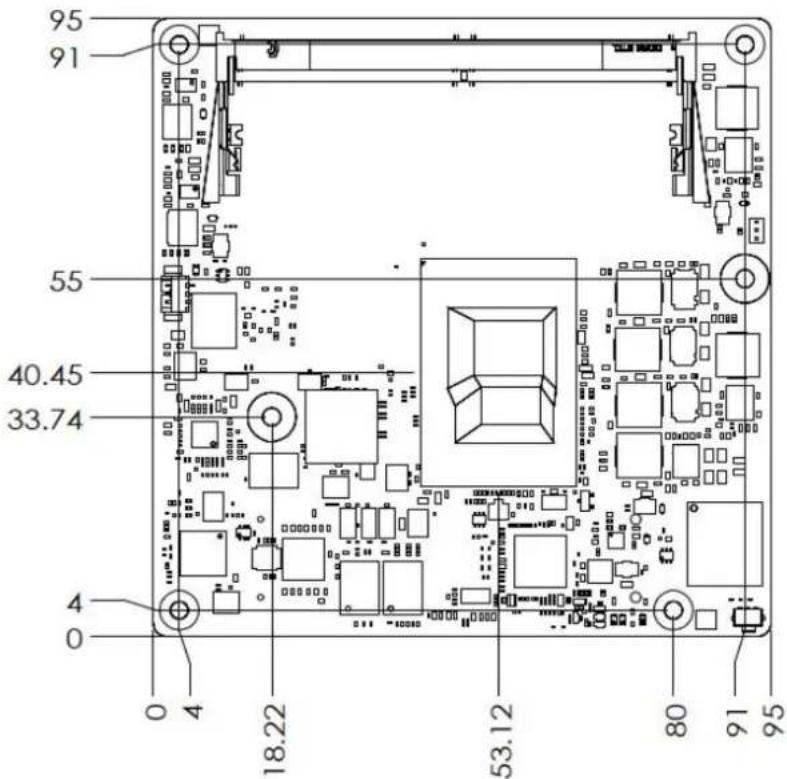
2.2 Mechanical Diagrams
For more details and 2D/3D models, please consult Advantech COM support through the website http://com.advantech.com.
text_image
95 91 55 40.45 33.74 4 0 0 4 18.22 53.12 80 91 95Figure 2.3 Board Mechanical Diagram – Front

text_image
74.20 16.50 18 6 0Figure 2.4 Board Mechanical Diagram – Rear

text_image
4 ±0.25 2.10 ±0.21Figure 2.5 Board Mechanical Diagram – Side1
2.3 Assembly Diagram
These figures demonstrate the order of assembly for attaching the thermal module and COM module to the carrier board.
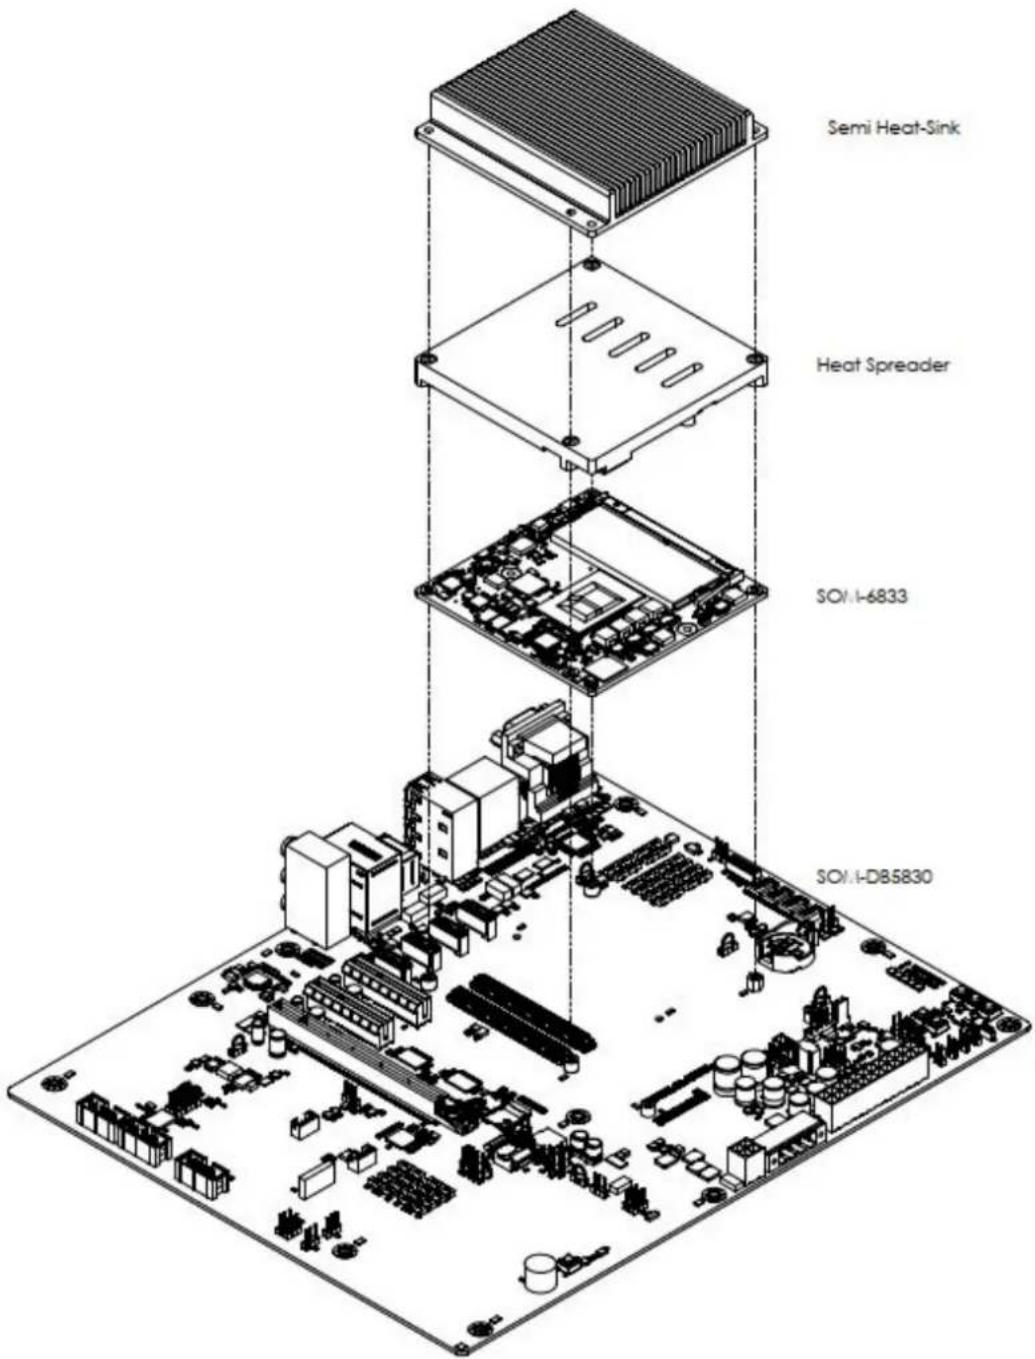
text_image
Semi Heat-Sink Heat Spreader SOI-6833 SOI-DB5830Figure 2.6 Assembly Diagram
There are 5 reserved screw holes for SOM-6833 to be pre-assembled with the heat spreader.
2.4 Assembly Diagram
Please consider the CPU and chip height tolerance when designing your thermal solution.

text_image
0.25 (MAX COMPONENT THICKNESS) 0.305±0.019 (TOP OF SUBSTRATE TO TOP OF DIE) 0.272±0.05 (PRE-SMT BGA BALL THICKNESS) 0.809±0.095 (SUBSTRATE THICKNESS) 1.114±0.097 (BOTTOM OF SUBSTRATE TO TOP OF DIE) 1.386±0.109 (PRE-SMT STACK-UP THICKNESS) DETAIL A SCALE 16 : 1Figure 2.7 CPU Height and Tolerance
Chapter 3
AMI BIOS
This chapter provides BIOS setup information for the SOM-6833 CPU Computer-on-Module.
Sections include:
Introduction
Entering Setup
Hot/Operation Keys
■ Exit BIOS Setup Utility
3.1 Introduction
AMI BIOS has been integrated into many motherboards for over a decade. With the AMI BIOS Setup Utility, users can modify BIOS settings and control various system features. This chapter describes the basic navigation of the BIOS Setup Utility.
text_image
Aptio Setup - AMI Main Advanced Chipset Security Boot Save & Exit BIOS Information BIOS Vendor American Megatrends Core Version 5.0.2.6 0.23 x64 Compliancy UEFI 2.8.0; PI 1.7 Project Version 6E330000060X007 Build Date and Time 03/12/2024 13:32:53 Access Level Administrator Total Memory 16384 MB Memory Frequency 4800 MT/s System Language [English] System Date [Mon 09/11/2023] System Time [C8:41:46] Choose the system default language +: Select Screen ↑↓: Select Item Enter: Select +/-: Change Opt. F1: General Help F2: Previous Values F3: Optimized Defaults F4: Save & Exit ESC: Exit Version 2.22.1239 Copyright (C) 2024 AMIFigure 3.1 Setup Program Initial Screen
AMI BIOS ROM has a built-in setup program that allows users to modify the basic system configuration. This information is stored in flash ROM so it retains the setup information when the power is turned off.
3.2 Entering Setup
Turn on the computer and then press or
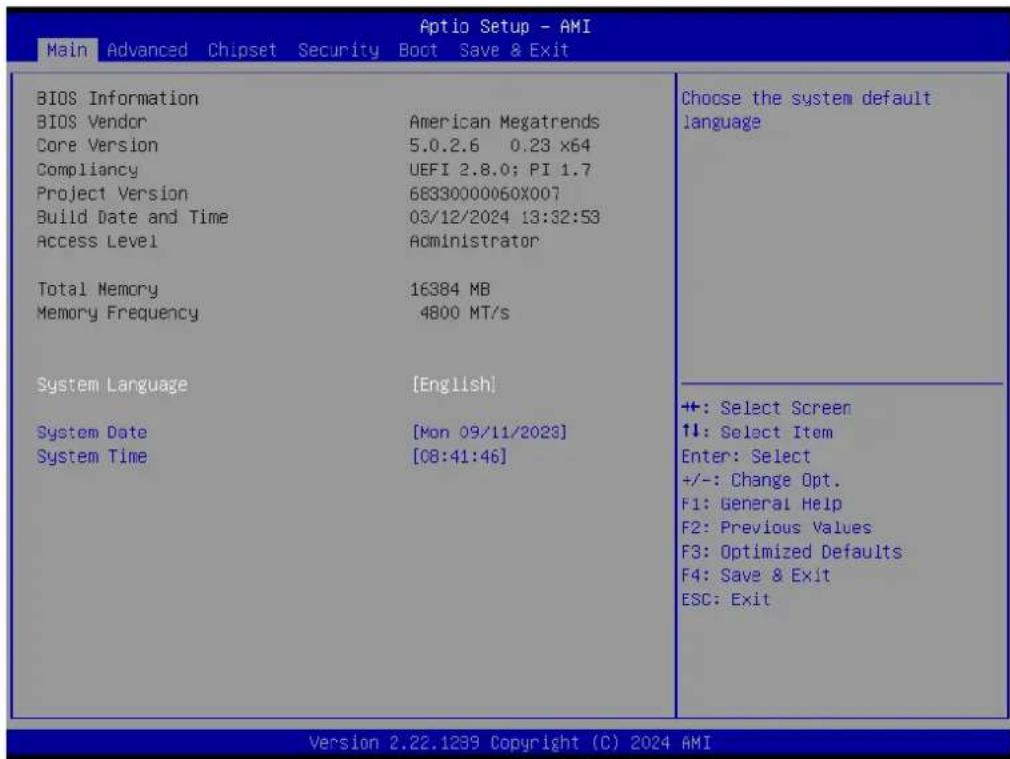
3.3 Main Setup
When users first enter the BIOS Setup Utility, users will enter the Main setup screen. Users can always return to the Main setup screen by selecting the Main tab. There are two Main Setup options. They are described in this section. The Main BIOS Setup screen is shown below.

text_image
Main Advanced Chipset Security Boot Save & Exit BIOS Information BIOS Vendor American Megatrends Core Version 5.0.2.6 0.23 x64 Compliancy UEFI 2.8.0; PI 1.7 Project Version 68330000060X007 Build Date and Time 03/12/2024 13:32:53 Access Level Administrator Total Memory 16384 MB Memory Frequency 4800 MT/s System Language [English] System Date [Mon 09/11/2023] System Time [08:41:46] Choose the system default language +#: Select Screen ↑: Select Item Enter: Select +/-: Change Opt. F1: General Help F2: Previous Values F3: Optimized Defaults F4: Save & Exit ESC: Exit Version 2.22.1239 Copyright (C) 2024 AMIFigure 3.2 Main Setup Screen
The Main BIOS setup screen has two main frames. The left frame displays all the options that can be configured. Grayed-out options cannot be configured; options in blue can. The right frame displays the key legend.
Above the key legend is an area reserved for a text message. When an option is selected in the left frame, it is highlighted in white. Often a text message will accompany it.
■ System Time / System Date
Use this option to change the system time and date. Highlight System Time or System Date using the
3.4 Advanced BIOS Features Setup
Select the Advanced tab from the SOM-7533 setup screen to enter the Advanced BIOS Setup screen. Users can select any item in the left frame of the screen, such as CPU Configuration, to go to the sub-menu for that item. Users can display an Advanced BIOS Setup option by highlighting it using the
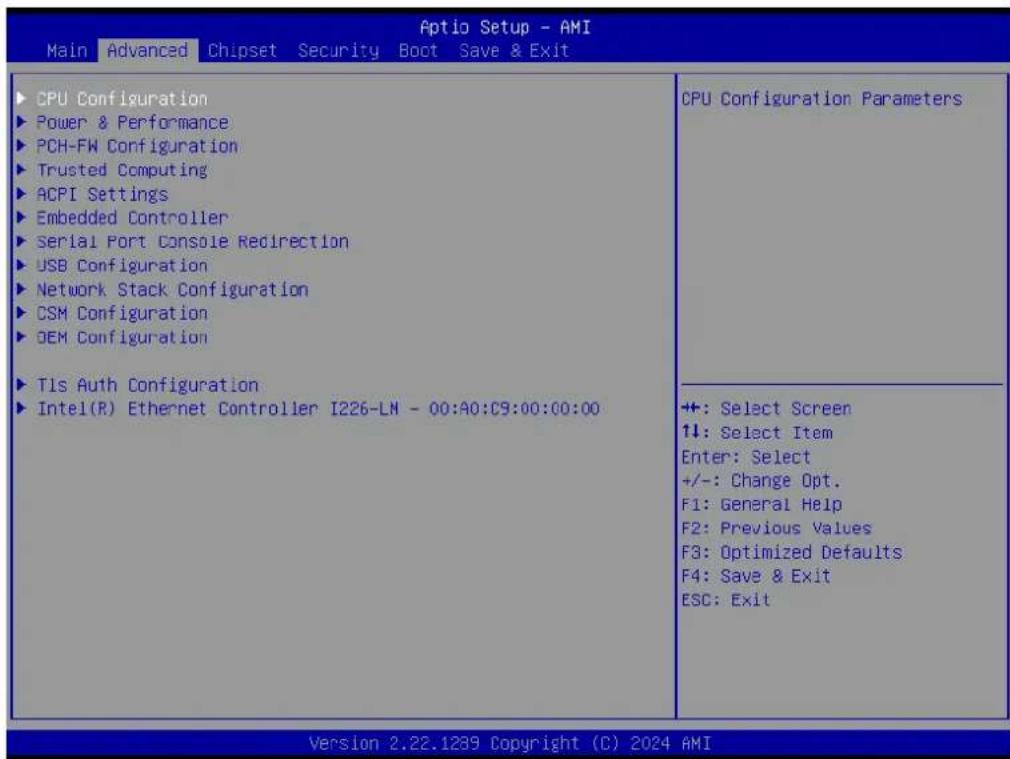
text_image
Aptio Setup - AMI Main Advanced Chipset Security Boot Save & Exit CPU Configuration Power & Performance PCH-FW Configuration Trusted Computing ACPI Settings Embedded Controller Serial Port Console Redirection USB Configuration Network Stack Configuration CSM Configuration DEM Configuration Tls Auth Configuration Intel(R) Ethernet Controller I226-LM - 00:A0:C9:00:00:00 CPU Configuration Parameters +: Select Screen 1↓: Select Item Enter: Select +/-: Change Opt. F1: General Help F2: Previous Values F3: Optimized Defaults F4: Save & Exit ESC: Exit Version 2.22.1239 Copyright (C) 2024 AMIFigure 3.3 Advanced BIOS Features Setup Screen
CPU Configuration
CPU Configuration Parameters.
Power & Performance
Power & Performance Options.
■ PCH-FW Configuration
Configure Management Engine Technology Parameters.
Trusted Computing
Trusted Computing Settings.
ACPI Settings
ACPI Sleep State.
■ Embedded Controller
Embedded Controller Parameters.
Serial Port Console Redirection
Console Redirection Settings.
USB Configuration
USB Configuration Parameters.
■ Network Stack Configuration
Network Stack Settings.
CSM Configuration
CSM Configuration: Enable/Disable, Optional ROM execution settings, etc.
■ OEM Configuration
Advanced settings.
■ Tls Auth CConfiguration
Press
Intel(R) Ethernet Controller I226-LM-74:FE:48:86:97:4E
Configure Gigabit Ethernet device parameters.
3.4.1 CPU Configuration

text_image
Advanced Aptio Setup - AMI CPU Configuration ID 0xB06E0 Brand String:Intel(R) Core(TM) 13-N305 VMX Supported CPU Flex Ratio Override [Disabled] CPU Flex Ratio Settings 18 Active Efficient-cores [A11] Enable/Disable CPU Flex Ratio Programming ++: Select Screen ↑↓: Select Item Enter: Select +/-: Change Opt. F1: General Help F2: Previous Values F3: Optimized Defaults F4: Save & Exit ESC: Exit Version 2.22.1239 Copyright (C) 2024 AMIFigure 3.4 CPU Configuration
■ CPU Flex Ratio Override
Enable/Disable CPU Flex Ratio Programming.
■ Active Efficient-cores
This is the number of E-cores to enable in each processor package. Note: Number of Cores and E-cores are looked at together. When both are 0,0 , Pcode will enable all cores.
3.4.2 Power & Performance

text_image
Advanced Power & Performance ▶ CPU - Power Management Control ▶ GT - Power Management Control CPU - Power Management Control Options ++: Select Screen ↑↓: Select Item Enter: Select +/-: Change Opt. F1: General Help F2: Previous Values F3: Optimized Defaults F4: Save & Exit ESC: Exit Version 2.22.1239 Copyright (C) 2024 AMIFigure 3.5 Power & Performance
■ CPU - Power Management Control
CPU - Power Management Control Options.
■ GT - Power Management Control
GT - Power Management Control Options.
3.4.2.1 CPU - Power Management Control

text_image
Advanced CPU - Power Management Control Boot performance mode [Turbo Performance] Intel(R) SpeedStep(1m) [Enabled] Turbo Mode [Enabled] Config TDP Configurations C states [Enabled] Select the performance state that the BIOS will set starting from reset vector. +:-: Select Screen ↑↓: Select Item Enter: Select +/-: Change Opt. F1: General Help F2: Previous Values F3: Optimized Defaults F4: Save & Exit ESC: Exit Version 2.22.1289 Copyright (C) 2024 AMIFigure 3.6 CPU - Power Management Control
■ Boot performance mode
Select the performance state that the BIOS will set starting from the reset vector.
Intel(R) SpeedStep(tm)
Allows more than two frequency ranges to be supported.
Turbo Mode
Enable/Disable processor Turbo Mode (requires EMTTM enabled too). AUTO means enabled.
■ Config TDP Configurations
Configurable Processor Base Power (cTDP) Configurations.
C states
Enable/Disable CPU Power Management. Allows CPU to go to C states when it's not 100% utilized.
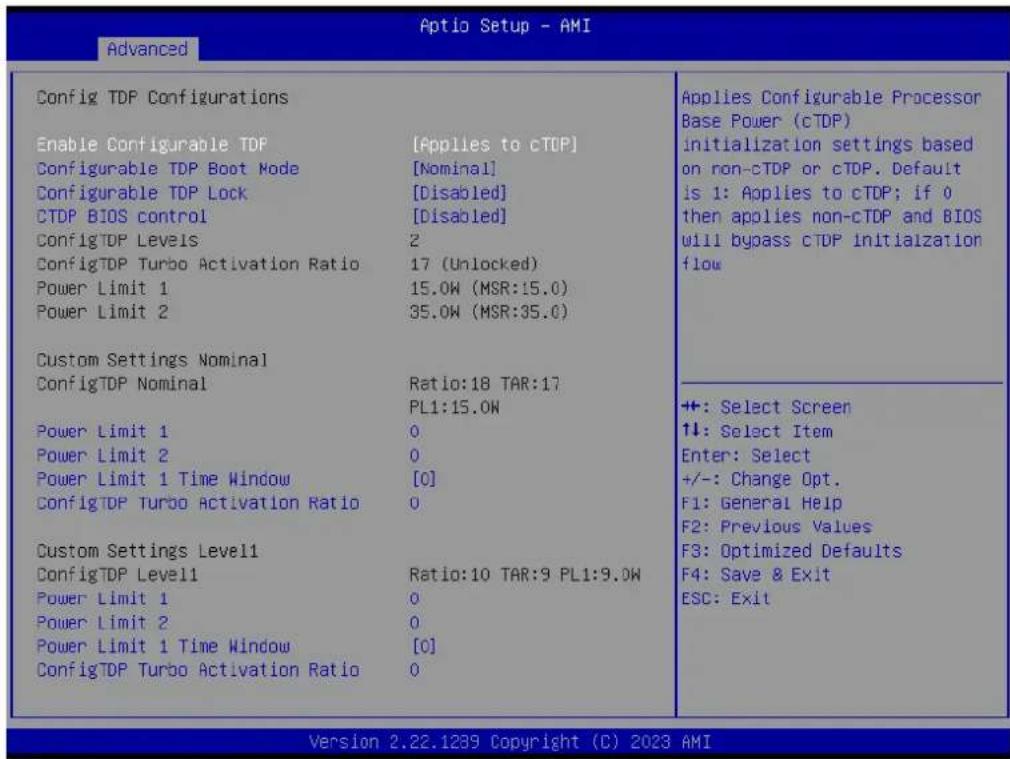
text_image
Aptio Setup - AMI Advanced Config TDP Configurations Enable Configurable TDP [Applies to cTDP] Configurable TDP Boot Mode [Nominal] Configurable TDP Lock [Disabled] CTDP BIOS control [Disabled] ConfigTDP Levels 2 ConfigTDP Turbo Activation Ratio 17 (Unlocked) Power Limit 1 15.0W (MSR:15.0) Power Limit 2 35.0W (MSR:35.0) Custom Settings Nominal ConfigTDP Nominal Ratio:18 TAR:17 PL1:15.0W Power Limit 1 0 Power Limit 2 0 Power Limit 1 Time Window [0] ConfigTDP Turbo Activation Ratio 0 Custom Settings Level1 ConfigTDP Level1 Ratio:10 TAR:9 PL1:9.0W Power Limit 1 0 Power Limit 2 0 Power Limit 1 Time Window [0] ConfigTDP Turbo Activation Ratio 0 Applies Configurable Processor Base Power (cTDP) initialization settings based on non-cTDP or cTDP. Default is 1: Applies to cTDP; if 0 then applies non-cTDP and BIOS will bypass cTDP initialization flow +: Select Screen ↑↓: Select Item Enter: Select +/-: Change Opt. F1: General Help F2: Previous Values F3: Optimized Defaults F4: Save & Exit ESC: Exit Version 2.22.1239 Copyright (C) 2023 AMIFigure 3.7 Config TDP Configurations
■ Enable Configurable TDP
Applies Configurable Processor Base Power (cTDP) initialization settings based on non-cTDP or cTDP. Default is 1: Applies to cTDP; if 0, then it is non-cTDP; if 0, then non-cTDP and BIOS will bypass cTDP initialization flow.
- Configurable TDP Boot Mode
Configurable Processor Base Power (cTDP) Mode as Nominal/Level1/Level2/Deactivate TDP selection. The "Deactivate" option will set MSR to Nominal and MMIO to Zero.
- Configurable TDP Lock
Configurable Processor Base Power (cTDP) Mode Lock sets the Lock bits on TURBO_ACTIVATION_RATIO and CONFIG_TDP_CONTROL. Note: When CTDP Lock is enabled, Custom ConfigTDP Count will be forced to 1 and Custom ConfigTDP Boot Index will be forced to 0.
CTDP BIOS control
Enable Configurable Processor Base Power (cTDP) control via runtime ACPI BIOS methods. This "BIOS only" feature does not require EC or driver support.
Power Limit 1
Power Limit1 in milliwatts. BIOS will round to the nearest 1/8W when programming. 0=no custom override. For 12.50W, enter 12500. Overlocking SKU: Value must be between Max and Min Power Limits (specified by PACKAGE_POW-ER_SKU_MSR). Other SKUs: This value must be between the Min Power Limit and Processor Base Power (TDP) Limit.
Power Limit 2
Power Limit2 in milliwatts. BIOS will round to the nearest 1/8W when programming. 0=no custom override. For 12.50W, enter 12500. The processor applies control policies such that the package power does not exceed this limit.
■ Power Limit 1 Time Window
Power Limit 1 Time Window value in seconds. The value may vary from 0 to 128. 0=default value (28 sec for Mobile and 8 sec for Desktop). The defines the time window which for which the Processor Base Power (TDP) value should be maintained.
■ ConfigTDP Turbo activation Ratio
This is the custom value for the Turbo Activation Ratio. It needs to be configured with valid values from LFM to Max Turbo. 0 means it will not use a custom value.
Power Limit 1
Power Limit1 in milliwatts. BIOS will round to the nearest 1/8W when programming. 0=no custom override. For 12.50W, enter 12500. Overclocking SKU: Value must be between Max and Min Power Limits (specified by PACK-AGE_POWER_SKU_MSR). Other SKUs: This value must be between the Min Power Limit and Processor Base Power (TDP) Limit.
Power Limit 2
Power Limit2 in milliwatts. BIOS will round to the nearest 1/8W when programming. 0=no custom override. For 12.50W, enter 12500. The processor applies control policies such that the package power does not exceed this limit.
■ Power Limit 1 Time Window
Power Limit 1 Time Window value in seconds. The value may vary from 0 to 128. 0=default value (28sec for Mobile and 8 sec for Desktop). This defines the time window which in which the Processor Base Power (TDP) value should be maintained.
■ ConfigTDP Turbo activation Ratio
Custom value for Turbo Activation Ratio. This needs to be configured with valid values from LFM to Max Turbo. 0 means it does not use a custom value.
3.4.2.2 GT - Power Management Control

text_image
Optio Setup - AMI Advanced GT - Power Management Control RC6(Render Standby) [Enabled] Check to enable render standby support. +#: Select Screen 1#: Select Item Enter: Select +/-: Change Opt. F1: General Help F2: Previous Values F3: Optimized Defaults F4: Save & Exit ESC: Exit Version 2.22.1239 Copyright (C) 2024 AMIFigure 3.8 GT - Power Management Control
RC6 (Render Standby)
Check to enable render standby support.
3.4.3 PCH-FW Configuration
text_image
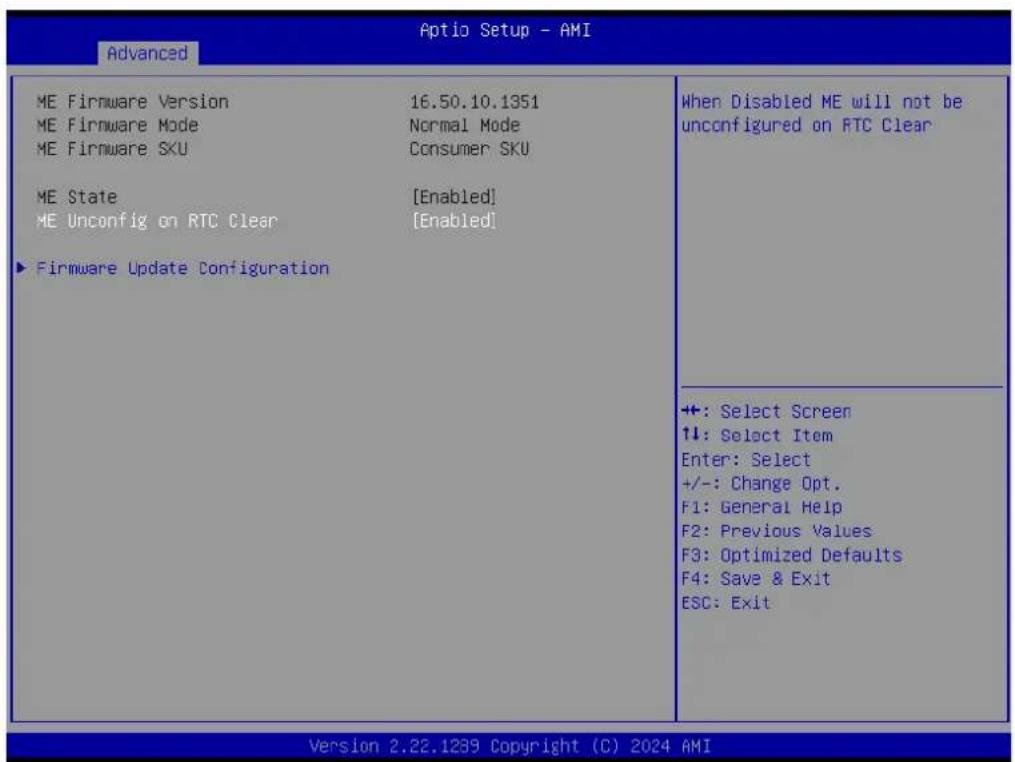
Aptio Setup - AMI Advanced ME Firmware Version 16.50.10.1351 ME Firmware Mode Normal Mode ME Firmware SKU Consumer SKU ME State [Enabled] ME Unconfig on RTC Clear [Enabled] ► Firmware Update Configuration When Disabled ME will not be unconfigured on RTC Clear +: Select Screen ↑↓: Select Item Enter: Select +/-: Change Opt. F1: General Help F2: Previous Values F3: Optimized Defaults F4: Save & Exit ESC: Exit Version 2.22.1239 Copyright (C) 2024 AMIFigure 3.9 PCH-FW Configuration
ME State
When Disabled, ME will be put into ME Temporarily Disabled Mode.
■ ME Unconfig on RTC Clear
When Disabled, ME will not be unconfigured on RTC clear.
■ Firmware Update Configuration
Configure Management Engine Technology Parameters.
3.4.3.1 Firmware Update Configuration

text_image
Aptio Setup - AMI Advanced Me FW Image Re-Flash [Disabled] FW Update [Enabled] Enable/Disable Me FW Image Re-Flash function. +:-: Select Screen ↑↓: Select Item Enter: Select +/-: Change Opt. F1: General Help F2: Previous Values F3: Optimized Defaults F4: Save & Exit ESC: Exit Version 2.22.1289 Copyright (C) 2024 AMIFigure 3.10 Firmware Update Configuration
■ Me FW Image Re-Flash
Enable/Disable Me FW Image Re-Flash function.
FW Update
Enable/Disable ME FW Update function.
3.4.4 Trusted Computing
| TPM 2.0 Device Found Firmware Version: 7.2 Vendor: NTC | Enables or Disables BIOS support for security device. O.S. will not show Security Device. TCG EFI protocol and INT1A interface will not be available. | |
| Security Device Support [Enable] Active PCR banks SHA256 Available PCR banks SHA256,SHA384 | ||
| SHA256 PCR Bank [Enabled] SHA384 PCR Bank [Disabled] | ||
| Pending operation [None] Platform Hierarchy [Enabled] Storage Hierarchy [Enabled] Endorsement Hierarchy [Enabled] Physical Presence Spec Version [1.3] TPM 2.0 InterfaceType [TIS] Device Select [Auto] | +: Select Screen ↑↓: Select Item Enter: Select +/-: Change Opt. F1: General Help F2: Previous Values F3: Optimized Defaults F4: Save & Exit ESC: Exit | |
Figure 3.11 Trusted Computing
■ Security Device Support
Enables/Disable BIOS support for a security device. The OS will not show the security device. TCG EFI protocol and INT1A interface will not be available.
SHA256 PCR Bank
Enable/Disable SHA256 PCR Bank.
SHA384 PCR Bank
Enable/Disable SHA384 PCR Bank.
■ Pending operation
Schedule an Operation for the Security Device. NOTE: Your Computer will reboot during restart in order to change the State of Security Device.
Platform Hierarchy
Enable/Disable Platform Hierarchy.
■ Storage Hierarchy
Enable/Disable Storage Hierarchy.
■ Endorsement Hierarchy
Enable/Disable Endorsement Hierarchy.
■ Physical Presence Spec Version
Select to tell the OS to support PPI Spec Version 1.2 or 1.3. Note: some HCK tests might not support 1.3.
Device Select
TPM 1.2 will restrict support to TPM 1.2 devices, TPM 2.0 will restrict support to TPM 2.0 devices, Auto will support both with the default set to TPM 2.0 devices. If not found, TPM 1.2 devices will be enumerated.
3.4.5 ACPI Settings
text_image
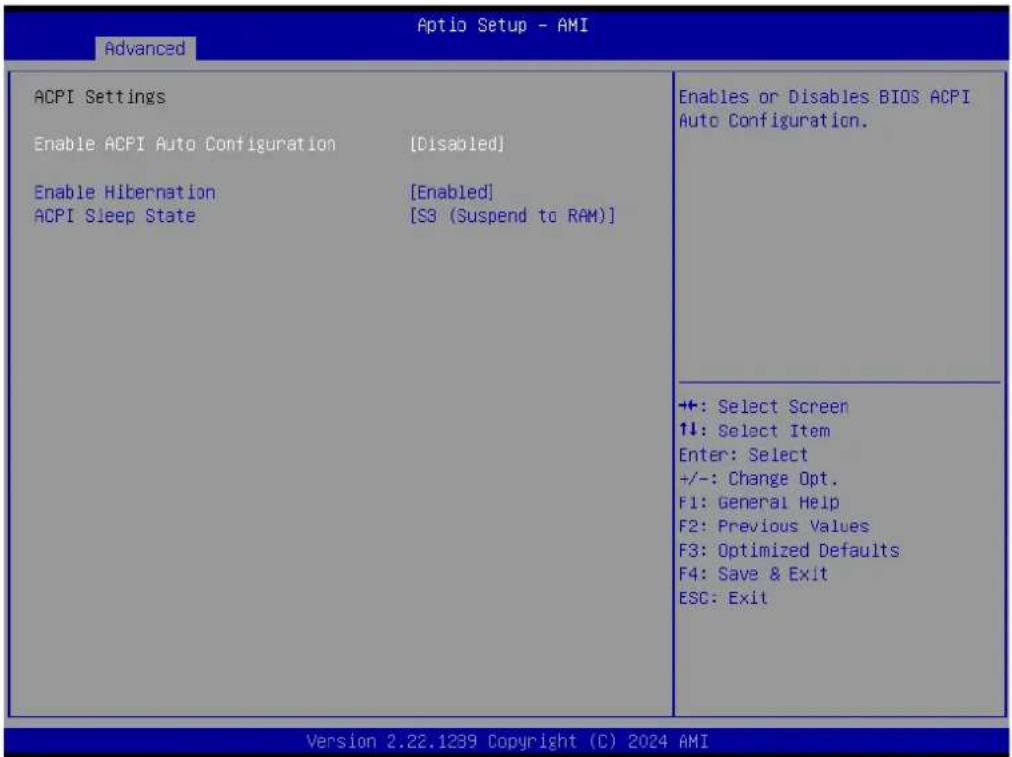
Advanced Aptio Setup - AMI ACPI Settings Enable ACPI Auto Configuration [Disabled] Enable Hibernation [Enabled] ACPI Sleep State [S3 (Suspend to RAM)] Enables or Disables BIOS ACPI Auto Configuration. +: Select Screen ↑↓: Select Item Enter: Select +/-: Change Opt. F1: General Help F2: Previous Values F3: Optimized Defaults F4: Save & Exit ESC: Exit Version 2.22.1239 Copyright (C) 2024 AMIFigure 3.12 ACPI Settings
■ Enable ACPI Auto Configuration
Enable/Disable BIOS ACPI Auto Configuration.
■ Enable Hibernation
Enable/Disable the system's ability to hibernate (OS/S4 Sleep State). This option may be not effective with some OS.
ACPI Sleep State
Select the highest ACPI sleep state the system will enter when the SUSPEND button is pressed.
3.4.6 Embedded Controller

text_image
Advanced Aptio Setup - AMI Embedded Controller Embedded Controller EIO-211 Firmware Version X00024226 CPU Shutdown Temperature [Disable] Smart Fan - COM Module [Auto] Smart Fan - Carrier Board [Auto] Backlight Enable Polarity [Native] Brightness PWM Polarity [Native] Power Saving Mode [Normal] Serial Port 1 Configuration Serial Port 2 Configuration Hardware Monitor CANO Control [Disabled] I2CO Control [Enabled] SMBus0 Control [Enabled] CPU Shutdown Temperature +: Select Screen ↑↓: Select Item Enter: Select +/-: Change Opt. F1: General Help F2: Previous Values F3: Optimized Defaults F4: Save & Exit ESC: Exit Version 2.22.1239 Copyright (C) 2024 AMIFigure 3.13 Embedded Controller
■ CPU Shutdown Temperature
CPU Shutdown Temperature
Smart Fan - Carrier Board
Control Carrier Board Smart FAN function. Get value from EC and only set value when Save Changes.
■ Backlight Enable Polarity
Switch Backlight Enable Polarity for Native or Invert
■ Brightness PWM Polarity
Backlight Control Brightness PWM Polarity for Native or Invert
Power Saving Mode
Select Power Saving Mode
Serial Port 1 Configuration
Set Parameters of Serial Port 1 (COMA)
Serial Port 2 Configuration
Set Parameters of Serial Port 2 (COMB)
Hardware Monitor
Monitor hardware status
CAN0 Control
Enable/Disable CAN0 controller on RDC-IS211.
I2C0 Control
Enable/Disable I2C0 controller on RDC-IS211.
■ SMBus0 Control
Enable/Disable SMBus0 controller on RDC-IS211.
3.4.6.1 Serial Port 1 Configuration
text_image
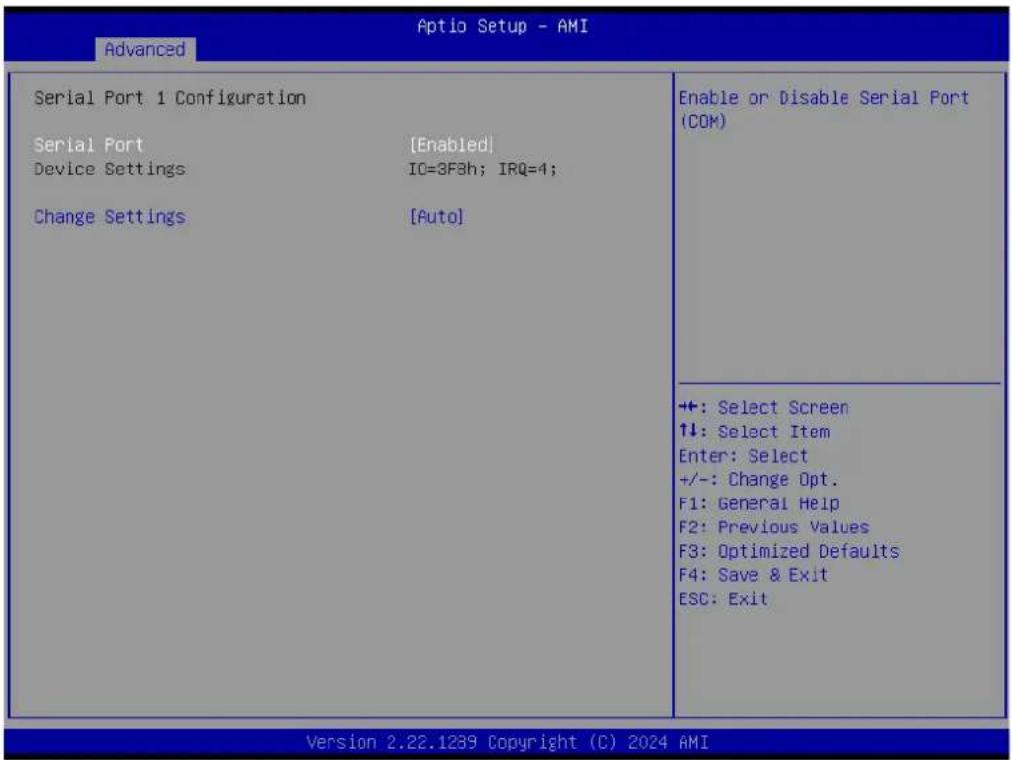
Advanced Aptio Setup - AMI Serial Port 1 Configuration Serial Port [Enabled] Device Settings IO=3F3h; IRQ=4; Change Settings [Auto] Enable or Disable Serial Port (COM) +: Select Screen ↑↓: Select Item Enter: Select +/-: Change Opt. F1: General Help F2: Previous Values F3: Optimized Defaults F4: Save & Exit ESC: Exit Version 2.22.1289 Copyright (C) 2024 AMIFigure 3.14 Serial Port 1 Configuration
Serial Port
Enable/Disable Serial Port (COM).
Change Settings
Select optimal settings for a Super IO Device.
3.4.6.2 Serial Port 2 Configuration

text_image
Advanced Aptio Setup - AMI Serial Port 2 Configuration Serial Port [Enabled] Device Settings IC=2F3h; IRQ=3; Change Settings [Auto] Enable or Disable Serial Port (COM) +: Select Screen ↑↓: Select Item Enter: Select +/-: Change Opt. F1: General Help F2: Previous Values F3: Optimized Defaults F4: Save & Exit ESC: Exit Version 2.22.1239 Copyright (C) 2024 AMIFigure 3.15 Serial Port 2 Configuration
Serial Port
Enable/Disable Serial Port (COM).
Change Settings
Select optimal settings for a Super IO Device.
3.4.6.3 Hardware Monitor

text_image
Advanced Aptio Setup - AMI PC Health Status CPU Temperature : + 55°C/ + 131°F COM Module FAN : 0 RPM Carrier Board FAN : 6882 RPM +12V : +12.05 V + 5V : +4.94 V VBAT : +2.84 V +: Select Screen ↑↓: Select Item Enter: Select +/-: Change Opt. F1: General Help F2: Previous Values F3: Optimized Defaults F4: Save & Exit ESC: Exit ++: Select Screen ↑↓: Select Item Enter: Select +/-: Change Opt. F1: General Help F2: Previous Values F3: Optimized Defaults F4: Save & Exit ESC: Exit Version 2.22.1239 Copyright (C) 2024 AMIFigure 3.16 Hardware Monitor
3.4.7 Serial Port Console Redirection
text_image
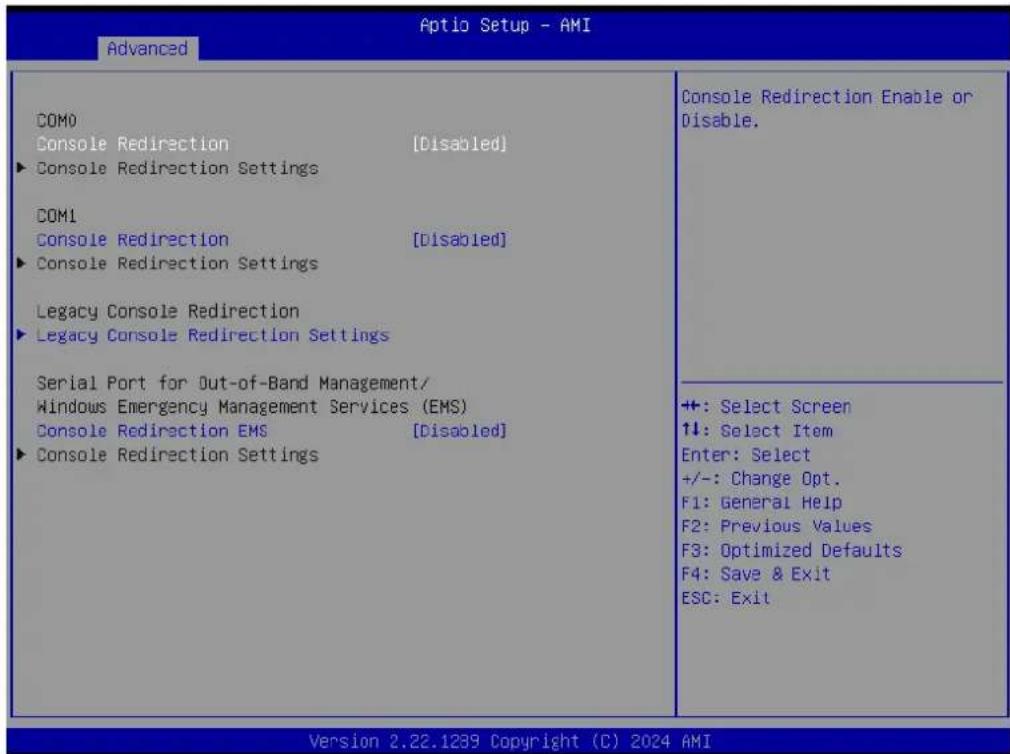
Aptio Setup - AMI Advanced COM0 Console Redirection [Disabled] ► Console Redirection Settings COM1 Console Redirection [Disabled] ► Console Redirection Settings Legacy Console Redirection ► Legacy Console Redirection Settings Serial Port for Out-of-Band Management/ Windows Emergency Management Services (EMS) Console Redirection EMS [Disabled] ► Console Redirection Settings Console Redirection Settings Console Redirection Settings Console Redirection Settings Console Redirection Settings Console Redirection Settings Console Redirection Settings Console Redirection Settings Console Redirection Settings Console Redirection Settings Console Redirection Settings Console Redirection Settings Console Redirection Settings Console Redirection Settings Console Redirection Settings Console Redirection Settings Console Redirection Settings Console Redirection Settings Console Redirection Settings Console Redirection Settings Console Redirection Settings console Redirection Settings console Redirection Settings console Redirection Settings console Redirection Settings console Redirection Settings console Redirection Settings console Redirection Settings console Redirection Settings console Redirection Settings console Redirection Settings console Redirection Settings console Redirection Settings console Redirection Settings console Redirection Settings console Redirection Settings console Redirection Settings console Redirection Settings console Redirection Settings console Redirection Settings console Redirection Settings consoles Redirection Settings consoles Redirection Settings consoles Redirection Settings consoles Redirection Settings consoles Redirection Settings consoles Redirection Settings consoles Redirection Settings consoles Redirection Settings consoles Redirection Settings consoles Redirection Settings consoles Redirection Settings consoles Redirection Settings consoles Redirection Settings consoles Redirection Settings consoles Redirection Settings consoles Redirection Settings consoles Redirection Settings consoles Redirection Settings consoles Redirection Settings consoles Redirection Settings console Select Screen ↑↓: Select Item Enter: Select +/-: Change Opt. F1: General Help F2: Previous Values F3: Optimized Defaults F4: Save & Exit ESC: ExitFigure 3.17 Serial Port console Redirection
■ Console Redirection
Console Redirection Enable or Disable.
■ Legacy Console Redirection Settings
Legacy Console Redirection Settings.
■ Console Redirection EMS
Console Redirection Enable or Disable.
3.4.8 USB Configuration
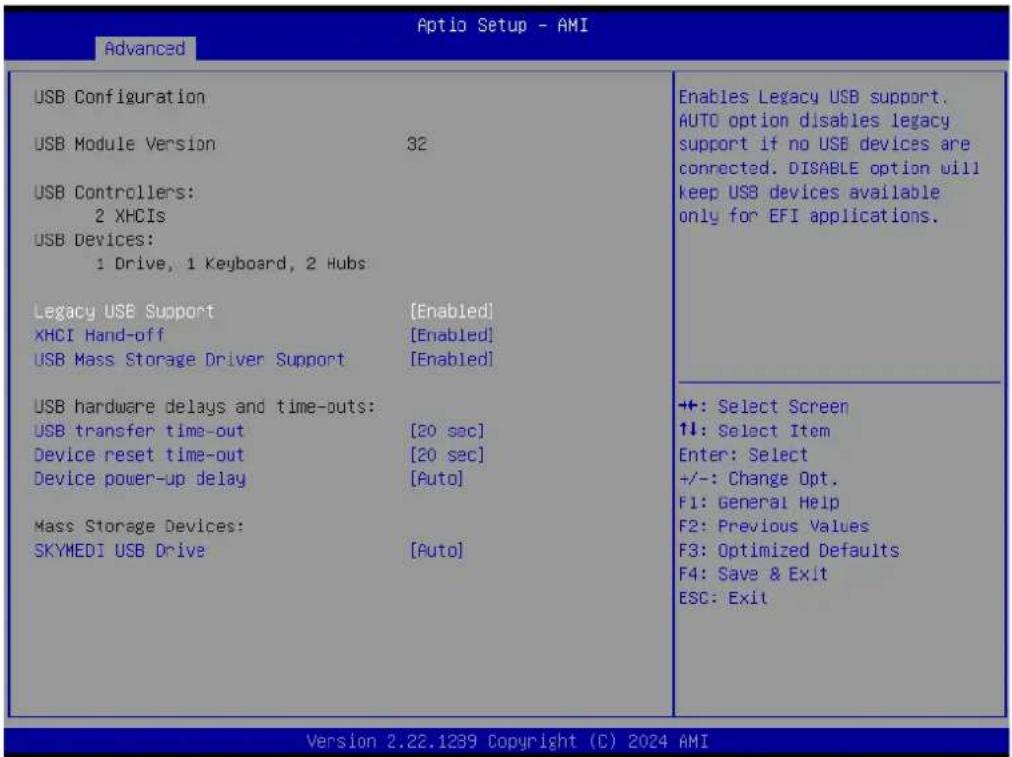
text_image
Advanced Optio Setup - AMI USB Configuration USB Module Version 32 USB Controllers: 2 XHCIs USB Devices: 1 Drive, 1 Keyboard, 2 Hubs Legacy USB Support [Enabled] XHCI Hand-off [Enabled] USB Mass Storage Driver Support [Enabled] USB hardware delays and time-outs: USB transfer time-out [20 sec] Device reset time-out [20 sec] Device power-up delay [Auto] Mass Storage Devices: SKYMEDI USB Drive [Auto] Enables Legacy USB support. AUTO option disables legacy support if no USB devices are connected. DISABLE option will keep USB devices available only for EFI applications. ++: Select Screen ↑↓: Select Item Enter: Select +/-: Change Opt. F1: General Help F2: Previous Values F3: Optimized Defaults F4: Save & Exit ESC: Exit Version 2.22.1239 Copyright (C) 2024 AMIFigure 3.18 USB Configuration
Legacy USB Support
Enables Legacy USB support. The AUTO option disables legacy support if no USB devices are connected. The DISABLE option will keep USB devices available only for EFI applications.
XHCI Hand-off
This is a workaround for OS without XHCI hand-off support. The XHCI ownership change should be claimed by the XHCI driver.
USB Mass Storage Driver Support
Enable/Disable USB Mass Storage Driver Support.
USB transfer time-out
The time-out value for Control, Bulk, and Interrupt transfers.
■ Device reset time-out
USB mass storage device Start Unit command time-out.
■ Device power-up delay
This is the maximum time the device will take before it properly reports itself to the Host Controller. 'Auto' uses the default value: for a Root port it is 100 ms; for a Hub port the delay is taken from the Hub descriptor.
3.4.9 OEM Configuration

text_image
Advanced Aptio Setup - AMI DEM Configuration SATA_LED/SPKR Pin Control [Auto Mode] Select GPP_B14 pin function to Serial ATA LED or Speaker Output. Hybrid:SPKR in pre-boot, SATA LED in runtime. +: Select Screen ↑↓: Select Item Enter: Select +/-: Change Opt. F1: General Help F2: Previous Values F3: Optimized Defaults F4: Save & Exit ESC: Exit Version 2.22.1239 Copyright (C) 2024 AMIFigure 3.19 OEM Configuration
■ SATA\_LED/SPKR Pin Control
Select the GPP_B14 pin function to Serial ATA LED or Speaker Output. Hybrid: SPKR in pre-boot, SATA LED in runtime.
3.4.10 Network Stack Configuration
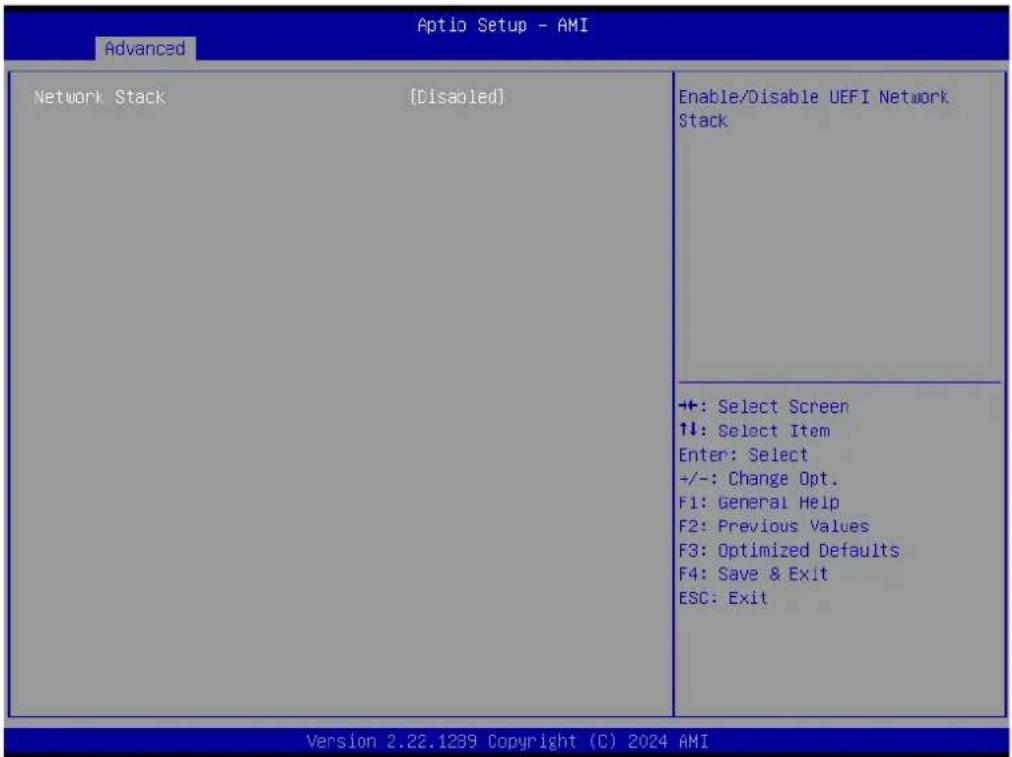
text_image
Advanced Aptio Setup - AMI Network Stack [Disabled] Enable/Disable UEFI Network Stack +: Select Screen ↑↓: Select Item Enter: Select +/-: Change Opt. F1: General Help F2: Previous Values F3: Optimized Defaults F4: Save & Exit ESC: Exit Version 2.22.1239 Copyright (C) 2024 AMIFigure 3.20 Network Stack Configuration
Network Stack
Enable/Disable UEFI Network Stack.
3.4.11 Compatibility Support Module Configuration

text_image
Aptio Setup - AMI Advanced Compatibility Support Module Configuration CSM Support [Disabled] Enable/Disable CSM Support. +: Select Screen ↑↓: Select Item Enter: Select +/-: Change Opt. F1: General Help F2: Previous Values F3: Optimized Defaults F4: Save & Exit ESC: Exit Version 2.22.1239 Copyright (C) 2024 AMIFigure 3.21 Compatibility Support Module Configuration
CSM Support
Enable/Disable CSM Support.
3.5 Chipset Setup
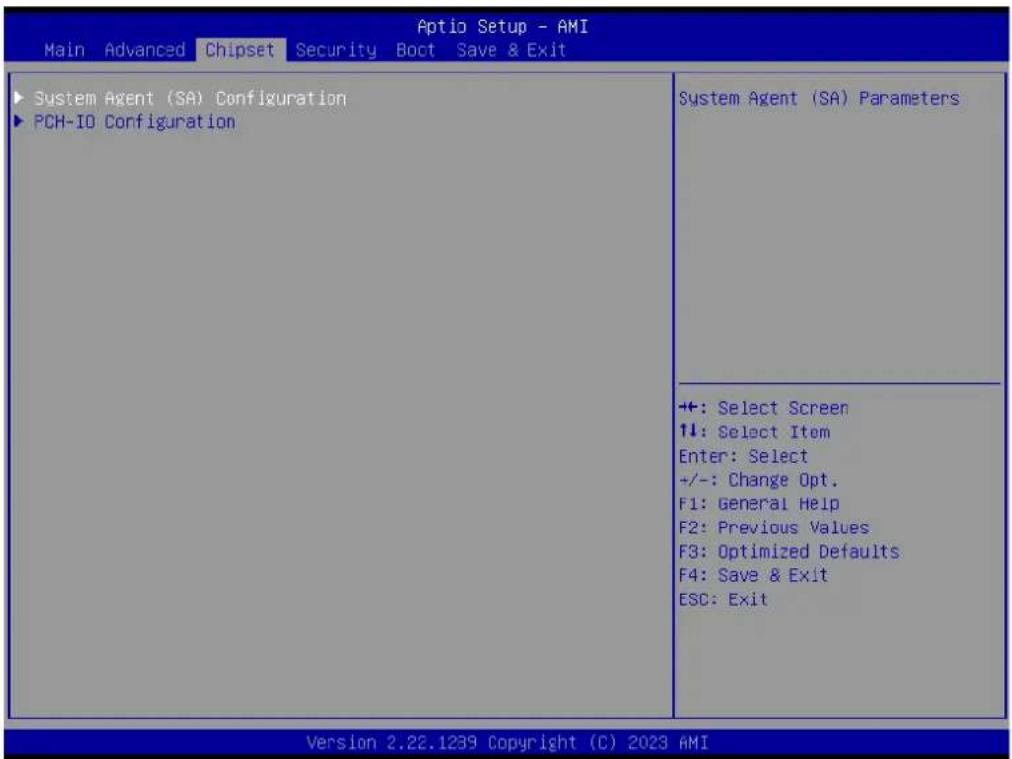
text_image
Aptio Setup - AMI Main Advanced Chipset Security Boot Save & Exit ► System Agent (SA) Configuration ► PCH-ID Configuration System Agent (SA) Parameters ++: Select Screen ↑↓: Select Item Enter: Select +/-: Change Opt. F1: General Help F2: Previous Values F3: Optimized Defaults F4: Save & Exit ESC: Exit Version 2.22.1239 Copyright (C) 2023 AMIFigure 3.22 Chipset Setup
System Agent (SA) Configuration System Agent Parameters.
■ PCH-I0 Configuration
PCH parameters.
3.5.1 System Agent (SA) Configuration
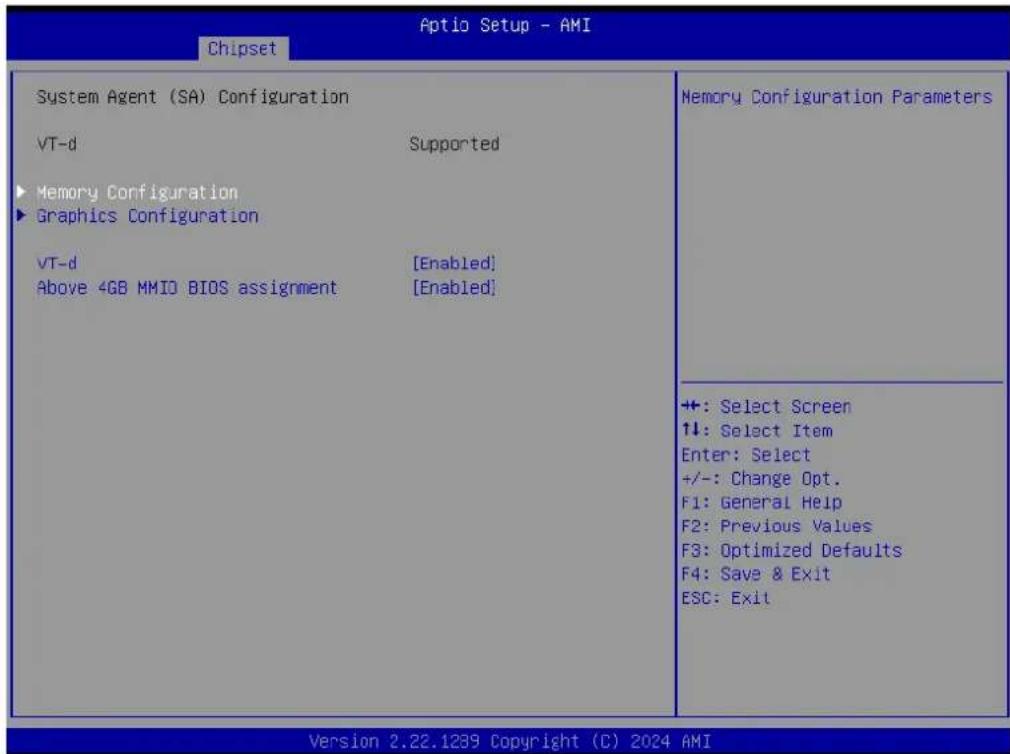
text_image
Chipset System Agent (SA) Configuration VT-d Supported ► Memory Configuration ► Graphics Configuration VT-d [Enabled] Above 4GB MMIO BIOS assignment [Enabled] Memory Configuration Parameters +: Select Screen ↑↓: Select Item Enter: Select +/-: Change Opt. F1: General Help F2: Previous Values F3: Optimized Defaults F4: Save & Exit ESC: Exit Version 2.22.1239 Copyright (C) 2024 AMIFigure 3.23 System Agent (SA) Configuration
■ Memory Configuration
Memory Configuration Parameters.
■ Graphic Configuration Graphics Configuration.
■ VT-d
VT-d capability.
■ Above 4GB MMIO BIOS assignment
Enable/Disable above 4GB memory mapped IO BIOS assignment. This is enabled automatically when the aperture size is set to 2048MB.
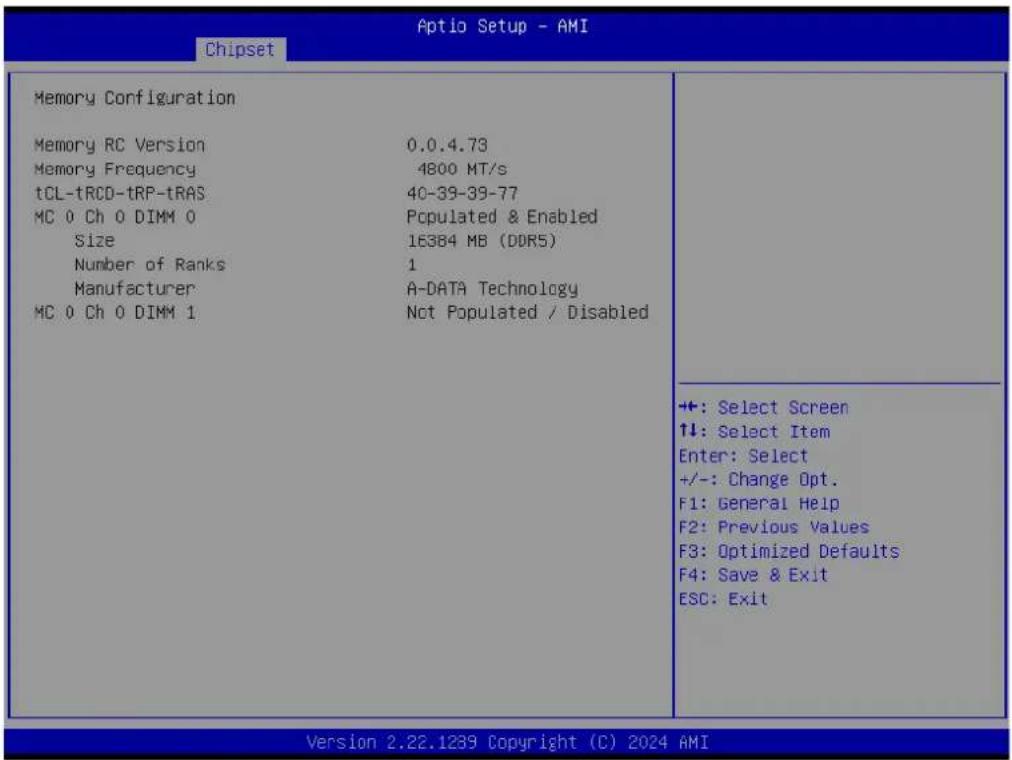
3.5.1.1 Memory Configuration
text_image
Aptio Setup - AMI Chipset Memory Configuration Memory RC Version 0.0.4.73 Memory Frequency 4800 MT/s tCL-tRCD-tRP-tRAS 40-39-39-77 MC 0 Ch 0 DIMM 0 Populated & Enabled Size 16384 MB (DDR5) Number of Ranks 1 Manufacturer A-DATA Technology MC 0 Ch 0 DIMM 1 Not Populated / Disabled +:-: Select Screen ↑↓: Select Item Enter: Select +/-: Change Opt. F1: General Help F2: Previous Values F3: Optimized Defaults F4: Save & Exit ESC: Exit Version 2.22.1239 Copyright (C) 2024 AMIFigure 3.24 Memory Configuration
3.5.1.2 Graphics Configuration

text_image
Aptio Setup - AMI Chipset Graphics Configuration Internal Graphics [Auto] GTT Size [8MB] Aperture Size [256MB] LCD Control Keep IGFX enabled based on the setup options. +: Select Screen ↑↓: Select Item Enter: Select +/-: Change Opt. F1: General Help F2: Previous Values F3: Optimized Defaults F4: Save & Exit ESC: Exit Version 2.22.1239 Copyright (C) 2024 AMIFigure 3.25 Graphics Configuration
Internal Graphics
Keep IGFX enabled based on the setup options.
GTT Size
Select the GTT size.
Aperture Size
Select the aperture size. Note: Above 4GB MMIO BIOS assignment is atomically enabled when selecting 2048MB aperture. To use this feature, please disable CSM support.
LCD Control
LCD control.
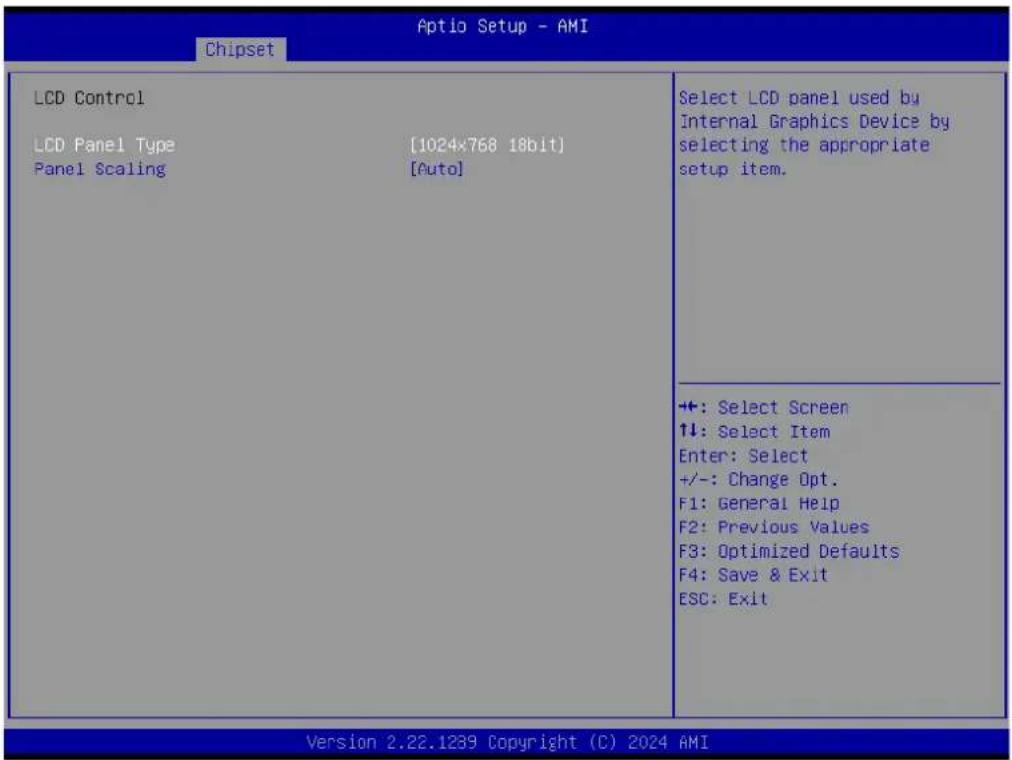
LCD Control
text_image
Chipset Aptio Setup - AMI LCD Control LCD Panel Type [1024x768 18bit] Panel Scaling [Auto] Select LCD panel used by Internal Graphics Device by selecting the appropriate setup item. +:- Select Screen ↑↓: Select Item Enter: Select +/-: Change Opt. F1: General Help F2: Previous Values F3: Optimized Defaults F4: Save & Exit ESC: Exit Version 2.22.1239 Copyright (C) 2024 AMIFigure 3.26 LCD Control
- LCD Panel Type
Select the LCD panel used by the Internal Graphics Device by selecting the appropriate setup item.
- Panel Scaling
Select the LCD panel scaling option used by the Internal Graphics Device.
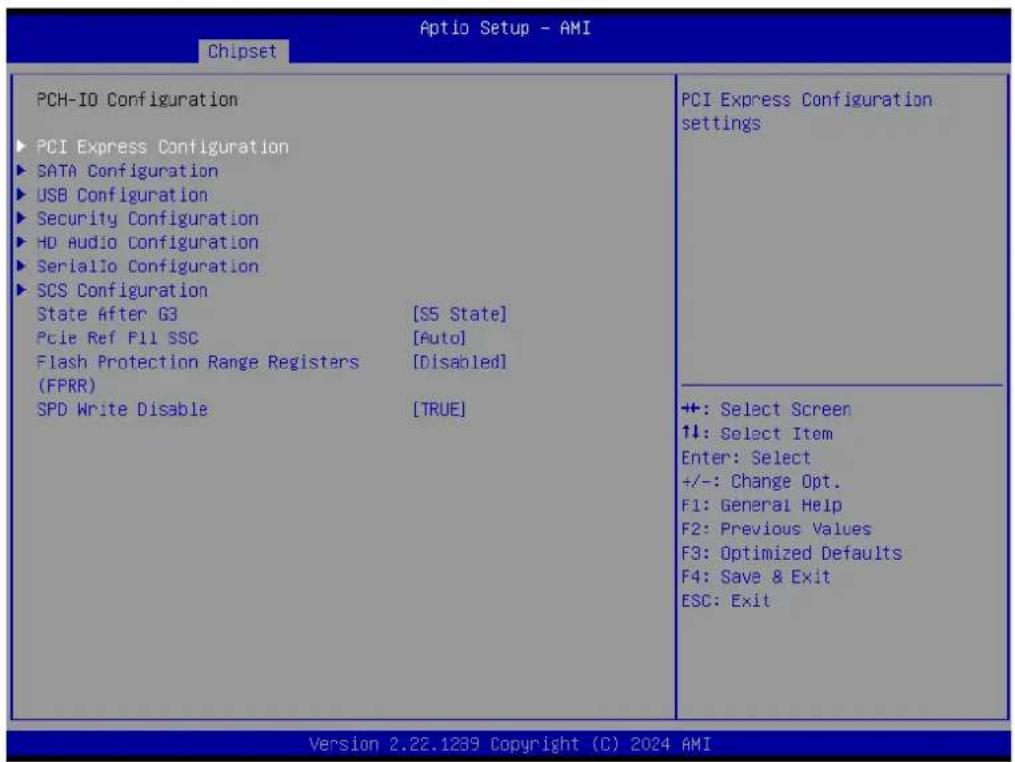
3.5.2 PCH-IO Configuration
text_image
Aptio Setup - AMI Chipset PCH-IO Configuration PCI Express Configuration SATA Configuration USB Configuration Security Configuration HD Audio Configuration SerialTo Configuration SCS Configuration State After G3 [SS State] Pcie Ref P11 SSC [Auto] Flash Protection Range Registers [Disabled] (FPRR) SPD Write Disable [TRUE] PCI Express Configuration settings +: Select Screen ↑↓: Select Item Enter: Select +/-: Change Opt. F1: General Help F2: Previous Values F3: Optimized Defaults F4: Save & Exit ESC: Exit Version 2.22.1289 Copyright (C) 2024 AMIFigure 3.27 PCH-IO Configuration
PCI Express Configuration
PCI Express Configuration settings.
■ SATA Configuration
SATA device option settings.
USB Configuration
USB Configuration settings.
■ Security Configuration
Security Configuration settings.
■ HD Audio Configuration
HD audio subsystem configuration settings.
Seriallo Configuration
Seriallo configuration settings.
■ SCS Configuration
Storage and Communication Subsystem (SCS) Configuration.
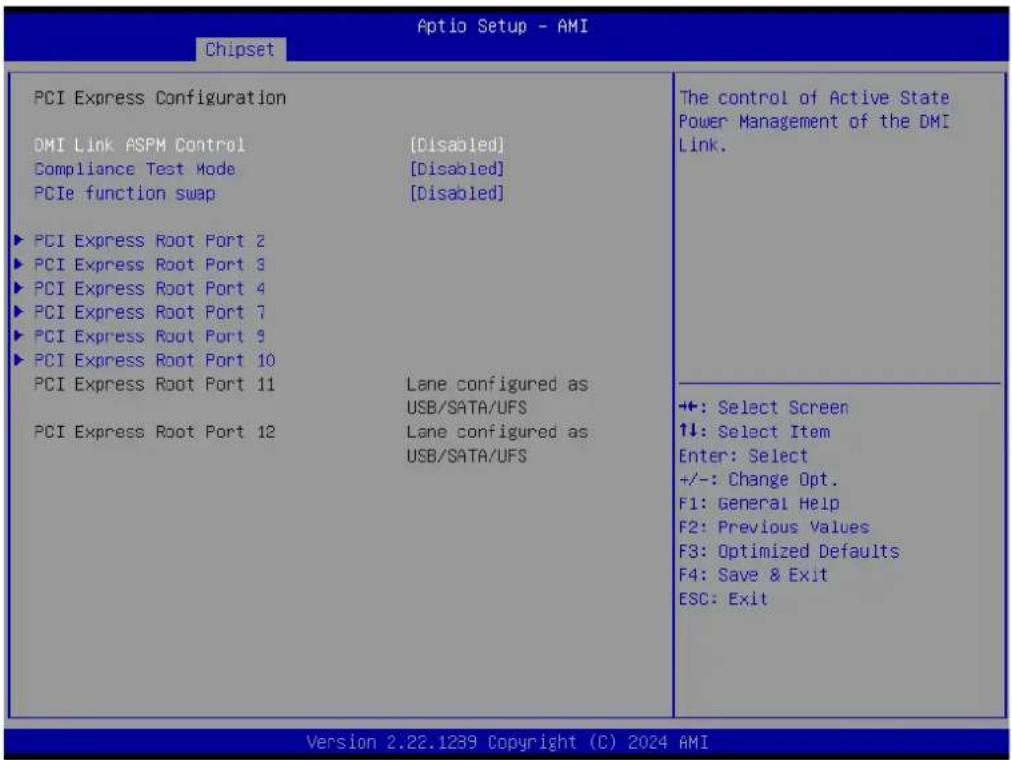
3.5.2.1 PCI Express Configuration
text_image
Aptio Setup - AMI Chipset PCI Express Configuration DMI Link ASPM Control [Disabled] Compliance Test Mode [Disabled] PCIe function swap [Disabled] PCI Express Root Port 2 PCI Express Root Port 3 PCI Express Root Port 4 PCI Express Root Port 7 PCI Express Root Port 9 PCI Express Root Port 10 PCI Express Root Port 11 Lane configured as USB/SATA/UFS PCI Express Root Port 12 Lane configured as USB/SATA/UFS The control of Active State Power Management of the DMI Link. +:-: Select Screen ↑↓: Select Item Enter: Select +/-: Change Opt. F1: General Help F2: Previous Values F3: Optimized Defaults F4: Save & Exit ESC: Exit Version 2.22.1239 Copyright (C) 2024 AMIFigure 3.28 PCI Express Configuration
■ DMI Link ASPM Control
The control of Active State Power Management of the DMI Link.
■ Compliance Test Mode
Enable when using a Compliance Load Board.
PCIe function swap
When Disabled, this prevents PCIE rootport function swap. If any function other than 0th is enabled, 0th will become visible.
PCI Express Root Port 2
PCI Express Root Port Settings.
PCI Express Root Port 3
PCI Express Root Port Settings.
PCI Express Root Port 4
PCI Express Root Port Settings.
PCI Express Root Port 7
PCI Express Root Port Settings.
PCI Express Root Port 9
PCI Express Root Port Settings.
PCI Express Root Port 10
PCI Express Root Port Settings.
PCI Express Root Port 2

text_image
Aptio Setup - AMI Chipset PCI Express Root Port 2 [Enabled] ASPM [Disabled] Hot Plug [Disabled] PCIe Speed [Auto] Control the PCI Express Root Port. +: Select Screen ↑↓: Select Item Enter: Select +/-: Change Opt. F1: General Help F2: Previous Values F3: Optimized Defaults F4: Save & Exit ESC: Exit Version 2.22.1239 Copyright (C) 2024 AMIFigure 3.29 PCI Express Root Port 2
- PCI Express Root Port 2
Control the PCI Express Root Port.
- ASPM
Set the ASPM Level: Force L0s – Force all links to L0s State AUTO – BIOS auto configure DISABLE – Disables ASPM.
- Hot Plug
PCI Express Hot Plug Enable/Disable.
- PCIe Speed
Configure PCIe Speed.
PCI Express Root Port 3

text_image
Aptio Setup - AMI Chipset PCI Express Root Port 3 [Enabled] ASPM [Disabled] Hot Plug [Disabled] PCIe Speed [Auto] Control the PCI Express Root Port. +:-: Select Screen ↑↓: Select Item Enter: Select +/-: Change Opt. F1: General Help F2: Previous Values F3: Optimized Defaults F4: Save & Exit ESC: Exit Version 2.22.1289 Copyright (C) 2024 AMIFigure 3.30 PCI Express Root Port 3
- PCI Express Root Port 3
Control the PCI Express Root Port. - ASPM
Set the ASPM Level: Force L0s – Force all links to L0s State AUTO – BIOS auto configure DISABLE – Disables ASPM. - Hot Plug
PCI Express Hot Plug Enable/Disable. - PCIe Speed
Configure PCIe Speed.
PCI Express Root Port 4

text_image
Aptio Setup - AMI Chipset PCI Express Root Port 4 [Enabled] ASPM [Disabled] Hot Plug [Disabled] PCIe Speed [Auto] Control the PCI Express Root Port. +: Select Screen ↑↓: Select Item Enter: Select +/-: Change Opt. F1: General Help F2: Previous Values F3: Optimized Defaults F4: Save & Exit ESC: Exit Version 2.22.1239 Copyright (C) 2024 AMIFigure 3.31 PCI Express Root Port 4
- PCI Express Root Port 4
Control the PCI Express Root Port.
- ASPM
Set the ASPM Level: Force L0s – Force all links to L0s State AUTO – BIOS auto configure DISABLE – Disables ASPM.
- Hot Plug
PCI Express Hot Plug Enable/Disable.
- PCIe Speed
Configure PCIe Speed.
PCI Express Root Port 7

text_image
Aptio Setup - AMI Chipset PCI Express Root Port 7 [Enabled] ASPM [Disabled] Hot Plug [Disabled] PCIe Speed [Auto] Control the PCI Express Root Port. +:-: Select Screen ↑↓: Select Item Enter: Select +/-: Change Opt. F1: General Help F2: Previous Values F3: Optimized Defaults F4: Save & Exit ESC: Exit Version 2.22.1289 Copyright (C) 2024 AMIFigure 3.32 PCI Express Root Port 7
- PCI Express Root Port 7
Control the PCI Express Root Port. - ASPM
Set the ASPM Level: Force L0s – Force all links to L0s State AUTO – BIOS auto configure DISABLE – Disables ASPM. - Hot Plug
PCI Express Hot Plug Enable/Disable. - PCIe Speed
Configure PCIe Speed.
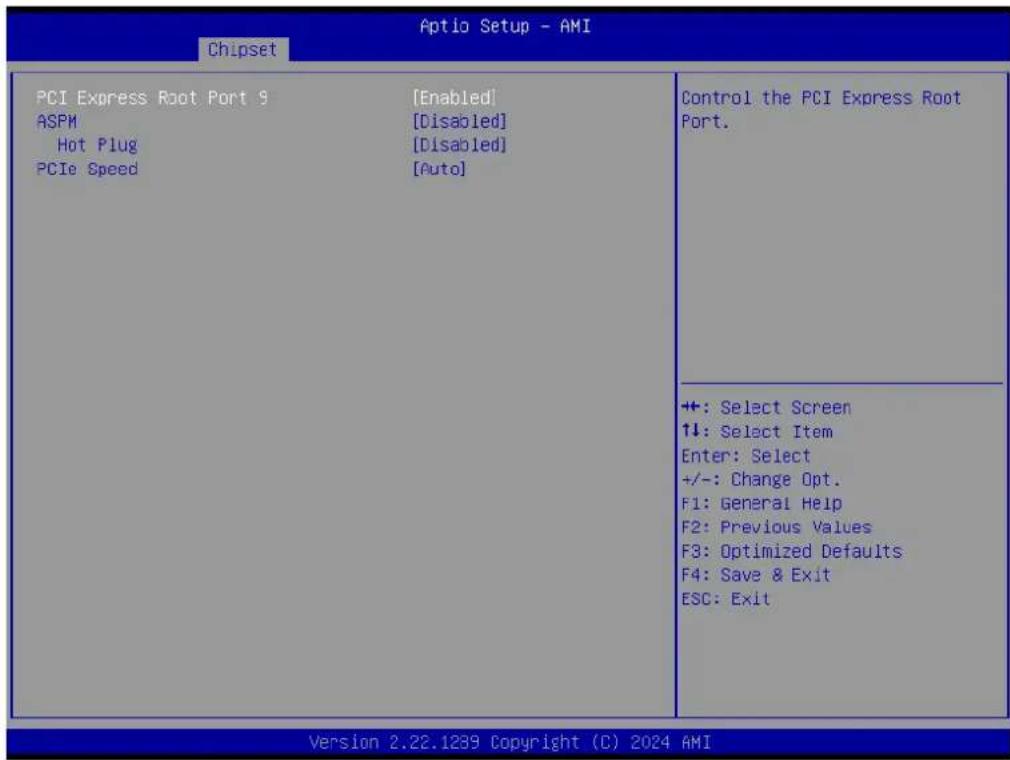
PCI Express Root Port 9
text_image
Aptio Setup - AMI Chipset PCI Express Root Port 9 [Enabled] ASPM [Disabled] Hot Plug [Disabled] PCIe Speed [Auto] Control the PCI Express Root Port. +: Select Screen ↑↓: Select Item Enter: Select +/-: Change Opt. F1: General Help F2: Previous Values F3: Optimized Defaults F4: Save & Exit ESC: Exit Version 2.22.1239 Copyright (C) 2024 AMIFigure 3.33 PCI Express Root Port 9
- PCI Express Root Port 9
Control the PCI Express Root Port.
- ASPM
Set the ASPM Level: Force L0s – Force all links to L0s State AUTO – BIOS auto configure DISABLE – Disables ASPM.
- Hot Plug
PCI Express Hot Plug Enable/Disable.
- PCIe Speed
Configure PCIe Speed.
PCI Express Root Port 10
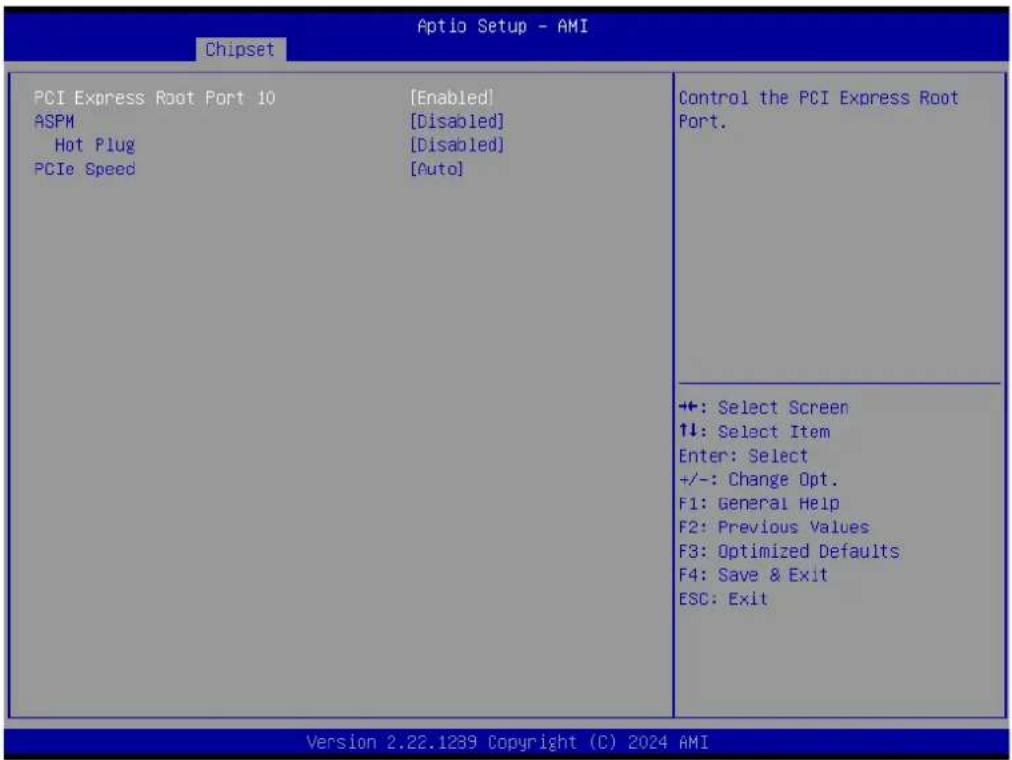
text_image
Aptio Setup - AMI Chipset PCI Express Root Port 10 [Enabled] ASPM [Disabled] Hot Plug [Disabled] PCIe Speed [Auto] Control the PCI Express Root Port. +:-: Select Screen ↑↓: Select Item Enter: Select +/-: Change Opt. F1: General Help F2: Previous Values F3: Optimized Defaults F4: Save & Exit ESC: Exit Version 2.22.1289 Copyright (C) 2024 AMIFigure 3.34 PCI Express Root Port 10
- PCI Express Root Port 10
Control the PCI Express Root Port. - ASPM
Set the ASPM Level: Force L0s – Force all links to L0s State AUTO – BIOS auto configure DISABLE – Disables ASPM. - Hot Plug
PCI Express Hot Plug Enable/Disable. - PCIe Speed
Configure PCIe Speed.
3.5.2.2 USB Configuration
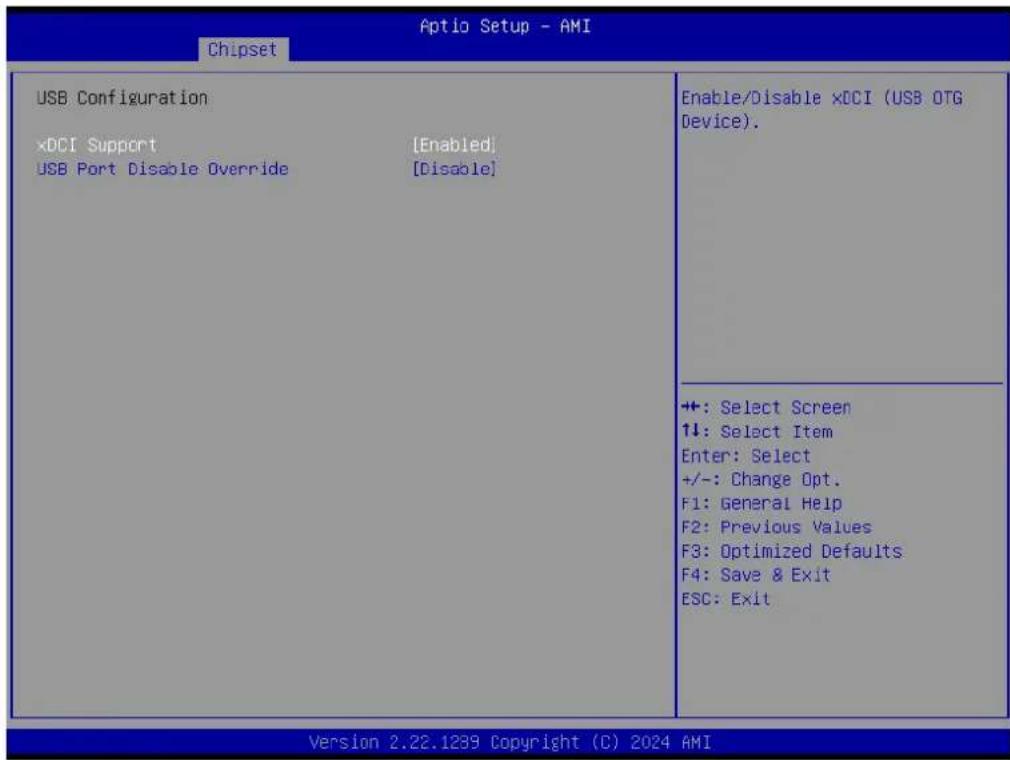
text_image
Chipset Aptio Setup - AMI USB Configuration ×DCI Support [Enabled] USB Port Disable Override [Disable] Enable/Disable xDCI (USB OTG Device). +: Select Screen ↑↓: Select Item Enter: Select +/-: Change Opt. F1: General Help F2: Previous Values F3: Optimized Defaults F4: Save & Exit ESC: Exit Version 2.22.1239 Copyright (C) 2024 AMIFigure 3.35 USB Configuration
xDCI Support
Enable/Disable xDCI (USB OTG Device).
USB Port Disable Override
Selectively Enable/Disable the corresponding USB port from reporting a Device Connection to the controller.
3.5.2.3 Security Configuration
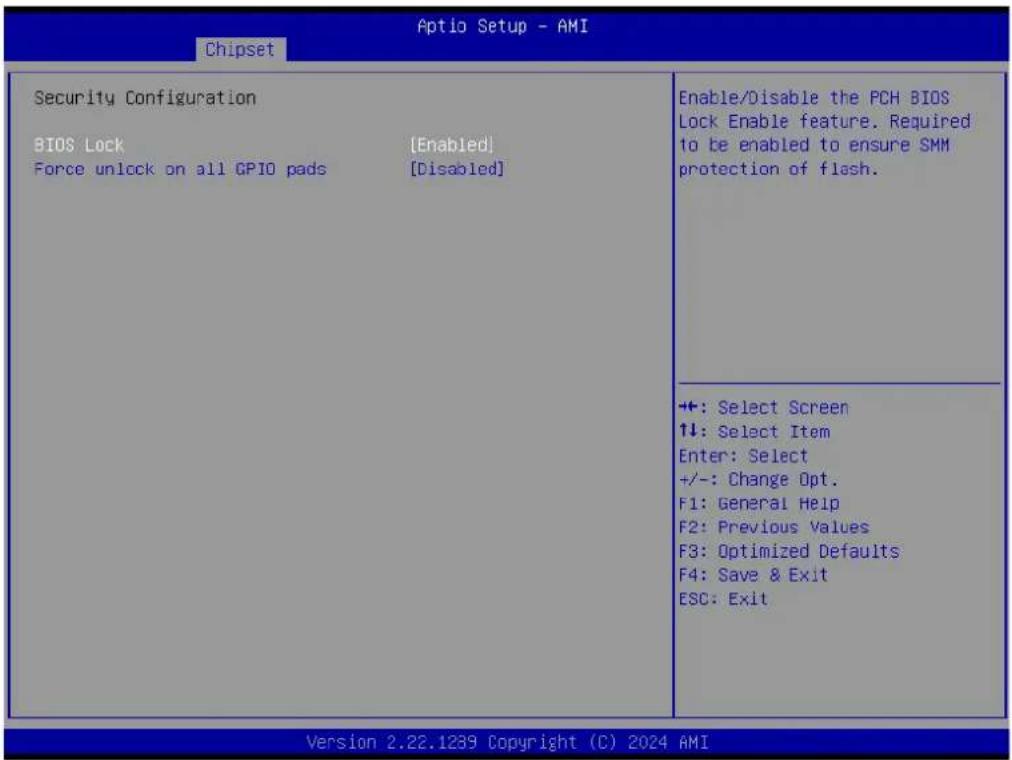
text_image
Chipset Aptio Setup - AMI Security Configuration BIOS Lock [Enabled] Force unlock on all GPIO pads [Disabled] Enable/Disable the PCH BIOS Lock Enable feature. Required to be enabled to ensure SMM protection of flash. +:-: Select Screen ↑↓: Select Item Enter: Select +/-: Change Opt. F1: General Help F2: Previous Values F3: Optimized Defaults F4: Save & Exit ESC: Exit Version 2.22.1289 Copyright (C) 2024 AMIFigure 3.36 Security Configuration
BIOS Lock
Enable/Disable the PCH BIOS Lock Enable feature. This is required to be enabled to ensure SMM protection of flash.
■ Force unlock on all GPIO pads
If Enabled, BIOS will force all GPIO pads to be in an unlocked state.
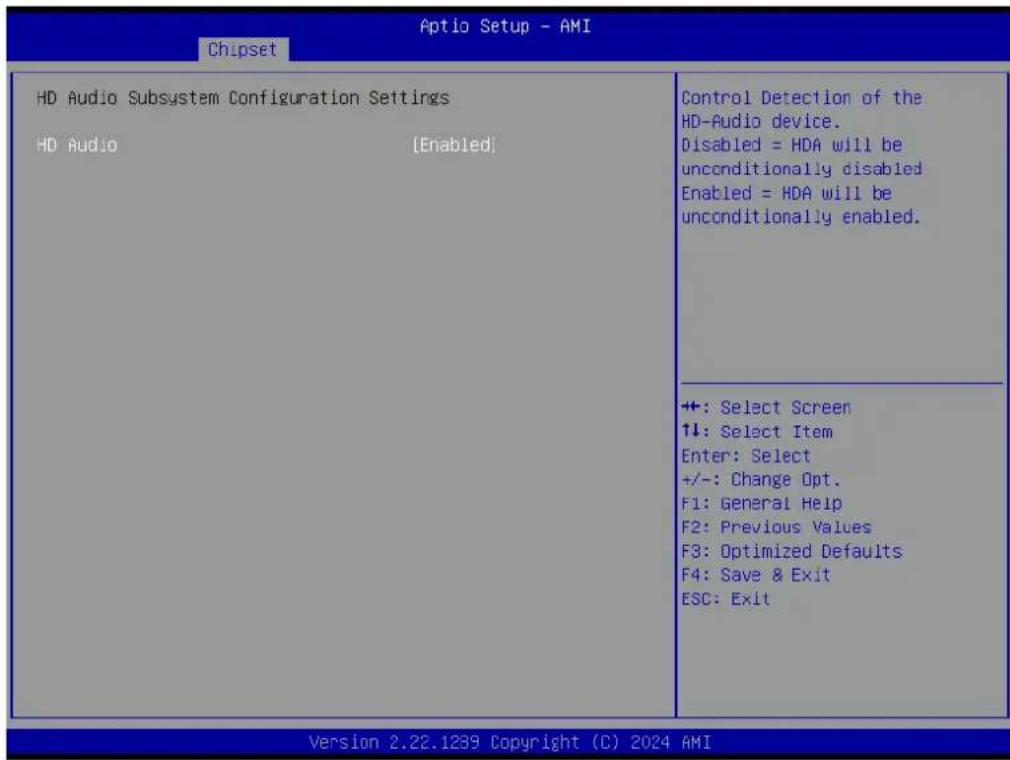
3.5.2.4 HD Audio Subsystem Configuration Settings
text_image
Aptio Setup - AMI Chipset HD Audio Subsystem Configuration Settings HD Audio [Enabled] Control Detection of the HD-Audio device. Disabled = HDA will be unconditionally disabled Enabled = HDA will be unconditionally enabled. +: Select Screen ↑↓: Select Item Enter: Select +/-: Change Opt. F1: General Help F2: Previous Values F3: Optimized Defaults F4: Save & Exit ESC: Exit Version 2.22.1239 Copyright (C) 2024 AMIFigure 3.37 HD Audio Subsystem Configuration Settings
HD Audio
Control Detection of the HD Audio device. Disabled=HDA will be unconditionally disabled. Enabled=HDA will be unconditionally enabled.
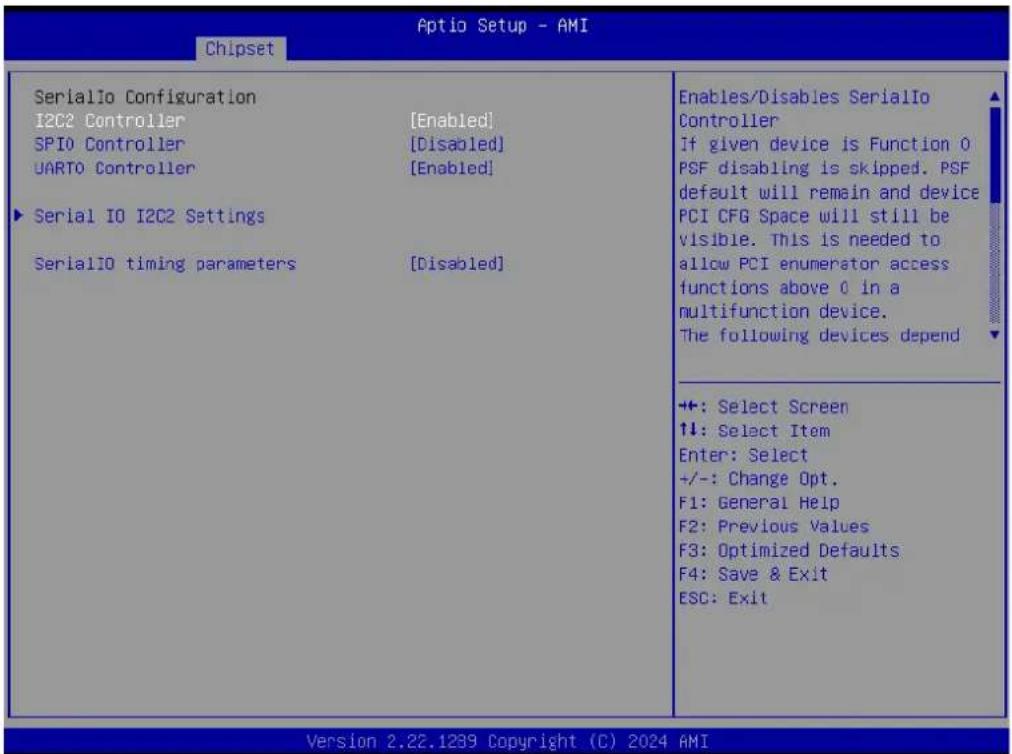
3.5.2.5 Seriallo Configuration
text_image
Aptio Setup - AMI Chipset SerialIO Configuration I2C2 Controller [Enabled] SPI0 Controller [Disabled] UART0 Controller [Enabled] Serial IO I2C2 Settings SerialIO timing parameters [Disabled] Enables/Disables SerialIo Controller If given device is Function 0 PSF disabling is skipped. PSF default will remain and device PCI CFG Space will still be visible. This is needed to allow PCI enumerator access functions above 0 in a multifunction device. The following devices depend +: Select Screen +: Select Item Enter: Select +/-: Change Opt. F1: General Help F2: Previous Values F3: Optimized Defaults F4: Save & Exit ESC: Exit Version 2.22.1289 Copyright (C) 2024 AMIFigure 3.38 Seriallo Configuration
I2C2 Controller
Enable/Disable the Seriallo Controller.
If a given device has Function 0 PSF disabling skipped, PSF default will remain and device PCI CFG Space will still be visible. This is needed to allow PCI enumerator access functions above 0 in a multifunction device.
The following devices depend on each other:
I2C0 and I2C1,2,3
UART0 and UART1,SPI0,1
UART2 and I2C4,5
UART 0 (00:30:00) cannot be disabled when:
- A child device is enabled like CNVi Bluetooth (_SB.PC00.UA00.BTH0)
UART 0 (00:30:00) cannot be enabled when:
- I2S Audio codec is enabled (_SB.PC00.I2C0.HDAC)
■ SPIO Controller
Enable/Disable the Seriallo Controller.
If a given device has Function 0 PSF disabling skipped, the PSF default will remain and device PCI CFG Space will still be visible. This is needed to allow PCI enumerator access functions above 0 in a multifunction device.
The following devices depend on each other:
I2C0 and I2C1,2,3
UART0 and UART1,SPI0,1
UART2 and I2C4,5
UART 0 (00:30:00) cannot be disabled when:
- A child device is enabled, such as CNVi Bluetooth (_SB.PC00.UA00.BTH0)
UART 0 (00:30:00) cannot be enabled when:
- I2S Audio codec is enabled (_SB.PC00.I2C0.HDAC)
UART0 Controller
Set UART0 mode – DBG is used for BIOS log print and/or Kernel OS Debug – COM – 16550 compatible serial port with Power Gating support.
Serial IO I2C2 Settings
Configure Seriallo Controller.
SerialIO timing parameters
Enables additional timing parameters for all Seriallo controllers. Defaults can be changed in each controller setting. A platform restart is required to apply changes.
Serial IO I2C2 Settings

text_image
Aptio Setup - AMI Chipset Serial IO I2C2 Settings Timing parameters disabled +: Select Screen ↑↓: Select Item Enter: Select +/-: Change Opt. F1: General Help F2: Previous Values F3: Optimized Defaults F4: Save & Exit ESC: Exit Version 2.22.1239 Copyright (C) 2023 AMIFigure 3.39 Serial IO I2C2 Settings
3.5.2.6 SCS Configuration
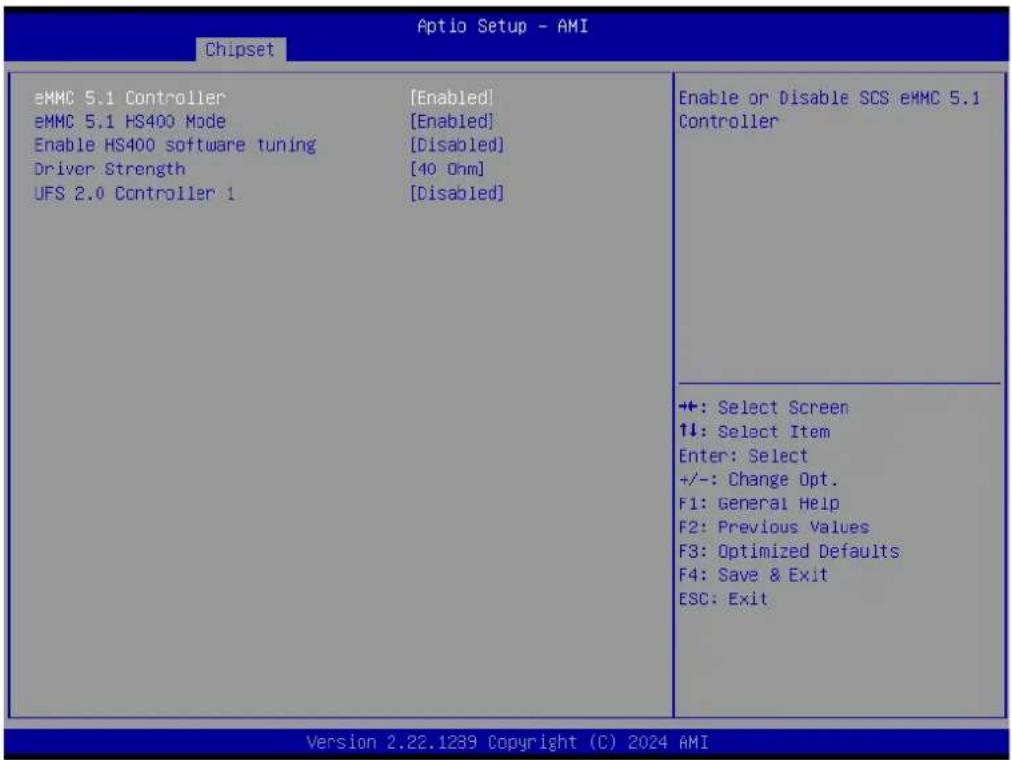
text_image
Aptio Setup - AMI Chipset eMMC 5.1 Controller [Enabled] eMMC 5.1 HS400 Mode [Enabled] Enable HS400 software tuning [Disabled] Driver Strength [40 Ohm] UFS 2.0 Controller 1 [Disabled] Enable or Disable SCS eMMC 5.1 Controller +:-: Select Screen ↑↓: Select Item Enter: Select +/-: Change Opt. F1: General Help F2: Previous Values F3: Optimized Defaults F4: Save & Exit ESC: Exit Version 2.22.1289 Copyright (C) 2024 AMIFigure 3.40 SCS Configuration
■ eMMC 5.1 Controller
Enable/Disable SCS eMMC 5.1 Controller.
eMMC 5.1 HS400 Mode
Enable/Disable SCS eMMC 5.1 HS400 Mode.
■ Enable HS400 software tuning
Software tuning should improve eMMC HS400 stability at the expense of boot time.
Driver Strength
Sets I/O driver strength.
■ UFS 2.0 Controller 1
Enable/Disable UFS 2.0 Controller.
3.6 Security Chipset
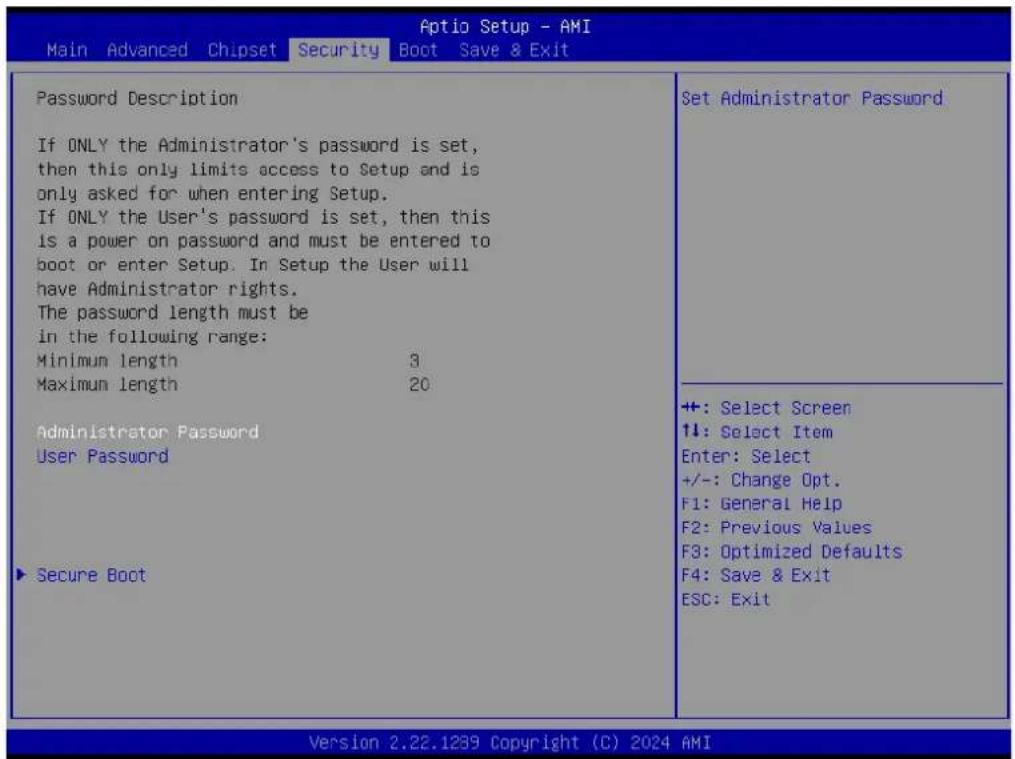
text_image
Aptio Setup - AMI Main Advanced Chipset Security Boot Save & Exit Password Description If ONLY the Administrator's password is set, then this only limits access to Setup and is only asked for when entering Setup. If ONLY the User's password is set, then this is a power on password and must be entered to boot or enter Setup. In Setup the User will have Administrator rights. The password length must be in the following range: Minimum length 3 Maximum length 20 Administrator Password User Password ► Secure Boot Set Administrator Password +: Select Screen ↑↓: Select Item Enter: Select +/-: Change Opt. F1: General Help F2: Previous Values F3: Optimized Defaults F4: Save & Exit ESC: Exit Version 2.22.1239 Copyright (C) 2024 AMIFigure 3.41 Security Chipset
Administrator Password
Set Setup Administrator Password.
User Password
Set User Password.
Secure Boot
Secure Boot Configuration.
3.6.1 Secure Boot
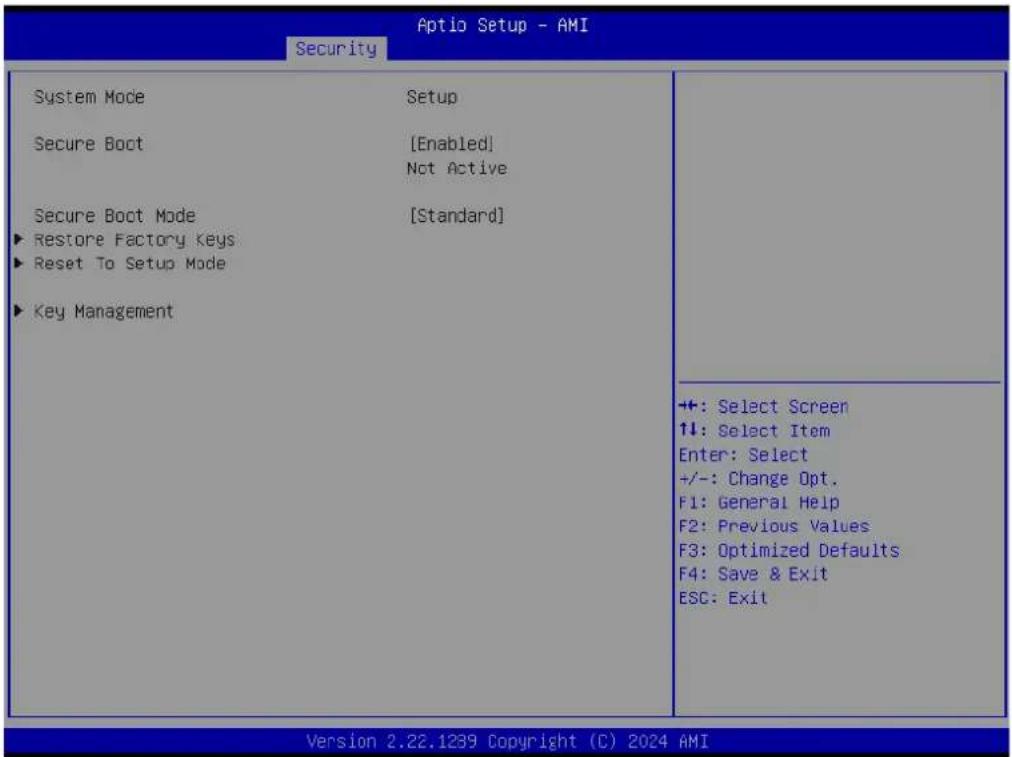
text_image
Aptio Setup - AMI Security System Mode Setup Secure Boot [Enabled] Not Active Secure Boot Mode [Standard] ►Restore Factory Keys ►Reset To Setup Mode ►Key Management ++: Select Screen ↑↓: Select Item Enter: Select +/-: Change Opt. F1: General Help F2: Previous Values F3: Optimized Defaults F4: Save & Exit ESC: Exit Version 2.22.1239 Copyright (C) 2024 AMIFigure 3.42 Secure Boot
Secure Boot
The Secure Boot feature is Active if Secure Boot is Enabled, Platform Key (PK) is enrolled and the System is in User mode. The mode change requires a platform reset.
- Secure Boot Mode
Secure Boot mode options:
Standard or Custom.
In Custom mode, Secure Boot Policy variables can be configured by a physically present user without full authentication.
3.7 Boot Setup

text_image
Aptio Setup - AMI Main Advanced Chipset Security Boot Save & Exit Boot Configuration Setup Prompt Timeout Bootup NumLock State Quiet Boot 1 [On] [Disabled] Boot Option Priorities Boot Option #1 [LEFI: SKYMEDI USB Drive, Partition 1 (SKYMEDI USB Drive)] Driver Option Priorities Number of seconds to wait for setup activation key. 65535(0xFFFF) means indefinite waiting. ++: Select Screen ↑↓: Select Item Enter: Select +/-: Change Opt. F1: General Help F2: Previous Values F3: Optimized Defaults F4: Save & Exit ESC: Exit Version 2.22.1239 Copyright (C) 2024 AMIFigure 3.43 Boot Setup
Setup Prompt Timeout
Number of seconds to wait for a setup activation key. 65535(0xFFFF) means indefinite waiting.
■ Bootup NumLock State
Select the keyboard NumLock state.
Quiet Boot
Enable/Disable the Quiet Boot option.
■ Boot Option #1
Sets the system boot order.
3.8 Save & Exit
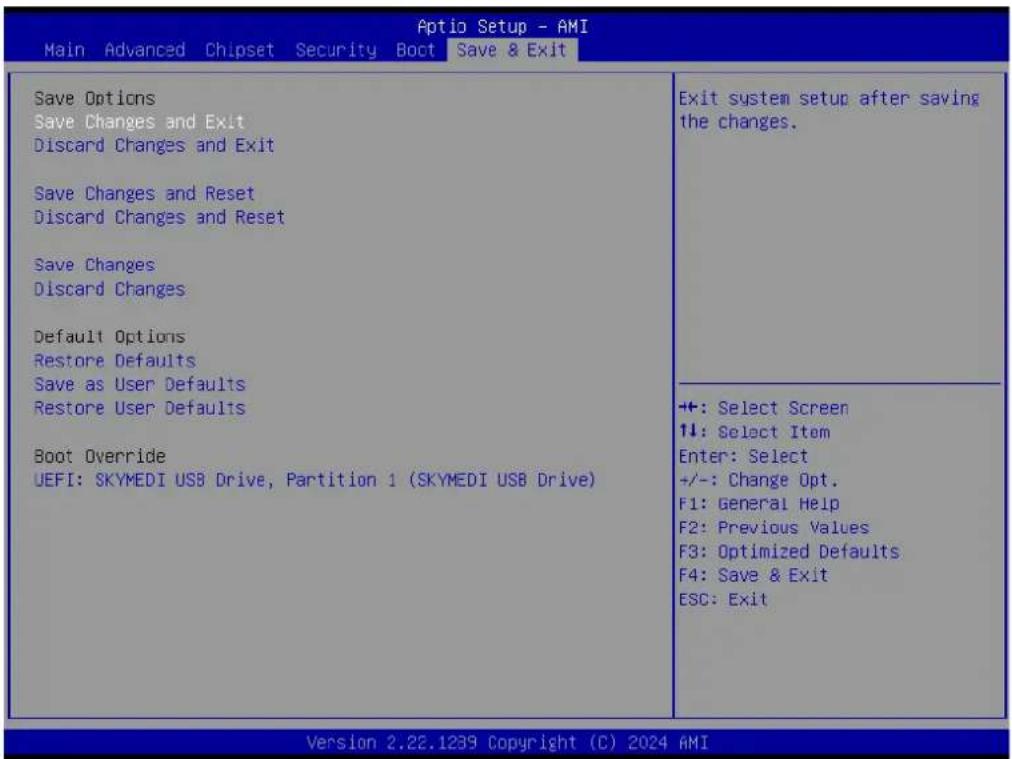
text_image
Aptio Setup - AMI Main Advanced Chipset Security Boot Save & Exit Save Options Save Changes and Exit Discard Changes and Exit Save Changes and Reset Discard Changes and Reset Save Changes Discard Changes Default Options Restore Defaults Save as User Defaults Restore User Defaults Boot Override UEFI: SKYMEDI USB Drive, Partition 1 (SKYMEDI USB Drive) Exit system setup after saving the changes. ++: Select Screen ↑↓: Select Item Enter: Select +/-: Change Opt. F1: General Help F2: Previous Values F3: Optimized Defaults F4: Save & Exit ESC: Exit Version 2.22.1239 Copyright (C) 2024 AMIFigure 3.44 Save & Exit
■ Save Changes and Exit
Exit system setup after saving the changes.
- Discard Changes and Exit
Exit system setup without saving any changes.
■ Save Changes and Reset
Reset the system after saving the changes.
- Discard Changes and Reset
Reset system setup without saving any changes.
■ Save Changes
Save changes done so far to any of the setup options.
- Discard Changes
- Discard changes done so far to any of the setup options.
- Restore Defaults
Restore/Load default values for all the setup options.
■ Save as User Defaults
Save the changes done so far as User Defaults.
- Restore User Defaults
Restore the User Defaults to all the setup options.
Boot Override
Chapter 4
S/W Introduction & Installation
■ Software Introduction
Driver Installation
■ Advantech iManager
4.1 Software Introduction
The mission of Advantech Embedded Software Services is to "Enhance quality of life with Advantech platforms and Microsoft Windows embedded technology." We enable Windows Embedded software products on Advantech platforms to more effectively support the embedded computing community. Customers are freed from the hassle of dealing with multiple vendors (hardware suppliers, system integrators, embedded OS distributors) for projects. Our goal is to make Windows Embedded Software solutions easily and widely available to the embedded computing community.
4.2 Driver Installation
The Intel® Chipset Software Installation (CSI) utility installs the Windows INF files that outline to the operating system how the chipset components will be configured.
4.2.1 Windows Driver Setup
To install the drivers on a Windows-based operating system, please connect to the Internet and go to http://support.advantech.com.tw where you can download the drivers that you want to install. Follow the Driver Setup instructions to complete the installation.
4.2.2 Other OS
Linux Ubuntu.
4.3 Advantech iManager
Advantech's platforms come equipped with iManager, a microcontroller that provides embedded features for system integrators. These features have been relocated from the OS/BIOS level to the board level to increase reliability and simplify integration. iManager operates independently of the operating system, capable of tracking boot times and running hours, monitoring device health, and deploying an advanced watchdog to manage errors in real time. iManager also comes with a secure and encrypted EEPROM for storing important security keys or other customer-defined information. All embedded functions are configured through an API and include corresponding utilities. These APIs adhere to PICMG EAPI (Embedded Application Programmable Interface) specifications, simplifying integration and accelerating development schedules while ensuring software continuity when upgrading hardware. For detailed instructions on using the APIs and utilities, please refer to the Advantech iManager 2.0 Software API User Manual.
Control

GPIO
General Purpose Input/Output is a flexible parallel interface that allows a variety of custom connections. It allows users to monitor the level of signal input or set the output status to switch on/off a device. Our API also provides Programmable GPIO, which allows developers to dynamically set the GPIO input or output status.

SMBus
SMBus is the System Management Bus defined by Intel® Corporation in 1995. It is used in personal computers and servers for low-speed system management communications. The SMBus API allows a developer to interface a embedded system environment and transfer serial messages using the SMBus protocols, allowing multiple simultaneous device control.

PC
^1 PC is a bi-directional two wire bus that was developed by Philips for use in their televisions in the 1980s. The ^2 PC API allows a developer to interface with an embedded system environment and transfer serial messages using the ^3 PC protocols, allowing multiple simultaneous device control.
Display

Brightness Control
The Brightness Control API allows a developer to interface with an embedded device to easily control brightness.

Backlight
The Backlight API allows a developer to control the backlight (screen) on/off in an embedded device.
Monitor

Watchdog
A watchdog timer (WDT) is a device that performs a specific operation after a certain period of time if something goes wrong and the system does not recover on its own. A watchdog timer can be programmed to perform a warm boot (restarting the system) after a certain number of seconds.

Hardware Monitor
The Hardware Monitor (HWM) API is a system health supervision API that inspects certain condition indexes, such as fan speed, temperature and voltage.

Hardware Control
The Hardware Control API allows developers to set the PWM (Pulse Width Modulation) value to adjust fan speed or other devices; it can also be used to adjust the LCD brightness.
Power Saving

CPU Speed
Make use of Intel SpeedStep technology to reduce power power consumption. The system will automatically adjust the CPU Speed depending on system loading.

System Throttling
Refers to a series of methods for reducing power consumption in computers by lowering the clock frequency. These APIs allow the user to lower the clock from 87.5% to 12.5%.
Appendix A
Pin Assignment
This appendix provides information about the hardware pin assignments for the SOM-6833 CPU System on Module
Sections include:
■ SOM-6833 Type 6 Pin Assignments
A.1 SOM-6833 Pin Assignment
This section provides pin assignments for SOM-6833 on the COM Express connector, following the COMR.0 R3.1 Type 6 pin-out specifications. For detailed guidance on using these pins and for design assistance, please contact Advantech for a design guide, checklist, reference schematic, and additional hardware/software support.
Table A.1: SOM-6833 Pin Assignments
| SOM-6833 Rows A,B | |||
| A1 GND (FIXED) B1 GND (FIXED) | |||
| A2 GBE0_MDI3- B2 GBE0_ACT# | |||
| A3 GBE0_MDI3+ B3 LPC_FRAME# | |||
| A4 GBE0_LINK_MID# B4 LPC_AD0 | |||
| A5 GBE0_LINK_MAX# B5 LPC_AD1 | |||
| A6 GBE0_MDI2- B6 LPC_AD2 | |||
| A7 GBE0_MDI2+ B7 LPC_AD3 | |||
| A8 GBE0_LINK# B8 ESPI_ALERT0#(optional) | |||
| A9 GBE0_MDI1- B9 N/A | |||
| A10 GBE0_MDI1+ B10 LPC_CLK | |||
| A11 GND (FIXED) B11 GND (FIXED) | |||
| A12 GBE0_MDI0- B12 PWRBTN# | |||
| A13 GBE0_MDI0+ B13 SMB_CK | |||
| A14 N/A | B14 | SMB_DAT | |
| A15 SUS_S3# | B15 | SMB_ALERT# | |
| A16 SATA0_TX+ | B16 | SATA1_TX+ | |
| A17 SATA0_TX- | B17 | SATA1_TX- | |
| A18 SUS_S4# | B18 | SUS_STAT#/ESPI_RESET# | |
| A19 SATA0_RX+ | B19 | SATA1_RX+ | |
| A20 SATA0_RX- | B20 | SATA1_RX- | |
| A21 GND (FIXED) B21 GND (FIXED) | |||
| A22 N/A | B22 | N/A | |
| A23 N/A | B23 | N/A | |
| A24 SUS_S5# | B24 | PWR_OK | |
| A25 N/A | B25 | N/A | |
| A26 N/A | B26 | N/A | |
| A27 BATLOW# | B27 | WDT | |
| A28 (S)ATA_ACT# | B28 | N/A | |
| A29 HDA_SYNC | B29 | HDA_SDIN1 | |
| A30 HDA_RST# | B30 | HDA_SDIN0 | |
| A31 GND (FIXED) B31 GND (FIXED) | |||
| A32 HDA_BITCLK | B32 | SPKR | |
| A33 HDA_SDOUT | B33 | I2C_CK | |
| A34 BIOS_DIS0# | B34 | I2C_DAT | |
| A35 THRMTRIP# | B35 | THRM# | |
| A36 USB6- | B36 | USB7- | |
| A37 USB6+ | B37 | USB7+ | |
| A38 USB_6_7_OC# | B38 | USB_4_5_OC# | |
| A39 USB4- | B39 | USB5- | |
Table A.1: SOM-6833 Pin Assignments
| A40 USB4+ B40 USB5+ | |
| A41 GND (FIXED) B41 GND (FIXED) | |
| A42 USB2- B42 USB3- | |
| A43 USB2+ B43 USB3+ | |
| A44 USB_2_3_OC# B44 USB_0_1_OC# | |
| A45 USB0- B45 USB1- | |
| A46 USB0+ B46 USB1+ | |
| A47 VCC_RTC B47 ESPI_EN# | |
| A48 RSMRST_OUT# B48 N/A | |
| A49 GBE0_SDP B49 SYS_RESET# | |
| A50 LPC_SERIRQ/ESPI_CS1# B50 CB_RESET# | |
| A51 GND (FIXED) B51 GND (FIXED) | |
| A52 PCIE_TX5+ B52 PCIE_RX5+ | |
| A53 PCIE_TX5- B53 PCIE_RX5- | |
| A54 GPIO B54 GPO1 | |
| A55 PCIE_TX4+ B55 PCIE_RX4+ | |
| A56 PCIE_TX4- B56 PCIE_RX4- | |
| A57 GND B57 GPO2 | |
| A58 PCIE_TX3+ B58 PCIE_RX3+ | |
| A59 PCIE_TX3- B59 PCIE_RX3- | |
| A60 GND (FIXED) B60 GND (FIXED) | |
| A61 PCIE_TX2+ B61 PCIE_RX2+ | |
| A62 PCIE_TX2- B62 PCIE_RX2- | |
| A63 GPI1 B63 GPO3 | |
| A64 PCIE_TX1+ B64 PCIE_RX1+ | |
| A65 PCIE_TX1- | B65 PCIE_RX1- |
| A66 GND | B66 WAKE0# |
| A67 GPI2 | B67 WAKE1# |
| A68 PCIE_TX0+ B68 PCIE_RX0+ | |
| A69 PCIE_TX0- | B69 PCIE_RX0- |
| A70 GND (FIXED) B70 GND (FIXED) | |
| A71 LVDS_A0+ | B71 LVDS_B0+ |
| A72 LVDS_A0- | B72 LVDS_B0- |
| A73 LVDS_A1+ | B73 LVDS_B1+ |
| A74 LVDS_A1- | B74 LVDS_B1- |
| A75 LVDS_A2+ | B75 LVDS_B2+ |
| A76 LVDS_A2- | B76 LVDS_B2- |
| A77 LVDS_VDD_EN | B77 LVDS_B3+ |
| A78 LVDS_A3+ | B78 LVDS_B3- |
| A79 LVDS_A3- | B79 LVDS_BKLT_EN |
| A80 GND (FIXED) B80 GND (FIXED) | |
| A81 LVDS_A_CK+ | B81 LVDS_B_CK+ |
| A82 LVDS_A_CK- | B82 LVDS_B_CK- |
| A83 LVDS_I2C_CK | B83 LVDS_BKLT_CTRL |
| A84 LVDS_I2C_DAT | B84 VCC_5V_SBY |
| A85 GPI3 B85 VCC_5V_SBY | |
| A86 GP_SPI_MOSI | B86 VCC_5V_SBY |
Table A.1: SOM-6833 Pin Assignments
| A87 eDP_HPD B87 VCC_5V_SBY | |||
| A88 PCIE_CLK_REF+ B88 BIOS_DIS1# | |||
| A89 PCIE_CLK_REF- B89 N/A | |||
| A90 GND (FIXED) B90 GND (FIXED) | |||
| A91 SPI_POWER B91 N/A | |||
| A92 SPI_MISO B92 N/A | |||
| A93 GPO0 B93 N/A | |||
| A94 SPI_CLK B94 N/A | |||
| A95 SPI_MOSI B95 N/A | |||
| A96 TPM_PP B96 N/A | |||
| A97 N/A B97 SPI_CS# | |||
| A98 SER0_TX B98 GP_SPI_MISO | |||
| A99 SER0_RX B99 GP_SPI_CK | |||
| A100 GND (FIXED) B100 GND (FIXED) | |||
| A101 SER1_TX B101 FAN_PWMOUT | |||
| A102 SER1_RX B102 FAN_TACHIN | |||
| A103 LID# B103 SLEEP# | |||
| A104 VCC_12V B104 VCC_12V | |||
| A105 VCC_12V B105 VCC_12V | |||
| A106 VCC_12V B106 VCC_12V | |||
| A107 VCC_12V B107 VCC_12V | |||
| A108 VCC_12V B108 VCC_12V | |||
| A109 VCC_12V B109 VCC_12V | |||
| A110 GND (FIXED) B110 GND (FIXED) |
SOM-6833 Rows C,D
| C1 | GND (FIXED) D1 | GND (FIXED) | |
| C2 | GND | D2 | GND |
| C3 | USB_SSRX0- | D3 | USB_SSTX0- |
| C4 | USB_SSRX0+ | D4 | USB_SSTX0+ |
| C5 | GND | D5 | GND |
| C6 | USB_SSRX1- | D6 | USB_SSTX1- |
| C7 | USB_SSRX1+ | D7 | USB_SSTX1+ |
| C8 | GND | D8 | GND |
| C9 | USB_SSRX2- | D9 | USB_SSTX2- |
| C10 | USB_SSRX2+ | D10 USB_SSTX2+ | |
| C11 GND (FIXED) D11 GND (FIXED) | |||
| C12 | USB_SSRX3- | D12 USB_SSTX3- | |
| C13 | USB_SSRX3+ | D13 USB_SSTX3+ | |
| C14 | GND | D14 GND | |
| C15 | N/A | D15 DDI1_CTRLCLK_AUX+ | |
| C16 | N/A | D16 DDI1_CTRLCLK_AUX- | |
| C17 | N/A | D17 N/A | |
| C18 | GND | D18 N/A | |
| C19 | PCIE_RX6+ | D19 PCIE_TX6+ | |
| C20 | PCIE_RX6- | D20 PCIE_TX6- | |
| C21 | GND (FIXED) D21 GND (FIXED) | ||
| C22 | N/A | D22 N/A | |
Table A.1: SOM-6833 Pin Assignments
| C23 N/A D23 N/A |
| C24 DDI1_HPD D24 GND |
| C25 N/A D25 GND |
| C26 N/A D26 DDI1_PAIR0+ |
| C27 N/A D27 DDI1_PAIR0- |
| C28 N/A D28 GND |
| C29 N/A D29 DDI1_PAIR1+ |
| C30 N/A D30 DDI1_PAIR1- |
| C31 GND (FIXED) D31 GND (FIXED) |
| C32 DDI2_CTRLCLK_AUX+ D32 DDI1_PAIR2+ |
| C33 DDI2_CTRLDATA_AUX- D33 DDI1_PAIR2- |
| C34 DDI2_DDC_AUX_SEL D34 DDI1_DDC_AUX_SEL |
| C35 N/A D35 N/A |
| C36 N/A D36 DDI1_PAIR3+ |
| C37 N/A D37 DDI1_PAIR3- |
| C38 N/A D38 GND |
| C39 N/A D39 DDI2_PAIR0+ |
| C40 N/A D40 DDI2_PAIR0 |
| C41 GND (FIXED) D41 GND (FIXED) |
| C42 N/A D42 DDI2_PAIR1+ |
| C43 N/A D43 DDI2_PAIR1- |
| C44 N/A D44 DDI2_HPD |
| C45 GP_SPI_CS# D45 GND |
| C46 N/A D46 DDI2_PAIR2+ |
| C47 N/A D47 DDI2_PAIR2- |
| C48 N/A D48 GND |
| C49 N/A D49 DDI2_PAIR3+ |
| C50 N/A D50 DDI2_PAIR3- |
| C51 GND (FIXED) D51 GND (FIXED) |
| C52 N/A D52 N/A |
| C53 N/A D53 N/A |
| C54 N/A D54 N/A |
| C55 N/A D55 N/A |
| C56 N/A D56 N/A |
| C57 N/A D57 N/A |
| C58 N/A D58 N/A |
| C59 N/A D59 N/A |
| C60 GND (FIXED) D60 GND (FIXED) |
| C61 N/A D61 N/A |
| C62 N/A D62 N/A |
| C63 GND D63 GND |
| C64 GND D64 GND |
| C65 N/A D65 N/A |
| C66 N/A D66 N/A |
| C67 RAPID_SHUTDOWN D67 GND |
| C68 N/A D68 N/A |
| C69 N/A D69 N/A |
Table A.1: SOM-6833 Pin Assignments
| C70 GND (FIXED) D70 GND (FIXED) |
| C71 N/A D71 N/A |
| C72 N/A D72 N/A |
| C73 GND D73 GND |
| C74 N/A D74 N/A |
| C75 N/A D75 N/A |
| C76 GND D76 GND |
| C77 GND D77 GND |
| C78 N/A D78 N/A |
| C79 N/A D79 N/A |
| C80 GND (FIXED) D80 GND (FIXED) |
| C81 N/A D81 N/A |
| C82 N/A D82 N/A |
| C83 GND D83 GND |
| C84 GND D84 GND |
| C85 N/A D85 N/A |
| C86 N/A D86 N/A |
| C87 GND D87 GND |
| C88 N/A D88 N/A |
| C89 N/A D89 N/A |
| C90 GND (FIXED) D90 GND (FIXED) |
| C91 N/A D91 N/A |
| C92 N/A D92 N/A |
| C93 GND D93 GND |
| C94 N/A D94 N/A |
| C95 N/A D95 N/A |
| C96 GND D96 GND |
| C97 GND D97 GND |
| C98 N/A D98 N/A |
| C99 N/A D99 N/A |
| C100 GND (FIXED) D100 GND (FIXED) |
| C101 N/A D101 N/A |
| C102 N/A D102 N/A |
| C103 GND D103 GND |
| C104 VCC_12V D104 VCC_12V |
| C105 VCC_12V D105 VCC_12V |
| C106 VCC_12V D106 VCC_12V |
| C107 VCC_12V D107 VCC_12V |
| C108 VCC_12V D108 VCC_12V |
| C109 VCC_12V D109 VCC_12V |
| C110 GND (FIXED) D110 GND (FIXED) |
Appendix B
Watchdog Timer
This appendix gives you information about programming the watchdog timer on the SOM-6833 CPU System on Module.
Sections include:
■ Watchdog Timer Programming
B.1 Programming the Watchdog Timer
Table B.1: Programming the Watchdog Timer
| Trigger Event Note |
| IRQ (BIOS setting default disable)** |
| NMI N/A |
| SCI Power button event |
| Power Off Support |
| H/W Restart Support |
| WDT Pin Activate Support |
** WDT new driver support automatically selects an available IRQ number from the BIOS, and then sets it to EC. Only Windows 10 supports it.
In other OS, it will still use an IRQ number from the BIOS as usual.
For details, please refer to the iManager & Software API User Manual.
Appendix C
Programming GPIO
This appendix illustrates the General Purpose Input and Output pin settings.
Sections include:
GPIO Register
C.1 GPIO Register
Table C.1: GPIO Register
| GPIO Byte Mapping H/W Pin Name |
| BIT0 GPI0 |
| BIT1 GPI1 |
| BIT2 GPI2 |
| BIT3 GPI3 |
| BIT4 GPO0 |
| BIT5 GPO1 |
| BIT6 GPO2 |
| BIT7 GPO4 |
For details, please refer to the iManager and Software API User Manual.
Appendix D
System Assignments
This appendix provides information about system resource allocation on the SOM-6833 CPU System on Module
Sections include:
System I/O Ports
■ DMA Channel Assignments
Interrupt Assignments
■ ^st MB Memory Map
D.1 System I/O Ports
Table D.1: System I/O Ports
| Addr. Range (Hex) Device |
| 0x00000299-0x0000029A Motherboard resources |
| 0x000002C0-0x000002DF Motherboard resources |
| 0x000002A0-0x000002BF Motherboard resources |
| 0x000002A0-0x000002BF Motherboard resources |
| 0x00000290-0x0000029F Motherboard resources |
| 0x0000029E-0x000002AD Motherboard resources |
| 0x00000060-0x0000006F Motherboard resources |
| 0x00000200-0x0000027F Motherboard resources |
| 0x00000300-0x0000037F Motherboard resources |
| 0x00000280-0x0000028F Motherboard resources |
| 0x00000280-0x0000028F Motherboard resources |
| 0x000002F0-0x000002F7 Motherboard resources |
| 0x0000002E-0x0000002F Motherboard resources |
| 0x0000004E-0x0000004F Motherboard resources |
| 0x00000061-0x00000061 Motherboard resources |
| 0x00000063-0x00000063 Motherboard resources |
| 0x00000065-0x00000065 Motherboard resources |
| 0x00000067-0x00000067 Motherboard resources |
| 0x00000070-0x00000070 Motherboard resources |
| 0x00000080-0x00000080 Motherboard resources |
| 0x00000092-0x00000092 Motherboard resources |
| 0x000000B2-0x000000B3 Motherboard resources |
| 0x00000680-0x0000069F Motherboard resources |
| 0x0000164E-0x0000164F Motherboard resources |
| 0x00000062-0x00000062 Microsoft ACPI-Compliant Embedded Controller |
| 0x00000066-0x00000066 Microsoft ACPI-Compliant Embedded Controller |
| 0x00001854-0x00001857 Motherboard resources |
| 0x000003F8-0x000003FF Communications Port (COM1) |
| 0x000002F8-0x000002FF Communications Port (COM2) |
| 0x00000020-0x00000021 Programmable interrupt controller |
| 0x00000024-0x00000025 Programmable interrupt controller |
| 0x00000028-0x00000029 Programmable interrupt controller |
| 0x0000002C-0x0000002D Programmable interrupt controller |
| 0x00000030-0x00000031 Programmable interrupt controller |
| 0x00000034-0x00000035 Programmable interrupt controller |
| 0x00000038-0x00000039 Programmable interrupt controller |
| 0x0000003C-0x0000003D Programmable interrupt controller |
| 0x000000A0-0x000000A1 Programmable interrupt controller |
| 0x000000A4-0x000000A5 Programmable interrupt controller |
| 0x000000A8-0x000000A9 Programmable interrupt controller |
| 0x000000AC-0x000000AD Programmable interrupt controller |
| 0x000000B0-0x000000B1 Programmable interrupt controller |
| 0x000000B4-0x000000B5 Programmable interrupt controller |
Table D.1: System I/O Ports
| 0x000000B8-0x000000B9 Programmable interrupt controller |
| 0x000000BC-0x000000BD Programmable interrupt controller |
| 0x000004D0-0x000004D1 Programmable interrupt controller |
| 0x00003000-0x0000303F Intel® UHD Graphics |
| 0x00000000-0x00000CF7 PCI Express Root Complex |
| 0x00000D00-0x0000FFFF PCI Express Root Complex |
| 0x00003090-0x00003097 Standard SATA AHCI Controller |
| 0x00003080-0x00003083 Standard SATA AHCI Controller |
| 0x00003060-0x0000307F Standard SATA AHCI Controller |
| 0x00000040-0x00000043 System timer |
| 0x00000050-0x00000053 System timer |
| 0x00002000-0x000020FE Motherboard resources |
D.2 Interrupt Assignments
Table D.2: Interrupt Assignments
| Interrupt# Interrupt Source | |
| IRQ 4294967290 Intel® USB 3.20 eXtensible Host Controller - 1.20 (Microsoft) | |
| IRQ 4294967294 PCI Express Root Port #7 - 54BE | |
| IRQ 4294967278 Intel® Management Engine Interface #1 | |
| IRQ 27 Intel® Serial IO I2C Host Controller - 54E8 | |
| IRQ 4294967288 Intel® Ethernet Controller I226-LM | |
| IRQ 4294967287 Intel® Ethernet Controller I226-LM | |
| IRQ 4294967286 Intel® Ethernet Controller I226-LM | |
| IRQ 4294967285 Intel® Ethernet Controller I226-LM | |
| IRQ 4294967284 Intel® Ethernet Controller I226-LM | |
| IRQ 4294967283 Intel® Ethernet Controller I226-LM | |
| IRQ 4294967282 Intel® Ethernet Controller I226-LM | |
| IRQ 4294967281 Intel® Ethernet Controller I226-LM | |
| IRQ 4294967280 Intel® Ethernet Controller I226-LM | |
| IRQ 4 Communications Port (COM1) | |
| IRQ 3 Communications Port (COM2) | |
| IRQ 4294967279 Intel® Smart Sound Technology BUS | |
| IRQ 17 USB Synopsys Controller | |
| IRQ 4294967291 Intel® UHD Graphics | |
| IRQ 6 Motherboard resources | |
| IRQ 6 Motherboard resources | |
| IRQ 16 Intel Serial IO UART Host Controller - 54A8 | |
| IRQ 16 Intel SD Host Controller | |
| IRQ 55 Microsoft ACPI-Compliant System | |
| IRQ 56 Microsoft ACPI-Compliant System | |
| IRQ 57 Microsoft ACPI-Compliant System | |
| IRQ 58 Microsoft ACPI-Compliant System | |
| IRQ 59 Microsoft ACPI-Compliant System | |
| IRQ 60 Microsoft ACPI-Compliant System | |
| IRQ 61 Microsoft ACPI-Compliant System |
Table D.2: Interrupt Assignments
| IRQ 62 Microsoft ACPI-Compliant System |
| IRQ 63 Microsoft ACPI-Compliant System |
| IRQ 64 Microsoft ACPI-Compliant System |
| IRQ 65 Microsoft ACPI-Compliant System |
| IRQ 66 Microsoft ACPI-Compliant System |
| IRQ 67 Microsoft ACPI-Compliant System |
| IRQ 68 Microsoft ACPI-Compliant System |
| IRQ 69 Microsoft ACPI-Compliant System |
| IRQ 70 Microsoft ACPI-Compliant System |
| IRQ 71 Microsoft ACPI-Compliant System |
| IRQ 72 Microsoft ACPI-Compliant System |
| IRQ 73 Microsoft ACPI-Compliant System |
| IRQ 74 Microsoft ACPI-Compliant System |
| IRQ 75 Microsoft ACPI-Compliant System |
| IRQ 76 Microsoft ACPI-Compliant System |
| IRQ 77 Microsoft ACPI-Compliant System |
| IRQ 78 Microsoft ACPI-Compliant System |
| IRQ 79 Microsoft ACPI-Compliant System |
| IRQ 80 Microsoft ACPI-Compliant System |
| IRQ 81 Microsoft ACPI-Compliant System |
| IRQ 82 Microsoft ACPI-Compliant System |
| IRQ 83 Microsoft ACPI-Compliant System |
| IRQ 84 Microsoft ACPI-Compliant System |
| IRQ 85 Microsoft ACPI-Compliant System |
| IRQ 86 Microsoft ACPI-Compliant System |
| IRQ 87 Microsoft ACPI-Compliant System |
| IRQ 88 Microsoft ACPI-Compliant System |
| IRQ 89 Microsoft ACPI-Compliant System |
| IRQ 90 Microsoft ACPI-Compliant System |
| IRQ 91 Microsoft ACPI-Compliant System |
| IRQ 92 Microsoft ACPI-Compliant System |
| IRQ 93 Microsoft ACPI-Compliant System |
| IRQ 94 Microsoft ACPI-Compliant System |
| IRQ 95 Microsoft ACPI-Compliant System |
| IRQ 96 Microsoft ACPI-Compliant System |
| IRQ 97 Microsoft ACPI-Compliant System |
| IRQ 98 Microsoft ACPI-Compliant System |
| IRQ 99 Microsoft ACPI-Compliant System |
| IRQ 100 Microsoft ACPI-Compliant System |
| IRQ 101 Microsoft ACPI-Compliant System |
| IRQ 102 Microsoft ACPI-Compliant System |
| IRQ 103 Microsoft ACPI-Compliant System |
| IRQ 104 Microsoft ACPI-Compliant System |
| IRQ 105 Microsoft ACPI-Compliant System |
| IRQ 106 Microsoft ACPI-Compliant System |
| IRQ 107 Microsoft ACPI-Compliant System |
| IRQ 108 Microsoft ACPI-Compliant System |
Table D.2: Interrupt Assignments
| IRQ 109 Microsoft ACPI-Compliant System |
| IRQ 110 Microsoft ACPI-Compliant System |
| IRQ 111 Microsoft ACPI-Compliant System |
| IRQ 112 Microsoft ACPI-Compliant System |
| IRQ 113 Microsoft ACPI-Compliant System |
| IRQ 114 Microsoft ACPI-Compliant System |
| IRQ 115 Microsoft ACPI-Compliant System |
| IRQ 116 Microsoft ACPI-Compliant System |
| IRQ 117 Microsoft ACPI-Compliant System |
| IRQ 118 Microsoft ACPI-Compliant System |
| IRQ 119 Microsoft ACPI-Compliant System |
| IRQ 120 Microsoft ACPI-Compliant System |
| IRQ 121 Microsoft ACPI-Compliant System |
| IRQ 122 Microsoft ACPI-Compliant System |
| IRQ 123 Microsoft ACPI-Compliant System |
| IRQ 124 Microsoft ACPI-Compliant System |
| IRQ 125 Microsoft ACPI-Compliant System |
| IRQ 126 Microsoft ACPI-Compliant System |
| IRQ 127 Microsoft ACPI-Compliant System |
| IRQ 128 Microsoft ACPI-Compliant System |
| IRQ 129 Microsoft ACPI-Compliant System |
| IRQ 130 Microsoft ACPI-Compliant System |
| IRQ 131 Microsoft ACPI-Compliant System |
| IRQ 132 Microsoft ACPI-Compliant System |
| IRQ 133 Microsoft ACPI-Compliant System |
| IRQ 134 Microsoft ACPI-Compliant System |
| IRQ 135 Microsoft ACPI-Compliant System |
| IRQ 136 Microsoft ACPI-Compliant System |
| IRQ 137 Microsoft ACPI-Compliant System |
| IRQ 138 Microsoft ACPI-Compliant System |
| IRQ 139 Microsoft ACPI-Compliant System |
| IRQ 140 Microsoft ACPI-Compliant System |
| IRQ 141 Microsoft ACPI-Compliant System |
| IRQ 142 Microsoft ACPI-Compliant System |
| IRQ 143 Microsoft ACPI-Compliant System |
| IRQ 144 Microsoft ACPI-Compliant System |
| IRQ 145 Microsoft ACPI-Compliant System |
| IRQ 146 Microsoft ACPI-Compliant System |
| IRQ 147 Microsoft ACPI-Compliant System |
| IRQ 148 Microsoft ACPI-Compliant System |
| IRQ 149 Microsoft ACPI-Compliant System |
| IRQ 150 Microsoft ACPI-Compliant System |
| IRQ 151 Microsoft ACPI-Compliant System |
| IRQ 152 Microsoft ACPI-Compliant System |
| IRQ 153 Microsoft ACPI-Compliant System |
| IRQ 154 Microsoft ACPI-Compliant System |
| IRQ 155 Microsoft ACPI-Compliant System |
Table D.2: Interrupt Assignments
| IRQ 156 Microsoft ACPI-Compliant System |
| IRQ 157 Microsoft ACPI-Compliant System |
| IRQ 158 Microsoft ACPI-Compliant System |
| IRQ 159 Microsoft ACPI-Compliant System |
| IRQ 160 Microsoft ACPI-Compliant System |
| IRQ 161 Microsoft ACPI-Compliant System |
| IRQ 162 Microsoft ACPI-Compliant System |
| IRQ 163 Microsoft ACPI-Compliant System |
| IRQ 164 Microsoft ACPI-Compliant System |
| IRQ 165 Microsoft ACPI-Compliant System |
| IRQ 166 Microsoft ACPI-Compliant System |
| IRQ 167 Microsoft ACPI-Compliant System |
| IRQ 168 Microsoft ACPI-Compliant System |
| IRQ 169 Microsoft ACPI-Compliant System |
| IRQ 170 Microsoft ACPI-Compliant System |
| IRQ 171 Microsoft ACPI-Compliant System |
| IRQ 172 Microsoft ACPI-Compliant System |
| IRQ 173 Microsoft ACPI-Compliant System |
| IRQ 174 Microsoft ACPI-Compliant System |
| IRQ 175 Microsoft ACPI-Compliant System |
| IRQ 176 Microsoft ACPI-Compliant System |
| IRQ 177 Microsoft ACPI-Compliant System |
| IRQ 178 Microsoft ACPI-Compliant System |
| IRQ 179 Microsoft ACPI-Compliant System |
| IRQ 180 Microsoft ACPI-Compliant System |
| IRQ 181 Microsoft ACPI-Compliant System |
| IRQ 182 Microsoft ACPI-Compliant System |
| IRQ 183 Microsoft ACPI-Compliant System |
| IRQ 184 Microsoft ACPI-Compliant System |
| IRQ 185 Microsoft ACPI-Compliant System |
| IRQ 186 Microsoft ACPI-Compliant System |
| IRQ 187 Microsoft ACPI-Compliant System |
| IRQ 188 Microsoft ACPI-Compliant System |
| IRQ 189 Microsoft ACPI-Compliant System |
| IRQ 190 Microsoft ACPI-Compliant System |
| IRQ 191 Microsoft ACPI-Compliant System |
| IRQ 192 Microsoft ACPI-Compliant System |
| IRQ 193 Microsoft ACPI-Compliant System |
| IRQ 194 Microsoft ACPI-Compliant System |
| IRQ 195 Microsoft ACPI-Compliant System |
| IRQ 196 Microsoft ACPI-Compliant System |
| IRQ 197 Microsoft ACPI-Compliant System |
| IRQ 198 Microsoft ACPI-Compliant System |
| IRQ 199 Microsoft ACPI-Compliant System |
| IRQ 200 Microsoft ACPI-Compliant System |
| IRQ 201 Microsoft ACPI-Compliant System |
| IRQ 202 Microsoft ACPI-Compliant System |
Table D.2: Interrupt Assignments
| IRQ 203 Microsoft ACPI-Compliant System |
| IRQ 204 Microsoft ACPI-Compliant System |
| IRQ 256 Microsoft ACPI-Compliant System |
| IRQ 257 Microsoft ACPI-Compliant System |
| IRQ 258 Microsoft ACPI-Compliant System |
| IRQ 259 Microsoft ACPI-Compliant System |
| IRQ 260 Microsoft ACPI-Compliant System |
| IRQ 261 Microsoft ACPI-Compliant System |
| IRQ 262 Microsoft ACPI-Compliant System |
| IRQ 263 Microsoft ACPI-Compliant System |
| IRQ 264 Microsoft ACPI-Compliant System |
| IRQ 265 Microsoft ACPI-Compliant System |
| IRQ 266 Microsoft ACPI-Compliant System |
| IRQ 267 Microsoft ACPI-Compliant System |
| IRQ 268 Microsoft ACPI-Compliant System |
| IRQ 269 Microsoft ACPI-Compliant System |
| IRQ 270 Microsoft ACPI-Compliant System |
| IRQ 271 Microsoft ACPI-Compliant System |
| IRQ 272 Microsoft ACPI-Compliant System |
| IRQ 273 Microsoft ACPI-Compliant System |
| IRQ 274 Microsoft ACPI-Compliant System |
| IRQ 275 Microsoft ACPI-Compliant System |
| IRQ 276 Microsoft ACPI-Compliant System |
| IRQ 277 Microsoft ACPI-Compliant System |
| IRQ 278 Microsoft ACPI-Compliant System |
| IRQ 279 Microsoft ACPI-Compliant System |
| IRQ 280 Microsoft ACPI-Compliant System |
| IRQ 281 Microsoft ACPI-Compliant System |
| IRQ 282 Microsoft ACPI-Compliant System |
| IRQ 283 Microsoft ACPI-Compliant System |
| IRQ 284 Microsoft ACPI-Compliant System |
| IRQ 285 Microsoft ACPI-Compliant System |
| IRQ 286 Microsoft ACPI-Compliant System |
| IRQ 287 Microsoft ACPI-Compliant System |
| IRQ 288 Microsoft ACPI-Compliant System |
| IRQ 289 Microsoft ACPI-Compliant System |
| IRQ 290 Microsoft ACPI-Compliant System |
| IRQ 291 Microsoft ACPI-Compliant System |
| IRQ 292 Microsoft ACPI-Compliant System |
| IRQ 293 Microsoft ACPI-Compliant System |
| IRQ 294 Microsoft ACPI-Compliant System |
| IRQ 295 Microsoft ACPI-Compliant System |
| IRQ 296 Microsoft ACPI-Compliant System |
| IRQ 297 Microsoft ACPI-Compliant System |
| IRQ 298 Microsoft ACPI-Compliant System |
| IRQ 299 Microsoft ACPI-Compliant System |
| IRQ 300 Microsoft ACPI-Compliant System |
Table D.2: Interrupt Assignments
| IRQ 301 Microsoft ACPI-Compliant System |
| IRQ 302 Microsoft ACPI-Compliant System |
| IRQ 303 Microsoft ACPI-Compliant System |
| IRQ 304 Microsoft ACPI-Compliant System |
| IRQ 305 Microsoft ACPI-Compliant System |
| IRQ 306 Microsoft ACPI-Compliant System |
| IRQ 307 Microsoft ACPI-Compliant System |
| IRQ 308 Microsoft ACPI-Compliant System |
| IRQ 309 Microsoft ACPI-Compliant System |
| IRQ 310 Microsoft ACPI-Compliant System |
| IRQ 311 Microsoft ACPI-Compliant System |
| IRQ 312 Microsoft ACPI-Compliant System |
| IRQ 313 Microsoft ACPI-Compliant System |
| IRQ 314 Microsoft ACPI-Compliant System |
| IRQ 315 Microsoft ACPI-Compliant System |
| IRQ 316 Microsoft ACPI-Compliant System |
| IRQ 317 Microsoft ACPI-Compliant System |
| IRQ 318 Microsoft ACPI-Compliant System |
| IRQ 319 Microsoft ACPI-Compliant System |
| IRQ 320 Microsoft ACPI-Compliant System |
| IRQ 321 Microsoft ACPI-Compliant System |
| IRQ 322 Microsoft ACPI-Compliant System |
| IRQ 323 Microsoft ACPI-Compliant System |
| IRQ 324 Microsoft ACPI-Compliant System |
| IRQ 325 Microsoft ACPI-Compliant System |
| IRQ 326 Microsoft ACPI-Compliant System |
| IRQ 327 Microsoft ACPI-Compliant System |
| IRQ 328 Microsoft ACPI-Compliant System |
| IRQ 329 Microsoft ACPI-Compliant System |
| IRQ 330 Microsoft ACPI-Compliant System |
| IRQ 331 Microsoft ACPI-Compliant System |
| IRQ 332 Microsoft ACPI-Compliant System |
| IRQ 333 Microsoft ACPI-Compliant System |
| IRQ 334 Microsoft ACPI-Compliant System |
| IRQ 335 Microsoft ACPI-Compliant System |
| IRQ 336 Microsoft ACPI-Compliant System |
| IRQ 337 Microsoft ACPI-Compliant System |
| IRQ 338 Microsoft ACPI-Compliant System |
| IRQ 339 Microsoft ACPI-Compliant System |
| IRQ 340 Microsoft ACPI-Compliant System |
| IRQ 341 Microsoft ACPI-Compliant System |
| IRQ 342 Microsoft ACPI-Compliant System |
| IRQ 343 Microsoft ACPI-Compliant System |
| IRQ 344 Microsoft ACPI-Compliant System |
| IRQ 345 Microsoft ACPI-Compliant System |
| IRQ 346 Microsoft ACPI-Compliant System |
| IRQ 347 Microsoft ACPI-Compliant System |
Table D.2: Interrupt Assignments
| IRQ 348 Microsoft ACPI-Compliant System |
| IRQ 349 Microsoft ACPI-Compliant System |
| IRQ 350 Microsoft ACPI-Compliant System |
| IRQ 351 Microsoft ACPI-Compliant System |
| IRQ 352 Microsoft ACPI-Compliant System |
| IRQ 353 Microsoft ACPI-Compliant System |
| IRQ 354 Microsoft ACPI-Compliant System |
| IRQ 355 Microsoft ACPI-Compliant System |
| IRQ 356 Microsoft ACPI-Compliant System |
| IRQ 357 Microsoft ACPI-Compliant System |
| IRQ 358 Microsoft ACPI-Compliant System |
| IRQ 359 Microsoft ACPI-Compliant System |
| IRQ 360 Microsoft ACPI-Compliant System |
| IRQ 361 Microsoft ACPI-Compliant System |
| IRQ 362 Microsoft ACPI-Compliant System |
| IRQ 363 Microsoft ACPI-Compliant System |
| IRQ 364 Microsoft ACPI-Compliant System |
| IRQ 365 Microsoft ACPI-Compliant System |
| IRQ 366 Microsoft ACPI-Compliant System |
| IRQ 367 Microsoft ACPI-Compliant System |
| IRQ 368 Microsoft ACPI-Compliant System |
| IRQ 369 Microsoft ACPI-Compliant System |
| IRQ 370 Microsoft ACPI-Compliant System |
| IRQ 371 Microsoft ACPI-Compliant System |
| IRQ 372 Microsoft ACPI-Compliant System |
| IRQ 373 Microsoft ACPI-Compliant System |
| IRQ 374 Microsoft ACPI-Compliant System |
| IRQ 375 Microsoft ACPI-Compliant System |
| IRQ 376 Microsoft ACPI-Compliant System |
| IRQ 377 Microsoft ACPI-Compliant System |
| IRQ 378 Microsoft ACPI-Compliant System |
| IRQ 379 Microsoft ACPI-Compliant System |
| IRQ 380 Microsoft ACPI-Compliant System |
| IRQ 381 Microsoft ACPI-Compliant System |
| IRQ 382 Microsoft ACPI-Compliant System |
| IRQ 383 Microsoft ACPI-Compliant System |
| IRQ 384 Microsoft ACPI-Compliant System |
| IRQ 385 Microsoft ACPI-Compliant System |
| IRQ 386 Microsoft ACPI-Compliant System |
| IRQ 387 Microsoft ACPI-Compliant System |
| IRQ 388 Microsoft ACPI-Compliant System |
| IRQ 389 Microsoft ACPI-Compliant System |
| IRQ 390 Microsoft ACPI-Compliant System |
| IRQ 391 Microsoft ACPI-Compliant System |
| IRQ 392 Microsoft ACPI-Compliant System |
| IRQ 393 Microsoft ACPI-Compliant System |
| IRQ 394 Microsoft ACPI-Compliant System |
Table D.2: Interrupt Assignments
| IRQ 395 Microsoft ACPI-Compliant System |
| IRQ 396 Microsoft ACPI-Compliant System |
| IRQ 397 Microsoft ACPI-Compliant System |
| IRQ 398 Microsoft ACPI-Compliant System |
| IRQ 399 Microsoft ACPI-Compliant System |
| IRQ 400 Microsoft ACPI-Compliant System |
| IRQ 401 Microsoft ACPI-Compliant System |
| IRQ 402 Microsoft ACPI-Compliant System |
| IRQ 403 Microsoft ACPI-Compliant System |
| IRQ 404 Microsoft ACPI-Compliant System |
| IRQ 405 Microsoft ACPI-Compliant System |
| IRQ 406 Microsoft ACPI-Compliant System |
| IRQ 407 Microsoft ACPI-Compliant System |
| IRQ 408 Microsoft ACPI-Compliant System |
| IRQ 409 Microsoft ACPI-Compliant System |
| IRQ 410 Microsoft ACPI-Compliant System |
| IRQ 411 Microsoft ACPI-Compliant System |
| IRQ 412 Microsoft ACPI-Compliant System |
| IRQ 413 Microsoft ACPI-Compliant System |
| IRQ 414 Microsoft ACPI-Compliant System |
| IRQ 415 Microsoft ACPI-Compliant System |
| IRQ 416 Microsoft ACPI-Compliant System |
| IRQ 417 Microsoft ACPI-Compliant System |
| IRQ 418 Microsoft ACPI-Compliant System |
| IRQ 419 Microsoft ACPI-Compliant System |
| IRQ 420 Microsoft ACPI-Compliant System |
| IRQ 421 Microsoft ACPI-Compliant System |
| IRQ 422 Microsoft ACPI-Compliant System |
| IRQ 423 Microsoft ACPI-Compliant System |
| IRQ 424 Microsoft ACPI-Compliant System |
| IRQ 425 Microsoft ACPI-Compliant System |
| IRQ 426 Microsoft ACPI-Compliant System |
| IRQ 427 Microsoft ACPI-Compliant System |
| IRQ 428 Microsoft ACPI-Compliant System |
| IRQ 429 Microsoft ACPI-Compliant System |
| IRQ 430 Microsoft ACPI-Compliant System |
| IRQ 431 Microsoft ACPI-Compliant System |
| IRQ 432 Microsoft ACPI-Compliant System |
| IRQ 433 Microsoft ACPI-Compliant System |
| IRQ 434 Microsoft ACPI-Compliant System |
| IRQ 435 Microsoft ACPI-Compliant System |
| IRQ 436 Microsoft ACPI-Compliant System |
| IRQ 437 Microsoft ACPI-Compliant System |
| IRQ 438 Microsoft ACPI-Compliant System |
| IRQ 439 Microsoft ACPI-Compliant System |
| IRQ 440 Microsoft ACPI-Compliant System |
| IRQ 441 Microsoft ACPI-Compliant System |
Table D.2: Interrupt Assignments
| IRQ 442 Microsoft ACPI-Compliant System |
| IRQ 443 Microsoft ACPI-Compliant System |
| IRQ 444 Microsoft ACPI-Compliant System |
| IRQ 445 Microsoft ACPI-Compliant System |
| IRQ 446 Microsoft ACPI-Compliant System |
| IRQ 447 Microsoft ACPI-Compliant System |
| IRQ 448 Microsoft ACPI-Compliant System |
| IRQ 449 Microsoft ACPI-Compliant System |
| IRQ 450 Microsoft ACPI-Compliant System |
| IRQ 451 Microsoft ACPI-Compliant System |
| IRQ 452 Microsoft ACPI-Compliant System |
| IRQ 453 Microsoft ACPI-Compliant System |
| IRQ 454 Microsoft ACPI-Compliant System |
| IRQ 455 Microsoft ACPI-Compliant System |
| IRQ 456 Microsoft ACPI-Compliant System |
| IRQ 457 Microsoft ACPI-Compliant System |
| IRQ 458 Microsoft ACPI-Compliant System |
| IRQ 459 Microsoft ACPI-Compliant System |
| IRQ 460 Microsoft ACPI-Compliant System |
| IRQ 461 Microsoft ACPI-Compliant System |
| IRQ 462 Microsoft ACPI-Compliant System |
| IRQ 463 Microsoft ACPI-Compliant System |
| IRQ 464 Microsoft ACPI-Compliant System |
| IRQ 465 Microsoft ACPI-Compliant System |
| IRQ 466 Microsoft ACPI-Compliant System |
| IRQ 467 Microsoft ACPI-Compliant System |
| IRQ 468 Microsoft ACPI-Compliant System |
| IRQ 469 Microsoft ACPI-Compliant System |
| IRQ 470 Microsoft ACPI-Compliant System |
| IRQ 471 Microsoft ACPI-Compliant System |
| IRQ 472 Microsoft ACPI-Compliant System |
| IRQ 473 Microsoft ACPI-Compliant System |
| IRQ 474 Microsoft ACPI-Compliant System |
| IRQ 475 Microsoft ACPI-Compliant System |
| IRQ 476 Microsoft ACPI-Compliant System |
| IRQ 477 Microsoft ACPI-Compliant System |
| IRQ 478 Microsoft ACPI-Compliant System |
| IRQ 479 Microsoft ACPI-Compliant System |
| IRQ 480 Microsoft ACPI-Compliant System |
| IRQ 481 Microsoft ACPI-Compliant System |
| IRQ 482 Microsoft ACPI-Compliant System |
| IRQ 483 Microsoft ACPI-Compliant System |
| IRQ 484 Microsoft ACPI-Compliant System |
| IRQ 485 Microsoft ACPI-Compliant System |
| IRQ 486 Microsoft ACPI-Compliant System |
| IRQ 487 Microsoft ACPI-Compliant System |
| IRQ 488 Microsoft ACPI-Compliant System |
Table D.2: Interrupt Assignments
| IRQ 489 Microsoft ACPI-Compliant System |
| IRQ 490 Microsoft ACPI-Compliant System |
| IRQ 491 Microsoft ACPI-Compliant System |
| IRQ 492 Microsoft ACPI-Compliant System |
| IRQ 493 Microsoft ACPI-Compliant System |
| IRQ 494 Microsoft ACPI-Compliant System |
| IRQ 495 Microsoft ACPI-Compliant System |
| IRQ 496 Microsoft ACPI-Compliant System |
| IRQ 497 Microsoft ACPI-Compliant System |
| IRQ 498 Microsoft ACPI-Compliant System |
| IRQ 499 Microsoft ACPI-Compliant System |
| IRQ 500 Microsoft ACPI-Compliant System |
| IRQ 501 Microsoft ACPI-Compliant System |
| IRQ 502 Microsoft ACPI-Compliant System |
| IRQ 503 Microsoft ACPI-Compliant System |
| IRQ 504 Microsoft ACPI-Compliant System |
| IRQ 505 Microsoft ACPI-Compliant System |
| IRQ 506 Microsoft ACPI-Compliant System |
| IRQ 507 Microsoft ACPI-Compliant System |
| IRQ 508 Microsoft ACPI-Compliant System |
| IRQ 509 Microsoft ACPI-Compliant System |
| IRQ 510 Microsoft ACPI-Compliant System |
| IRQ 511 Microsoft ACPI-Compliant System |
| IRQ 4294967292 Standard SATA AHCI Controller |
| IRQ 4294967289 Intel® USB 3.10 eXtensible Host Controller - 1.20 (Microsoft) |
| IRQ 0 System timer |
| IRQ 14 Intel® Serial IO GPIO Host Controller - INTC1057 |
| IRQ 29 Intel® Serial IO I2C Host Controller - 54EA |
| IRQ 4294967293 PCI Express Root Port #1 - 54B8 |
D.3 1st MB Memory Map
Table D.3: 1st MB Memory Map
| Addr. Range (Hex) Device | |
| 0xFEDC0000-0xFEDC7FFF Motherboard resources | |
| 0xFEDA0000-0xFEDA0FFF Motherboard resources | |
| 0xFEDA1000-0xFEDA1FFF Motherboard resources | |
| 0xC0000000-0xCFFFFFFF Motherboard resources | |
| 0xFED20000-0xFED7FFFF Motherboard resources | |
| 0xFED90000-0xFED93FFF Motherboard resources | |
| 0xFED45000-0xFED8FFFF Motherboard resources | |
| 0xFEE00000-0xFEEFFFFFF Motherboard resources | |
| 0x1310000-0x131FFFF Intel® USB 3.20 eXtensible Host Controller - 1.20 (Microsoft) | |
| 0x80400000-0x806FFFFFF PCI Express Root Port #7 - 54BE | |
| 0x80400000-0x806FFFFFF PCI Express Root Complex | |
| 0xFFCFA000-0xFFCFAFFF Intel® Management Engine Interface #1 | |
| 0xFFCF8000-0xFFCF8FFF Intel® Serial IO I2C Host Controller - 54E8 | |
| 0x80500000-0x805FFFFFF Intel® Ethernet Controller I226-LM | |
| 0x80600000-0x80603FFF Intel® Ethernet Controller I226-LM | |
| 0xFED00000-0xFED003FF High precision event timer | |
| 0xFFCFC000-0xFFCFFFFFF Intel® Smart Sound Technology BUS | |
| 0xFFD00000-0xFFDFFFFFF Intel® Smart Sound Technology BUS | |
| 0xFFE00000-0xFFFFFFF USB Synopsys Controller | |
| 0xFFCF9000-0xFFCF9FFF USB Synopsys Controller | |
| 0x0000-0xFFFFFFF Intel® UHD Graphics | |
| 0x0000-0xFFFFFFF Intel® UHD Graphics | |
| 0xFFCFB000-0xFFCFBFFF Intel® Serial IO UART Host Controller - 54A8 | |
| 0xA0000-0xBFFF PCI Express Root Complex | |
| 0xE0000-0xE3FFF PCI Express Root Complex | |
| 0xE4000-0xE7FFF PCI Express Root Complex | |
| 0xE8000-0xEBFFF PCI Express Root Complex | |
| 0xEC000-0xFFFF PCI Express Root Complex | |
| 0xF0000-0xFFFF PCI Express Root Complex | |
| 0x80700000-0x80701FFF Standard SATA AHCI Controller | |
| 0x80703000-0x807030FF Standard SATA AHCI Controller | |
| 0x80702000-0x807027FF Standard SATA AHCI Controller | |
| 0xFED40000-0xFED44FFF Trusted Platform Module 2.0 | |
| 0x1300000-0x130FFFF Intel® USB 3.10 eXtensible Host Controller - 1.20 (Microsoft) | |
| 0xFD6E0000-0xFD6EFFFF Intel® Serial IO GPIO Host Controller - INTC1057 | |
| 0xFD6D0000-0xFD6DFFF Intel® Serial IO GPIO Host Controller - INTC1057 | |
| 0xFD6A0000-0xFD6AFFF Intel® Serial IO GPIO Host Controller - INTC1057 | |
| 0xFD690000-0xFD69FFF Intel® Serial IO GPIO Host Controller - INTC1057 | |
| 0x133A000-0x133AFFF Intel SD Host Controller | |
| 0xFFCF7000-0xFFCF7FFF Intel® Serial IO I2C Host Controller - 54EA | |
| 0x1320000-0x1327FFF Performance Monitor | |
| 0xFE010000-0xFE010FFF SPI (flash) Controller - 54A4 |
www.advantech.com
Please verify specifications before quoting. This guide is intended for reference purposes only.
All product specifications are subject to change without notice.
No part of this publication may be reproduced in any form or by any means, such as electronically, by photocopying, recording, or otherwise, without prior written permission from the publisher.
All brand and product names are trademarks or registered trademarks of their respective companies.
© Advantech Co., Ltd. 2024