GO200 - Video projector Vankyo - Free user manual and instructions
Find the device manual for free GO200 Vankyo in PDF.

| Product Type | Video Projector |
| Brand | Vankyo |
| Model | GO200 |
| Display Technology | LCD |
| Native Resolution | 854 x 480 (WVGA) |
| Brightness | 100 ANSI Lumens |
| Contrast Ratio | 1000:1 |
| Lamp Life | Up to 30,000 hours |
| Projection Size | 30 – 100 inches |
| Keystone Correction | ±15° |
| Built-in Speaker | 3W |
| Connectivity | HDMI, USB, AV, 3.5mm audio out |
| Wi-Fi / Bluetooth | No |
| Dimensions (L x W x H) | 7.1 x 4.6 x 2.0 inches (18 x 11.7 x 5.1 cm) |
| Weight | 0.75 lbs (0.34 kg) |
| Power Consumption | 30W |
| Power Supply | AC 100-240V, 50/60Hz (adapter included) |
| Fan Noise | < 30 dB |
| Warranty | 1 year limited |
| Package Contents | Projector, remote control, power adapter, AV cable, user manual |
Frequently Asked Questions - GO200 Vankyo
User questions about GO200 Vankyo
0 question about this device. Answer the ones you know or ask your own.
Ask a new question about this device
Download the instructions for your Video projector in PDF format for free! Find your manual GO200 - Vankyo and take your electronic device back in hand. On this page are published all the documents necessary for the use of your device. GO200 by Vankyo.
USER MANUAL GO200 Vankyo
natural_image
Front view of a white electronic device casing with a square button and 'VANKYO' logo (no text or symbols on the device itself)GO200
USER MANUAL
Please read this manual thoroughly before using this product and keep it for future reference.
CONTENTS
PACKING LIST 01
NOTICE 01
PRODUCT OVERVIEW 02
GETTING STARTED 03
- Power ON/OFF 03
- Charge 04
- LED Indicator 04
ESSENTIAL TOUCH GESTURES 04
FOCUS AND KEYSTONE 05
- Focus 05
- Keystone 06
FUNCTION OVERVIEW 06
Use the Remote as a Mouse 06
WIFI Connection 07
Multimedia Connection 07
- Project from a USB Disk 07
- Play Videos in YouTube 09
- Project from HD Input Connection 09
Apps Management 09
Check All the Apps 09
Install Apps 09
Uninstall Apps 09
SCREEN MIRRORING THROUGH WIRELESS CONNECTION 10
A: Airplay 10
For iOS System Only 10
B: WifiDisplay 11
For Android System Only 11
C: EShare 12
For iOS System 12
For Android System 13
For Mac 14
For Windows Laptop 15
SCREEN MIRRORING THROUGH WIRED CONNECTION 16
For iOS System 16
SETTINGS 17
SPECIFICATIONS 18
PACKING LIST
GO200
Remote
(Batteries Not Included)
02 support@ivankyo.com
GETTING STARTED
1. Power ON/OFF
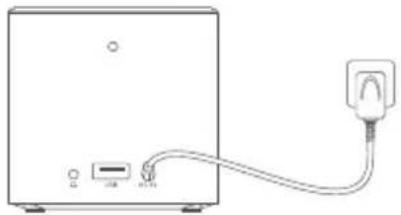
1 Connect the projector to the power outlet with the provided power adapter.
natural_image
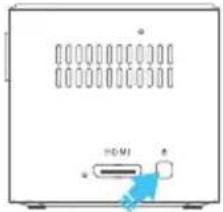
Simple line drawing of a device with an attached plug and cable (no text or symbols)2 To power on the projector, press and hold the Power Button on the projector for 3s. The LED indicator turns blue when the projector is powered on.
natural_image
Front view of a white electronic device with a digital display and a blue arrow pointing to a USB port (no text or symbols visible)3 To power it off, press the Power Button on the projector/remote, then select OK to continue.
2. Charge
GO200 can be powered by the provided power adapter or the built-in rechargeable battery. It is strongly recommended to charge the battery for at least 2 hours before your first use.

Tip:
Charging the projector in POWER OFF state is recommended.
3. LED Indicator
Charging: Red
Fully Charged: Off
Working: Blue
IMPOPRTANT:
* Please charge the projector or connect it to power supply timely when the battery is low.
* Do not use it as a projector and a power bank at the same time when it is not connected to power supply.
* It is recommended to connect the projector to the power supply to avoid sudden shutdown.
ESSENTIAL TOUCH GESTURES
Four essential gestures may help when you navigate the touch screen.
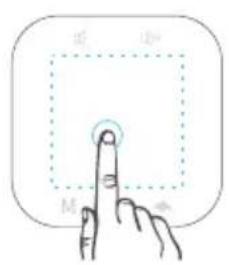
Tap
* Tap to select or launch an application.
* When watching movies, tap once to show the menu on the screen.
04
support@ivankyo.com
2. Keystone
Option (1): Auto keystone.
Please enter Settings > Keystone correction > Auto keystone, then press the OK button to enable this function. Once it's enabled, the projector will automatically correct the image shape after it is powered on.
Option (2): Adjust the keystone manually.
Please enter Settings > Keystone correction > Up-Down Correction/Left-Right Correction, then press the Right/Left button on the remote to adjust the image shape as needed.
Notes:
* Enter Settings > Keystone correction > Initial Angle Correction, then press the OK button to slightly adjust the image shape to make it more accurate.
* If you adjust the keystone manually, the auto keystone option will be unavailable.
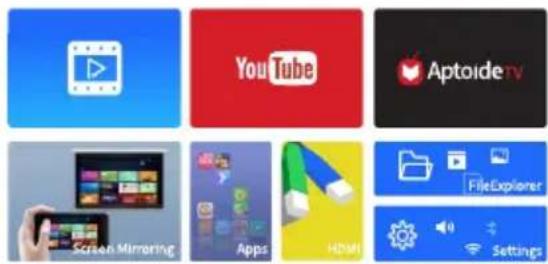
FUNCTION OVERVIEW
After the projector is turned on, the interface below will be projected on the screen/wall.
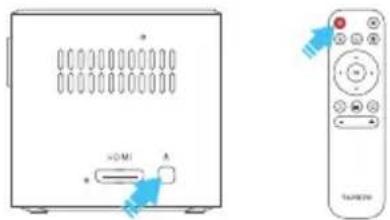
Use the Remote as a Mouse
Step 1: Press 📄 on the remote, you will see a cursor icon and notice Enter into mouse mode shown on the screen.
06 support@ivankyo.com
Step 2: Press and hold the Up/Down/Left/Right button on the remote to move the direction of the cursor accordingly.
Step 3: Press ☐ on the remote again to quit and return to default button mode.
WIFI Connection
1 Go to Settings > Network settings > Wi-Fi, then press the Right button and the OK button to switch it to ON.
2 Press the Up/Down button to select your WIFI, then press OK to continue.
3 Enter the correct password, then select Connection to get the Internet connected.
Multimedia Connection
1. Project from an USB Disk
You can select Media Center or FileExplorer on the homepage to play files.
Option (1): Play files through Media Center
1 Power on the projector and insert an USB disk into the USB port.
2 Select Media Center on the homepage, it will display an interface below.
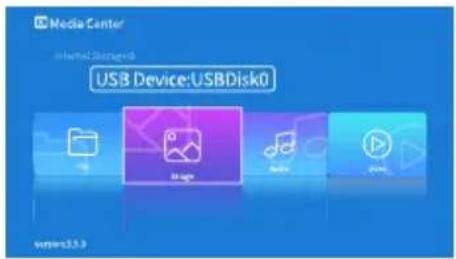
3 Press the Up/Down button on the remote to select USB Device.
4 Press the Left/Right button on the remote to select the File/Image/Audio/Video you want to play.
Option (2): Play files through FileExplorer
1 Power on the projector and insert an USB disk into the USB port.
2 Select FileExplorer on the homepage, it will display an interface below.
![Files Internal flash/emulated/0 Internal flash USB stock [MENU] for more operations phone.bmp audio.mp4 music.mp3 textot 164. 500-12.19M4000 164. 500-12.19M4000 164. 500-12.19M4000 164. 500-12.19M4000 164. 500-12.19M4000](/content/2026/05/1063767/images/11e9e1d6b38d9d694a043b6a9ac71285a2731cc5dce52c448feebb87d4e9f9a0.jpg)
3 Press the Up/Down/Left/Right button to select USB.
4 Press OK to enter, then press the Up/Down button on the remote to select the file you would like to project accordingly.

Tips:
* There will be a pop-up window on the screen to ask which app is preferred to open the photo/video/music/text file with. Select an app you prefer, then click ALWAYS/ONCE to play the photo/video/music/text file via the selected app as needed.
* If you have selected ALWAYS but want to play the files via another app, please do as the instructions below:
1 Go to Settings > Other Settings > Application Management, or go to Apps > ApkInstaller > Advance, then click the app that you selected ALWAYS to play the file with.
2 Select Open by default and CLEAR DEFAULTS.
The pop-up window will be displayed on the screen again when playing any file, you can change to another app as needed.
Different file formats supported
| Text Format Supported | TXT |
| Photo Format Supported | JPG/BMP/PNG |
| Audio Format Supported | MP3/WMA/MP2/OGG/AAC/M4A/MA4/FLAC/APE/3GP/WAV |
| Video Format Supported | MP4/MPG/AVI/MKV/M2TS/MOV/FLV/DAT/ASF |
08 support@ivankyo.com
2. Play Videos in Youtube
Select YouTube to play videos after the projector is connected to your WIFI.
3. Project from HD Input Connection
1 Connect the projector to your device with a HDMI cable.
2 Select HDMI on the homepage to project the contents from your device to the screen/wall.
App Management
Check All the Apps
Select Apps on the homepage to check all the apps preloaded and downloaded in the projector.
Install Apps
Option (1): Install Online
Step①: Connect the projector to WIFI.
Step②: Select Aptoide TV on the homepage and download apps, then install into your projector.
Option (2): Install via USB Disk
Step①: Copy the APK to your USB disk, then insert the USB disk to the projector.
Step②: Go to APPS > ApkInstaller > App Install > USB disk, then find the APK in the USB disk and install it to your projector.
Uninstall Apps
Option (1):
Step①: Select APPS on the homepage, then select the app needs to be uninstalled.
Step②: Press and hold OK button on the remote for 3 seconds, then release until you see a pop-up window displays "Do you want to uninstall this app?"
Step③: Select OK to continue.
Option(2):
Step①: Go to APPS > ApkInstaller > App Manage.
Step②: Select the app needs to be uninstalled, then press OK button on the remote to bring up the menu displays Launch, Export and Uninstall.
Step③: Select Uninstall and press OK to confirm.
SCREEN MIRRORING THROUGH WIRELESS CONNECTION
IMPOPRTANT:
Higher Internet speed contributes to faster load speed. Please improve the Internet speed or place the projector near your router to ensure a more stable WIFI connection.
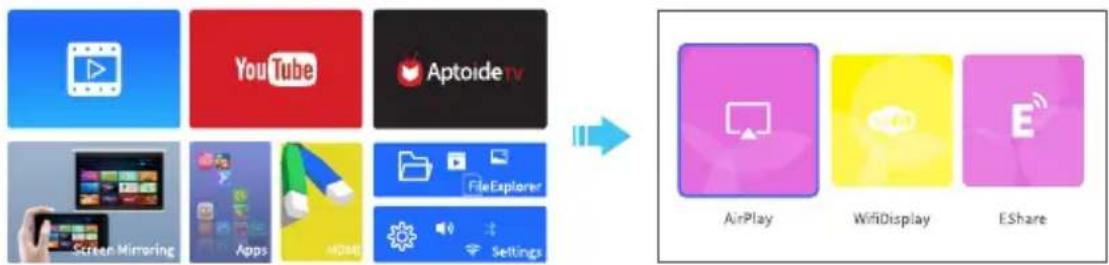
Select Screen Mirroring on the homepage to enter the interface displays the options of Airplay, WifiDisplay and EShare.
flowchart
graph LR
    A["YouTube"] --> D["Aptoide TV"]
    B["Screen Mirroring"] --> C["Apps"]
    C --> D
    D --> E["FileExplorer"]
    E --> F["Settings"]
    G["AirPlay"] --> H["WifiDisplay"]
    I["EShare"] --> J["Service Icon"]
A: Airplay
For iOS System Only
Option 1: Streaming through WIFI Connection
1 Connect your iOS device and the projector to the same WIFI network.
2 Select Screen Mirroring > Airplay or press □ on the remote, then press OK to enter.
3 Activate Screen Mirroring/Airplay Mirroring on your iOS device and search for the projector.
4 Select EShare-XXXX from the searching list.
10 support@ivankyo.com
5 Your iOS device display will be projected to the wall/screen.
Option 2: Streaming through Cellular Connection
1 Enable the WIFI hotspot function of the projector. Go to Settings > Network settings > Convenient hotspot, press the Right button on the remote to select OFF, then press OK to switch it to ON.
2 Select Screen Mirroring > Airplay or press □ on the remote, then press OK to enter.
3 Turn on the WIFI of your iOS device, select Projector from the searching list, then input the password 12345678.
Note:
You will see No Internet connection after the projector is connected to your iOS device, please ignore and continue the steps below.
4 Activate Screen Mirroring/Airplay Mirroring on your device and search for the projector.
5 Select EShare-XXXX from the searching list.
6 Your iOS device display will be projected to the wall/screen.
B: WifiDisplay
For Android System Only
To activate this function, please make sure your device supports Multi-Screen/Wireless Sharing/Wireless Projection. Names may vary with different Android devices.
1 Connect your Android device and the projector to the same WIFI network.
* WIFI connection on Android device is not a must unless live streaming content will be performed.
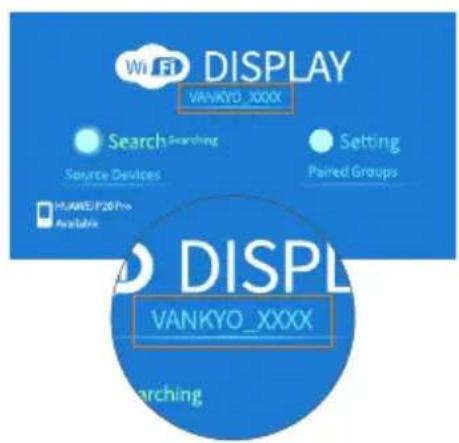
2 Go to Screen Mirroring > WifiDisplay to launch WifiDisplay on your projector.
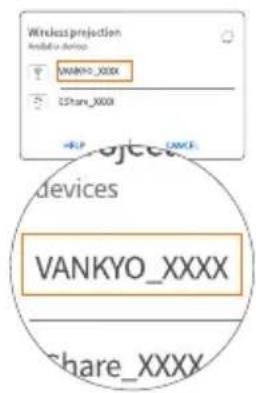
3 Activate Multi-Screen on your device and search for the projector.
4 Select VANKYO_XXXX from the searching list.
5 Your Android device display will be projected to the wall/screen.


C: EShare
For iOS System
1 Connect your iOS device and the projector to the same WIFI network.
2 Go to Screen Mirroring > EShare and press OK, or directly press 📋 on the remote to enter EShare.
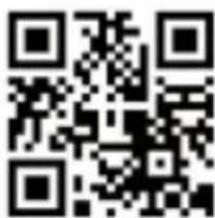
3 Scan the QR code below or visit http://XXX.XXX.XXX.XX:8000 (varies with different projector, please check it on the projected screen) to download EShare to your iOS device.

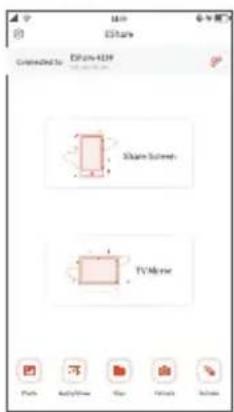
4 Launch EShare App on your iOS device and tap EShare-XXXX to connect.
5 Tap Share Screen, activate Screen Mirroring on your iOS device, then select EShare-XXXX to project the content on your iOS device to the screen/wall; tap TV Mirror to mirror the content on the screen/wall to your iOS device.
12 support@ivankyo.com

Tip:
When streaming live content, you can tap 📋 on the video player to cast the video to the screen/wall and do other things without interrupting the video as long as your iOS device is still connected.
For Android System
1 Connect your Android device and the projector to the same WIFI network.
2 Go to Screen Mirroring > EShare and press OK, or directly press 📋 on the remote to enter EShare.
3 Scan the QR code below or visit http://XXX.XXX.XXX.XX:8000 (varies with different projector, please check it on the projected screen) to download EShare to your Android device.
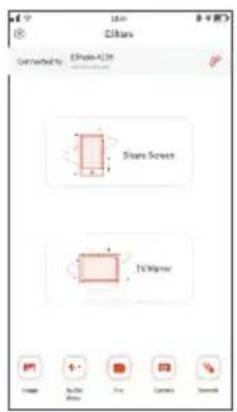
4 Launch EShare App on your Android device and tap EShare-XXXX to connect.
5 Tap Share Screen, activate Multi-screen/Wireless display on your Android device, then select Eshare-xxxx to project the content on your Android device to the screen/wall; tap TV Mirror to mirror the content on the screen/wall to your Android device.
If you want to stream live content, please exit EShare App and follow the steps below:
1 Activate Multi-screen/Wireless display on your Android device.
2 Select EShare-XXXX from the searching list.
3 Launch a video player on your Android device and select a video to play.

Tip:
Tap 📄 on the screen to cast the video to the screen/wall and do other things without interrupting the video as long as your Android device is still connected.
For Mac
1 Enable WIFI on the projector and your Mac, then connect them to the same WIFI.
2 Click □ on the mac and select EShare -XXXX from the searching list.
3 The display on your Mac will be projected to the screen/wall.
14
support@ivankyo.com
For Windows Laptop
1 Enable WiFi on both the projector and your Windows Laptop, then connect them to the same WIFI.
2 Go to Screen Mirroring > EShare and press OK, or directly press 📄 on the remote to enter EShare.
3 Scan the QR code below or visit http://XXX.XXX.XXX.XX:8000 (varies with different projector, please check it on the projected screen) to download EShare to your windows laptop.

Note:
If you download and install the Eshare App through QR code scanning, it will support the functions of Share Screen and TV Mirror; while if through visiting http://XXX.XXX.XXX.XX:8000, it only supports the function of Share Screen.
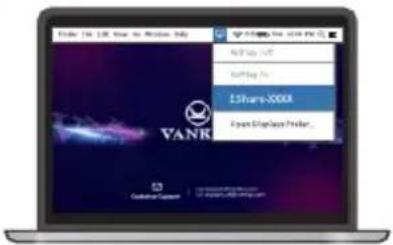
4 Launch Ehare App on your laptop, and tap Connect to connect the laptop with the projector.
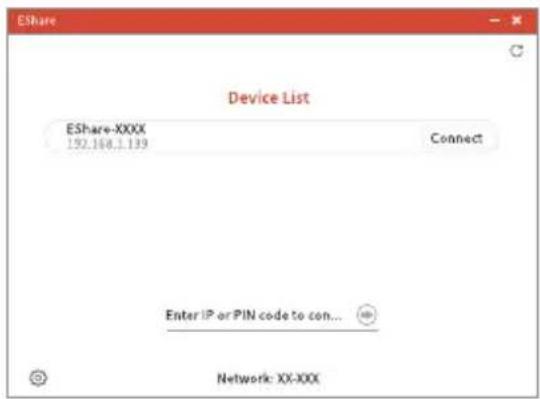
5 After connection, tap Share Screen, the display on your Windows laptop will be projected to the screen/wall; tap TV Mirror, the display on the screen/wall will be mirrored on your Windows laptop.

SCREEN MIRRORING THROUGH WIRED CONNECTION
For iOS System Only
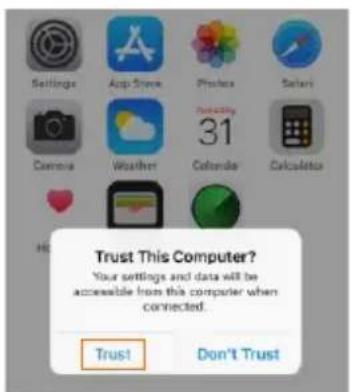
1 Connect your iOS device to the projector with the ORIGINAL USB to Lightning cable.
2 Select Trust in the pop-up window of Trust This Computer.
3 Your iOS device display will be projected to the wall/screen.
natural_image
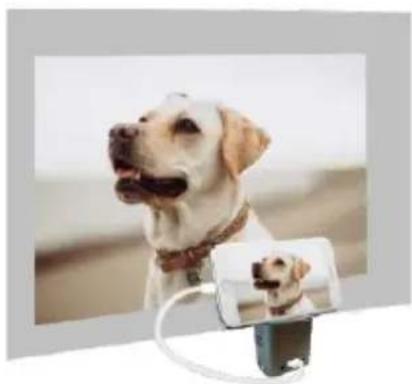
Close-up of a white dog with a collar and two puppies peeking from a smartphone (no text or symbols visible)16 support@ivankyo.com
Note:
* For Android system, GO200 does not support screen mirroring through wired connection.
SETTINGS
Select Settings on the homepage, then press OK to enter the interface of all the available setting options.
Network settings
Connect the projector to WIFI, turn the projector into a WIFI hotspot, enable Bluetooth etc.
Note:
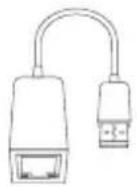
You can insert an Ethernet cable into the projector after you turn the Ethernet option to On. An extra USB to RJ45 cable is required (not supplied).
Common settings
Adjust sound and brightness level, select keyboard&input methods, set up language and Date&time.
Projection mode
Set up projection mode.
Keystone correction
Set up keystone correction.
Developer Options
Set USB to on when you need to transfer files between your PC and the projector via USB cable.
Other settings
Check the information about this projector, make a factory data reset, do a system update via USB disk, check the storage, adjust the pointer speed and manage application.
SPECIFICATIONS
| Adapter Input | 100-240V~ / 50-60hz |
| Adapter Output | 5V=3A |
| Ports | USB x 1/Mini HD x 1/Audio Out x 1/DC In x 1 |
| Operating System | Android 7.1.2 |
| WIFI | 2.4G/5G Dual-band WIFI |
| RAM/ROM | 1G/16GB |
| CPU | ARM Cortex-A7 CPU with up to 1.2GHz |
| Battery Capacity | 3300mAh |
| Display Technology | DLP |
| Light Source | LED |
| Resolution | 854 x 480 |
| Projection Distance/Screen Size | 1m-3m/37-110inch |
| Aspect Ratio | 4:3/16:9/16:10 |
| Keystone | Auto/Manual |
| Focus | Manual |
| Projection Mode | Rotate Front/Rotate Rear/Rotate Ceiling/Rotate Rear Ceiling |
| Frequency Range | 2402MHz-2480MHz |
| Transmit Power(EIRP) | ≤20dBm |
FCC Caution
Any Changes or modifications not expressly approved by the party responsible for compliance could void the user's authority to operate the equipment.
This device complies with part 15 of the FCC Rules. Operation is subject to the following two conditions:
(1) This device may not cause harmful interference, and
(2) this device must accept any interference received, including interference that may cause undesired operation.
Note: This equipment has been tested and found to comply with the limits for a Class B digital device, pursuant to part 15 of the FCC Rules. These limits are designed to provide reasonable protection against harmful interference in a residential installation.
This equipment generates, uses and can radiate radio frequency energy and, if not installed and used in accordance with the instructions, may cause harmful interference to radio communications. However, there is no guarantee that interference will not occur in a particular installation.
If this equipment does cause harmful interference to radio or television reception, which can be determined by turning the equipment off and on, the user is encouraged to try to correct the interference by one or more of the following measures:
—Reorient or relocate the receiving antenna.
—Increase the separation between the equipment and receiver.
—Connect the equipment into an outlet on a circuit different from that to which the receiver is connected.
—Consult the dealer or an experienced radio/TV technician for help.
This equipment complies with FCC radiation exposure limits set forth for an uncontrolled environment. This equipment should be installed and operated with minimum distance 20cm between the radiator& your body.
This transmitter must not be co-located or operating in conjunction with any other antenna or transmitter.
ISEDC Warning
This device complies with Industry Canada licence-exempt RSS standard(s). Operation is subject to the following two conditions:
(1) this device may not cause interference, and
(2) this device must accept any interference, including interference that may cause undesired operation of the device.
The device is compliance with RF exposure guidelines, users can obtain Canadian information on RF exposure and compliance.
The minimum distance from body to use the device is 20cm.
Operation of this device in the band 5150-5250 MHz is restricted to indoor use only.
This transmitter must not be co-located or operating in conjunction with any other antenna or transmitter.
RISK OF EXPLOSION IF BATTERY IS REPLACED BY AN INCORRECT TYPE.
DISPOSE OF USED BATTERIES ACCORDING TO THE INSTRUCTIONS

The symbol indicates DC voltage

RECYCLING
This product bears the selective sorting symbol for Waste electrical and electronic equipment (WEEE). This means that this product must be handled pursuant to European directive 2012/19/EU in order to be recycled or dismantled to minimize its impact on the environment. User has the choice to give this product to a competent recycling organization or the retailer when he buys a new electrical or electronic equipment.
This product can be used across EU member states.
The device is low power device, it can meet the requirement of the RF exposure.
EU Compliance Statement: Shenzhen VanTop Technology & Innovation Co., Ltd. hereby declares that this device is in compliance with the essential requirements and other relevant provisions of the Directive 2014/53/EU.
A copy of the EU Declaration of Conformity is available online at https://doc.vantop.com/.

| AT | BE | CY | CZ | DK | EE | FI |
| FR | DE | EL | HU | IE | IT | LV |
| LT | LU | MT | NL | PL | PT | SK |
| SI | ES | SE | UK | BG | RO | HR |
In all EU member states, operation of 5150-5350 MHz is restricted to indoor use only.
VANKYO SUPPORT
North America support@ivankyo.com
United Kingdom support.uk@ivankyo.com

www.ivankyo.com

@VankyoOfficial

VANKYO