Leisure E30WT - Video projector Vankyo - Free user manual and instructions
Find the device manual for free Leisure E30WT Vankyo in PDF.


| Product Type | Video Projector |
| Brand | Vankyo |
| Model | Leisure E30WT |
| Display Technology | LCD |
| Native Resolution | 800 x 480 pixels |
| Supported Resolution | 1080p (Full HD) |
| Brightness (Lumens) | 2400 ANSI Lumens |
| Contrast Ratio | 2000:1 |
| Light Source | LED |
| Lamp Life | 30,000 hours |
| Projection Size | 40 - 120 inches |
| Throw Ratio | 1.4:1 |
| Keystone Correction | ±15 degrees |
| Built-in Speaker | 1 x 3W |
| Connectivity | HDMI, VGA, USB, AV, Audio Out, SD Card |
| Power Supply | AC 100-240V, 50/60Hz |
| Power Consumption | 50W |
| Dimensions (W x D x H) | 7.9 x 5.9 x 3.1 inches (20 x 15 x 8 cm) |
| Weight | 1.2 kg (2.6 lbs) |
| Included Accessories | Remote control, AV cable, Power cord, User manual |
| Maintenance | Clean lens with a soft, dry cloth |
| Safety | Avoid moisture and direct sun exposure |
| Reparability | LED light source is non-replaceable; other parts may be serviced by professionals |
Frequently Asked Questions - Leisure E30WT Vankyo
User questions about Leisure E30WT Vankyo
0 question about this device. Answer the ones you know or ask your own.
Ask a new question about this device
Download the instructions for your Video projector in PDF format for free! Find your manual Leisure E30WT - Vankyo and take your electronic device back in hand. On this page are published all the documents necessary for the use of your device. Leisure E30WT by Vankyo.
USER MANUAL Leisure E30WT Vankyo
natural_image
Line drawing of a Vankyo projector device with ventilation slots and a circular vent (no text or symbols on body)Leisure 530W / Leisure E30WT / Leisure E30WQ
USER MANUAL
Please read this manual thoroughly before using and keep it for future reference.
WHAT'S INCLUDED

natural_image
Line drawing of a portable electronic device with a circular vent and control panel (no text or symbols)Projector
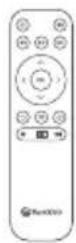
Remote (Batteries Not Included)
User Manual

HD Cable
Power Cable
NOTICE
Recommended

NOT Recommended

(EN)
KNOW YOUR PROJECTOR


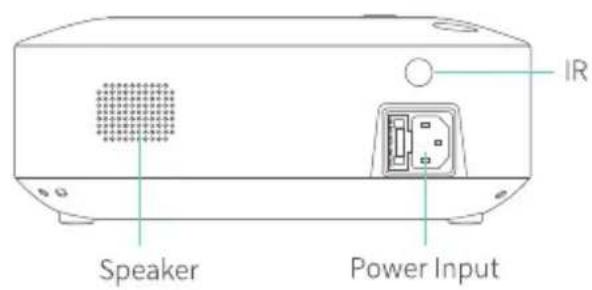
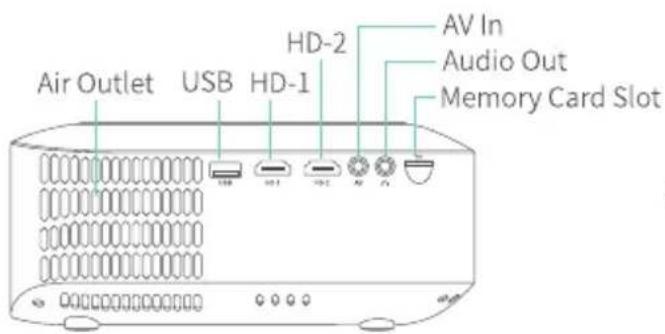

02
support.uk@ivankyo.com
QUICK START

natural_image
Simple line drawing of a device with an attached plug and cable (no text or symbols)Plug the power cord into an outlet.

natural_image
Simple line drawing of a projector with a slide, no text or symbols presentTake off the lens cover.
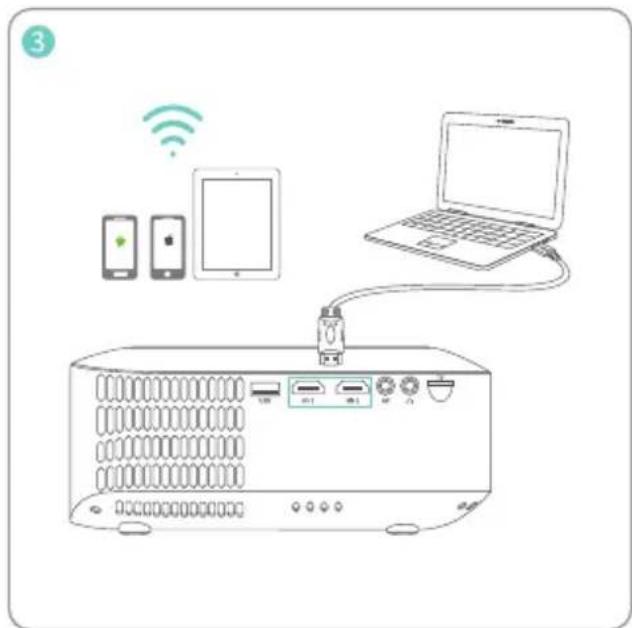
Connect your device to the projector correctly.

Press the Power Button to turn on the projector.
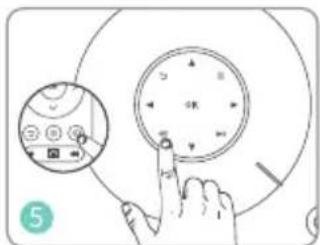
Select the correct input source to project your device.

natural_image
Diagram of a washing machine with a circular head and a side panel, showing internal components (no text or symbols)Adjust the kickstand accordingly.

Adjust the focus ring on the projector and correct keystone distortion in Projection Image Settings to get the best image performance.
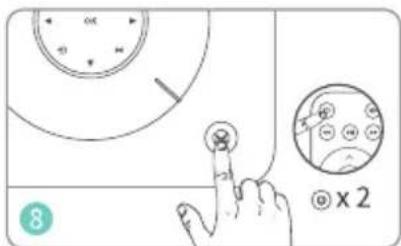
Press the Power Button twice to turn off the projector.
EN
HOMEPAGE

KEYSTONE CORRECTION
Step 1:
Select 📍 on the Homepage to enter the interface of Settings, then select Projection Images Setting to enter the interface of Projection. Or, press 📂 on the remote to directly enter the interface of Projection.
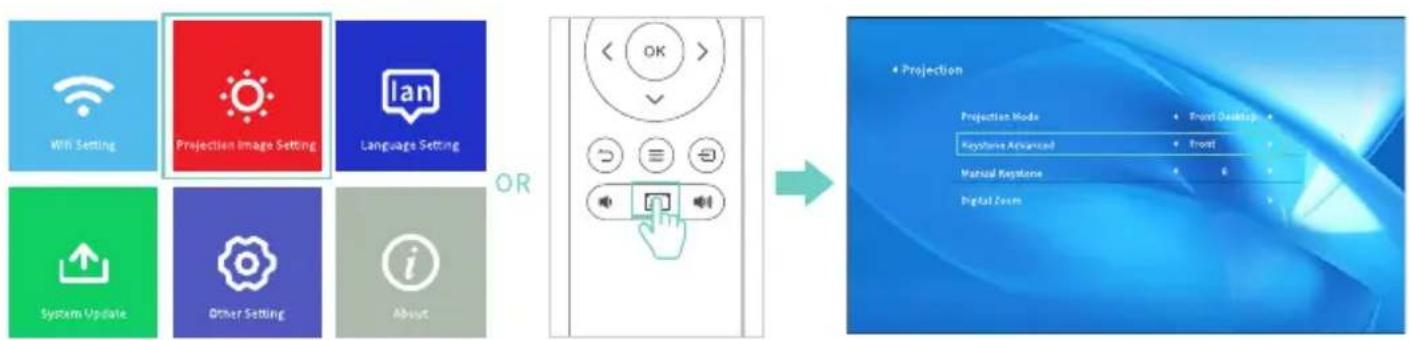
flowchart
graph LR
    A["Wi-Fi Setting"] --> B["Projection Image Setting"]
    B --> C["Language Setting"]
    D["System Update"] --> E["Other Setting"]
    E --> F["About"]
    G["OR"] --> H["Display Panel"]
    H --> I["Projection Mode"]
    I --> J["Front Desktop"]
    I --> K["Keyboard Advanced"]
    I --> L["Front"]
    I --> M["Manual Keystone"]
    I --> N["Digital Zoom"]
04
support.uk@ivankyo.com
(EN)
Step 2:
* Select Front in the option of Keystone Advanced and the Manual Keystone option will be displayed. You can correct the Vertical keystone distortion manually until the shape is evenly rectangular.

flowchart
graph LR
    A["Trapezoid"] --> B["Rectangle"]
    B <--> C["Trapezoid"]
* Select Side in the option of Keystone Advanced and the 4-Point Keystone option will be displayed. You can correct the image shape by four corners.

flowchart
graph TD
    A["Blue parallelogram"] --> B["Blue rectangle"]
    B --> C["Blue rectangle"]
    C --> D["Blue rectangle"]
    D --> E["Blue rectangle"]
    E --> F["Blue rectangle"]
    style A fill:#fff,stroke:#000
    style B fill:#fff,stroke:#000
    style C fill:#fff,stroke:#000
    style D fill:#fff,stroke:#000
    style E fill:#fff,stroke:#000
    style F fill:#fff,stroke:#000
(EN)
MULTIMEDIA CONNECTION
USB Disk/Memory Card Connection
Step 1: Turn on the projector and insert your USB disk/memory card into the USB port/memory card slot.

Step 2: Go to Homepage and select the file category you would like to display among Movie, Music, Photo and Office Suite, then enter the inserted USB disk/memory card to check all files stored.
* Video files
1 Select Movie to correspondingly read video files stored.
2 Tap OK on the projector/Press OK on the remote for a certain video file to enter full-screen display.
3 Tap OK/ ≡ on the projector or press OK/ ≡ on the remote when playing a video to bring up the toolbar to control the video playing.
Video Format Supported: AVI/MP4/MKV/FLV/MOV/RMVB/3G2/MPG/VOB/SWF/MPG/H.264/TS/WMV
* Audio files
1 Select Music to correspondingly read audio files stored.
2 Tap OK on the projector/Press OK on the remote for a certain audio file to enter full-screen display, then press ▶ on the remote to start/pause playing.
Audio Format Supported: AAC/MP3/FLAC/OGG/APE/AMR/WAV/MP2
06
support.uk@ivankyo.com
EN
* Photo files
1 Select Photo to correspondingly read photo files stored.
2 Tap OK on the projector/Press OK on the remote for a certain photo file to enter full-screen display.
Image Format Supported: JPEG/BMP/PNG
* Document files
1 Select Office Suite to correspondingly read document files stored.
2 Tap OK on the projector/Press OK on the remote to view contents of a certain file.
3 Tap ≡ on the projector or press ≡ on the remote to jump the cursor to the toolbar at the top.
Text Format Supported: DOC/DOCX/XLS/XLSX/PPT/PPTX/TXT
Step 3: Tap ☑ on the projector or press ☑ on the remote to go back to Homepage.
HD Connection
Step 1: Turn on the projector and connect your device to the HD 1/HD 2 Port of the projector with the provided HD cable.
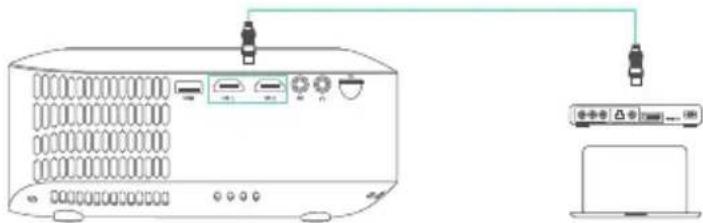
natural_image
Diagram of a device with ports and connectors, connected to a monitor (no text or symbols visible)Step 2: Select HD 1/HD 2 on the left side of the Homepage as the input source, then the contents of your device will be projected to the screen/wall.
(EN)


Tip:
For Windows 7 or higher system, press the "Windows Logo + P" key combination to access four display modes.
1 PC screen only option displays contents on computer screen only.
2 Duplicate option displays the same contents on both computer screen and projected screen.
3 Extend option splits the display between the computer screen and the projected screen.
4 Second screen only option displays contents only on the projected screen.
AV Connection
Step 1: Turn on the projector and connect your device to the AV Port of the projector with an AV cable.

Step 2: Select AV on the left side of the Homepage as the input source, then the contents of your device will be projected to the screen/wall.
08
support.uk@ivankyo.com
SCREEN MIRRORING
For iOS System
Step 1: Select 🔒 on the upper right corner of the Homepage, then enter Settings interface and select Wifi Setting.
Step 2: Turn on the WiFi switch of the projector and connect the projector to your router's WiFi.

Step 3: Enter WiFi settings of your iOS device and connect it to the same router's WiFi.
Step 4: Go to Homepage > iOS Cast to enter the following interface.

(EN)
Step 5: Activate Screen Mirroring/AirPlay Mirroring on your iOS device and search for the projector.
Step 6: Select Leisure 530W-XXXX from the searching list to connect.


Step 7: The contents on your iOS device will be mirrored to the wall/screen.
For Android System
To activate this function, please make sure your Android device supports Multi-screen/Wireless display. Names may differ from one Android device to another.
Step 1: Turn ON the WiFi switch in your Android device.
Note:
Successful WiFi connection is not a must, but please make sure the WiFi switch in your Android device is ON.
Step 2: Go to Homepage > Miracast to enter the following interface.
10
support.uk@ivankyo.com

Step 3: Activate Multi-Screen function on your Android device and search for the projector.
Step 4: Select Leisure 530W-XXXX from the searching list to connect.
Step 5: The contents on your Android device will be mirrored to the wall/screen.
Note:
The fluency of screen mirroring will be affected by the network environment. A bandwidth of 100Mbit or more is recommended when using screen mirroring.
② Make sure your mobile device is close to the projector when using wireless connection. A distance within 3ft is recommended.
3 Some mobile devices may not support screen mirroring due to the compatibility.
SETTINGS
Select 🔒 on the upper right corner of the Homepage to enter Settings interface.
(EN)



| Wifi Setting | Connect the projector to your router's WiFi |
| Projection Image Setting | 1. Change Projection Mode among Front-Desktop, Rear-Desktop, Front-Ceiling and Rear Ceiling.2. Enter Keystone Advanced(Front/Side) to correct image distortion.3. Enter Digital Zoom and use the Up/Down button to enlarge/reduce the image. |
| Language Setting | Select a language for the projector. |
| System Update | 1. Local Update: Update the firmware version via a USB disk with upgrade file named as RY-3H017.bin. (Contact our customer service to get the upgrade file.)2. Online Update: Update the firmware version online when a new version is available.3. Restore Factory: Restore the projector to the factory settings. |
12
EN
Other Setting
1. Power On Option
* If you select Direct, the projector will directly power on when you plug its power cord into an electrical outlet for the next use.
* If you select Standby, you need to press ⏻ to turn the projector on when you plug its power cord into an electrical outlet for the next use.
2. Scheduled Shutdown
Set the time duration for the projector to shut down automatically. Options include Off, 10min, 20min, 30min, 60min and 120min.
About
Check the System Version and MAC Address of the projector.
PROJECTION DISTANCE&SIZE
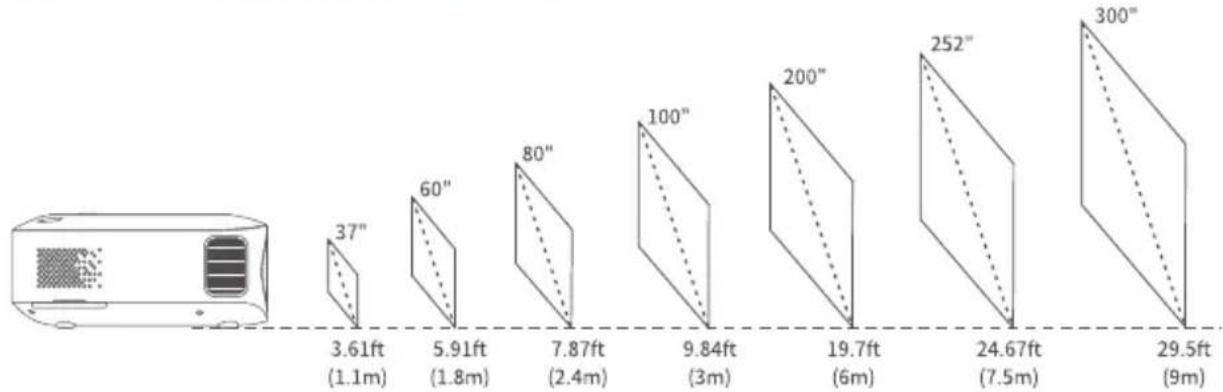
bar
| Height (ft) | Distance (m) | |---|---| | 3.61 | 1.1 | | 5.91 | 1.8 | | 7.87 | 2.4 | | 9.84 | 3 | | 19.7 | 6 | | 24.67 | 7.5 | | 29.5 | 9 |* The recommended projection distance varies with different projection contents. Please adjust the distance between the wall/screen and the projector properly as needed.
* Ambient darkness will improve the clarity of the projected images.
(EN)
SPECIFICATION
| Display Technology | LCD | Light Source | LED |
| Resolution | Native 1920 x 1080 | Input Signal | 576i、720P、1080i、1080P |
| Installation Type | Front/Rear/Ceiling | Aspect Ratio | 4:3/16:9/Auto |
| Focus | Manual | Electronic Keystone | ±50° |
| Speaker | 3W/4ohm | Power Supply | AC 100-240V, 50/60Hz |
| Unit Dimension | 240 x 210 x 90mm | Unit Net Weight | 1.8kg |
| Photo Format Supported | JPGE/BMP/PNG | Audio Format Supported | AAC/MP3/FLAC/OGG/APE/AMR/WAV/MP2 |
| Mounting Screws | M4 Metric | Number of Screw | 4 |
| Video Format Supported | AVI/MP4/MKV/FLV/MOV/RMVB/3G2/MPG/VOB/SWF/MPG/H.264/TS/WMV | ||
| Ports | HD In x 2 / USB x 1 / Audio Out x 1 / AV In x 1 / Memory Card Slot x 1 | ||
| Text Format Supported | DOC/DOCX/XLS/XLSX/PPT/PPTX/TXT | ||
14
support.uk@ivankyo.com
TROUBLESHOOTING GUIDE
- The content from Hulu, Netflix, and similar services can not be mirrored or cast.
* Due to the copyright restriction from Hulu, Netflix, and similar services, the contents MAY NOT be mirrored or cast.
- What should I do if I want to watch the content from Hulu, Netflix, and similar services via the projector?
* Please prepare a Fire TV stick, Roku stick or Chromecast™ (not included), then connect it to the projector to watch the content.
- Blurry Image
* Adjust focus ring/keystone.
* Projector and screen/wall must be in effective distance.
- Remote Unresponsive
* Make sure remote points at IR receiver directly.
* Do not cover IR receiver.
* Try a new pair of AAA batteries.
- Upside Down Images
* Go to Homepage > 🎨 > Projection Image Setting > Projection Mode to flip the projection image.
- Factory Reset
* Go to Homepage > 🎨 > System Update > Restore Factory to reset the projector to default settings.
(EN)
FCC Statement
Any Changes or modifications not expressly approved by the party responsible for compliance could void the user's authority to operate the equipment. This device complies with part 15 of the FCC Rules. Operation is subject to the following two conditions:
(1) This device may not cause harmful interference, and
(2) this device must accept any interference received, including interference that may cause undesired operation.
NOTE: This equipment has been tested and found to comply with the limits for a Class B digital device, pursuant to part 15 of the FCC
Rules. These limits are designed to provide reasonable protection against harmful interference in a residential installation. This equipment generates, uses and can radiate radio frequency energy and, if not installed and used in accordance with the instructions, may cause harmful interference to radio communications. However, there is no guarantee that interference will not occur in a particular installation. If this equipment does cause harmful interference to radio or television reception, which can be determined by turning the equipment off and on, the user is encouraged to try to correct the interference by one or more of the following measures:
—Reorient or relocate the receiving antenna.
—Increase the separation between the equipment and receiver.
—Connect the equipment into an outlet on a circuit different from that to which the receiver is connected.
—Consult the dealer or an experienced radio/TV technician for help.
This equipment complies with FCC radiation exposure limits set forth for an uncontrolled environment. This equipment should be installed and operated with minimum distance 20cm between the radiator& your body.
This transmitter must not be co-located or operating in conjunction with any other antenna or transmitter.
16
support.uk@ivankyo.com
EN
ISEDC Warning
This device complies with Industry Canada licence-exempt RSS standard(s). Operation is subject to the following two conditions:
(1) this device may not cause interference, and
(2) this device must accept any interference, including interference that may cause undesired operation of the device.
Operation of this device in the band 5150-5250 MHz is restricted to indoor use only.
North America support@ivankyo.com
United Kingdom support.uk@ivankyo.com

www.ivankyo.com

@VankyoOfficial

VANKYO
- Leisure 530W / Leisure E30WT / Leisure E30WQ
- USER MANUAL
- WHAT'S INCLUDED
- NOTICE
- (EN)
- 02
- QUICK START
- EN
- HOMEPAGE
- KEYSTONE CORRECTION
- Step 1:
- 04
- Step 2:
- MULTIMEDIA CONNECTION
- USB Disk/Memory Card Connection
- 06
- HD Connection
- Tip:
- AV Connection
- 08
- SCREEN MIRRORING
- For iOS System
- For Android System
- Note:
- 10
- SETTINGS
- Other Setting
- Power On Option
- Scheduled Shutdown
- About
- PROJECTION DISTANCE&SIZE
- 14
- TROUBLESHOOTING GUIDE
- FCC Statement
- 16
- ISEDC Warning
Brand : Vankyo
Model : Leisure E30WT
Category : Video projector