F-JPU70M - Air purifier PANASONIC - Free user manual and instructions
Find the device manual for free F-JPU70M PANASONIC in PDF.

| Product Type | Air Purifier |
| Brand | Panasonic |
| Model | F-JPU70M |
| Dimensions (H x W x D) | 560 x 370 x 200 mm |
| Weight | 7.0 kg |
| Power Supply | 220-240 V, 50/60 Hz |
| Power Consumption | 45 W |
| Coverage Area (approx.) | 20-30 m² |
| CADR (Clean Air Delivery Rate) | 200 m³/h |
| Filtration System | Pre-filter, HEPA, Activated Carbon |
| Technology | nanoe™ |
| Air Quality Sensor | Yes |
| Operating Modes | Auto, Sleep, Turbo, Timer (1/2/4/8 h) |
| Noise Level | 20 - 45 dB |
| Filter Replacement Indicator | Yes |
| Pre-filter Cleaning | Every month |
| HEPA Filter Replacement | Every 2-3 years |
| Activated Carbon Replacement | Every 2 years |
| Safety Features | Auto shut-off, Child lock |
| Repairability / Spare Parts | Filters available as spare parts |
Frequently Asked Questions - F-JPU70M PANASONIC
User questions about F-JPU70M PANASONIC
0 question about this device. Answer the ones you know or ask your own.
Ask a new question about this device
Download the instructions for your Air purifier in PDF format for free! Find your manual F-JPU70M - PANASONIC and take your electronic device back in hand. On this page are published all the documents necessary for the use of your device. F-JPU70M by PANASONIC.
USER MANUAL F-JPU70M PANASONIC
natural_image
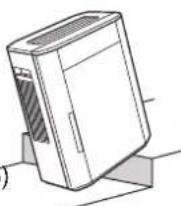
Illustration of a white industrial air purifier unit with ventilation grilles and control panel (no text or symbols visible)Panasonic®
OPERATING INSTRUCTIONS
تعليمات التشفيل
ziaino™ Air Treatment Unit
(Space sterilization and deodorization machine)
This product is for indoor use only
WATER SUPPLY/DRAINAGE METHOD .....13\~15
•ADDING A SALT TABLET 15
MAINTENANCE 16\~24
- WHEN REPLACING THE ELECTRODE UNIT…… 22\~23
- WHEN IDLE FOR A LONG TIME 24
OPTIONAL ACCESSORIES 24
TROUBLESHOOTING 25\~27
• LIST OF ERROR CODES 27
SPECIFICATIONS BACK COVER
المحتويات
Thank you for purchasing this Panasonic product.
Please read these operating instructions carefully before operation and maintenance.
Also, be sure to read the "SAFETY PRECAUTIONS" section (P.2\~6) before use.
Failure to comply with instructions could result in injury or property damage.
Please retain this booklet for future reference.
■ Disconnect power supply before maintenance and filling water.
For cleaning and descaling see "maintenance" and regarding filling (water supply) see "WATER SUPPLY/DRAINAGE METHOD".
If the supply cord is damaged, it must be replaced by the manufacturer, its service agent or similarly qualified persons in order to avoid a hazard.
This product is not intended for use by persons (including children) with reduced physical, sensory or mental capabilities, or lack of experience and knowledge, unless they have been given supervision or instruction concerning use of the product by a person responsible for the safety.
Children should be supervised to ensure that they do not play with the product.
The safety precautions should be strictly followed in order to prevent injury or damage to properties.
■ The following symbols differentiate the levels of danger or injury that may result if the product is not used correctly as instructed.
Those things shown in this column indicate that there is possibility of causing death or severe injury.
Those things shown in this column indicate that there is possibility of causing minor injury or damage to properties.
The following symbols are used to indicate the type of instructions that need to be followed. (The symbols given below are examples.)
This symbol indicates an action that must not be performed.
This symbol indicates an action that must be performed.
■ Do not pull the power cord when carrying or storing the product.
(Jeila, youth is interesting to be a low level)
■ Do not insert your fingers, metallic objects or others into the air inlet, air outlet or gaps.
(Otherwise, you may be hurt by the inner units with the possibility of electric shock or injury.)
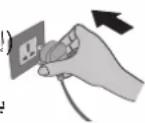
■ Insert the power plug into the power socket completely.
أدخل قابس الإطاقة في الامقبس الاكهربي بالاكامل. (If the power plug is not fully inserted, electric shock may occur, or a fire may be caused due to overheating of the power cord.)
- Do not use damaged power plug or loose power socket.
■ Do not damage the power cord or power plug.
- Do not cut, modify, excessive distort, twist, squeeze the power cord, and do not place it near heat sources, place heavy weight on it, etc.
(Otherwise, the power cord may be damaged with the possibility of fire or electric shock.)
■ Do not let the product get wet.
- Do not place cups, etc. on the main unit.
(Otherwise, the product may short circuit with the possibility of fire or electric shock.)
■ For hospitals, rehabilitation centers or the like, please pay attention to the operating places of this product. Make sure that customers with implanted medical pacemakers keep their pacemaker implantation sites away from the opening and closing part of the front panel, water supply tank, drain tank and tray of this product.
(Otherwise, the magnets on the product may negatively affect the pacemaker.)
■ Do not touch the power plug with wet hands.
(Otherwise, electric shock may occur.)
■ Clean the power plug regularly.
(If dust and humidity is found on the power plug, which may cause damage to insulation, causing fire.)
- Disconnect the power plug and wipe it with dry cloth.
- When the product will not be used for a long period, disconnect the power plug.
■ In case of any abnormality or malfunction, immediately stop using the product and disconnect the power plug.
(Otherwise, electric shock, fire or smoke may occur.)
• Operation stops after the power cord is touched.
- Abnormal noise or severe vibration occurs during operation.
- The main unit becomes abnormally hot or emits a smell of burning.
- There is any other abnormalities or malfunction.
→Please stop operating immediately and disconnect the power plug, and contact the dealer to check and repair.
Be sure to only use an AC power supply of 220 V and 50 Hz, instead of any power supplies, universal outlets or connecting devices exceeding the rated values.
■ Do not disassemble or modify the product.
(Otherwise, the product may catch fire or malfunction, thus resulting in fire or electric shock.)
■ Do not place the product in the incline and unstable place or at heights.
(Otherwise, the product may fall over and injury may occur, the water may spill out and fire, electric shock may occur or wet furniture, etc.)
■ Do not use the product in the place where oil or inflammable gas may be leaked.
(Otherwise, a fire or smoke may occur due to ignition in the product.)
■ Do not place the product in the place where oil fume is emitted, such as in kitchens.
(Otherwise, the product may crack and injury may occur.)
■ Do not use the product in the place where the air outlet faces animals or plants directly.
(Otherwise, it may cause discomfort to the animals and dry out the plant.)
■ Do not place the product in the place where the temperature or humidity is extremely high, or watery area, such as bathroom.
■ Do not push over or overturn the product.
■ Do not sit on or lean against this product.
(Otherwise, the product may fall over and injury may occur, the water may spill out and fire, electric shock may occur or wet furniture, etc.)
- Families with children should pay more attention.
■ Do not operate this product in places where indoor fumigation type insecticides are being used.
(Otherwise, chemical residue may build up inside the product and discharge from the air outlet, which is harmful to your health.)
→ Ventilate the room with fresh air thoroughly after using insecticides before operating the product.
■ Do not place the product near combustible materials such as lighted cigarette, incense, etc.
(Otherwise, these may be absorbed into the product with possibility of fire.)
■ Do not let the wind blow directly onto walls or handrails or any other metal objects.
■ Do not drink the water in the water supply tank, drain tank or tray, or feed animals or water plants with it.
(Otherwise, human health may be harmed and adverse effects may be caused.)
■ Do not use a punctured or damaged water supply tank, drain tank or tray.
(Otherwise, discoloration or deterioration of the floor may be caused.)
■ Do not clean the product with gasoline or other volatile mixture solvents, and avoid contacting with spray insecticides.
(Otherwise, the product may crack or short circuit with the possibility of injury, fire or electric shock.)
■ Do not add chemicals, air fresheners, essential oils, etc. into the water supply tank or tray.
(Otherwise, toxic gas may be produced, which is harmful to your health. Or, the water supply tank or tray may be damaged, thus wetting the floor and resulting in discoloration or deformation.)
■ When disconnecting the power plug, hold the power plug instead of the power cord.
(Otherwise, the power cord may be damaged with the possibility of fire or electric shock.)
- Keep the room well-ventilated when using the product together with a burner.
- This product cannot remove carbon monoxide.
■ When carrying the product.
عند حمل الوحدة.
- Turn off the product and disconnect the power plug, take out the tank, and pour water out of the water supply tank, drain tank and tray.
(Otherwise, discoloration or deterioration of the floor may be caused.)
- Hold the left and right handles, but not the louver, operation part cover, and the front panel to carry the product.
(Otherwise, the product may slip out injury may occur.)
■ Make sure that no water spills out when carrying the water supply tank, drain tank or tray. If any water spills out, wipe it off immediately.
(If water spills out on the floor, etc., discoloration or deterioration may be caused due to the bleaching effect of hypochlorous acid.)
■ When draining the water, turn on the tap to flush the sink clean.
(Otherwise, the sink and water pipe may oxidize to form rust.)
■ Clean the water supply tank, the drain tank and the interior of the main unit frequently.
- Replace the water in the tank with new tap water every day.
ستبند الماء الموجود فيelves زان بماع جديد من الصنboro كل يوم. (When the product is not operating, a foul odor may occur due to mildew and miscellaneous bacterium breeding caused by dirt or incrustation, which may be harmful to your health.)
■ When you feel uncomfortable, stop using the product immediately and consult a doctor at once.
(Otherwise, physical discomfort may be caused.)
Keep a safe distance during use as instructed below.
(Poor ventilation may cause the internal temperature of the main unit to rise, thus resulting in malfunction.)
■ Do not put any obstacles at the inlet and outlet of the product.
■ Place the main unit indoors and use it within the ambient temperature range of 5 °C to 35 °C.
■ Do not set the product in the following places.
- Where the product will be exposed directly to sunlight, outlet of air conditioner or heat, etc.
(Otherwise, deformation, deterioration, degeneration, discoloration or malfunction may be caused.)
- Near objects such as TV and radio.
→Keep a distance of 1 m or above.
■ Do not use the same power socket with TV, radio, etc.
→In this case, insert the power plug into another power socket.
■ Do not place any object on the product.
■ Do not use the product with the air inlet filter removed.
(Otherwise, dust may build up inside the main unit, thus resulting in malfunction.)
■ When there may be freezing, please empty the water supply tank, drain tank and tray.
(Operating with frozen water may cause malfunction.)
■ Clean the walls regularly.
Using the product continuously at the same location may result in dirty surrounding walls due to the air inhaled by the product. You are recommended to clean the walls regularly.
■ Do not disconnect the power plug unless the product will not be in use for a long time.
Make sure that there is water in the water supply tank and keep the power plug inserted since the cleaning operation (Page 13) will start automatically once the product stops working.
If the product will not be in use for a long time, disconnect the power plug, and empty the water supply tank, drain tank and tray.
(Otherwise, it may cause mildew and miscellaneous bacterium breeding since the effect of hypochlorous acid is weakened while the power is off.)
- There is no problem if the power plug is disconnected briefly.
■ Do not use the product in a smoking environment.
(Otherwise, performance degradation may be caused and the replacement cycle of the electrode unit, sterilization filter and dust filter may be shortened.)
وَإِلَا، فَقْدِ يُحْدَّت تَدَهُورِ فِي الْأَدَاءِ وَقَدِ يُحْدَّت تَقْصِيرِ دورة استُبَال
(If the product inhales cigarette smoke, the interior of the main unit may become dirty with cigarette tar, and dirty water containing cigarette tar or other components may be blown out from the main unit.)
■ Be sure to add one salt tablet into the tray after water is supplied.
■ Tighten the cover to keep the salt container sealed after unpacking.
■ Do not swallow any salt tablets.
- If salt tablets are swallowed by accident, drink enough water immediately. (It is recommended to drink 500 mL water per salt tablet.)
- If too many salt tablets are swallowed, or if a patient with hypertension or heart disease swallows salt tablets by accident, consult a doctor at once.
- Blinking: The electrode replacement time is approaching. The electrode reset indicator will become steady on after blinking for about one month.
● Steady on: The product does not work.
■ When the cleaning reset indicator lights on
→ Please perform maintenance.
After the maintenance, install the dust filter, tray, pump assembly, anti-fungus assembly, and sterilization filter assembly (Pages 16\~22) back to the main unit. After installation, press and hold Clean Up for about 3 seconds.
- If you perform maintenance before the cleaning reset indicator lights on, press and hold Clean Up for about 3 seconds as well.
→ The front panel is open or not closed properly, and the product cannot operate at this time.
→ There is little or no water in the tray, and the product cannot operate at this time.
Lighting on from the center to both sides: Normal operation is in progress.
Blinking on both ends at the same time: Preparatory operation is in progress.
Blinking at the center: Cleaning operation is in progress.
■ When the drain indicator lights on
→The drain tank is full of water. Please empty the drain tank and install it back; otherwise the product cannot operate.
→ One salt tablet should be added. After adding, press the salt input confirm button on the control panel; otherwise the product cannot operate.
■ When the operation indicator lights on
→The product is operating normally.
Preparations: Before setup, fill in the date of first use on the "(Check records)" label : الاستعدادات : on the inner surface of the front panel.
②Insert the power plug into the power outlet.
③Supply/drain water. (→"Water supply/drainage method" on Page 13\~15)
(The operation indicator lights on)
2 Select the operation mode.
Air Volume
● After the preparatory operation is completed, the product starts to operate.
● The air volume can be set in 3 levels.
● The factory setting is "High" mode.
- It can be set during preparatory operation.
(The indicator lights off)
● The product continues to blow air for about 10 seconds after the button is pressed.
(The purpose is to drain the hypochlorous acid accumulated in the main unit.)
- If the front panel is opened during operation, the product will sound "BIBIBIBIBI!" and pause the operation. While the front panel is open, the door open indicator keeps blinking. The product enters preparatory operation in about 20 seconds after the front panel is closed. After the preparatory operation is completed, the product returns to the operation mode before the front panel is opened.
natural_image
Line drawing of a hand inserting a small component into a rectangular device (no text or symbols)You can change the wind direction by adjusting the louver by hand.
● The louver is adjustable in 3 levels.
natural_image
Simple line drawing of a heat exchanger with three upward arrows indicating airflow or heat flow (no text or symbols)natural_image
Simple line drawing of a toaster with three blades and arrows indicating airflow direction (no text or symbols)natural_image
Diagram of a device with three arrows pointing upward, showing internal structure (no text or symbols)451 درجة تقرibia
Switching the brightness
تbrids Ellaspوع
Indicator Off/On
If you are not satisfied with the brightness, press this button to turn off the status indicator. Then other indicators will dim.
Locking the operation
清凉 الإتشغيل
Lock
(Press the button for about 3 seconds)
(اضغط علاي الإزر
The purpose is to prevent misoperation.
With this setting, if you press
any button other than

the product will sound "BI-BI-" and operation is not possible.
Press the button for about 3 seconds again.
(The indicator lights off)
Selecting the electrolytic strength
Electrolytic Strength
Press this button to switch level by level.
flowchart
graph TD
    L[" L "] --> M[" M "]
    M --> H[" H "]
    H --> L
    L --> M
    M --> H
If you are not satisfied with the smell in the room, or if you want to improve the sterilization effect, select "H". (You may smell some chlorine during electrolysis.) (The factory setting is "M".)
Cleaning operation (Auto)
- In order to keep its inside clean, the product will automatically perform the cleaning operation regularly (for approximately 4 minutes every 4 hours) when it is idle.
(A gentle breeze may blow out during the cleaning operation.)
(The status indicator is blinking at the center.)
( Yeuroy, yu)
(المتصف.
WATER SUPPLY/DRAINAGE METHOD
- When the water supply tank runs out of water, the product will sound "BIBI" 5 times and stop operating. (The water refill indicator and drain indicator are blinking.)
If you remove the water supply tank still with water, the drain indicator will blink after about 5 seconds. After the drain indicator blinks, please empty the drain tank; otherwise the product cannot operate.
Water-level window Used to check the remaining amount of water in the water supply tank.
■ Make sure that no water spills out when carrying the water supply tank, drain tank or tray. If any water spills out, wipe it off immediately.
(If water spills out on the floor, etc., discoloration or deterioration may be caused due to the bleaching effect of hypochlorous acid.)
■ When draining the water, turn on the tap to flush the sink clean.
(Otherwise, the sink and water pipe may oxidize to form rust.)
■ Make sure to use the tap water.
(Because chlorination has been performed generally for tap water and hence the miscellaneous bacterium is difficult to breed.)
- Do not use the following water.
- Hot water above 40 °C, or water mixed with detergents.
(Otherwise, the tank deformation may be caused.)
• Water mixed with chemicals, air fresheners and essential oils.
(Otherwise, the tank may be damaged and the furniture, appliances, etc. may be wet. →Page 6)
• Water from a water purifier, alkaline ion water, mineral water
(Otherwise, mildew and miscellaneous bacterium may multiply fast.)
(Otherwise, mildew and miscellaneous bacterium breeding may be caused, discoloration may occur, and the replacement cycle of the electrode unit may be shortened.)
■ With a full tank of water supports continuous operation of up to 9.6 hours.
(When the air volume is set to "H", the indoor temperature is 20 °C and the relative humidity is 30%)
1 Remove the water supply tank and drain tank from main unit.
- Be sure to disconnect the power plug when adding water.
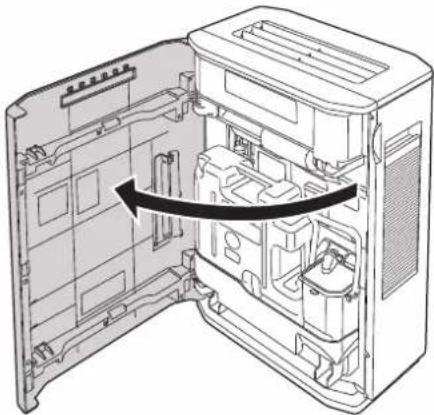
① Open the front panel.
afتح اللوحة农业大学.
natural_image
Technical line drawing of an open computer case with internal components and a black arrow indicating a directional flow (no text or symbols present)② Remove the water supply tank and drain tank.
Water supply tank
خزان إمداد المياء
Drain tank
خزان التصريف
Take it out carefully to avoid water spilling.
③Open the tank cover of the water supply tank.
natural_image
Line drawing of a mechanical housing component (no text or symbols)Water supply/drainage and reassembly Adding a salt tablet
2 Add water to the water supply tank, empty the drain tank and install it back to the main unit.
① Add water to the water supply tank and screw the tank cover tightly.
- Add water with a kettle, etc. if the tank cannot be put into the sink.
Hold the tank firmly to avoid tilting.
③ Install the water supply tank and drain tank back to the main unit.
- Check that the tray and drain tank are already installed back to the innermost of the main unit. Otherwise, the sensor may not function normally or water may leak out of the product.
3 Add one salt tablet in the tray and press the salt input confirm button.
①Take out one salt tablet from the salt container inside the main unit.
natural_image
Technical line drawing of a mechanical assembly with no visible text or symbolsSalt container
حاوية الملك
②Put one salt tablet into the salt inlet of the tray.
natural_image
Diagram of a computer case with a CD inside, showing internal components and a magnified view of the disk (no text or symbols)■ Be sure to add one salt tablet in the tray each time when you add water.
- If no salt tablet is added, the effect of hypochlorous acid may be weakened or even completely eliminated.
Connect the power plug. TOUSIPIL قابس الطاقة. (Wipe the water off power plug and your hands before connecting the power plug.)
(The salt input confirm indicator lights off.)
natural_image
Technical line drawing of a mechanical component or bracket assembly (no text or symbols)Notice ملاحظة
- Be sure to close the front panel properly.
- Once the power plug is inserted into the power outlet, the product starts to drain water.
■ Make sure to disconnect the power plug before cleaning the product.
(Otherwise, the product might operate with the possibility of electric shock or injury.)
(Otherwise, toxic gas may be produced, which is harmful to your health.)
(Jeila qud yintj gaz sam sadar byhctk)
Notice ملاحظة
Wipe the main unit clean with a well wrung-out soft cloth when you find it dirty. Wiping with a hard cloth may cause scratch the surface.
- Do wipe the power plug with a dry cloth.
Please contact the dealer for purchase or replacement of the above accessories.
Cleaning frequency varies with water quality and operating environment.
Flush the water supply tank and drain tank clean.
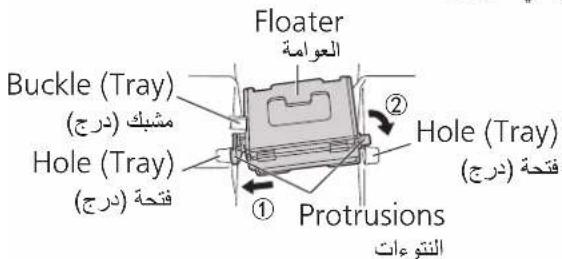
(If the floater is not installed correctly, the product cannot operate and water may leak.)
■ If the floater is shifted:
Fit both protrusions into the corresponding holes of appropriate sizes.
■ Make sure that no water spills out when carrying the water supply tank, drain tank or tray. If any water spills out, wipe it off immediately.
■ When draining the water, turn on the tap to flush the sink clean.
(Otherwise, the sink and water pipe may oxidize to form rust.)
■ Do not clean the product with gasoline or other volatile mixture solvents, and avoid contacting with spray insecticides.
(Otherwise, the product may crack or short circuit with the possibility of injury, fire or electric shock.)
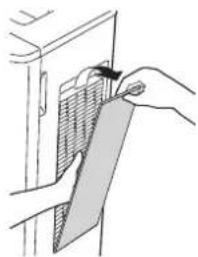
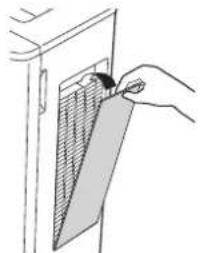
① Pull the top of the pre-filter forward to remove the pre-filter.
natural_image
Line drawing of hands installing a panel on a cabinet (no text or symbols)② Remove the dust filter.
أزل فلتر الغبار.
natural_image
Illustration of hands installing or adjusting a panel on a door (no text or symbols visible)- Do not wash the dust filter with water.
As the degree of dirtiness varies with the operating environment, maintenance may be required even before the specified time is reached, as long as there is an unpleasant odor or the water in the tank is reduced at a slower speed.
- Do not operate the product with the dust filter or pre-filter removed. (Otherwise, dust may build up inside the main unit, thus resulting in malfunction.)
3 Install the pre-filter and dust filter back.
① Install the dust filter.
ثبت فلتر الغبار.
natural_image
Hand inserting a card into a door panel (no text or symbols visible)② Insert the protrusions (two) of the pre-filter into the holes (two) on the main unit.
③ Push it in until it clicks into place.
natural_image
Simple line drawing of a door handle with a panel inserted, no text or symbols presentReference replacement cycle of the dust filter
(Optional accessories: Page 24)
※ As the degree of dirtiness varies with the operating environment, replacement may be required even within 2 years if there is still an unpleasant odor or the water in the tank is reduced a slower speed upon maintenance.
① Slide up the slider latch to the top.*1
② Remove the tray.
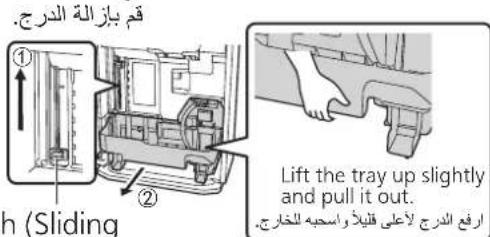
※1 You cannot take the tray out without lifting the slider latch (electrode unit). Therefore, be sure to check that the electrode unit is lifted before taking the tray out.
2 Remove the partition panel, sterilization filter assembly and anti-fungus assembly from the tray, and clean them one by one.
Partition panel (pump assembly)
natural_image
Technical diagram of a mechanical assembly with exploded view and internal components (no text or labels)■ Do not remove the floater (expanded polystyrene). (The product may not work if they are not installed correctly.)
If the floater is shifted: Put the protrusions under the buckle.
② insert them into the holes.
أدخلها في النقوب.
- Remove the incrustation and any other dirt with a soft cloth moistened in water.
● Wipe the dirt with a swab, or use a toothbrush to scrub it.
4 Install the partition panel, sterilization filter assembly and anti-fungus assembly onto the tray.
① Place the anti-fungus assembly horizontally into the recess.
② Insert the partition panel along the groove.
③ Install the gear of the sterilization filter assembly into the recess of the tr
natural_image
Exploded view diagram of a mechanical assembly showing internal components and directional arrows (no text or labels)① Set slider latch at the top position.
Slider latch (Sliding while pinching.)
1 Remove the pump assembly from the partition panel.
① Unscrew the hand screw and remove the coupler from the partition plate.
Pump assembly
مجموعة المضخة
② Lift the drain pump up to pull it out.
2 Remove the pump filter and impeller from the pump assembly.
Rotate the cover on the opposite side to the pump filter in the arrow direction (①) and remove the impeller.
- Do not remove the hose or the sealing ring.
● Wipe the dirt off the pump filter with a cotton swab, or use a toothbrush to scrub it.
Install the removed parts back properly; otherwise:
- The tank cannot supply water to the main unit anymore.
● Water may leak out or the product may malfunction.
Make sure that the sealing ring is installed correctly.
4 Install the pump filter and impeller onto the pump assembly.
Install the pump filter, impeller and cover.
(Align the pump filter and the cover with the respective positioning marks, and fasten the buckles (three).)
المشابك (ثلاثة)
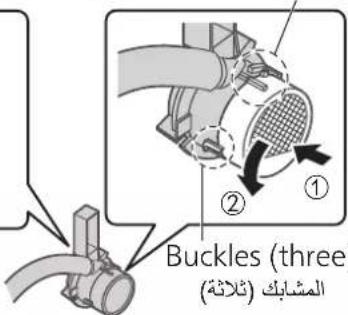
Buckles (three)Buckles (thr
المشابك (ثلاثة)
5 Install the pump assembly onto the partition plate.
Align the buckles (two) of the coupler with the notches and insert them in.
Install the hand screw onto the partition plate.
natural_image
Technical line drawing of a mechanical assembly with no visible text or symbolsAlign the buckle with the hole and insert it vertically downward.
Suggested time—Cleaning frequency varies with water quality and operating environment. It is suggested to clean it at least about once every 6 months.
Anti-fungus assembly
- Check whether the housing of the anti-fungus assembly is dirty.
→If dirty, wipe it clean with a soft cloth.
● The anti-fungus assembly may have powder sometimes. This is normal and not a problem with use.
● The anti-fungus agent will be small along with the use. This is not a problem with the anti-fungus performance.
- The anti-fungus agent has its own special smell, harmless to humans.
Reference replacement cycle of the anti-fungus assembly
(Optional accessories: Page 24)
- After replacement, fill in the replacement date, etc. on the "(Check records)" label on the inner surface of the front panel.
Sterilization filter assembly
Remove the filter plate and sterilization filter from the filter frame.
- Press and wash sterilization filter with clean/warm water.
- Do not scrub it with a brush or wash it with a washing machine.
- Do not dry it with a drier. (Doing this may cause shrinkage)
● Wash the filter frame and filter plate with water
natural_image
Illustration of hands washing a bowl with a coiled cord (no text or symbols)3 Install التركيب
① Insert the sterilization filter into the filter frame.
② Install the filter plate onto the filter frame.
- Do not leave a gap between the sterilization filter and the filter plate as well as the filter frame, nor press the round parts of both ends.
(Otherwise, performance degradation may be caused.)
Reference replacement cycle of the sterilization filter
(Optional accessories: Page 24)
※ As the degree of dirtiness varies with the water quality and operating environment, replacement may be required even within 5 years if there is still an unpleasant odor or the water in the tank is reduced at a slower speed upon maintenance.
- Please dispose of the used sterilization filter as non-combustible garbage. However, do not discard the filter frame and filter plate.
- After replacement, fill in the replacement date, etc. on the "(Check records)" label on the inner surface of the front panel.
When replacing the electrode unit
- The electrode reset indicator will become steady on after blinking for about one month. (When the electrode reset indicator becomes steady on, the product cannot operate.)
- About once every 5 years. (In the case that the product runs 12 hours a day.)
● The replacement cycle may vary with the water quality and operating environment.
- After replacement, fill in the replacement date, etc. on the "(Check records)" label on the inner surface of the front panel.
- Be sure to use the electrode unit dedicated for this product. (See "Optional accessories" on Page 24.)
- When lifting up or pressing down the electrode unit, please pinch the slider latch to move it.
Removing/Installing the electrode unit
① Disconnect the power plug.
② Open the front panel.
③ Take the water supply tank and drain tank out.
④ Lift the slider latch up and place the electrode unit into the main unit.
⑤ Remove the tray from the main unit.
⑥ Press the slider latch down and take the electrode unit out from the main unit.
⑦ Remove the housing of the electrode unit.
⑧ Remove the connector.
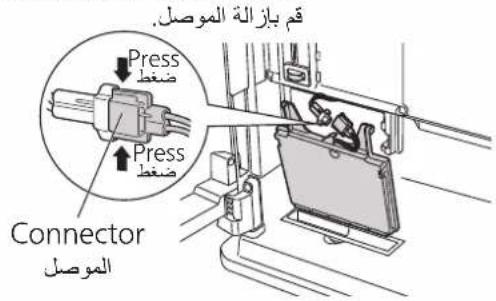
Installing
التركيب
① Install the connector of the new electrode unit onto the main unit.
Insert the protrusions (two) into the recesses (two).
Align with the direction of the line
② Install the housing onto the electrode unit.
① Align the buckles with the holes.
Insert the housing completely to the end.
(If not installed securely, the housing may fall off when you lift the slider latch.)
③ Lift the slider latch up and place the electrode unit into the main unit.
④ Install the tray back to the main unit.
⑤ Pull the slider latch down.
⑥ Install the water supply tank and drain tank back to the main unit.
⑦ Insert the power plug into the power outlet, and press and hold Replace Electrode for about 3 seconds.
⑧ Close the front panel.
أغلاق اللunoحة大宗商品.
Disposing of the electrode unit
● The electrode unit is a mixture of plastic and metal. Please dispose of it according to your local garbage classification rules.
① Disconnect the power plug.
② Empty the water supply tank, drain tank and tray, and clean the product.
③ Wipe each part dry and install them back to the main unit. The water refill indicator, drain indicator and salt input confirm indicator will blink.
④ Insert the power plug into the power outlet to enter drying operation of the sterilization filter.
(To prevent mildew and miscellaneous bacterium breading)
Drying operation of the sterilization filter
The product will start the drying operation of the sterilization filter in the [H] mode.
It will stop automatically after about 2 hours.
To cancel it halfway, press and hold these two buttons for about 2 seconds again.
If the drying operation is canceled halfway, the sterilization filter may not be completely dried.
⑤ After the operation is stopped, disconnect the power plug and cover the main unit with a plastic bag or the like.
⑥ Store the product in a dry, level and stable place in an upright position.
Not include filter plate and filter frame.
Please contact the dealer for purchase or replacement of the above accessories.
If a problem is encountered, please investigate it by going through the following items.
If the problem still persists, please disconnect the power plug and contact the dealer for repair.
Check the error code, disconnect the power plug and do the following.
If the problem still persists after you have finished the above operations, please contact the dealer.
※1 The power consumption is about 1 W when the power plug is inserted into the power outlet and the operation is "Off". (17 W for cleaning operation)
※2 The noise is A-weighted sound pressure level, measured in a total silencing laboratory environment.
※3 The continuous operation time with full water is obtained in an environment where the room temperature is 20 °C and the relative humidity is 30%. The continuous operation time may differ depending on the room temperature and humidity.