
421502 - Environmental Thermometer Extech - Free user manual and instructions
Find the device manual for free 421502 Extech in PDF.


| Product Type | Dual Input Digital Thermometer (Type J/K) |
| Dimensions | 192 x 91 x 52.5 mm (7.5 x 3.6 x 2.1 in) |
| Weight | 365 g (11.7 oz) |
| Power Supply | 9V DC battery (NEDA 1604, IEC 6F22, or 006P) |
| Battery Life | Approx. 160 hours with carbon zinc battery |
| Auto Power Off | After approx. 30 minutes of inactivity |
| Display | 5-digit LCD multifunction display |
| Temperature Range (J Type) | -328 to 1922°F (-200 to 1050°C) |
| Temperature Range (K Type) | -328 to 2498°F (-200 to 1370°C) |
| Resolution | 0.1°C or 0.2°F |
| Accuracy | ±(0.05% rdg + 0.3°C) from -50°C to 1370°C; ±(0.05% rdg + 0.7°C) from -50°C to -200°C |
| Reading Rate | 1 reading per second |
| Input Protection | 24VDC or 24VAC rms max; max voltage between T1 and T2: 1V |
| Input Connectors | Accepts standard miniature thermocouple connectors |
| Supplied Thermocouple | 4 ft (1.2 m) type K, Teflon insulation, max 260°C (500°F) |
| Functions | Dual T1/T2/T1-T2 display, Min/Max/Avg, Data Hold, Relative mode, HI/LO alarms, timer/clock |
| Water Resistance | Gasket protected front panel, water resistant housing |
| Operating Environment | 32 to 122°F (0 to 50°C); <80% RH |
| Storage Temperature | -4 to 140°F (-20 to 60°C); <70% RH |
| Alarm Sound Level | 95 dB |
| Warranty | 1 year from date of shipment (6 months for sensors and cables) |
Frequently Asked Questions - 421502 Extech
User questions about 421502 Extech
0 question about this device. Answer the ones you know or ask your own.
Ask a new question about this device
Download the instructions for your Environmental Thermometer in PDF format for free! Find your manual 421502 - Extech and take your electronic device back in hand. On this page are published all the documents necessary for the use of your device. 421502 by Extech.
USER MANUAL 421502 Extech
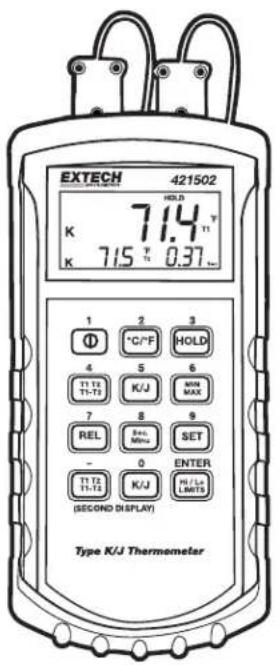
Model 421502 Dual Input Type J/K Digital Thermometer
- Dual input T1 / T2 / T1 – T2 displays
• Maximum temperature record mode - Selectable units
- Data Hold
INTRODUCTION
Congratulations on your purchase of Extech's Digital Thermometer. This professional meter, with proper care, will provide years of safe reliable service.
| Display 5 digit LCD multifunction display | |
| Battery Power Supply | NEDA 1604, IEC 6F22, or 006P 9VDC battery. |
| Auto Power off Meter shuts | down after approx. 30 mins. of inactivity |
| Battery life | 160 hours typical with carbon zinc battery |
| Dimensions / Weight | 7.5 x 3.6 x 2.1" (192x91x52.5mm); 11.7oz. (365g) |
| J TC Range -328 to 1922 | °F (-200 to 1050°C) |
| K TC Range -328 to 2498 | °F (-200 to 1370°C) |
| Resolution 0.1 | °C or 0.2°F |
| Temperature units | Selectable C or F temperature units |
| Accuracy | ±(0.05% rdg + 0.3°C) -50°C to 1370°C |
| ±(0.05% rdg + 0.7°C) -50°C to -200°C | |
| ±(0.05% rdg + 0.6°F) -58°F to 2498°F | |
| ±(0.05% rdg + 1.4°F) -58°F to -328°F | |
| Temperature Coefficient | 0.1 times the applicable accuracy specifications per °C from 0°C to 18°C and 28°C to 50°C (32°F to 64°F and 82°F to 122°F) |
| Water resistant housing Gasket protected front panel | |
| Input Protection | 24VDC or 24VAC rms max. input on any combination of inputs.Max voltage between T1 and T2 inputs = 1V |
| Reading rate One reading per second | |
| Input connectors | Accepts standard miniature thermocouple connectors |
| Supplied thermocouple | 4', type K, teflon insulation,Max insulation temp: 260°C (500°F)Accuracy: ±2.2°C or ±0.75% of rdg (whichever is greater) |
| Ambient Operating Range | 32 to 122°F (0 to 50°C); less than 80% RH |
| Storage Temperature | -4 to 140°F (-20 to 60°C); less than 70% RH |
| Alarm 95dB | |
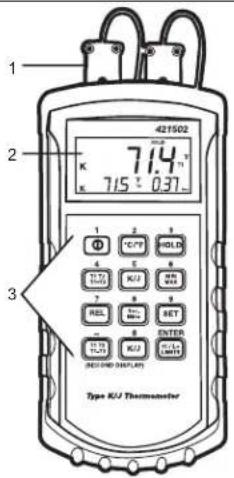
- Thermocouple Input Jacks
- LCD Display
- Keypad
OPERATION
Ensure that a fresh battery is installed by powering the meter (press the Power key) and observing the LCD display. If the LCD does not display characters, check the battery.
Connect the thermocouples to the meter's thermocouple input jacks (meter top).
NOTE: If the SET or MIN/MAX/AVG MODE is engaged, the meter cannot be powered down. Exit these modes before attempting to power down.
Temperature Units
The meter's dual display (one for each thermocouple input) can read either in ^ or ^ . Press the "C/F" key to toggle between ^ and ^ temperature units. The meter recalls the selected units of measure the next time the meter is powered up.
Data Hold Mode
During measurements, pressing the "Hold" key "freezes" the MAIN DISPLAY temperature value and the "HOLD" indicator will appear on the LCD. Press "Hold" again to return to normal operation. In MIN/MAX Mode, pressing the "Hold" key cancels the data recording session (pressing "Hold" again resumes recording).
Main Display Input Selection "T1, T2, or T1 - T2"
Pressing the "T1 T2 / T1 - T2" key (the key with the number 4 overlay) permits the user to select the thermocouple input configuration which will be reflected on the meter's Main Display (largest LCD digits). Choose "T1 or T2" to show either thermocouple input 1 or 2 respectively. Select "T1 - T2" to display the difference between the two thermocouple input temperatures. In T1 - T2 mode, a reading of zero indicates that both thermocouples are reading the same temperature.
"K/J" Key (Selecting the Thermocouple Type for the T1 Main Display)
For the type of thermocouple that is plugged into the T1 terminal on the meter, select K or J to match it by toggling the "K/J" key. The meter remembers this selection upon power OFF.
MIN/MAX/AVG Temperature mode (for Main Display only)
To enter this mode, press the "MIN/MAX" key. Repeated key-presses cycle through Min, Max, and Avg modes each with its own LCD icon. Once this key is pressed, the meter begins recording peak, valley, and average temperatures. Each time a new peak is measured, the previous Max displayed value is replaced. The same applies to the Min function. An audible beep alerts the user that a new peak or valley has been recorded. To toggle between start/stop recording, press the HOLD key. When recording is stopped, the stored values are held in meter memory until Min/Max/Avg mode is canceled or resumed by pressing the "Hold" again.
NOTE: Keep in mind that the main displayed value is either the Min, Max, or Avg reading depending upon which icon appears on the LCD. Cycle through Min/Max/Avg with the "MIN/MAX" key.
The Min/Max/Avg mode cancels the Auto Power OFF feature, disables most of the meter keys, and will not allow a manual power OFF.
Note: Press and hold the MIN/MAX key for several seconds to return to normal operation.
Relative Mode (REL) for Main Display Only
The Relative Mode permits the user to store the current temperature value (or enter one manually - see Set Mode) and compare it to subsequent temperature readings. The display then shows: Actual temp. minus the Relative temp. = Displayed temperature). To enter this mode press the "REL" key and the REL icon will appear on the LCD. While in REL Mode the Main Display will show the difference between actual temperature and the relative temperature previously entered. Press the REL key again to exit the REL Mode. To display the difference between the actual temperature and a manually entered Relative value, press the REL key and then the SET key (see SET mode below).
Elapsed Timer
The Timer (third display on bottom right of LCD) displays Clock or Elapsed Time and is a convenient way to see when Min and Max temperatures occurred. Each time new Min or Max temperature values are stored, the timer/clock value for the Max or Min temperature is also stored for later recall. Real time can be entered by setting the meter's clock to the current time (set Hours:Mins display using the MIN/SEC key). To use the clock as an elapsed timer, first reset the clock to zero in Set Mode (see next section). The timer will begin counting as soon as it is set in SET mode.
SET Mode (for Relative Mode, HI/LO Alarm setpoints, and Clock/Timer settings)
Manually setting the Relative Values in SET Mode
Press the "SET" key once and the display will go to all dashes "======". Enter the relative value using the meter's keys which double as numeric keys. USE LEADING ZEROS SINCE DISPLAY IS 5-DIGITS. Once the Relative value is entered, press the ENTER key FOUR times to return to normal operation. Meter will now display Actual Temperature minus Relative Temperature
Setting the Timer/Clock in SET Mode
Press the "SET" key and then the "ENTER" key. Next key in the Hours, Minutes, and Seconds (HH:MM:SS) via the overlay numeric keys. When editing is complete, the clock will begin counting. Press the "ENTER" key three times to return to normal meter operation. Now use the SEC/MIN key to toggle between Hours/Minutes and Minutes/Seconds display.
Alarm HI/LO Limit Programming in SET Mode
Press the "SET" key once and then the "ENTER" key twice. Key in the desired HI Alarm value (high temperature at which the meter will audibly alert the user) via the overlay numeric keys. Now press the "ENTER" key once. Next, key in the LO Alarm Limit value (low temperature at which the meter audibly alerts the user). Press the ENTER key once to return to normal operation. After exiting the SET mode, press the "HI/LO Limits" key to activate the Alarm, the audio icon on the LCD tells you that the Alarm is now armed and will alert you if HI/LO limits are encountered.
Second Display Input Selection "T1, T2 or T1-T2"
Pressing the "T1 T2 / T1 - T2" key (the key with the minus sign printed over it) permits the user to select the thermocouple input configuration which will be reflected on the meter's Second Display (lower left LCD). Choose "T1 or T2" to show either thermocouple input 1 or 2 respectively. Select "T1 - T2" to display the difference between the two thermocouple input temperatures. In T1 - T2 mode, a reading of zero indicates that both thermocouples are reading the same temperature.
"K/J" Key (Selecting the Thermocouple Type for the T2 Main Display)
For the type of thermocouple that is plugged into the T2 terminal on the meter, select K or J (to match input) by toggling the "K/J" key. The meter remembers this selection upon power OFF.
HI/LO Alarm Limits Mode
Press the "HI/LO Limits" key to arm the HI/LO Alarms (the audio speaker icon will appear on the right side of the LCD). When the actual temperature meets or exceeds the user programmed temperature limits a continuous alert tone will be heard. To disarm or silence a tripped Alarm press the HI/LO Limit key again (the audio display icon will disappear).
BATTERY REPLACEMENT
Replace the battery when the low battery indication symbol appears on the upper left corner of the display. To replace the battery, remove the two screws that secure the rear battery compartment cover. Remove the old battery, install a new one, and replace cover
CALIBRATION / REPAIR SERVICES
Extech offers repair and calibration services for the products we sell. Extech also provides NIST certification for most products. Call the Customer Service Department for information on calibration services available for this product. Extech recommends that annual calibrations be performed to verify meter performance and accuracy.
WARRANTY
EXTECH INSTRUMENTS CORPORATION warrants this instrument to be free of defects in parts and workmanship for one year from date of shipment (a six month limited warranty applies to sensors and cables). If it should become necessary to return the instrument for service during or beyond the warranty period, contact the Customer Service Department at (781) 890-7440 ext. 210 for authorization or visit our website www.extech.com for contact information. A Return Authorization (RA) number must be issued before any product is returned to Extech. The sender is responsible for shipping charges, freight, insurance and proper packaging to prevent damage in transit. This warranty does not apply to defects resulting from action of the user such as misuse, improper wiring, operation outside of specification, improper maintenance or repair, or unauthorized modification. Extech specifically disclaims any implied warranties or merchantability or fitness for a specific purpose and will not be liable for any direct, indirect, incidental or consequential damages. Extech's total liability is limited to repair or replacement of the product. The warranty set forth above is inclusive and no other warranty, whether written or oral, is expressed or implied.

Support line (781) 890-7440
Technical support: Extension 200; E-mail: support@extech.com
Repair & Returns: Extension 210; E-mail: repair@extech.com
Product specifications subject to change without notice
For the latest version of this User's Guide, Software updates, and other up-to-the-minute product information, visit our website: www.extech.com Extech Instruments Corporation. 285 Bear Hill Rd., Waltham, MA 02451
Copyright © 2005 Extech Instruments Corporation
All rights reserved including the right of reproduction in whole or in part in any form.
Copyright © 2005 Extech Instruments Corporation
- Model 421502 Dual Input Type J/K Digital Thermometer
- INTRODUCTION
- OPERATION
- Temperature Units
- Data Hold Mode
- Main Display Input Selection "T1, T2, or T1 - T2"
- "K/J" Key (Selecting the Thermocouple Type for the T1 Main Display)
- MIN/MAX/AVG Temperature mode (for Main Display only)
- Relative Mode (REL) for Main Display Only
- Elapsed Timer
- SET Mode (for Relative Mode, HI/LO Alarm setpoints, and Clock/Timer settings)
- Manually setting the Relative Values in SET Mode
- Setting the Timer/Clock in SET Mode
- Alarm HI/LO Limit Programming in SET Mode
- Second Display Input Selection "T1, T2 or T1-T2"
- "K/J" Key (Selecting the Thermocouple Type for the T2 Main Display)
- HI/LO Alarm Limits Mode
- BATTERY REPLACEMENT
- CALIBRATION / REPAIR SERVICES
- WARRANTY
- Support line (781) 890-7440
- Product specifications subject to change without notice
- Copyright © 2005 Extech Instruments Corporation
Brand : Extech
Model : 421502
Category : Environmental Thermometer