USER MANUAL KG-160A-IM VOX
KG-160A-IM
OPERATING INSTRUCTIONS CONTACT GRILL
MANUALE DELL'UTENTE GRIGLIA DI CONTATTO
BEDIENUNGSANLEITUNG KONTAKTGRILL
ИНСТРУКЦИЯ ПО ЭКСПЛУАТАЦИИ КОНТАКТНЫЙ ГРИЛЬ
UPUTSTVO ZA UPOTREBU KONTAKT GRIL
MANUAL DE USUARIO PARRILLA DE CONTACTO
MANUAL DO USUÁRIO GRELHADOR DE CONTACTO
ЕГХЕІРІДІО ХРНЗТН ГКРІА ЕПАФНЗ
NAVODILA ZA UPORABO KONTAKTNI ŽAR
UPUTE ZA UPORABU KONTAKTNI GRIL
UPUTSTVO ZA UPOTREBU KONTAKT GRIL
УПАТСТВА ЗА РАКУВАНЬЕ КОНТАКТЕН ГРИЛ
MANUALI I PERDORUESIT SKARЁ ELEKTRIKE

natural_image
Line drawing of a portable grater with control panel and two side dishes (no text or symbols)
Read the manual instruction carefully and keep it for future reference.
IMPORTANT SAFEGUARDS
- READ ALL INSTRUCTIONS
- Just use the corresponding Volt, 50 Hz& 60 Hz. Use only for household.
- Do not touch hot surfaces. Use handle or knobs.
- To protect against risk of electric shock, do not immerse the cord, plug or cooking unit in water or any other liquid.
- Close supervision is necessary when the appliance is used by or near children.
- This appliance is not intended for use by persons (including children) with reduced physical, sensory or mental capabilities, or lack of experience and knowledge, unless they have been given supervision or instruction concerning use of the appliance by a person responsible for their safety.
- Unplug from outlet when not in use and before cleaning. Allow to cool before putting on or taking off parts, and before cleaning the appliance.
- Do not operate the appliance with a damaged cord, if has malfunctioned or been damaged in any manner. In order to avoid the risk of an electric shock, never try to repair the Grill Toaster yourself. Take it to an authorized service station for examination and repair. An incorrect reassembly could present a risk of electric shock when the Grill Toaster is used.
- The use of accessory attachments not recommended by the manufacturer may result in fire, electrical shock, or risk of injury to persons.
- Do not use outdoors or for commercial purposes.
- Do not let power cord hang over the edge of the table or counter, or touch hot surfaces.
- Do not place on or near a hot gas or electric burner or heated oven.
- Unplug the unit when you have finished use.
- Do not use the appliance for other than intended use.
- Do not intend to operate by means of an external timer or separate remote-control system.
- Extreme caution must be exercised when moving an appliance containing hot oil or other hot liquids.
WARNING: TO REDUCE THE RISK OF FIRE OR ELECTRIC SHOCK, ONLY AUTHORIZED PERSONNEL SHOULD DO REPAIRS.
SAVE THESE INSTRUCTIONS
To reduce the risk of electric shock this appliance has a grounded plug. If the plug does not fit fully into the electrical outlet contact a qualified electrician. Do not modify the plug in any way or use an adaptor.
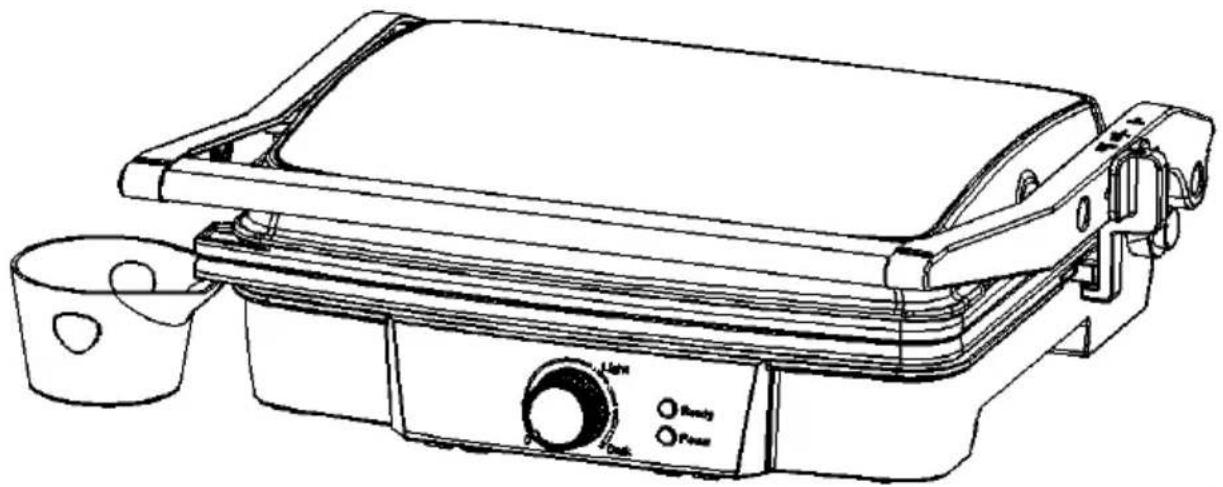
PARTS IDENTIFICATION
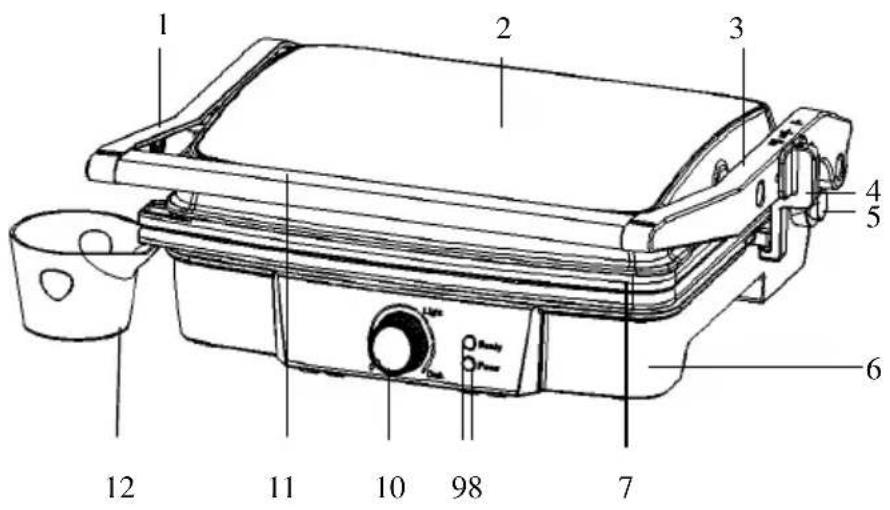
- Left Lift lever
- Cover
- Right Lift lever
- Lift lever Button
- 180° Angle button
- Bottom Housing
- Grill Non-stick Plate
- Ready Light
- Power Light
- Thermostat Knob
- Handle
- Oil Tray
BEFORE FIRST USE
- Read all instructions carefully and keep them for any future reference.
- Remove all packaging.
- Clean the Cooking Plates by wiping with a sponge or cloth dampened in warm water.
DO NOT IMMERSE THE UNIT AND DO NOT RUN WATER DIRECTLY ONT THE COOKING SURFACES.
• Dry with a cloth or paper towel.
- For best results, lightly coat the cooking plates with a little cooking oil or cooking spray.
Notice: When your Grill Toaster is heated for the first time, it may emit slight smoke or odor. This is normal with many heating appliances. This does not affect the safety of your appliance.
HOW TO USE
Before using the appliance for the first time, peel off any promotional materials and packaging materials and check that the cooking plates are clean and free of dust. If necessary, wipe over with a damp cloth. For best results, pour a teaspoon of vegetable oil on to the non-stick plates. Spread over with an absorbent kitchen towel and wipe off any excess oil.
PREPARING YOUR GRILL TOASTER
- Close the Grill Toaster and plug it into the wall outlet. You will find the red power lights, indicating that the Grill Toaster has begun Power. At this time, you can by the right Thermostat Knob set the temperature control to your desired setting: “MIN” for light colored food and “MAX” for darker food. At first, try a setting in the middle.; You will find the green ready lights 。 indicating that the Grill Toaster has begun preheatin. You may later adjust it lower or higher according to your preference, Different foods will also cook up differently.
- It will preheat approximately 3\~5 minutes to reach baking temperature. Green ready light goes out; the Grill Toaster is ready for use.
COOKING
- Set the Grill Toaster Temperature Control to your desired setting. At first, try setting in the max. You may later adjust it lower or higher according to your preference.
- Prepare the burgers, boneless pieces of meat and thin cuts of meat or other foods as directed and place it onto the bottom cooking plate.
- Close the top cooking plate which has a floating hinge that is designed to evenly press down on the food. The top plate must be fully lowered to achieve Grill marks on the selected foods.
- When the foods is cooked use the handle to open the lid. Remove the food with the help of a plastic spatula. Never use metal tongs or a knife as these can cause damage to the non-stick coating of the cook plates.
- Use the Grill Toaster as a contact grill to cook burgers, boneless pieces of meat and thin cuts of meat and vegetables.
- Use the Grill-Toaster as a contact grill, when you want to cook something in a short amount of time or when
you are looking for a healthy method of grilling. When cooked on the contact grill, food will cook quickly because you are grilling both sides of the food at the same time. The ribs on the grill plates combined with the grease spout at the corner of the plate allow the grease to drip from the meat and drain off the plates.

natural_image
Line drawing of a standard 35-inch grill with grating and side outlets (no text or labels)
Using the Extendable Feet
- In cooking, if you want extra fat to go out better, you can open the extendable feet at the bottom.

natural_image
Pure technical line drawing without any text, numbers, or symbols
Slant Device
To Use as Press grill
- Set the Grill Toaster Temperature Control to your desired setting. At first, try setting in the "MAX". You may later adjust it lower or higher according to your preference.
- Prepare the sandwich as directed and place it onto the bottom cooking plate. Always place sandwiches towards the rear of the bottom cooking plate.
- Close the top cooking plate which has a floating hinge that is designed to evenly press down on the sandwich. The top plate must be fully lowered to cook sandwiches.
• Cook for about 3 to 6 minutes or until golden brown, adjusting the time to suit your own individual taste.
- When the sandwich is cooked use the handle to open the lid. Remove the sandwich with the help of a plastic spatula. Never use metal tongs or a knife as these can cause damage to the non-stick coating of the cook plates.
- Use the Grill Toaster as a Press grill to grill sandwiches, bread and quesadillas.
- The Grill Toaster is designed with a unique handle and hinge that allows the cover to adjust to the thickness of the food. You can easily grill anything from a thinly-sliced potato to a thick sirloin steak with even results.
- When cooking more than one food item in the contact grill, it is important that the thickness of food items is consistent so the cover will close evenly on the food.
To Use as Open grill
- Place Grill Toaster on a clean flat surface where you intend to cook. The Grill Toaster can be positioned in flat position.
- Upper plate/cover is level with lower plate/base. The upper and lower plates line up to create one large cooking surface. To set the Grill Toaster to this position, locate the hinge release lever on the right arm.
Angle button• With you left hand on the handle, use your right hand to slide the lever toward you. Push the handle back until the cover rests flat

on the counter. The unit will stay in this position until you lift the handle and cover to return it to the closed position.
- Use the Grill Toaster as an open grill to cook burgers, steak, poultry (we do not recommend cooking bone-in chicken, since it does not cook evenly on an open grill), fish and vegetables.
- Cooking on the open grill is the most versatile method of using the Grill Toaster. In the open position, you double the surface area for grill.
- You have the option of cooking different types of foods separately without combining their flavors, or cooking large amounts of the same type of food. The open position also accommodates different cuts of meat with varying thicknesses, allowing you to cook each piece to your liking.

natural_image
Line drawing of a two-tiered grating or microwave oven with control knobs and heat sinks (no text or symbols)
Flat Position
CLEANING AND CARE
• Always unplug the Grill Toaster and allow it to cool before cleaning. The unit is easier to clean when slightly warm. There is no need to disassemble Grill Toaster for cleaning. Never immerse the Grill Toaster in water or place in dishwasher.
• The cooking plates can be cleaned in water or dishwasher.
- Wipe cooking plates with a soft cloth to remove food residue. For baked on food residue squeeze some warm water mixed with detergent over the food residue then clean with a non-abrasive plastic scouring pad or place wet kitchen paper over the grill to moisten the food residue.
- Do not use anything abrasive that can scratch or damage the non-stick coating.
- Do not use metal utensils to remove your foods, they can damage the non-stick surface.
- Wipe the outside of the grill toaster with a damp cloth only. Do not clean the outside with any abrasive scouring pad or steel wool, as this will damage the finish. Do not immerse in water or any other liquid.
• Do not place in the dishwasher.
- Remove and empty the drip tray after each use and wash the tray in warm, soapy water. Avoid the use of scouring pads or harsh detergents as they may damage the surface.
- Rinse and dry thoroughly with a clean, soft cloth and replace.
STORAGE
• Always unplug the Grill Toaster before storage.
• Always make sure the Grill Toaster is cool and dry before storing.
- The power cord can be wrapped around the bottom of base for storing.
ENVIRONMENT FRIENDLY DISPOSAL

natural_image
Symbol of a trash bin crossed with a diagonal line and a horizontal bar below (no text or labels)
You can help protect the environment!
Please remember to respect the local regulations: hand in the non-working electrical equipment to an appropriate waste disposal centre.

natural_image
Abstract black-and-white geometric pattern with diagonal stripes (no text or symbols)
VOX
ELECTRONICS
ITA
natural_image
Line drawing of a flat-screen grater with control panel and two side dishes (no text or symbols)
natural_image
Line drawing of a standard 35-inch grater with a side sink and control panel (no text or symbols)
natural_image
Line drawing of a portable electric grill with heat exchanger and control panel (no text or symbols)
Posizione piana
natural_image
Symbol of a trash bin crossed with no text or numbers, representing environmental restriction (no text present)
natural_image
Abstract black and white geometric pattern with diagonal stripes (no text or symbols)
VOX
ELECTRONICS
DEU
KONTAKTGRILL
BEDIENUNGSANLEITUNG
KG-160A - IM

natural_image
Line drawing of a flat-screen grater with control panel and two side bowls (no text or symbols)
natural_image
Abstract black and white geometric pattern with diagonal stripes (no text or symbols)
VOX
ELECTRONICS
RUS
natural_image
Line drawing of a flat-screen grater with control panel and two side bowls (no text or symbols)
natural_image
Line drawing of a standard 35-inch grater with a side dish, no text or symbols present
natural_image
Line drawing of a flat-screen grating or toaster with no text or symbols
natural_image
Simple line drawing of a trash bin with crossed lines indicating no waste or discharge (no text or symbols)
natural_image
Line drawing of a portable grater with two side dishes and control knobs (no text or symbols)
Pažljivo pročitajte ovo uputstvo pre korišćenja i sačuvajte ga za kasniju upotrebu
VAŽNA BEZBEDNOSNA UPUTSTVA
• PROČITAJTE SVA UPUTSTVA
• Proverti da li napon u zidnoj utičnici odgovara naponu uređaja. 50 Hz & 60 Hz. Koristite samo za kučnu upotrebu.
- Ne dodirujte vrude površine. Uvek karistite ručke ili dugmad.
- Da biste se zaštili od opasnosti od električnog udara, nemqte uranjati kabl, utikač li uređaj u vodu li neku drugu tečnost.
- Neophodan je strogi nadzor kada uređaj koriste deca ili su ublizini istog.
•Aparat nije namenjen za upotrebu od strane osoba (uključujuci decu) sa smanjenim fizikim, serzomim ili mentalnim sposobnostima, ili nedostakom iskustva i znanja, osim ukoliko su pod nadzorom osobe odgovome za njihovu bezbednost, ili su odiste dobili uputstva o upotrebi aparata.
- Isključite kabl za napajanje iz utičnice kada uređaj nije u upotrebi i pre čišćenja istog. Pustite da se uređaj dhladi pre stavljanja ili skladanja delova i pre čišćenja uređaja.
- Ne koristite uređaj ako je neispravan ili oštečen na bilo koji drugi način. Kako biste izbegli rizik od strujnog udara, nikada ne pokušavajte sami da popravite uređaj. Vratite uređaj u najbiliži ovlaščeni servis na pregled i popravku. Bilo kakvo nepravilno sklapanje uređaja može predstavljaći rizik od strujnog udara kada se koristi Grill Toster.
- Upotreba dodatne opreme koja nije preporučena od strane proizvođača može dovesti do požara, električnog udara ili opasnosti od povreda osoba.
- Ne koristite uređaj napolju ili ukomerdjalne svithe.
- Paziti da kabi zanapajanje tokom upotrebene visi sa ivicestola, radne površine ili bizu bilo kakvog grejnog tela...
- Ne postavljajte uređaj u bizini ili napovršini pinskog ili električnog šporeta, ili zagrejane rerne.
- Isključite kabi zanapajanje iz utičnicekada završite upotrebu aparata
- Koristite uređaj samo u skladu sa njegovom predviđenom namenom
UPOZNAJTE VAŠ UREĐAJ
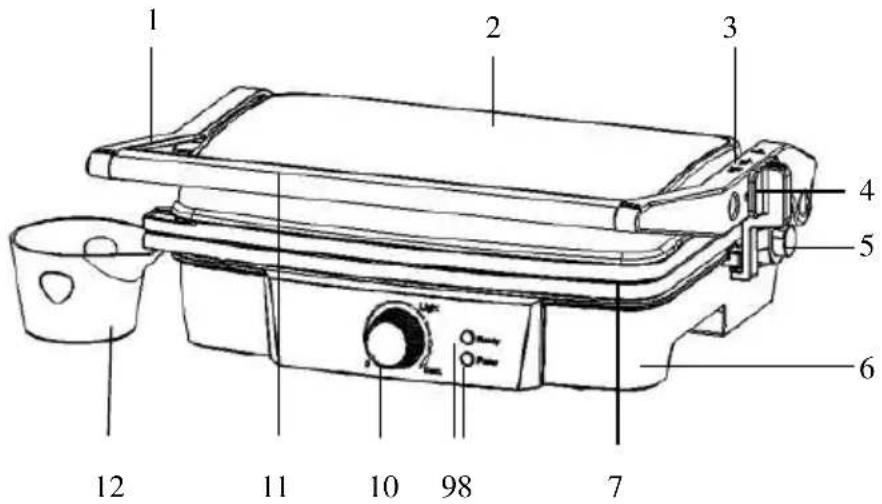
- Leva poluga za podizanje
- Gornje kućište
- Desna poluga za podizanje
- Dugme za podizanje poluga
- Dugme za otvaranje ploše do 180°
- Donje kućište
- Nelepljiva gril ploča
- Indikator spremnosti
- Indikator napona
- Regulator termostata
- Ručka
- Tacna za višak ulja
PRE PRVE UPOTREBE
natural_image
Line drawing of a standard flat-screen grater with a side sink and control panel (no text or symbols)
natural_image
Line drawing of a flat-screen electric grill with heat sinks and control panel (no text or symbols)
Ravan pdożaj
ČIŠĆENJE I ODRŽAVANJE
- Uvek isključite aparat i ostavite da se ohladi pre čišćenja. Aparat je laikše čistiti kada je blago topao. Nema potrebe za rastavljanjem aparata rad čišćenja. Nikada ne uranjajte aparat u vodu niti ga stavljajte u mašinu za pranje sudova.
- Očistite ploče za pečenje mekom krpom da biste ukronili ostatke hrane. Za zapečene ostatke dodajte malo mlake vode s deterdžentom preko ostatka hrane, zašim očistite neabrazivnim sunderom ili postavite vlažan kuhinjski ubrus preko ploče kako biste navlažli ostatke hrane na ploči.
- Nemojte koristiti nikakavo abrazivno sredstvo koje bi moglo ošetiti ili ogrebati nelepljive ploče.
- Spoljašnjost uređaja očistte isključvo vlažnom krpom. Nemojte čstiti spoljašnjost uređaja abrazivnim sunđerom ili čeličnom žicom, jer će to oštetti površinu. Ne uranjajte uređaj u vodu ili bilo koju drugu tečnost.
- Ne stavljajte umašinu za pranje sudova.
- Nakon svake upotrebe, uklonite i ispraznite tacnu za skupljarje viška ulja i operite tacnu toplom vodom sa sapunicom. Izbegavajte upotrebu sunđera ili jakih deterdženata, jer mogu oštešti površinu. Isperte i detaljno osušite čstom, mekom krpom i odločte.
SKLADIŠTENJE
natural_image
Line drawing of a portable grater with two buckets and control panel (no text or symbols)
natural_image
Line drawing of a standard 35-inch grater with a side sink and control panel (no text or symbols)
natural_image
Pure mechanical part outline without any text, numbers, or symbols
Dispositivo inclinado
natural_image
Technical line drawing of a heat exchanger or cooling unit with pipes and cooling fins (no text or symbols)
natural_image
Line drawing of a two-wet grating or frying pan with a side dish (no text or symbols)
Posición plana
LIMPIEZA Y MANTENIMIENTO
natural_image
Symbol of a trash bin crossed with no text or labels, accompanied by a black rectangular block below (no readable text or symbols)
natural_image
Line drawing of a flat-screen grater with control panel and two side dishes (no text or symbols)
natural_image
Pure mechanical part outline without any text, numbers, or symbols
Dispositivo
inclinado
natural_image
Technical line drawing of a mechanical assembly with no visible text or symbols
natural_image
Line drawing of a two-tier electric grill with heat sinks and control panel (no text or symbols)
Posição plana
LIMPEZA E CUIDADO
natural_image
Symbol of a trash bin crossed with two crossed lines and a solid black rectangle below (no text or labels)
natural_image
Line drawing of a microwave oven with two side dishes and control panel (no text or symbols)
natural_image
Line drawing of a standard flat-screen grating with a side sink and control panel (no text or symbols)
natural_image
Pure technical line drawing of a mechanical component without any text, numbers, or symbols
Χαμηλή συσκευή
natural_image
Line drawing of a flat-screen grater with control panel and two side dishes (no text or symbols)
natural_image
Line drawing of a standard 3D grill with a side sink and control panel (no text or symbols)
natural_image
Line drawing of a portable electric grill with heat sink and side-mounted fans (no text or symbols)
Vodoraven polożaj
ČIŠČENJE IN VZDRŽEVANJE
- Adjustments in Income, which take effect as could result for an outcome to find useful documentation
KONTAKT GRIL
UPUTE ZA UPORABU
KG-160A - IM
natural_image
Line drawing of a portable grater with two side dishes and control knobs (no text or symbols)
natural_image
Line drawing of a standard 35-inch grater with a side sink and control panel (no text or symbols)
Uporaba podesivog žljeba
- Tjekom spremanja, ukoliko želite da se ulje bolje ocjedi, možete da proširite žljeb na dnu.

natural_image
Pure mechanical part outline without any text, numbers, or symbols
Nagib aparata
Za uporabu aparata kao tostera
- Postavite aparat na željenu temperaturu. Najprije probajte sa najvišom razinom (max). Kasnije možete smanjiti ili pojačati po želji.
- Pripremite sendviče po uputama i postavite ih na dno grijne ploče. Uvijek postavite sendviče prema zadnjem dijelu ploče.
- Zatvorite gornju ploču koja ima plutajuću šarku dizajniranu za ravnomjerno pritiskanje hrane. Gornja ploča mora biti potpuno spuštena kako bi se spremili sendviči.
- Pecite 3 do 6 minuta ili dok sendviči ne dobiju zlatno braon boju, u skladu sa vašim ličnim okusom.
- Kada je sendvič gotov, koristite ručku da otvorite poklopac. Uklonite sendvič pomoću plastične lopatice. Nikada ne koristite metalne hvataljke ili nož jer oni mogu da oštete premaz koji spriječava ljepljenje hrane za ploče.
- Koristite aparat kao toster da pripremite sendviče, kruh i kasadilje.
- Toster je dizajniran sa jedinstvenom ručkom i šarkom koja omogućuje da se poklopac prilagodi debljini hrane. Možete lako grilovati svu hranu, od tanko sječenih režnjeva paradajza do ramsteka i da je sve ravnomjerno ispečeno.
- Kada spremate više od jedne vrste hrane u kontaktnom grilu, važno je da je debljina namirnica postojana tako da se poklopac ravnomjerno zatvori iznad hrane.
Za uporabu otvorenog aparata
- Postavite aparat na čistu, ravnu površinu na kojoj namjeravate da spremate hranu. Aparat mora biti postavljen u ravnom položaju.
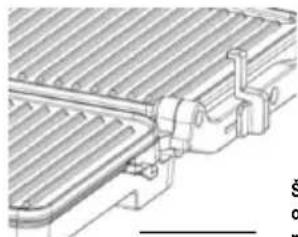
- Gornja ploča/poklopac je u ravni sa donjom pločom/postoljem. Gornja i donja ploča su u liniji formirajući veliku površinu za spremanje hrane. Da biste postavili aparat u ovaj položaj, nadite ručicu za spuštanje šarke na desnoj strani aparata.
natural_image
Technical diagram of a mechanical assembly with ribbed metal components and a clamp (no text or symbols)
natural_image
Line drawing of a two-wet grating appliance with cooling fins and side fans (no text or symbols)
Ravan položaj
ČIŠĆENJE I ODRŽAVANJE
- Uvijek isključite aparat i ostavite da se ohladi prije čišćenja. Aparat je lakše čistiti kada je blago topao. Nema potrebe za rastavljanjem aparata radi čišćenja. Nikada ne uranjajte aparat u vodu niti ga stavljajte u mašinu za pranje sudova.
- Ploče za pečenje se mogu prati u vodi ili u mašini za pranje sudova.
- Očistite ploče za pečenje mekom krpom da biste uklonili ostatke hrane. Za zapečene ostatke dodajte malo mlake vode s deterdžentom preko ostatka hrane, zatim očistite neabrazivnom spužvom ili postavite vlažan kuhinjski ubrus preko ploče kako biste navlažili ostatke hrane na ploči.
- Nemojte koristiti nikakavo abrazivno sredstvo koje bi moglo oštetiti ili ogrebati premaz koji štiti od ljepljenja hrane.
- Nemojte koristiti metalne predmete da biste uklonili hranu, oni mogu oštetiti neljepljivu površinu.
- Vanjsku stranu aparata očistite isključivo vlažnom krpom. Nemojte čistiti vanjsku stranu aparata abrazivnom spužvom ili čeličnom žicom, jer će to oštetiti površinu. Ne uranjajte u vodu ili bilo koju drugu tekućinu.
- Ne stavljajte u mašinu za pranje sudova.
- Nakon svake uporabe, uklonite i ispraznite tacnu za skupljanje viška ulja i operite tacnu toplom vodom sa sapunicom. Izbjegavajte uporabu spužve ili jakih deterdženata, jer mogu oštetiti površinu. Isperite i detaljno osušite čistom, mekom krpom i odložite.
ČUVANJE
natural_image
Symbol of a trash bin with crossed lines indicating no waste or restriction, and a solid black rectangle below (no text or labels)
natural_image
Line drawing of a flat-screen grater with control panel and two side buckets (no text or symbols)
Pažljivo pročitajte ovo uputstvo prije korišćenja i sačuvajte ga za kasniju upotrebu
VAŽNA BEZBJEDNOSNA UPUTSTVA
• PROČITAJTE SVE INSTRUKCIJE
- Koristite isključivo pri odgovarajućem naponu, 50 Hz i 60 Hz. Koristiti isključivou domađinstvu.
- Nemojte dodirivati vruče površine. Koristite ručkuili dugmad.
- Da biate izbjegli rizik od elektrošoka, nemojte uranjati kabi, utikač ili grijni dio u vodu ili bilo koju drugu tečnost.
- Neophodan je strogi nadzor kada aparat koriste djeca ili se aparatkoristi bilzu njih.
•Aparat nije namijenjen za upotrebu od strane osoba (uključujuci djecu) sa smanjenim fizičkim, senzomim ili mentalnim sposobnostima, ili nedostatkom iskustva i znanja, osim ukolko su pod nadzorom osobe odgovome za njihovu bezbjednost, ili su odiste dobili uputstva o upotrebi aparata.
- Isključite kabi za napajanje iz utičnice kada uređaj nije u upotrebi i prije čišćenja istog. Pustite da se uređaj ohladi prije stavljanja ili skidanja dijelova i prije čišćenja uređaja.
- Ne koristite uređaj ako je neispravan ili oštećen na bilo koji drugi nađin. Kako biste izbjegli rizik od strujnog udara, nikada ne pokušavajte sami da popravite uređaj. Vratile uređaj u najbliži ovlaščeni servis na pregled i popravku. Bilo kakvo nepravilno sklapanje uređaja može predstavljati rizik od strujnog udara kada se koristi Grill Toster.
- Upotreba dodatne opreme koja nije preporuđena od strane proizvođača može dovesti do požara, električnog udara ili opasnosti od povreda osoba.
- Ne koristite uređaj napolju ili ukomerdjaine svrhe.
- Paziti dakabi za napajanje tokom upotrebene visi sa ivicestola, radne površine ili blizu bilo kakvog grijnog tijela.
- Ne postavljajte uređaj u blizini ili na površini plinskog ili električnog šporeta, ili zagrijane reme.
- Isključitekabl zanapajarje iz utičnice kada zavrište upotrebu aparata
- Koristite uređaj samo u skladu sa njegovom prečvidenom namjenom
- Nemojte upotrebljavati uređaj pomoču eksternog tajmera ili odvojenog sistema za daljinsko upravljanje.
DIJELOVI APARATA

- Lijeva poluga za podizanje
- Poklopac
- Desna poluga za podizanje
- Dugme za podizanje poluga
- Dugme za otvaranje ploče do 180°
- Donje kućište
- Neljepljiva gril ploča
- Indikator spremnosti za rad
- Indikator napona
- Regulator termostata
- Ručka
- Tacna za višak ulja
PRIJE PRVE UPOTREBE
natural_image
Line drawing of a standard 35-inch grater with a side sink and control panel (no text or symbols)
Upotreba podesivog žljeba
- Tokom spremanja, ukoliko želite da se ulje bolje ocjedi, možete da proširite žljeb na dnu.
natural_image
Pure mechanical part outline without any text, numbers, or symbols
Nagib aparata
natural_image
Line drawing of a Ravan položaj electric heater with cooling fins and heat exchangers (no text or symbols on the diagram itself)
ČIŠĆENJE I ODRŽAVANJE
- Uvijek isključite aparat i ostavite da se ohladi prije čišćenja. Aparat je lakše čistiti kada je blago topao. Nema potrebe za rastavljanjem aparata radi čišćenja. Nikada ne uranjajte aparat u vodu niti ga stavljajte u mašinu za pranje sudova.
natural_image
Symbol of a trash bin with crossed lines indicating no waste or restriction, and a solid black rectangle below (no text or labels)
natural_image
Line drawing of a portable grater with two side dishes and control knobs (no text or symbols)
natural_image
Line drawing of a standard 35-inch grater with a side sink and control panel (no text or symbols)
natural_image
Pure mechanical part outline without any text, numbers, or symbols
Нагиб на уредот
natural_image
Technical line drawing of a heat exchanger or cooling unit with pipes and cooling fins (no text or symbols)
natural_image
Line drawing of a two-tiered electric grill with heat sinks and cooling unit (no text or symbols)
Рамна положба
ЧИСТЕЊЕ И ОДРЖУВАЊЕ
natural_image
Symbol of a trash bin crossed with no visible text or labels
natural_image
Line drawing of a flat-screen grater with two side dishes (no text or symbols)
natural_image
Line drawing of a standard 35-inch electric grill with a side dish (no text or symbols)
natural_image
Pure mechanical part outline without any text, numbers, or symbols
natural_image
Line drawing of a two-tiered grating or toaster with heat sinks and control panel (no text or symbols)
Pozita e rrafshët
PASTRIMI DHE MIRËMBAJTJA
natural_image
Symbol of a trash bin crossed with no text or labels, accompanied by a black rectangular block below (no text or symbols present)


