SC EasyFix ATK 2 - Steam cleaner KARCHER - Free user manual and instructions
Find the device manual for free SC EasyFix ATK 2 KARCHER in PDF.

User questions about SC EasyFix ATK 2 KARCHER
0 question about this device. Answer the ones you know or ask your own.
Ask a new question about this device
Download the instructions for your Steam cleaner in PDF format for free! Find your manual SC EasyFix ATK 2 - KARCHER and take your electronic device back in hand. On this page are published all the documents necessary for the use of your device. SC EasyFix ATK 2 by KARCHER.
USER MANUAL SC EasyFix ATK 2 KARCHER
Operating Instructions
Please read the operating instructions carefully before using the unit
natural_image
Line drawing of a vacuum cleaner device with coiled cable and control knob (no text or symbols)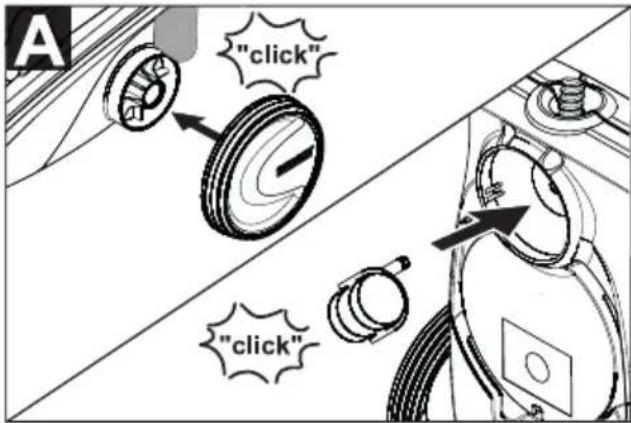
text_image
"click" "click"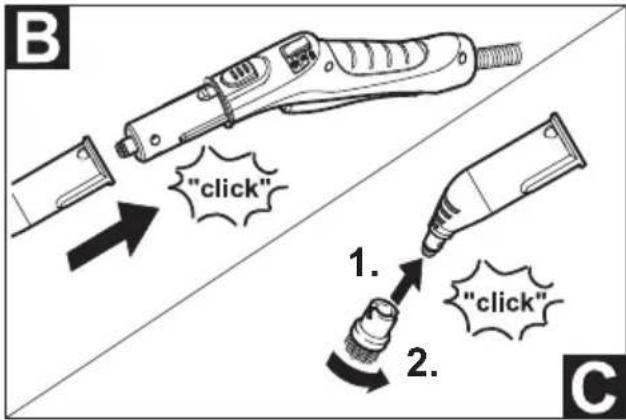
text_image
B "click" 1. "click" 2. C
text_image
"click" "click"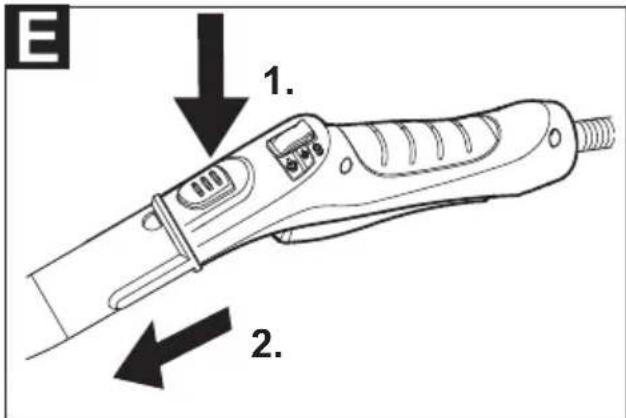
text_image
E 1. 2.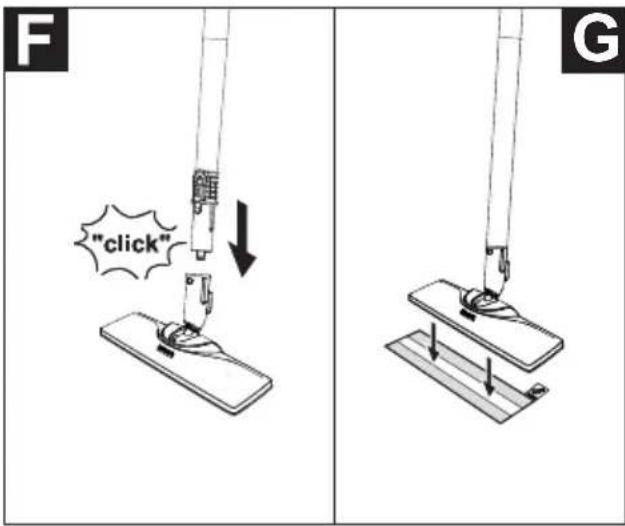
text_image
"click" F G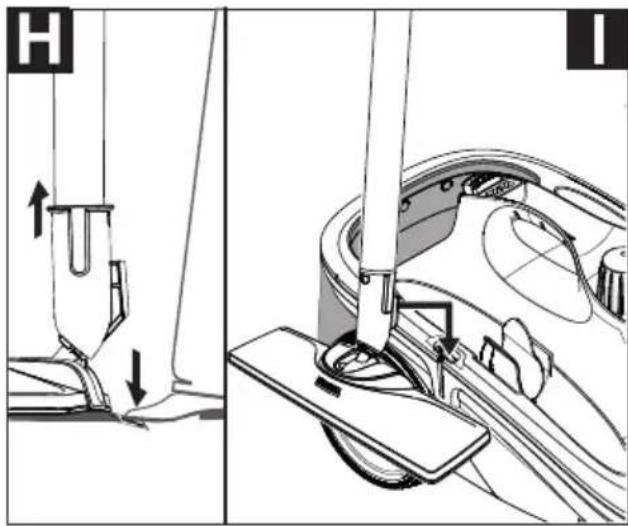
text_image
Technical diagram showing mechanical assembly steps with labeled components H and I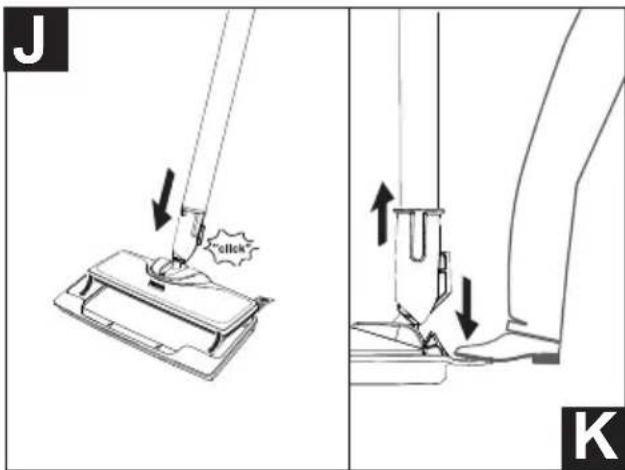
text_image
J click K
text_image
L 1. 2. M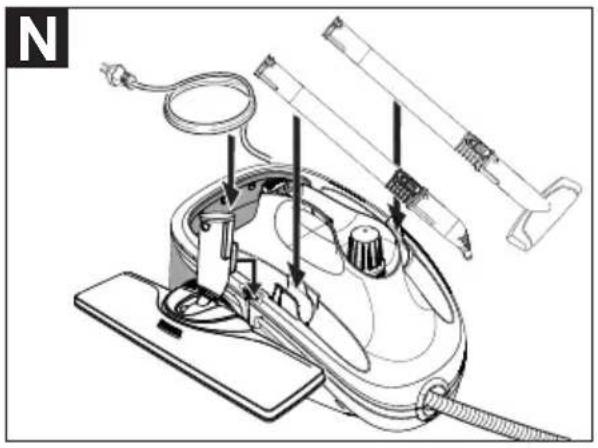
natural_image
Technical diagram of a vacuum cleaner assembly with labeled components (no text or symbols present)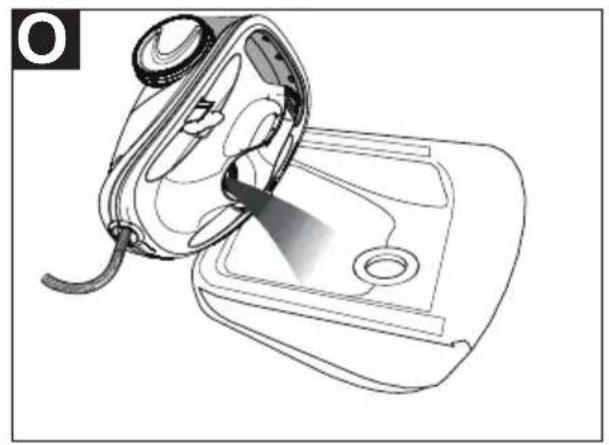
natural_image
Line drawing of a handheld device with a handle and circular ports, no text or symbols presentContents
Safety Instructions for Steam Cleaners ..... 4
Safety Devices 7
Description of the Appliance 8
Description of the Appliance ..... 9
Quick Reference 10
Operation.... 1
How to Use the Accessories ..... 12
Care and maintenance 13
Troubleshooting....14
Technical specifications....14
General information

Before using your appliance for the first time, read these original operating instructions, act in compliance with them, and keep them for later use or for subsequent owners.
Proper use
Use the steam cleaner only for private households. The appliance is intended to be used with steam and can be used with the appropriate accessories as described in these operating instructions. You will not need any detergent. Please adhere to the safety instructions.
Environmental protection

The packaging material can be recycled. Please do not place the packaging into the ordinary refuse for disposal, but arrange for the proper re-
cycling
Old appliances contain valuable materials that can be recycled. Please arrange for the proper recycling of old appliances. Please dispose your old appliances using appropriate collection sys-
tems.
Notes about the ingredients (REACH)
You will find current information about the ingredients at:
www.kaercher.com/REACH
Scope of delivery
The scope of delivery of your appliance is illustrated on the packaging. Check the contents of the appliance for completeness when unpacking.
In the event of missing accessories or any transport damage, please contact your dealer.
Spare parts
Only use original accessories and spare parts, they ensure the safe and trouble-free operation of the device.
For information about accessories and spare parts, please visit www.kaercher.com.
Warranty
The warranty terms published by the relevant sales company are applicable in each country. We will repair potential failures of your appliance within the warranty period free of charge, provided that such failure is caused by faulty material or defects in manufacturing. In the event of a warranty claim please contact your dealer or the nearest authorized Customer Service centre. Please submit the proof of purchase. (See address on the reverse)
Safety Instructions for Steam Cleaners
- Apart from the notes contained herein the general safety provisions and rules for the prevention of accidents of the legislator must be observed.
- Warnings and notes that are attached on the appliance provide important notes for the safe operation.
Hazard levels
⚠️DANGER
Pointer to immediate danger, which leads to severe injuries or death.
⚠ WARNING
Pointer to a possibly dangerous situation, which can lead to severe injuries or death.
⚠CAUTION
Pointer to a possibly dangerous situation, which can lead to minor injuries.
ATTENTION
Pointer to a possibly dangerous situation, which can lead to property damage.
Electric components
⚠️DANGER
■ Never use the appliance in pools containing water.
■ Do not level the steam jet directly at equipment that contains electrical components, such as the inside of ovens.
■ Do not fill the appliance without a removable water tank directly via the water connection as long as it is connected to the mains. Instead, use a jar for filling it.
- Check the appliance and the accessories, especially the power cord, the safety lock and the steam hose for proper condition.
Do not use the appliance in case of damage.
If the power cord is damaged, please arrange immediately for the exchange by an authorized customer service or a skilled electrician.
■ Promptly replace a damaged steam hose. You may only use a steam hose that is recommended by the manufacturer.
■ Never touch the mains plug and the socket with wet hands.
■ Always disconnect the mains plug and allow the steam cleaner to cool down before performing any maintenance work.
■ Repair works may only be performed by the authorized customer service.
■ The connection between the power cord and extension cable must not lie in water.
⚠ WARNING
■ The appliance may only be connected to an electric supply that has been installed by an electrician in accordance with IEC 60364.
■ The appliance may only be connected to alternating current. The voltage must correspond with the type plate of the appliance.
In wet rooms, e.g. bathrooms, connect the appliance to sockets with a series connected RCD adapter.
■ Only use splash-proof electrical extension cables with a minimum cross-section of 3 × 1 mm^2
■ Replace couplings at the power cord or extension cable only with couplings that have the same protection against splashing water and the same mechanical strength.
■ Be very careful while cleaning tiled walls with sockets.
△CAUTION
■ Make sure that the power cord or extension cable is not damaged by running over, pinching, dragging or the like. Protect the power cords from heat, oil, and sharp edges.
Safe handling
⚠️DANGER
■ The user must use the appliance as intended. The person must consider the local conditions and must pay attention to other persons in the vicinity when working with the appliance.
■ The appliance may not be operated in explosive atmospheres.
■ If the appliance is used in hazardous areas the corresponding safety provisions must be observed.
■ Do not use the appliance if it fell down, is visibly damaged or leaking.
■ Never use the appliance to clean objects containing hazardous substances (e.g. asbestos).
■ Never touch the steam jet from a short distance with your hands and never direct the steam jet to persons or animals (risk of scalds).
■ Never open the maintenance / safety lock during operation. Allow appliance to cool down first.
■ Do not fill in detergents or other additives!
■ Risk of scalding when the boiler is hot. Allow the boiler to cool down prior to filling in water.
⚠ WARNING
■ The appliance must not be operated by children or per-
sons who have not been in- structed accordingly.
This appliance is not intended for use by persons with limited physical, sensory or mental capacities or lacking experience and/or skills, unless such persons are accompanied and supervised by a person in charge of their safety or they have received precise instructions on the use of this appliance and have understood the resulting risks.
■ Children must not play with this appliance.
■ Supervise children to prevent them from playing with the appliance.
- Keep appliance out of reach of children as long as it is switched on or hasn't cooled down.
■ Operate or store the appli- ance only in accordance with the description or illustration!
■ Do not wedge the steam lever / the steam button during operation.
■ Only switch on the appliance when there is water in the boiler. Otherwise the appliance might overheat (see Troubleshooting).
■ Hot water may drip out of the accessory parts while you are detaching them! Allow appliance to cool down.
■ Never separate accessories from the appliance as long as steam is escaping!
⚠CAUTION
■ Create stability for the appliance prior to any work on or with the appliance to prevent accidents or damage.
■ Never fill solvents, solvent-containing liquids or undiluted acids (e.g. detergents, benzene, paint thinner, and acetone) into the boiler as these substances affect the materials used on the appliance.
■ Never leave the appliance unattended as long as it is in operation.
ATTENTION
In case of longer breaks and after use, switch the appliance off at the main switch / appliance switch and pull the mains plug.
■ Do not operate the appliance at temperatures below 0 °C.
■ Protect the unit from rain. Do not store outside.
- Do notse vinegar or similar agents.
Descaling the boiler
⚠CAUTION
■ Do not screw the safety lock onto the appliance during de-calcification.
■ Do not use the steam cleaner as long as there is decalcifying agent in the boiler.
■ Be careful when filling and draining the steam cleaner with the decalcifying solution. The decalcifying solution can corrode sensitive surfaces.
- Do not use vinegar or similar agents.
Safety Devices
⚠CAUTION
■ Safety devices protect the user and may not be modified or bypassed.
Symbols on the machine
Symbols depending on unit type.
⚠CAUTION

Surfaces are liable to get hot during use!

Danger of scalding by steam!

CAUTION – Please read the operating instructions!
Safety Devices
△CAUTION
Safety devices protect the user and must not be modified or bypassed.
Pressure controller
The pressure controller keeps the boiler pressure during the operation as constant as possible. The heating is turned off if the maximum operating pressure of 4 bar is reached in the boiler and is reactivated in case of a pressure drop in the boiler due to steam tapping.
Safety thermostat
The safety thermostat turns off the appliance if the boiler thermostat and the pressure controller fails and the appliance overheats in case of a malfunction. Please contact your local KÄRCHER customer service to arrange for the reset of the safety thermostat.
Safety lock
The safety lock seals the boiler against the steam pressure that builds up in the boiler. If the pressure controller is defect and the steam pressure in the boiler rises, a pressure control valve in the safety lock opens, and steam is emitted through the lock to the outside. Please contact your local KÄRCHER customer service before you put the appliance into operation again.
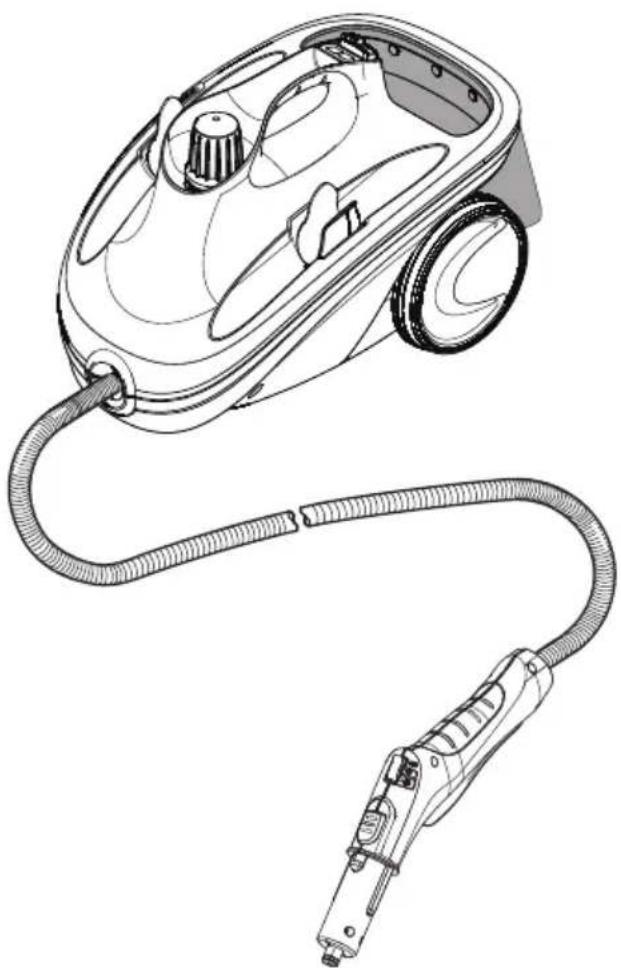
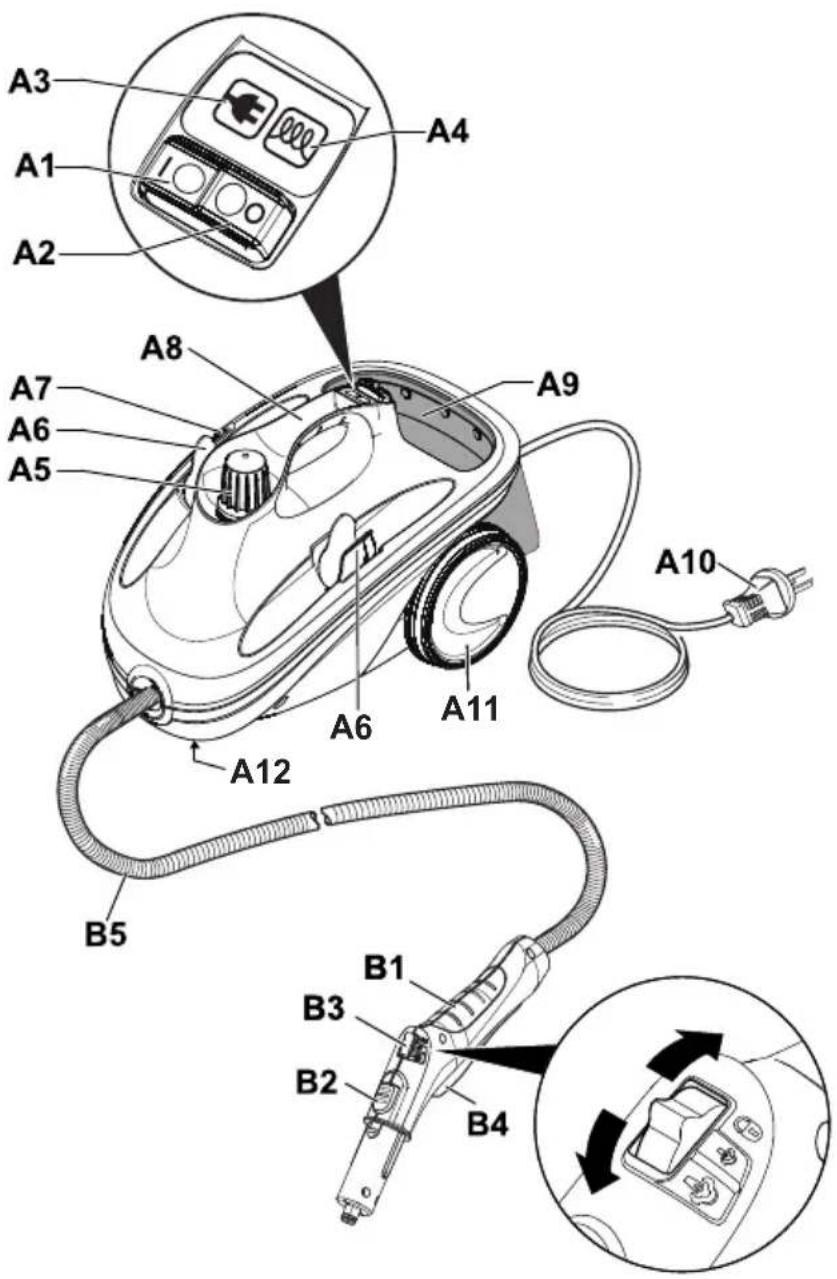
Description of the Appliance
A1 Switch - ON
A2 Switch - OFF
A3 Indicator lamp (green) – line voltage is on
A4 Indicator lamp - heater (ORANGE)
A5 Safety cap
A6 Holder for accessories
A7 Storage holder for floor nozzle
A8 Carrying handle
A9 Accessories storage
A10 Mains cable with mains plug
A11 Running wheels (2 ea.)
A12 Steering roller
B1 Steam gun
B2 Unlocking button
B3 Selector switch for the steam volume (with child protection)
B4 Steam lever
B5 Steam hose
text_image
A3 A1 A2 A4 A8 A7 A6 A5 A9 A10 A6 A11 A12 B5 B1 B3 B2 B4Description of the Appliance
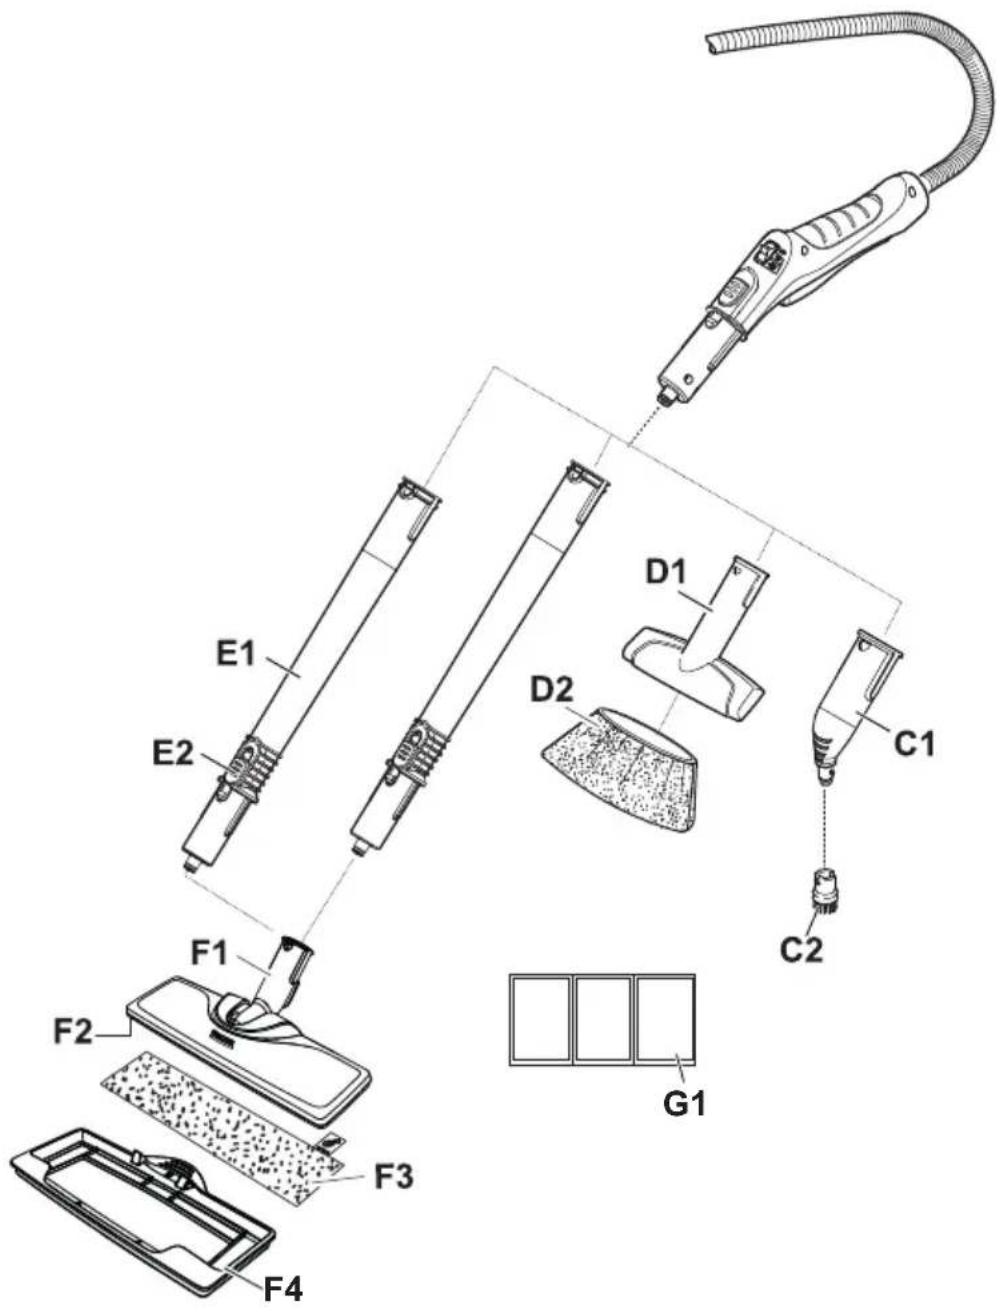
C1 Detail nozzle
C2 Round brush
D1 Hand nozzle
D2 Manual nozzle microfibre cover
E1 Extension tubes (two tubes)
E2 Unlocking button
F1 Floor nozzle
F2 Hook and loop fastener
F3 Microfibre floor cloth
F4 Carpet glider
G1 Descaler
text_image
E1 E2 D1 D2 C1 C2 F1 F2 F3 G1 F4Quick Reference
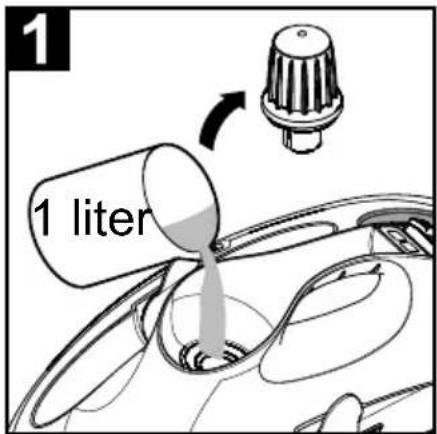
1 Unscrew the safety lock and fill the steam cleaner with a max. of 1 litre of water.
2 Screw in safety cap.
3 Plug in the mains plug.
Turn on the machine.
The green and orange indicator lamps light up.
4 Wait until the orange indicator lamp goes out.
5 Connect the accessories to the steam gun.
The steam cleaner is ready to use.
text_image
1 liter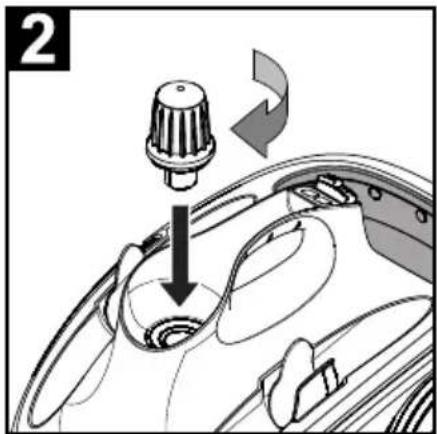
text_image
2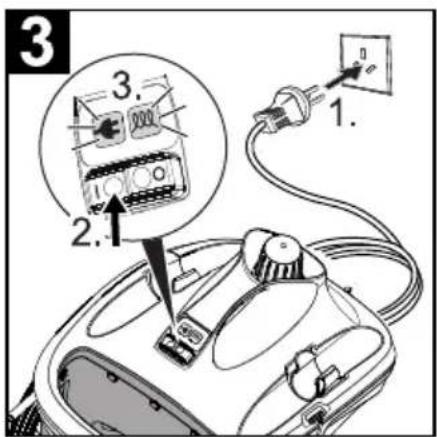
text_image
3 2. 3. 1.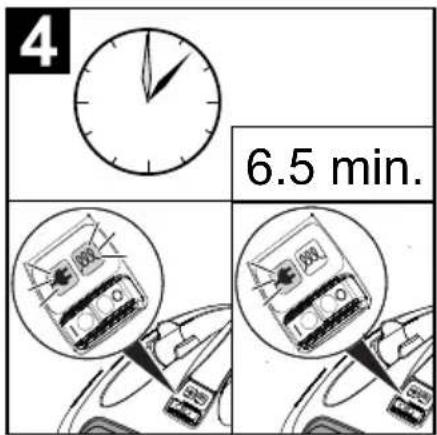
text_image
4 6.5 min.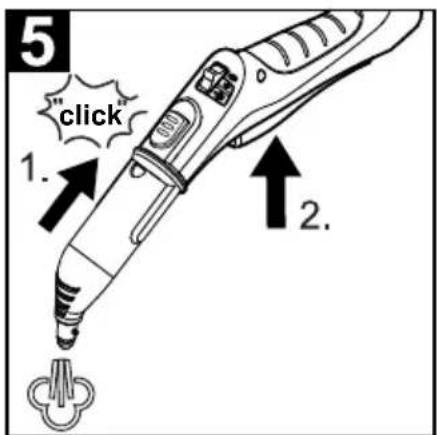
text_image
5 1. click 2.Operation
Attaching the Accessories
Illustration A
→ Insert steering roller and running wheels and lock them.
Illustration B
→ Connect the required accessories (see Chapter "How to use the accessories") to the steam gun. Insert the open end of the accessory on the steam gun and push onto the steam gun until the unlocking button of the steam gun locks into place.
Illustration D
→ Use the extension tubes if necessary. To do so, connect one or both extension tubes to the steam gun. Insert the required accessories on the free end of the extension tube.
Removing the Accessories
→ Move the selector switch for the steam volume back (steam lever locked).
Illustration E
To detach the accessory parts, press the unlocking button and pull the items apart.
Fill up with water
Note:
If you always use usual commercial distilled water it is not necessary to descale the boiler.
ATTENTION
Do not use condensation water from the drier!
Do not fill in detergents or other additives!
→ Remove the safety lock from the device.
Illustration
→ Completely empty the water tank to remove existing water.
→ Fill the boiler with a maximum of 1 liters of fresh tap water.
Note:
You can cut down the heating-up time by using warm water.
→ Screw the safety cap back onto the device.
Turning on the Appliance
→ Place the unit securely on a firm surface.
→ Insert the mains plug into a socket.
→ Press the ON switch to turn on the appliance. Both indicator lamps must illuminate.
→ The orange indicator lamp goes out after approximately 8 minutes.
The steam cleaner is ready to use.
Adjusting the Steam Quantity
Use the selector switch for the steam volume to regulate the discharged steam. The selector switch has three positions:
 | Maximum steam volume |
 | Reduced steam volume |
 | No steam - child protectionNote:In this lever position, the steam lever cannot be used. |
→ Set selector switch to the required steam volume.
→ While operating the steam switch, always direct the steam gun at a separate piece of cloth until the steam is emitted evenly.
Note:
The heating of the steam cleaner is turned on in regular intervals during the operation of the appliance in order to maintain the pressure in the boiler at a constant level. When the heating is turned on, the orange indicator lamp (heater) lights up.
Refilling Water
Water needs to be filled into the boiler, if the steam volume decreases during work and no more steam is emitted in the end.
Note:
The safety lock cannot be opened as long as slight pressure remains in the boiler.
Illustration L
→ Press the OFF switch to turn off the appliance.
Illustration M
→ Push the steam switch until steam discharge stops. Now, the boiler of the appliance is unpressurized.
→ Move the child protection unit toward the back (steam lever locked).
→ Remove the safety lock from the device.
→ Fill the boiler with a maximum of 1 liters of fresh tap water.
→ Screw the safety cap back onto the device.
→ Press the ON switch to turn on the appliance.
→ The orange indicator lamp goes out after approximately 8 minutes.
The steam cleaner is ready to use.
Turning Off the Appliance
Illustration L
→ Press the OFF switch to turn off the appliance.
→ Disconnect the mains plug from the socket.
Illustration M
→ Push the steam switch until steam discharge stops. Now, the boiler of the appliance is unpressurized.
→ Move the child protection unit toward the back (steam lever locked).
Storing the Appliance
Illustration N
- Put the extension pipes into the large accessory holders.
- Insert the manual nozzle and detail nozzle onto each extension pipe.
- Attach the round brush to the detail nozzle.
- Stow power cord into the accessory storage.
- Insert the steam hose with the steam gun into the floor nozzle.
- Hook the floor nozzle into the parking position.
ATTENTION
Material damage due to a stuck safety lock
If the safety lock is not removed after cleaning, there is a possibility that the lock could get stuck in the thread. After cleaning, unscrew the safety lock and store it, for example, with the other device accessories.
How to Use the Accessories
Important application instructions
Cleaning floor surfaces
It is recommended to sweep or vacuum the floor prior to using the steam cleaner. This way, the floor is already cleared of dirt/loose particles prior to the wet cleaning.
Refreshing textiles
Prior to treatment with the steam cleaner, always check the reaction of the textiles in an inconspicuous location: Steam at first, then let dry and then check for colour or shape changes.
Cleaning of Coated or Lacquered Surfaces
When cleaning painted or plastic-coated surfaces, as found on kitchen and living room furniture, doors, parquet; wax, furniture polish, plastic surfaces or paint can come loose or stains can be created. When cleaning these surfaces, briefly steam a cloth and wipe the surfaces with it.
ATTENTION
Never direct the steam jet at glued edges as the edge band may loosen. Do not use the steam cleaner on unsealed wooden or parquet floors.
Cleaning of Glass
In case of low outside temperatures, especially in the winter, warm up the window pane by slightly steaming the entire glass surface. This will prevent tensions on the surface which might lead to glass breakage.
Then clean the window surface with the hand nozzle and attachment. Use a squeegee to remove the water or wipe the surfaces dry.
ATTENTION
Do not direct steam onto the sealed locations of the window frame to prevent damage.
Steam gun
You can use the steam gun without any additional accessories, e.g.:
- to remove light wrinkles from hanging clothes by steaming them at a distance of 10 to 20~cm .
- to remove dust from plants. Here, keep a distance of 20-40 cm.
– for moist dusting, by briefly steaming the cloth and wiping the furniture with it.
Detail nozzle
The closer this nozzle is to the contaminated area, the higher the cleaning effect, as the temperature and the steam are highest at the nozzle output. Especially suited for cleaning difficult access locations, joints, fittings, drains, sinks, toilets, blinds and heaters. Heavy lime scale can be drenched in vinegar prior to steam-cleaning. Let the vinegar penetrate for about 5 minutes.
Illustration B
→ Slide the spotlight nozzle onto the steam gun.
Round brush
The round brush can be installed onto the detail nozzle as an accessory. Attached brushes can therefore be used to remove heavy soiling.
ATTENTION
Not suited for the cleaning of sensitive surfaces. Illustration C
→ Attach the round brush to the detail nozzle.
Hand nozzle
The manual nozzle is used for cleaning small areas that can be washed down, shower cubicles and mirrors.
Illustration B
→ Push the manual nozzle onto the steam gun according to the spotlight nozzle.
→ Pull the cover over the manual nozzle.
Floor nozzle
The floor nozzle is used for cleaning washable wall and floor coverings e.g. stone floors, tiles and PVC floors.
ATTENTION
Damage due to build-up of steam
Heat and moisture can lead to damage. Check the heat resistance and steam effect on an inconspicuous area using a minimal volume of steam prior to use.
NOTICE
Detergent residue or care emulsions on the surface to be cleaned can lead to streaks, which will disappear however once these have been used several times.
We recommend sweeping the floor or vacuum cleaning it before using the appliance. In this way the floor will be cleared of dirt and loose particles before the wet cleaning commences. Work slowly on surfaces that are heavily soiled so that the steam can impact longer.
Illustration D
→ Connect the extension tubes with the steam gun.
Illustration F
→ Push the floor nozzle onto the extension tube. Illustration G
→ Fasten the floor cleaning cloth to the floor nozzle. Place the floor cleaning cloth with the hook and loop strips pointing upwards on the floor.
Place the floor nozzle onto the floor cleaning cloth, applying slight pressure.
The floor cleaning cloth will stick to the floor nozzle of its own accord due to the hook and loop fastening.
Removing the floor cleaning cloth
Illustration H
→ Place one foot on the bottom corner of the floor cleaning cloth and lift the floor nozzle up.
NOTICE
Initially, the floor cleaning cloth's hook and loop fastener strip is very strong and cannot be removed from the floor nozzle easily. After the floor cleaning cloth has been used several times and washed, it is easier to remove from the floor nozzle and it has reached the optimum adhesion.
Parking the floor nozzle
Illustration I
→ During work breaks, hook the floor nozzle into the parking holder.
Carpet glider
The carpet glider is used for freshening up carpets.
ATTENTION
Beware of damaging the carpet glider and carpet
Contamination on the carpet glider, as well as heat and moisture penetration, can result in the carpet being damaged.
Prior to the application, also check the heat resistance and impact of steam on the carpet at an insignificant spot using as small an amount of steam as possible.
Observe the cleaning instructions from the carpet manufacturer. Prior to using the carpet glider, make sure that the carpet has been vacuumed and that stains have been removed.
Prior to application and following operating pauses, remove any possible water accumulation (condensate) in the appliance by means of evaporating the condensate into a drain (without floor cleaning cloth / with accessories).
Only use the carpet glider with a floor cleaning cloth on the floor nozzle. Steam clean with a weak steam stage when using the carpet glider. In order to prevent too much moistening and to avoid the risk of damage due to temperature effects, do not direct the steam continuously onto one spot (maximum 5 seconds).
Do not use the carpet glider on deep-pile carpets.
Fastening the carpet glider to the floor nozzle
Illustration G
→ For fastening the floor cleaning cloth to the floor nozzle, please refer to chapter Floor nozzle.
Illustration J
→ Using a little force, allow the floor nozzle to slide into the carpet glider and engage there.
→ Start cleaning the carpet.
Removing the carpet glider from the floor nozzle
△CAUTION
Beware of burns to your feet
The carpet glider can heat up during the steaming process. Do not operate or remove the carpet glider bare-footed or using open sandals.
Only operate or remove the carpet glider using suitable footwear.
Illustration K
→ Press the strap on the carpet glider downwards using your toecap.
→ Lift the floor nozzle upwards.
Care and maintenance
Rinsing the boiler
Rinse the steam cleaner boiler at the latest after 10 boiler fillings.
→ Fill the boiler with water and shake it strongly. This dissolves lime scaling residing on the boiler bottom.
Illustration
→ Empty water out.
Descaling the boiler
Note:
If you always use usual commercial distilled water it is not necessary to descale the boiler.
As limescale builds up on the boiler walls, we recommend to descale the boiler in the following intervals (RF=reservoir fillings):
| Degree of hardness ° dH mmol/l RF | ||
| I soft 0-7 0-1,3 55 | ||
| II medium 7-14 1,3-2,5 45 | ||
| III hard 14-21 2,5-3,8 35 | ||
| IV very hard >21 >3,8 25 | ||
Note
The hardness of the tap water can be inquired at your water management office or the municipal utilities.
Illustration L
→ Turn off the appliance.
See Chapter „Turning Off the Appliance“.
→ Allow device to cool down.
→ Remove the safety lock from the device.
Illustration
→ Completely empty the water tank to remove existing water.
→ Use KÄRCHER decalcifying agents for descaling. Please follow the dosing instructions on the packaging when preparing the descaler.
ATTENTION
Use caution when filling and emptying the steam cleaner. The descaling solution can have an aggressive effect on delicate surfaces.
→ Completely empty the descaling solution after 8 hours. A small amount of the solution will remain in the boiler. Therefore, you should rinse the boiler two to three times with cold water to remove any residues of the descaler.
Illustration
→ Completely empty the water tank to remove existing water.
Care of the Accessories
(Accessories - depending on scope of delivery)
NOTICE
The micro fibre cloths are not suitable for dryer.
NOTICE
When washing the cloths, observe the instructions on the washing tag. Do not use any liquid softeners as this will affect the ability of the cloths to pick up dirt.
→ Wash the floor cleaning cloths and covers at a max. temperature of 60 °C in the washing machine.
Troubleshooting
Often, failures have simple causes and you can do the troubleshooting yourself using the following overview. If you are in doubt or if the failure is not listed here please contact the authorized customer service.
Long heating-up time
Steam boiler is decalcified
→ Descale the steam boiler.
No steam
No water in the steam boiler.
→ Turn off the appliance.
→ Refill water
Steam lever cannot be pressed anymore
Steam switch is secured with the lock / child-proof lock.
→ Move the selector switch for the steam volume to the front.
High water output
Steam chamber too full
→ Press the steam gun until less water is emitted.
Steam boiler is decalcified
→ Descale the steam boiler.
Technical specifications
Power connection
| Voltage 220-240 | V | |
| 1~50-60 | Hz |
Protective class I
Protection class IPX4
Performance data
Heating output 1500 W
Operating pressure max. 0.32 MPa
Heating time 6.5 Minutes
Steam volume
Steam push max. 100 g/min
Dimensions
Boiler capacity 1.0 l
Weight (without accessories) 2.9 kg
Width 254 mm
Length 404 mm
Height 265 mm
Subject to technical modifications!

natural_image
Black thumbs-up icon on white background (no text or symbols)THANK YOU!
MERCI! DANKE! iGRACIAS!

Register your product and benefit from many advantages.
www.kaercher.com/welcome


Rate your product and tell us your opinion.
natural_image
Icon showing a gear and wrench inside a square frame (no text or symbols)www.kaercher.com/dealersearch
Alfred Kärcher SE & Co. KG
Alfred-Kärcher-Str. 28-40
71364 Winnenden (Germany)
Tel.: +49 7195 14-0
Fax: +49 7195 14-2212