
SCHC35EP - Audio System PANASONIC - Free user manual and instructions
Find the device manual for free SCHC35EP PANASONIC in PDF.



| Product type | Mini stereo system |
| Brand | PANASONIC |
| Model | SCHC35EP |
| Dimensions (W x H x D) | 200 x 300 x 150 mm |
| Weight | 3.5 kg |
| Power supply | 220-240 V AC, 50/60 Hz |
| Output power | 40 W RMS |
| Main functions | CD player, FM/AM radio, USB, Bluetooth, auxiliary input |
| Speakers | 2-way: 10 cm woofer, tweeter |
| Power consumption | 50 W |
| Maintenance and cleaning | Wipe with a soft dry cloth. Do not use solvents. |
| Safety | Do not expose to moisture. Unplug before cleaning. |
| Included spare parts | Remote control, FM/AM antennas, remote control battery |
| Repairability (index) | 6.5/10 |
| General information | User manual available for download in PDF format |
Frequently Asked Questions - SCHC35EP PANASONIC
User questions about SCHC35EP PANASONIC
0 question about this device. Answer the ones you know or ask your own.
Ask a new question about this device
Download the instructions for your Audio System in PDF format for free! Find your manual SCHC35EP - PANASONIC and take your electronic device back in hand. On this page are published all the documents necessary for the use of your device. SCHC35EP by PANASONIC.
USER MANUAL SCHC35EP PANASONIC
Operating Instructions
Instrukcja obslugi
Návod k obsluze
Hnctpykunno 3Kcnpnyatau
Thank you for purchasing this product.
For optimum performance and safety, please read these instructions carefully.
Please keep this manual for future reference.
Included Installation Instructions ( 2,6)
The installation should never be done by any other than a qualified installation specialist.
Before commencing work, carefully read these installation instructions and the operating instructions to ensure that installation is performed correctly.
(Pleases keep these instructions. You may need them when maintaining or moving this unit.)
Drogi Kliencie
MOHTax Maé BnKohyBaTu TiIbKn KBaIicIKOBaHm φaxIBEu i3 MOHTaxy.
Ipeep noatkom pobit ybaxho npoHTaTe iHCTpykuio 3 MOtaxy ta iHCTpykuio 3 ekcnIyatauii, uo6 npabnIbHO BVKOHATN MOtax.
(36epejxtb ihtpykjiio.BoHa moKe 3HaOobntncn iid aac
obcnyrobybann afo nepemiieneHH anapaTa.)
Safety precautions
WARNING
Unit
- To reduce the risk of fire, electric shock or product damage,
- Do not expose this unit to rain, moisture, dripping or splashing.
- Do not place objects filled with liquids, such as vases, on this unit.
- Use only the recommended accessories.
- Do not remove covers.
- Do not repair this unit by yourself. Refer servicing to qualified service personnel.
- Do not let metal objects fall inside this unit.
- Do not place heavy items on this unit.
AC mains lead
-
To reduce the risk of fire, electric shock or product damage,
-
Ensure that the power supply voltage corresponds to the voltage printed on this unit.
- Insert the mains plug fully into the socket outlet.
- Do not pull, bend, or place heavy items on the lead.
- Do not handle the plug with wet hands.
- Hold onto the mains plug body when disconnecting the plug.
- Do not use a damaged mains plug or socket outlet.
- Install this unit so that the AC mains lead can be unplugged from the socket outlet immediately if any problem occurs.
CAUTION
Unit
- This unit utilizes a laser. Use of controls or adjustments or performance of procedures other than those specified herein may result in hazardous radiation exposure.
- Do not place sources of naked flames, such as lighted candles, on this unit.
- This unit may receive radio interference caused by mobile telephones during use. If such interference occurs, please increase separation between this unit and the mobile telephone.
- This unit is intended for use in moderate climates.
Placement
- Place this unit on an even surface.
- To reduce the risk of fire, electric shock or product damage, - Do not install or place this unit in a bookcase, built-in cabinet or in another confined space. Ensure this unit is well ventilated.
- Do not obstruct this unit's ventilation openings with newspapers, tablecloths, curtains, and similar items.
- Do not expose this unit to direct sunlight, high temperatures, high humidity, and excessive vibration.
Batteries
- Danger of explosion if battery is incorrectly replaced. Replace only with the type recommended by the manufacturer.
- Mishandling of batteries can cause electrolyte leakage and may cause a fire. - Do not heat or expose to flame.
- Do not leave the battery(ies) in a car exposed to direct sunlight for a long period of time with doors and windows closed.
- Do not take apart or short circuit.
- Do not recharge alkaline or manganese batteries.
- Do not use batteries if the covering has been peeled off.
- Remove batteries if you do not intend to use the remote control for a long period of time. Store in a cool, dark place.
- When disposing the batteries, please contact your local authorities or dealer and ask for the correct method of disposal.
NORSK
ADVARSEL
Produkt
For a redusere faren for brann, elektrisk stot erer skade pa apparatet:
"Made for iPod" and "Made for iPhone" mean that an electronic accessory has been designed to connect specifically to iPod, or iPhone, respectively, and has been certified by the developer to meet Apple performance standards.
Apple is not responsible for the operation of this device or its compliance with safety and regulatory standards.
Please note that the use of this accessory with iPod, or iPhone may affect wireless performance.
iPhone, iPod, iPod classic, iPod nano, and iPod touch are trademarks of Apple Inc., registered in the U.S. and other countries.
The Bluetooth® word mark and logos are owned by Bluetooth SIG, Inc. and any use of such marks by Panasonic Corporation is under license. Other trademarks and trade names are those of their respective owners.
MPEG Layer-3 audio coding technology licensed from Fraunhofer IIS and Thomson.
Product Identification Marking is located on bottom of the unit.
HC55
Safety information for customers in the EU
€1177
Declaration of Conformity (DoC)
Hereby, "Panasonic Corporation" declares that this product is in compliance with the essential requirements and other relevant provisions of Directive 1999/5/EC.
Customers can download a copy of the original DoC to our R&TTE products from our DoC server:
http://www.doc.panasonic.de
Contact to Authorised Representative: Panasonic Marketing Europe GmbH, Panasonic Testing Centre, Winsberging 15, 22525 Hamburg, Germany
This product is intended to be used in the following countries.
AT, BE, BG, CH, CY, CZ, DE, DK, EE, ES, FI, FR, GR, HU, IS, IT, LT, LU, LV, MT, NL, NO, PL, PT, RO, SE, SI, SK
This product is intended for general consumer. (Category 3)
About descriptions in these operating instructions
- Operations in these instructions are described using remote control, but you can do the operations with the main unit if the controls are the same. Your unit may not look exactly as illustrated.
- These operating instructions are applicable to models SC-HC55 and SC-HC35. Unless otherwise indicated, illustrations in these operating instructions are of SC-HC55.
HC55 :indicates features applicable to SC-HC55 only.
HC35 :indicates features applicable to SC-HC35 only.
Pages to be referred to are indicated as ○
CD:indicates CD-DA (except MP3).
MP3 :indicates MP3 files.
Information for Users on Collection and Disposal of Old Equipment and used Batteries
These symbols on the products, packaging, and/or accompanying documents mean that used electrical and electronic products and batteries should not be mixed with general household waste.
For proper treatment, recovery and recycling of old products and used batteries, please take them to applicable collection points, in accordance with your national legislation and the Directives 2002/96/EC and 2006/66/EC. By disposing of these products and batteries correctly, you will help to save valuable resources and prevent any potential negative effects on human health and the environment which could otherwise arise from inappropriate waste handling.
For more information about collection and recycling of old products and batteries, please contact your local municipality, your waste disposal service or the point of sale where you purchased the items.
Penalties may be applicable for incorrect disposal of this waste, in accordance with national legislation.
For business users in the European Union If you wish to discard electrical and electronic equipment, please contact your dealer or supplier for further information.
[Information on Disposal in other Countries outside the European Union]
These symbols are only valid in the European Union. If you wish to discard these items, please contact your local authorities or dealer and ask for the correct method of disposal.
![PANASONIC SCHC35EP - [Information on Disposal in other Countries outside the European Union] - 1](/content/2019/08/105229/images/e2098d6485a8b046e0ce1d3fd67330b83206574f506957d47b0dc5bef8a3d258.jpg)
Note for the battery symbol (bottom two symbol examples):
This symbol might be used in combination with a chemical symbol. In this case it complies with the requirement set by the Directive for the chemical involved.
Accessories
Check the supplied accessories before using this unit.
1 Remote control
(HC55 N2QAYB000643)
HC35 N2QAYB000641)
1 AM loop antenna
1 AC mains lead
1 Battery for remote
control
1 FM indoor antenna
Wall mounting accessories
2 Safety holders
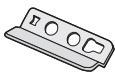
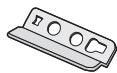
1 Safety holder D

2 Safety holder screws (Black)
2 Wall mount brackets
1 Safety holder screw (Silver)
2 Rear pads

- Product numbers correct as of January 2011. These may be subject to change.
- Do not use AC mains lead with other equipment.
Unit and media care
Pull out the AC mains lead from the outlet before maintenance.
Clean this unit with a soft, dry cloth
- When dirt is heavy, wring the cloth moistened in water tightly to wipe the dirt, and then wipe it with a dried cloth.
- When cleaning the speaker covers, use a fine cloth. Do not use tissues or other materials (towels, etc.) that can fall apart. Small grains may get stuck inside the speaker cover.
- Never use alcohol, paint thinner or benzine to clean this unit.
- Before using chemically treated cloth, carefully read the instructions that came with the cloth.
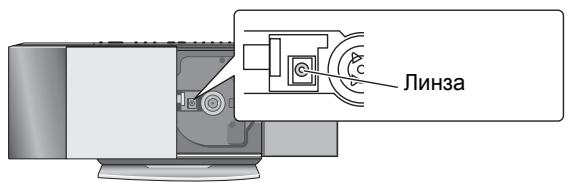
■ Maintenance of the lens
- Clean the lens regularly to prevent malfunctions. Use a blower to remove dust and a cotton swab if it is extremely dirty.
- You cannot use a CD type lens cleaner.
- Do not leave the sliding door open for prolonged periods of time. This will cause the lens to get dirty.
- Be careful not to touch the lens with your fingers.
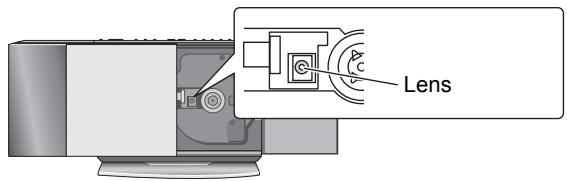
Table of contents
Safety precautions. 2
Accessories 4
Unit and media care. 4
Connections 5
Attaching the unit to a wall (optional) 6
Control reference guide 8
Opening/Closing the sliding door 9
Disc operations 9
Radio operations. 11
Sound adjustment. 12
Timer 12
Listening to audio from iPod or iPhone. 12
HC55 Using a Bluetooth® compatible device 13
Listening to audio from a USB device 16
Others 16
Troubleshooting 17
Specifications. 19
The remote control information
Insert so the poles (+ and -) match those in the remote control.
Place this side in before the other side.
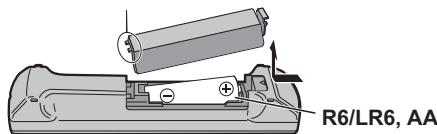
- Use alkaline or manganese batteries.
Clean discs
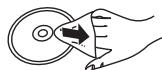
DO
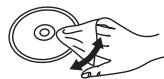
DO NOT
Wipe with a damp cloth and then wipe dry.
Disc handling precautions
- Handle discs by the edges to avoid inadvertent scratches or fingerprints on the disc.
- Do not attach labels or stickers to discs.
- Do not use record cleaning sprays, benzine, thinner, static electricity prevention liquids or any other solvent.
-
Do not use the following discs:
-
Discs with exposed adhesive from removed stickers or labels (rented discs etc.).
- Discs that are badly warped or cracked.
- Irregularly shaped discs, such as heart shapes.
Notes on speakers
- These speakers do not have magnetic shielding. Do not place them near a television, personal computer or other devices easily influenced by magnetism.
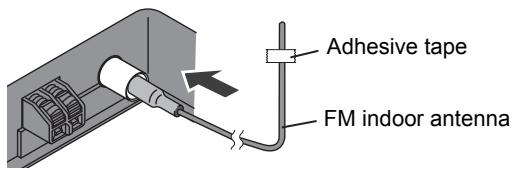
Basic Connections
1 Connect the FM indoor antenna.
- Tape the antenna to a wall or column, in a position with the least amount of interference.
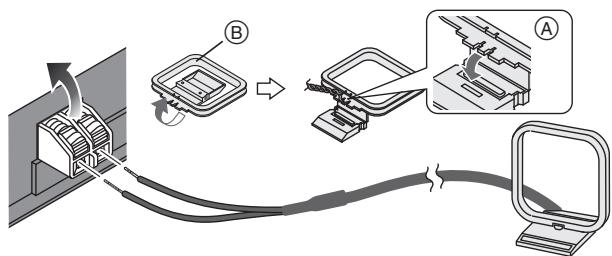
Connect the AM loop antenna.
- Keep the loop antenna cord away from other wires and cords.
A Stand the antenna up on its base until it clicks.
⑥AM loop antenna
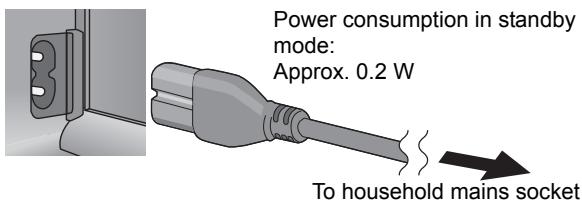
3 Connect the AC mains lead.
Connect the AC mains lead after all other connections are complete.
Turn the unit on after a few seconds.
Additional Connections
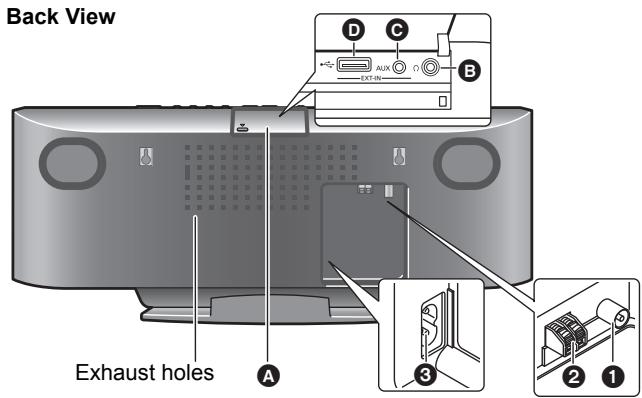
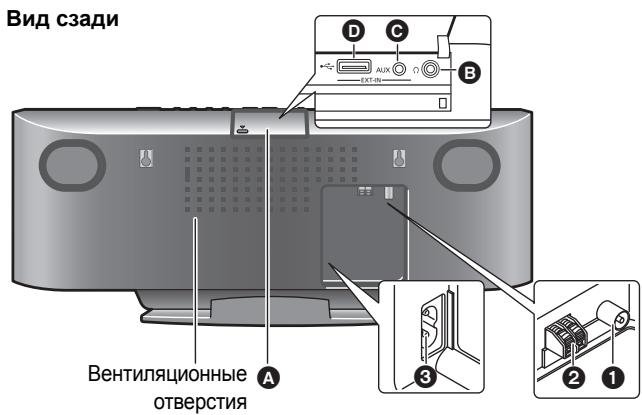
Open the EXT-IN AUX/Headphone/USB cover to connect headphones, USB devices or external music devices (e.g. MP3 player).
Push the projecting part to open the cover A. Top View

EXT-IN AUX Headphone/USB cover Projecting part
Connect the headphones (not supplied)
Reduce the volume level and connect the headphones.
Plug type: 3.5 mm stereo B

- Listening at full volume for long periods may damage the user's ears.
- To prevent hearing damage, avoid listening for prolonged periods of time. Excessive sound pressure from earphones and headphones can cause hearing loss.
Connect an external music device (for AUX mode)
① Plug the audio cable (not supplied) into the EXT-IN AUX jack .
Plug type: 3.5mm stereo
② Press [EXT-IN, RADIO] repeatedly to select “AUX” and start playback on the connected device.
AUX

You can select the sound input level of the external device.
HC55 ① Press [SOUND] repeatedly to select "INPUT LEVEL".
② Press [▲, ▲] to select “HIGH” or “NORMAL”.
HC35 Press [INPUT LEVEL] repeatedly to select "HIGH" or "NORMAL".
- Switch the equalizer off or turn the volume of the external device down to reduce the input signal. High level of input signal will distort the sound.
- For details, refer to the instruction manual of the other equipment.
- Cables and devices are not supplied.
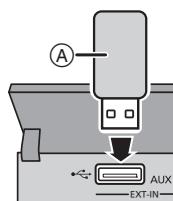
Connect the USB device (not supplied)
① Reduce the volume level and plug the USB device A into the USB terminal D.
(2) Press [EXT-IN, RADIO] repeatedly to select "USB" and start playback. ( 16)

Attaching the unit to a wall (optional)
Installation accessories
Supplied accessories
- 1 Safety holder screw (Silver)
- 2 Safety holder screws (Black)
- 1 Safety holder D (⇒ 4)
- 2 Safety holders (⇒ 4)
- 2 Wall mount brackets
- 2 Rear pads
Commercially available accessories (not supplied)
- 4 Wall bracket fixing screws
-
1 Safety holder fixing screw ⑥
-
Keep the wall mount brackets out of reach of children to prevent swallowing.
- Keep the rear pads out of reach of children to prevent swallowing.
- Keep the screws out of reach of children to prevent swallowing.
- Keep the safety holder out of reach of children to prevent swallowing.

- Use screws with a nominal diameter of 4 mm ,which are suitable to the material of the wall (e.g.,wood,steel, concrete,etc.)
Safety precautions
WARNING!
- Only a qualified building contractor shall install or uninstall this unit.
- Improper installation may cause the unit to fall, resulting in injury.
- To prevent injury, the unit must be securely attached to the wall in accordance with the installation instructions.
-
Do not install the unit where it cannot support the load.
-
If the mounting parts are not strong enough, this may cause the unit to fall, resulting in injury.
-
Do not use installation methods other than instructed.
- This may cause the unit to fall and be damaged, resulting in injury.
- Do not install the unit at locations other than vertical walls.
- This may cause the unit to fall and be damaged, resulting in injury.
- Take the safety factor for mounting strength into account.
Insufficient strength will cause the unit to fall, resulting in injury.
- The wall on which the unit is to be attached to should be capable of supporting 33kg per screw.
Insufficient strength of the walls will cause the unit to fall in the long run. - Do not disassemble or modify the wall-mounting hanger.
- This will cause the unit to fall and be damaged, resulting in injury.
CAUTIONS!
- Do not install this unit at humid or dusty locations, or locations where airborne grease or steam may come into contact with the unit, or under an air conditioner where water may drip onto the unit.
- This may have negative impact on the unit, resulting in fire or electric shock.
- Secure enough space of more than 30~cm above the main unit and more than 10~cm on the left and right sides respectively. Keep space between the wall and rear of the unit clear of obstructions.
- Blocking the exhaust holes on the main unit may result in fire.
- Use the designated components for installation.
- Otherwise, the main unit may fall and be damaged, resulting in injury.
-
Prevent the mounting screws or AC mains lead from coming into contact with metal parts inside the wall during installation.
-
Failure to do so may cause electric shock.
-
When removing the main unit, remove the wall mounting screws as well.
- Otherwise the wall mounting screws may hit a person and lead to injury.
- Install the unit at a height where the USB port and operation buttons can be seen for safe operation.
- Operating at improper position may cause the unit to fall and be damaged, resulting in injury.
Notes on installation
- Before installation, read the "Safety precautions" and "Wall mount instructions" for correct installation.
-
For optimal performance and to prevent potential problems, do not install this unit:
-
at locations other than vertical walls.
- near a sprinkler or a sensor.
- near high-voltage lines or power sources.
- near heating device.
- at locations where the unit is subject to vibration or impact.
- near sources of magnetism, heat, vapour, airborne grease, etc.
-
at locations where there may be water droplets (e.g. under an air conditioner).
-
Do not install this unit under ceiling lights (e.g. spotlight, halogen light, etc.).
-
Failure to do so may bend the cabinet or lead to damage caused by high heat.
-
Use a proper installation method that suits the structure and material of the wall.
- Use a soft blanket or cloth to prevent damage to the product or floor during installation.
- When tightening screws, make sure the screws are not loosely-tightened or overtightened.
- Secure a safe surrounding area and pay attention to safety during installation.
- Panasonic is not liable for incidental or consequential damages resulting from improper installation or operation.
Wall mount instructions
Before installation, turn the unit off and disconnect the AC mains lead from the household mains socket.
1 Detach the stand from the unit.
(1) Unscrew the fixing screw A (4 pieces) at the bottom of the unit.
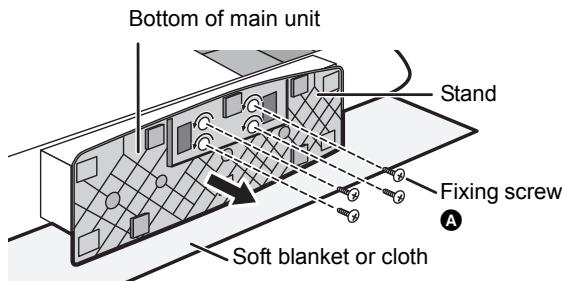
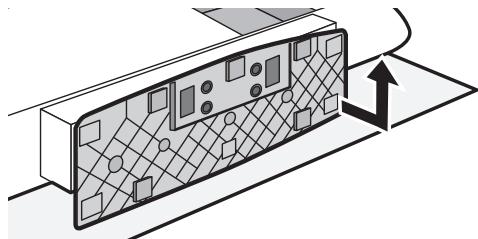
Gently pull the bottom of the stand and slide the stand off the unit.
- Keep the removed screws and stand in a safe place.
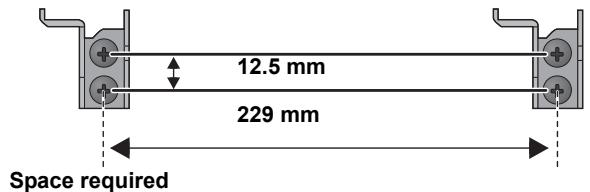
2 Measure and mark the position of the wall mount brackets (Both sides).
- Use figures below to identify the screwing positions.
The position to attach the wall mount brackets
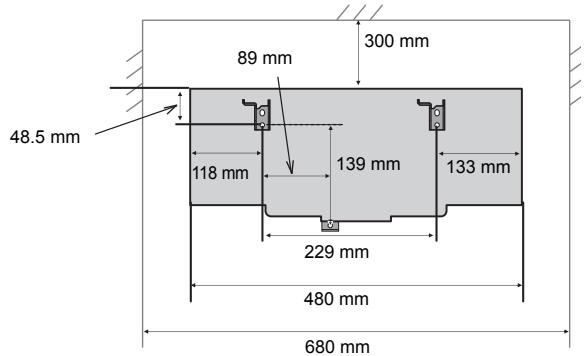
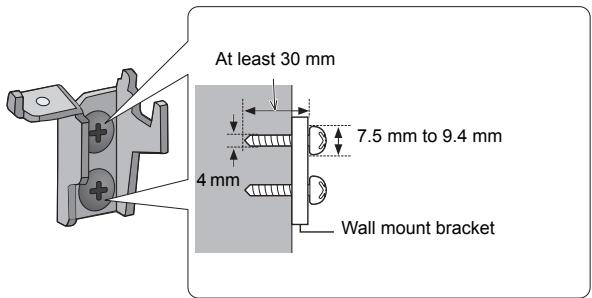
3 Attach the wall mount bracket to the wall with 2 screws F. (Both sides)
- Use a spirit level to ensure both wall mount brackets are level.
- Use a screw which is strong enough to support the weight of at least 33kg .
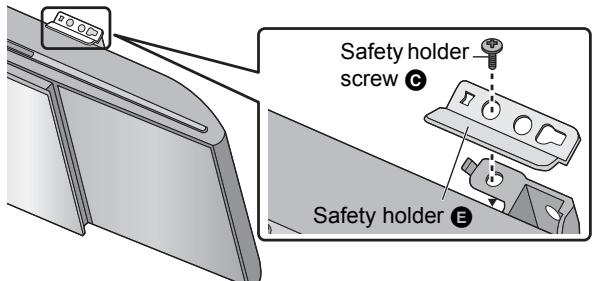
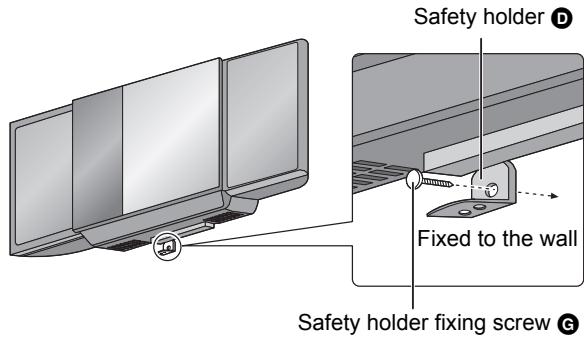
4 Fix the safety holder ① onto the unit with the safety holder screw ③ .
- Before attaching, stick the rear pads (supplied) to .
- Screw tightening torque: 50N· cm to 70N· cm .

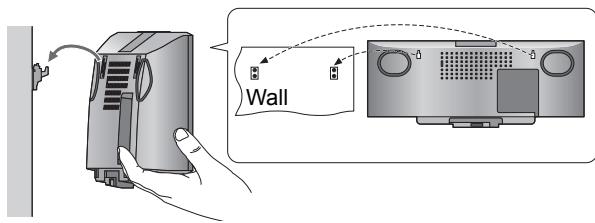
5 Hang the unit on the wall.
Hook the unit securely onto the wall mount brackets.
- Connect the FM/AM antenna and the AC mains lead to the unit before hanging the unit onto the wall. ( 5)
- After hanging the unit, release your hand carefully to confirm the unit sits securely on the wall.
6 Fix the safety holders ③ onto the wall mount brackets with the safety holder screws ⑨ (Both sides).
- Screw tightening torque: 80N· cm to 120N· cm .
7 Drive the safety holder fixing screw ⑥ to secure the safety holder ① onto the wall.
Refer to step 3 for requirements before screwing.
Control reference guide
Remote control
HC55
HC35
Main unit
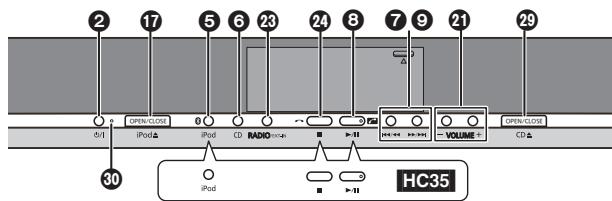
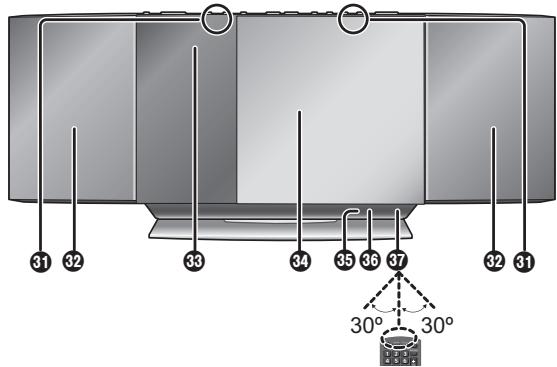
Buttons such as 2 function the same as the remote control. They can be used interchangeably. Top view
Front view
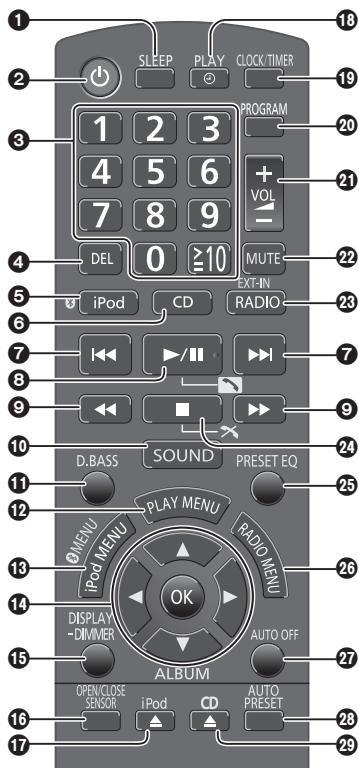
1 [SLEEP] (⇒ 12)
Standby/on switch [ ] [I] ( 9,10,16) Press to switch the unit from on to standby mode or vice versa. In standby mode, the unit is still consuming a small amount of power.
Numeric buttons [1-9, 0, ≥10] (⇒ 10, 11, 16) To select a 2-digit number e.g. 16: [≥10] → [1] → [2] To select a 3-digit number e.g. 226: [≥10] → [≥10] → [2] → [2] → [6]
4 [DEL] (⇒ 10)
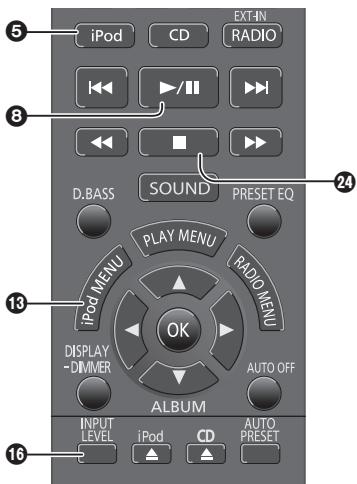
5 HC55 [,iPod] ( 13 14) HC35 [iPod] ( 13)
6 [CD] ( 10)
7 [11], [10, 11, 13, 14, 16)
[▶/II] (⇒ 10, 13, 14, 16)
HC55 [ ] (⇒ 15)
9 [<], [▶] (⇒ 10, 11, 13)
10 [SOUND] (⇒ 5, 9, 12, 14)
[B.BASS] ( 12)
12 [PLAY MENU] (⇒ 10)
[Pod MENU] (⇒ 13)
HC55 [MENU] (⇒ 15)
14 [A,▼,▲,▶], [OK] (⇒ 5, 10, 11, 12, 13, 15, 16)
[DISPLAY] ( 10,14) [-DIMMER] Press and hold to dim the display panel. Press and hold again to cancel.
16 HC55 [OPEN/CLOSE SENSOR] ( 9) HC35 [INPUT LEVEL] ( 5)
[iPod ] ( 9) [iPod , OPEN/CLOSE] HC55 Sensor activity indicator*
16 [PLAY, 2] (⇒ 12)
19 [CLOCK/TIMER] (⇒ 12)
20 [PROGRAM] ( 10,11)
[+,VOL,-] [-VOLUME ^+ ] ( 15) Adjusts sound volume.
22 [MUTE] ( 15) Mutes the sound. Press again to cancel. "MUTE" is also cancelled when the volume is adjusted or the unit is turned off.
[EXT-IN, RADIO] [RADIO/EXT-IN] ( 11, 16)
24 [ ] (⇒ 10, 13, 14, 16) HC55 [×] (⇒ 15)
[PRESET EQ] ( 12)
[ RADIO MENU] (⇒ 11)
[AUTO OFF] This function allows you to turn the unit off (except in radio mode) after the unit is left unused for about 30 minutes. When the function is turned on, the "A.OFF" indicator light.
[AUTO PRESET] ( 11)
[CD ] (⇒ 9)
[CD , OPEN/CLOSE]
HC55 Sensor activity indicator*
30 Standby indicator
31 HC55 Open/Close sensor ( 9)
Speaker
Display
44 Sliding door
HC55 Microphone ( 15)
36 HC55 Bluetooth indicator ( 14)
Remote control signal sensor Distance: Within approx. 7m directly in front.
- The sensor activity indicator will light when the Open/Close sensor is turned on.
One of the indicators will flash while the sliding door is opening or closing.
Opening/Closing the sliding door
Preparation
Press [O] to turn the unit on.
Opening the sliding door
For disc operations:
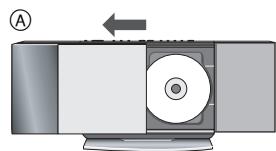
A While the sliding door is closed, press [CD ] to open the sliding door.
For iPod/iPhone operations:
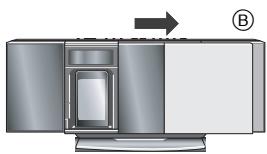
(8) While the sliding door is closed, press [iPod ▲] to open the sliding door.
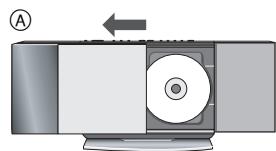
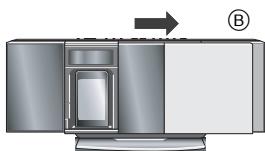
Closing the sliding door
Press [CD ] or [iPod ] again.
- Keep fingers away from the sliding door when it is closing to avoid possible minor injuries.

- Damage may occur if the sliding door is forced closed.
- Be careful of CD hitting the sliding door while being removed.
- The sliding door will not close if the docking switch lever is not returned to the original position.
HC55 Open/Close sensor
With this function the sliding door can be opened without pressing a button. The sliding door will open or close by moving the palm of your hand over the sensors on the top of the unit.
For disc operations:
Place the palm of your hand over sensor ⑧ and then move it over sensor ④.
- To close the sliding door, place the palm of your hand over sensor A and then move it over sensor B.
For iPod/iPhone operations:
Place the palm of your hand over sensor A and then move it over sensor B.
- To close the sliding door, place the palm of your hand over sensor B and then move it over sensor A.
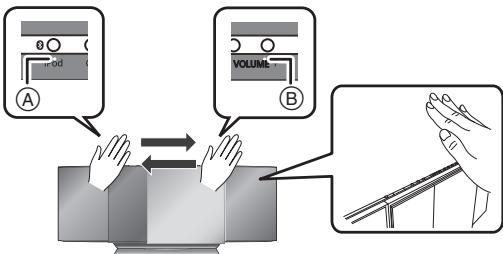
To change the setting of the open/close sensor
The sensitivity of the sensor can be changed to increase or decrease the activating area of the open/close sensor.
Press [OPEN/CLOSE SENSOR] repeatedly to select "MODE 1", "MODE 2", "MODE 3" or "OFF SENSOR".
Select the mode that allows correct operation.
- Factory preset: "MODE 2"
To turn the open/close sensor off, select "OFF SENSOR".
To change the sound effect settings of the open/close sensor
① Press [SOUND] repeatedly to select "BUZZER".
② Press [▲] or [▶] to select the following setting.
LOW: Set the sound effect level to low.
MID: Set the sound effect level to medium.
HIGH: Set the sound effect level to high.
OFF: Turn the sound effect off.

- A red light is lit from the position of the sensor. This is normal.
- The open/close sensor might be unintentionally activated if an object, hand, part of your arm, pets or children move over the top of the unit.
- If the open/close sensor does not react, move the palm of your hand closer to the top of the unit and change the speed that you move your hand.
- If the open/close sensor does not work, try changing the sensor's setting. If it still does not work, open/close the sliding door using the buttons on the unit or the remote control.
- When the sensor setting is changed to "MODE 1", move your hand closer (approx. 3cm ) over the unit.
- The disc operation side of the sliding door will not open during CD playback or pause.
Disc operations
Inserting a disc
1 Press [O] to turn the unit on.
2 Open the sliding door. ( left)
3 With the label of the disc facing towards you, tilt the disc into the disc tray under the sliding door.
4 Place the disc onto the spindle in the centre and then push the disc down until it clicks into place.
- Make sure that the unit does not fall when inserting the disc.
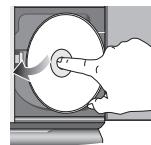
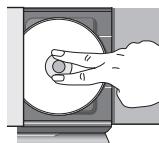
5 Close the sliding door. ( left)
Removing a disc
① Open the sliding door.
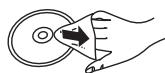
(2) Hold the centre and the top right of the disc and pull the top right of the disc to unlock it from the spindle.
③ Tilt the disc so as not to touch the sliding door or the lens and remove the disc.
Basic play
1 Press [] to turn the unit on.
2 Insert the disc to be played ( 9) .
3 Press [CD].
4 Press [▶/■] to start play.
| Stop | Press [■]. |
| Pause | Press [▶/■]. Press again to resume play. |
| Skip | Press [←] or [▶] to skip track. Press [▲,▼] to skip album. (MP3) |
| Search CD | Press and hold [←] or [▶]. |
| Direct access play (Play starts from the track you selected.) | CD: Press the numeric buttons to select the track. MP3: ① Press [▲,▼] to select the album. ② Press [▶] once and then the numeric buttons to select the track. ·This function does not work during random play or program play. |
| View contents information | Press [DISPLAY] repeatedly during play or pause. The current track's information, etc. is displayed. ·Maximum number of displayable characters: approximately 30 ·This unit supports ver. 1.0, 1.1 and 2.3 ID3 tags. Text data that is not supported will not be displayed or shown differently. |
Repeat play
After performing steps 1-3 in "Basic play"
1 Press [PLAY MENU] repeatedly to select "REPEAT".
2 Press [▲, ▲] to select "ON REPEAT" and press [OK].
3 Press [▶/III] to start play.
- To stop repeat play, select "OFF REPEAT" in step 2.
Play mode function
After performing steps 1-3 in "Basic play"
1 Press [PLAY MENU] repeatedly to select "PLAY MODE".
2 Press [<, >] to select the following mode and press [OK].
| 1-TRACK 1TR: | Plays one selected track on the disc. |
| 1-ALBUM 1ALBUM: | Plays one selected album on the disc. |
| MP3 | ● Press [▲,▼] to select the album. |
| RANDOM RND: | Plays a disc randomly. |
| 1-ALBUM | |
| RANDOM 1ALBUM RND: | Plays all tracks in one selected album randomly. |
| MP3 | ● Press [▲,▼] to select the album. |
3 Press [▶/■] to start play.
![PANASONIC SCHC35EP - Press [▶/■] to start play. - 1](/content/2019/08/105229/images/057579da3ba07b3bcc09796bc14300c558dc7099473d5f57702e2afcb02d0d97.jpg)
- During random play, you cannot skip to the previous track.
- The current play mode is cleared when you open the sliding door.
- To repeat program play or selected play mode, select "ON REPEAT" in PLAY MENU.
Program play
Enables you to program up to 24 tracks.
After performing steps 1-3 in "Basic play"
1 Press [PROGRAM] during the stop mode.
2 CD:
Press the numeric buttons to select the track.
- To program more tracks, continue by pressing the numeric buttons.
MP3:
① Press [, ] to select the album.
② Press [▶▶] once and then the numeric buttons to select the track.
③ Press [OK].
To program more tracks, repeat steps ① - ③.
3 Press [▶/III] to start play.
| Cancel programme mode | Press [PROGRAM] in the stop mode to clear “PGM” indicator from the display. |
| Check programme contents | Press [▲] or [▶] when “PGM” is displayed in the stop mode. |
| Delete last programmed track | Press [DEL] in the stop mode. |
| Clear all programmed tracks | ① Press [■] in the stop mode. ② Press [■] again while blinking “CLR ALL”. |
![PANASONIC SCHC35EP - Press [▶/III] to start play. - 1](/content/2019/08/105229/images/edc8209371b81aa4a24899e199c4d469ce414dcd88f0e7893d7e621bc8b9b1b9.jpg)
- The program memory is cleared when you open the sliding door.
Notes on CD-R/CD-RW
- This unit can play CD-R and CD-RW recorded with CD-DA or MP3.
- Use an audio recording disc for CD-DA and finalize* it when you finish recording.
A process performed after recording that enables CD-R or CD-RW players to play audio CD-R and CD-RW.
- The unit may not be able to play some discs due to the condition of the recording.
- Do not use irregularly shaped CDs.
- Do not attach extra labels and stickers.
- Do not use CDs with labels and stickers that are coming off or with excessive adhesive under the labels and stickers.
- Do not attach scratch-proof covers or any other kind of accessories.
- Do not write anything on the CDs.
- Do not clean CDs with liquids (Wipe with a soft and dried cloth).
Creating MP3 files playable on this unit
- Maximum number of tracks and albums: 999 tracks and 254 albums (Excluding Root folder).
- Compatible compression rate: Between 64 kbps and 320 kbps (stereo). 128 kbps (stereo) is recommended.
- Disc formats: ISO9660 level 1 and level 2 (except for extended formats).
- The time for reading TOC depends on the number of the tracks, folders or folder structures.
Limitations on MP3
- This unit is compatible with multi-sessions and it takes more time to start playing.
- This unit cannot play files recorded using packet write.
- If the disc includes both MP3 and normal audio data (CD-DA), the unit plays the type recorded in the inner part of the disc. If the disc includes both MP3 and other types of audio data (e.g. WMA or WAV), the unit plays only the MP3.
- Depending on how you create the MP3 files, they may not play in the order you numbered them or may not play at all.
Radio operations
Manual tuning
1 Press [EXT-IN, RADIO] repeatedly to select "FM" or "AM".
2 Press [←] or [▶] to select the frequency of the required station.
- "ST" is displayed when a stereo FM broadcast is being received.
- To tune automatically, press and hold [←] or [▶] until the frequency starts changing rapidly.
-To cancel auto tuning, press [or once again.
- Auto tuning may not function when there is excessive interference.
To improve FM sound quality
① Press [RADIO MENU] to select "FM MODE" while receiving FM broadcasts.
② Press [▲, ▲] to select “MONO” and then press [OK].
- Select "STEREO" in Step ② to return to stereo broadcasts.
- "MONO" is canceled if the frequency is changed.
To improve AM sound quality
① Press [RADIO MENU] to select "B.PROOF" while receiving AM broadcasts.
② Press [▲, ▲] to select the beat proof setting ("BP 1" or "BP 2") and press [OK].
- This setting is reset to "BP 1" when changes are made (e.g. frequency is changed).
Memory preset
You can preset up to 30 FM channels and 15 AM channels.
Preparation
Press [EXT-IN, RADIO] repeatedly to select "FM" or "AM".
Automatic presetting
① Press [OK] to switch between the "LOWEST" and "CURRENT" frequency.
② Press [AUTO PRESET].
"PGM" starts to flash and the tuner starts to preset all the stations it can receive into the channels in ascending order.
Manual presetting
① Press [▲] or [▶▶] to tune to the required station.
② Press [PROGRAM].
③ While "PGM" is flashing, press the numeric buttons to select a channel.
- The station occupying a channel is erased if another station is preset in that channel.
- To preset more stations, repeat steps ① - ③.
Selecting a preset station
Press [1] or [▶▶] to select the channel.
- Alternatively, press the numeric buttons to select the channel.
AM frequency step
This unit is factory-set to AM 9 kHz, but you can change it to receive broadcasts allocated in AM 10 kHz steps.
To change the step
① Press [EXT-IN, RADIO] to select "AM".
(2) Press and hold [RADIO/EXT-IN] on the main unit. After a few seconds the display changes to display current minimum frequency.
③ Continue to hold down [RADIO/EXT-IN] on the main unit. When the minimum frequency changes, release the button.
To return to the original step, repeat steps 1-3.
- After the setting is changed, any previously preset frequency will be cleared.
RDS broadcasting
The unit can display the text data transmitted by the radio data system (RDS) available in some areas.
When "FM" is selected
Press [DISPLAY] to display the text data.
Each time you press the button:
PS: Program service
PTY: Program type
(Frequency display)
![PANASONIC SCHC35EP - Press [DISPLAY] to display the text data. - 1](/content/2019/08/105229/images/6f3c04097b6456c07d5234b0bb0836d71e508f276f6e73a0da4f88a4a140b6da.jpg)
- RDS displays may not be available if reception is poor.
Sound adjustment
The following sound effects can be added to the audio output.
| Preset EQ | Press [PRESET EQ] repeatedly to select “HEAVY”, “SOFT”, “CLEAR”, “VOCAL” or “FLAT”. |
| Bass or Treble | ① Press [SOUND] repeatedly to select “BASS” or “TREBLE”. ② Press [▲, ▲] to adjust the level (-4 to +4). |
| Surround Sound | ① Press [SOUND] repeatedly to select “SURROUND”. ② Press [▲, ▲] to select “ON SURROUND”. • To cancel surround sound, select “OFF SURROUND” in step ②. • If interference in FM stereo reception increases, cancel the surround sound effect. |
| D.Bass | Press [D.BASS] during play to select “ON D.BASS” or “OFF D.BASS”. |
- You may experience a reduction in sound quality when these effects are used with some sources. If this occurs, turn the sound effects off.
Timer
Setting the clock
This is a 24-hour clock.
1 Press [CLOCK/TIMER] to select "CLOCK".
2 Within 10 seconds, press [, ] to set the time.
3 Press [OK].

- To display the clock, press [CLOCK/TIMER].
- Reset the clock regularly to maintain accuracy.
Play timer
You can set the timer to come on at a certain time to wake you up.
This unit offers 3 optional play timers.
Preparation
- Turn the unit on and set the clock ( above).
- Prepare the music source (disc, radio, iPod/iPhone, USB or AUX) and set the volume.
1 Press [CLOCK/TIMER] repeatedly to select "④PLAY 1", "④PLAY 2" or "④PLAY 3".
2 Within 10 seconds, press [, ] to set the starting time.
3 Press [OK].
4 Set the finishing time by repeating steps 2 and 3.
To activate the timer
5 Press [PLAY, ②] repeatedly to set the desired play timer on.
6 Press [O] to turn the unit off.
| Check the settings (When the unit is on or in standby mode) | Press [CLOCK/TIMER] twice. (The setting is displayed.) |
| Cancel | Press [PLAY, ➁] twice to clear the timer indicator from the display. |

- The timer will start at the preset time, with the volume increasing gradually to the preset level.
Sleep timer
The sleep timer can turn the unit off after a set time.
1 Press [SLEEP] to turn the sleep function on or off.
$$ \begin{array}{l} 3 0 \mathrm {M I N} \rightarrow 6 0 \mathrm {M I N} \rightarrow 9 0 \mathrm {M I N} \rightarrow 1 2 0 \mathrm {M I N} \ \uparrow \quad \text {O F F (C a n c e l)} \leftarrow \ \end{array} $$
2 Press [SLEEP] once to check the remaining time.
- The play timer and sleep timer can be used together. The sleep timer always has the priority. Be sure not to overlap the timer settings.
- When "AUTO OFF" is "ON" and the unit is left unused for about 30 minutes, the unit will shut down even if the play time or sleep time has not expired.
Listening to audio from iPod or iPhone
Inserting/Removing an iPod/ iPhone
Inserting an iPod/iPhone
1 Open the sliding door. ( 9)
2 Insert the suitable dock adapter (not supplied) for the iPod/iPhone.
- Insert the side of the iPod/iPhone dock adapter with the clips facing towards you first and then push the opposite side until it clicks into place.
A Clips
Dock adapter
iPod/iPhone docking switch lever
⑥ Connector
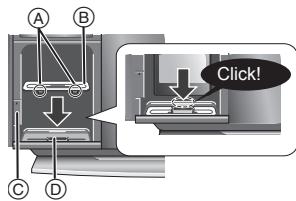
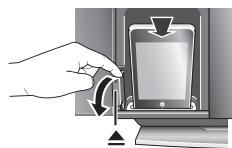
3 Press [▲] to unlock the iPod/iPhone dock and then pull the docking switch lever to tilt the iPod/iPhone dock.
4 Connect the iPod/iPhone (not supplied) firmly.
- Be sure to remove the iPod/iPhone from its case.
5 Push the docking switch lever back until it clicks into place.
6 Close the sliding door. ( 9)
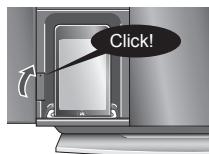
Removing an iPod/iPhone
① Repeat step 1 and 3 (⇒ above).
② To remove, simply pull the iPod/iPhone straight out.
③ Repeat step 5 and 6 (⇒ above).

- If the iPod/iPhone dock is not tilted when connecting or disconnecting the iPod/iPhone, it may cause damage to the connector.
- Be sure to use a dock adapter that is compatible with your iPod/iPhone. To purchase a dock adapter, consult your iPod/Phone dealer.
- Reduce the volume of the main unit to minimum before connecting or disconnecting the iPod/iPhone.
iPod/iPhone operations
Press [iPod] [HC55: [3, iPod]) repeatedly to select "IPOD".
Preparation
| Play | Press [▶/■]. |
| Pause | Press [▶/■] or [■]. Press again to resume play. |
| Skip track | Press [▲] or [▶]. |
| Search the current track | Press and hold [▲] or [▶]. |
| Display iPod/iPhone menu/return to previous menu | Press [iPod MENU] in the play mode. (Remote control only) |
| Select contents from iPod/iPhone menu | Press [▲,▼] and then [OK]. (Remote control only) |
- The operations may vary or not work depending on the iPod/iPhone models.
Compatible iPod/iPhone (as of January 2011)
- Update your iPod/iPhone with the latest software before using this unit.
- Compatibility depends on the software version of your iPod/iPhone.
| Name | Memory size |
| iPod touch 4th generation | 8 GB, 32 GB, 64 GB |
| iPod nano 6th generation | 8 GB, 16 GB |
| iPod touch 3rd generation | 32 GB, 64 GB |
| iPod nano 5th generation (video camera) | 8 GB, 16 GB |
| iPod touch 2nd generation | 8 GB, 16 GB, 32 GB |
| iPod classic | 120 GB, 160 GB (2009) |
| iPod nano 4th generation (video) | 8 GB, 16 GB |
| iPod classic | 160 GB (2007) |
| iPod touch 1st generation | 8 GB, 16 GB, 32 GB |
| iPod nano 3rd generation (video) | 4 GB, 8 GB |
| iPod classic | 80 GB |
| iPod nano 2nd generation (aluminum) | 2 GB, 4 GB, 8 GB |
| iPod 5th generation (video) | 60 GB, 80 GB |
| iPod 5th generation (video) | 30 GB |
| iPod nano 1st generation | 1 GB, 2 GB, 4 GB |
| iPhone 4 | 16 GB, 32 GB |
| iPhone 3GS | 8 GB, 16 GB, 32 GB |
| iPhone 3G | 8 GB, 16 GB |
| iPhone | 4 GB, 8 GB, 16 GB |
- Depending on the model, it may be necessary to remove the iPod/iPhone and select the album, artist, etc. on the iPod/iPhone.
Notes on iPhone:
- All phone features can only be controlled by the iPhone's touch screen.
- The unit does not display incoming calls or the phone status.
- The ringtone of incoming call can be heard from the iPhone's speaker. When the unit is in iPod/iPhone mode, the ringtone can also be heard from the unit's speakers.
- Connecting or disconnecting the iPhone from the unit will not cancel a call.
- There is no Apple Inc. specification that will guarantee the iPhone responses above. iPhone responses may vary on new iPhone models or iPhone new software updates.
Charging the iPod/iPhone
- When iPod/iPhone is being charged in standby mode, "IPOD CHARGING" is shown on the main unit's display.
- Check iPod/iPhone to see if the battery is fully charged. If you are not using iPod/iPhone for an extended period of time after recharging has completed, disconnect it from the main unit as the battery will be depleted naturally. (Once fully recharged, additional recharging will not occur.)
HC55
Listening to the Internet Radio
This unit can output internet radio if "vTuner for Panasonic" is installed on your iPhone/iPod touch.
- Visit the below website for the following information about "vTuner for Panasonic": http://radio.vtuner.com/panasonic/en/ (Compatible iPhone/iPod touch models and software versi purchasing, installation and operation details.)
Preparation
Install "vTuner for Panasonic" to your iPhone/iPod touch.
1 Insert the iPhone/iPod touch to this unit.
2 Press [3, iPod] repeatedly to select "INTERNET RADIO".
"vTuner for Panasonic" starts.
HC55 Using a Bluetooth® compatible device
About using Bluetooth®
What is Bluetooth?
Bluetooth® technology allows you to make a wireless connection with another electronic device.
Frequency band used
This unit uses the 2.4 GHz frequency band, however other devices may use this frequency as well. To avoid interference with other wireless devices, please follow the cautions listed below.
■ Certification of this device
This unit conforms to frequency restrictions and has received certification based on frequency laws, so a wireless permit is not necessary. However, the following action is punishable by law in some countries:
- Taking apart/modifying the unit.
Usage restrictions
- Wireless transmission and/or usage with all Bluetooth® equipped devices is not guaranteed.
- Compatible mobile phones capable of wireless transmission include and comply to standards set by the Bluetooth SIG, Inc. However, if the mobile phone is optimized to meet standard specifications, some functions may work. Even so, depending on the specifications and settings of the mobile phone, a connection may not be established, nor are the methods of operation, display, or operation guaranteed.
- This unit supports Bluetooth® security features, however depending on the operating environment and/or settings, this security may not be sufficient. Use caution when transmitting data wirelessly.
- Please be aware that Panasonic accepts no responsibility for data and/or information that may be compromised during a wireless transmission.
Range of use
Use this device within an unobstructed 10m range. The range of usage or perimeter may be shortened depending on any obstructions, devices causing interference, other people in the room, or the construction of the building. Please note that the range mentioned above is not guaranteed.
Effects from other devices
- It is possible that this unit may not operate correctly or you may experience other effects of instability such as "broken up" audio, etc. when other devices are placed within close proximity. Therefore, in order to prevent signal interference, we recommend separating this unit from the following devices during use:
Microwave oven/Wireless LAN/Electronic devices/Audio & Video devices/Office Assistant machines & devices/Digital cordless phones/Fax machines, etc.
- If you live in close proximity to a broadcasting studio and the signal is too strong, the unit may not operate correctly.
- When using a notebook PC with a wireless LAN transmitter, do not use this unit and the wireless LAN at the same time.
- If you are still experiencing noise even outside of the 5 m range of a wireless LAN device, turn the power to the wireless LAN device off.
Intended usage limitations
This unit is intended for normal, general use. This unit is not developed or manufactured with the intention of use in "high safety" or hazardous occupations. Do not use this unit in these kinds of environments or occupations.
- The following examples require extreme caution, and can directly result in loss of life, or extreme bodily harm.
e.g.) Nuclear Engineering, and control of a nuclear reaction/automated control of aircraft/air traffic control management/controlling movement of heavy freight systems/control of life support or extension systems/control of weapons systems and/or missile launch systems, etc.
Bluetooth® pairing
Preparation
Pair the Bluetooth® device with this unit to create an audio connection.
1 Press [3, iPod] repeatedly to select "BLUETOOTH".
When using it for the first time, it enters pairing mode automatically.
2 While this unit is in pairing mode, access the Bluetooth® menu of the Bluetooth® device and execute a Bluetooth® search to find this unit (SC-HC55).
- Please refer to the Bluetooth® device user manual for further instruction on how to connect a Bluetooth® device.
- If prompted for the passkey, enter "0000".
3 If pairing is successful, the paired device's name will be displayed for 2 seconds. The Bluetooth® indicator lights up. The unit is now ready to be used with the Bluetooth® device.

- Make sure the Bluetooth® device supports A2DP (Advance Audio Distribution Profile).
- This unit supports the A2DP reception which is copyright-protected by SCMS-T method.
- A2DP enables you to stream stereo sound from an audio source (mobile phone, PC or laptop) to this unit via Bluetooth®.
- Depending on the specification or setting of mobile phones, connection may not be established, or operation and display may vary.
- You can register up to 6 devices into this unit. Disconnect the current Bluetooth® device and refer to "To register more devices" (⇒ 15).
- If you register more than the maximum device number, the oldest device in connection history will be overwritten.
- If a registered device is re-registered, it will be overwritten.
Basic play
Pair the Bluetooth® device with this unit to create an audio connection.
1 Press [3, iPod] repeatedly to select "BLUETOOTH".
2 On the Bluetooth® device: Select this unit (SC-HC55) on the Bluetooth® setup screen to make the connection.
3 On the Bluetooth device: Start playback of a music source.
- If the device is connected, the music will be heard on this unit.
- The Bluetooth® indicator lights when there is a connection.
- Please refer to the Bluetooth® device user manual if required.
4 You can also make the following controls with the remote control.
| Play | Press [▶/■] to start play. |
| Stop | Press [■]. |
| Pause | Press [▶/■]. Press again to resume play. |
| Skip track | Press [↓←] or [▶→]. |
| Display information | Press [DISPLAY] repeatedly. |

- To utilise these functions, the Bluetooth® device must support AVRCP (Audio Video Remote Control Profile).
- This unit cannot transmit data to a Bluetooth® device.
- When playing iPod/iPhone by Bluetooth® with the main unit, intermittent sound may be experienced if you leave the iPod/iPhone Bluetooth® menu screen active or when making Bluetooth® registration and connection. If this occurs, please exit the iPod/iPhone Bluetooth® menu screen.
- When playing music by iPod/iPhone via Bluetooth® connection and the iPod/iPhone is connected into this unit iPod/iPhone dock, the audio will not be re-produced while "BLUETOOTH" is selected. Select "IPOD" to continue enjoying the music.
Input level
You can select the sound input level of the Bluetooth® device.
1 Press [3, iPod] repeatedly to select "BLUETOOTH".
2 Press [SOUND] repeatedly to select "INPUT LEVEL".
3 Press [, ] to select “0”, “+1” or “+2”.
- Select "0" if the sound is distorted.
Display function
Press [DISPLAY] repeatedly to view the information of the current connected device.
BLUETOOTH Connected device name
Connected profiles<
Hands-Free Profile (HFP)
This unit works as a Bluetooth® hands-free for your mobile phones.
| To answer a call (“IN CALL” blinks) | Press [✔]. “CALLING” starts blinking on the display (Talk into the unit's microphone). Press [✔] again to transfer the call to the mobile phones (“TRANSFER” blinks. You may now converse using the mobile phone). |
| To cancel a call | Press [×]. |
| To adjust the sound volume | Press [+ , VOL , -] (Adjustable from “TEL VOL 1” to “TEL VOL 10”). |
| To mute the microphone | Press [MUTE]. Press again to cancel. (During “MIC MUTE”, the caller is not able to hear your voice). |

- This unit does not work with Headset Profile (HSP).
- When the mobile phone is too close to the microphone of this unit, noise may occur. Always keep the mobile phone away from the microphone of this unit when making a call.
- The audio from a disc will be paused while calling in hands-free mode.
Disconnecting a Bluetooth® device
1 Press [3, iPod] repeatedly to select "BLUETOOTH".
2 Press [MENU] to display "DISCONNECT?" and then press [OK].
A confirmation message is displayed.
3 Press [▲, ▲] to select “YES” and then press [OK].

- The connection can also be stopped when you disable Bluetooth® transmission on the connected Bluetooth® device.
Advanced functions
Preparation
Press [3, iPod] repeatedly to select "BLUETOOTH".
- These functions are unavailable if a device is connected. Disconnect the Bluetooth® devices to display these functions.
To register more devices
1 Press [MENU] repeatedly to select "NEW DEV." and then press [OK].
- The unit enters pairing mode and "PAIRING" starts blinking on the display.
2 While this unit is in pairing mode, access the Bluetooth® menu of the Bluetooth® device and execute a Bluetooth® search to find this unit (SC-HC55).
- If prompted for the passkey, enter "0000".
To select communication quality
1 Press [MENU] repeatedly to select "LINK MODE".
2 Press [<, >] to select the following modes and then press [OK].
MODE 1: Connection with emphasis on communication stability
MODE 2: Connection with high bit rate for good audio quality (Communication might easily be disconnected in this mode, select "MODE 1" if this occurs).
To select Auto Link mode
1 Press [MENU] repeatedly to select "AUTO LINK".
2 Press [<, >] to select the following modes and then press [OK].
ON: This unit will automatically select "BLUETOOTH" when a Bluetooth® device is connected. OFF

- When "LINKING" is displayed, pressing [3] MENU] is invalid.
- Auto Link works only if your device supports A2DP.
- The communication quality settings also depend on the settings on the connected device. If the communication quality of the connected device is set for stable communication, the quality of the audio will remain low even if this unit is set to "MODE 2".
Listening to audio from a USB device
Compatible devices
Devices which are defined as USB mass storage class:
USB devices that support bulk only transfer
USB devices that support USB 2.0 full speed
Notes on USB
- Supported format: Files with extension“.mp3” or“.MP3”
- CBI (Control/Bulk/Interrupt) is not supported.
- FAT12, FAT16 and FAT32 file systems are supported.
- Depending on the sector size, some files may not work.
- This unit can access up to 254 albums (excluding Root folder) and 2500 tracks.
- The maximum number of tracks in a folder is 999 tracks.
- Only one memory card will be selected when connecting a multiport USB card reader, typically the first memory card inserted.
- Disconnect the USB card reader from the unit when you remove the memory card. Failure to do so may cause malfunction to the device.
- When you connect the digital audio player to the USB port, it charges all the time when the unit is on.
USB operations
The USB connectivity enables you to connect and play MP3 tracks from a USB device.
Preparation:
- Before connecting any USB device to this unit, be sure to back up the data.
- It is not recommended to use a USB extension cable. The device connected via the cable will not be recognized by this unit.
1 Plug the USB device into the unit. ( 5)
2 Press [EXT-IN, RADIO] repeatedly to select "USB".
3 Press [▶/■] to start play.
| Stop | Press [■]. • The position is memorized while “RESUME” is displayed. Press [▶/■] to resume play. Press [■] again to clear the position. |
| Pause | Press [▶/■]. • Press [▶/■] again to restart play. |
| Skip | Press [↓←] or [▶→]. (Track) Press [▲,▼]. (Album) |
| Direct access play (Play starts with the track you select.) | ① Press [▲,▼] to select the album. ② Press [▶→] once and then the numeric buttons to select the track. |
- Before removing the USB device, select a source other than "USB".

- Removing the USB device while it is selected can damage the data stored in the device.
For other operating functions, they are similar as those described in "Disc operations".
Others
Changing the main unit and remote control mode
Other Panasonic audio/video equipment may start functioning when you operate the unit using the supplied remote control. You can operate this unit in another mode by setting the remote control operating mode to "REMOTE 2".
The main unit and remote control must be set to the same mode.
1 Press [EXT-IN, RADIO] to select "AUX".
2 Press and hold [RADIO/EXT-IN] on the main unit and [2] on the remote control until the main unit's display shows "REMOTE 2".
3 Press and hold [OK] and [2] on the remote control for at least 4 seconds.
To change the mode back to "REMOTE 1", repeat the steps above by replacing [2] with [1].
Memory reset (Initialization)
When the following situations occur, reset the memory:
- There is no response when buttons are pressed.
- You want to clear and reset the memory contents.
1 Disconnect the AC mains lead. (Wait for at least 3 minutes before proceeding to step 2.)
2 While pressing and holding down [ / I] on the main unit, reconnect the AC mains lead.
"-----" appears on the display.
3 Release [O/I].
All the settings are returned to the factory preset. You will need to reset the memory items.
Troubleshooting
Before requesting service, make the following checks. If you are in doubt about some of the check points, or if the solutions indicated in the following guide do not solve the problem, consult your dealer for instructions.
Common problems
Incorrect display or play will not start.
- You have not inserted the disc properly. Insert it correctly.
The disc is scratched or dirty (Tracks skipped). - There is moisture on the lens. Wait for about an hour and then try again.
MP3 cannot be read.
- You may not be able to play MP3 if you have copied a multi-session disc that has no data between sessions.
- When creating a multi-session disc, it is necessary to close the session.
- The amount of data on the disc is too small. Set the amount of data to above 5 MB.
Noise is heard or no sound.
- While playing MP3, noise may occur if the recording is poor.
- Keep this unit away from mobile phones if the interference is apparent.
- Turn the volume up.
- Switch the unit off, check and correct the connection and then switch the unit on. Causes include straining of the speakers through excessive volume or power and using the unit in a hot environment.
Humming heard during play.
- An AC mains lead or fluorescent light is near the cords. Keep other appliances and cords away from this unit's cables.
A beat sound or noise is heard while receiving radio broadcast.
- Switch the television or other audio player off or separate it from the unit.
- Switch the portable audio player off if connected to the EXT-IN AUX port.
A low hum or noise is heard during AM broadcast.
- Keep the antenna away from other cables and cords.
- Keep the AM antenna away from the unit.
The picture on the television near the unit disappears or stripes appear on the screen.
- The location and orientation of the antenna are incorrect.
- The television antenna wire is too close to the unit. Separate the antenna wire of the television from the unit.
No response when remote control buttons are pressed.
- Check that the battery is inserted correctly ( 4) .
HC55 Open/close sensor
The sliding door does not open (or malfunctions).
Is the unit turned on?
Is the open/close sensor turned off? ( 9)
- During CD playback or pause, the CD operation side of the sliding door will not open.
- The open/close sensor may not react to dark objects.
- Depending on the lighting, the open/close sensor may malfunction. In this case, try moving the unit to a different place. (Do not place this unit under strong lighting, e.g., direct sunlight or fluorescent lights, etc.)
- When the open/close sensor is on, the sliding door may open/ close while operating the buttons on the top of the unit. In this case, use the remote control.
The open/close button lights are flashing.
- If there is an object close to both open/close sensors, both open/close button lights will flash and the open/close sensor will not function.
In this case try the below:
- Changing the sensor setting to "MODE 1". ( 9)
- Move the unit away from the object, or vice versa. (It will take a few seconds for the unit to check if the clearance is sufficient.)
The open/close sensor sound effect cannot be heard when the sliding door opens/closes.
- This is normal while listening to the radio, during playback, etc. or when linked to a Bluetooth® device.
iPod/iPhone operations
iPod/iPhone does not turn on.
Cannot operate with [iPod MENU] button.
- Verify that the iPod/iPhone battery is not depleted before connecting it to the unit.
- Before inserting the iPod/iPhone into the dock, turn both the unit and the iPod/iPhone off. Turn the power on and select the appropriate source.
No sound is heard from the speakers.
- The iPod/iPhone is not inserted correctly into the dock. Turn the iPod/iPhone off and remove it from the dock connector. Reinsert it and turn it on again.
- Make sure that the iPod/iPhone is actually playing something.
- Adjust the volume.
Distorted sound or the sound level is too low.
- Make sure the equalizer function of the iPod/iPhone is turned off.
iPod/iPhone cannot be controlled by the remote control or main unit.
- Make sure the iPod/iPhone is inserted properly into the dock.
- Check the dock connection and make sure that iPod/iPhone is selected as the source of music ( 12).
iPod/iPhone does not charge.
- Check all connections ( 5, 12) .
HC55 Bluetooth® operations
The name of the connected device is shown as *
- Character that cannot be displayed will be replaced by “*”.
- An unknown device name is detected and displayed as "**".
Noise is heard or broken sound.
- The Bluetooth® communication distance has exceeded 10 m. Bring the device closer to the unit.
- There are obstructions between the device and the unit. Remove or avoid the obstacles.
- Select "MODE 1" to improve connection quality ( 15).
- Interference from mobile phones.
USB operations
No response when [ / ] is pressed.
- Disconnect the USB device and then reconnect it. Alternatively, turn the unit off and on again.
The USB drive or its contents cannot be read.
- The USB drive format or its contents is/are not compatible with the unit ( 16) .
- The USB host function of this product may not work with some USB devices.
- USB devices with storage capacity of more than 8 GB may not work in some instances.
Slow operation of the USB flash drive.
- Large file size or high memory USB flash drive takes longer time to read.
The elapsed time displayed is different from the actual play time.
- Copy the data to another USB device or backup the data and reformat the USB device.
Displayed messages
The following messages or service numbers appear on the unit's display when something unusual is detected during startup and use.
“
- You plugged the AC mains lead in for the first time or there was a power failure recently. Set the time ( 12) .
"ADJUST CLOCK
- Clock is not set. Adjust the clock accordingly.
"ADJUST TIMER"
- Play timer is not set. Adjust the play timer accordingly.
"PGM FULL"
- The number of programmed tracks is limited to 24. No further tracks can be programmed.
"NO PLAY"
- A CD-ROM disc that is not in CD-DA or MP3 format is inserted. It cannot be played.
- Check the content. Only MP3 format files can be played.
- If there are more than 255 albums or folders (audio and non-audio), some of the MP3 files in these albums may not be read and played. Transfer these music albums to another USB. Alternatively, reformat the USB device and save these music albums prior to saving the other non-audio folders.
"ERROR"
- Incorrect operation is performed. Read the instructions and try again.
"F61" or "F76"
- There is a power supply problem. Consult the dealer.
- Disconnect the USB device. Turn the unit off and on again.
"AUTO OFF"
- The unit has been left unused for about 30 minutes and will shut down in a minute. Press any button to cancel it.
"ILLEGAL OPEN"
- Sliding door is not in correct position. Turn the unit off and on again.
“NODEVICE”
- The iPod/iPhone device is not inserted correctly. Read the instructions and try again ( 12).
- The USB device is not inserted. Check the connection.
"REMOTE 1"
- The main unit is in "REMOTE 1" mode. Switch the remote control to "REMOTE 1" mode ( 16 ).
"REMOTE 2"
- The main unit is in "REMOTE 2" mode. Switch the remote control to "REMOTE 2" mode ( 16 ).
HC55 "F70"
- There is a Bluetooth® module problem. Disconnect the AC mains lead and consult your dealer.
"NO DISC"
- Insert the disc to be played ( 9) .
"NOT SUPPORTED"
- You have inserted an iPod/iPhone that cannot be played ( 12) .
HC55 "START ERROR"
- Check the iPhone/iPod touch.
Visit the below website for more information: http://radio.vtuner.com/panasonic/en/
"UNLOCKED"
- The iPod/iPhone docking switch lever is not locked in position. Make sure that the iPod/iPhone docking switch lever is properly pushed back into place ( 12) .
HC55 “CANNOT SET”
- Select an audio source other than "BLUETOOTH" or "INTERNET RADIO".
Specifications
AMPLIFIER SECTION
RMS Output Power Stereo mode
Front Ch (both ch driven)
20 W per channel (6 Ω),
1 kHz, 10% THD
Total RMS Stereo mode power
40W
TUNER SECTION
Preset Memory
FM 30 stations
AM 15 stations
Frequency Modulation (FM)
Frequency range
87.50 MHz to 108.00 MHz
(50 kHz step)
75Ω (unbalanced)
Antenna terminals
Amplitude Modulation (AM)
Frequency range
522 kHz to 1629 kHz
(9 kHz step)
520 kHz to 1630 kHz
(10 kHz step)
DISC SECTION
Disc played [8 cm or 12 cm]
CD, CD-R/RW
(CD-DA, MP3*)
Pick up
Wavelength
Laser power
[NORSK]
Bolgelengde
Laserstyrke
Audio Output (Disc)
Number of channels
MPEG-1 Layer 3, MPEG-2 Layer 3
790 nm
CLASS 1, CLASS 1M
790 nm
Klasse 1, Klasse 1M
2 way, 2 speaker system
(Passive Radiator)
Speaker unit(s)
Woofer
Tweeter
Passive Radiator
Impedance
6.5 cm Cone type × 1 per channel
1.5 cm Piezo type×1 per channel
8 cm×2 per channel
6Ω
HC35
Type
Speaker unit(s)
Full range
Passive Radiator
Impedance
1 way, 1 speaker system
(Passive Radiator)
6.5 cm Cone type × 1 per channel
8cm× 2 per channel
6Ω
HC55 BLUETOOTH SECTION
Bluetooth® system specification
Wireless equipment
classification
Supported profiles
Frequency band
Driving distance
V2.1 + EDR
Class 2 (2.5 mW)
A2DP,AVRCP,HFP
2402 MHz to 2480 MHz
(Adaptive Frequency
Hopping)
10 m Line of Sight
iPhone 4, at height 1 m, in
"MODE 1")
TERMINAL SECTION
Phone jack
Terminal
AUX (Rear)
Terminal
USB Port
USB Standard
Media file format support
USB device file system
USB port power
Stereo, 3.5 mm jack
Stereo, 3.5 mm jack
USB 2.0 full speed
MP3 (.mp3)
FAT12, FAT16, FAT32
Max 500 mA
GENERAL
Power consumption 28 W
Power consumption in standby mode
Approx. 0.2 W
Power supply AC 220 V to 240 V, 50 Hz
Operating temperature range
Operating humidity range
Approx. 2.4kg
0^ C to +40^ C
35% to 80% RH
(no condensation)

- Specifications are subject to change without notice.
Mass and dimensions are approximate.
- Total harmonic distortion is measured by a digital spectrum analyzer.
PTY: Character programu
(Czestotliwość)

(Adaptive Frequency Hopping
-adaptywnzmiana
czechotliwosci)
Zasieg
$$ [ 1 - 9, 0, \geq 1 0 ] (\Rightarrow 4 6, 4 7, $$
$$ [ \text {R A D I O / E X T - I N} ] (\Rightarrow 4 7, $$
$$ \begin{array}{c} 5 2) \end{array} $$
2 BnHTa 3aunTHoro depKataTeIa (YepHbIe)
2 KpoHnTeHa HACTeHHORO
1 BnHT 3aunTHoro 步KataTeJI (cepe6pncTbI)
2 3aDnHnx PpOKNaDkn

HOpema 3nDennBepbI NO cOeToaHHo Ha HnBapb 2011 r. OHN MOryt N3MeHbTcBc.
He nCnoIb3OBAt bHyp 3JIeKtpoNITaHnI nepeMeHHbIM TOKOM cDpyrMn yCTpOJcTBAMN.
CopepkHne
MepblnpedoctopoXhoctn 56
Akceccyapbl 58
Yxoid 3a H3deJIHem HOCHTeJIaMn INHΦopMaqun .58
Cxembl noDcoeHHeHna 59
KpenneHne yctpoicTbHa h cTeHy (DOnOpHnTeIbHo).....60
CnpaBOUHoe pyKOBoDCTBO NO 3JIeMeHTam ynpaBHeHna. 62
OTkpBbAHne/3aKpbBaHne cDvNxHOI DBepuI...63
Onepaunncnckamn 63
Onepaunncpaio 65
PerynipoBka 3Byka. 66
Taimep. 66
PpocnyuBauHne aydno c iPod nii iPhone. 66
HC55 IcnoIb3OBAHnYyCTpoiCTB,COBMecTmblx C Bluetooth® 67
PpocnyuBbAne ayDno c USB-ycTpoiCTBa 70
PpOee 70
Ponck u yctpaenHe HeNoJaok 71
Texnueckne xapaKtepcntkn 73
HnΦopMaunO npIbTe nctaHNoHHoro ynpabNeHn
BctabnIte 3JIeMeHbI NITaHnI TaKIM O6pa3OM, YTO6bl IIOUca (+ n-) COBpAnI C NOHcAMN B NyIbTe DInCTaHUNHO UnpaBHeHna.
BCTABJIte ChauJa 3Ty CTOpOHy.
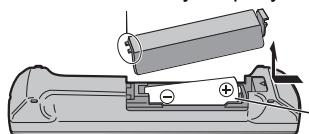
R6/LR6, AA
- IVonolbyyTe 7eIIOUHbIe IINI MapraHcEbbIe 3JIeMeHTbl IITaHnI.
Yxod 3a n3dennem HocnteJMaHnΦopMaun
Ipepe 6cbnykmbaHnem OTcoeunHnte 7TeTceB 3JIeKTPoNTaHnO T p03eTKn.
IpoTupaTe H3dJIne MmKo cyXoTkaHbIO.
- Писиьнм 3агразиелпатально пotрпte, сиьнho прижимая сmoуенhyю в boide ТkaHь, утобь CBытб рязь, a 3aTeM пotрпte cyхои тprлков.
- Ppi OuchTe KpbIeK DnHAMIKOB IcNOnb3yIte NDOXoJyU TkaHb. He IcNoJIb3yIte TkaHb INI dpyroM MaTePnaJIb (IIOJToHca IN np.), cNooc6HbIe OCTaBnTb YactNUcK. MeJIKe YactNUcbl MOryt nonactb B Kopnyc rPoMKOrOBoPntenJ.
- OuNTKn daHoro annapata HeIb3a IcNoIb3OBaTb CnIPT, pa36abntel nJ KpacOK nIN 6eH3nH.
- ПпждчемИСПОЛьЗВАТь XIMMУЧЕСКИ OБрабоТанHyIO TKAиь, BHIMaTeIbHOr ПОНТITE ИСHTРКUПLO, ПОЛуЧЕНHYIO BМЕСТС C3TOI TKAнБIO.
06cnyxnbHne JINH3bl
PeryIpaHOnOuHuaTeIIN3yBOu36exKaHHeNcnpaBHOCTe. YdaJIaTe PbIb C NOMoUbIOB3dyXoDyBKN INI BATHOROTAMIOHa npn OueHb CNlbHOM 3arp3HeHH.
- Henb3Я Испльбовы КOMпаКТ-DиСКД ДЯ OчИСТКЛИH3.
He octabnTc DmKHyIOBepU OTkpIToB B TeueHene IINTeHoro BpeMeHN. 3To npuBeTeK 3aqrpa3HeHHIO JINH3bl.
- Octopoxho: He kacaTecb IINH3bl NaIbcaMn.
OuNCTKa DnCKOB
PnPABnJIbHO
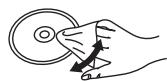
HEINPABINbHO
IpoTpnte BnaKHO TkaHbO, a 3aTeM cyXoJ.
Mepbl npedoctopoXHocTn npn o6paueHn c DnCKOM
- Бернштейпскни Края, чтобы Избжа Тцарин Или OTпechаТКов пальсев НдИСКе, KOTOPьг HeBO3MOЖHOУдДЛNTь.
He npikneBaIte Ha nDCKN 3TNKeTK nHn HAKJeKn. - He nonbytecb a3p030JMy dIy yCTpaHeHn HaIInce, 6eH3HOM, pactBOpTeJIem, KIJKOCTaMn dIy yCTpaHeHn cTaTtueckoro 3IeKTPnueeCTBa IIN KaKIMN-IOBO dpYrIMn pactBOpTeJIaMn.
He nCnoJIb3yIe yka3aHHbIe HnKe DnCKn.
ДиСКИ,наКOTOBbIX OCTancяКЛeN OT yДаJIeHHbIX HAKJIeEKNJIN 3TNIKETOK (ДИССКИ N3 ПОКaТА N T.Д.).
—CnIbHO nOKopo6JIeHHbIe IINI NOnOMaHHbIe IuCKN.
ДиСКН He npaBnIbHон ФорMbI, HanpIMeP, B Форme cepdua.
Cxembl IOdcoeINHeHnA
IpimueaHnOTHOCHTeJIbHOINHaMnKOB
3TNINHAMMnH He OCHAeHbMaHTNTHbIM 3KpaHIpOBaHMe. He pacnonarate INx BO3NE TeneBnOpa, nepcoHaNBHO KOMNbKoTepea INp dpynIX yCTPOCTB, paOToa KOTopbIX MOKeT NERKO yUxDUnTcBc OTR BO3DeJTBm MaHTNHO INyUeHN.
HC55 ① HaxmMaTe KhONKy [SOUND], YTO6bI BbIbpaTb "INPUT LEVEL".
② Haxmnte [▲, ], qTo6bI Bbl6paTb “HIGH” nJIH "NORMAL".
HaximaiTe KhoIky [INPUT LEVEL], YTO6bI BbI6paTb "HIGH" nII "NORMAL".
BbIKNIOUHTE 3KbaIaI3ep IINy yMeHbIHTe rPOMKOTb 3Byka HbHEUMEB YTObIy MeHbIHTb yOpeHb BXoHOrO CnHgana. BcKcOKYypoBeHb BXoDHorO CnHgana pnpBeT K NsKaXeHNO 3Byka.
-Подрбье CBeDEHnCm.ВИнструкип NO 3KcNpyaTauNi COOTBETCTBYUOe yCTPOICTBa.
- KaBeJIn uYcTpoiCTBa He BxOJaT B KOMnJIeKt NIOCTaBKn.
Подкlioчени USB-устpoиства (He BXoДNTВ KOMПлжт)
① Ymehbinte rpoMkoCTb 3Byka n BCTaBbTe wTekep USB-ycTpoiCTBa A B USB-nopt D.
② HaxinMaTe KhONky [EXT-IN, RADIO], YTo6bl BbIbpaTb "USB", a 3aTeM NaHnTE BOCnpOn3BedeHne. (⇒ 70)
Kpenenne yctpoiCTBa Ha cTeHy (donoHnTeIbHo)
MoNTaXHbIe npHaJneXHOCTN
PpHaJdIeXHOCHTn, BXOJaIe N E KOMnJIeKT
1 BnHT 3aunTHoro depeKaTeTBA (cepe6pcTbI)
2 BnHTa 3aunTHoro depeKxateJg (YeepHbI)
- 16e30nachbIepeXaTeJIb ( 58)
23aunTHbIX DepeXaTeJIa ( 58)
2KpOHTeHa HacteHHoro KpeJIeHnA
23aHnX npoknaKn
OoctynHbIe B npoJaXe KOMNoHeHTbI (He BXoJrT B KOMJIeKT NocTaBKn)
- 4 KpeπeKbIX BnHTa ДЯ CTENHOrO KoPOnHTeNHa F
- 1 BИNT 3auntHOrO DepeKaTeNa 6
XpaHnTe KpOHTeHbI dIa MOtTaXa Ha cTeHy B HeIOCTynhIx dIa detei MeCTax BO n36exAHne npOrnaTbIBAHn.
XpAHnTe 3aJHnE pOPOJAKIN B HeOCTyINOM DnAteIeMce BO m36ExKAHne PnOrnATbBAHNs.
XpAHNTe BnHTbI B HeOCTyNHOM DnI DeTe MCeTe BO I36ExAHane INporATbIBAHN.
XpaHnTe 3aunTHbI depKataJIb B HeIOCTyINOM dIra deteMeCe BO n36ekAHne npOrnaTbIbaHH.

MepbI ppeOCTOPOXHOCTHI
PENyPEXDEHNE!
- MoNTax I demoHTax 3TOI yCTpoICTBa DOJNXeH OcyuSectBnTbCt ToIbKO KBAHINΦU\POBAHbIM CTPOITeNbIM NOpRdYnKOM. - HenpABInhBm MOHTAX MOKeT pINBeCTN K NaDEHNIO yCTpoICTBa IN HAHECNHO IM TPABM.
Bo n36ekaHne TpaBM ycTpoiCtBO DoJIxHO 6bIb HadeJHo npKpennHe K cTeHe cornaHo IHcTpykUmaM IO MOHTaxy. - He yctahabnblaite yctpOJIcTBo B mectax, KOTOpbHe HE CMOyT BbIePdXbT bero BC. - Ecnm MOtAIXhBle DeaTIH NHeOCTaTOHNO PnoHbI, yCTpOJIcTBo MOKET YnaCTb NHaECTN TbpMV.
- PnIMeHHTb TOnbKo PrnBeHeDeHbte B INCTpyKUHN MToTobMoHTaXa. -B nptOBHOM cIyue yCTpoIcTB OMeKt yIaCt b N IOnyUHTb NOpeKExHnA/INn HAnEChTu TpaMbI.
- MoTHpyuTe yctpoIeTBO ToJIbKO Ha BepTmKanJIbHbIX CTeHax. -B npOtINBOM cIyae YcTOpIeTBO MOKeY uNaCTb H nOnyUHTb NOpeXeNDN NnNn HAnEChTI TPABMsI.
- Pn onpehenen Hecuey cnoocbHCTy yHTbIaBe Te K03ΦHcHnENT 6e3oNaCHOCTN. - Heoctatoohra Hecuay cnoocbHCTb npBBeTe K naedHyo yctpoiCTBa n HAoeCEHHIO TpABM.
CTeHa,KKOTOPOKPENITCyaCTpoIcTBO,DOLIXHb6bITbCNOC6BaBbIepKaTb33KHaBnT. HeNodatoTuHae HecuJzAcnocO6HoCTb CTen npBedeT K naJeHHoYcTOpOCTBa Upe3 onpeDeHHeh bcpok.
He pa36npaTb Hne H3MeHraTb KPOHHTeHn DnA MOHTaHa HA cTeHy. B npOTHBOM Cnyae yCtpoIcTB Oyadet NOnyUHT nobpeXdHm WmNn HaHecet TpaBMbI.
BHIMAHHE!
He mOHTnpyIte 3TO yCTpoIcTBo BO BnaxhBx IIN IIbIbHbIX MecTAX, a TAKKBE MecTAX, rJe HA yCTpoIcTBo MOrY IONaIaTb paCbIeHHbIe B BO3dUyX JINbI IIN IAP, a TAKKBE IOK OKnDInuOnHePAmN BO3dUyX, rJe H aYCTpoIcTBo MoKET KanaTb BOda. -3TO MOKET OTPrCuATEbIHO NOBIIaTb H a YCTpoIcTBo IN pINbEcTI K NOkApY IIN NopApaKeHIO 3NeKtPTOKOM.
- 06ecnebyte doctatochnyb3a3op6o0ee 30 cm nad ochoBbIM 6nokom yctpoiCTBa n no 10 cm cneBa n cnpBa. OcTabte CBO6OHyb m npocTpaHCTBO MEXdy CTeHOH n 3aJeH CTeKoY cTPOICTBA. - BnOKIOBAAHE BEHTINJLAQIOHHbX OTBepCTn Ha rnaBHom 6noke YcTPOICTBa MOKET pINBECTN K NOkApy.
- Mcnon3yne Dn MOHTaKToIbKO yka3AHbIe KOMnoHEHbI. -B npTbHMcI cyuae rnaBbI bIOk cTOpOCTBa MoKet ynactb I n OJnuHTb NOBpeXdEHH W/nnN HHeCTn TpaBMt.
MeDONYCKAITE KOHTAKA MOHTAXHBX BINTHOB INI HUNYPA 3JNEKTPONTAHNC MeTALNUECKMNIEMETAMH BYHTPNCTEHBI BO BPEMMOHTAKA. -B NPTOBHM CNYaue BO3MOXHO NOPAKHEJI 3JNEKTPOTOKOM.
- DEMOHTHpyraBbHbIbNOK yCTPOcTbA, He 3a6yDte BbHyTb N3 CTHe MoHTaxHbIe BNHTbl. -B npOTnBOM cNyae IIOJIO MOrTy IIOyUHTb TpaBMy o6 octabuimeCB a CTeHE MOHTaxHbIe BNHTbl.
-ДябezонachиэкспунациустанавлваiteустpoctBOHa takоь bVcote,haKotopoMoxHOBdETUSB-noptnKhONKmynpabaleHnA 一KcnpaatauayycpoTCTBAHnepaHbHOMnoLOKeHnMOKet npRBeCTN K erO naDeHnO NOBpeXeHnIOuNIIHnHaHeCEHnTOpABM.
Приимechanical OTHOCHTeNb MOrTaXa
Ipeed MoHTaxOM npOHTaTe pa3dEnbI "Mepbl npedeoctopoxKHOCTN I N WHTpykUNn MOHTaxy Ha cTeHy", YTO6bl BbINONHtB MoTAX npaBILbHo.
Дя ONТIMальбОН пОн3ВODиTeььHOCTN BO n36eЖане B03MOxHbIX npOБлЕн He yCtahAиBnBaIte 3TO yCtpoIcTBO:
- HrIe, KpOME BepTnKaJIbHbIX CTeH;
-Bo3Je pa36pb3rNaBateJI nn DaTnuKa; - BO3JIe JINHIN BbICOKO HAnpJKeHn IJN NCTOCHNKOB 3HeprnI;
- BO3JIe HArpeBaTeIbHbIx yCTpoIcTB;
B MeCTax, Ie yCTpoIcTBO NOBepraeTcB Nbpaunm nn yDapam; - BO3JIE ICTOUYIKOB MArTHIHorO I3nyeHnI, TENIIa, npA, paCnblJeHNbIX JXKOPB U T.Д.;
B MeCTax, Tze Bo3MOXHO NOpaDaHne KaPeIb BOdBi (HaNPIMep, NOD KOHNIOHepOM BO3dyxa).
He yctahanaBnBaIte 3TO yCTPOBJCTBO nOJNTONOCHbIMn lamnAMn (hainpMOp, ToyeChbIMn, ranFOEHObIMn uT. d.).
-B npotnbHOM cnyae moKet BO3NHKnHyTb deOpmaunia KpOyca nIIN dpyrne NOBpeXDeHnA, Bb3BaHHbE BbICOKo TEMpepaTyPOi.
IcnonJIb3yIte MeTOD yCTaHOBKIN, KOTOpB IIOxOAnIT DnA CTrpyKTypbl MATEpHNA CTBeH.
IcnoJIb3yIe MArKoe OeJIo IIN KyCOK TKAHN BO I36BeHAne NOBpeXdEHN I3DeIIn NIN NOnA BO BPEM MoTtAXa.
-ПиЗЗТЯгИВАнИ ВИNTОВ He OCTaBЛЯte Ix 3aTЯHyтБIMn He Do KOHua n He nepetraNbaIte.
- 06ecneu7e 6e3oNaChyio pa6ooyio 3ohy i co6IIOaJTe texHnky 6e3oNaChOCTn npN MOHTaxe.
Kompana Panaonic He Hecet OTbCTBENHOCTNa CNYaHbIe INn HnepMaIbe NpOBxqEnH, KOtOpBe IPONCoRD BCNeDCTBHe HnpeBaINbHOrO MOHTaKa INn 3KcNJIyatauIN.
HaDeXHo yCTaHOBnTe yCTpOJCTBO Ha KPOHHTeHbI dIa MoHTaxa Ha CTehy.
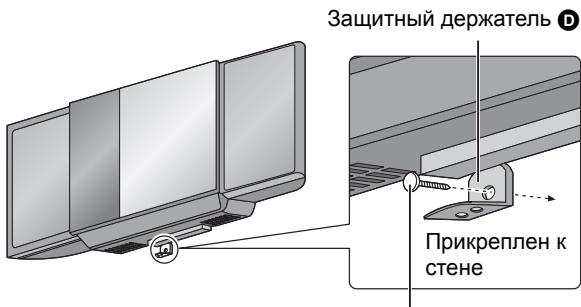
BnHT 3aunTHoro DepeKataTeNa
IoproToBka K nCIOJIb3OBAHnIO
HakatneM KhoNk [B] BkIIOHTe yCTpoIcTBO.
OTKpbBaHne cDvXHOJ DBepcbl
Дяопераци с дисамн
EcnCdBnKnaIbepa3akpbIta,HaxMnte [CD ],YTO6blOTKpbITb ee.
Для onepaцис iPod/Phone
EcnCdBnKnaIbepa3akpbIta,HaxMnte [iPod ],YTO6blOTkpItb ee.
3aKpbBaHne CdBHXHOI DBepcbl
Повторно нахмпт e [CD ] nii [iPod ]
He noHnOcHTe naIbIyK CdBVHXHOJDbepue, KOrHa OHa OTkpBIAeTcN IIN 3aKpbBaTeCt, YTObI H36EkaTb BO3MOXhBIX NERKNX NOBPEKDeHNI.

Iocne BbInOpHeHnA DeiCTBn 1-3 B paZdene "BaOBAaФyHKuN BOCPOn3BeDeHn"
1 HaKImaTe KHONky [PLAY MENU], YTo6bI Bbl6paTb "PLAY MODE".
2 HaxMMTe [<, >], yTo6bI BbIbpaTb yKa3aHHbI HNxKe peXKIM, a 3aTEM HaxMMTe [OK].
OrpaHnueHn nCpOJb3ObaHn MP3
3To yctpoiCTBO NOIdepjxNBAET MHOROeAChBle 3aHNC; B 3TOM cIyae do hauana BOCpOIN3BeDHeN IPOXoDIT 60JIbWe BPEMeHn.
JaHHOe YCTPOBCTBOHe BOCPON3BODIT PaJIbI, CO3aHnHbE C NOMOcIbIO nAKETOH 3ANHC.
- Ecnn Ha DnCKe cOepKxTcKa KФaHbI MP3, TAK n o6bUHbIe ayuDnAHHbe (ΦoPMat CD-DA), yCTPOCTBO BOCPOn3BODHT qaHbls 3aNtCaHHBe HbYTpReHHe uactn DaNcKa. Ecnn DnCK coepKNT Ka MP3, TAK n dpyrTne Tnbly ayuDnAHHbx (HanpIMep, WMA nnWAV), yCTPOCTBO BOCPOn3BODHT ToJbKO qaHbl MP3.
B 3aBcIMNOCtN OT CnOc6a CoaIaHna FaiIOB MP3 OH MoryT BocPOn3BOITbc H E TOm POpJKe, B KOTOpbIM pPoHymeBaHbI, ININ HE BocPOn3BOITbc BOo6Be.
Операци с радно
Руная有很大тояк.
1 HaxmajTe KhONky [EXT-IN, RADIO], YTo6bI Bbl6paTb "FM" nIn "AM".
2 HaxmajTe [A] nI [▶], yTo6bI Bbl6paTb YactOTy HxHOn CTaHcun.
- "ST" OTObpaKaaTcB BO BpEma TpeeOTpaHcJIaCnB Dnana3OHe FM.
-Дя abTomatUnecko HacTPOkN HaxMITE n ydepxBaIte [←]иПn [▶], noka Yactota He Nauchet 6bICTpo MEHЯТьСЯ.
-ДЯ OTMeHbI ABOTMaTHUeCKOHaCTpoiKN eIe pa3 HAKMNTe KHOKNy [A] nIIN [B].
-ABTOMaTnuecka HAcTpoiKa MoKeT He pa6oTaB B 3OHAX CInbHbIX NOMEx.
UnyucheHne KaueCTBa 3Byka B Dnana3OHe FM
① Д��а Вьбoga "FM MODE" ВВремприема пereдач Вдиапазоне FM нахмITE [RADIO MENU].
② HaxmTe KhoNky [<, ], yTo6bI BbIbpaTb "MONO", a 3aTeM HaxmTe [OK].
- Bb6epnte“STEREO"B DeiCTBn ②,YTObI BepHyTbcBpeXIM CtepeoTpaHcPraun.
- “MONO”OTMeHReTc PnI N3MeHEnN YactOTbl.
UnyucheHne KaueCTBa 3Byka B dnaanaOHe AM
IoproTOBka K nCNoJb3OBAHnIO
HaximaiTe KhoNkY [EXT-IN, RADIO], YTO6bI bVb6paTb "FM" mIn "AM".
■ ABTOMaTnuecka IpeDvBapnteJbHa NactpoiKa
① Hαχmnte [OK], Κτόbì nepekJIIOUHTcRA MεχДу γαctOTOI “LOWEST” n “CURRENT”.
② Hαχmnte [AUTO PRESET].
“PGM”HaunHaeT MnraTb; npneMHNK HaunHaeT npedBaPntbHyHO HacrpoiKy Bcex CTaHcI, KOtOpBle MOKeT pINHrTb, COxpanraN X B KaHeCTBe KaHaoB y bblauoem nopraKe.
5 Haxmnte pbyar nepeknouaTeJI CTbIKOBKn Ha3aD, NOKa OH He BCTaHET Ha MecTO CO UeJYKOM.
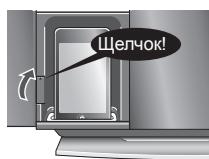
6 3aKpOJIe CdBnXHyIO IbEPu. ( 63)
OTKJIUOHeHne iPod/iPhone
① Повториные CTBWA 1 n 3 (⇒ Виш).
②ДЯТОТКЛЮЧЕНИ ПСОТTO BБТЯНTE iPod/iPhone, coхсаня ровhoe пложени.
③ TOBTOPTMe DeIeCTBn4 5 n 6 (⇒ BbIe).

- Ecnn He haknIOHnTb DOK-CTaHcIIO iPod/Phone BO BpEma NOkJIHOeHnA INJN OTKJIIOHeHnA iPod/Phone, OHa MOKeT nobpeHt pb3em.
- Пи И снпьзовани щадаптора дok-stаци убдnteь,чTO OH COBMECTIM C Вашил iPod/iPhone.
- Пи поукné щадаптора дok-stаци,проконсльтupyнтсь у св氧ero
Дилега iPod/iPhone.
-пелег поклioунем сил OTКIOUCHyEM iPod/iPhone ymehbinte rpoMKoctb 3Byka Ha rnaBHom 6nOKe yctPoHCTBa Do MHHMaJIbHOrO ypoBHr.
Haxmnte [iPod] (HC55: [®, iPod]) HeckoJIbKO pa3, YTo6bl Bbl6paTb "IPOD".
Ioprotobka K nCIOJIb3ObaHnIO
CoBmecTmblcMoJeIiPod/iPhone (no coCToHnIO Ha RaHBapb 2011 r.)
4To Takoe Bluetooth?
TexhONorIa Bluetooth®no3B0JareT yCTaHaBnBaTaB 6ecnpoBOAnHyO CB83c DpyrIM 3NeKToPOnHHbIM yCTpoiCTBOM.
IcnoJb3yembldHana3OH yactOTbl
B yctpoiCTBe IcNoIb3yETcI dIanaIoh YactOToI b2,4 TgU, Ho 3a YactOta TaIOKe MocKet IcNoIb3oBAtcHa nDpyHx YcTPOiCTBax. Bo N36eXaHMe NOMEx npn OIOBpeMeHHo paOte HeckOnklnx B6ecnpoBodhix YcTPOiCTB CO6JIHOaTe Yka3aHHle HIXe MePb IpneOCTpOxHOctHt.
Ceptnuikauza daHHoro ycTpoiCTBa
DaHHeO yctpOietBO COOTBCTBYET ORaHmUeHnA M TaCTOTbI N ceTneMnpoBaHO CORNACHO ZAKOHMO O qactOTax, NO3OMy CnEuaJIbHopepaTeHeHNe H 6ecPPOBDoNHyC BcAry He TpeByTC.
Tem He MeHHe, B HEKOTOpbIX CTpaHAX 3aKOHOM MOKeT 6bITb 3aIpeUeHO cnDeuUoo:
Pa3bpaHne yCTpoNCTBa N BHeceHne B Hero n3MeHeHn.
OrpaHnueHnIcNoJIb3OBAHnI
He rapaHTnpuyTc8 beCnpOBoNHa nepeDaay aanHbix n/Inn cnpObn30BaHne co BcEMn yctpoCTbAMn, OcnaeHHbIMn Bluetooth®.
K COBMECTHMbIM MOBILbHM TeLEFOHAM, KOtOpBie PnIroDhbI DnA 6ecnpoBDHOH nepedan dAnhbs, OTHOCrTcTeBOHcO, COOBETCTBYUOe CTaHApTAM KOMNAHN Bluetooth SIG. OncJaO, ECNI MOBILbHb Tbe TEPOH ONOTMM3HPOBAH naincoBTCTBnCTAHdAPThbM CNEUΦNkauzHM, NEKOTOpBe FyHKuM MoryT paboTaB. DaxBe B 30m CIyae, B 3ABINMOCTOn tCneUΦNkauM N HAcTPOEe MOBILbHoro TEFOHCA, CB3b MoKTe He 6bl yCTaHOBHeA; He rapAHTpyETc TaKke NOpepKa ONpeDEHbIX MEOTOB APOBtB, INHINKAUIn IINPEXMOB 3KcNPTaATaun.
- DānHoe yctpoiCTBO noDedepXnBaET ΦyHKuIN 6e3oNaChOCTn Bluetooth°, Ondako, B 3aBcIMNOCtN To pa60yeI cpebl uHIn npametPOB, 3ta 6e3oNaChOCTb MOKet He 6b1b DoCTaTOUHO. Co6bJaTe OTOpOxHocTb Pnip 6e3npOBDoHN nepeade DaHbIX.
YuHTHe, YTO KOMaHAnHa Panasonic He CETE HIKAKO OTBETCBHEHOCTNa 3a BO3MOxHYO yTeKyD aanDaHbIX u/INn HOpFoMaN Bu BPEM 6ecnpBOaHNOpeHaNDA.
3oha DeiCTBnA
NcnoIb3yIte 3to yctpoICTBO HA pacCTOHHM 10 M,6e3 npenTCTBm. 3OHa deIcTBA MOKOT EMeHsUaTBCB 3aBICIMCIOCT ON HAMuY IpePITCTBm,Co3dAOLuX NOMEXH YcTOPTCB, pncSyCTBnDpyrNx IIODe B NOMESEHIN INO OCOBEHNHOET KOHCTpykUH 3dAHN.YtHTte, Yo kua3aHAA 3OHa DeIcTBA He rapAHpYTeC.
Bo3dienCTBne dpynx ycTroponCTB
EcnB HnncpeDCTBeHHo 6bn30CTn OT daHnHO rYCTPOIcTBA paCnIOXeHbI dpyIe npN6Opbl, BO3MOKbHb HApUSeHnra Pa6Obl TaanHO rYCTPOIcTBA nI IN dpyIe IPOBREHnne HEnCnPABHO np6Obl, HanpIMep, ppeBbNcTOe BOCpnON3BeHnne aydno n T. D. NtOmy Bo n36ExaHne nomex BO BpEma pa6Obl TeKoMeHNyETc YCTaHABINbATb 3TO yCTPOIcTBO Ha DOCTaTOHOM pacctOAHmOT yKa3aHHbIX HnKe np6OpOB u CInCTem.
MnKpOBoNHOBa NcMb/6ecnpoBOnHna Cetb LAN/3aNeKtPoHnbye UcTpoCTBa/aayDno- H bVideOeUcTpoCTBa/OfncHaTaeTexHnka annapaTb/uIcΦpOBeIbe 6ecnpoBOHnbTepeOhoB/daKcbu T. d.
B cnyae haoxqdeHn B HENOCpeCTBeHHoB 6m3OCTOn OT radIOCTAHm, KOTOPa nepeadaet CInbHb CInHAp, BO3MOXhbl HapUeHnra paOToI yctpoiCTBa.
- PnI hCNoNtB0OBaHIM nOpTATNBHOrO KOMNbHoTepa C 6ecnPobODhIM nepeDaTuKoM LAN He nCnoNt3yIte 6ecnPobODhyo cTe b LAN ODHOBPeMeHHO C DAHHbIM yCTPOYCTOBm.
EcnnIy mPnOIOJIaKe BbIOINbC TaJaKe npn HAXOJcHIMN yCTpoiCTBa Ha pacctoHmN 60one 5 M ot 6ecnpoBOHOro yCTpoiCTBa LAN, BbKnIOUHTe 6ecnpoBOHoe yCTpoiCTBo LAN.
OrpaHnueHnIcNoJIb3OBAHnI NO Ha3NaYeHnIO
Данhoe устpoctBO npedha3aueho Дя obiyHOrO obse HcnoIb3oBaHn. 3TO ystpoCTBO He npedha3aueho DЯ 3KcIIpyatauN B 3Ohax C nobblIeHHbIMN Tpe6oBaHnMn K 6e3oNaChocTn* INI ONaChbIX 3Ohax. He nCNoIb3yIte 3TO ystpoCTBO B 3Tnx 3OHaX INI B COOTBetCTByUOxN CEJAX.
PnBBeEHbIe HNKe pImEpbI uNIOCTpnpyHT NOTpe6HOCTb B KpaHneOCTOPKNOCT; HApUeHne 3TO TpeBOABHIM MOKET HENOCpeCTBEHHo PnBBeCTN K CMEPTenBOMHy NCxOyI NIN TReJEBIM TEeCHBM NOPBExDEHHM. HanPnEMe, ATOMHAR 3HEPRTNKA I KOHTPOJIb AOTMHBX PEAKLIIN, ABOTMATN3IPOBaHHI KOHTPOJIb IeTATENBtBx annapatOB, DNCNETpErn3aUNB O3UdYHOrO COOBUHIN, KOHTPOJIb NEPEMeueHHI TRXeBJx rpy30BbIX CNTTEM, KOHTPOJIc CTTEM Jm3HeoBecNeHEnu IN NOKCycCTBEHHx opraHOB, KOHTPOJIc CNTTEM BOOpXeHHN u/In 3anyCa Paket n T. n.
Понарhoe coeДинене сnomоьу Bluetooth®
Iodrotobka K nCNoJIb3OBAHnIO
ObeHnHe yCTpoiCtBO Bluetooth B npay c3TmUyCTPOIcTBOM, yTObI CO3aTaB ayDIOOCB3b.
1 HaxmTe [3, iPod] HeckoIbko pa3, yTo6bl Bbl6paTb "BLUETOOTH".
ObeHnHe yCtpoCTBO Bluetooth B npay C3TmU yCtpoCTBOM, yTObI CO3aTb ayDIOCB83b.
1 HaXMMTe [3, iPod] HeCKOJIbKO pa3, YTO6bl Bbl6paTb "BLUETOOTH".
2 Ha yctpojctbe c Bluetooth: Bb6epnTe daHnoe ycTpojCTBO (SC-HC55) B 3kpaHe hAcTpojKn fynKcnni Bluetooth dny BblOpJIHeHna CoeINHeHnI.
3 Ha yctpoiCTBe c Bluetooth®: BkHouHTe BocnpOn3BedeHne My3bIkaJIbHOro nCTOuHnKa.
- Ecnu yctpoCTBO NODKIOUeHO, My3bIka 6ydet CbIHa Ha daHHOM annapate.
- Пин налчим подклоченя CBETNTСИ ИДИКАТОР "Bluetooth®".
B cnyuae heo6xOIMMocTn 6paTntecb K pykoBOcTBy noJIb3OBaTeJy yctpoCTBa C Bluetooth®.
4 C NOMOUIIyJIbTa IINCTAHUOHHO ynpaBHeHn TaKKe MOXHO BbINOHNrYyka3aHHbIe HNKe DeIcTBnNo ynpaBHeHIO.
- YctpoiCTBO He pearnpye Ta HaxaTnKHOIOK.
- Huyxho ydaHnB n c6pocnTb coedePKHMoe naMRTN.
1 OTKJIOUHTe 5Hyp 3JIeKTPoNTaHn. (IpoOxDInTe He MeHee 3-x MNHyT, npexJe Yem IpeeITK BbINOJHeHnO DeICTBn2).
2 Haxab ydepxnBa KhoNky [O/I] Ha rIaBHOM 6JIOKe ycTpoiCTBa, CHOBA IoKJIIOHTe WHyp 3JIeKTPoPiTaHn.
iPod/iPhone He BKJIIOuaeTcra.
He cpa6aTbIbAeT KhONka [iPod MENU].
- PπeXdJe cHem nOaIKnIHOaTb iPD/iPhone K yCTpOiCTBy, npOBepbTe, He pa3pJxKHe IIN ero aKKyMnyTOp.
- Праздуем полкючатb iPod/iPhone К дok-stанци, ВькючтЕ данhoe устюгИ и iPod/iPhone.ВькючтЕ 3лжКТРОПNTAHNE и ВьберпTo NOxOДЯцIN NCTOCHNK.
I3 DnHaMnKOB He BbIBODNTc3BYK.
- iPod/iPhone HenpabnIbHo NOdkJIOueH K DOK-CTAHuN. BbIKIOUHTe iPod/iPhone n CHIMITE erO C DOK-CTAHuN. CHOBA yCTaHOBHTe erO, a 3aTeM BKIOHTe.
- Y6eIntecb, yTo Ha iPod/iPhone DeiCTBnTeIbHO BOCPON3BOINTcA COpeKIMoe.
- OTPerynpyTe rpoMkoCTb.
NCKaKExHHbI NII CNIIJKOM THXN 3ByK.
- Ybendtecb, yToФункия 3KbanaI3epa Ha iPod/iPhone BbIKJIOUeHa.
UnpaBHeHne iPod/iPhone c npIbTa nCTaHcNoHHoro UnpaBHeHn IIN rIaNbHOrO 6JIOka yCTpoiCTBa HeBO3MOxHO.
- Y6eIntecb, yTo iPod/iPhone npaBnIbHO BCTaBHeN B DOK-CTaHcIIO.
-Поверъп подклоченke КдOK-stанци И убдnteь,чTO iPod/iPhone BbIpaH в КаустBE nICToUHnKa My3blkN ( 66).
iPod/iPhone He 3apjxaeTc.
- PioBoepeTe Bce noKlnuOeHnra ( 59,66)
HC55 Onerpaunc Bluetooth®
CJIbIiHTcIyMIIINIpepbIBnCTbI 3ByK.
- PacCTOARHnC BcR3n C Bluteoth® npeBbICnIO 10 M. IpeMeCTNTE CBZ3AHHOy yCTPOIcTBO 6JIHXe K TnABHOMY yCTPOIcTBY.
- Mekdy CBa3AHbIM IaABHbIM yCTPOIcTBOM HaxOJATcnpenrTCTBn. Y6epnte nIN oOyIte npenrTCTBn.
- BbIbepnTe“MODE 1”,UTo6blIOBbICNTb KaueCTBO CBA3N ( 69)
- Помени OT мбилььх телегонов.
Oepaunc USB
OTcyTCTByET peakun npn haxatm KhoNk [I].
- OTKJIIOUHTe USB-yCTpoIcTBO, a 3aTeM CHOBa NOdkJIOUHTe erO.
ИпЯ оTKJIIOUHTe ДaHHoe yCTpoIcTBO, a 3aTeM CHOBA BKNIOUHTe erO.
He ydaetc qntaTB USB-ycptoictBO nH erO coepxHMoe.
-Φopmat USB-ycptoiCTBa nIe erO coepxMOro He COBmecTIm C daHHbIM ycptoiCTBOM ( 70)
-ФункцяглавногoUSB-устpoиCTBaДанHorOи3deJIMMOKET He pa60taTb C HeKOTOpbIMN USB-yctpoiCTBaMn.
- USB-ycptpoiCTBa EMKoCTbIO 60nee 8 ΓB MoryT He pa6oTaB B HeKOToPbIX CnyaX.
MeDneHna pa6ota USB-hakonnteJra.
-ДясчтbingафайовблwxиразмеровИNUSB-HocnteNe60blsoemKoCTn Tpe6yetcДNTeHbHOe Bpema.
HnDnkaunocTaBweroCByPemn Bocpon3BeDeHHOTnueTcTOnΦakTnueckoroBpemn Bocpon3BeDeHHa.
- CkOnnpyTe daHbIe Ha npryoe yctpoiCtBO USB nIN cDeNaIte KOnNIO daHbIX N OToFopMaTpyTe yCTpoiCtBO USB.
OTo6paXkaembIe coo6uHnIa
PnObHapyKeHH HeNoJaOK BO BpeMa Nnn 3KcNpyataun yctpoiCTBa Ha erO dncJIee OTo6paXaIOTcYka3aHHbe HNXe COo6eHHa NIn cepBnCHbIe Homepa.
“-·”
- LHyp 3JektpoNTaHnI NOKJIuOeH BnepBbIe, IJIIN HeJaBHNO MeI MeTO nepe6o 3JektpoNTaHnI. YcTaHObTe Bpemr ( 66)
"ADJUST CLOCK
BpemHa Yacax He yCTaHOJIeHO. YcTaHOBInTe COOTBeTCTByIOUee BpemHa Yacax.
"ADJUST TIMER"
Taimep Bocnpoun3BedeHne yctanOBnH. Hactpoite Taimep Bocnpoun3BedeHncoOTBetCTBYUIMO6pa3OM.
"PGM FULL"
- MakcmaJIbHoe KOJIneCTBO 3aInporpaMMIpOBaHHbIX DOPOXKeK -24. IporpaMMIpOBaHne DoONJInHTeJIbHbIX DOPOXKeK HeBO3MOxHO.
"NO PLAY"
BcTaBHeN DnCK CD-ROM, fOpMaT KOtOporo OTnIuHaetcR O T CD-DA nII MP3.Ero BOCPpOn3BeDeHne HeBO3MOxHO.
- Поверпго саджимоe. Можно Воспpon3вогntь Только
файлб Формanta MP3.
- EcIn ImeTcB 60JIe 255 aIb6oMoB nIin nanok (aydno n dpyrHe daHHbe), HeKOTOpbIe paIbn MP3 B 3tNx aIb6oMax MOryT He 6bItb CHTaHbI N BOCnPOn3BeDeHbI. IpeHecnte 3TN My3bKaIbHbIe aIb6oMbI Ha dpyroE USB-yCTpOiCtBO. INJn Je nepeΦopMaTnpuTe USB-yCTpOiCtBO n COxpaHnTE 3TN My3bKaIbHbIe aIb6oMbI, npexJe Yem coXpaHraTb dpyrHe pAnKn, He coDEpXaUne aydno.
"ERROR"
- BbInonHnEeTc HnepaBnIbHaonepaZu. IpnouTaIte HNCTpyKun N NOBTopTe nonblKy.
"F61" unn "F76"
- IMeetc npo6Iema c 3neKtpoNTaHnem. O6paTntecb K dIepey.
- OTKIIOHNTe USB-yCTPOIcTBo. BbIKIOHNTe daHHoe yCTPOIcTBO, a 3aTeM BKIOHNTe erO.
"AUTO OFF"
YCTPOINCTBO He NcIOJIb3OBAJIOCb npIMepHO 30 MmHyT n 6yIe TBbIKJIIOUeHO uepe3 MNHyTu. HaxMMTe JIO6yIO KHOJKy, YTO6bl OTMeHNb 3TO DeIcTBVE.
"ILLEGAL OPEN"
CzBnKna DBePca B HnPaBnIbHOM nOIOKeHH. BbIKIOHTe DaHHe yCTpoIcTBO, a 3aTe M BKIOHTe erO.
"NODEVICE"
- UcTpoIcTbO iPod/Phone nodkJIOUeHO HnepaBnIbHo.
PpOHTaIe INCTpyKUnn N NOBtOpIte nonblTy ( 66). - USB-устюство He подклочeo. Поберьтпдклоченe.
"REMOTE 1"
B Annapat BCTabNeHo yCTpoiCTBO iPod/iPhone, KOTOPoe He ydaetc BOCnpOn3BeCTn ( 66)
HC55 “START ERROR”
- Поберът ePhone/iPod touch. Долоннельная Иформача НхODNTСЯ на Be6-caITe: http://radio.vtuner.com/panasonic/en/
"UNLOCKED"
- Pbyar nepeKIOUaTeIaCTbIKOBKn iPod/iPhone He 3abNOkpOBAH Ha MeCTe. HaxMITE pyar nepeKIOUaTeIaCTbIKOBKn iPod/iPhone Ha3aI, IOKa OH He BCTaHE THa MeCTo CO UeNtKOM ( 66).
HC55 “CANNOT SET”
DAHHbIE OByCnJIteJIe
BbIXoHa nA cpeNHeKBaDpaTnHna MoUHOCTb B
CTepeopexKMe
ΦροHTaJIbHbI KaHaJI (O6a
kaHaJa pa6oTaIOT)
20Вт ha KaHа (6Ω), 1ΚΓι, 10% THD (cymmaHbI KσΦΦnηeHT rapMOHιK)
Cymmapna
cpeHekBaDpaTnHa
MOUHOCTb B CTepeopeXnme
40BT
ДАHHьЕ O ПРИЕМнIKE
IpeDbapnteHnaHaNCTpOka namrtn
30 CTaHcN B DnnaIa3OHe FM
15 CTaHcI B DnAna3OHe AM
YactoTnma MoyJlaun (FM)
YactOTHbI dHaNa3OH
87,50 mΓι - 108,00 mΓι
(50 KU uar)
75Ω(heCmmMeTpnuHbI)
Pa3beMbla aHTehHbI
AMnIyDnaMoDyLya(AM)
YactOTbI dna3OH
522 KΓι - 1629 KΓι
(9KΓUw)
520 KΓι - 1630 KΓι
(10 kTz war)
ДАHHыЕ O ДИСКАX
Bocnpo3BOOIMbI INCK [8cmHJ12cm]
CD, CD-R/RW
(CD-DA, MP3*)
YyBCTBnteIbHbI 3JeMeHT
ДинанВОнны
Mouhoctb Jla3epa
BbIXoHoi ayDnOCHnI (DnCK)
Yncno kaHaIOB
790HM
KJIACC 1, KJIACC 1M
MPEG-1, cnoi3, MPEG-2, cnoi3
FL, FR, 2 kaHaHa
DAHHbIE OДИHAMNKAX
HC55
Tun
2-ПОLOСТА AkCyTчecSа СИСТЕмС 2 ДИнAМИКамИ (PаДиATOP nAccBHorO oxnaxKdENH)
Tolobka(n) rpoMkoROBOpnteIa
Hn3KoUacToTHbIy DnHaMnK 6,5cm KOHyc,Ttπ×1Ha KaHaJ
BbICOKOaCToTHbI
ДиHamNK
Pádnatop naccnbHoro
OxJaXeHnA
UmmpeDanC
1,5cmTun nbe30x1Ha KaHai
8cm×2 Ha KaHaJ
6Ω
HC35
Tun
1-noOchaj akyctuYecka cnCTema c 1DnHaMnKOM (PaNaTOp naccBHO oro oxnaXdEHH)
Tolobka(n) rromkoorOBopnteIa
NonHbI dHaana3OH
6,5cm KOHyc, Tnπ ×1 ha KaHaI
Pañnatap naccNBHoro
OxJaXdHnA
UmmpeandaHc
8cm×2HaKaHaJ
6Ω
HC55 DAHHbIE O Bluetooth®
Cneunfkauncntembl
Bluetooth®
V2.1 + EDR
KnaccnФикадубспpoBODHOrO
60bpyoBAnn
Pndepxmbaemble npoqniln
YactOTbI dnaana3OH
KJacc 2 (2,5 MBT)
A2DP, AVRCP, HFP
2402 mΓu —2480 mΓu
(aanTnBna
ckaUoo6pa3Ha
nepectpoika yacTobl)
10 M 3oHa npraMoI
BVDIMOCTN
(iPhone 4 Ha BbICOTE 1 M B
"MODE 1")
Pa6ooye pacctoHne
DAHHbIE O PA3bEMAX
Pa3bEmДЯHayuHnKOB
Pa3bem
Ctepeo,pa3bem 03,5 MM
AUX (3aDnH)
Ctepeo,pa3bem 03,5 MM
Pa3bem
USB nopT
CTaHdapT USB
USB 2.0 NoIhOscOpocTHO
Iopdepkka fopmaTOB
MP3 (*.mp3)
MeDnaΦaIIOB
3aybaxte, 10BnKOpNCTaHnIyO npIaIpaIaIpa3oI iPod u iPhone moKe BnInHytn Ha kicIb 6e3pOToBOrO 3'EnHaHH.
iPhone, iPod, iPod classic, iPod nano Ta iPod touch ε ToprobIMM Mapkami KomnaiHii Apple Inc., 3apecctpobAHmB CUSA ta ihuixx kpaiahax.
CIOBECNHIO TOBAPNIH 3nak i norotunu Blotho ^電 Bnachicto Bluetooth SIC, Inc., y BCix Bnapdakx Kopnpaia Panasonic Corporation BVOKPNCTOBYe TAK3nak 3a Niueh3iO. IhuI TOBAPHI 3nakTa ToproBi HnabN Hanejatb BIDNOBIHM BnACHIKAM.
Texhonorio KodyBaHnHa 3Byky MPEG Layer-3 oTrpMaHO 3a liueHsieIO BID Fraunhofer IIS ta Thomson.
IdENTphiikauiHe MapkyBaHHB Bnpo6y po3TaioBaHe Ha HmXhOmy 6oqi npictpOIO.
InΦopMaia yOo yTnJIaui B KpaIHax, kI He BXOJaTB B EbponecBkn Co03
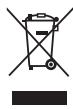
OuHHeHHaNCKiB UO CIIID POBNTI
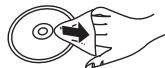
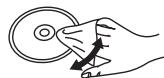
3ABOPOHЯETbC
YnCTbTe ix BONOROIO TKAHHHOIO, a ToDi InpOTpiH hAcyXo.
3aCTepexeHHy ⅢOIO BVKnOpncTaHHn DnCKIB
TpmaTe DNCKn 3a Kpa, uO6 yHnKHyTN HeBMnCHNX NOprnn H a6o BiD6ntkiv naIbCJB Ha DNCKy.
He npinkpinnoiTe do nickiB etnkeTkn afo Hanilkn.
- He BnKOpNCTOByTe IJIy NIIeHHeNpO3NIIOBaU, 6eH3NH, pO3HHKn, peOBoHn IJIy yCyHeHHe CTaTNuHx 3apJiB TOIO.
He BnKOpncTOByTe HAcTyNHi DnCKn.
ДиСКИ,HaЯKnx3aJIINuBcKNeBⅡd3HЯTnxHaKJIeNOKч eTnKeTOK(ДиСКИЗпpoKATyI.T.D.).
-Покороблени abo trichyti dinckn.
-ДиCKn HEnpaBnIbHoI ΦOpMn, HApnKnaI y BnIyIi cepu.
Ppimitkn 0do DnHaMikIB
LJi DNAMIKH e OCHAUHO MarIHTHM EKPAHYBAHNM. He CTABTE IX 6IINa TeneB3Opa, KOMN'OTepa a6o iHUNX npcSTPOIB, HA kI BnINBAIOb marHiTHI nonA.
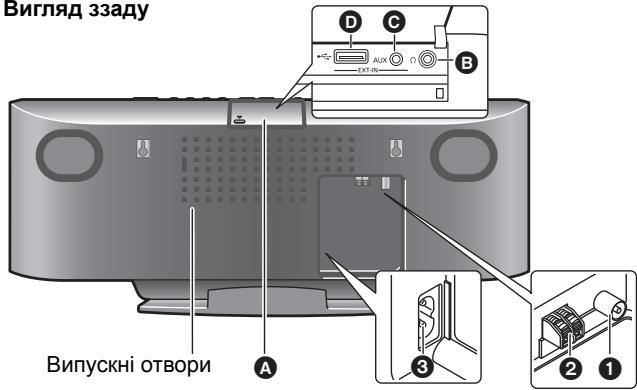
BnIy33aNy
OCHOBHI nIDKIIIOUeHnRA
1ПидкнючehняКIMHaTHOi aHTeHnДIANa3OHy FM.
- PπκπiπiB aHTeHy KJIeKoIO CTpiKoIO Do CTiHKn a60 KOJIoHn B pIoXeHHi, 3a JKOro BOHa 3a3Haε HauMeHux 3aBaI.
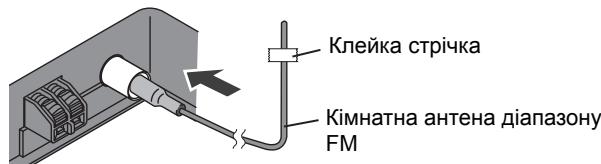
2ПидкючehнpaMKOBoi aHTeHnДiana3OHy AM.
- TpimaiTe uHyp paMKoBoI aHTeHi nOaJI bID iHux dpOTiB iUHypiB.
AIOCTaBte aHTeHy BepTnKaJIbHo, IIOb BOHa BcTaHOBnJaCra Ha OCHOBi 3 KlaUaHHaM.
⑥PamKoBa aHTeHa diIana3OHy AM
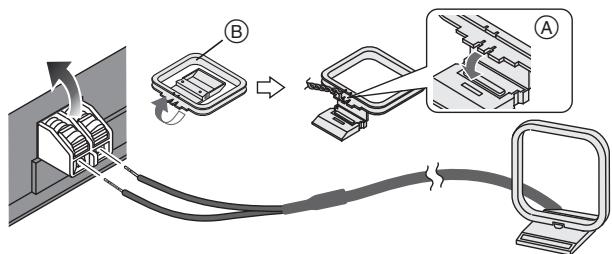
3 Piiknioitb Hyp KInBneHHra 3miHoro cTpyMy.
PiiKlnHcytB shyp kNbJIeHn3MiHHOro cTpym niCnBnBkoHaHH Bcix iHxN PiiKlOyehb.
YbIMKHTb anapatYepe3 DekiIbka cekyHd.
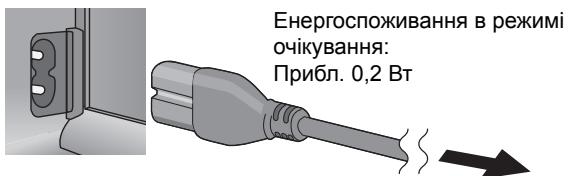
IIO NObyoBOi PO3eTKn 3MiHHoro CTpyM
IodatKobiPiiknHoueHHa
Bikpnite KpnskyEXT-IN AUX/HaByuHnKIB/USB dny iNkIyueHHaBvUHnKiB, npncTroib USB a6o 3OBHIux My3uHnx pncTroib (Hanpknad, MP3-npeepa).
HaTnCHiTb BnCTynaOuy qactHy, 06 BiDkpntu KpnkUy A.
Bvrrn3Bepxy
KpMUKKYEXT-IN AUX/HabyuHmKIB/USB
Bnctyauohuaactna
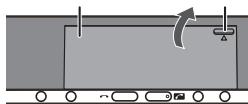
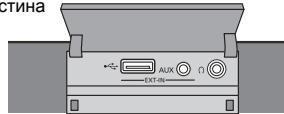
Пдклочь habушнки (He noctaayotbсВ KOMnlekti)
3meHspePBHeB ruyHoCTi Ta niKJIouHITb HabyuHNKn.
TnI uTekepa: 03,5 MM, cTepeo B
0

- Tpmbane npocnybannha noBHy rynHcTb moKe noKoDnTu cnIyX.
- 06aanooBti nooKoJxHIO oprAHIB cnyx, yHnKaIe doBroUacHO npocnyxOByBaHHa. HAdmipHNI TcK 3bky 3 roNoBHOro Tepeohy a6o HabyuHnKiB npn3BouHt bdo BpATn Cnyx.
HC35 HaTncHb [INPUT LEVEL] kIbka pa3iB dIy Bn6opy "HIGH" a6o "NORMAL".
BMMKHTb EkanaI3ep a60 nprrnuyuTb rnuHCTb 208HIJIbOro pnpCTPOU,IO6 3MeHUMTN BxIDHN CnIHAN. BnCOKNI pIBeHb BXIDHOr CnHAny MoKe PpN3BOITN Do cnoTobOPENH 3ByK.
- DeTalbHi BiIDOMOCTI DnB. B nociBnky 3 ekCnnyatauii IHwOro oBnaHaHHa.
- Kaβeni Ta npicTpoI He noctaHIObC B KOMnneKti.
■ПдклочьnpсстриUSB(нocтачаctьсяВ komплектi)
① 3MeHsTe pIbeHb rUyHoCTi Ta BcTaBTe npncTpii USB A y po3'EM USB D.
② HaTnchItb [EXT-IN, RADIO] kInbka pa3iB dIy Bn6opy "USB" i noHITb BiIDTBOpEHN. ( 88)
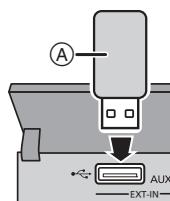
He NidohocBe TaneI Go DeBepur, KOI BOH BI KDbPBAOtBuCBy TaZAKPBNAoBcBc, OOOYHKMNHTO MOKNBNIBX JIEKINTX UYKOxDKeHB.

3aKNTTt 3cBvHIX DeBpI t3 aactocyBaHHMa HnMIpHO CnIN MOKe npNtAeNo noJokKOdXeB.
Cjldkyte 3a Tm, 06b Komnakt-DmK He Bdapmbc8 o6 3cybH dEepa7 npn BmAHNI.
3cybHdBepuTaHe 3akpnoTbCBy, kkuO CTkyBaIbHn BaxInb nepemKaua He nobepTaetbcry BxixHe noJoxehn.
HC55ДатунК BiДКрпTTЯ/3aKрNTTЯ
3a donomoroio ci fyHKuii 3cybHI dBepuraTo MoKHa BiIDkpnaBAtn, He HATNCKaIOUKNKONky. 3cybHI dBepaTa BiIDkpNAIoTBc Ta 3aKpNaIObTcpeMIIeHHm DOLOHi pyKn HaJ daTaNkAMN B BepxHni YactnHi anapaty.
Onepaui3 dNscamn:
Po3TaWyIe DOJIOHO HaI DaTChKOM ⑧ i notim nepemictiB ii HaI DaTChKOM A.
- 3aKpNt3cBHy DBePcTa, po3TaWyIe DONoHO HaDaTChKOM A i NOTiIM NepeMictb II HA dAaTHKOM B.
Onepaui3 iPod/iPhone:
Po3TaWyIe DOJIOHO HaI DaTChKOM A i notim nepemictiB II HaI DaTChKOM B.
- 3aKpNt3cBHy DBePcYTa, po3aWyIe DONoHO HaDaTChKOM B i NOTiIM NepeMICTb II HAD DaTCHKOM A.
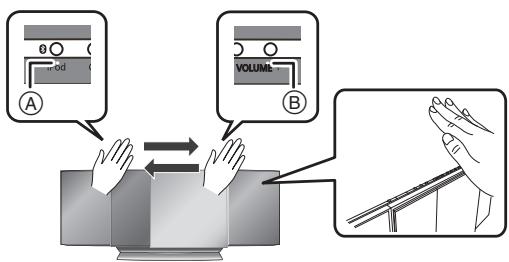
ДяЗмHeHЯHaJaWTyBaHbДaTHyKByBIDkpTTra/3aKpTTra
Uo3miHnTPO3mIP 3OHnAKTNBaui DaTUnKy BiJkpTT/ 3aKpTT, Tpe6a3miHnT NeuTnBicTb UboO DaTUnKy.
HaTnCHiTb [OPEN/CLOSE SENSOR] kiIbka pa3iB ДЯ Вибopy "MODE 1", "MODE 2", "MODE 3" a6o "OFF SENSOR".
Bn6epitbpekm, 0o 3a6e3neue npabnlbHy po60ty.
1 HaTnchItb [EXT-IN, RADIO] kIbka pa3iB dIy Bn6opy "FM" a6o "AM".
2 Hatncihtb [a6o [▶]ДЯ ВибopyчacToTn notpi6HoI ctaHci.
"ST" BiO6paJyETbCra, KOJI npImaeTbCra cTepeMOBHeHHa y dianaoHi FM.
Для abTomatuHoiHaCTpOKN HaTnCHiB i yTpmyTe [▲] a6o [▶], nOKu qactota He noUHe WbNko 3miHOBaTNCJ.
-Ⅲo6 cKacyBaTn aBtOMaTHUHe HAcTpOHOBaHHa,HaTNCHITb [a] a60 [b] 1e pa3.
-AbTomatnHe HactpoOBaHHo ME He IpaIOBaTH, RaIoo E HaDmipHi 3aBaIi.
■Покрашениякosci 3BykyВдIANa30hi FM
① Κιδό συρατη “FM MODE” πί ἀς πρήμαπην ΜΟβλενην B ὅπησαθού Φ ἀντηκίβτόν [RADIO MENU].
② HatnchItb [▲, ]Дя Вибору "MONO" i NOTIM HatnchItb [OK].
B ViBe9iB "STEREO" npn BIKOHAHH KPOKY ②,IO6 NOBepHyTnCdo CTpeOEOMOBHnE.
-MONO"ckacOByEbCp np 3MiHi yactOTn.
■Покрашениякosci三百ув diana30hi AM
① Κύδ συρατη “B.PROOF” πί ἀς πρήμαπην ΜΟβλενην B dianasaθοι ΜΑΜ, ὁτηκιχήβ [RADIO MENU].
② HatnciTb [▲, ]Дя Вибору Настюк Коригувань ровсяу "Beat Proof" ("BP 1" a60 "BP 2") i notim HatnciTb [OK].
LHaHactpoKaCKndaetbcaHa“BP1”,KkuoBnKoHaHi3MiHn(Hanpknad,3MHeHa Yactota).
HanaTyuBaHHa, 36epeXeHi B nam'YrTi
■ ABTomatnue He HaJaTaYBaHHa
① Hataichi [OK], 106 nepeknouhtu chaTOTy mIX "LOWEST" i "CURRENT".
② HaTnCHiItb [AUTO PRESET].
"PGM" nouHaε 6bHMaTn, i THeP noUHaε 3a3dAeridb peεctpyBatn Bcī CTaHci, kKi MOKe npiHrTn, nO KaHαJax y BVCxIDHOMy nopAky.
■PyuHe HanaTyuBaHHa
① Hattschitb [▲] a60 [▶] Дя HabctpoHOBaHHЯ Ha notpiHy cTaHciio.
② Hatnchtb [PROGRAM].
③ Kōnī 6bɪmæe “PGM”, Bùbēpiǐt b KaHàn 3a DòpOMOrOu LüfφρOBnX KHOnOK.
- KaHo Ha KaHAn 3aHOTOByEbCtAHcHJI, To paHIe 3aHOTOBaHa Ha cei KaHAn, cTahJIg Bye BnIaJIeHa.
- Ⅲo63apeectpybatn 6iIbwe cTahui, NOBTOPIb KpOKn 3 ①—③.
Bn6ip 3apeectpoBaHoI cTaHcii
HaTnCHTb [1] a6o [▶]ДлЯ Вибору kaHaIy.
- A60 Bn6epitb kaHaJI, HATNCHyBwIu nUΦpOBI KhoNkI.
Kpok yactotn B pekimi AM
Lcienapat hanaTobAHnPiJ Yac BuroTOBHeHnBpeKmI AM 9Kt, aJe BN MoKeTe 3miHTn Ioro IpnMaHHraPaoJepeDaay, kpi po3HeCehi 3 KpOKOM AM 10 Kt. Lio6 3miHTn Kpok
① HaTnCHiTb [EXT-IN, RADIO] nIЯ BnBöpy "AM".
② HATINCHITb Ta yTpIMyIe [RADIO/EXT-IN] Ha oCHOBHOmy anapati Upe3 DeKiIbKa cekHy dIscnnei 3MiHHTbcia BiIObpaKyaBaTmE nOTOHy mIHImaJIbHy qAcTOTy.
③ Побожу TeутимуВати [RADIO/EXT-IN]Ha ochOBHomy anapati.
KoJIMiHimaJIbHa yactota 3MiHHTbcra, BiDnyctITb KHONKy.
- Ⅲo5 noBepHytnca do noaTkoBOrO kpoKy, nobTopiB kpkn 3 ①—③.
-Писязмин Habтpoи pahiш bctahOBNeHa cactota 6yde ouHsHe.
Ley anapat moke biOobpaKaTn TeKCToBi daHi, kI nepeaIObCnCTeMoIO nepeaui paioHΦopMaui (RDS), kA doctynBa Deeknx Micx.
JaKIO Bn6pAno "FM"
HaTnchItb [DISPLAY] nIa BiOobpaXeHHa TEKCTOBuX daHux.
KoXhoro pa3y npn HataNcKaHH KhoNk:
PS:KoI nporpam,kaBioobpaKaetbcra
PTY: Tn nporpamn
(BiöobpaXeHHaCTOTn)
![PANASONIC SCHC35EP - HaTnchItb [DISPLAY] nIa BiOobpaXeHHa TEKCTOBuX daHux. - 1](/content/2019/08/105229/images/8173252f2e3aa4cb07c141ed02c0d3e4442c03dddce1f0b49cee2b4606e09f11.jpg)
RDS Moxe He BiDObpaKaTncb, JaIIO npnO mOraHm.
PerguioBaHHa 3ByKy
Hactynhi 3bYkoBI eΦeKTH MoKyTB 6yTn DoaHi Do BuxiDHoro aydiocnHaJy.
| П一步一步 вд. "Пелегд. "Пелегд. "Пелегд. "Пелегд. "Пелегд. "Пелегд. "Пелегд. "Пелегд. "Пелегд. "Пелегд. "Пелегд. "Пелегд. "Пелегд. "Пелегд. "Пелегд. "Пелегд. "Пелегд. " Пелегд. "Пелегд. "Пелегд. "Пелегд. "Пелегд. "Пелегд. "Пелегд. "Пелегд. "Пелегд. "Пелегд. "Пелегд. "Пелегд. "Пелегд. "Пелегд. "Пелегд. "Пелегд. "Пелегд. "HEAVY", "SOFT", "CLEAR", "VOCAL" a60 "FLAT". | |
| Ниьк iabo Високi ЧастOTи | ①Наточь [SOUND] кільka pa3ib Дял Bибору "BASS" a60 "TREBLE". ②Наточь [4, ]Дяр reуловань piВя (ВID - 4do +4). |
| Оточюн Звук | ①Наточь [SOUND] кільka pa3ib, сцоб Вибору "SURROUND". ②Наточь [4, ]Дял Bибору "ON SURROUND". •Дяск acyвань оточюго 3bykU Виберіть "OFF SURROUND" пid час виковань крokу ②. •Як soo zabadi рпprйомi FM stereо 3бльшються, скасут eфekt оточюго 3bykU. |
| Глбokи Бас | Наточь [D.BASS] пid час вidтворенья Дял Вибору "ON D.BASS" a60 "OFF D.BASS". |
BCTaBnHn/BNdaJIeHn iPod/ iPhone
BCTablaHHn iPod/iPhone
1 BiKpnIte 3cYbHI dBepaTa. ( 81)
2 BCTaBTe BiIDNoBiDnHm aIaIaTep DOK-CTaHcii (He NoctaChaETbCBy KOMJIeKti) dJa iPod/iPhone.
Cnouatky BCtABTe OdHb6iK aanTepa DOK-CTAHuIi iPod/ iPhone 3aTnCKaUAMN Do ce6e, a NotIM HATnCHITb Ha npOTINEXKnB 6iK, 0o6 BIn CTab Ha Mlce 3 KlaaHaHnM.
A 3aTnckaui
⑥ AanTepeK-CTaHcii
Baxijb nepemika ctNkyBaHHia iPod/ iPhone
D Po3EM
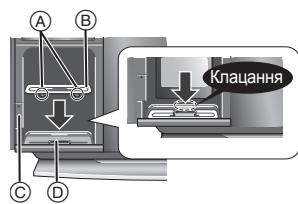
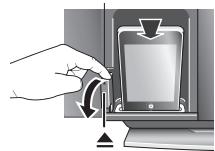
3 HaTnchIb [A], 0o6 po36JIOkyBaTu DOK-CTaHciIO iPod/iPhone, Ta notarHITb BaxiJeCb nepemkaua CTKyBaHHra, 0o6 HaxNJNTu DOK-CTaHciIO iPod/iPhone.
4 HadiiHOn iNkIouItb iPod/iPhone (He nocTaUaTbcra B KOMJIneKTI).
- 06ob'raKoBO BnMItb iPod/iPhone i3 qoxJa.
5 HaTnchItb Baxiineupe nepemkaua CTkyBaHHHa3aI, DOKN BiH He CtaHe Ha Micue i3 KnaaAHm.
6 3aKpInTe 3cyBHi DBepuTa. ( 81)
■ BvdaJIeHnI iPod/iPhone
① NIOBTOPIb KPOKn 1 i 3 (⇒ Bnue).
② Дя Видалени iPod/iPhone дocTaTHbO myo npocTo BNTaHHTN.
③ NobToPiB KpOkn 5 i 6 (⇒ Bnue).
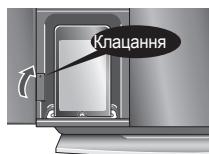

- KaioDok-ctaHuiO iPod/iPhone He haxnnti ni ndac niknoeHHa 60 biKIOHcHHe iPod/iPhone,ue moke np3BecTn do nowkoJKeHH po3'EMy.
- Пеконайтесь, сцадпетер дok-stанчсусmicн 3 bawim iPod/iPhone. Кунуочи дok-адпетер, пороксунытунтесь уCBORо дinepa iPod/iPhone.
3MENHTe rYHnicb cOBOHORo 6IOnKa o MIHNMy, nepH W HIK NiDknOHTa n60 BiDknOHTaPi POD/Phone.
Операцii 3 iPod/iPhone
HaTnChiIb [iPod] (HC55: [*, iPod]) kɪlka paɪB ἀπλ Bɪbɒpy "IPOD".
IiIroTobka
Ceptnphiakia npnctpo
Lên anapat Biñonobáie CaCTOTNHIM OMBEKENHIM i pnoioub cepTNIΦikaúHQHO CHOBICACTOTHORO 3aKHOHOABCTBA, TOMY DO3BIn HA BIKOHAHHH 6e3DPTOBO 3B'3Aky HE e O BOB'3AKBOM.
Btim, y DeaKnx KpaIHax 3aKHOJabCTbOM MoKe 6ytn 3a6OpOHeo:
- P036bɪpənHr/MoɪnɪφɪyBaɪnHr aɪpɑpɑtə.

06mexhenhao DO BnKOpncTaHH
BeZdIpOToBa NEpeDyA Ta/a6B BnKOpCtAnHg 3YcMa pIeCTpOMyI, 6oBndaHmIMu Bluetooth®, he rapaHTyIbCb.
Cymichi Mobilhi TeneoHm 3 MOJIbICTHO Be3pOToBoI nepeaHi BIKUohAOTb CTAndAPnT, BCTAOBNEHI KopnpaueIO Bluetooth S1G, Inc., Ta BkIDNObIAOTb cIM CTAndAPtAM. Ipote RaKIO MobIH N TepeOH ONTIHMIOBAHIN Ie BIDIOBIAHOTCI STAHApNDTM TEXIHIVMM XapAKTePNCTKAM, DeRki FyHKUII MoXyTB npaUOBATn. HabIT npi UBOMy 3 a DeRkX Hx TEXIHIVNX XapAKTePNCTKI NaCTPoiKO MobILHOrTO TeneoHpy NdKnIOuCHENH MOKe He BCTAOHBaTcN, a MOJIXbICTH BIKOPcNTaHHI CnOC6B B KepyBAHn A BO BIDOpBXeHNeH e RapaHTyCb.
- Κει anapat πιπτρήμες 3axnchi φυнкιί Bluetooth, ante 3a deκηκιx Hactρονη τα/àδο ρούθου σερεδοῦns Σ έλεχός Μοκe δυτη ἐνεθοσθάτιH. Bybnde Μερόβεκη Πρή εδεβροτου Μερεδηαι dανΗπ.
3Bephitb ybary, 10Kopnpaia Panasonic He BiNobiJa 3a pniuk, kamy niDnAHTBCa dani ta/a6o inHOpmaia nI qac 6e3pOtoBOi nepeda.
Paqiyc 3actocyBaHHa
Ley nprictpi Bnikopnctobyctbca B padiyc 10 M 3a biccythocti nepeikkod. Padiyc 3aocycbaHHa a6o nepimetmu KoybT 3mehuHTnC3a 3a HABHOCTI nepekuO, nprictpoIB, cIO CTBOPUHb 3abadi, IHsIX N IeD y pnmuHcIIb a6o Peery KOHCTpyKlIO 6dybl. 3BepHbYBaYr, zo p6oBoTa y BKsAahOMy paDiCyI He rapaHTyBc3.
BnInb iHux npncTroib
Ley anapat moke npaioBAtn HnpabInbNo a6o moKyt BvnHkaTn iHsi O3hAn KHeTa6BnHOi Po6ToN, HanpknIaad nepeepBaCTM 3ByK ToIO, RaIO uHpi npicrpo 6yDyB pOtaTbOaHI be3nocepeHbO npoyu 3 Hm. Tomy 063an60irtn TaabaDAMnIra CpeOMeHdyTeBc BIDokPemTNu eJ anapat ndac BkOpncTahn Bi dakx npnaiaB:
MikpoxBnIbOa Ni/6e3ApOToBA LAN/eneKtpOnHi npNCTpOI/aYIO- ta BideonnpCTpoI/oficiH diOnomixhi anapatn Ta npNCTpoI/cuNfPobi 6e3ApOToBI TepeOnH/phiKcIMInJIbH anapatn ToIO.
- KIto npimiieneHH 3naoHnTbc nopyu i3 cytdio MOBHeHH i CnHAn 3aHaTO CNbHn, anapat MOke He npaOBoTu HnAeXHM MHNOM.
- Пи ВИКОПИСТАНHI HOуБУka 3 педачИКOM 6e3dpoTOBOI LAN He KОпICTУТЕСТУМ anapatOM i 6e3dpoTOBOU LAN OДноЧАСNo.
- RkUO uym uYtH habiTa h Ba iDctahi 6iBHe 5 M BiD npCtpoIO 6e3dpoTobOI LAN, BmKHiTb XnBLeHHa npCtpoIO 6e3dpoTobOI LAN.
06MexKeHHy 1oDo 3aIJaHOBaHOrO BnKOpNCtAHH
Ley anapat npn3haeHn dny 3BnuayHoro BUKOPNCaHHB 3araIbHnx cIyX. Ley anapat He po3po6JYBCs i He BnPO6JIYBCs dny BHKOpNCaHH 3 "BVCOKIM pIBHem 6e3neKIN* a60 dny He6e3neHoiIo pOBoTI. He BUKOpNCTOByTe uei anapat B He6e3neHOMy cepedOBuSi a60 dny He6e3neHoiIo pObotn.
Y HabeedeHnX HnKcE Y KocT npKnady CntuaJx Cnd Byd nHa3BnauHo yBaKHMnOCKIbKM BOH NMOxyTB pInBe3CTn D0 BpTaN XHTTA 60 BAeKHX TINECHNX UIKODKeHb.HanPknad,JeDpaH epeReTKeA,KepyBaHHaJeDPHNMPeakuMABTOMATUH N KOHTPOB JITAKOM/KepyBaHHaHO KOHTPOJEM NOBITPRAHCNOTUYENHCB/CNTEMKOHTPOINO PXYB BENIKOBAROBX NOTARIB/KOHTPONB CNTEMKTT3e3a3e3neHHN ABO CNTEM NIOOBxHHe/HoKTPOB 36poHNX CNTEM Ta/ABO CNTEM 3ANcyKPAket TOU.
CTBOpENHЯ napи 3a ДОПOMOROJO Bluetooth®
IiDroTOBka
CtBopitbnapy3npictpoBluethoTaCboro anapataDnBCTaHOBJIeHHaydioniIKNIOUeHH.
1 HaTnchIb [3, iPod] kiIbka pa3iB dIy Bn6Opy "BLUETOOTH".
Anapat He pearye Ha HatackaHHKnaBii.
Bn 6aKaTe ONUCTNT Ta CKNHyTN nam'YTB.
1 BiKJIHouiTb HHP XNBHeHHa 3MiHHoro cTpmy. (3auekaIte He MeHwe 3 XBnIH npeed nepexoDm do KpOky 2.)
2 Utpmyuohn HATNCHYTOO KnaBiuy [I/I] Ha roIOBHOmy 6noci, BiJ'cHaaiTe wHyp XNBHeHHa3MiHHoro CTpyMy. "-----" 3'ABJIeTbcra Ha dncnnei.
3 BiDnycTiB KJabiuy [O/I].
Yci haIaIyBaHnI NOBepHyTbCn Do 3aBODcbKnx. NToPi6HOCKnHyTne IeMeHTn nam'rti.
He bdaetbca npoynta MP3.
- HEmoJINBO BiTbBOPHOBAtu MP3,ЯкIo CKoniIOBaHO 6aRaTOceAHCOBnДИСК Бe3 DaHnX MIX CeAHCamN.
- Пи CTbopehi ьагоceahcoBOrO днсka NotpiHOb 3akpmbaTn ceaHC.
- 06'EM daHnX ha nCKy 3aHaTTo MaHn. BcTaHOBiTb 06'EM daHnX 6iNbwe 5 M6.
Uytnuym,afoHemaε3Byky.
Плд acвдтборен� МРз може 6утчушm,якsoякictb 3aпсу HeBUCOka.
TpImaTe ue anapat noaJI BiD Mo6iNbHx TepeoHIB, kUO 3'ABJIObCT3abaI.
36inbWTe ryHicTb.
Bumkhitb anapat, nepebiTe Ta BnnpaTe niKluoyenH, notim BKlquHb anapat 3HOby. Cepd MoKJIbHX npuHN - DeOpmaizi DnHaMikiv Chee3 3aHaJTO BnCOky rUHyHcTb a6o NotyKHiCTb Ta BnKOpNCtAHnAnapaTa 3a BnCOKoi TemnepaTyPi.
IiudacBidTbOpHnrytHo ryn.
- BInI shHypB po3TaWBOHO shHyp JxNBHeHHa 6o lyopecHTHy lamny. TpImaTe iHsi npnbopn Ta shHypn kHaJdani BiD kaBeNIB anapata.
iPod/iPhone He BMnKaTbcra.
HemoxnBO BVKohyBaTN onepaui 3a donomoroIO KhoNk [iPod MENU].
-Перед підклоченям до anapata посянайтеся,юelenent кивлени iPod/Phone He po3prdkeho.
-Пелед BCtablenHЯm iPod/iPhone ydoK-cTaHciO BIMKhHb anapat i iPod/iPhone. YbIMKhHbЖиBHeHra Ta BnBepiB BiNoBiNe duKepeNo.
He yTu 3Byk i3 DnHaMikib.
- iPod/iPhone He BCTaBJIeHO B DOK-CTaHciIO JAK CnI. BIMKHITb iPod/iPhone i BImiTb i3 po3'Emy DOK-CTaHciII. BCTaBTe 3HOBy yVBIMKHITb.
-Переконайся,ю ha iPod/iPhone уocb bivTBopOeTbcra.
BvdperynioTe rnuHicTB.
CnotBopeHn a6o 3aHaTTo Tuxn 3ByK.
iPod/iPhone He 3apdkaTbcra.
AmnilitydHa moylaicia (AM)
YactOTHn diana3OH
87,50 mΓu - 108,00 mΓu
(50 kTкрok)
75Ω(He cImMeTpnuHn)
522KΓι - 1629 KΓι
(9KΓU KPOK)
520KΓι - 1630 KΓι
(10 kΓι κροκ)
CEKZIAYDNUCKIB
ДиСКИ ДЯ BiIbTBopeHЯ [8cm a6o 12 cm]
CD, CD-R/RW
(CD-DA, MP3*)
Пибпань
ObKnHa XBnI
NotyXhictb Janaepa
AydioBnxiD (nck)
YncNo KaHaJIb
790HM
KJIAC 1, KJIAC 1M
Ipeedni IiBni,peedni npaBni,2 kaHajn
※ MPEG-1 pibn3, MPEG-2 pibn3
CEKLIJI DINHAMIKIB
HC55
Tun
2cmyrobaakyctnha cnctema
Hni3do dny HabyuHnKIB
P03'EM
Dion. (3aDiHii)
Po3'EM
USB nopt
CTaHdapr USB
IiTpumka φopmatib
mediaaaiiib
Фаилова систema пистоов
USB
EneKtpnHe HabaHTaxeHHa
nopTy USB
Ctepeo, po3'em 03,5 MM
Ctepeo, po3'em 03,5 MM
USB 2.0 NOBHOWBnDkICHn
MP3 (*.mp3)
FAT12, FAT16, FAT32
He 6iJIbIe 500 mA
3AΓΑΙΝΗΙ ΜΑΗΙ
Cnoxnbaha nOtuykHicTb 28BT
ToIbko DnIy MoJeN SC-HC55
Tinbkn DnA SC-HC55
INHOpmaOnHHbI ΚeHTp Panasonic
IhpaMaZbIbIcHTp Panasonic
Для phikcahabaн суьзi 3ванok пТэрьторьБеларусьясплathы.
BecnnaTbI 3BOHOK cStaHOpHbIX TelefoHOb n3 BeIoopyccnn: 8-820-007-1-21-00
IhOpMauiHnIeHTp Panasonic
MixnapoDiHn D3BInKn Ta D3BiHKn i3 KneBa: +380-44-490-38-98
Pursuant to at the directive 2004/108/EC, article 9(2)
Panasonic Testing Centre
Panasonic Marketing Europe GmbH
Winsberging 15, 22525 Hamburg, Germany

Bluetooth®
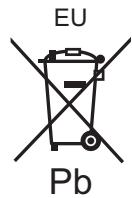
Panasonic Corporation
Web Site: http://panasonic.net
EnPoCzRuUr
- Included Installation Instructions ( 2,6)
- Drogi Kliencie
- Safety precautions
- WARNING
- Unit
- AC mains lead
- CAUTION
- Placement
- Batteries
- NORSK
- ADVARSEL
- Produkt
- HC55
- Safety information for customers in the EU
- Declaration of Conformity (DoC)
- About descriptions in these operating instructions
- Information for Users on Collection and Disposal of Old Equipment and used Batteries
- [Information on Disposal in other Countries outside the European Union]
- Note for the battery symbol (bottom two symbol examples):
- Accessories
- Wall mounting accessories
- Unit and media care
- Clean this unit with a soft, dry cloth
- ■ Maintenance of the lens
- Table of contents
- The remote control information
- Clean discs
- Disc handling precautions
- Notes on speakers
- Basic Connections
- Connect the FM indoor antenna.
- Connect the AM loop antenna.
- Connect the AC mains lead.
- Additional Connections
- Push the projecting part to open the cover A. Top View
- Connect the headphones (not supplied)
- Connect an external music device (for AUX mode)
- Connect the USB device (not supplied)
- Attaching the unit to a wall (optional)
- Installation accessories
- Supplied accessories
- Commercially available accessories (not supplied)
- WARNING!
- CAUTIONS!
- Notes on installation
- Wall mount instructions
- Detach the stand from the unit.
- Measure and mark the position of the wall mount brackets (Both sides).
- Attach the wall mount bracket to the wall with 2 screws F. (Both sides)
- Fix the safety holder ① onto the unit with the safety holder screw ③ .
- Hang the unit on the wall.
- Fix the safety holders ③ onto the wall mount brackets with the safety holder screws ⑨ (Both sides).
- Drive the safety holder fixing screw ⑥ to secure the safety holder ① onto the wall.
- Control reference guide
- Remote control
- HC35
- Main unit
- Front view
- Opening/Closing the sliding door
- Opening the sliding door
- Closing the sliding door
- HC55 Open/Close sensor
- To change the setting of the open/close sensor
- To change the sound effect settings of the open/close sensor
- Disc operations
- Inserting a disc
- Basic play
- Repeat play
- Play mode function
- Press [▶/■] to start play.
- Program play
- Press [▶/III] to start play.
- Notes on CD-R/CD-RW
- Creating MP3 files playable on this unit
- Limitations on MP3
- Radio operations
- Manual tuning
- Press [EXT-IN, RADIO] repeatedly to select "FM" or "AM".
- Press [←] or [▶] to select the frequency of the required station.
- To improve FM sound quality
- To improve AM sound quality
- Memory preset
- Preparation
- Automatic presetting
- Manual presetting
- Selecting a preset station
- AM frequency step
- RDS broadcasting
- Press [DISPLAY] to display the text data.
- Sound adjustment
- Timer
- Setting the clock
- Play timer
- Sleep timer
- Listening to audio from iPod or iPhone
- Inserting/Removing an iPod/ iPhone
- iPod/iPhone operations
- Compatible iPod/iPhone (as of January 2011)
- Notes on iPhone:
- Charging the iPod/iPhone
- Listening to the Internet Radio
- HC55 Using a Bluetooth® compatible device
- About using Bluetooth®
- Frequency band used
- ■ Certification of this device
- Usage restrictions
- Range of use
- Effects from other devices
- Intended usage limitations
- Bluetooth® pairing
- Press [3, iPod] repeatedly to select "BLUETOOTH".
- While this unit is in pairing mode, access the Bluetooth® menu of the Bluetooth® device and execute a Bluetooth® search to find this unit (SC-HC55).
- If pairing is successful, the paired device's name will be displayed for 2 seconds. The Bluetooth® indicator lights up. The unit is now ready to be used with the Bluetooth® device.
- On the Bluetooth® device: Select this unit (SC-HC55) on the Bluetooth® setup screen to make the connection.
- On the Bluetooth device: Start playback of a music source.
- You can also make the following controls with the remote control.
- Input level
- Press [SOUND] repeatedly to select "INPUT LEVEL".
- Press [, ] to select “0”, “+1” or “+2”.
- Display function
- Press [DISPLAY] repeatedly to view the information of the current connected device.
- Hands-Free Profile (HFP)
- Disconnecting a Bluetooth® device
- Advanced functions
- To register more devices
- To select Auto Link mode
- Listening to audio from a USB device
- Compatible devices
- Notes on USB
- USB operations
- Preparation:
- Others
- Changing the main unit and remote control mode
- Memory reset (Initialization)
- Troubleshooting
- Common problems
- Incorrect display or play will not start.
- MP3 cannot be read.
- Noise is heard or no sound.
- Humming heard during play.
- A beat sound or noise is heard while receiving radio broadcast.
- A low hum or noise is heard during AM broadcast.
- The picture on the television near the unit disappears or stripes appear on the screen.
- No response when remote control buttons are pressed.
- The sliding door does not open (or malfunctions).
- The open/close button lights are flashing.
- The open/close sensor sound effect cannot be heard when the sliding door opens/closes.
- iPod/iPhone does not turn on.
- Cannot operate with [iPod MENU] button.
- No sound is heard from the speakers.
- Distorted sound or the sound level is too low.
- iPod/iPhone cannot be controlled by the remote control or main unit.
- iPod/iPhone does not charge.
- HC55 Bluetooth® operations
- Noise is heard or broken sound.
- No response when [ / ] is pressed.
- The USB drive or its contents cannot be read.
- Slow operation of the USB flash drive.
- The elapsed time displayed is different from the actual play time.
- Displayed messages
- The following messages or service numbers appear on the unit's display when something unusual is detected during startup and use.
- "ADJUST CLOCK
- "ADJUST TIMER"
- "PGM FULL"
- "NO PLAY"
- "ERROR"
- "F61" or "F76"
- "AUTO OFF"
- "ILLEGAL OPEN"
- “NODEVICE”
- "REMOTE 1"
- "REMOTE 2"
- HC55 "F70"
- "NO DISC"
- "NOT SUPPORTED"
- HC55 "START ERROR"
- "UNLOCKED"
- HC55 “CANNOT SET”
- Specifications
- AMPLIFIER SECTION
- TUNER SECTION
- DISC SECTION
- HC55 BLUETOOTH SECTION
- TERMINAL SECTION
- GENERAL
- CopepkHne
- HnΦopMaunO npIbTe nctaHNoHHoro ynpabNeHn
- Yxod 3a n3dennem HocnteJMaHnΦopMaun
- IpoTupaTe H3dJIne MmKo cyXoTkaHbIO.
- 06cnyxnbHne JINH3bl
- OuNCTKa DnCKOB
- Mepbl npedoctopoXHocTn npn o6paueHn c DnCKOM
- Cxembl IOdcoeINHeHnA
- IpimueaHnOTHOCHTeJIbHOINHaMnKOB
- HaximaiTe KhoIky [INPUT LEVEL], YTO6bI BbI6paTb "HIGH" nII "NORMAL".
- Подкlioчени USB-устpoиства (He BXoДNTВ KOMПлжт)
- Kpenenne yctpoiCTBa Ha cTeHy (donoHnTeIbHo)
- MoNTaXHbIe npHaJneXHOCTN
- OoctynHbIe B npoJaXe KOMNoHeHTbI (He BXoJrT B KOMJIeKT NocTaBKn)
- MepbI ppeOCTOPOXHOCTHI
- PENyPEXDEHNE!
- BHIMAHHE!
- Приимechanical OTHOCHTeNb MOrTaXa
- OTKpbBaHne cDvXHOJ DBepcbl
- 3aKpbBaHne CdBHXHOI DBepcbl
- OrpaHnueHn nCpOJb3ObaHn MP3
- Операци с радно
- Руная有很大тояк.
- HaxmajTe KhONky [EXT-IN, RADIO], YTo6bI Bbl6paTb "FM" nIn "AM".
- HaxmajTe [A] nI [▶], yTo6bI Bbl6paTb YactOTy HxHOn CTaHcun.
- UnyucheHne KaueCTBa 3Byka B Dnana3OHe FM
- UnyucheHne KaueCTBa 3Byka B dnaanaOHe AM
- IoproTOBka K nCNoJb3OBAHnIO
- ■ ABTOMaTnuecka IpeDvBapnteJbHa NactpoiKa
- CoBmecTmblcMoJeIiPod/iPhone (no coCToHnIO Ha RaHBapb 2011 r.)
- IcnoJb3yembldHana3OH yactOTbl
- Ceptnuikauza daHHoro ycTpoiCTBa
- OrpaHnueHnIcNoJIb3OBAHnI
- 3oha DeiCTBnA
- Bo3dienCTBne dpynx ycTroponCTB
- OrpaHnueHnIcNoJIb3OBAHnI NO Ha3NaYeHnIO
- Понарhoe coeДинене сnomоьу Bluetooth®
- Iodrotobka K nCNoJIb3OBAHnIO
- iPod/iPhone He BKJIIOuaeTcra.
- He cpa6aTbIbAeT KhONka [iPod MENU].
- I3 DnHaMnKOB He BbIBODNTc3BYK.
- NCKaKExHHbI NII CNIIJKOM THXN 3ByK.
- UnpaBHeHne iPod/iPhone c npIbTa nCTaHcNoHHoro UnpaBHeHn IIN rIaNbHOrO 6JIOka yCTpoiCTBa HeBO3MOxHO.
- iPod/iPhone He 3apjxaeTc.
- HC55 Onerpaunc Bluetooth®
- CJIbIiHTcIyMIIINIpepbIBnCTbI 3ByK.
- Oepaunc USB
- OTcyTCTByET peakun npn haxatm KhoNk [I].
- He ydaetc qntaTB USB-ycptoictBO nH erO coepxHMoe.
- MeDneHna pa6ota USB-hakonnteJra.
- HnDnkaunocTaBweroCByPemn Bocpon3BeDeHHOTnueTcTOnΦakTnueckoroBpemn Bocpon3BeDeHHa.
- OTo6paXkaembIe coo6uHnIa
- PnObHapyKeHH HeNoJaOK BO BpeMa Nnn 3KcNpyataun yctpoiCTBa Ha erO dncJIee OTo6paXaIOTcYka3aHHbe HNXe COo6eHHa NIn cepBnCHbIe Homepa.
- "F61" unn "F76"
- "NODEVICE"
- HC55 “START ERROR”
- DAHHbIE OByCnJIteJIe
- BbIXoHa nA cpeNHeKBaDpaTnHna MoUHOCTb B
- ДАHHьЕ O ПРИЕМнIKE
- ДАHHыЕ O ДИСКАX
- DAHHbIE OДИHAMNKAX
- HC55 DAHHbIE O Bluetooth®
- DAHHbIE O PA3bEMAX
- InΦopMaia yOo yTnJIaui B KpaIHax, kI He BXOJaTB B EbponecBkn Co03
- OuHHeHHaNCKiB UO CIIID POBNTI
- 3aCTepexeHHy ⅢOIO BVKnOpncTaHHn DnCKIB
- Ppimitkn 0do DnHaMikIB
- OCHOBHI nIDKIIIOUeHnRA
- 1ПидкнючehняКIMHaTHOi aHTeHnДIANa3OHy FM.
- 2ПидкючehнpaMKOBoi aHTeHnДiana3OHy AM.
- Piiknioitb Hyp KInBneHHra 3miHoro cTpyMy.
- IodatKobiPiiknHoueHHa
- Пдклочь habушнки (He noctaayotbсВ KOMnlekti)
- HC35 HaTncHb [INPUT LEVEL] kIbka pa3iB dIy Bn6opy "HIGH" a6o "NORMAL".
- ■ПдклочьnpсстриUSB(нocтачаctьсяВ komплектi)
- HC55ДатунК BiДКрпTTЯ/3aKрNTTЯ
- ДяЗмHeHЯHaJaWTyBaHbДaTHyKByBIDkpTTra/3aKpTTra
- HaTnCHiTb [OPEN/CLOSE SENSOR] kiIbka pa3iB ДЯ Вибopy "MODE 1", "MODE 2", "MODE 3" a6o "OFF SENSOR".
- HaTnchItb [EXT-IN, RADIO] kIbka pa3iB dIy Bn6opy "FM" a6o "AM".
- Hatncihtb [a6o [▶]ДЯ ВибopyчacToTn notpi6HoI ctaHci.
- ■Покрашениякosci 3BykyВдIANa30hi FM
- ■Покрашениякosci三百ув diana30hi AM
- HanaTyuBaHHa, 36epeXeHi B nam'YrTi
- ■ ABTomatnue He HaJaTaYBaHHa
- ■PyuHe HanaTyuBaHHa
- Bn6ip 3apeectpoBaHoI cTaHcii
- Kpok yactotn B pekimi AM
- HaTnchItb [DISPLAY] nIa BiOobpaXeHHa TEKCTOBuX daHux.
- PerguioBaHHa 3ByKy
- BCTaBnHn/BNdaJIeHn iPod/ iPhone
- Операцii 3 iPod/iPhone
- Ceptnphiakia npnctpo
- 06mexhenhao DO BnKOpncTaHH
- Paqiyc 3actocyBaHHa
- BnInb iHux npncTroib
- 06MexKeHHy 1oDo 3aIJaHOBaHOrO BnKOpNCtAHH
- CTBOpENHЯ napи 3a ДОПOMOROJO Bluetooth®
- IiDroTOBka
- He bdaetbca npoynta MP3.
- Uytnuym,afoHemaε3Byky.
- IiudacBidTbOpHnrytHo ryn.
- iPod/iPhone He BMnKaTbcra.
- He yTu 3Byk i3 DnHaMikib.
- CnotBopeHn a6o 3aHaTTo Tuxn 3ByK.
- iPod/iPhone He 3apdkaTbcra.
- CEKZIAYDNUCKIB
- CEKLIJI DINHAMIKIB
- 3AΓΑΙΝΗΙ ΜΑΗΙ
Brand : PANASONIC
Model : SCHC35EP
Category : Audio System