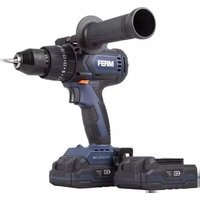
FEPD-500 - Drill Ferm - Free user manual and instructions
Find the device manual for free FEPD-500 Ferm in PDF.


| Product Type | Corded Drill |
| Brand | Ferm |
| Model | FEPD-500 |
| Power Input | 500 W |
| Voltage | 230 V / 50 Hz |
| No-Load Speed | 0 – 2800 rpm |
| Chuck Type | Keyless chuck |
| Chuck Capacity | 1 – 10 mm |
| Drilling Capacity (Steel) | 10 mm |
| Drilling Capacity (Wood) | 25 mm |
| Impact Function | Yes (for masonry) |
| Speed Settings | Variable speed trigger |
| Forward/Reverse | Yes |
| Weight | 1.6 kg |
| Cable Length | 2 m |
| Protection Class | Class II (double insulated) |
| Accessories Included | Depth stop, auxiliary handle, chuck key |
| Maintenance | Clean vents regularly, lubricate chuck |
| Safety Features | Lock-on button, overload protection |
| Spare Parts Availability | Carbon brushes, chuck, switch |
Frequently Asked Questions - FEPD-500 Ferm
User questions about FEPD-500 Ferm
0 question about this device. Answer the ones you know or ask your own.
Ask a new question about this device
Download the instructions for your Drill in PDF format for free! Find your manual FEPD-500 - Ferm and take your electronic device back in hand. On this page are published all the documents necessary for the use of your device. FEPD-500 by Ferm.
USER MANUAL FEPD-500 Ferm
UK Subject to change
natural_image
Black FERM power tool with visible screw and handle (no text or symbols on body)UK
USERS MANUAL 03
D
natural_image
Three different types of twist drill bit designs (no text or symbols)Fig.B

natural_image
Pure mechanical diagram showing a valve or actuator without any text, numbers, or symbolsFig.E

Fig.C

REF NR DESCRIPTION FERM NR
| 1 LEFT SCREW (FOR DRILL CHUCK) 407387 |
| 2 DRILL CHUCK 407380 |
| 3 CHUCK KEY 407381 |
| 8 GEAR 407382 |
| 15 ARMATURE 407390 |
| 17 FIELD COIL 407391 |
| 20 CARBON BRUSH (SET) 407386 |
| 22 CARBON BRUSH HOLDER 407389 |
| 25 SWITCH 407384 |
| - SIDEHANDLE 407388 |
uk English
IMPACT DRILL
THE NUMBERS IN THE FOLLOWING TEXT
CORRESPOND WITH THE PICTURES AT PAGE 2

Caution! For your own safety, carefully read these
instructions for use before using the machine
CONTENTS:
I. MACHINE INFORMATION
No load speed/min 10.2500
No load speed/min | 0-250 Impacts to 10,40000/min
impact rate | 0-40000/min
Max. drill diameter (Wood) | 25 mm
Max. drill diameter (Concrete) | 13 mm
Max. drill diameter (Steel) | 10 mm
Weight
Lpa (sound pressure)
Lwa (sound power)
Vibration value
1.9kg
90 dB(A)
103 dB(A)
10.8m/s ^2
PRODUCT INFORMATION
Fig.A
I Left/right switch
2 On/off switch with speed control
3 Switch lock
4 Side handle
5 Chuck
6 Drill depr limiter
7 Switch for normal and percussion drilling
PACKAGE CONTENTS
The package contains:
I Impact drill
3 Drills
1 Depth gauge
1 Side handle
- Instruction manual
1 Warranty card
Check the machine, loose parts and accessories for transport damage.
2. SAFETY INSTRUCTIONS
The following symbols are used throughout this manual:

Denotes risk of personal injury, loss of life or damage to the tool in case of non-observance of the instructions in this manual.

Denotes risk of electric shock.

In accordance with essential applicable safety standards of European directives

Wear ear and eye protection

Faulty and/or discarded electrical or electronic apparatus have to be collected at the appropriate recycling locations.
Carefully read this manual before using the machine. Make sure that you know how the machine functions and how to operate it. Maintain the machine in accordance with the instructions to make sure it functions properly.
ELECTRICAL SAFETY
When using electric machines always observe the safety regulations applicable in your country to reduce the risk of fire, electric shock and personal injury. Read the following safety instructions and also the enclosed safety instructions.
Keep these instructions in a safe place!

Always check that the power supply corresponds to the voltage on the rating plate.

Your machine is double insulated in accordance with EN 50144; therefore no earthwire is required.
Replacing cables or plugs
Immediately throw away old cables or plugs when they have been replaced by new ones. It is dangerous to insert the plug of a loose cable in the wall outlet.
Using extension cables
Only use an approved extension cable suitable for the power input of the machine. The minimum conductor size is 1.5 mm ^2 . When using a cable reel always unwind the reel completely.
- Check the following:
Do the voltage of the machine correspond with the
mains voltage
Are the mains lead and the mains plug in a good condition.
- Do not use extension cables which are too long. Use extension cables with a core diameter of 1.5 mm ^2 minimal and only when the cable is rolled out completely.
- In case of a blockage, switch of the machine immediately.
• Always compare the maximum rotation speed of accesores with the maximum speed of the percussion drill.
- Pull the mainsplug from the socket before you change a drill or accessory.
WHEN OPERATING THE MACHINE:
- Check if the switch is placed in the 'OFF'-position before you connect the machine to mains.
- Keep the mains cable away from moving parts of the machine.
- First switch off the machine before you move the machine downwards along your body.
- Never cover the ventilation slots.

IMMEDIATELY SWITCH OFF THE MACHINE IN CASE OF:
- Excessive sparking of the brushes and verticilliosis in the collector.
- Malfunction of the mainsplug, -socket or damaged cables.
- Broken switch.
• Smoke or smell caused by scorched insulation.
Use only sharp drills of the following types Fig.B
| Concrete/masonry | Hard metal |
| Metal | HSS |
| Wood | HSS |
MOUNTING ACCESSORIES
Fig.C

Prior to mounting an accessory always unplug the tool.
Placing and removing bits
In addition to bits the machine can also hold screw bits with a hexagonal shaft. This is done as follows:
- Hold the drill head (A) and slide the ring (B) in the direction of the drilling machine.
- Place the shaft of the bit in the nesting place of the drill chuck. Tighten the bit by holding ring B and turning the drill head (A).
- Once the bit has been tightened in, slide ring B in the direction of the drill head. This will stop the drill head from loosening due to vibration during use.
- Slide the sidegrip over the drillhead.
- Slide the measuring rod in the sidegrip and tighten the grip by turning the sidegrip.
- Tighten the workpiece to a workbench by using a clamp.
- When all preparations are done the machine can be connected to mains. First check if the switch is in the 'OFF'-position and if the rotationswitch is in the RIGHT-position.
4. OPERATION
THE ON/OFF SWITCH
Fig.D
- Switch the machine on by pressing the triggerswitch (A). When you release the triggerswitch (A) the machine will turn off.
SWITCH-LOCK
- You can lock the On/Off switch by pressing the triggerswitch (A) and then pressing knob (B). Release the switch-lock by pressing the triggerswitch (A) shortly.
SPEED-CONTROL
- The rotation-speed can be continuously adjusted between 0 and 2500 rotations per minute, by pressing the switch (A) deeper or less deep.
ADJUSTING OF THE MAXIMUM ROTATIONSPEED
- Switch the machine on by pressing triggerswitch (A).
- Lock the triggerswitch (A) by pressing knob (B). - Adjust the speed by turning the small wheel (C) to the desired maximum rotation speed.
SWITCHING THE DIRECTION OF ROTATION
- Direction of rotation counter-clockwise: shift switch (D) to "L".
- Direction of rotation clockwise: shift switch (D) to "R".
SWITCH FOR PERCUSSION DRILLING
Fig.E
- Slide the switch to the "Drill" symbol for normal
drilling.
- Slide the switch to the "Hammer" symbol for percussion drilling.
MALFUNCTION
Below we have listed a number of possible causes and corresponding solutions in case the machine does not function as it should:
1. Excessive sparkling
- This usely indicates dirt in the motor or worndown carbon brushes.
- Bring your percussion drill to your Ferm-dealer.
2. The percussion drill is overheating
- The ventilationslots are covered with dirt. - Clean them with a dry cloth.
- The percussion drill is overloaded. - Use the machine for work for which it is ment to be. - Replace the drill for a sharp one or sharpen the drill by using a benchgrinder and a twist drill grinding attachment.
- The motor is defect. - Bring your percussion drill to your Ferm-dealer for repairance.
5. SERVICE & MAINTENANCE

Make sure that the machine is not live when carrying out maintenance work on the motor.
The Ferm machines have been designed to operate over a long period of time with a minimum of maintenance. Continuous satisfactory operation depends upon proper machine care and regular cleaning.
Cleaning
Regularly clean the machine housing with a soft cloth, preferably after each use. Keep the ventilation slots free from dust and dirt. If the dirt does not come off use a soft cloth moistened with soapy water. Never use solvents such as petrol, alcohol, ammonia water, etc. These solvents may damage the plastic parts.
Lubrication
The machine requires no additional lubrication.
Faults
Should a fault occur, e.g. after wear of a part, please contact the service address on the warranty card. In the back of this manual you find an exploded view showing the parts that can be ordered.
Environment
To prevent damage during transport, the appliance is delivered in a solid packaging which consists largely of reusable material. Therefore please make use of options for recycling the packaging.

Faulty and/or discarded electrical or electronic apparatus have to be collected at the appropriate recycling locations.
GUARANTEE
The guarantee conditions can be found on the separately enclosed guarantee card.

DECLARATION OF CONFORMITY

We declare under our sole responsibility that this product is in conformity with the following standards or standardized documents
EN50144-1, EN50144-2-1, EN55014-1, EN55014-2, EN61000-3-2, EN61000-3-3
in accordance with the regulations.
98/37/EEC
73/23/EEC
89/336/EEC
from 01-06-2005
ZWOLLENL
W. Kamphof
Quality department

It is our policy to continuously improve our products and we therefore reserve the right to change the product specification without prior notice.
Ferm BV·Lingenstraat 6·8028 PM Zwolle The Netherlands

Deutsch
SCHLAGBOHRMASCHINE
• Der Motor is defect.
98/37/EEC 73/23/EEC 89/336/EEC
\$IMBOLU SKAIDROJUMS
98/37/EEC 73/23/EEC 89/336/EEC
01-06-2005
98/37/EEC 73/23/EEC 89/336/EEC
kelt01-06-2005
ZWOLLENL
W. Kamphof
Minőségügyi osztály
INFORMACJA O PRODUKCIE
Rys. A
98/37/EEC 73/23/EEC 89/336/EEC
98/37/EEC 73/23/EEC 89/336/EEC
01-06-2005
ZWOLLENL
W. Kamphol Ütvar kvality

Ferm BV·Lingenstraat 6 8003 CD Zwolle Netherlands

- uk English
- IMPACT DRILL
- THE NUMBERS IN THE FOLLOWING TEXT
- CONTENTS:
- PRODUCT INFORMATION
- PACKAGE CONTENTS
- SAFETY INSTRUCTIONS
- ELECTRICAL SAFETY
- Replacing cables or plugs
- Using extension cables
- WHEN OPERATING THE MACHINE:
- IMMEDIATELY SWITCH OFF THE MACHINE IN CASE OF:
- MOUNTING ACCESSORIES
- Placing and removing bits
- OPERATION
- THE ON/OFF SWITCH
- SWITCH-LOCK
- SPEED-CONTROL
- ADJUSTING OF THE MAXIMUM ROTATIONSPEED
- SWITCHING THE DIRECTION OF ROTATION
- SWITCH FOR PERCUSSION DRILLING
- MALFUNCTION
- Excessive sparkling
- The percussion drill is overheating
- SERVICE & MAINTENANCE
- Cleaning
- Lubrication
- Faults
- Environment
- GUARANTEE
- DECLARATION OF CONFORMITY
- Deutsch
- SCHLAGBOHRMASCHINE
- \$IMBOLU SKAIDROJUMS
- 01-06-2005
- kelt01-06-2005
- ZWOLLENL
- INFORMACJA O PRODUKCIE
- Rys. A
Brand : Ferm
Model : FEPD-500
Category : Drill