
AW 150 - Pressure washer HiKOKI - Free user manual and instructions
Find the device manual for free AW 150 HiKOKI in PDF.


| Product Type | Electric Pressure Washer |
| Model | AW 150 |
| Brand | HiKOKI |
| Power Supply | 230 V ~ 50 Hz |
| Motor Power | 1500 W |
| Max Pressure | 150 bar |
| Rated Pressure | 120 bar |
| Max Flow Rate | 420 l/h |
| Hose Length | 8 m |
| Power Cable Length | 5 m |
| Detergent Tank Capacity | 0.8 L |
| Weight | 6.5 kg |
| Dimensions (L x W x H) | 360 x 300 x 570 mm |
| Main Functions | High-pressure washing, detergent application, surface cleaning |
| Safety Features | Thermal overload protection, trigger safety lock, auto shut-off |
| Maintenance | Clean inlet filter after each use, check hose for leaks, store in frost-free environment |
| Spare Parts Availability | Nozzles, hose, detergent siphon tube, trigger gun |
| Repairability | Serviceable by authorized HiKOKI centers; user-replaceable parts: nozzles, filters, hose |
| General Information | Compact design, suitable for vehicles, patios, garden equipment, and building surfaces |
Frequently Asked Questions - AW 150 HiKOKI
User questions about AW 150 HiKOKI
0 question about this device. Answer the ones you know or ask your own.
Ask a new question about this device
Download the instructions for your Pressure washer in PDF format for free! Find your manual AW 150 - HiKOKI and take your electronic device back in hand. On this page are published all the documents necessary for the use of your device. AW 150 by HiKOKI.
USER MANUAL AW 150 HiKOKI
natural_image
Line drawing of a modern pressure<|im_start|> Puerto Rico water heater with coiled cable and wheels, enclosed in a circular frame (no text or symbols)保留备用
Keep for future reference
图13
图 14
使用滤网软管套件(分开销售)
natural_image
Illustration of a person spraying water with a hose (no text or symbols)中文
扳机掣(图 23)
喷枪上装有扳机掣,以防拉动扳机。
natural_image
Line drawing of a manual vacuum cleaner with attached fan and hose (no text or symbols)图25
安全装置
清洗机配有以下安全装置以确保安全使用。
电源开关
防止清洗机意外运转。
可锁定的喷枪
防止拉动扳机,使清洗机意外运转。
压力继电器
OPTIONAL ACCESSORIES (sold separately).... 28
APPLICATIONS....29
USING THE STRAINER HOSE SET (sold separately) 34
WASHING 36
ON COMPLETION OF USE 37
SAFETY MECHANISMS 38
MAINTENANCE AND INSPECTION 39
TROUBLESHOOTING....40
SERVICE PARTS LIST 42
GENERAL POWER TOOL SAFETY WARNINGS

WARNING
Read all safety warnings and all instructions.
Failure to follow the warnings and instructions may result in electric shock, fire and/or serious injury.
Save all warnings and instructions for future reference.
- Make sure the work area is always kept neat and tidy.
Failure to observe this may result in accidents.
- Take the surrounding environment into consideration when using the washer.
○ Make sure the work area is brightly lit.
○ Do not use the washer near fl ammable liquid or gas.
- Beware of electric shocks.
Do not touch anything that is earthed (grounded) when using the High Pressure Washer. (For example, pipes, heaters, microwave ovens, refrigerators, etc.)
- Do not use the washer near children.
People other than the person using the washer must not be allowed to touch the washer or the cord.
○ People other than the person using the washer must not come near the work area.
- Store the washer in a safe place when not in use.
Store the washer in a dry, high location or protected with a lock out of the reach of children.
- Do not use the washer in inappropriate ways.
Use the High Pressure Washer within the limits of its capabilities to ensure safe and efficient results.
☐ Do not use the washer for any purpose other than that for which it was designed.
7. Wear safe clothing when using the washer.
Use safety boots, gloves, helmets with visors and earplugs in accordance with necessity.
8. Use protective goggles and dust-protection masks when using the washer.
There is a chance that splashes and dust may enter the eyes and mouth when using the washer.
9. Do not handle the power cord roughly.
Do not carry the High Pressure Washer with only the power cord or pull the plug from the socket while holding the power cord.
Keep the power cord away from heat, oil and sharp corners.
10. Make sure the item being cleaned is firmly fixed in place.
There are cases in which the power of the water pressure will cause light objects to fly off. Do not use the washer on light objects that cannot be fixed in place.
11. Maintain a proper stance when using the washer.
Make sure your feet are always placed firmly on the ground to maintain balance.
12. Pay close attention to maintaining the High Pressure Washer.
○ Clean the washer regularly to ensure safe and efficient use.
○ Refer to the instruction manual when replacing supplied parts.
○ Regularly check the power cord and ask your dealer for repairs in the event of it being damaged.
○ If using an extension cord, check it regularly and replace it in the event of it being damaged.
○ Make sure the grip is always kept dry and clean, and do not allow oil of grease to come into contact with it.
13. Switch off and unplug the High Pressure Washer in the following situations:
○ When it is not in use and when it is being repaired.
○ When attaching or detaching supplied or purchased parts.
○ In other situations in which risks seem apparent.
14. Always remove equipment used for adjustment purposes.
Check to make sure that all equipment used for adjustment purposes has been removed before switching on the power.
15. Avoid accidentally switching on the power.
○ Make sure you do not accidentally switch on the power to the washer when it is plugged in.
○ Check to make sure that the washer is switched off before plugging it into the power supply.
16. Inadequate extension cords can be dangerous.
17. Pay attention at all times when using the washer.
○ Pay attention to the methods of use stipulated in the instruction manual and the surrounding environment when using the High Pressure Washer.
○ Do not use the washer when tired.
18. Only use specified accessories and attachments.
Using accessories and attachments other than those specified in the instruction manual or in HiKOKI catalogs may result in accidents or injuries and must be avoided at all costs.
19. High Pressure Washer repairs to be performed only by experts.
☐ The High Pressure Washer conforms to all relevant safety regulations and must not be modified.
All repairs must be requested to HiKOKI authorized service centers. Attempting to carry out repairs without the correct skills may result in accidents or injuries.
English
- Do not use the machine if a supply cord or important parts of the machine are damaged, e.g. safety devices, high pressure hoses, trigger gun.
- Use a power supply that conforms to the voltage listed on the name plate.
Failure to observe this may result in the washer operating at higher speeds than normal, leading to overheating and the outbreak of smoke and fire, which may cause damage or injuries.
- Use an independent power socket with a rated value of 15 A or more.
Sharing a power socket with other equipment may result in the breaker shutting down.
- Hold the trigger gun firmly in both hands when using the washer.
Failure to observe this may result in injury.
- High-pressure water can be dangerous if used incorrectly.
High-pressure water jets must not be directed at people, animals, easily-broken items, electrical equipment or the washer itself.
- Do not use gasoline, oil, organic solvents or other inflammable or toxic liquids, or any other inappropriate liquid.
Failure to observe this may result in explosions, the outbreak of fire or smoke, or other accidents, which may cause damage or injury.
- When washing automobile tires, make sure that the tip of the nozzle is kept at least 50cm distant from the surface being washed.
Failure to observe this may result in damage to the tire or brakes, which may cause serious accidents.
- Do not touch the power plug or power socket with wet hands.
Failure to observe this may result in electric shocks.
- High pressure cleaners shall not be used by children or untrained personnel.
- Water that has flown through backflow preventers is considered to be non-potable.
Make sure that a backflow valve is used without fail when connecting the washer to a drinking water faucet.
Water that has passed through the backflow valve cannot be used for drinking.
- Make sure that water is not splashed onto the High Pressure Washer, power cord, extension cable, power plug, power socket or other areas. Also, neither exposes it to rain nor use it in the rain.
Failure to observe this may result in electric shocks.
- Do not hold the trigger gun when fi xing it in place.
- If the washer is not functioning normally or is emitting strange noises or vibrations switch it off immediately and contact HiKOKI authorized service centers to request inspections or repairs.
Continued use may result in injury.
- If the washer is accidentally dropped or banged into something solid, inspect it for damage, cracks and malformation.
Failure to observe this may result in injury.
- Do not direct the jet against yourself or others in order to clean clothes or footwear.
- Always switch off the mains disconnecting switch when leaving the machine unattended.
CAUTION
- Purge all of the pressure within the washer before disconnecting the high-pressure hose.
- Attach all supplied accessories correctly in accordance with the instruction manual.
Failure to observe this may result in the accessories becoming detached or in injury.
- Check to make sure that no foreign matter is adhering to the object being washed. Failure to observe this may result in the matter flying off and causing unexpected injury.
- Do not spray a jet of water at the areas surrounding labels on the object being washed.
Failure to observe this may result in the labels peeling off.
- Grip the handle firmly when carrying the washer.
- Do not use any accumulated water other than clean water from the faucet (water containing dirt, mud, sand, etc.) when using the auto-suction function.
- Children should be supervised to ensure that they don't play with the appliance.
SYMBOL
WARNING
The following show symbols used for the machine. Be sure that you understand their meaning before use.
 | To reduce the risk of injury, user must read instruction manual.Failure to follow the warnings and instructions may result in electric shock, fi re and/or serious injury. | 回 | Class II tool |
| ⚠️ | Warning | ||
| V | Volts | ||
| A | Amperes | ||
 | High-pressure water can be dangerous if used incorrectly.High-pressure water jets must not be directed at people, electrical equipment or the washer itself. | Hz | Hertz |
| W | Watts | ||
| kg | Kilograms | ||
| ~ | Alternating current | MPa | Megapascals |
SPECIFICATIONS
| Model AW150 | |
| Voltage (by areas)*1 | Single-phase AC 50/60 HzVoltage 220 V to 240 V |
| Power input*1 | 2000 W |
| Max. discharge pressure(1MPa: 10.2 kgf/cm2) | 11.0 MPa |
| Max permissible pressure 15.0 MPa | |
| Max feed pressure 0.7 MPa | |
| Max water discharge 6.67 L/min | |
| Permissible temperature 40 °C or less | |
| Dimensions(Length × Width × Depth) | 425 mm × 345 mm × 905 mm(Including the hose handle, power cord holder, gun holder,gun support and water feed connector) |
| Weight*2 | 12.4 kg |
*1 Be sure to check the nameplate on product as it is subject to change by areas.
*2 Weight: Excluding the power cord, weight consists of trigger gun, high-pressure hose, variable nozzle, water feed connector and accessory holder.
STANDARD ACCESSORIES
In addition to the main unit (1 unit), the package contains the accessories listed in the below.
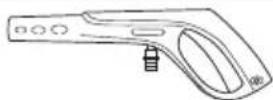 | Trigger gun 1 | |
 | High-pressure hose (10 m) 1 | |
 | Variable nozzle(with pressure adjuster) | 1 |
 | Turbo nozzle 1 | |
 | Detergent bottle nozzle(stored inside the unit) | 1 |
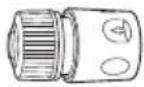 | One-touch joint (black)(For use with the strainer hose) | 1 |
 | Water feed connector 1 | |
 | Nozzle cleaner pin 1 | |
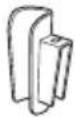 | Gun holder 1 | |
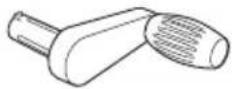 | Hose handle 1 | |
 | Gun support(with 1 attachment screw) | 1 |
OPTIONAL ACCESSORIES (sold separately)
Items shown in are sold separately. Contact HiKOKI authorized service centers for replacements if the standard accessories become damaged or broken.
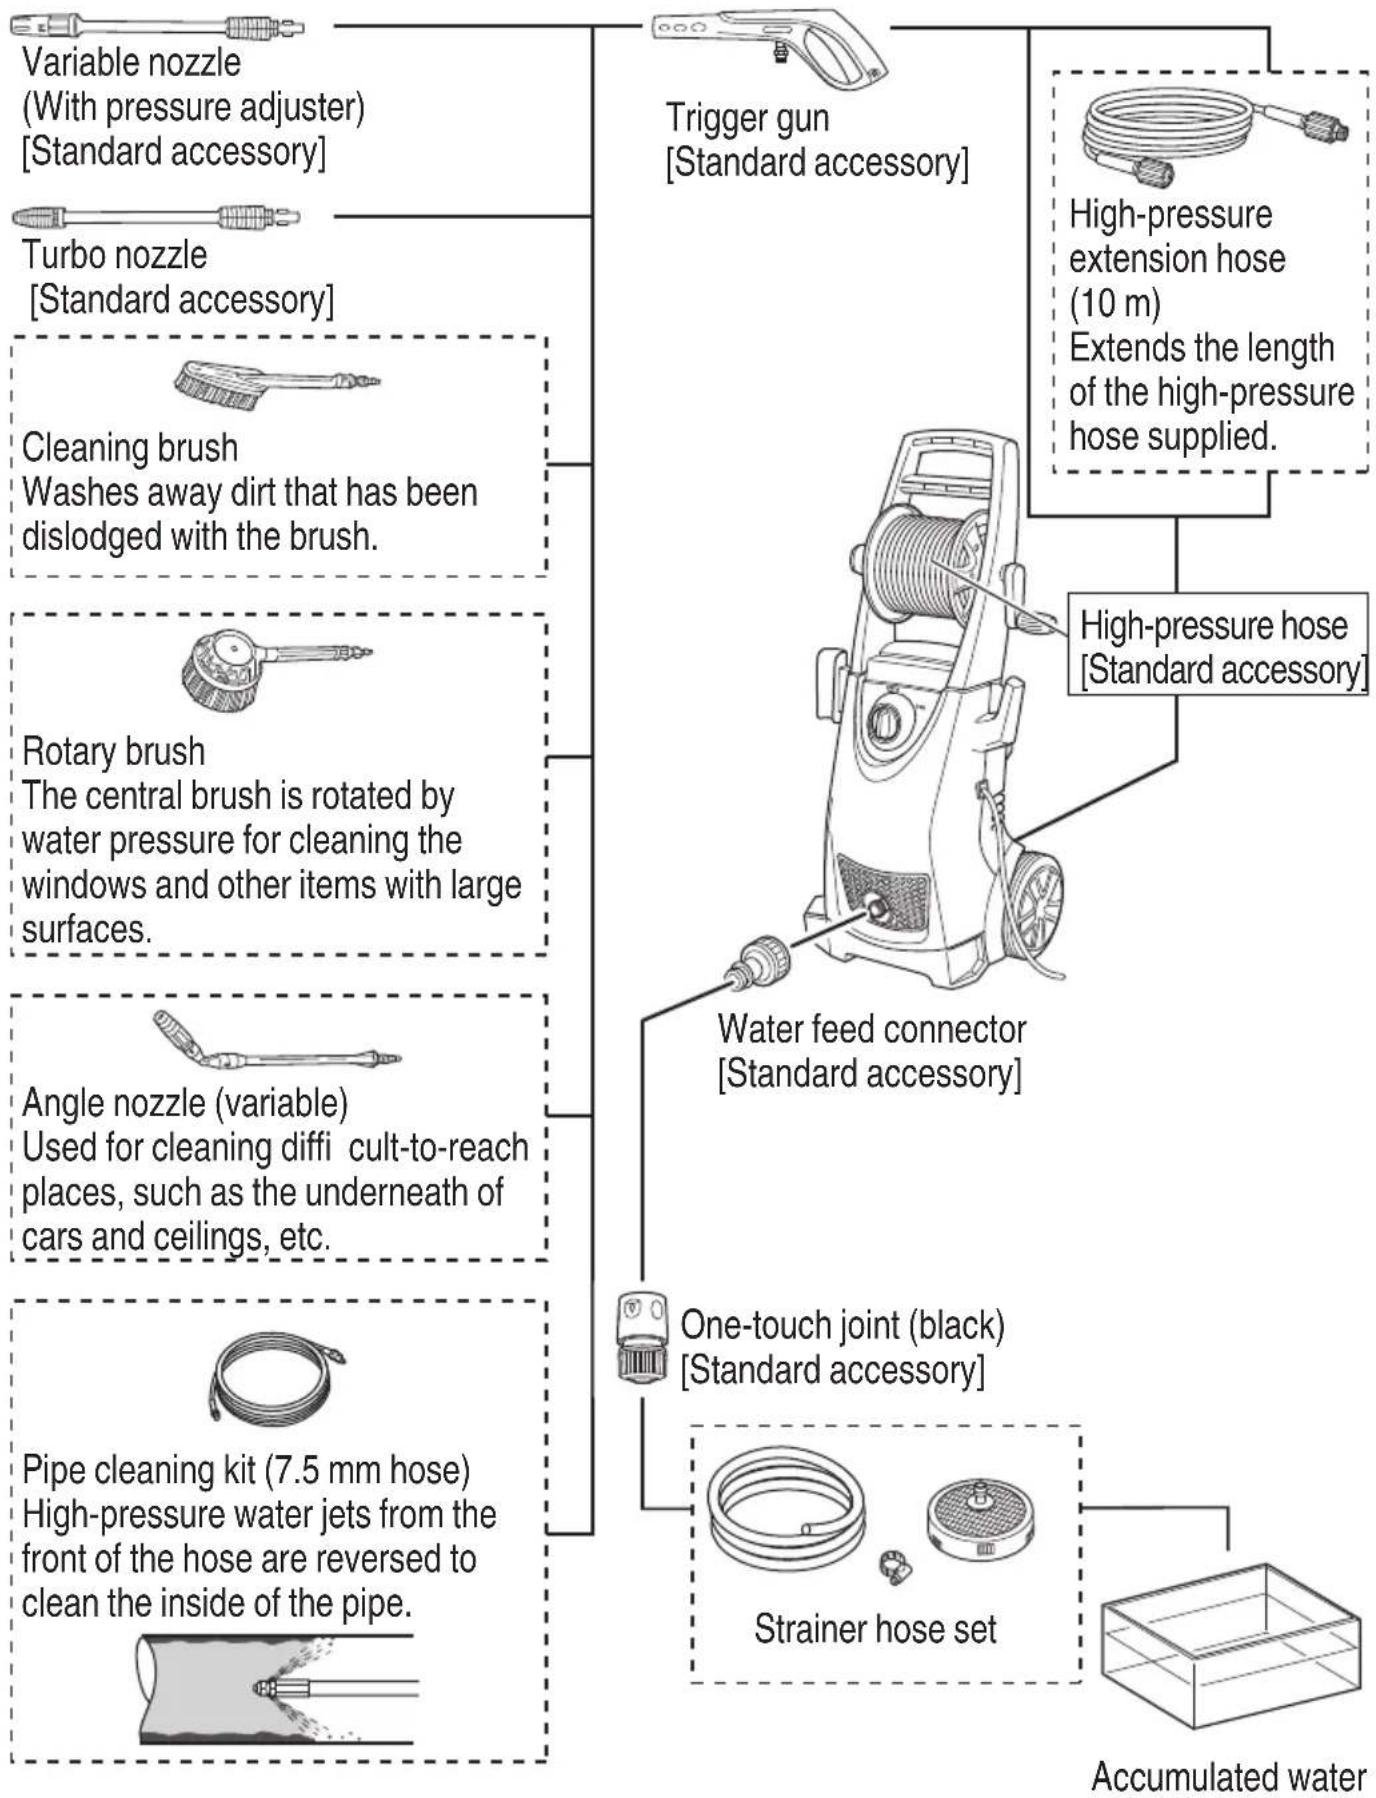
flowchart
graph TD
    A["Variable nozzle\n(With pressure adjuster)\n[Standard accessory"]] --> B["Turbo nozzle\n[Standard accessory"]]
    B --> C["Cleaning brush\nWashes away dirt that has been dislodged with the brush."]
    C --> D["Rotary brush\nThe central brush is rotated by water pressure for cleaning the windows and other items with large surfaces."]
    D --> E["Angle nozzle (variable)\nUsed for cleaning diffi cult-to-reach places, such as the underneath of cars and ceilings, etc."]
    E --> F["Pipe cleaning kit (7.5 mm hose)\nHigh-pressure water jets from the front of the hose are reversed to clean the inside of the pipe."]
    F --> G["Trigger gun\n[Standard accessory"]]
    G --> H["Water feed connector\n[Standard accessory"]]
    H --> I["One-touch joint (black)\n[Standard accessory"]]
    I --> J["Strainer hose set"]
    J --> K["Accumulated water"]
    L["High-pressure extension hose\n(10 m)\nExtends the length of the high-pressure hose supplied."] --> M["High-pressure hose\n[Standard accessory"]]
APPLICATIONS
○ Cleans screen doors, window glass, floors, walls, etc.
○ Cleans automobiles, motorbikes, etc.
○ Cleans mud off gardening equipment and agricultural equipment.
PRIOR TO OPERATION
1. Installation of an earth leakage circuit breaker
It is recommended that an earth leakage circuit breaker is connected to the washer to shut off the power if leaking current exceeds 30 mA for 30 milliseconds in order to prevent electric shocks.
2. Keep the work area neat and tidy
Dirty water will be sprayed about when using the washer. It is therefore necessary to check the area to make sure there are no hindrances, and keep the work area neat and tidy.
3. Situating the washer
Select flat locations where the washer will not be splashed with water when cleaning.
4. Using extension cords
Make sure the cord is thick enough to provide a constant supply of electricity, and use cords that are as short as possible.
Acceptable cord thicknesses (Nominal cross sectional area cable) and cord length are indicated in the table below.
| Cord Thickness (mm2) Cord Length (m) | |
| 1 12.5 | |
| 1.5 20 | |
| 2.5 30 | |
5. Attaching the gun holder (Fig. 1)
Align the groove on the gun holder with the protrusion on the washer and push until it clicks into place.
6. Prepare a water feed hose (Fig. 2)
Prepare the following when using water feed hoses:
○ Hoses that can withstand pressure (equipped with meshes)
○ Hoses with an inner diameter of 14 to 15 mm.
○ Hoses with an outer diameter of 20 mm or less.
7. Attaching the gun support (Fig. 3)
(1) Press the protrusion on the gun support into the long hole on the washer at an angle shown in the illustration.
(2) Firmly screw the screw supplied into the screw hole with a Phillips screwdriver.
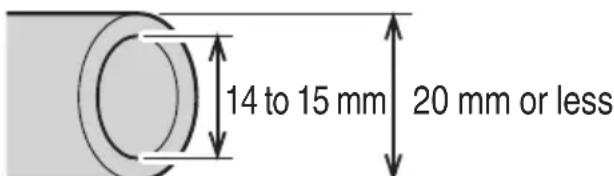
Fig. 2 Fig. 3

Fig. 1

English
8. Attaching the hose handle (Fig. 4)
(1) Insert the hose handle into the attachment hole on the washer.
(2) Press down while rotating it until it reaches a position approximately 15 mm deep.
(3) Continue to press down and rotate it until it clicks into place at approximately 15 mm deep.
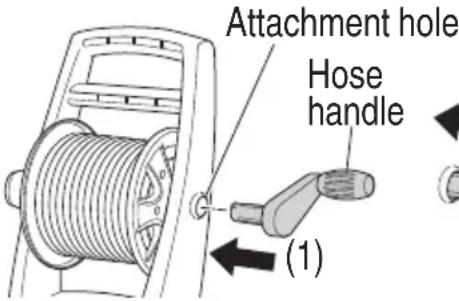

(2) (3)

Fig. 4
INSPECTIONS PRIOR TO USE
WARNING
Check the following before using the washer. Check the items listed in 1 and 2 before plugging into the power socket.
1. Check to make sure the switch is at the "OFF" position (Fig. 5)
Plugging the washer into the power socket with the switch set at "ON" will cause the washer to immediately begin operating, which may result in unexpected injuries.
2. Check the power supply
Only use a rated voltage.
Do not use motor engines are direct current. Failure to observe this will not only result in damage to the washer, it is also very dangerous.
3. Check the power socket
If the power socket is loose or the plug is easily dislodged, it needs to be repaired.
It is dangerous to use it in this condition. Consult with your local electrical engineering outlet.
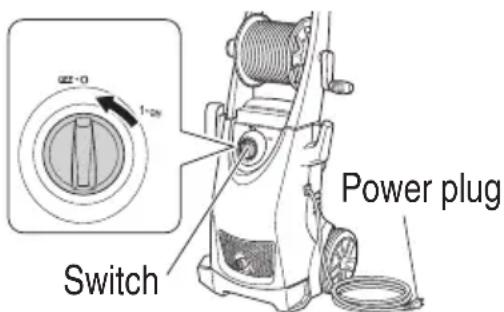
Fig. 5
ATTACHING PARTS
Make sure all parts are correctly attached in the following sequence in order to guarantee safe usage.
WARNING
Switch off the washer and disconnect it from the power socket without fail to prevent unexpected accidents.
1. Attach the water feed connector to the water feed inlet on the washer (Fig. 6)
Remove the cap on the washer's water feed inlet and firmly attach the water feed connector.
Loose connections may result in water leaks.
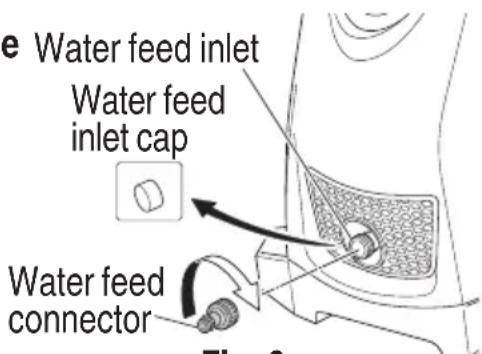
Fig. 6
2. Pull the high-pressure hose from the hose reel (Fig. 7)
Pull the entire length of the high-pressure hose from the reel while steadying the reel to prevent it from toppling over.
NOTE
Using the washer with part of the hose wrapped around the reel may result in insufficient pressure or abnormal vibrations.

Fig. 7
3. Attach the high-pressure hose to the trigger gun. (Fig. 8)
Grip the thick end of the high-pressure hose, insert it into the connector on the trigger gun, and then rotate the ring on the hose to fix it in place.
NOTE
○ Moisten the O-ring with water to facilitate the connection if it is difficult to insert the hose.
○ If the ring cannot be tightened, it means that the end of the high-pressure hose has not been sufficient inserted.
4. Attach the nozzle to the trigger gun.
(1) Align the protrusion on the nozzle with the entry hole on the trigger gun and press it into place.
NOTE
- Remove all dirt, mud and other matter from the trigger gun's entry hole and the protrusion on the nozzle.
○ Moisten the O-ring with water to facilitate the connection if it is difficult to insert the nozzle.
(2) Press down firmly on the nozzle and then rotate it in the direction of the arrow until it stops (half rotation.)
(3) Check to make sure that the nozzle cannot be pulled out once it has been attached.
Press down firmly on the nozzle and then rotate it counterclockwise until it stops. The nozzle can be withdrawn at that position.

Fig. 8

Fig. 9
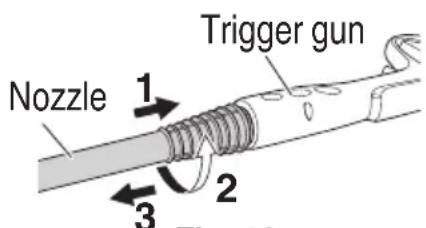
Fig. 10
USING DIFFERENT NOZZLES
Variable nozzle (with pressure adjustor) (Fig. 11)
The variable nozzle (with pressure adjustor) can be used to alternation between “Jet” and “Spray” and between “High Pressure” and “Low Pressure”.
Rotate the end on the nozzle clockwise for "Jet", and counter-clockwise for "Spray".
Also, rotate the pressure adjuster clockwise for "Low Pressure", and counter-clockwise for "High Pressure".
Nozzle tip
Low-pressureJet
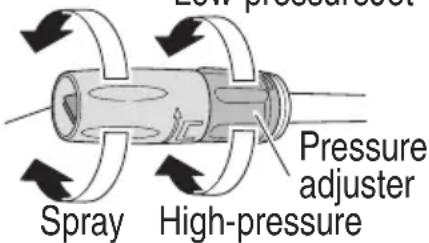
Fig. 11
- Jet washer
A water jet is discharged in a direct line to remove stubborn mud and other dirt from agricultural machinery, etc.
- Spray washer
The water is discharged in a wide fan for cleaning walls, motorbikes and automobiles, etc. The entire nozzle can be rotated by approximately 90 degrees to change the shape of the spray between horizontal and vertical.
NOTE
The pressure adjuster will also be rotated when alternating between "Jet" and "Spray", so readjust this to the required setting after making the adjustment.
○ Set the spray adjustment to “Jet” first of all, and then gradually move it to the “Spray” position while pulling the trigger.
Note that there is a chance of the water being sprayed horizontally over a wide area if this is rotated fully to the “Spray” position.
Note that the nozzle may be damaged if it is forced to move past the stop position when alternating between “Jet” and “Spray”.
Turbo nozzle
The turbo nozzle rotates as it sprays high-pressure jets of water for efficient washing.
NOTE
The turbo nozzle only discharges powerful jets of water when set at the “Jet” mode. Avoid using this on items that are easily broken or for which coatings are easily peeled.
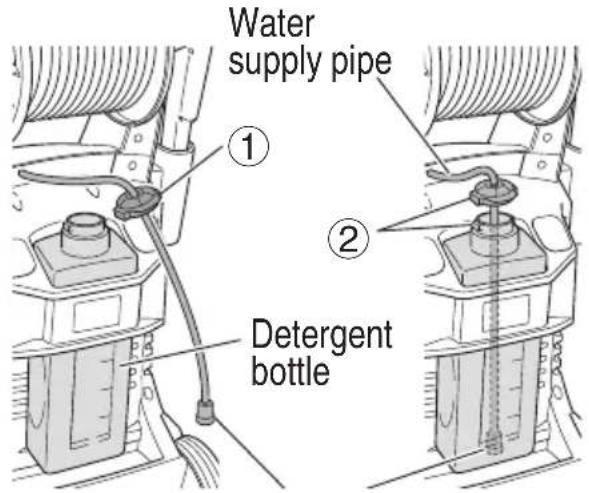
USING THE DETERGENT BOTTLE (Fig. 12)
Sprays water mixed with detergent.
Uses neutral detergents available on the open market.
WARNING
Do not use acidic or alkali detergents. Use only neutral detergents available on the open market.
Using detergents other than neutral detergents or chemical agents may result in accidents or malfunctions.
NOTE
Check to make sure that the water feed pipe is firmly connected to the washer.
The detergent will not be mixed with the spray otherwise.
① Remove the cap from the detergent bottle and pour the detergent into it.
② Make sure the filter on the tip of the detergent bottle's water feed pipe is inserted into the liquid and then tighten the cap firmly.
NOTE
Only the "Low Pressure" setting can be used for variable nozzles (with pressure adjustors) when using the detergent bottle.
The detergent will not be sprayed if the "High Pressure" setting on variable nozzles (with pressure adjustors) or turbo nozzles are used.
③ Set the adjustor to "Low Pressure" when using variable nozzles (with pressure adjustors.)
④ Water containing the detergent will be sprayed at low pressure when the trigger on the trigger gun is pulled.
Filter on the tip of the water feed pipe
Fig. 12
Cleaning the detergent bottle (Figs. 13 and 14)
① Remove the detergent bottle's water feed pipe from the washer.
② Push the detergent bottle from the bottom and withdraw it from the top.
③ Wash the detergent bottle, water feed pipe and filter with water from the faucet.
④ When reattaching the bottle, hold it as shown in Fig. 14, and then push the protrusion on the bottom in as far as it will go.
⑤ Insert the water feed pipe into the washer and tighten the cap while making sure dust or dirt does not enter.

Fig. 13
Fig. 14
USING THE STRAINER HOSE SET (sold separately)
The separately-sold strainer hose set is equipped with a function that will automatically suck water from a water tank, etc., when attached to the AW150.
The maximum height of suction (lifting range) is approximately 0.5 m.
Attach this correctly in accordance with conditions.
Suction height when the height of the water feed outlet is lower than the maximum height of the suction hose: From the maximum height of the suction hose to the surface of the water.
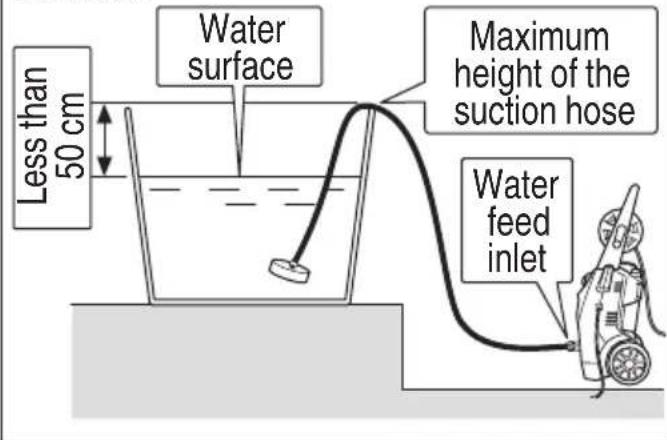
Suction height when the height of the water feed outlet is the same as the maximum height of the suction hose: From the water feed outlet to the surface of the water.

1. Attaching the strainer to the suction hose (Fig. 15)
(1) Pass the suction hose through the hose band supplied and then gently moisten the inside of the suction hose with water.
(2) Insert the strainer as far as it will go, and then firmly tighten the hose band with a fl at-headed screwdriver.

Fig. 15
2. Attaching the one-touch joint (black) to the suction hose (Fig. 16)
Attach the one-touch joint (black) supplied as a standard accessory to the suction hose.

Fig. 16
3. Starting the suction hose water suction process (Fig. 17)
Sink the strainer hose set into a container filled with water.
Start off the suction process (introduce water to the suction hose.)
NOTE
○ Do not use anything other than clean water (river or pond water, muddy water containing sand granules.)
Failure to observe this may result in malfunctions.
○ Set the switch at "ON" without the nozzle attached.
Failure to observe this may result in dry operations, leading to malfunctions.
4. Insert the one-touch joint into the water feed connector (Fig. 18)
Withdraw the one-touch joint from the accumulated water and insert it into the water feed connector on the washer while making sure that the water inside the hose does not escape.
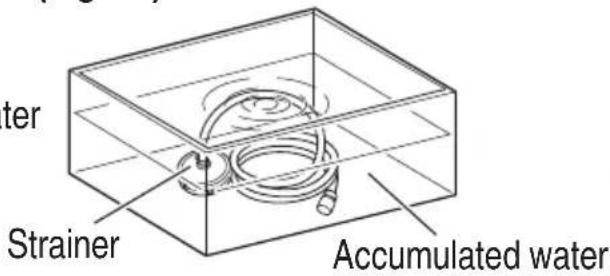
Fig. 17

Fig. 18
5. Check to make sure the water is flowing out (Fig. 19)
(1) Connect the trigger gun from which the nozzle has been removed to the high-pressure hose.
(2) Plug in the power socket and set the switch to "ON".
(3) Pull the trigger gun's trigger, and then set the switch to "OFF" after checking that sufficient water is flowing out.
6. Attach the nozzle.
NOTE

Fig. 19
Set the switch at "OFF" if water does not flow out within two minutes.
Failure to observe this may result in malfunctions (dry operations.)
7. Washing
Set the switch at "ON" and pull the trigger gun's trigger to commence washing.
8. Cleaning
Remove all dirt from the strainer's grill, wash it with water and store it after it has dried.
WASHING
WARNING
○ Do not switch the washer on while the trigger is being pulled.
Failure to observe this may result in high-pressure water being sprayed immediately, leading to unexpected accidents.
○ Do not point the nozzle at people or animals.
Failure to observe this may result in injury.
CAUTION
○ Set the switch to "OFF" immediately if the hose becomes detached from the faucet or washer, and if water is no longer being fed to the washer.
Failure to observe this may result in immediate malfunctions (dry operations.)
○ Set the switch to "OFF" without fail when temporarily suspending operations.
Failure to observe this may result in the motor automatically starting up.
○ Place your finger in the center of the trigger during operations (Fig. 20)
Failure to observe this may result in injury from pinched fingers.
Grip the gun and nozzle firmly with both hands.
○ The trigger gun may kick back when water is discharged.
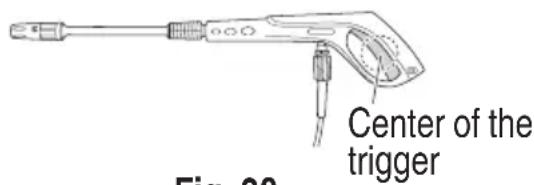
Fig. 20
NOTE
Do not use the water hose when it is wound onto the reel. Failure to observe this may result in insufficient water feed.
Commence initial washing approximately 2 to 3 meters away from the targeted item, and then move gradually closer while checking the level of cleaning until you reach a distance in which soiling is effectively washed away.
The pressure of the spray from the washer is approximately 20-times greater than tap water. High-pressure water jets may therefore damage or peel the coating from the items being washed.
There are cases when the water spray will appear unstable owing to the fact that air that has built up in the pump and hose is purged together with the water immediately after use. In this event, allow the water to flow out until it stabilizes.
Leave two or more seconds gap between pulling and releasing the trigger.
Failure to observe this may result in the pressure switch malfunctions.
Do not use the washer for more than thirty consecutive minutes without giving it a break.
1. Open the faucet to its fullest.
Point the nozzle in a safe direction and then fully open the faucet. Check to make sure no water is leaking from the joints.
Release the trigger stopper with the washer switched off, pull the trigger on the trigger gun to discharge a small amount of water from the nozzle with just the pressure from the tap water.
Check to make sure that no water is leaking.
NOTE
Do not switch the washer on with the faucet turned off.
Failure to observe this may result in malfunctions.
2. Set the switch to the "ON" position (Fig. 21)
The motor will start operating when the washer is switched on. The motor will automatically switch off once sufficient water pressure has built up inside the washer.

3. Pull the trigger (Fig. 22)
Hold the trigger gun firmly in both hands, point the nozzle at the item to be washed, and then pull the trigger.
The high-pressure water jet will spray out.
Adjust the nozzle between "Jet" and "Spray" in accordance with need.
Trigger stopper (Fig. 23)
The trigger gun is fitted with a trigger stopper to prevent the trigger from being pulled.
The trigger is locked and released by pressing the stopper in the direction shown by the arrows.
NOTE
Lock the trigger with the trigger stopper during pauses and after washing has been completed.
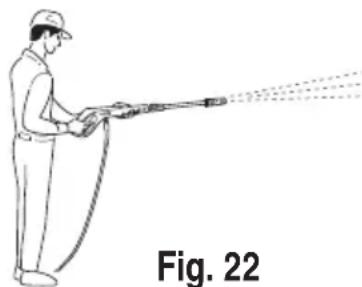
natural_image
Illustration of a person spraying water with a hose, labeled Fig. 22 (no text or symbols on the diagram itself)
Fig. 23
ON COMPLETION OF USE
Once the targeted item has been washed, drain the residual water from the washer and store it in a well-ventilated location to dry.
There are cases in which water left in the hose may freeze during the winter, so drain as much water as possible and store it indoors.
WARNING
Make sure all residual water is drained from the washer, the trigger gun and the hose, etc., after use.
Failure to observe this may result in freezing, leading to malfunctions.
1. Draining water from the washer
(1) Stop the water supply.
(2) Set the switch to "ON" and pull the trigger on the trigger gun to drain the water from the inside of the washer. Continue this until water is no longer discharged (approximately 30 to 60 seconds.)
(3) Press the trigger stopper on the trigger gun to lock it in place.
English
2. Set the switch to "OFF".
(1) Switch off the washer.
(2) Unplug the power cord from the mains socket.
NOTE
Leaving the washer switched on may result in dry operations, leading to malfunctions.
3. Detach the trigger gun.
Follow the reverse procedure explained in "Attach the high-pressure hose to the trigger gun" to detach the trigger gun. Hose reel
4. Rewind the high-pressure hose (Fig. 24)
Place the end of the high-pressure hose at a position lower than the reel and then rewind it while draining out all residual water.
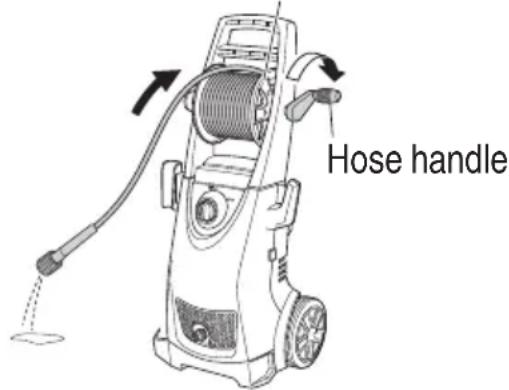
Fig. 24
5. Drain the water from the washer (Fig. 25)
(1) Tilt the washer to drain out the residual water.
(2) Wipe away all moisture with a dry cloth.
CAUTION
Water left in the washer may freeze in the winter, which could result in damage to the pump.

natural_image
Line drawing of a vacuum cleaner with coiled hose and circular components (no text or symbols)Fig. 25
SAFETY MECHANISMS
The washer is equipped with the following safety mechanisms to ensure safe usage.
Power switch
This prevents the washer from being unintentionally operated.
Trigger gun equipped with a lock
This prevents the trigger from being pulled, unintentionally operating the washer.
Pressure switch
This prevents the pressure inside the washer from exceeding permissible levels. Releasing the lever on the trigger gun causes the valve operated by water pressure to halt pump operations, which allows the pressure to be released through the water feed. The pump is started again when the lever is pulled.
Thermal protector
This protects the motor by halting operations when abnormal heat is detected in the motor. It will start operating again when the motor cools down.
MAINTENANCE AND INSPECTION
WARNING
Switch off the washer and disconnect the plug from the power socket without fail when inspecting and cleaning it. Nozzle hole
1. Inspecting the washer and hoses (Fig. 26)
Check to make sure that there is no damage, cracks or malformations.
Make sure you clean the hole on the nozzle with the nozzle cleaner pin supplied on a regular basis.
NOTE
Detach the trigger gun and clean the nozzle hole.
2. Inspecting the strainer (Fig. 27)
Wash all blockages out of the grid with water on a regular basis.
NOTE
Withdraw the strainer from the water feed inlet with the use of fl at radio pliers.
3. Clean the washer

Fig. 26

Fig. 27
Squeeze the excess moisture from a cloth soaked in soap and water and wipe the washer.
Do not use gasoline, thinner, benzene, kerosene, etc. Failure to observer this may result in malformations.
4. Check for loose screws.
Check for loose screws on a regular basis and tighten any screws that are loose. Failure to observe this could be dangerous.
5. Tidying up and storing the washer after use (Fig. 28)
The accessories can be stored inside the washer as shown in Fig. 28 when not in use and when being carried around.
Avoid the following environments and store the washer and accessories in a safe, dry location when not in use.
○ Do not store within the reach of children, or in locations where children can use it.
Do not store in location where rain can reach it, such as in front of the house, or in locations with high humidity.
Do not store in locations that are subject to drastic changes in temperature or direct sunlight.
○ Do not store in locations containing volatile substances that may ignite or explode.
6. Replacing supply cord
If the replacement of the supply cord is necessary, it has to be done by a HiKOKI Authorized Service Center to avoid a safety hazard.

Fig. 28
English
7. Service parts list
CAUTION
Repair, modification and inspection of HiKOKI Power Tools must be carried out by a HiKOKI Authorized Service Center.
This Parts List will be helpful if presented with the tool to the HiKOKI Authorized
Service Center when requesting repair or other maintenance.
In the operation and maintenance of power tools, the safety regulations and standards prescribed in each country must be observed.
MODIFICATIONS
HiKOKI Power Tools are constantly being improved and modified to incorporate the latest technological advancements.
Accordingly, some parts may be changed without prior notice.
TROUBLESHOOTING
Use the inspections in the table below if the tool does not operate normally. If this does not remedy the problem, consult your dealer or the HiKOKI Authorized Service Center.
| Symptom Possible cause Remedy | ||
| The motor won't operate when the trigger is pulled. | The power plug is not plugged into the power socket. | Plug the power cord into the power socket. |
| The switch is set at “OFF” Switch the washer on. | ||
| The extension cord is unplugged or severed midway. | Replace the extension cord or check it with a different electrical appliance. | |
| The thermal protector has been activated. | Remedy the problem in accordance with the details listed in “Safety Mechanisms” on page 38. | |
| The motor continues operating when the trigger is released. | The water volume or pressure from the faucet is too low. | Open the faucet fully.Unravel any twists in the water hose and high-pressure hose.Check to make sure that the inner diameter of the water hose is correct.Check to make sure that the water hose is not wound onto the reel. |
| Water is leaking. Check the hose connections. | ||
| Water is not being discharged. | The water hose is not connected. | Connect the water hose. |
| The water hose or high-pressure hose is twisted. | Unravel the twists. | |
| The backflow valve on the one-touch joint is not operating. | Check to make sure that the inner diameter of the water hose is correct. | |
| Water is not being discharged. | The trigger stopper is locked. Remedy the problem in accordance with the details listed in “Trigger Stopper” on page 37. | |
| The faucet it turned off . Open the faucet fully. | ||
| The nozzle is blocked. Clean the end of the nozzle with the nozzle cleaner pin supplied. | ||
| The strainer is blocked. Wash the strainer, which is incorporated into the water feed inlet, in accordance with the details listed in “Inspecting the Strainer” on page 39. | ||
| The water pressure won’t rise. | The power plug is not plugged into the power socket. | Plug the power cord into the power socket. |
| The switch is set at “OFF”. Switch the washer on. | ||
| The water volume or pressure from the faucet is too low. | Open the faucet fully.Unravel any twists in the water hose and high-pressure hose.Check to make sure that the inner diameter of the water hose is correct.Check to make sure that the water hose is not wound onto the reel. | |
| The nozzle is blocked. Clean the end of the nozzle with the nozzle cleaner pin supplied. | ||
| The electrical voltage is too low. Check to make sure that the thickness and length of the extension cord is appropriate. | ||
| Water is leaking. Check the hose connections. | ||
SERVICE PARTS LIST

| ITEM NO. | PART NAME Q'TY | |
| 1 | PUMP ASS'Y (P8) (INCLUDE 6-8) | 1 |
| 2 MOTOR 1 | ||
| 3 MOTOR COVER 1 | ||
| 4 BACK MOTOR FILTER 1 | ||
| 5 CARBON BRUSH 2 | ||
| 6 FRONT MOTOR FILTER 1 | ||
| 7 SCREW 5.5 × 25 4 | ||
| 8 PEACH SHAPED RING 1 | ||
| 9 INLET FILTER (MESH) 1 | ||
| 10 VALVE CAP 1 | ||
| 11 VALVE CORE 1 | ||
| 12 SPRING 1 | ||
| 13 MICRO SWITCH 1 | ||
| 14 MOTOR WIND COVER (A) 2 | ||
| 15 SCREW 2.9 × 13 4 | ||
| 16 FAN COVER 1 | ||
| 17 SEAL PLATE | 1 | |
| 18 HANDLE | 1 | |
| 19 HOSE REEL COVER | 1 | |
| 20 CONNECTOR | 1 | |
| 21 O-RING ( 4.8 × 1.8 ) | 1 | |
| 22 CONNECTION TUBE | 1 | |
| 23 HOSE REEL | 2 | |
| 24 HANDLE (HOSE REEL) | 1 | |
| 25 HANDLE COVER (L) | 1 | |
| 26 SCREW 4.8 × 20 | 20 | |
| 27 HANDLE COVER (R) | 1 | |
| 28 GUN HOLDER | 1 | |
| 29 U-PIN | 2 | |
| 30 INNER HOSE | 1 | |
| 31 SCREW 4.8 × 16 6 | ||
| 32 HANDLE GRIP | 1 | |
| 33 SCREW 4.8 × 25 4 | ||
| 34 TUBE CONNECTOR | 1 | |
| 35 CAUTION LABEL | 1 | |
| 36 INNER TUBE | 1 | |
| 37 SPRAY TUBE | 1 | |
| 38 TANK COVER | 1 | |
| 39 SPRAY SPIGOT | 1 | |
| 40 SPRAY PLUG 1 | ||
| 41 TANK | 1 | |
| 42 FRONT CLAMP | 1 | |
| 43 KNOB | 1 | |
| ITEM NO. | PART NAME Q'TY | |
| 44 K | NOB COVER (SILVER) 1 | |
| 45 INLET COVER | 1 | |
| 46 INLET PLATE | 1 | |
| 47 FRONT HOUSING | 1 | |
| 48 BACK CLAMP | 1 | |
| 49 SCREW (C) 4 × 14 | 13 | |
| 50 SEAL RING | 1 | |
| 51 FRONT SW COVER | 1 | |
| 52 SW SHAFT | 1 | |
| 53 MAIN SWITCH | 1 | |
| 54 CAPACITOR | 1 | |
| 55 BACK SW COVER | 1 | |
| 56 WIND BOARD | 1 | |
| 57 FERRITE CORE | 2 | |
| 58 PLATE | 1 | |
| 59 GUN SUPPORT | 1 | |
| 60 PUMP BASE 1 | ||
| 61 FERRITE CORE | 2 | |
| 62 SCREW M5 × 18 2 | ||
| 63 WHEEL GUARD (L) | 1 | |
| 64 WHEEL GUARD (R) | 1 | |
| 65 CORD SET | 1 | |
| 66 BACK HOUSING | 1 | |
| 67 WHEEL SHAFT | 1 | |
| 68 NAME PLATE | 1 | |
| 69 WHEEL | 2 | |
| 70 WHEEL COVER | 2 | |
| 71 WASHER | 2 | |
| 72 EXTERNAL CIRCLIP | 2 | |
| 501 | NOZZLE CLEANER PIN | 1 |
| 502 | INLET NUT | 1 |
| 503 | TURBO NOZZLE (INCLUDE 505) | 1 |
| 504 | VARIABLE NOZZLE (B)(INCLUDE 505) | 1 |
| 505 | O-RING | 2 |
| 506 | GUN (A) 1 | |
| 507 | O-RING | 2 |
| 508 | HIGH-PRESSURE HOSE(INCLUDE 507) | 1 |
| 509 | ONE-TOUCH JOINT | 1 |
服务中心
工机商业(中国)有限公司
- 使用滤网软管套件(分开销售)
- 中文
- 扳机掣(图 23)
- 安全装置
- 电源开关
- 可锁定的喷枪
- 压力继电器
- GENERAL POWER TOOL SAFETY WARNINGS
- WARNING
- Wear safe clothing when using the washer.
- Use protective goggles and dust-protection masks when using the washer.
- Do not handle the power cord roughly.
- Make sure the item being cleaned is firmly fixed in place.
- Maintain a proper stance when using the washer.
- Pay close attention to maintaining the High Pressure Washer.
- Switch off and unplug the High Pressure Washer in the following situations:
- Always remove equipment used for adjustment purposes.
- Avoid accidentally switching on the power.
- Inadequate extension cords can be dangerous.
- Pay attention at all times when using the washer.
- Only use specified accessories and attachments.
- High Pressure Washer repairs to be performed only by experts.
- English
- CAUTION
- SYMBOL
- STANDARD ACCESSORIES
- OPTIONAL ACCESSORIES (sold separately)
- APPLICATIONS
- PRIOR TO OPERATION
- Installation of an earth leakage circuit breaker
- Keep the work area neat and tidy
- Situating the washer
- Using extension cords
- Attaching the gun holder (Fig. 1)
- Prepare a water feed hose (Fig. 2)
- Attaching the gun support (Fig. 3)
- Attaching the hose handle (Fig. 4)
- INSPECTIONS PRIOR TO USE
- Check to make sure the switch is at the "OFF" position (Fig. 5)
- Check the power supply
- Check the power socket
- ATTACHING PARTS
- Attach the water feed connector to the water feed inlet on the washer (Fig. 6)
- Pull the high-pressure hose from the hose reel (Fig. 7)
- NOTE
- Attach the high-pressure hose to the trigger gun. (Fig. 8)
- Attach the nozzle to the trigger gun.
- USING DIFFERENT NOZZLES
- Variable nozzle (with pressure adjustor) (Fig. 11)
- - Jet washer
- - Spray washer
- Turbo nozzle
- USING THE DETERGENT BOTTLE (Fig. 12)
- Cleaning the detergent bottle (Figs. 13 and 14)
- USING THE STRAINER HOSE SET (sold separately)
- Attaching the strainer to the suction hose (Fig. 15)
- Attaching the one-touch joint (black) to the suction hose (Fig. 16)
- Starting the suction hose water suction process (Fig. 17)
- Insert the one-touch joint into the water feed connector (Fig. 18)
- Check to make sure the water is flowing out (Fig. 19)
- Attach the nozzle.
- Washing
- Cleaning
- WASHING
- Open the faucet to its fullest.
- Set the switch to the "ON" position (Fig. 21)
- Pull the trigger (Fig. 22)
- Trigger stopper (Fig. 23)
- ON COMPLETION OF USE
- Draining water from the washer
- Set the switch to "OFF".
- Detach the trigger gun.
- Rewind the high-pressure hose (Fig. 24)
- Drain the water from the washer (Fig. 25)
- SAFETY MECHANISMS
- Power switch
- Trigger gun equipped with a lock
- Pressure switch
- Thermal protector
- MAINTENANCE AND INSPECTION
- Inspecting the washer and hoses (Fig. 26)
- Inspecting the strainer (Fig. 27)
- Clean the washer
- Check for loose screws.
- Tidying up and storing the washer after use (Fig. 28)
- Replacing supply cord
- Service parts list
- MODIFICATIONS
- TROUBLESHOOTING
- SERVICE PARTS LIST
Brand : HiKOKI
Model : AW 150
Category : Pressure washer