BCM1004 - Charger Ferm - Free user manual and instructions
Find the device manual for free BCM1004 Ferm in PDF.


| Product Type | Charger |
| Brand | Ferm |
| Model | BCM1004 |
| Input Voltage | 220-240 V AC, 50/60 Hz |
| Output Voltage | 12 V DC |
| Output Current | 4 A |
| Charging Modes | Automatic, trickle charge |
| Protection Features | Overload, short circuit, reverse polarity, overheat |
| Dimensions (L x W x H) | 200 x 150 x 80 mm |
| Weight | 1.2 kg |
| Cable Length | 1.8 m |
| LED Indicators | Power, charging, fully charged, error |
| Suitable Battery Types | Lead-acid (WET, AGM, GEL, MF) |
| Maintenance | Keep clean and dry; check cables periodically |
| Safety Instructions | Use in well-ventilated area; do not cover; keep away from flammable materials |
| Spare Parts Availability | Replacement cables and fuses available from Ferm |
| General Information | Compact design with mounting brackets; suitable for workshop and garage |
Frequently Asked Questions - BCM1004 Ferm
User questions about BCM1004 Ferm
0 question about this device. Answer the ones you know or ask your own.
Ask a new question about this device
Download the instructions for your Charger in PDF format for free! Find your manual BCM1004 - Ferm and take your electronic device back in hand. On this page are published all the documents necessary for the use of your device. BCM1004 by Ferm.
USER MANUAL BCM1004 Ferm
natural_image
Two black Formi industrial control units with visible branding and mounting brackets (no readable text or symbols)Ferm
6 & 11 Ampère
Battery charger
Batterie-Ladegerät
Akkulader
Product: Ferm battery charger
Ferm, Genemuiden, The Netherlands.
This apparatus has a overload protection by means of a thermal fuse which will switch on as soon as the electricity is switched off.
CAREFULLY READ THE INSTRUCTIONS BEFORE YOU USE THE BATTERY CHARGER!
I. KNOW YOUR APPARATUS
Before you use the apparatus, carefully read the instructions, especially the safety rules. Observe the instructions for maintenance to ensure your apparatus always operates properly. Before attempting to operate the apparatus, familiarise yourself with the controls and make sure you know how to stop it quickly in an emergency. Save this user's manual and the other documents supplied with this apparatus for future reference.
2. GENERAL SAFETY RULES
Keep the work area clean.
A cluttered work area may cause accidents. take sure the work area is well-lit.
Work environment.
Never leave tools in the rain. Do not use tools in damp or wet places. Never use tools near inflammable liquids or gasses.
Prevent electrical shock.
Keep the power cord away from heat, oil and sharp edges. Avoid skin contact with exposed parts of the power cord or plug.
Keep children away.
Never allow children or spectators to touch the tools.
keep them at a safe distance from the work area.
Store tools in a safe place.
Tools that are not used must be stored in a dry and
locked placed, out of the reach of children
Do not force the tool.
The machine will do the job better and safer at the rate for which it was intended. Damage caused by forcing the tool is not covered by the warranty.
Use the right type of tool.
Do not use low-powered tools for heavy-duty operations. Never use the machine other than for its intended purpose.
Cable.
Never carry the tool by its cable and do not tug at the cable to pull the plug from the socket. Keep the cable away from heat, oil and sharp edges.
Maintain the tool with care.
- The tool works best and safest if it is kept clean.
- Observe the instructions for maintenance and changing accessories. Keep the tool dry and free from oil and grease.
Disconnect the machine.
Disconnect the machine when you do not use it, before cleaning and when changing accessories and tools.
Extension cable for outdoor use.
When working outdoors use only extension cables suitable for this purpose and marked as such. When using machines with earth-connection, use an extension cable with earth-connection.
Stay alert.
Watch what you are doing, use your common sense, do not operate the tool when you cannot concentrate on the job.
Check the machine for damage.
- Before starting the machine, check that all safety devices and damaged parts operate smoothly and efficiently;
- If not stated otherwise in this manual, damaged safety devices and machine parts must be repaired or replaced by a recognized service centre. Damaged switches must be replaced by a service centre. Do not use the machine when it cannot be switched on or off.
24 MONTHS GUARANTEE CERTIFICATE • 24 MONATE GARANTIE-SCHEIN • 24 MAANDEN GARANTIEKAART • 24 MOIS CERTIFICAT DE GARANTIE • 24 MESES CARTA DE GARANTIA • CERTIFICADO DE GARANTIA DE 24 MESES • KOYTONI EFRYHΣΗΣ 24 MHNΩN
Stamp dealer:
Stempel Händler:
Stempel handelaar:
Timbre marchand:
Sello del vendedor:
Carimbo
do comerciante:
Αντιπροσώπου:
Address/Adresse/Adres/Adresse/
Endereço/Dirección/Διεύθυνση:
Only in case of guarantee claim, send this card to:
In the design of the battery charger the requirements for safe usage have been taken into account. Any change, adaptation, conversion or other use may interfere with the safety of the apparatus. In addition, the guarantee will no longer be valid because of this.
- Check the following things:
- Does the voltage of the battery charger correspond to the mains voltage. Battery chargers with the indication of 230 Volt can also be used when there is a mains voltage of 220 Volt.
- Are the mains lead and the mains plug in good condition.
- Avoid the use of long extension cables for the battery charger.
- Do not try to open the housing of the battery, because dangerous substances may be released.
- Do not use the battery charger where there is moisture.
- Do not expose the battery (and the charger) to vivid sunlight and high temperatures.
- During charging the battery acid may start to boil, which is not unusual. Beware of splashing, however, for battery acid is caustic. The battery charger therefore needs to be switched off in order to prevent accidents and to allow the battery to cool down.
- During charging so-called detonating gas can be liberated. That is why the filler caps are unscrewed before charging (does not apply to closed batteries, this means accumulators without filler caps). Charging has to take place in a thoroughly ventilated space.
- The battery charger does not stop automatically after charging. For this reason it needs to be switched off and disconnected from the battery. Do not leave the battery charger connected to the mains voltage after the battery has been charged completely.
THE APPARATUS NEEDS TO BE SWITCHED OFF COMPLETELY IN THE CASE OF:
-
Malfunctioning or damage to the mains plug or mains cable.
-
Smoke or stench from scorched insulation.

Always wear safety glasses and old clothes during working with the accumulator, because battery acid is a biting product!
DEFECTIVE BATTERIES
- Damaged batteries which do not retain their charge. It is often the case that batteries which are in very bad condition can no longer be charged; they need to be replaced because they do not retain their charge.
- Short circuited batteries.
If, after several hours the battery charger still does not indicate that the battery is being charged, this usually means that one of the elements is short circuited. The battery needs to be replaced.
4. WARRANTY PROVISIONS
- Ferm guarantees all material and construction defects for a period of 24 MONTHS after purchase. Other claims in respect of damage, of whatever nature, direct or indirect, to persons and/or materials are excluded.
- Always consult your Ferm dealer in the first instance. Usually he will be able to solve the problem or repair the defect.
- If parts are repaired or replaced within the warranty period, this does not extend the warranty period.
- Fair wear and tear is not covered by this warranty. For example batteries or switches.
- if you can submit proof of the date of purchase,
i.e. a RECEIPT stating the date of purchase: - if you have completed and signed the enclosed warranty card. You will find the warranty card in the back of this manual.;
- if no repairs or alterations have been made to the machine by third parties, nor other than the original parts have been fitted;
- if the machine was used in accordance with the instructions;
- if we cannot plead force majeure.
- The warranty provisions apply in combination with our terms of delivery and sale.
- All cost of transport of the machine to be repaired ar at buyer's expense. Badly packed articles are not accepted.
5. THIS WARRANTY APPLIES ONLY:
5. ENVIRONMENTAL PROTECTION
Recycling raw materials is preferred to dumping them as waste.
To prevent the machine from being damaged during transport its packing must be strong. Insofar as possible the packing consists of recyclable materials. Because recycling is better for the environment, we suggest you use as much as possible the recycling methods.
6. FERM'S AFTER SALES SERVICE
Save the original packing. Should you ever have to move the machine there is less risk of damage in the original packing. Should your machine nevertheless become defective, please consult your local Ferm dealer.
7. INSTALLATION
Before putting the battery charger into operation the following steps need to be taken (see diagram):
I. If the battery is still connected, it needs to be disconnected.
FIRST THE NEGATIVE TERMINAL THEN THE POSITIVE TERMINAL
It is advisable to remove the battery from the vehicle before charging it.
- Check the level of the battery acid. For this purpose remove the battery stoppers first, then check the acid level and, if necessary, fill up with distilled water (available from the chemists'). The level of the electric charge can be checked with a hydrometer.
- Clean the connections and the terminals. This can be done with a steel wire brush or with sandpaper.
- Connect the positive clamp of the charger (red) to the positive terminal (+) of the battery. Then connect the negative clamp of the charger (black) to the negative terminal (-) of the battery.
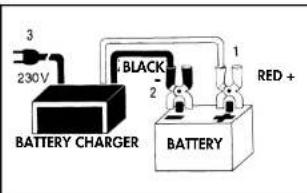
Check if the clamps of the charger are firmly connected to the battery.
- The following steps need to be taken with the help of the information of the charge control display.
On the front side of the battery charger three coloured LED's can be seen. These LED's indicates the situation of the charging process.
RED LED LIGHTS UP
The red led indicates that the battery charger is correctly connected to the battery poles. Charging can start by connecting the battery charger to the mains. During the entire charging procedure the red LED will burn.
IMPORTANT: When the red LED doesn't light up after connecting to the battery poles of the battery terminals, the fuse has to be checked (see 'change of the fuse') or the safety switch has to be pushed in.
YELLOW LED LIGHTS UP
The yellow led indicates that the, to the mains connected battery charger is now charging. During the entire charging procedure the yellow LED will burn.
IMPORTANT: When the yellow LED doesn't light up after connection to the mains, the condition of the mains socket has to be checked. If the yellow LED goes out during the charging procedure, the circuit was interrupted by the protecting system of the transformer against overload. Disconnect the charger from the mains socket and after a pause of 10 minutes (cooling break) you can connect the charger to the mains socket again.
GREEN LED LIGHTS UP
The charging procedure has been finished. After the battery is fully charged the green LED lights up. Besides the light intensity of the LED will change continuously from weak light intensity to bright light intensity.
Weak light intensity:
Charging procedure almost finished.
Bright light intensity:
Charging procedure finished.
After charging the battery the battery charger doesn't stop automatically. It needs to be disconnected from the mains and from the battery. Remove the plug from the mains socket as soon as the battery is fully charged.
24 VOLT BATTERY CHARGERS
The Ferm battery charger, art. nr. 160380, can also charge batteries for 24 Volt (truck batteries). For this purpose the switch at the front of the battery charger needs to be in the '24 Volt' position.
FAST OR NORMAL CHARGING
The battery chargers type 20/100 ampère obtain the possibility of fast charging or normal charging. At normal charging the complete active battery mass will be regenerated. At fast charging the battery will not be able to reach its full capacity. With the switch at the front of the battery charger you can choose between fast or normal charging.
CHANGING THE FUSE
For changing the fuse you have to disconnect the battery charger from the mains and then you have to unfasten the battery terminals of the battery poles.
- The fuse is visible installed in the front cap.
- Remove the defective fuse (the fuse wire has melted) and replace it by a fuse with the same current intensity (20A). For removing the fuse you have to put a screw-driver into the crack between the fuse and the fuse holder and use the screw-driver as a lever.

Replacing the fuse has to take place without the use of force!
Parts list
CHECK CHARGED BATTERY
On the basis of the specific gravity of the battery acid can be gathered if an accumulator is fully loaded or not. With the help of a specific gravitymeter the specific gravity can be appointed.
Empty battery: s.g. = 1.13 kg/dm ^3 Full battery: s.g. = 1.28 kg/dm ^3
STAND BY START
The battery charger20/100 ampère is equipped with a stand by start of 100 Amp. Put the switch at the front of the battery charger in the FAST/START position. Connect the charging cables with the motor vehicle that has to be started and start the engine. If the safety switch is turned off, the start-peak current (which can be up to 250 Amp.) is to high.

The charging procedure will not be cut off. So automatically keep watching the charging procedure. On the basis of the LED's the situation can be determined.
II. MAINTENANCE

Always remove the plug from the mains socket when the battery charger is being serviced or cleaned. Never use any water or other liquids when cleaning the charger. Keep the cable and your battery charger clean. Some cleaners and solvents (petrol, thinner) can affect or dissolve plastic parts. These products contain a.o. benzene, trichloroethylene, chloride and ammonia.
The life of your battery will be considerably longer if the following advice is taken:
- Check the liquid level of the battery every month and, if necessary, fill it up with distilled water.
- Clean the terminals of your battery regularly to prevent deposit. Put a little bit of vaseline on the terminals.
- If the vehicle is seldom used, the battery will discharge. Therefore it needs to be charged regularly to maximum capacity. In this way malfunctioning can be prevented.
12. MALFUNCTION
If your battery charger no longer functions as it should, this may be due to the following reasons:
- The clamp has been connected wrongly. Check if the right clamp is connected to the right terminal.
- The safety switch is switched off.
If everything has been checked, and the battery charger still does not charge as it should, it needs to be taken to your Ferm dealer for repair.
13. ACCESSORIES AND SPARE PARTS
The following is supplied with your battery charger:
- Manual;
- Battery clamps
Spare parts are available through your local Ferm dealer. Their numbers mentioned with the parts drawing of the battery charger. If you want to order spare parts you can use these numbers. All parts which do not mention an order number are not available from stock.

Deutsch
6. CONDITIONS DE GARANTIE
Battery Charge - 160350/360/370/380
Hst 6.1.4
...... and fuses.
Hst 9.1.1
Remove the battery from the vehicle, before charging it.
Hst 914
Now, couple the mains plug of the battery charge with the wall socket.
Hst 10.3
Then, start with loosening the (-) clips and thereafter the (+)
ELEMENTEN AAN TEKST VERANKERD
-HULPPAGINA-

- CAREFULLY READ THE INSTRUCTIONS BEFORE YOU USE THE BATTERY CHARGER!
- KNOW YOUR APPARATUS
- GENERAL SAFETY RULES
- MONTHS GUARANTEE CERTIFICATE • 24 MONATE GARANTIE-SCHEIN • 24 MAANDEN GARANTIEKAART • 24 MOIS CERTIFICAT DE GARANTIE • 24 MESES CARTA DE GARANTIA • CERTIFICADO DE GARANTIA DE 24 MESES • KOYTONI EFRYHΣΗΣ 24 MHNΩN
- THE APPARATUS NEEDS TO BE SWITCHED OFF COMPLETELY IN THE CASE OF:
- DEFECTIVE BATTERIES
- WARRANTY PROVISIONS
- THIS WARRANTY APPLIES ONLY:
- ENVIRONMENTAL PROTECTION
- FERM'S AFTER SALES SERVICE
- INSTALLATION
- FIRST THE NEGATIVE TERMINAL THEN THE POSITIVE TERMINAL
- RED LED LIGHTS UP
- YELLOW LED LIGHTS UP
- GREEN LED LIGHTS UP
- VOLT BATTERY CHARGERS
- FAST OR NORMAL CHARGING
- CHANGING THE FUSE
- Parts list
- CHECK CHARGED BATTERY
- STAND BY START
- MAINTENANCE
- MALFUNCTION
- ACCESSORIES AND SPARE PARTS
- Deutsch
- CONDITIONS DE GARANTIE
- ELEMENTEN AAN TEKST VERANKERD
- -HULPPAGINA-
Brand : Ferm
Model : BCM1004
Category : Charger