DRP-15 - Radio DAEWOO - Free user manual and instructions
Find the device manual for free DRP-15 DAEWOO in PDF.

| Product Type | Portable Radio |
| Brand | Daewoo |
| Model | DRP-15 |
| Dimensions (approx.) | 200 x 120 x 80 mm |
| Weight (approx.) | 0.5 kg |
| Power Source | AC adapter (DC 9V) or 6 x AA batteries |
| Frequency Bands | FM (87.5-108 MHz), AM (530-1710 kHz) |
| Antenna | Telescopic antenna for FM, built-in ferrite bar for AM |
| Speaker | Built-in dynamic speaker (3 inches) |
| Headphone Jack | 3.5 mm stereo output |
| Controls | Volume dial, tuning dial, band selector, power/function switch |
| Display | Analog tuning dial with frequency markings |
| Additional Features | Carrying handle, telescopic antenna, battery indicator LED |
| Care Instructions | Wipe with a dry cloth; avoid moisture and extreme temperatures |
| Safety Warnings | Do not open the device; keep away from water; use only specified power supply |
| Spare Parts Availability | Contact Daewoo service for replacement antennas or battery compartments |
| Repair Information | Refer to qualified technician for repairs; no user-serviceable parts inside |
| Release Year (estimated) | 2010s |
| Manual Languages | English, plus additional languages available online |
Frequently Asked Questions - DRP-15 DAEWOO
User questions about DRP-15 DAEWOO
0 question about this device. Answer the ones you know or ask your own.
Ask a new question about this device
Download the instructions for your Radio in PDF format for free! Find your manual DRP-15 - DAEWOO and take your electronic device back in hand. On this page are published all the documents necessary for the use of your device. DRP-15 by DAEWOO.
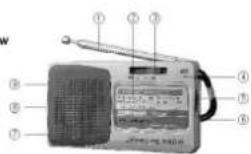
USER MANUAL DRP-15 DAEWOO
(1) Telescopic Antenna
(2) Tuning Frequency Indicating Window
(3) Band Selector Switch
(4) Tuning Indicator
(5) Tuner
(6) Hand Belt
(7) Battery Slot (Back)
(8) Earphones Socket
(9) Power Switch & Volume Control
Operation Instructions
- Put two No.5 batteries into Battery Slot (7) with correct polarity.
- Clockwise turn on the Power Switch & Volume Control (9) and adjust it to the optimum volume.
- Move Band Selector Switch (3) to choose FM/AM.
- Turn the Tuner (5), and watch the Tuning Frequency Indicating Window (2) and pointer select the program which you want to receive.
- The Tuning Indicator(4) will light up, when the correct station is received and the station signal is sufficiently strong.
- When you receive FM station, please pull out the Telescopic Antenna (1) to get the best reception by changing its length and angle.
- Receiving AM by using the internal magnetic antenna, and you can get the best reception by rotating the direction of the radio.
- In order not to affect others, please insert the earphones in the Earphones Socket (8) (the speaker inside the radio disconnects automatically), you can listen to the radio by earphones.
- When bad receiving, please open the Battery Slot (7) to change the batteries.
-
When you would not like to listen to the radio, please move the Power Switch & Volume Control (9) down to turn off the power.
-
Frequency Range:
AM 530-1600 KHz
FM 88-108 MHz -
Sensitivity:
AM ≤ 6mV/m
FM ≤ 25μV -
AM S/N: ≥34dB
- Speaker: Φ45mm/6Ω/0.25W
- Power: DC 3V, two AA 1.5V batteries
- Output power: ≥100mW
- Size: 110 x 62 x 23mm
- Weight: 108g
Maintenance and safety
- Do not expose the unit to rain, moisture or extreme high temperature.
- Do not place the unit near strong magnets
- Do not attempt to repair this product yourself. Please refer all servicing of this product to a qualified professional.
Declaration of Conformity
Flamagas, S.A. declares product DRP-15 complies with the essential protective requirements and objectives of:
. EMC Directive 89/336/EC
To check the entirely declaration of conformity of this model, visit www.electronicaflamagas.com
Warranty
This device has 2 years warranty from the buying date against all manufactured defective problems. Batteries are not related to this warranty.
The non-fulfilment of the instructions or cautions use in this manual implies automatically a cancellation of the warranty.
It is necessary to show the buying invoice to validate this warranty.