
BFR-100 - Drill Bort - Free user manual and instructions
Find the device manual for free BFR-100 Bort in PDF.

| Product Type | Paint Roller System |
| Brand | Bort |
| Model | BFR-100 |
| Roller Cover Size | 3/8 inch nap, perforated |
| Compatible Paints | Water soluble and most oil-based paints (not paint removers) |
| Operation | Manual plunger mechanism |
| Power Source | None (manual) |
| Included Accessories | Roller frame, roller core, fill tube, paint can clip, spatter shield, petroleum jelly, stand |
| Components | Plunger, handle assembly, O-rings, duck bill valve, wiper seal, fill cap cover, roller frame, roller core, outer end cap, spatter shield, hose extension ribs, fill tube, paint can clip |
| Lubrication | Petroleum jelly required on seals and valves |
| Noise Level | Sound pressure <67 dB(A), sound power <78 dB(A) |
| Vibration | <7.23 m/s² (hand-arm method) |
| Safety Precautions | Use eye protection, work in ventilated area, read manual |
| Cleaning | Disassemble; wash with warm soapy water (water-based paints) or mineral spirits (oil-based) |
| Intended Use | Painting walls and ceilings with roller |
| Standards Compliance | EN 60745-2-4:2009, EN 60745-1:2009, CE marked |
| Material | Plastic and metal components |
| Roller Core Type | Perforated, 3/8 inch |
Frequently Asked Questions - BFR-100 Bort
User questions about BFR-100 Bort
0 question about this device. Answer the ones you know or ask your own.
Ask a new question about this device
Download the instructions for your Drill in PDF format for free! Find your manual BFR-100 - Bort and take your electronic device back in hand. On this page are published all the documents necessary for the use of your device. BFR-100 by Bort.
USER MANUAL BFR-100 Bort
natural_image
Silhouette of a hammer inside a circle, no text or symbols presentBort®

natural_image
Line drawing of a mechanical device with a cylindrical component and a long rod (no text or symbols)BFR-100
98298772
natural_image
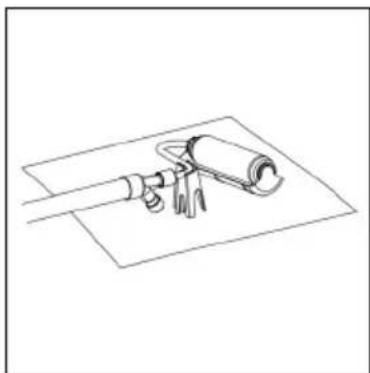
Diagram of a cylindrical device with a probe inserted, showing internal structure and an arrow indicating direction (no text or symbols)Push roller assembly over roller frame and thread collar onto the roller assembly.
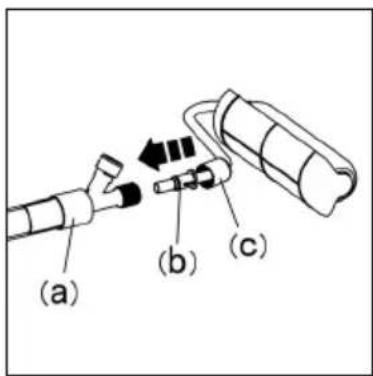
Thread handle collar on roller frame.

natural_image
Technical line drawing of a mechanical tool with a clip and arrow indicating direction (no text or symbols)Snap fi II tube into the clamps of paint can clip.
natural_image
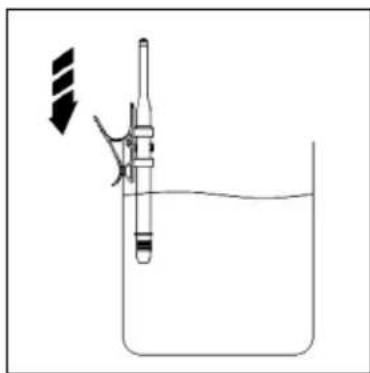
Simple line drawing of a laboratory setup with a U-shaped tube submerged in liquid, no text or symbols present.Clip the paint can clip onto paint can.
natural_image
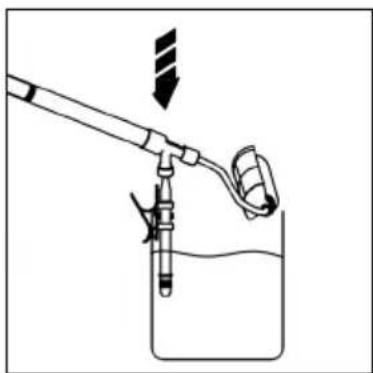
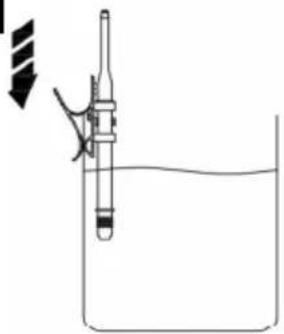
Diagram of a laboratory procedure showing a syringe connected to a beaker with liquid, no text or symbols presentPush fill valve down over fill tube until it bottoms on fill tube.
natural_image
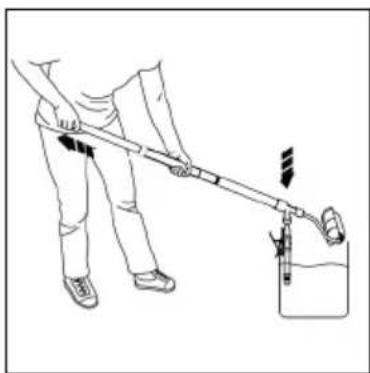
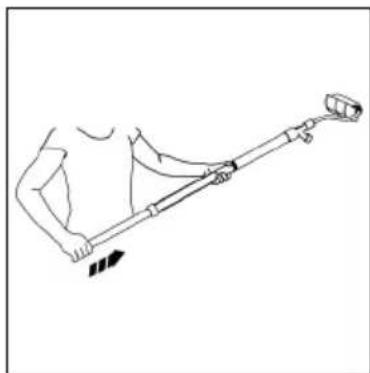
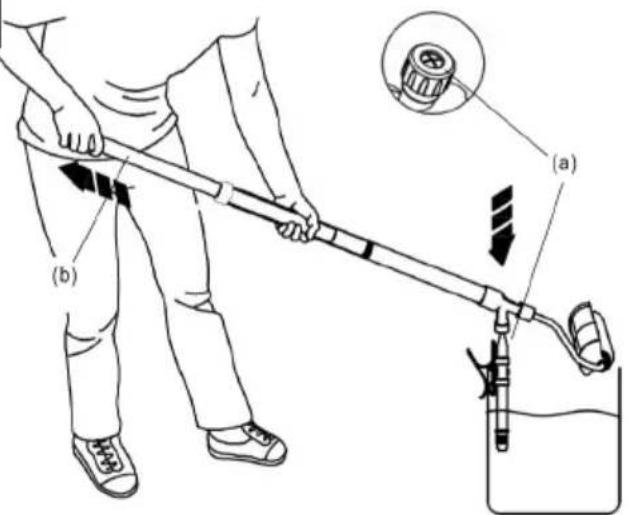
Illustration of a person using a long-handled tool to lift a container with a submerged object (no text or symbols)Pull back plunger to draw paint. (May take some force).
natural_image
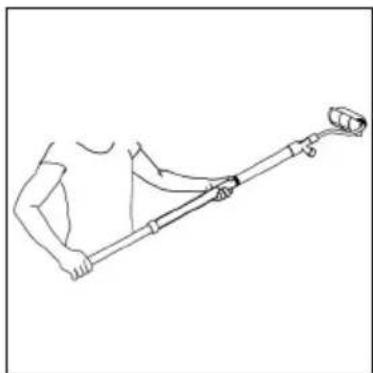
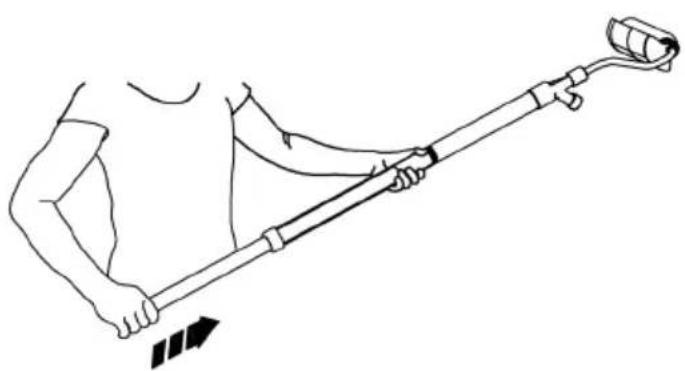
Line drawing of a person using a handheld device to measure a weight (no text or symbols)Push forward the plunger to fill roller with paint
natural_image
Line drawing of a person holding a long pole with a magnifying glass (no text or symbols)Begin rolling on wall. Rest the Har
natural_image
Simple line drawing of a mechanical device with a lever and cylindrical component (no text or symbols)Paint Roller on the stand when not in use.

WARNING: To reduce the risk of injury, user must read and understand the instruction manual before using the Handy Paint Roller

WARNING: Some paints contain chemicals known to cause cancer, birth defects or other reproductive harm. To reduce your exposure wear appropriate safety equipment such as face masks, gloves, and other appropriate protective equipment. Please review and follow the safety precautions on the paint container.
SAFETY GUIDELINES - DEFINITIONS
It is important for you to read and understand this manual. The information it contains relates to protecting YOUR SAFETY and PREVENTING PROBLEMS. The symbols below are used to help you recognize this information.

DANGER: Indicates an imminently hazardous situation which, if not avoided, will result in death or serious injury.

WARNING: Indicates a potentially hazardous situation which, if not avoided, could result in death or serious injury.

CAUTION: Indicates a potentially hazardous situation which, if not avoided, may result in minor or moderate injury.
NOTICE: Used without the safety alert symbol indicates a potentially hazardous situation which, if not avoided, may result in property damage.
IMPORTANT SAFETY INSTRUCTIONS
WARNING:
■ Do not use Handy Paint Roller for purposes other than described in this manual. Failure to do so may result in injury to persons and or property damage.
■ For use only with water soluble and most oil based paints and stains. Not for use with oil based paints and stains that require cleaning solutions stronger than mineral spirits (refer to label on original paint container). Do not use with paint removers, or the like. Liquids other than paint or stain may damage product and result in injury to persons or property damage.
- Read the label on the original paint container and follow all directions. Failure to do so may result in injury to persons or property damage.
■ Use proper eye protection and other safety equipment for skin and respiratory protection when mixing the paint, and when filling, using, and cleaning the product. Paint and its fumes can cause personal injury.
■ To reduce the risk of injury, use only in a well ventilated area.
■ Thoroughly clean and rinse product after using with a particular paint. Mixing different paints in the product may result in property damage.
■ To reduce the risk of injury, use only recommended accessories.
■ When servicing, use only identical replacement parts. Failure to do so may result in personal injury.
SAVE THESE INSTRUCTIONS
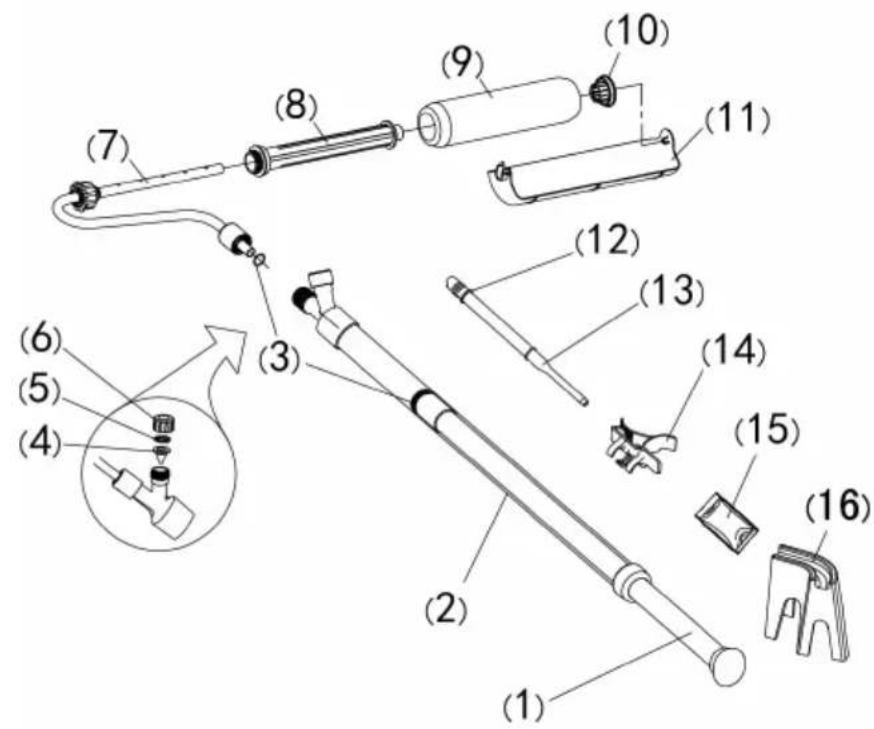
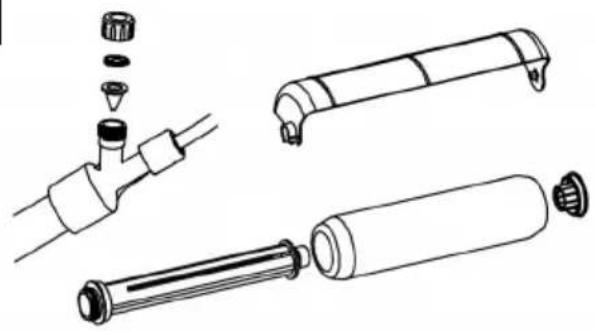
COMPONENTS
FUNCTIONAL DESCRIPTION
- Plunger
- Handle Assembly
- O-Rings
- Duck Bill Valve
- Wiper Seal
- Fill Cap Cover
- Roller Frame
- Roller Core
- 3/8 in. perforated roller
- Outer End Cap
- Spatter Shield
- Hose Extension Ribs
- Fill Tube
- Paint Can Clip
- Petroleum Jelly
- Stand for temporary storage
TIPS FOR PAINTING WITH HANDY PAINT ROLLER
■ Only use a perforated roller cover. Standard roller covers will not work.
■ Inspect roller cover for lint before painting, if needed wash and dry before using.
■ When using the Handy Paint Roller for the first application, it will take most of the paint in the Handy Paint Roller tube to saturate the roller cover. A second fill may be needed.
- Keep roller moving while pushing plunger in to prevent dripping.
■ Stop pushing plunger in or squeezing trigger if the roller starts to skid, slide or drip.
■ When painting in tight areas partially fill Handy Paint Roller. This reduces its overall length.
■ When leaving Handy Paint Roller unattended for a longer period of time, wrap roller in a plastic bag to prevent drying, removing as much air as possible from bag.
■ Make sure the type of paint you use can be cleaned with either mineral spirits (for oil-based paints) or a warm water and soap solution (for water soluble paints like latex).
■ Use drop cloths to protect your floors and anything else in the room that you do not want accidentally splattered with paint.
■ When using the stand, always release pressure by pulling plunger out slightly.
PREPARING THE HANDY PAINT ROLLER TO PAINT
| 1.) Lubricate part (b) using petroleum jelly provided. Attach assembled roller (d) onto the roller frame (c). Screw the part (a) onto the inner end of the roller assembly. | 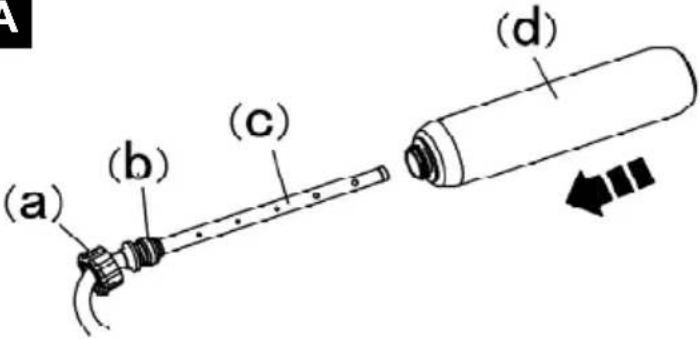 |
| 2.) Push roller frame (b) over end of part (d). Thread roller frame collar (c) snugly onto threads of part (a). | 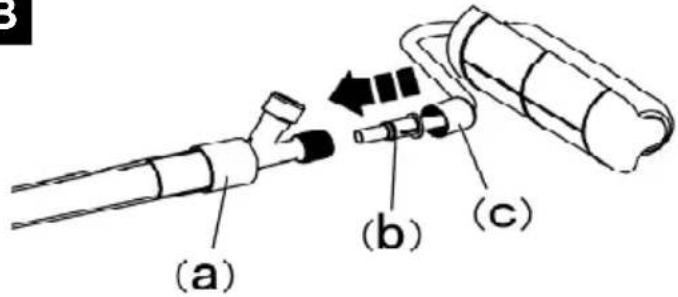 |
| 3.) The spatter shield helps reduce spatter when painting, especially on ceilings. Position the spatter shield by rotating around roller frame.NOTE: Spatter shield is also helpful to prevent dripping when the Handy Paint Roller is resting on the stand and is not in use. Just position spatter shield under roller. | 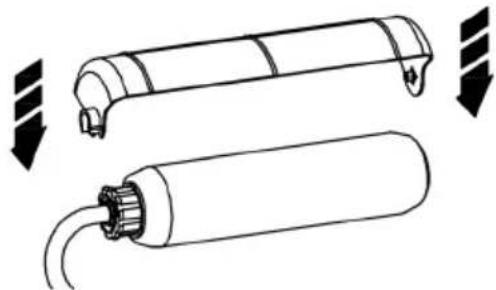 |
FILLING THE HANDY PAINT ROLLER WITH PAINT
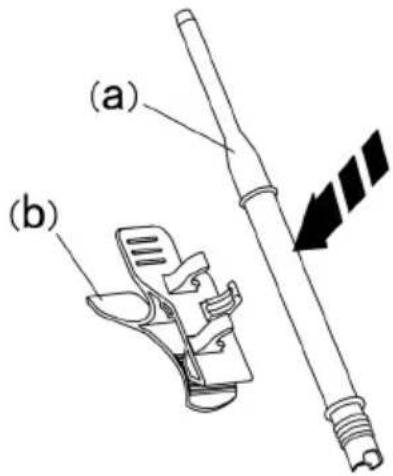
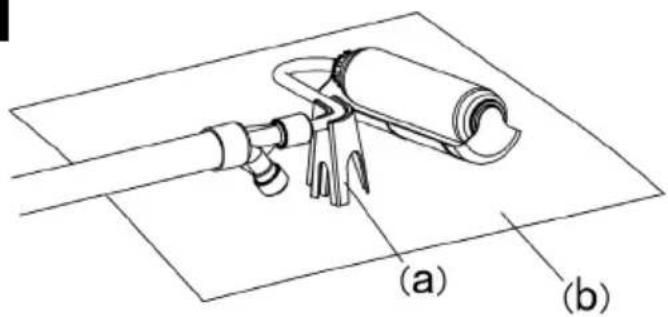
1.) Snap fi ll tube (a) into the clamps of paint can clip (b).
D
2.) Clip the paint can clip onto paint can. Lubricate top of fi ll tube stem with a small amount of petroleum jelly included in carton.
NOTE: For deeper containers like 5 gallon pails, fi t a section of 3/4 inch I.D. (inner diameter) clear tubing over the ribs of the fill tube to extend it (fig. E1) and clip to side of pail with fi ll tube can clip. Cut bottom end of tubing at slight angle. Tubing is available at most hardware stores.
E
natural_image
Simple line drawing of a laboratory setup with a test tube, tubing, and liquid (no text or symbols)E1
natural_image
Line drawing of a hand holding a test tube with a magnified inset showing internal components (no text or symbols)3.) Hold the Handy Paint Roller at a 45 degree angle and place the fi ll valve (a) over the fi ll tube. Gently push the Handy Paint Roller down until it bottoms on the fi ll tube.
Pull plunger (b) all the way back to draw paint into the Handy Paint Roller. (This may take some force.) Once tube is full you are ready to start painting. Lift the Handy Paint Roller slowly off fill tube.
NOTE: If you do not receive a complete fill the first time, push plunger slowly to return paint to can and then pull back plunger making sure angle is correct and fill valve fully bottoms on the fill tube.
F
PAINTING WITH THE HANDY PAINT ROLLER
1.) Begin rolling on wall and push plunger handle to feed paint into the roller cover.
NOTE: Initial saturation of the roller may require a large amount of paint from the first fill. Fill the Handy Paint Roller as needed.
HELPFUL HINTS
- If you are getting a dot pattern when painting, apply more paint.
- If the roller is sliding on the surface, apply less paint.
- You may notice petroleum jelly within the handle.
This is necessary and will help in its operation and will not affect the paint.
2.) When not in use rest the Handy Paint Roller on the stand (a).
- When using the stand, the Handy Paint Roller should always be on a drop cloth (b) or over newspaper in case of drips.
• To prevent drips, relieve pressure on the Handy Paint Roller by pulling plunger out slightly.
NOTE: Attaching the spatter guard when using the kickstand helps insure that any dripping paint is contained.
G
natural_image
Line drawing of a person using a handheld device to lift a weight (no text or symbols)H
RETURNING EXCESS PAINT TO PAINT CAN
| 1.) Pull plunger back to draw excess paint from roller frame into tube.HINT: Place thumb over fi ll cap cover (a) to help remove the most paint from the frame prior to pulling back plunger. | 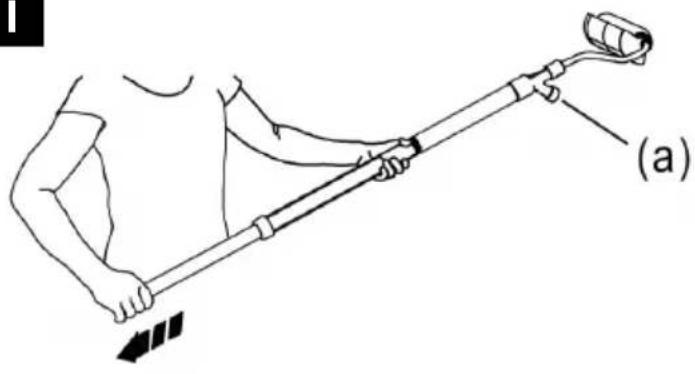 |
| 2.) Return paint from the Handy Paint Roller to can by holding it at a 45 degree angle and pushing fill valve onto fill tube until it bottoms on fi ll tube. Push plunger in until it stops. | 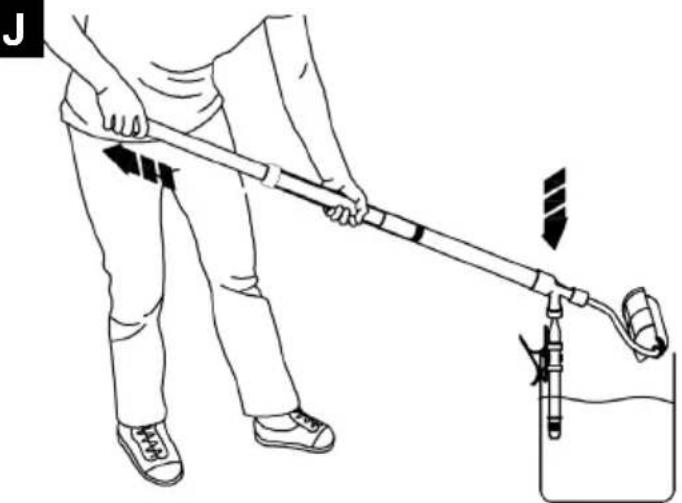 |
| 3.) Remove the roller by screwing out part (a) and pulling the roller from the roller frame. It may take some force.HINT: Wear disposable gloves or use a plastic bag over roller to keep your hands clean.Scrape excess paint into can from roller. | 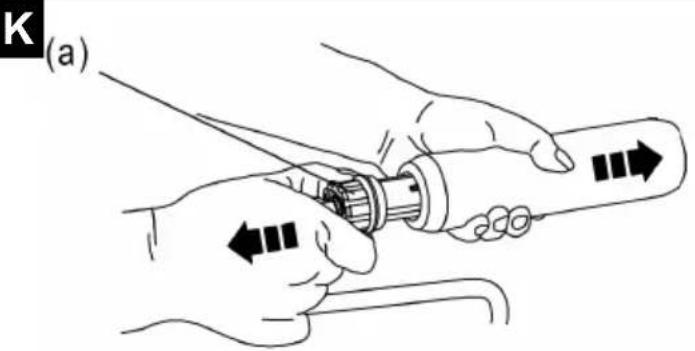 |
| 4.) Screw out part (a) from the roller core and remove the roller core. (fig. L). Empty any remaining paint.Remove the outer cap by inserting the roller frame into the roller and gently pushing the cap off (fig. M). | 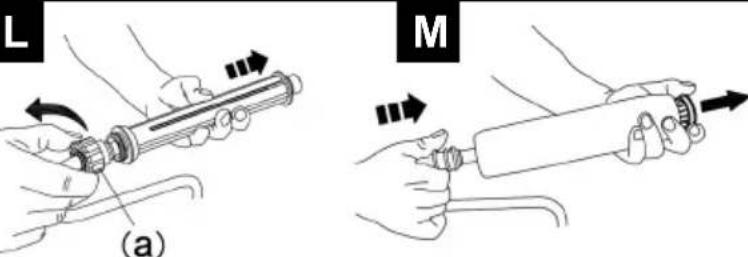 |
| 1.) Remove the fi ll tube from the paint can clip and push it directly into the fi ll valve. When cleaning water soluble paints, submerge the fi ll tube into warm, soapy water and pull the plunger in and out 5 or more times.When using oil based paints, instead of water, use proper cleaning solvent listed on manufacturer's container and dispose of properly.HINT: Use a sink, a wash tub, or any container that will hold water to perform above fl ushing process. Replace water when dirty or when moving to the next step. | N | 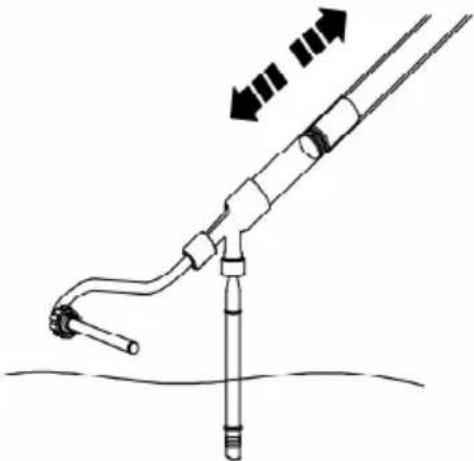 |
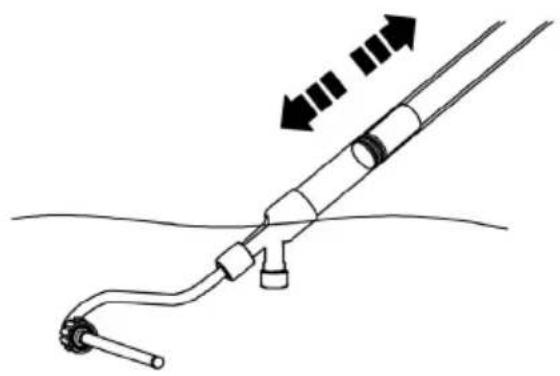
| 2.) Remove the fi ll tube. Then submerge the roller frame, and ensuring the fi ll valve is also under water, pull the plunger in and out 5 or more times (fi g. O). | O | 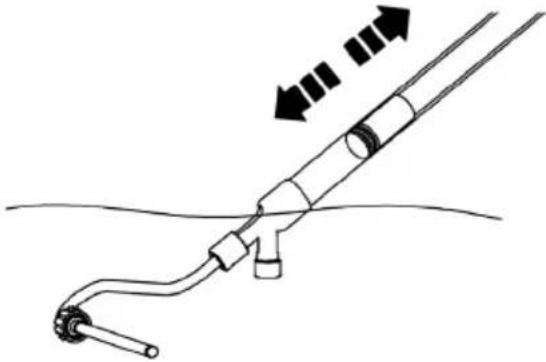 |
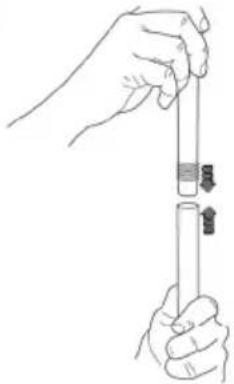
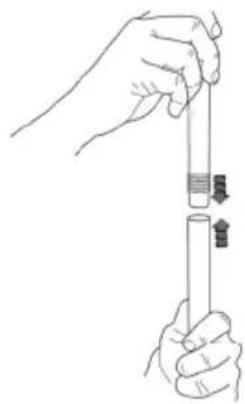
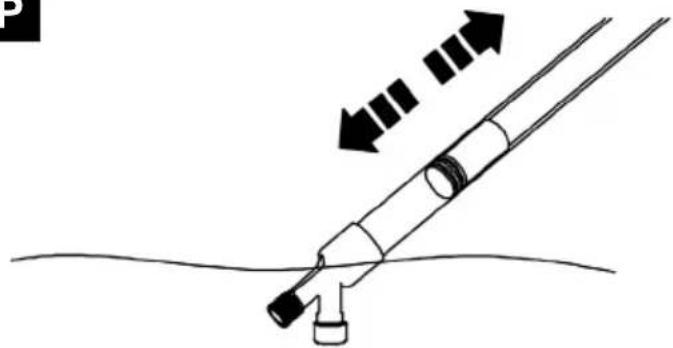
| 3.) Remove roller frame and continue cleaning as needed. Submerge the handle in the warm, soapy water and pull the plunger in and out 5 or more times.HINT: Wipe off remaining paint from the end of plunger (a). | P | 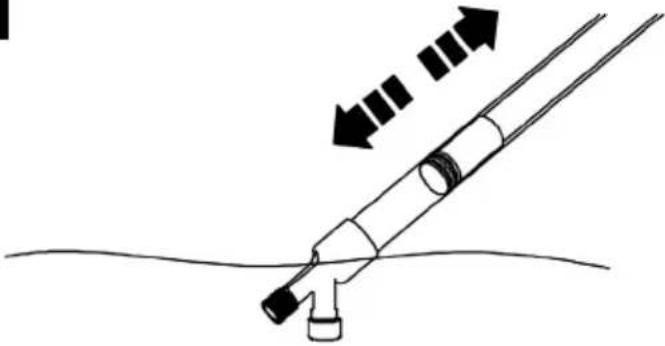 |
| 4.) Unthread valve cap and remove wiper seal and duck bill valve to clean. Rinse all remaining parts and drain all fl uid from the Handy Paint Roller.5.) Always purchase a perforated roller cover. A standard roller will not work. | Q | 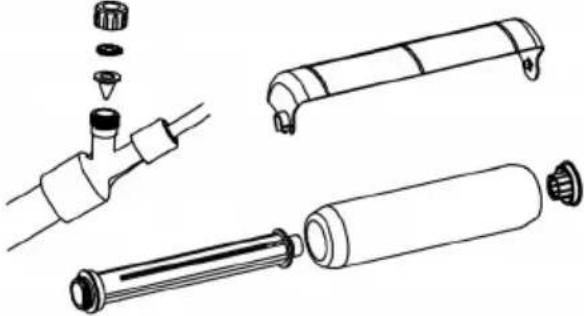 |
| Lubrication helps with normal operation and should be done after cleaning and before each use.1.) Pull the plunger out of the main tube (It may take some force) | R | 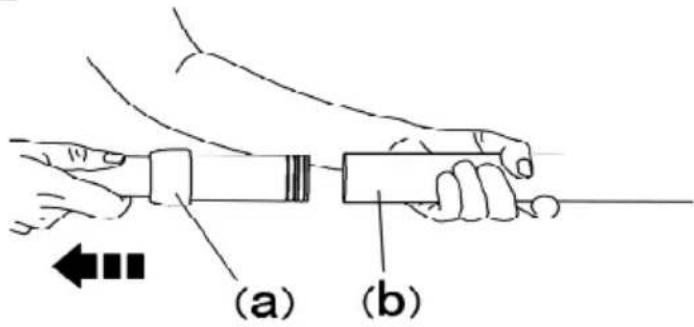 |
| 2.) Apply petroleum jelly around and in between the rubber seals shown. Reassemble, making sure the rubber seals are not twisted or damaged. Tighten the collar. | S | 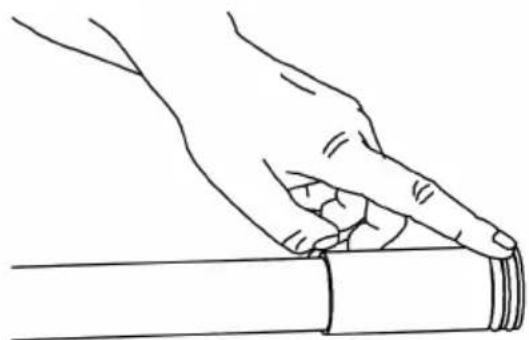 |
| 3.) Apply petroleum jelly to the duck bill valve and wiper seal and replace within unit threading the valve cap back into place. | T | 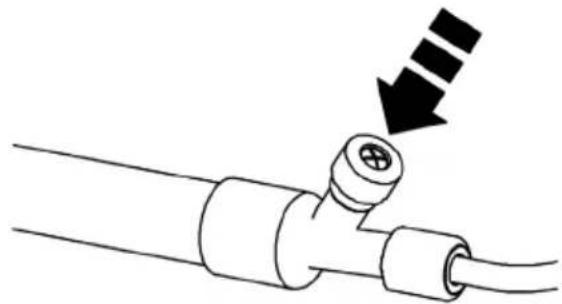 |
| 4.) Apply petroleum jelly to the inner seals on the end of the roller core (a) then assemble the roller by placing the core (a) inside of roller cover (b) and attaching the end cap and as shown. | 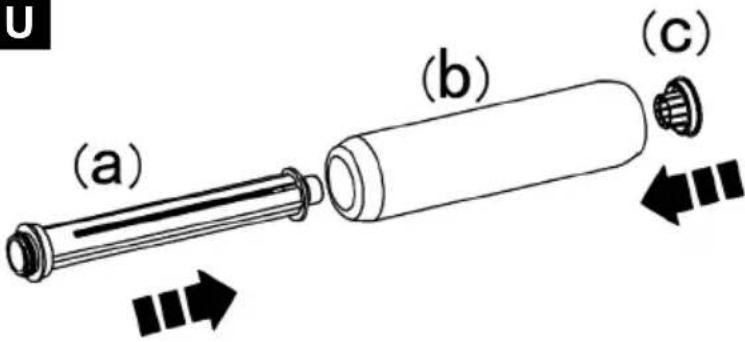 |
TROUBLESHOOTING
| Takes a long time for paint to appear on surface. | See fi rst note on“Painting with the Handy Paint Roller”. May take a second fi ll. |
| Air is drawn into handle instead of paint. | Slowly push handle in to expel air. Remove and reinsert product on fill tube. Be sure fill tube is fully seated in valve body. If necessary, apply petroleum jelly to fill tube which makes it easier to seat fill tube and valve body.Make sure O-ring is in place between handle assembly and roller frame and well lubricated. |
| Diffi cult to insert or remove fi ll tube from valve. | Put petroleum jelly in fill port opening and or fill tube. |
| Handle is diffi cult to move in and out. | Lubricate rubber seals at end of plunger, or twist plunger slightly to loose seal. |
| Paint leaks out end cap. | Make sure the outer end cap is pushed snugly into and are even with the end of roller cover, and the inner threaded end cap is screwed snugly into the end of roller core. If they are OK, remove end caps, clean out any old paint and relubricate with petroleum jelly. |
| Paint leaks out of fi ll valve. | Lubricate valve with petroleum jelly.Make sure wiper seal is in place. |
natural_image
Diagram of a cylindrical device with a connector and directional arrow indicating motion (no text or symbols)natural_image
Technical line drawing of a mechanical tool with a clip and arrow indicating direction (no text or symbols)natural_image
Simple line drawing of a laboratory setup with a funnel, submerged object, and liquid (no text or symbols)natural_image
Diagram of a laboratory procedure showing a syringe connected to a beaker with liquid, no text or symbols presentnatural_image
Line drawing of a person using a lever to lift a container with a bucket (no text or symbols)natural_image
Line drawing of a person using a selfie stick (no text or symbols)natural_image
Line drawing of a person holding a metal detector (no text or symbols)natural_image
Simple line drawing of a mechanical device with a lever and cylindrical component (no text or symbols)natural_image
Simple line drawing of a laboratory setup with a test tube, beaker, and directional arrow (no text or symbols)E1
natural_image
Line drawing of a hand holding a test tube with a magnified inset showing internal structure (no text or symbols)natural_image
Line drawing of a person using a handheld device to lift a weight (no text or symbols)natural_image
Diagram of a laboratory apparatus with tubing and a vertical rod, showing fluid flow direction (no text or labels)0
natural_image
Diagram of a medical or laboratory procedure showing fluid flow with arrows indicating direction (no text or symbols)P
natural_image
Diagram of a mechanical device with arrows indicating motion or force direction (no text or symbols)Q
natural_image
Technical line drawings of mechanical components including a valve, cylindrical housing, and cylindrical rod (no text or symbols)DECLARATION OF CONFORMITYGBCE
We declare under our sole responsibility that this product is in conformity with the following standards or standardized documents: EN 60745-2-4:2009; EN 60745-1:2009 in accordance with the regulations 2006/42/EEC, 2006/95/EEC, 2004/108/EEC.
NOISE/VIBRATION Measured in accordance with EN 60745 the sound pressure level of this tool is <67 dB(A) and the sound power level is <78 dB(A) (standard deviation: 3 dB), and the vibration is <7,23 m/s² (hand-arm method).
10719 Berlin, Germany

Discarded electric appliances are recyclable and should not be discarded in the domestic waste! Please actively support us in conserving resources and protecting the environment by returning this appliance to the collection centres (if available).
FR INFORMATIONS SUR LA PROTECTION DE L'ENVIRONNEMENT
natural_image
Silhouette of a syringe with a coiled cable, set against a gray circular background (no text or symbols)Bort®

- Bort®
- BFR-100
- SAFETY GUIDELINES - DEFINITIONS
- IMPORTANT SAFETY INSTRUCTIONS
- WARNING:
- SAVE THESE INSTRUCTIONS
- COMPONENTS
- FUNCTIONAL DESCRIPTION
- TIPS FOR PAINTING WITH HANDY PAINT ROLLER
- PREPARING THE HANDY PAINT ROLLER TO PAINT
- FILLING THE HANDY PAINT ROLLER WITH PAINT
- PAINTING WITH THE HANDY PAINT ROLLER
- HELPFUL HINTS
- RETURNING EXCESS PAINT TO PAINT CAN
- DECLARATION OF CONFORMITYGBCE
- FR INFORMATIONS SUR LA PROTECTION DE L'ENVIRONNEMENT
Brand : Bort
Model : BFR-100
Category : Drill