
WH-SDC16C6E5 - Heat pump PANASONIC - Free user manual and instructions
Find the device manual for free WH-SDC16C6E5 PANASONIC in PDF.

| Product type | Air-to-water heat pump split |
| Brand | PANASONIC |
| Model | WH-SDC16C6E5 |
| Category | Heat pump |
| Units | Indoor and outdoor (split) |
| Operating modes | Heating, Cooling, Tank, Heating + Tank, Cooling + Tank |
| Water outlet temperature range (heating) | 25 °C to 55 °C |
| Water outlet temperature range (cooling) | 5 °C to 20 °C |
| Outdoor temperature range (heating) | -20 °C to 35 °C |
| Outdoor temperature range (cooling) | 16 °C to 43 °C |
| Silent function | Yes, reduces outdoor unit noise |
| Backup heater | Integrated (automatic or manual via FORCE button) |
| Domestic hot water tank connection | Yes, configurable |
| Sterilization | Yes, adjustable from 40 °C to 75 °C, once a week |
| Timer | Weekly timer with 6 programs per day |
| Required water pressure | 0.05 MPa to 0.2 MPa |
| Safety device | Residual current circuit breaker (RCCB) integrated |
| Recommended maintenance | Annual cleaning of external filter and inspection by a professional |
Frequently Asked Questions - WH-SDC16C6E5 PANASONIC
User questions about WH-SDC16C6E5 PANASONIC
0 question about this device. Answer the ones you know or ask your own.
Ask a new question about this device
Download the instructions for your Heat pump in PDF format for free! Find your manual WH-SDC16C6E5 - PANASONIC and take your electronic device back in hand. On this page are published all the documents necessary for the use of your device. WH-SDC16C6E5 by PANASONIC.
USER MANUAL WH-SDC16C6E5 PANASONIC
Operating Instructions Air-to-Water Heatpump
Model No.
Indoor Unit
Outdoor Unit
WH-SDC07C3E5
WH-UD07CE5-A
WH-SDC09C3E5
WH-UD09CE5-A
WH-SDC12C6E5
WH-UD12CE5-A
WH-SDC14C6E5
WH-UD14CE5-A
WH-SDC16C6E5
WH-UD16CE5-A

ENGLISH
2~11
Before operating the unit, read these operating instructions thoroughly and keep them for future reference.
Before operating the unit, make sure the installation has been carried out correctly by authorized dealer correctly and precisely following the installation instructions given.
FRANCAIS
12~21
Thank you for purchasing Panasonic Product
TABLE OF CONTENTS
SAFETY PRECAUTIONS
2~3
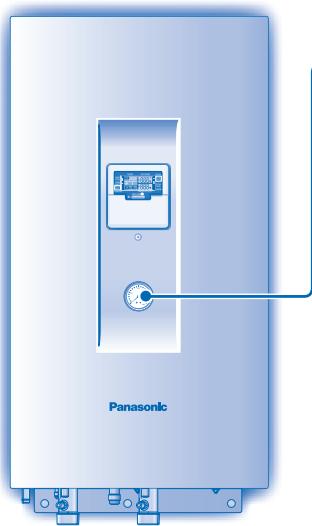
CONTROL PANEL
4~8
INDOOR UNIT
9
TROUBLESHOOTING
10
INFORMATION
11
NOTE
The illustrations in this manual are for explanation purposes only and may differ from the actual unit. It is subjected to change without notice for future improvement.
OPERATION CONDITION
| Water outlet Temperature (°C) | Indoor | |
| HEATING | Max. | 55 |
| Min. | 25 | |
| COOLING | Max. | 20 |
| Min. | 5 | |
INDOOR UNIT AND OUTDOOR UNIT
| Ambient Temperature (°C) | Outdoor | |
| HEATING | Max. | 35 |
| Min. | -20 | |
| COOLING | Max. | 43 |
| Min. | 16 | |
NOTICE : When the outdoor temperature is out of the above temperature range, the heating capacity will drop significantly and outdoor unit might stop for protection control.
SAFETY PRECAUTIONS
- Panasonic Air-to-Water Heatpump is a split system consisting only of an indoor unit and an outdoor unit. This system designed for combination with Panasonic Tank Unit. In case of non-Panasonic Tank Unit is being used with Panasonic Air-to-Water Heatpump System, Panasonic cannot guarantee neither good operation nor reliability of the system.
- This manual describes how to operate the Heatpump system between indoor and outdoor units only.
- Other operation such as water tank, radiator, external thermo controller and underfloor system, please refer to respective manufacturer operation manuals.
To prevent personal injury, injury to others, or property damage, please comply with the following.
Incorrect operation due to failure to follow instructions below may cause harm or damage, the seriousness of which is classified as below:

WARNING
This sign warns of death or serious injury.

CAUTION
This sign warns of injury or damage to property.
The instructions to be followed are classified by the following symbols:

This symbol denotes an action that is PROHIBITED.


These symbols denote an action that is COMPULSORY.

WARNING

This appliance is not intended for use by persons (including children) with reduced physical, sensory or mental capabilities, or lack of experience and knowledge, unless they have been given supervision or instruction concerning use of the appliance by a person responsible for their safety. Children should be supervised to ensure that they do not play with the appliance.
Please consult authorized dealer or specialist to repair, install, remove and reinstall the unit. Improper installation and handling will cause leakage, electric shock or fire.

Do not install the unit in a potentially explosive or flammable atmosphere. Failure to do so could result in fire.
Do not insert your fingers or other objects into the indoor or outdoor unit, rotating parts may cause injury.

Do not touch the outdoor unit during lightning, it may cause electric shock.
Do not attempt to repair the unit by yourself. Otherwise, it may cause injury if it is mishandling.
Do not install the indoor unit at outdoor. This is designed for indoor installation only.
| WARNING | |
| POWER SUPPLY | |
| Do not use modified cord, joint cord, extension cord or unspecified cord to prevent overheating and fire. | |
| Do not share the same power outlet with other equipment to prevent overheating and fire. | |
| Do not operate with wet hands to prevent electric shock. | |
| If the supply cord is damage, it must be replaced by the manufacturer, its service agent or similarly qualified persons in order to avoid a hazard. | |
| This unit is equipped with Residue Current Circuit Breaker (RCCB). It is strongly recommended to check the operation of the RCCB after installation and periodically after servicing or maintenance by authorized dealer to ensure it is in good working order. Otherwise, it may cause electrical shock or fire in case of malfunction. | |
| It is strongly recommended to be installed with Earth Leakage Circuit Breaker (ELCB) or Residual Current Device (RCD) to prevent electric shock or fire. | |
| It is recommended to wear gloves during servicing or maintenance in order to avoid hazard. | |
| This equipment must be earthed to prevent electrical shock or fire. | |
| Prevent electric shock by switching off the power supply when: - Before cleaning or servicing. - Extended non-use. - Abnormally strong lightning activity. | |
| This appliance is for multiple uses. All power supply circuits must be turn off before access to any of the terminals in the indoor unit, to avoid electrical shock, burn or fatal injury. | |

Stop using the product when any abnormality/failure occurs and disconnect the power plug or turn off the power switch and breaker. (Risk of smoke/fire/electric shock)
Examples of abnormality/failure
- The RCCB switches off by itself.
- Burning smell, abnormal noise or vibration sound is observed when the unit is in use.
- Hot water keeps on coming off the unit.
Contact immediately your local dealer for maintenance/repair.


CAUTION
INDOOR UNIT AND OUTDOOR UNIT

Do not wash the indoor unit with water, benzene, thinner or scouring powder.
Do not install the unit close to any combustible equipment or at bathroom. Otherwise, it may cause electric shock or fire.
Do not touch the water discharge pipe at the indoor unit during operation.
Do not place anything on top or beneath of the unit.
Do not sit or step on the unit, you may fall down accidentally.
Do not touch the sharp aluminium fin, sharp parts may cause injury.


Ensure drainage pipe is connected properly. Otherwise, leakage may occur.
Check the installation rack periodically to make sure that it is not damaged. After long periods of use, the strength of the installation rack may have deteriorated.
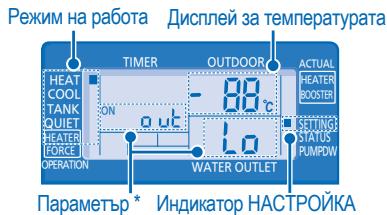
CONTROL PANEL

Do not let the control panel get wet. Otherwise, it may cause electric shock or fire.
Do not press the buttons on the control panel with hard, pointed objects. Otherwise, it may damage the unit.
Do not wash the control panel with water, benzene, thinner or scouring powder.
Do not inspect or service the control panel by yourself. Please consult authorized dealer. Otherwise, it may cause injury if mishandling.
- Some functions described in this manual may not be applicable to your unit.
- Consult your nearest authorized dealer for further information.
For normal operation, the RESET FORCE PUMPDW buttons are not in use.
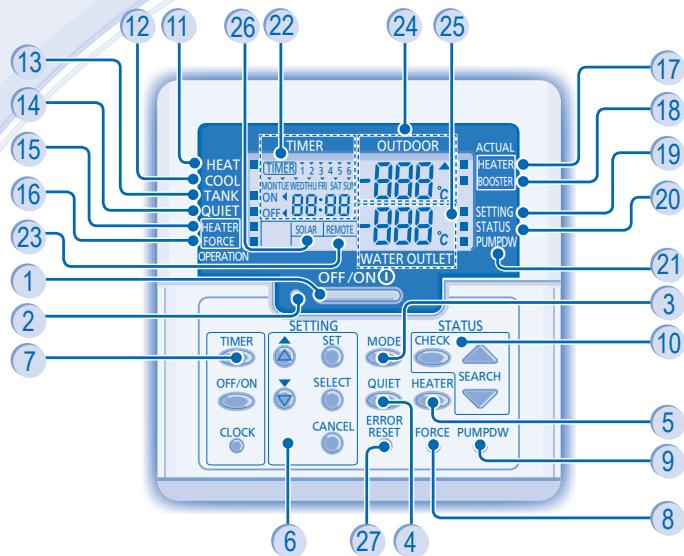
OFF/ON Button
Operation LED
3 Operation Mode Button
4 QuietOperationButton
5 Indoor Unit Backup Heater Operation Button
6 System Setting Mode Buttons
7 Timer Setting Group Buttons
8 Force Heater Mode Button
9 System Pumpdown Mode Button
10 System Status Check Mode Buttons
11 Heat Mode OFF/ON Indicator
Cool Mode OFF/ON Indicator
Tank Mode OFF/ON Indicator
14 Quiet Operation OFF/ON Indicator
15 Backup Heater Request OFF/ON Indicator
16 Force Heater Request OFF/ON Indicator
17 Backup Heater Actual Operation (OFF/ON) Indicator
18 Booster Heater Actual Operation (OFF/ON) Indicator
19 System Setting Mode OFF/ON Indicator
20 System Status Check Mode OFF/ON Indicator
21 System Pumpdown Mode OFF/ON Indicator
22 Timer/Clock Setting Display
23 Remote Display
24 Outdoor Ambient Temperature Display
25 Water Outlet Temperature Display
26 Solar Display
27 Error Reset Button
CONTROL PANEL PREPARATION
Setting Current Day and Time
- Press CLOCK
- Press or to set current day.
- Press SET to confirm.
- Repeat steps 2 and 3 to set the current time.
Notes:
- The current day and time need to be set when:
- The power is turned on for the first time.
- After a long time has elapsed since the power was last turned on.
- The current time that has been set will be the standard time for all the Timer operations.
SETTING UP THE SPECIAL FUNCTIONS
- After initial installation, you can manually adjust the settings. The initial setting remains active until the user changes it.
- The control panel can be used for multiple installations. Some functions may not be applicable to your unit.
- Ensure the operation LED is in OFF condition before setting.

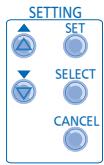
SELECT FUNCTIONS AND SET YOUR DESIRED TIMER
- Press SET and CHECK simultaneously for 5 seconds to enter special setting mode. "SETTING" and "STATUS" indicator is ON.
-
Press or to browse functions.
-
Press SELECT to enter the function.
-
Press or to enable YES or disable NO function, or set your desired day and time.
- Press SET to confirm.
| Function * | Operation Mode/ Actual Operation | Description |
| con | ro ai | External Thermo Controller (YES / NO) To set external thermo controller connection. |
| con | TANK | Tank Connection (YES / NO) To set tank connection. |
| Pry | SOLAR | Solar Priority (YES / NO) To choose the solar use for water tank heat up. |
| Pry | HEAT | Heating Priority (YES / NO) To choose the heat pump only use for Heating side during HEAT + TANK mode. |
| int | HEAT | Heating Heat-up Interval Set To set timer for Heating during HEAT + TANK mode (0.5hour ~ 10hours). |
| int | TANK | Tank Heat-up Interval Set To set timer for Tank during HEAT + TANK mode (5minutes ~ 1hour 35minutes). |
| dLY | BOOSTER | Booster Heater Delay Time Set To set delay timer for booster heater to ON if tank temperature is not reached (20minutes ~ 1hour 35minutes). |
| Fun | StrL | Sterilization (YES / NO) To set sterilization, if required. |
| Str | Sterilization Day & Time Set To set timer for sterilization (only once a week). | |
| boi | StrL | Sterilization Temperature Set To set temperature for sterilization function (40°C ~ 75°C). |
| oPr | Str | Sterilization Continue Time To set timer to maintain heating temperature in order to complete the sterilization function (5minutes ~ 1hour). |

TO TURN ON OR OFF THE UNIT
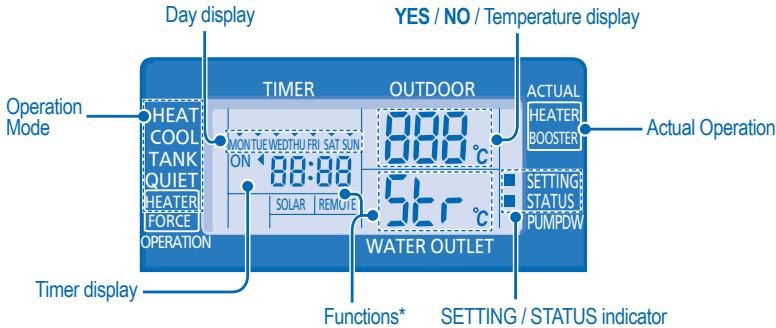
- When unit is ON, operation LED is lit and the actual temperature for water outlet and outdoor ambient are shown on the control panel display.

- To turn ON or OFF the panel/floor heating operation.
- In this mode, the outdoor unit will provide heating capacity to the indoor unit.
- HEAT + TANK MODE
- In this mode, the outdoor unit will provide heating capacity to the sanitary tank and indoor unit.
- This operation is not used when the sanitary water tank is not installed.
TANK MODE
- To turn ON or OFF the sanitary tank operation.
- In this mode, the outdoor unit will provide heating capacity to the sanitary tank.
COOL MODE
- To turn ON or OFF the panel operation.
- In this mode, the outdoor unit will provide cooling capacity to the indoor unit.
COOL + TANK MODE
- In this mode, the outdoor unit will provide cooling capacity to the indoor unit.
- Indoor unit will control booster heat in sanitary tank.

TO ENJOY QUIET ENVIRONMENT
- This operation reduces outdoor unit noise. In this condition, it may cause decrease in heating/cooling capacity.

- The backup heater provides extra heating capacity during cold outdoor temperature and only can operated at heat mode operation for indoor unit.
- The backup heater will automatically turn ON when the setting conditions is fulfilled.
- To cancel the Heater operation manually, press the respective button again.

STATUS
SYSTEM STATUS CHECK MODE
- Press CHECK for 5 seconds to enter STATUS mode.
- Press or to check the Water Inlet Temperature, Tank Temperature, Compressor Running Frequency or Error History.

- Press to exit STATUS mode.
- Once STATUS mode is entered, "STATUS" indicator is ON.
-
STATUS mode cannot be activated when the "SETTING" indicator is ON.
-
It is strongly recommended to contact the nearest authorized dealer to change the water temperature range.
- Using the control panel could set the temperature range for water outlet temperature and outdoor ambient temperature.
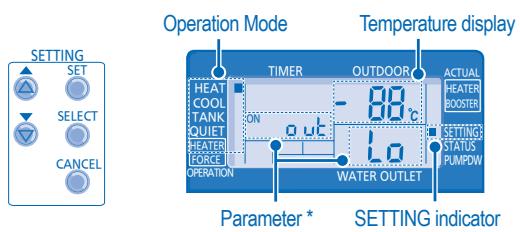
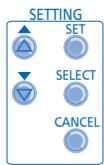
SYSTEM SETTING MODE
- Press SET for 5 seconds to enter "SETTING" mode. "SETTING" indicator is ON.
- Press or to choose a parameter.
- After selecting the desired parameter, press SELECT to enter the parameter.
- Press or to set the desired temperature.
- Press SET again to confirm the setting.
- Repeat steps 2 to 5 to set other parameters.
Operation Mode Parameter \* Description
HEAT a uC Lo Outdoor ambient set temperature at low water outlet temperature (-15^ 15^)
HEAT Outdoor ambient set temperature at high water outlet temperature (-15^ 15^)
HEAT H20 L o Water outlet set temperature at low outdoor ambient temperature (25^ 55^)
HEAT H 20 H, Water outlet set temperature at high outdoor ambient temperature (25^ 55^)
HEAT OFF Set temperature for turning OFF heating operation (5^ 35^)
HEATER a ut ON Outdoor ambient set temperature for turning ON heater operation (-15^ 20^)
COOL 5Eb Water set temperature during cool mode (5^ - 20^)
TANK 5E Sanitary tank set temperature (40^ 75^)
WATER TEMPERATURE THERMO SHIFT SETTING
-
Press SET within 5 seconds.
-
Repeat steps 3 to 5 to set the desired shift temperature (-5^ 5^) .
Notes:
- Press or wait 30 seconds to exit "SETTING" mode.
- The setting temperature will be stored in the system once confirm.
- “SETTING” mode cannot be activated when the “PUMPDW” and “STATUS” indicator is ON.
Timer Display
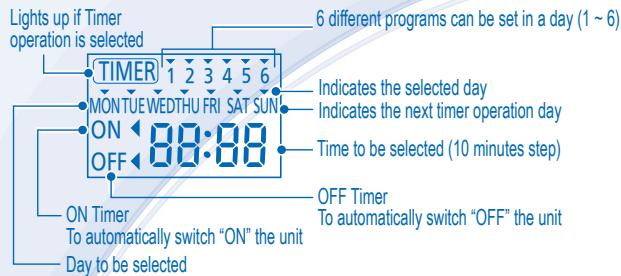

| Function | Step |
| Enter timer mode | TIMERPress . |
| Set day & time | 1. Press or to select your desired day SELECT2. Press to confirm SELECT3. "1" will be blinking, press to set program 1.OFF/ON4. Press to select ON or OFF timer5. Press or to select your desired time.If you want to set the timer together with other operations, press MODE and .6. Press to confirm program 1. The selected day will be highlighted with .After 2 seconds, the display will move to the next program.7. Repeat steps 4 to 7 to set programs 2 to 6.During timer setup, if no button is pressed within 30 seconds, or if the SET button is pressed the setting at that moment is confirmed and timer setup is ended. |
| Add/Modify timer | Repeat the steps above. |
| Disable timer | TIMERPress , then press . |
| Enable timer | TIMERPress , then press . |
| Check timer | 1. Press .2. Press or until your desired day is shown, press to confirm your selection.3. Press or to check the set programs. |
| Cancel timer | 1. Press .2. Press or until your desired day is shown. SELECT3. Press to enter program setting.4. Press or until your desired program is shown.CANCEL5. Press to cancel the program. |
Notes:
- You can set the Timer for each day of the week (Monday to Sunday) with 6 programs per day.
- When the unit is switched on by the ON TIMER, it will use the previously set temperature to control the room temperature.
- Same timer program cannot be set in the same day.
- You may also select collective days with same timer setting.
- Promotes energy saving by allowing you to set up to 6 programs in any given day.

CAUTION
- Switch off the power supply before cleaning.
CLEANING INSTRUCTIONS
- Do not use benzene, thinner or scouring powder.
- Use only soap ( pH7) or neutral household detergent.
- Do not use water hotter than 40^ .
HINT
- To ensure optimal performance of the unit, cleaning maintenance has to be carried out at regular intervals. Please consult authorized dealer.
WATER PRESSUREGAUGE
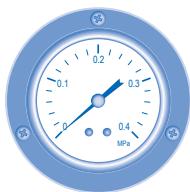


- Do not press or hit the glass cover with hard, pointed objects. This may damage the unit.
- Ensure that the water pressure is between 0.05 to 0.2MPa .
In case the water pressure is out of the above range, please consult authorized dealer.
INDOOR UNIT & CONTROL PANEL
- Do not splash water directly.
- Wipe the unit gently with a soft, dry cloth.
EXTERNAL FILTER
- Please clean the external filter at least once a year. Fail to do so might cause filter clogged, consequent system breakdown. Please consult authorized dealer.
OUTDOOR UNIT
- Do not obstruct the air inlet and air outlet vents, it may cause low performance or breakdown. Please remove obstacles to assure the ventilation.
- During winter, please clean and remove the snow near outdoor unit so that the snow does no cover the air inlet and air outlet vents.
INSPECTION
- In order to ensure optimal performance of the unit, seasonal inspections on the unit, external filter and field wiring have to be carried out at regular intervals. This maintenance should be carried out by authorized dealer.
- Clear any obstruction at the air inlet and air outlet vents of outdoor unit.
FOR EXTENDED NON-USE
- Turn off the power supply.
NON SERVICEABLE CRITERIAS
TURN OFF POWER SUPPLY then please consult authorized dealer under the following conditions:
Abnormal noise during operation.
Water/foreign particles have entered the control panel.
Water leaks from Indoor unit.
- Circuit breaker switches off frequently.
- Power cord becomes unnaturally warm.
TROUBLESHOOTING
The following symptoms do not indicate malfunction.
| SYMPTOM | CAUSE |
| Flowing sound during operation. | · Refrigerant flow inside the unit. |
| Operation is delayed a few minutes after restart. | · The delay is a protection to the unit's compressor. |
| Outdoor unit emits water/steam. | · Condensation or evaporation occurs on pipes. |
| Outdoor unit emits steam during heating mode. | · This is due to defrost operation happens at the heat exchanger. |
| Outdoor unit does not operate. | · When the outdoor temperature is out of the operation condition range, the heat pump system enter protection control. |
| Air-to-Water Heatpump system operation will turn off. | · If indoor unit water inlet temperature is lower than 20°C. Backup heater power will turn on to heat up the water. |
| System difficult to heat-up. | · When heating is operated by indoor unit together with floor heating or panel heater simultaneously, there may be case where warm water temperature is getting lower and cause floor heating or panel heater heat-up is weaken. · When outdoor air temperature is low, it may be difficult to get warm. · Is the snow pile blocking the discharge outlet or intake inlet of outdoor unit. · When water outlet set temperature is low, it may be difficult to get warm. |
| System cannot get warm instantly. | · Due to the nature of the heatpump system, it may take some time to heat-up the water if the unit is operated from cold-start. |
| Operation starts after power resumes. | · Unit is operates under auto restart function. |
Check the following before calling for servicing.
| SYMPTOM | CHECK |
| Heating/cooling operation is not working efficiently. | • Set the temperature correctly. • Is the panel heater/ cooler valve closed. • Clear any obstruction at the air inlet and air outlet vents of outdoor unit. |
| Noisy during operation. | • Check if the unit has been installed at an incline or the cover is not closed properly. |
| The unit does not work. | • Check if the circuit breaker is tripped. |
| Operation LED is no lit or control panel display is blank. | • Is the power supply off or power failure. |
The operation LED blinks and error code appear on control panel display.
| TIMER | |
| TIMER 1 2 3 4 5 6 MONTUE WEDTHU FRI SAT SUN ON 10000000 OFF 10000000 | Turn the unit off and reveal the error code to authorized dealer. Timer operation cancel when error code occur. |
Force Heater Mode Button
| FORCE | ·In case of a failure of the Air-to-Water Heatpump system, the backup heater can be used to heat up the heating water. Press FORCE to switch on the backup heater. ·Press OFF/ON ① to stop the force heater operation. ·During Force Heater mode, all other operations are not allowed. |
Information for Users on Collection and Disposal of Old Equipment

These symbols on the products, packaging, and/or accompanying documents mean that used electrical and electronic products should not be mixed with general household waste.
For proper treatment, recovery and recycling of old products, please take them to applicable collection points, in accordance with your national legislation and the Directives 2002/96/EC and 2006/66/EC.
By disposing of these products correctly, you will help to save valuable resources and prevent any potential negative effects on human health and the environment which could otherwise arise from inappropriate waste handling.
For more information about collection and recycling of old products, please contact your local municipality, your waste disposal service or the point of sale where you purchased the items.
Penalties may be applicable for incorrect disposal of this waste, in accordance with national legislation.

For business users in the European Union
If you wish to discard electrical and electronic equipment, please contact your dealer or supplier for further information.
[Information on Disposal in other Countries outside the European Union]
These symbols are only valid in the European Union. If you wish to discard these items, please contact your local authorities or dealer and ask for the correct method of disposal.
UNITÀ INTERNA E UNITÀ ESTERNA
| Temperatura ambiente (°C) | Esterna | |
| RISCALDAMENTO | Max. | 35 |
| Min. | -20 | |
| RAFFREDDAMENTO | Max. | 43 |
| Min. | 16 | |
INSTRUCTIE VOOR SCHOOLMAKEN
BINNEN-UNIT & CONTROLEPANEL
He TbxaIte npbCTTne Cn HN dApyrnpdMetn BbB BbTpEHHaMOyN, Tb KaTO BpTAAUe CE Yaactn MoRAT Da npdeH3BkAT HaapHaHBaHn.

He DOKOBAIte BbHUNH MaOyI NO BPeMe Ha rpbMOTeBnUHa 6py,TOBa MoKe Da DOBeDe Do TOKOB yIap.
He ce onitbtae da nonpaBte ypeda camm. B npotnbEn Cnyau TOBA MOKe da DoBeDe no HapaHbaHnA, ako ce N3bPshn HnpaBnHNo.
He MoTnpaIte BbTpeuHnMa MoUy nHaBbN. ToI e npEHa3NaueH cAmO 3a BbTpeuH MoTHaK.
| ! NPEДУПЕЖDEHNE | |
| ELEKTPO3AXPAHBAHE | |
| He i3noI3BaIte moiФицран ka6eI, cBp3BaHAN ka6eI, ydIbIgNiteI IliI HeyIkaaH h Ka6eI, 3a da I3beHneTe nperePraBaHne I noXap. | |
| He i3noI3BaIte eDINH I cBtI KOntAkt 3aedHc dpyr KoHcyMaTOp, 3a da I3beHneTe nperePraBaHne I noXap. | |
| He i3noI3BaIte C MOKpi pIbIe, 3a da I3beHneTe TOKOB yadap. | |
| Ako 3axpaHbAaIqY T Ka6eI e NOpeIeH, ToI pr8Ba da 6bIe NoDMeHEn OT pOnu3BODnIeHЯ, HeGOrBIA cepBvIeH aTeHT I liI NIO DO6Hb KBaIaMfUeHApH Iliua c Uel Da CE I3beHne OAnCHoCT. | |
| To3n MoDyI e OboPyDbaH C pNeKbCBaH Na BepRATA cnpRA MO Ta H YteHa (RCCB). CInlHO ce pIpePobYBa DA pOBeHPe T PabOTa H RA RCCB cIeMDTAgA N cIeD TOA pReNoDmHc - cIeD OcBlyXBAH eI INI pEmONT OT OTOPI3IparHbIa 3a da CE yBeRite, Ye ToI E B doBo pAO botHO cBCTOAHne. B npOTIBEN CnuyA ToI TOBA MoKeJa da IpeDiI3BnIka eJeKtpnueckn Yudap IliN IOXap B cIyauH a H NobPeDA. | |
| CunHO npEpoPbUHTeHNO e Da c MeONHpIa 3a3eMIteHEN ABOMATUHEN pKebCbSbAUY (ELCB) IliN yctroIbCTBO 3a DmFepErHuaHla 3aazHITa (RCD), 3a da I3beHneTe TOKOB yadap IliN IOXap. | |
| IpePobYHTeHNO e Da HocHTe pKbAByIe Np BpeMe Ha cEpBvIaHpe AII N pOndpBXkA 3a 6bE0nAChOCT. | |
| ToBa oBopUdBaHae TPr8Ba Da e 3a3eMehO, 3a da ce npDeObPbAtn TOKOB yadap IliN IOXap. | |
| I3BeHete TOKOB yadap, KaTO I3KJIouHte 3aXpaHBaHeto, KORATO: - PpeDI pOuNCTBaH eII N IcObCnyBaH. - PpOblTbXteHene I pAceTOn. - HeoBikHOBeHc CINHla TpbMOTeBvHAc AKTINBOCT. | |
| To3n Uped e npEduHa3NaueH 3a MHOroTOPOHQUHOrHaII HaOpTe6Ba. BcUnK bepRnHa n eIeKTPO3aXpAHBaHETo Tp8Ba DA ca NIKIbUeHEn, IpeRDa IdoCTHnREeTO DceKEN OT I3bOVIDte Ha BbTpeShHMy MOdYI, 3a Da I3beHete TOKOB yadap, I3rapAne IIc MbPTOHOCHO HapAHBaHae. | |
3A DA I3BEPETE PEXIM HA PABOTA

PEXMM HA OTONJIEHNE
- 3a da BKJIOUHTE nIIN N3KJIIOUHTE naHeHnOTo/NoDObOTo OTONJIeHne.
BTo3npeXIM BbHINrT MoynI NOdaBa MOoHcOCT 3a OTOpJIeHne Ha BbTpEHHN MaOyI.
- PEXKIM OTONJIENHE +3APEXDAHE
BTo3npexim BbHsHnT Moyn PnoBaMoUcOCT 3a OTonnHeHnHa cAnHTapHnpe3epBoaP nBbTpseHnMOnyI.
-TaiznФyHKZHNe He ce n3IOn3Ba, KOrato He e MoHTnpaH cAnHTapeH BoDHe pe3epBOap.
PEXIM HA 3APEXDAHE
- 3a da BKJIIOUHTE nIIN N3KJIIOUHTE caHITapHnpe3epBoap.
-BTO3npeXIMBbHUNHRTMOyI NOdaBa MOuHcOCT 3a OTOpHeHne Ha cAHITapHnpe3epBOap.
- PEXIM HA OXJIAXDAHE
- 3a da BKJIIOUHTE nIIN I3KJIIOUHTE naHeHnra peXIM.
-BtO3npeXIMBbHINrT MoUyI NOaBa MoUHOC3a OxnaJaHe Ha BbTpEuHnMaMoUyI.
- PEXIM OXJAXDAHE + 3APEXDAHE
BTO3n pejIM BbHsHnIy Moyn IpoIaBa MOuHoc 3a OxJaXdaHe Na BbTpewHnMoyn.
BbtpeunnT moyn ynpabnnaBa 6bp30To harpbahe B caHITapnna pe3epBoap.

3AДАСЕНСЛАЖДABATEHA TINXACPEDA
To3n pejzmH ha pa6oTa haamJIaBa 7uMa, m3daBaH OT BbHsHnMy MoUy. Iprn To3n pejzmH ha pa6oTa moUHocTtHa OTOIJIeHe/OxJaXdAne MoKe Da HamaJe.

PEXIM HA DONTBJINHHTENHO OTONJIEHNE
- Pexmblt Ha noBnHInTeHIO OTOnJIeHne rapaTnpu DOnbHInTeHn MoUHcT Ha OTOnJIeHne npH NcKa BbHsHa TempepaTyaN MoKe da Ce nIOnJ3Ba, KOraTo BbTpeuHnT MoUyE b peXMM Ha OTOnJIeHne.
- DonbJHInTeHnOTo OToJIeHneIe Ce I3KJIIOUCh ABToMaTtUHNO, KOraTO Ca I3NbJIHeHn 3aJaDeHnTe NaCTpoKN.
3a da na n3knHouHTe pBHyO pexima Ha OTOnnHeHne, HATNCHETe CbOTBETHN6yTOH OTHOBO.

PEXKIM HA IPOBEPKA HA CTATYCA HA CINCTEMATA
- Hanchete Check 3a 5 cekyndn, 3a da bne3eTe B pexim "STATUS" ("CTATYC").
- Hatnche 3a da npobepte Bbtpeshata TemnepaTpa Ha BOdaTa, TemnpaTpa Ta Ha MOyna, YecToTata Ha KOMPecopa HCTOpNra Ta Ha rpeKInTe.
CANCEL
- HatncheTe , 3a da n3ne3eTe ot pejkm CTATyC.
CneI KaTo BeNbX Ce BIne3e B pexim "STATUS" (CTATYC) nHnIkaTOpBt "STATUS" (CTATYC) ce BKIIIOUBA. -
PěžímblT "STATUS" (.CTATYC") He moze na ce akTNbɪpa, Kɔrato e BKJIQUEH nɪdɪkaTOpbT "SETTING" (HACTPOJKA").
-
Преничелно са ce CBpkeTe c Na-6bln3kn OToPn3npaH dInIbP, KOrato NcKaTe da npomeHite TempepaTyprnnaDnana30H Na BOData.
C nomoTa Ha naneHa 3a ynpabIeHne MOKeTe Da hAcTpoBaTe BbHnHnA TeMnepaTypeH dnaIa3oH Ha BoTaMa BbHnHaTa TMnepaTypa.
PEXKIM 3A HACTPOBBAHE HA CNTTEMATA
- Hatachete SET 3a 5cekyhni, 3a da bIe3eTe B pexim SETTING ("HACTPOIKA"). INdikatopbT "SETTING" ("HACTPOIKA") ce BKJIIOUBA.
- HatncheTe 乌,3a da n3bepeTe npametbp.
- Cném MapknapaHe Na JxelaHnI npaMaTeBp, HATNCHETe 3a da ro n36epeTe.
- Hatnchete nii, 3a da hactponte jeknaHata tempepaTpa.
-
HatncheTe SET OTHOBO, 3a da notbypnTe hactpoikata.
-
Повторе CTынкп OT 2do 5,за насточд ругни параметри.
Pekimn NapametbP \*Onncanne ha pa6oTa
HEAT ou t Lo HacTpoHa BbHnHa TempePaTypa npn Hncka BbHnHa TempePaTypa Ha BoDaTa (-15°C ~ 15°C).
HEAT HacTpoHa BbHnHa TempeAtypa npn BcOka BbHnHa TempeAtypa Ha BoData (-15°C ~ 15°C).
HEAT H20Lo Hactpoena BbHnHa TEMpeaTpa Ha BoDta npn Hncka BbHnHa TEMpeaTpa (25^ 55^)
HEAT HcH, HacTpoHa BbHnHa TempeAtya Ha BoDaTa npu BnCoka BbHnHa TempeAtya (25^ 55^)
HEAT OFF Hactpoeha temnepaTypa 3a N3KJIIOUBAHE ha pekma ha oToIeHne (5°C ~ 35°C).
HEATER aut ON HactpoBaHe Ha BbHnHaTa TempeaTpa 3a BKIIIOUBAHE Ha peXmHa Ha oToPJIeHne (-15°C ~ 20°C).
COOL 5Et 3aandaenaHa TempepaTya Ha BOdaTa no BpeMe Ha pekima Ha oxlaqdahe (5^ - 20^)
TANK 5Et HacpoiBaHe Na TemnepaTpata Ha cAnHapnna pe3epBoap (40^ 75^)
HACTPOIBAHE HA IPNOMHATA HA TEMINEPATYPATA
A36paHnT DeH eE ce nOuHeptae c V
Cne2cekyHnDn DcnpnepT 7e npemHe KbM CneDbauata nporpama.
7. Повторе съknот 4 до 7, за насясточи погамот 2 до 6.
Ako no BpeMe Ha NaCTpoiBaHe Ha TaImepa He HATnCHe T HIO ToH B IpOdbJIkeHne Ha 30 cekyHmN IIN Ako HATnCHe 6bTOHa SET),3aJaDeHaTa B MOMeHa T NaCTpoiKa ce nOTBbPjXdBa N HAcTpoiBaHETo Ce IpEkpTaYBa.
Taimep DobaBAreHe/ MoDnDnCnParahe
IobtopeTe ropeoncaHnTe CTbIKN.
OTMЯHa TaɪМeP
Hatuchete

CNEKoETO HATNCHETE


SET
3aDabaneHa TaMep
Hatuchete

CNEKoETO HATNCHETE
O
Поверка на
Таимера
- Hatnchete


KoTo Ce NOKaKe CbOTBcHnT DeH, CLeD KoETo HATNCHeTe 0 , 3a da
- Hatinchete


3a da npoebe

HaCtpoEHNITe NpOprMaM.
OTMЯна Na Taɪmep
- Hatnchete


- Hatnchete


DOKaTO Ce no

CbOTBETHIATIeH.
- Hatnchete


BJE3eTE B HAc

Ikata Ha nporpaMaTAt.
- Hatnichete


DOKATO CE NO.

E xenaata nporpama.
- HatncheTe
CANCEL
3a Da OTMeHInTe IporpaMaTAtA.
3a6eJekm.
- Moxe Ta hactponTe TaMepa 3a BCEKn DeH ON CEIMucaTa (OT NOHeJeNHK Do HeJeJ) C 6 nporpaMn Ha deH.
- Пп Вклочваны на моуна оТ ON TIMER ще се Използва заадената п dedи Това Temпература 3а Контрлираны на CTайнatable Temпература.
- Edha n cbsa nporpama Ha taMepa He moke da 6bde hAcTpoHa hAkoNkIO bTN 3a eHN n cbu nn.
Mokete da n36pepe TnKoNk DnC eDHa N Cbua Na HacTpoKa Ha TaMepa. - Повишава пессенью наеонг,在 Като Ви поьогая за насточпес do 6 nporpa'ma 3a daaden deH

BHHMAHNE
- ɪЗключete 三等奖pahBaHeto npedn noocntBaHe.
KPINTEPIN 3A IIOBPEDA
I3KJIIOUCHETE 3AXPAHBAHETO, cne KoTo ce o6bpeHe KbM OTOpn3iPpAraNdIITbB CneDnHTe cnuyan:
Heobuayeh 3Byk nO BpeMe Ha pa6oTa.
Boda/uyknduactnucanopaandaHbnaheha 3a ynpablenne.
- N3Tnua BOa O T BbTpseHnIypeI.
- PpeKbCBaYbT Ha en. Bepura ce n3KJIIOUyBa YecTo.
3axpaHbauT Ka6e ne 3aqrBa HeoBuHaHo.
CneHnnte cHmntomn npn pa6oTata Ha ypea He 03Naabat HEm3npaBHOCT.
| СИМПТOM | ПИЧИHA |
| Тech по врeme на是我国. | • Охлajдашиа чуност вътpe в уреда. |
| РавOTATA се забався сяколю минуtn сед рectorтурапe. | • 3akbcheniehoо тлухи 3а Заша на komпесора на уреда. |
| ВьнIHATA част OTДЕЛ ВODA/napa. | • Ро ТрьбITE се пolyчава кONDнзацьи пи ИЗпарвае. |
| ВьнIHIAЯТМоДУЛ OTДЕЛ НAPа пriправOTа в ржим на отолени. | • ПrinчINA за TOBA e grabOTATA no pa3mpa3raBaHe, korJOTo ce n3BbPbUBA B TOnIoo6MehNka. |
| ВьнIHIAЯТМоДУЛ He pa6OTI. | • Korato ВьнIHATAtemperaTура e n3BbH pa6OTHINa OxbaT, сисмATERA на{TepMONOMnATAВПЗАВЗВЗАВЗTO ynpaBValneHne. |
| РавOTATA на{TermonomnataТиПВьздуx-ВODA УSe cnpe. | • Ако TemperaTура Na HOДАТа, korJOTo BnIa3a BvB BtpeShINr arperaT, e NO-Hinca O T20°C. ДовлIHITENHOTO eNeKTPo3axpAHBaHne Ha HarpeBaTeJIЯ Stce ce BKNIOH, 3a Da 3arpee BoDA.Ta. |
| СисмATERA се затунявдд затоня. | • Korato Вьтseшниот MOdYl 3aTOnIY 3aEInDHO C NOJOOBO TOTONHENI ИПANIELH HargBaTeJI, може дуIMa cIvyaI, в КОТТemperaTурatura Na TOnIATA BoDA DA HamaJIeE I TOBA DA HamaJIIN CINIATA Na OTOIIHEnEO T OTOIBOTO OTOIINHENI ИПANIELH NARpeBaTeJI. |
| • Korato ВьнIHATAtemperaTура Na B3dYx e HnCKa, TOBA може дa 3atpydHI Na TOTONJIHEnO. | |
| • Дади HatrypanIHAT CNY RblOKIPA OTBOPITE 3a BXOДIQUME IN3XODIQUIN B3dYx Na BvHINHMOdYl. | |
| • Korato HabTPOeHATAtemperaTура Na 3XODa 3a BOda tA HnCKA, TOBA може дa 3atpydHI Na TOTONJIHEnO. | |
| СисмATERA He може дa 3atponlNi BeDHara. | • Поради OscoBeHocHTte Na CUSTEMATA Na TepMonomnATA mоже дa OTHEMe IN3ECTHO bPeme 3a 3aTOnIINe Ha BOdATA, akO MODyIbT ce IN3PON3BA B CTUdeHO CBSTOHINE. |
| РавOTATA залоча сед Вьзстановаяне на зхарbanhaNETO. | • Моульт grabOTи с Функция 3a ABTOMATNUH peCTapTirpaHne. |
PpOBepeTe cIeHNITE Heuca, PpeN da ce o6aHte Ha OTOpn3npan CepBn3.
Pursuant to at the directive 2004/108/EC, article 9(2)
Panasonic Testing Centre
Panasonic Service Europe, a division of
Panasonic Marketing Europe GmbH
Winsberging 15, 22525 Hamburg, F.R. Germany
- Operating Instructions Air-to-Water Heatpump
- ENGLISH
- FRANCAIS
- TABLE OF CONTENTS
- SAFETY PRECAUTIONS
- CONTROL PANEL
- INDOOR UNIT
- TROUBLESHOOTING
- INFORMATION
- NOTE
- Stop using the product when any abnormality/failure occurs and disconnect the power plug or turn off the power switch and breaker. (Risk of smoke/fire/electric shock)
- CAUTION
- INDOOR UNIT AND OUTDOOR UNIT
- CONTROL PANEL PREPARATION
- Setting Current Day and Time
- Notes:
- SETTING UP THE SPECIAL FUNCTIONS
- SELECT FUNCTIONS AND SET YOUR DESIRED TIMER
- TO TURN ON OR OFF THE UNIT
- - HEAT + TANK MODE
- TANK MODE
- COOL MODE
- COOL + TANK MODE
- TO ENJOY QUIET ENVIRONMENT
- SYSTEM STATUS CHECK MODE
- Operation Mode Parameter \* Description
- WATER TEMPERATURE THERMO SHIFT SETTING
- Timer Display
- CLEANING INSTRUCTIONS
- HINT
- WATER PRESSUREGAUGE
- INDOOR UNIT & CONTROL PANEL
- EXTERNAL FILTER
- OUTDOOR UNIT
- INSPECTION
- FOR EXTENDED NON-USE
- NON SERVICEABLE CRITERIAS
- The following symptoms do not indicate malfunction.
- Check the following before calling for servicing.
- The operation LED blinks and error code appear on control panel display.
- Force Heater Mode Button
- Information for Users on Collection and Disposal of Old Equipment
- For business users in the European Union
- [Information on Disposal in other Countries outside the European Union]
- INSTRUCTIE VOOR SCHOOLMAKEN
- BINNEN-UNIT & CONTROLEPANEL
- 3A DA I3BEPETE PEXIM HA PABOTA
- PEXMM HA OTONJIEHNE
- - PEXKIM OTONJIENHE +3APEXDAHE
- PEXIM HA 3APEXDAHE
- - PEXIM HA OXJIAXDAHE
- - PEXIM OXJAXDAHE + 3APEXDAHE
- 3AДАСЕНСЛАЖДABATEHA TINXACPEDA
- PEXIM HA DONTBJINHHTENHO OTONJIEHNE
- PEXKIM HA IPOBEPKA HA CTATYCA HA CINCTEMATA
- CANCEL
- PEXKIM 3A HACTPOBBAHE HA CNTTEMATA
- Pekimn NapametbP \*Onncanne ha pa6oTa
- HACTPOIBAHE HA IPNOMHATA HA TEMINEPATYPATA
- Taimep DobaBAreHe/ MoDnDnCnParahe
- 3a6eJekm.
- BHHMAHNE
- KPINTEPIN 3A IIOBPEDA
Brand : PANASONIC
Model : WH-SDC16C6E5
Category : Heat pump