
DVPMX855 - DVD player Sunstech - Free user manual and instructions
Find the device manual for free DVPMX855 Sunstech in PDF.

| Product Type | DVD Player |
| Brand | Sunstech |
| Model | DVPMX855 |
| Dimensions (W x D x H) | 260 x 190 x 40 mm |
| Weight | 1.2 kg |
| Power Supply | AC 100-240V, 50/60 Hz; DC 12V |
| Power Consumption | 10 W |
| Disc Compatibility | DVD, DVD±R/RW, CD, CD-R/RW, MP3, JPEG |
| Media Playback | USB 2.0, SD/MMC card |
| Video Output | Composite, HDMI |
| Audio Output | Stereo RCA, Digital Coaxial |
| Region Code | Region 2 (Europe) |
| Remote Control | Included |
| Maintenance | Clean with soft, dry cloth; avoid liquids |
| Safety Class | Class II (double insulation) |
| Laser Class | Class 1 (safe under normal use) |
| Spare Parts & Repairability | Contact Sunstech service center or authorized dealer |
| General Information | Supports multi-language menus, parental control, and last memory playback |
Frequently Asked Questions - DVPMX855 Sunstech
User questions about DVPMX855 Sunstech
0 question about this device. Answer the ones you know or ask your own.
Ask a new question about this device
Download the instructions for your DVD player in PDF format for free! Find your manual DVPMX855 - Sunstech and take your electronic device back in hand. On this page are published all the documents necessary for the use of your device. DVPMX855 by Sunstech.
USER MANUAL DVPMX855 Sunstech
High voltages are used in the operation of this product.
Do not remove the back cabinet from your set. Refer servicing to qualified service personnel.

Caution
To prevent fire or electrical shock hazard, Do not expose the main unit to moisture.

Caution
Do not drop or push objects into the player slots or openings. Never spill any kind of liquid on the product.

Caution
Avoid exposing the main unit to direct sunlight and other
source of the heat. Do not stand the player directly on other products which give off heat. E. g. video cassette players, Audio amplifiers.
Do not block the ventilation holes in the back cover. Ventilation is essential to prevent failure of electrical component. Do not squash power supply cord under the main unit.

Caution
Never stand on, lean on, push suddenly the product or its stand.
You should pay special attention to children.

Caution
Do not place the main unit on an unstable cart stand, shelf or table. Serious injury to an individual, and damage to the player, may result if it should fall.

Caution
When the product is not used for an extended period of time, it is advisable to disconnect the AC power cord from the AC outlet.
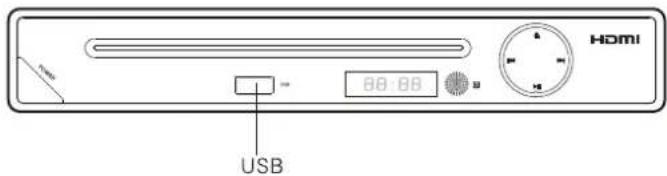
1. Components
1.1 Home DVD/MP3 player
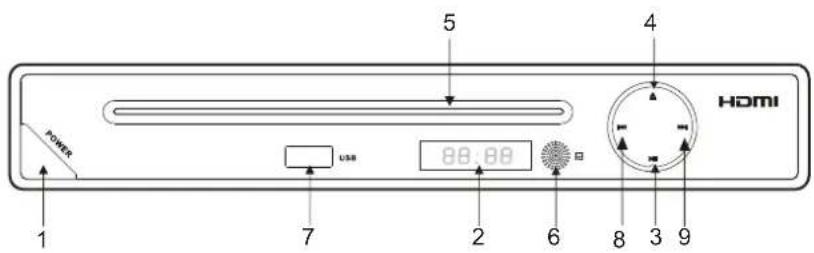
- POWER button
- LED display
- PLAY/PAUSE button
- OPEN/CLOSE button
- Disc tray
- Remote sensor
- USB slot
- PREV button
- NEXT button
LED display
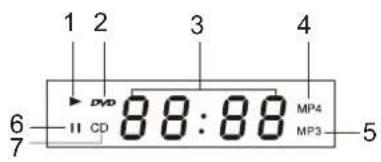
- PLAY indication
- DVD indication
- Multi-function indication
- MP4 indication
- MP3 indication
- PAUSE indication
- CD indication
Back panel
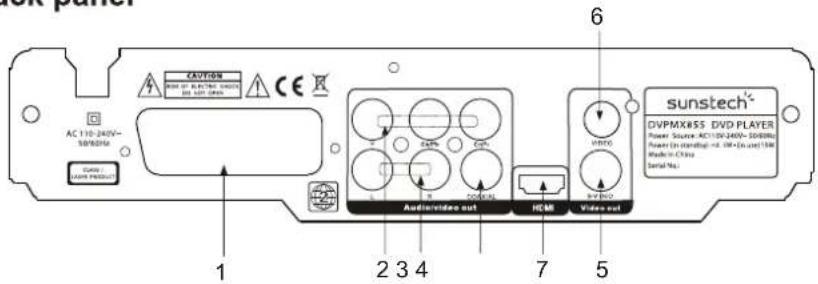
- SCART (output channel)
- Component video (output channel)
- L/R audio (output channel)
- Digital audio (output channel)
- S-Video (output channel)
- Composite video (output channel)
- HDMI (output channel)
1.2 Remote control
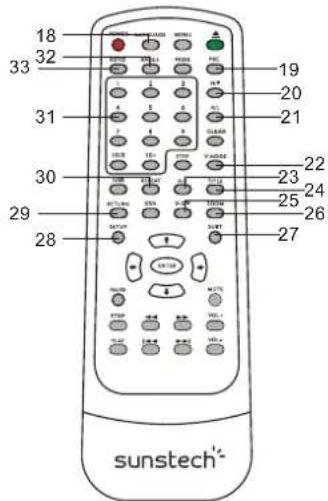
General functions
- POWER button
- MENU button
- OPEN/CLOSE button
- PROG button
- CLEAR button
- STEP button
- ENTER button
- MUTE button
- FF/REV buttons
- VOL +/- buttons
- PREV/NEXT buttons
- PLAY button
- STOP button
- PAUSE button
- ARROW buttons
- OSD button
- USB button

DVD/CD functions
- LANGUAGE button
- PBC button
- N/P button
- R/L button
- V-MODE button
- A-B button
- TITLE button
- SLOW button
- ZOOM button
- SUBT button
- SETUP button
- RETURN button
- REPEAT button
- NUMBER button
- ANGLE button
- GOTO button
2. DVD settings
This player allows you to customise the performance to your personal preferences.

flowchart
graph TD
    A["Setup Menu"] --> B["Language Setup"]
    A --> C["Video setup"]
    A --> D["Audio Setup"]
    A --> E["Rating Setup"]
    A --> F["Misc Setup"]
Displaying the setup menu screen The setup preferences. The selected category will provide you the setting details using the following screen.

flowchart
graph TD
    A["Language"] --> B["OSD Language"]
    A --> C["Subtitle"]
    A --> D["MPEG4 Subtitle"]
    A --> E["Audio"]
    A --> F["DVD Menu"]
    B --> G["English French Spanish German Italian Portuguese"]
    C --> H["English French Spanish German Italian Portuguese"]
    D --> I["Western European Central European"]
    E --> J["English French Spanish German Italian Portuguese"]
    F --> K["English French Spanish German Italian Portuguese"]
    L["Video"] --> M["Aspect Ratio"]
    L --> N["View Mode"]
    L --> O["TV System"]
    L --> P["Video out"]
    L --> Q["HD Resolution"]
    M --> R["FI1 Original Auto Fit Pan scan"]
    N --> S["NTSC PAL Auto"]
    O --> T["Composite S VIDEO Component RGBP Scan HD"]
    P --> U["Auto 480F/576P 720P 1080 1080E"]
    Q --> V["Off PCM ALL"]
    W["Audio"] --> X["Digital output"]
    Y["Rating"] --> Z["Parental Control: 8. Adult Set Password"]
    AA["Misc"] --> AB["Use Default Settings"]
    AA --> AC["Screen Saver"]
    AA --> AD["Last Memory"]
    AE["Edit"] --> AF["English French Spanish German Italian Portuguese"]
    AE --> AG["English French Spanish German Italian Portuguese"]
    AE --> AH["4.3 16.9"]
    AE --> AI["FI1 Original Auto Fit Pan scan"]
    AE --> AJ["NTSC PAL Auto"]
    AE --> AK["Composite S VIDEO Component RGBP Scan HD"]
    AE --> AL["Auto 480F/576P 720P 1080 1080E"]
    AE --> AM["Off PCM ALL"]
Set on "PARENTAL CONTROL" under "Rating", Press"enter" and input code 0000 (The original factory code is 0000). After input and confirm the code, press"PARENTAL CONTROL" and chose the desired rating. Move below to "SET PASSWORD", input again the code, and confirm. The function of "PARENTAL CONTROL" is effective.
Important note
Follow these steps to connect DVD player to TV through HDMI connection:
Connect your DVD player to TV through Scart Cable.
Connect your DVD player to your TV through HDMI Cable as well.
Press SETUP key in the remote control.
In VIDEO (VIDEO OUTPUT) section, select HD option.
Then, you should select HDMI input in your TV.
Disconnect Scart Cable from your DVD player and TV.
3. Basic operations
POWER • Press POWER that the player start work.
OPEN/CLOSE To open the disc tray, press OPEN/CLOSE To close the disc tray, press OPEN/CLOSE again.
TITLE During DVD playback, press TITLE to display the DVD title menu or play the first title. Note: this function is subject to the disc.
MENU During DVD playback, press MENU to display the disc menu of the current title. Note: this function is subject to the disc.
V-MODE Under the STOP mode, press this button to switch the video of Full, Original, Automatic and Panoramic.
OSD During VCD/DVD playback, press OSD button to show/hide time and status information.
PBC During VCD/SVCD playback, Press PBC to select the mode of PBC On or PBC Off
PBC: playback control used to navigate VCD/SVCD
0-10 Keys These keys are used to input the time, as well as title, chapter and track numbers
- When a CD,DVD,MP3 or VCD is playing (with PBC off), press the 0-10 keys to select a track Directly.
- When a numeric item is displayed on the screen, press the 0-10 keys to select the desired entry.
SLOW During DVD, VCD or SVCD playback, press SLOW for slow motion playback. Once you press SLOW, the disc will play at 1/2, 1/4, 1/6, 1/8, then back to normal speed. Press PLAY to resume normal playback.
PREV During MPEG4, DVD, CD, MP3 or VCD playback, press PREV to play the previous track.
NEXT During MPEG4, DVD, CD, MP3 or VCD playback, press NEXT to play the next track.
REPEAT ● Each press of the REPEAT button will change the repeat mode.
- During MPEG4, VCD, playback, there are three modes: repeat track, All & off
- During DVD, playback, there are three modes: Repeat character, Repeat Title and Repeat all and off. During CD, MP3 p;ayback, there are three modes: single, folder & off.
Note: During VCD playback, the PBC Mode must be set to Off
A-B During playback, press A-B tp select point A Press it again to select point B. The player will repeat the section from A to B automatically.
- Press A-B a third time to cancel A-B repeat and clear points A and B.
Note: During CD/VCD/SVCD playback points A and B must be within the same track. During MPEG4 DVD playback, points A and B can be selected from different chapters.
REV During MPEG4, DVD, CD, MP3 or VCD playback, press REV to scan in reverse. The play will review the disc at 2,4,8,16 times speed as follows:
• Press PLAY to resume normal playback.
FWD
During MPEG4, DVD, CD, MP3 or VCD playback, press FWD to scan forward.
The play will cue the disc at 2,4,8,16 times speed
as follows: Press PLAY to resume normal playback.
N/P
Press N/P when in STOP mode to select the mode from NTSC/PAL/AUTO.
MUTE
Press MUTE to turn off the audio.
Press MUTE again to resume normal sound.
R/L
During VCD/SVCD playback, press R/L repeatedly to select the
channel of audio-output: Stereo/Mono L /Mono R.
CLEAR
Press CLEAR TO delete the numbers you have entered in program mode.
PLAY
Press PLAY to resume normal palyback.
PAUSE
Press PAUSE during playback to pause playback.
STOP
Press STOP once during playback to stop and hold playback.
Press PLAY to resume playback from the point you have pressed STOP.
Press STOP twice to stop playback completely.
RETURN
When the PBC is on in the Menu displaying, select your item press return, you can select once again from
the menu displaying. This function is only valuable to VCD.
ZOOM
During VCD/SVCD/DVD/MPEG4 playback, press ZOOM to magnify the image
as follows:1X, 2X, 3X, off.
This function can zoom, also can lessen
STEP
When playing DVD, VCD, SVCD disc, press STEP once, the picture changes to next frame, Press
again to step forward one frame, Press PLAY to resume normal play.
NOTE: the step function is not available during CD playback
SETUP
Press the SETUP button on you remote control to access the setup menu. The setup menu is a
multi-level menu.
Use the▼or▲buttons to select the menu option that you need.
Use the◀ and ▶toto back to previous level menu or to enter or to enter the next level menu.
Press ENTER button to confirm selection.
Press SETUP button to exit setup.
VOL
Press VOL+ to enlarge the volume.
Press VOL- to reduce the volume.
SUBTITLE
During DVD playback.
Press SUBTITLE repeatedly to select from
up to 32 subtitle languages.
Note: This function is disc specific (language will vary).
USB
Press the USB button, you can choose USB.
NOTE: the source can only be selected when
the player is in stop mode.
ANGLE
Note: This function is disc specific.
During DVD playback, Press ANGLE to view scenes from different camera angles.
Press ANGLE to repeatedly to change from one camera angle to another.
GOTO
During DVD, VCD playback, press GOTO, and the menu will display as follow:
DVD:
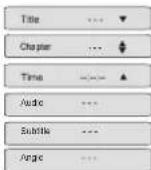
Use ↑ ↓ to select TITLE, CHAPTER, TIME. Use the number keys to input the desired time or track, then press ENTER to confirm.
During DVD playback, press SEARCH, and the menu will display as follow:
VCD:
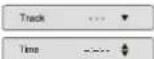
Use ↑ ↓ to select TRACK, TIME or DISC TIME. Use the number keys to input the desired time, title or chapter, then press ENTER to confirm.
Note: 1) TIME searches for an exact time in the track. 2) TRACK searches for a desired title or chapter. 3) For some DVD discs, the search function is unavailable.
PROG
Press PROG to get program menu when reading DVD & VCD, then program your wanted songs. (DVD programme needs TITLE and MENU.)
Program:
When playing mp3, press "right", "up" or "down" and "enter" to choose edit mode, and then Press "left" and "enter" to choose the music you want.
After that, press "right" and "enter" to choose "add to program", and then "up" and "enter" to choose "program view", next press "up" to choose "edit mode" and then press "Left" and "enter" to choose the music, press "play" to play the music.
Cancel program:
After program, press "stop" twice, and press "right" to choose "edit mode", and then press "left" to choose the music you'd like to cancel and "enter" to confirm your operation.
Press "right" and "enter" to choose "clear program", then press "Right" to "browse view" and return to play in order.
Note
If you are playing Mp3 songs or viewing Jpeg pictures, the maximum supported files on each folder is 500. In the case of having more than 500 pictures or songs, then you need to create a new folder and make sure each of them. Do not exceed more than 500 files. For example: if you have 1020 files then you need to create 3 different folders where in 2 of them you will need to record 500, Files in each and the third folder with the remaining 20 files. This way the unit will be able to recognize the folders and thus play all the content.
4. Spectal playback
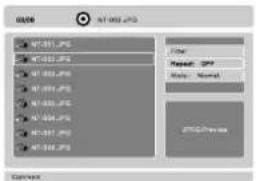
4.1 JPEG disc playback
When playing JPEG disc, a navigation menu will be displayed automatically if the disc is loaded successfully. Playback will start at the first file automatically.
- In the menu, use UP/DOWN navigation buttons to select a file and press ENTER to display the picture and the following picture as slide show.
- Press PAUSE to halt the slide show at the current picture.
- Press PLAY to resume the slide show.
- Press PREV or NEXT to select the previous or next picture.
- Press ZOOM to magnify the picture. In Zoom mode, use NAVIGATION keys to move the picture.
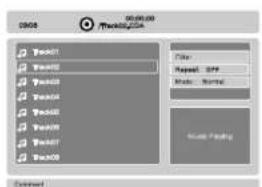
4.2 Mp3 playback
When playing MP3 disc, a navigation menu will be displayed automatically if the disc is loaded successfully.
- In the menu, use UP/DOWN navigation buttons to select a folder and press ENTER to display the files in that folder.
- In the folder, use UP/DOWN navigation buttons to select a file. Press ENTER to start playback of that file.
- Playback will continue automatically with the following files.
- Press PAUSE to halt the playback, press PLAY to resume the playback.
- Press STOP to end playback.
4.3 MPEG4 playback
When playing MPEG4 disc, a navigation menu will be displayed automatically if the disc is loaded successfully.
- In the menu, use UP/DOWN navigation buttons to select a file and press ENTER to start playback.
- Press PAUSE to halt the playback, press PLAY to resume the playback.
- Press STOP to end playback.
NOTE: If a disc contains mixed content (MP3 and video files). Player will only recognize, list and play one content type. The other content type is being ignored completely. However, MP3 and JPEG can be mixed on a disc.
4.4 Kodak Picture CD playback
When a KODAK PICTURE CD is inserted, a slide show of the images will start playback of the images.
The images are being scaled to fit the TV screen.
- Press PAUSE to halt the slide show at the current picture. Press PREV or NEXT to select the previous or next picture. Press PLAY to resume the slide show.
- Press NAVIGATION keys to flip or rotate the image: UP-flip vertical, DOWN-flip horizontal, LEFT-rotate left, RIGHT-rotate right.
- Press ZOOM to magnify the picture. In Zoom mode, use NAVIGATION keys to move the picture. NOTE: In Zoom mode, silde show is paused, image rotation and wipe effects are not available.
4.5 USB playback
DVD player is equipped with USB port, able to playback mp3, wma, jpeg and avi files from the inserted media.
To play from flash memory:
- Press the USB button, you can choose USB.
NOTE: the source can only be selected when player is in stop mode. - From the navigation menu, select a file to be played using UP and DOWN keys and press ENTER to start playback.
Note: Since the technology updates fast, this player may not be compatible with some flash memory devices.
*USB support Specification: USB 2.0 compatible
5. Technical data
Home DVD/MP3 player
| Parameter | Value |
| Voltage | 110-240V AC /50/60Hz |
| Max power consumption | 15W |
| Standby power consumption | <0.5W |
| Audio DAC | 16 bit / 48kHz |
| Video output | 1 Vpp (75 Ohm) |
| Audio output | 1.8 Vpp max. (10 kOhm) |
| Frequency response CD | 20Hz - 20 kHz (EIA1) |
| Frequency response DVD | 20 Hz - 22 kHz (48k) |
| 20 Hz - 44 kHz (96 k) | |
| Audio SIN Ratio | >90dB |
| Color system | PAL/NTSC |
| Audio system | Analog downmix stereo |
| 2 channel discrete analog audio output | |
| Output Terminals | Composite video (output channel) |
| S-Video (output channel) | |
| L/R audio (output channel) | |
| Digital audio (output channel) | |
| Component video (output channel) | |
| SCART (output channel) | |
| HDMI (output channel) |
Remote control
| Parameter | Value |
| Transmission system | Infrared |
| Power consumption | 2 batteries (AAA) |
Supported media formats
| Disc types | DVD / DVD-R / DVD-RW / CD-R / CD-RW / DIVX / SVCD / VCD / CD-DA |
| Picture formats | JPEG / Kodak Picture CD |
| Video formats | MPEG1, MPEG2, MPEG4, AVI |
| Audio formats | MPEG1 Layer I, II, III PCM Dolby Digital, MP3,WMA |
6. Disposal of used electrical and electronic equipment
The meaning of the symbol on the material, its accessory or packaging indicates that this product shall not be treated as household waste. Please, dispose of this equipment at your applicable collection point for the recycling of electrical and electronic equipments waste. In the European Union and Other European countries which there are separate collection systems for used electrical and electronic product. By ensuring the correct disposal of this product, you will help prevent potentially hazardous to the environment and to human health, which could otherwise be caused by unsuitable waste handling of this product. The recycling of materials will help conserve natural resources. Please do not therefore dispose of your old electrical and electronic equipment with your household waste.
For more detailed information about recycling of this product, please contact your local city office, your household waste disposal service or the shop where you purchased the product.
Warranty conditions
The warranty of this product is for 2 years since the purchase date. The warranty will exclude breakdowns caused by bad use of the product, wrong installation or installation in not desirable places for a proper maintenance of the product, rips, updates of the products that are not the supplied by the brand, pieces wore away for its use or for not domestic or inappropriate use. Also are excluded breakdowns caused for manipulations of the products by people or companies alien to our company. For any request regarding the warranty terms, the purchase receipt must be attached.


- Caution
- Components
- Home DVD/MP3 player
- LED display
- Remote control
- General functions
- DVD/CD functions
- DVD settings
- Important note
- Basic operations
- FWD
- N/P
- MUTE
- R/L
- CLEAR
- PLAY
- PAUSE
- STOP
- RETURN
- ZOOM
- STEP
- SETUP
- VOL
- SUBTITLE
- USB
- ANGLE
- GOTO
- PROG
- Program:
- Cancel program:
- Spectal playback
- JPEG disc playback
- Mp3 playback
- MPEG4 playback
- Kodak Picture CD playback
- USB playback
- Technical data
- Disposal of used electrical and electronic equipment
- Warranty conditions
Brand : Sunstech
Model : DVPMX855
Category : DVD player