BPB-KP7W-G3 - Uncategorized Bazooka - Free user manual and instructions
Find the device manual for free BPB-KP7W-G3 Bazooka in PDF.

| Product Type | Portable Bluetooth Speaker |
| Brand | Bazooka |
| Model | BPB-KP7W-G3 |
| Dimensions (W x H x D) | 30 x 20 x 15 cm |
| Weight | 2.0 kg |
| Power Supply | AC 100-240V 50/60Hz or Rechargeable Li-ion 7.4V 2600mAh |
| Battery Life | Up to 8 hours |
| Connectivity | Bluetooth 5.0, AUX 3.5mm, USB MP3 playback, SD slot |
| Output Power | 20W RMS |
| Frequency Response | 20Hz - 20kHz |
| Signal-to-Noise Ratio | ≥80dB |
| Main Features | Wireless audio streaming, hands-free calling, TWS pairing, microphone input for karaoke |
| Maintenance & Cleaning | Clean with a soft dry cloth. Do not use chemical cleaners. |
| Safety Precautions | Do not expose to water or excessive humidity. Avoid extreme temperatures. |
| Spare Parts & Repairability | Contact Bazooka support for spare parts. Repairs should be performed by a qualified technician. |
Frequently Asked Questions - BPB-KP7W-G3 Bazooka
User questions about BPB-KP7W-G3 Bazooka
0 question about this device. Answer the ones you know or ask your own.
Ask a new question about this device
Download the instructions for your Uncategorized in PDF format for free! Find your manual BPB-KP7W-G3 - Bazooka and take your electronic device back in hand. On this page are published all the documents necessary for the use of your device. BPB-KP7W-G3 by Bazooka.
USER MANUAL BPB-KP7W-G3 Bazooka
Note:
The Master Power button on the BPB16-G3, BPB16-G3-BAT, and BPB16-G3-BAT-WH is a MECHANICAL switch that kills all power to insure there is no parasitic current draw (battery drain) while your vehicle is in storage. The PWR button on the new dashboard remote does NOT and cannot operate that Master Power button. The PWR button on the dashboard remote will turn the internal Bluetooth module ON/OFF as well as Pause/Play the music provided the Master Power button on the unit is already ON.
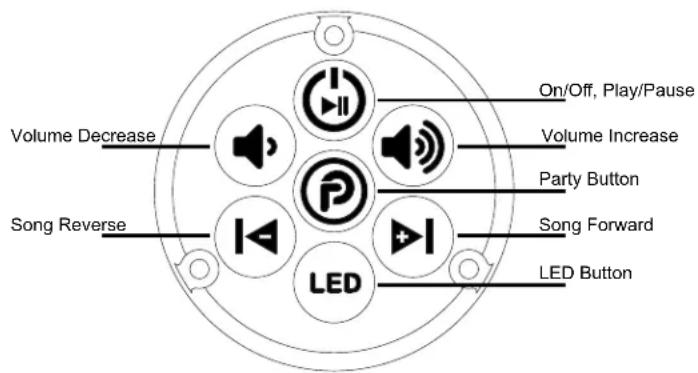
BPB-KP7W-G3
Power On/Off, Play/Pause: Press and hold turns bar on/off.
Click-press when music is playing causes music to pause.
Press again to play
LED: Press and hold turns led on/off. Click-press cycles the sequence. Double-click turns beat to the music option on.
Party Button: Will illuminate for 10 seconds when any button is pressed. Click-press cycles through the party modes. Party Button on sound bar will change colors along with a voice prompt for that mode. Party Button on remote will not change color.
Modes below:
Party Button on bar
Voice Prompt
Blue
Single Listener Mode
Purple
DJ Broadcast Mode
Red
DJ listening Mode
BPB24-G3, BPB24-DS-G3, BPB36-G3
Pairing Instructions:
Unplug the power wire from the Party Bar hold both the volume decrease and volume increase buttons down on remote until the Party Button is blinking. Plug the Party Bar's power wire back in. The remote will quickly blink 6 times, and then will be solid, indicating pairing was successful.
Pairing Instructions:
Turn the master power button off on the bar. Hold both the volume decrease and volume increase buttons down on remote until the Party Button is blinking. Turn the master power button on. The remote will quickly blink 6 times, and then will be solid, indicating pairing was successful.
Do Not use both 12vdc and battery power at the same time. If battery insulators have been removed. Batteries must be removed also when 12vdc pigtail is used.
Power pigtail can be attached to a 12 vdc source Red 12 vdc positive Black 12 vdc negative
Battery Installation
Remove 3 screws from the back. If first use, remove the clear insulator tabs. Other wise replace batteries CR2032 as needed. Be sure (+) is the correct orientation
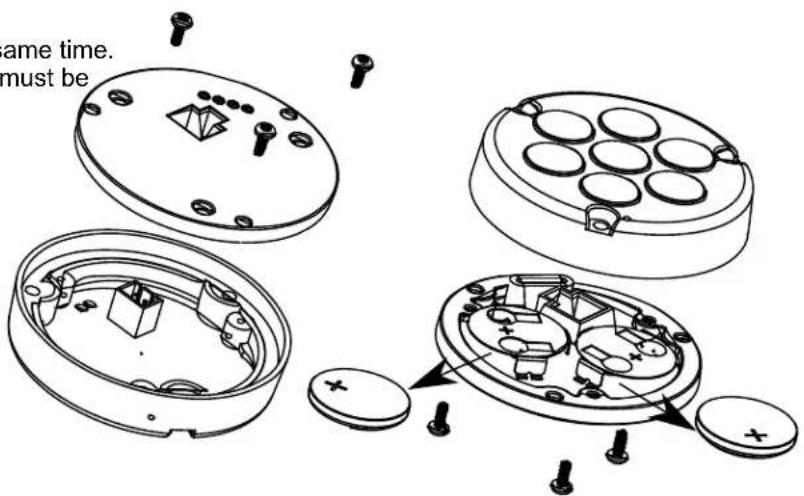
