VT4510 - Computer accessory VisionTek - Free user manual and instructions
Find the device manual for free VT4510 VisionTek in PDF.

| Product Type | Multi-Port USB-C Hub |
| Brand | VisionTek |
| Model | VT4510 |
| Color | Space Gray |
| Dimensions (L x W x H) | 10.5 x 5.0 x 1.5 cm |
| Weight | 55 g |
| Power Source | Bus-powered via USB-C |
| Input Interface | USB-C (Male) |
| Output Ports | 2x USB-A 3.0, 1x HDMI 4K@30Hz, 1x SD/TF Card Reader |
| Data Transfer Speed | Up to 5 Gbps (USB 3.0) |
| Video Resolution Support | Up to 3840x2160 @ 30Hz |
| Audio Support | Passthrough via HDMI |
| Compatibility | Windows, macOS, Chrome OS; USB-C or Thunderbolt 3/4 equipped devices |
| Cable Length | 15 cm (integrated) |
| Operating Temperature | 0°C to 45°C |
| Storage Temperature | -20°C to 60°C |
| Maintenance & Cleaning | Wipe with dry cloth; avoid liquids |
| Safety Precautions | Do not expose to moisture or excessive heat |
| Spare Parts & Repairability | Non-repairable; replace entire unit |
| Warranty | Limited 1-year warranty |
Frequently Asked Questions - VT4510 VisionTek
User questions about VT4510 VisionTek
0 question about this device. Answer the ones you know or ask your own.
Ask a new question about this device
Download the instructions for your Computer accessory in PDF format for free! Find your manual VT4510 - VisionTek and take your electronic device back in hand. On this page are published all the documents necessary for the use of your device. VT4510 by VisionTek.
USER MANUAL VT4510 VisionTek

TABLE OF CONTENTS
Introduction 2
Features 3
Contents 3
System Requirements 4
Docking Station Configuration 5
Driver Installation (Windows).... 7
Windows Setup 11
Driver Installation (macOS) 13
Managing Multiple Displays (macOS) 16
Configuring Displays from the Menu Bar (macOS) ...... 18
Warranty 19
INTRODUCTION
Your new Dual 4K Docking Station can connect to any host with USB A or Type C connectors providing a fully backward-compatible and future-proof docking solution. Allowing you to connect up to two additional monitors through a single USB cable.
The Dual 4K Docking Station Software allows full configuration of all additional USB displays, including:
- Support for up to 6 additional USB Displays (Windows)
- Support for up to 4 additional USB Displays (Mac OS X)
- Expand USB 3.0 connectivity
• Supports dual DP or dual HDMI display
• Gigabit Ethernet - Mic In and Audio out
- Extended, Mirrored, Primary Display
- Extend left, right, above, or below
- Rotation
- Layout of displays
- Color Depth
FEATURES
- Compatible with both Type-C and Type-A Laptops and Desktop Computers
- Supports resolutions up to 5K (5120 x 2880@60Hz) when using dual DP ports simultaneously
- Dual 4K HDMI/Dual 4K DisplayPort/4K HDMI + 4K DisplayPort output
• Supports Extend and Mirror Display Mode
• Supports 5.1 Channel Surround Sound
• Built-in USB 3.0 GPU, Plug and Display - Separate microphone input and audio output
- SuperSpeed USB 3.0, speeds up to 5Gbps and backward compatible with 2.0/1.1
• Built-in 10/100/1000 BASE-T Gigabit Ethernet RJ45 for increased network performance - VT4000 does not support laptop charging, VT4500 supports laptop charging of up to 60W, VT4510 up to 100W over USB Type-C connection
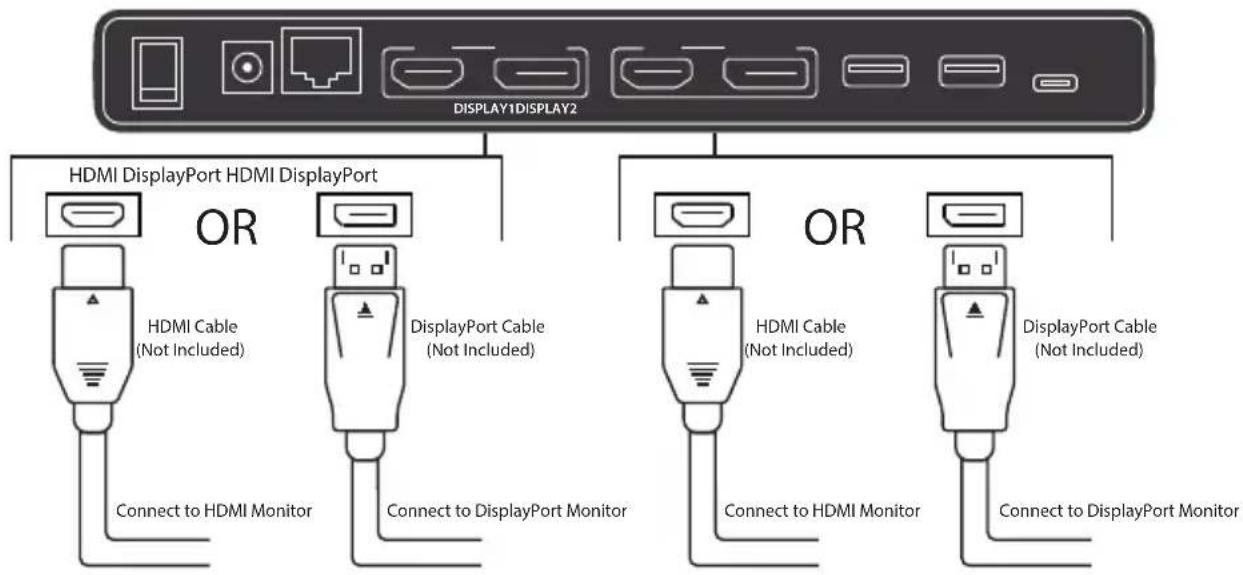
Note: If an HDMI display (either Display 1 or 2) and a DisplayPort display are connected at the same time, the DisplayPort display will be the primary display.
CONTENTS
• VT4000 / VT 4500 / VT4510 Dual Display Docking Station
- AC Power Adapter - (40W - VT4000, 100W - VT4500, 130W - VT4510)
• USB-C to USB-C Cable (1M)
• USB 3.0 A to USB-C Cable (1M)
- Quick Start Guide
SYSTEM REQUIREMENTS
DisplayLink USB Graphics Software for Windows
Windows 7 (32-bit and 64-bit editions)
Windows 8 (32-bit and 64-bit editions)
Windows 8.1 Update 2015 (32-bit and 64-bit editions)
Windows 10 (32-bit and 64-bit edition)
Windows XP SP2 and Vista are supported by older version of the DisplayLink software:
http://www.displaylink.com/downloads
DisplayLink USB Graphics Software for macOS
Big Sur 11
Yosemite 10.10
Catalina 10.15
Mavericks 10.9
Mojave 10.14
Mountain Lion 10.8
High Sierra 10.13
Lion 10.7
Sierra 10.12
Snow Leopard 10.6
El Capitan 10.11
Connect the USB-C to USB-C / USB-A to USB-C cable to the Docking Station. Plug the USB cable into your Laptop/Desktop Computer, Connect the power adapter and turn it on.
DOCKING STATION CONFIGURATION (Continued)
Step2
Connect your displays to the Docking Station
flowchart
graph TD
    A["DISPLAY1DISPLAY2"] --> B["HDMI DisplayPort HDMI DisplayPort"]
    A --> C["OR"]
    A --> D["OR"]
    B --> E["HDMI Cable (Not Included)"]
    B --> F["DisplayPort Cable (Not Included)"]
    C --> G["Connect to HDMI Monitor"]
    D --> H["Connect to DisplayPort Monitor"]
    D --> I["Connect to HDMI Monitor"]
    D --> J["Connect to DisplayPort Monitor"]
DRIVER INSTALLATION (Windows)
Step 1
The following section shows you how to install the Docking Station software on different operating systems.
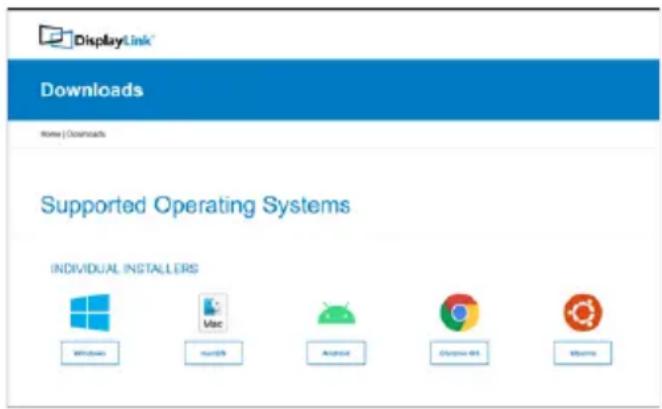
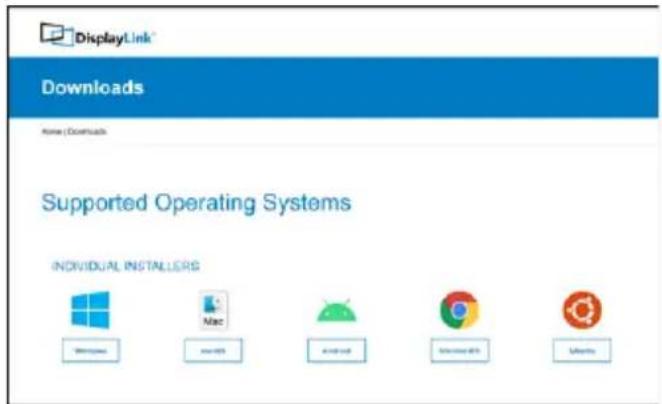
Download and install the latest Displaylink software. Select the driver according to your operating system.
Please visit displaylink.com/downloads and download the latest drivers. Displaylink-provided drivers are always compatible with the USB Docking Station.
DRIVER INSTALLATION (Windows Continued)
Step2
Select the downloaded file double click to begin the DisplayLink software installer
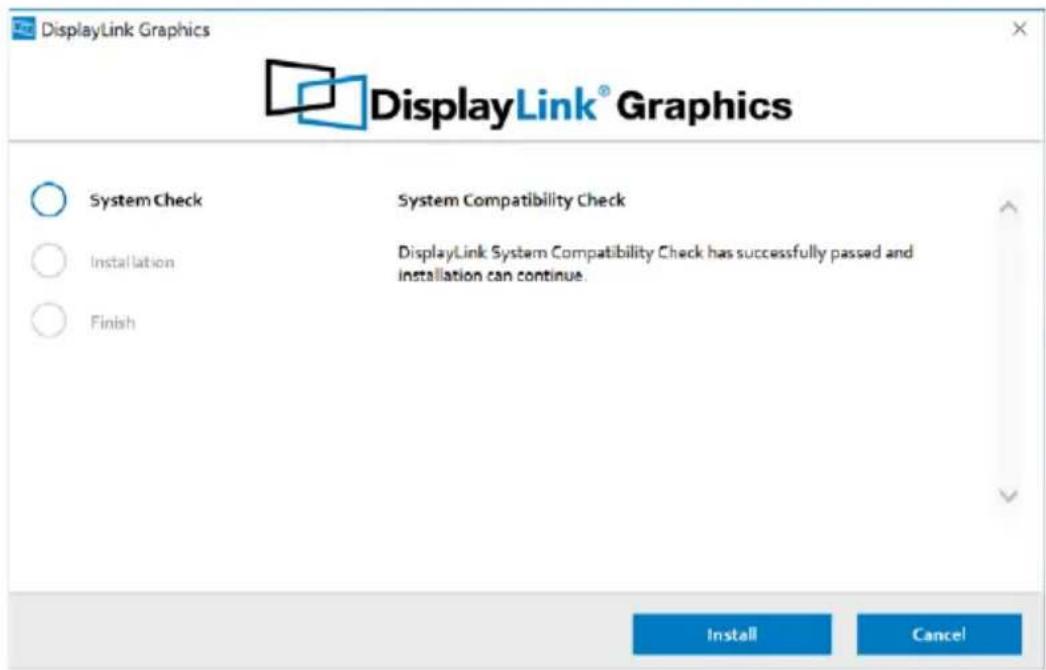
Step3
Once the installer begins a window will pop up and verify that your system is compatible with DisplayLink USB Graphics.
DRIVER INSTALLATION (Windows Continued)
Step4
Click "Install"
DRIVER INSTALLATION (Windows Continued)
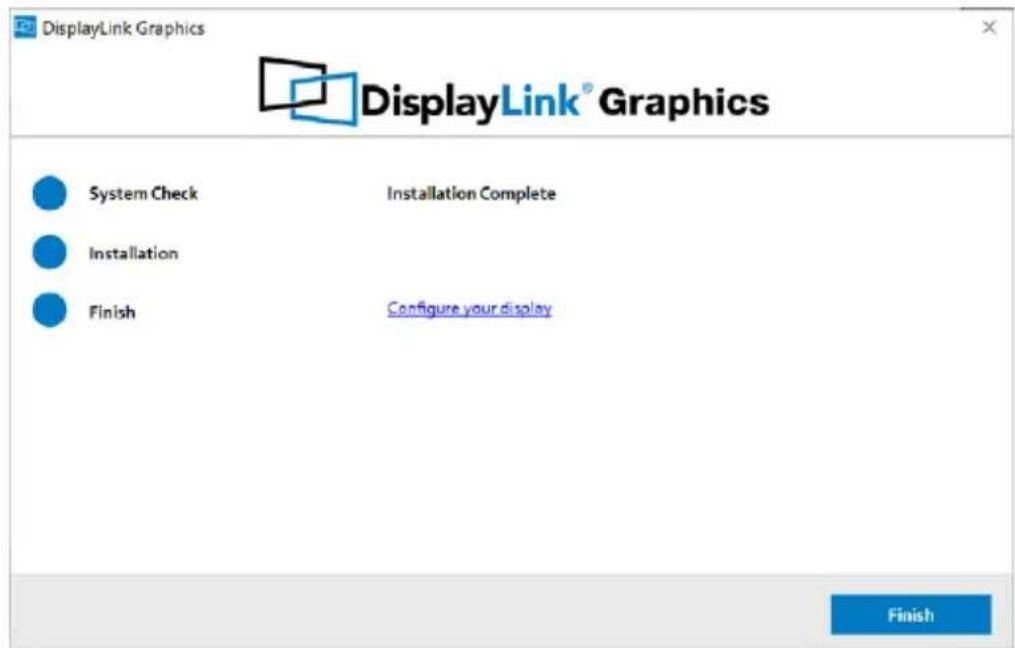
Step 5
Once the "Finish" button appears the install is complete and your system will may need to reboot. If the option pops up click "Reboot" to finalize the driver installation.
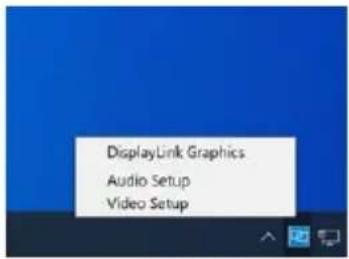
WINDOWS SETUP
Audio setting for Windows 10
Step 1
Click the DisplayLink "Icon" at the lower right corner to set up audio and video, click "Audio setup"
Step 2
Choose Speaker
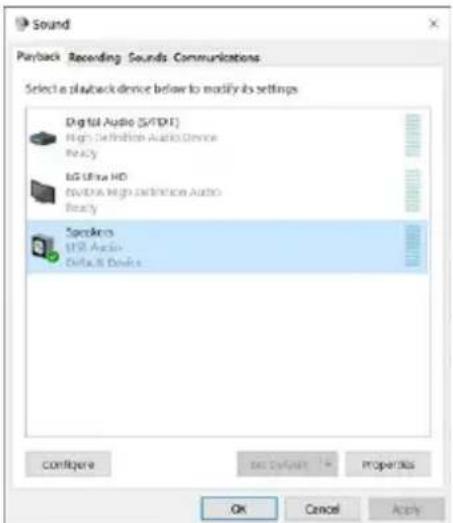
Step 3
Choose Microphone

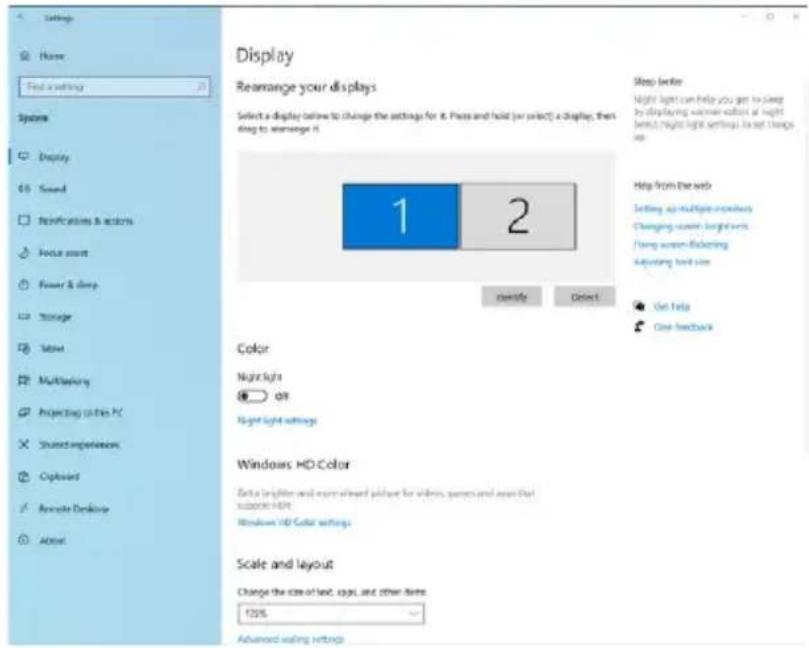
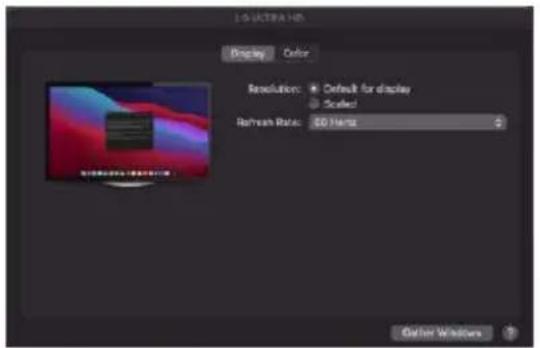
WINDOWS SETUP (Continued)
Video Setting: Windows 10
Display mode
- Click video setup
- Select Display and choose Orientation then select Extend desktop to this display.
DRIVER INSTALLATION (macOS)
Introduction: This guide applies to software version 1.3 and above of the Mac software.
What is the macOS Driver?
The macOS driver is designed for macOS 10.4 - 11 to enable you to add an additional monitor to your mac using Displaylink technology. This software allows you to run your DisplayLink UGA devices on any Intel or M1 based Mac desktop or laptop, allowing you to connect up to 4 additional monitors via USB.
Please Note: Power PC-based Macintosh computers, such as late-model iMacs, PowerBooks and PowerMacs, are not currently supported.
DRIVER INSTALLATION (macOS)
Step 1
Download and install the latest Displaylink software. Select the driver according to your operating system.
Please visit displaylink.com/downloads and download the latest drivers. Displaylink-provided drivers are always compatible with the USB Docking Station.
DisplayLink USB Graphics Software supports macOS 10.4 - 11. M1 macs are supported on software version 1.3 or later.
Please Note: Power PC-based Macintosh computers, such as late-model iMacs, PowerBooks and PowerMacs, are not supported.
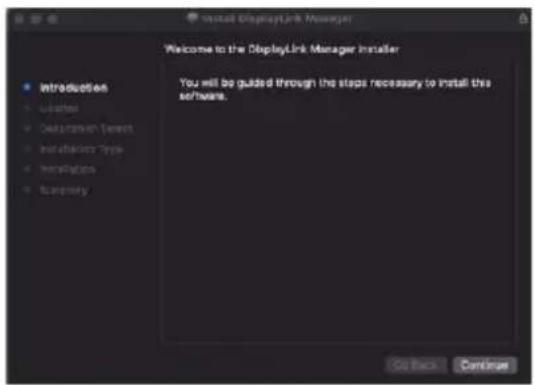
DRIVER INSTALLATION (macOS)
Step 2
Click "Continue" to start the installation process.
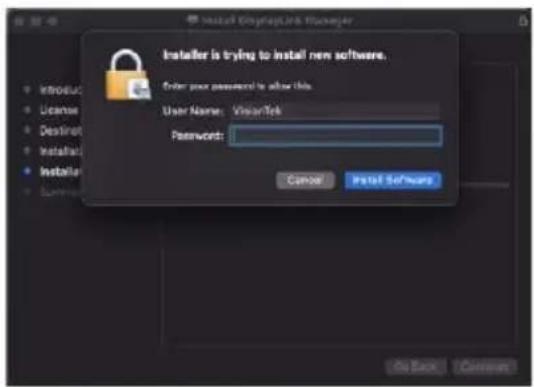
Step 3
Once prompted input your account password and click "Install Software"
Step 4
After installation is complete restart your system. Your dock should now be working. If not, make sure the Displaylink Manager application is running by entering "Displaylink" into the finder and running the DisplayLink application.
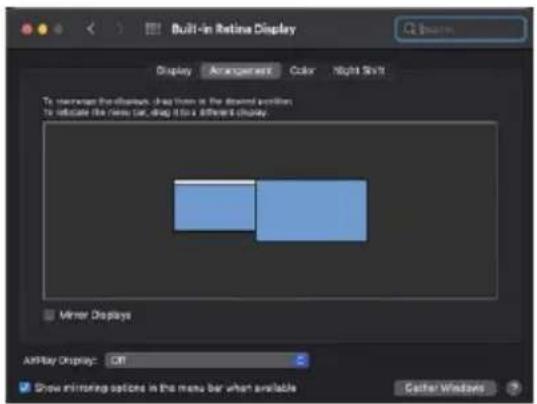
MANAGING MULTIPILE DISPLAYS (macOS)
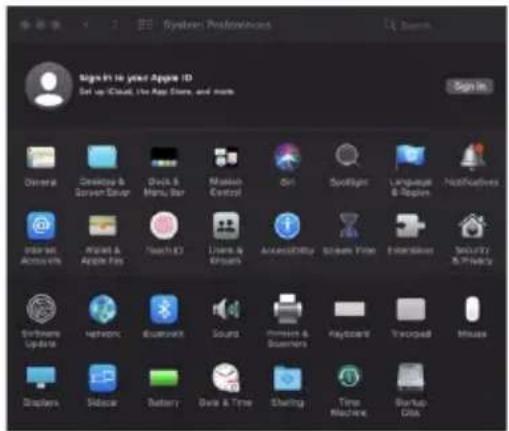
When a new display is connected to your Mac, it will default to being extended to the right of the main display. To configure the settings for each of your displays, select "Displays" from the "System Preferences" menu. This will open the "Display Preferences" window on each of your displays allowing you to configure each.
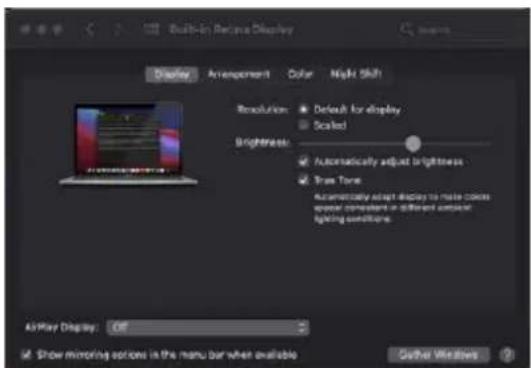
Display Preferences:
Display Resolutions
Rotating a Display
Display Positions
Display to Mirror mode
Display to Extend
Using both extended and mirrored displays
Changing the main display
MANAGING MULTIPLE DISPLAYS (mac OS Continued)
To arrange displays and configure mirrored or extended displays click on the arrangement tab.
To move a display, click and drag the display in the arrangements window.
To change primary display, click on the small bar on top of the main monitor and drag in onto the monitor you want to be the primary.
CONFIGURING DISPLAYS FROM THE MENU BAR (macOS)
If you have checked the "Show Displays" ON menu bar in "Display Preferences" then you can configure the displays by clicking the display icon in the menu bar.
This menu allows you to perform the following actions:
Detect all displays connected to the Mac
Turn display mirroring on/off
Set the resolution of both the primary display, and the additional display(s)
Open "Display Preferences"
WARRANTY
VisionTek Products LLC, ("VisionTek") is pleased to warrant to the original purchaser ("Warrantee") of the Device ("Product"), that the product will be free from manufacturing defects in material for Two (2) Years when given normal and proper usage. The product must be registered within 30 days from the original date of purchase to receive this 2 year warranty. All products not registered within 30 days will ONLY receive a 1 year limited warranty.
VisionTek's liability under this warranty, or in connection with any other claim relating to the Product, is limited to the repair or replacement, at VisionTek's option, of the product or portion of the product which is defective in manufacturing material. Warrantee assumes all risk of loss in transit. The returned products shall be the sole property of VisionTek. VisionTek warrants the repaired or replaced Products will be free from manufacturing defects in material for the remainder of the warranty period.
VisionTek reserves the right to inspect and verify the defectiveness of any products or portion of product returned. This warranty does not apply to any software component.
FULL WARRANTY DISCLOSURE AVAILABLE AT WWW.VISIONTEK.COM
Product must be registered within 30 days of purchase for warranty to be valid. IF YOU HAVE QUESTIONS OR NEED ASSISTANCE WITH THIS PRODUCT,
CALL SUPPORT AT 1 (866) 883-5411.
© 2021 VisionTek Products, LLC. All rights reserved. VisionTek is a registered trademark of VisionTek Products, LLC. Windows is a registered trademark of Microsoft Corporation in the United States and other countries.