
VT2000 - Computer accessory VisionTek - Free user manual and instructions
Find the device manual for free VT2000 VisionTek in PDF.


| Product Type | Multi Display MST Dock |
| Brand | VisionTek |
| Model | VT2000 |
| Compatible Devices | USB-C systems with DisplayPort over USB-C (DP Alt Mode), Windows 11/10/8.1/8/7, macOS 10.12+ |
| Display Support | Up to 3 displays; single display up to 4K@60Hz; dual/triple configurations depend on host system (e.g., VT2000 triple: 3x 1920x1080@60Hz) |
| Video Ports | 2x DisplayPort 1.4, 1x HDMI 2.0 |
| USB Ports | 2x USB 3.0 (5Gbps), 2x USB 2.0 (480Mbps) |
| Ethernet | Gigabit Ethernet (10/100/1000) |
| Card Reader | SD & Micro SD slots (SD V2.0/SDHC up to 32GB, compatible SDXC up to 2TB) |
| Audio | 3.5mm audio jack (headphone/headset) |
| Power Delivery | USB-C PD pass-through up to 85W (power adapter sold separately) |
| Security | Kensington lock slot |
| Safety Instructions | Keep away from humidity; avoid exposure to moisture; only service by qualified technician |
| Care and Maintenance | Clean with a soft, dry cloth; do not use liquid cleaners |
| Warranty | 2 years limited (requires registration within 30 days) |
Frequently Asked Questions - VT2000 VisionTek
User questions about VT2000 VisionTek
0 question about this device. Answer the ones you know or ask your own.
Ask a new question about this device
Download the instructions for your Computer accessory in PDF format for free! Find your manual VT2000 - VisionTek and take your electronic device back in hand. On this page are published all the documents necessary for the use of your device. VT2000 by VisionTek.
USER MANUAL VT2000 VisionTek
MULTI DISPLAY MST DOCK USER MANUAL
TABLE OF CONTENTS
SAFETY INSTRUCTIONS...... 2
INTRODUCTION.... 3
FEATURES.... 3
CONTENTS.... 4
SYSTEM REQUIREMENTS...... 4
DOCKING STATION PORTS...... 5
DOCKING STATION SETUP....7
SUPPORTED RESOLUTIONS.... 12
DISPLAY SETTINGS (Windows).... 14
AUDIO SETTINGS (Windows).... 15
DISPLAY SETTINGS (macOS).... 16
FAQ....18
NOTICE.... 21
WARRANTY / SUPPORT.... 22
SAFETY INSTRUCTIONS
Always read the safety instructions carefully.
Keep the User Manual for future reference.
Keep this equipment away from humidity.
If any of the following situations arise, have the equipment checked by a service technician immediately:
- The equipment has been exposed to moisture.
- The equipment has obvious signs of breakage.
- The equipment has not been working well or you cannot get it to function according to this manual.
COPYRIGHT STATEMENT
No part of this publication may be reproduced in any form by any means without prior written permission.
All trademarks and brand names mentioned herein are trademarks or registered trademarks of their respective companies.
DISCLAIMER
Information in this document is subject to change without notice. The manufacturer does not make any representations or warranties (implied or otherwise) regarding the accuracy and completeness of this document and shall in no event be liable for any loss of profit or any commercial damage, including but not limited to special, incidental, consequential, or other damage.

WEEE DIRECTIVE & PRODUCT DISPOSAL
At the end of its serviceable life, this product should not be treated as household or general waste. It should be handed over to the applicable collection point for the recycling of electrical equipment, or returned to the supplier for disposal.
INTRODUCTION
The VT2000 / VT2500 / VT2510 is built to be slim and light. It allows you to connect additional USB devices and monitors through one convenient USB-C Cable. You can run up to 3 displays at 1920 x 1080 @ 60Hz with the VT2000 / VT250 (depending on the host device). Extend up to 3 displays 2 x 3840 x 2160 @ 30Hz with 1 x 1920x1080 @ 60Hz with the VT2510. The 4 USB ports let you connect mice, keyboards, external storage drives and additional devices all in one place.
FEATURES
- Compatible with USB-C Systems via DP Alt Mode
- USB-C Power Passthrough (VT2000 up to 85W, power adapter sold separately)
• USB-C Power Delivery (VT2500 up to 85W, VT2510 up to 100W) - 2x SuperSpeed USB 3.0 up to 5Gbps, 2x High Speed USB 2.0 up to 480Mbps
• 10/100/1000 Gigabit Ethernet port for increased network performance
• Supports 1 monitor up to 4K @ 60Hz, Supports 2 monitors up to 4K @ 30Hz - Extend 2 displays (1920x1080 @ 60Hz) on most USB-C DP Alt Mode systems*
- VT2000 / VT2500 extend up to 3 Displays (1920x1080 @ 60Hz) DP 1.3/1.4 HBR3 with MST
- VT2510 extend up to 3 Displays (2 x 3840x2160 @ 30Hz, 1 x 1920x1080 @ 60Hz) DP 1.3/1.4 HBR3 with MST
• Supports SD V2.0/SDHC (Up to 32GB), compatible with SDXC (Up to 2TB)
*Note: Maximum resolution and number of extended displays is dependent on host system specifications.
CONTENTS
VT2000 - 901284
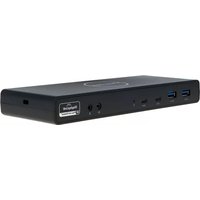
• VT2000 Multi Display MST Dock
• USB-C to USB-C Cable
- User Manual
VT2500 - 901381
• VT2500 Multi Display MST Dock
• 100W Power Adapter
- USB-C to USB-C Cable
- User Manual
VT2510 - 901551
• VT2510 Multi Display MST Dock
• 100W Power Adapter
- USB-C to USB-C Cable
- User Manual
SYSTEM REQUIREMENTS
Compatible Devices
System with USB-C port that supports DisplayPort over USB-C (DP Alt Mode MST) for video or MacBook with USB-C port that supports DisplayPort over USB-C (DP Alt Mode SST) for video
For USB-C charging, a system with a USB-C port that supports USB-C Power Delivery 3.0 is required
Operating System
Windows 11, 10, 8.1, 8, 7
macOS 10.12 or Later
DOCKING STATION PORTS
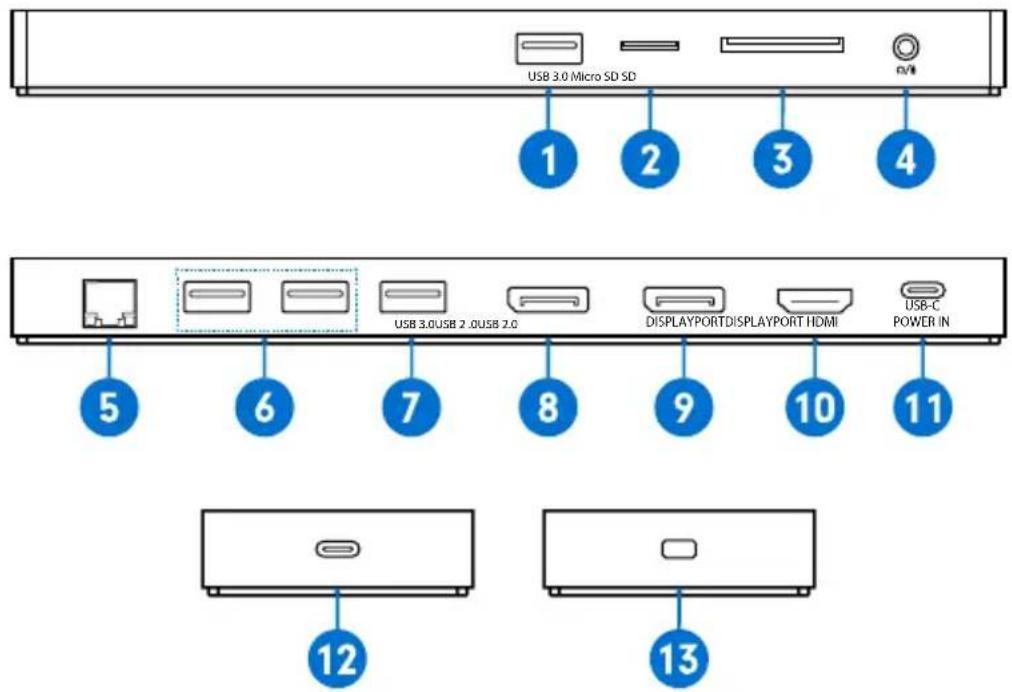
DOCKING STATION PORTS (Continued)
| Port Description | |
| 1. USB-A 3.0 Port Connect a USB-A device, supports 5Gbps transfer speeds | |
| 2. Micro SD Card Slot Supports SD V2.0/SDHC (Up to 32GB), compatible with SDXC (Up to 2TB) | |
| 3. SD Card Slot Supports SD V2.0/SDHC (Up to 32GB), compatible with SDXC (Up to 2TB) | |
| 4. Audio Jack Connect headphones, headset or other devices with 3.5mm connector | |
| 5. RJ45 Gigabit Ethernet Connect a network router or modem at 10/100/1000 Mbps | |
| 6. USB-A 2.0 Ports Connect a USB-A device, supports 480Mbps transfer speeds | |
| 7. USB-A 3.0 Port Connect a USB-A device, supports 5Gbps transfer speeds | |
| 8. DP 1.4 Port (DP Alt Mode) Display 1 | - Connect a display with a DP port to stream video up to 4K@60Hz* |
| 9. DP 1.4 Port (DP Alt Mode) Display 2 | - Connect a display with a DP port to stream video up to 4K@60Hz* |
| 10. HDMI 2.0 Port (DP Alt Mode) Display 3 | - Connect a display with a HDMI port to stream video up to 4K@60Hz* |
| 11. USB-C Power Supply In Supports USB-C power supply up to 100W, included with VT2500 / VT2510 | |
| 12. USB-C Host Upstream Port Connect to a laptop or PC, up to 20 Gbps to host, Power Delivery charging up to 85W (VT2000 / VT2500), 100W (VT2510) | |
| 13. Kensington Lock Slot Attach a Kensington Lock to secure docing station | |
*Note: 4K @ 60Hz max single display resolution, maximum resolution dependent on host system specifications.
DOCKING STATION SETUP
Connecting Power
- Plug the power adapter into the USB-C Power In port on the back of the dock. Connect the other end into a power outlet.
Note: Power supply is not required for dock operation. USB-C Power Supply for charging host system via USB-C PD. VT2000 does not include a USB-C Power Adapter, Sold Separately. VT2500 / VT2510 include 100W USB-C Power Adapter.

DOCKING STATION SETUP (Continued)
Connecting Systems
-
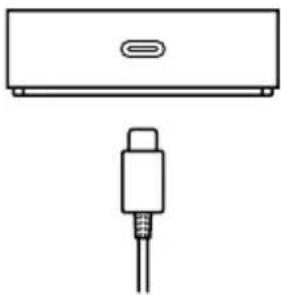
Connect the included USB-C cable to the USB-C Host port on the side of the VT2000 / VT2500 / VT2510. Connect the other end to your host laptop, PC or Mac.
-
The VT2000 / VT2500 / VT2510 has high resolution DP and HDMI outputs. Resolutions up to 3840 x 2160 @ 60Hz are supported depending on monitors connected and the host system capabilities.
natural_image
Simple line drawing of a device with a connector and cable (no text or symbols)USB-C to Host
DOCKING STATION SETUP (Continued)
Single Display Setup
- Connect your monitor to the Display A - DisplayPort, Display B - DisplayPort or Display C - HDMI.

Note: Display A, B and C output video via USB-C DP Alt Mode and will only output video when connected to a host system with this feature.
DOCKING STATION SETUP (Continued)
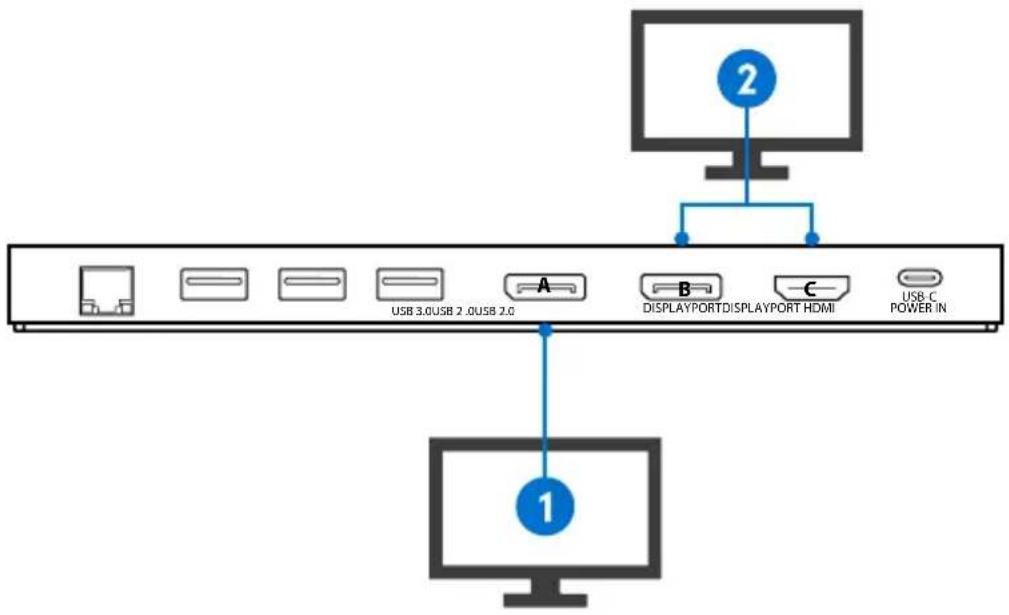
Dual Display Setup
- Connect monitor 1 to the Display A DisplayPort.
- Connect monitor 2 to Display B - DisplayPort or Display C - HDMI
flowchart
graph TD
    A["Device 1"] -->|USB 3.0USB 2.0USB 2.0| B["Device 2"]
    B --> C["Display Port"]
    B --> D["Display Port HDMI"]
    B --> E["Power In"]
    style A fill:#f9f,stroke:#333
    style B fill:#ccf,stroke:#333
DOCKING STATION SETUP (Continued)
Triple Display Setup
- Connect monitor 1 to Display A DisplayPort.
- Connect monitor 2 to Display B DisplayPort.
- Connect monitor 3 to Display C HDMI.

flowchart
graph TD
    Monitor["Monitor 3"] -->|2| Monitor
    Monitor -->|A| DisplayPort1["USB 3.0USB 2.0USB 2.0"]
    Monitor -->|B| DisplayPort2["DISPLAYPORTDISPLAYPORT HDMI"]
    Monitor -->|C| DisplayPort3["USB C POWER IN"]
SUPPORTED RESOLUTIONS
SINGLE DISPLAY
| Display Connection DP or HDMI | |
| Host System DP 1.2 3840 x 2 | 160 @ 30Hz / 2560 x 1440 @ 60Hz / 1920 x 1080 @ 60Hz |
| Host System DP 1.4 3840 x 2 | 160 @ 60Hz / 2560 x 1440 @ 60Hz / 1920 x 1080 @ 60Hz |
| Host System DP 1.4 MST 3840 | x 2160 @ 60Hz / 2560 x 1440 @ 60Hz / 1920 x 1080 @ 60Hz |
| macOS (Intel, M1, M2) 3840 | x 2160 @ 60Hz / 2560 x 1440 @ 60Hz / 1920 x 1080 @ 60Hz |
DUAL DISPLAY
| Display Connection DP + DP or DP + HDMI | |
| Host System DP 1.2 1920 x 1080 @ 60Hz | |
| Host System DP 1.4 3840 x 2160 @ 30Hz / 2560 x 1440 @ 60Hz / 1920 x 1080 @ 60Hz | |
| Host System DP 1.4 MST 3840 x 2160 @ 30Hz / 2560 x 1440 @ 60Hz / 1920 x 1080 @ 60Hz | |
| macOS (Intel) 3840 x 2160 @ 60Hz / 2560 x 1440 @ 60Hz / 1920 x 1080 @ 60Hz(1 Extended + 1 Cloned) |
SUPPORTED RESOLUTIONS
TRIPLE DISPLAY
| Display Connection DP + DP + HDMI | |
| Host System DP 1.2 N/A | |
| Host System DP 1.4 N/A | |
| Host System DP 1.4 MST VT2000 | / VT2500 - (3) 1920 x 1080 @ 60HzVT2510 - (2) 3840 x 2160 @ 30Hz, (1) 1920 x 1080 @ 60Hz |
| macOS (Intel, M1, M2) N/A | |
Note: In order to extend output to 3 displays and have video output from the host system, host system must have dedicated graphics with support for USB-C DP Alt Mode W/ MST. Host systems with DP 1.3 / DP 1.4 can extend up to 3 displays with laptop display disabled. Number of supported displays and maximum resolutions are dependent on host system specifications.
DISPLAY SETTINGS (Windows)
Windows 10 - Display Setup
- Right Click on any open spot on your desktop and select "Display Settings"
Arranging Displays
- In "Display", select the desired display that you want to adjust. Click and drag the selected display to your preferred arrangement
Extending or Duplicating Displays
- Scroll down to "Multiple displays" and select the mode in the drop-down list that fits your needs
Adjusting Resolution
- To adjust resolution select your desired resolution from the supported list under "Display resolution"
Adjusting Refresh Rate
-
To the refresh rate of the connected display click on "Advanced display settings"
-
Select the display you want to adjust from the drop down menu at the top
-
Under "Refresh Rate" select from the supported refresh rates in the drop down menu
Multiple displays

Connect to a wireless display
Advanced display settings
Graphics settings
AUDIO SETTINGS (Windows)
Windows 10 - Audio Setup
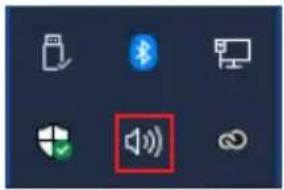
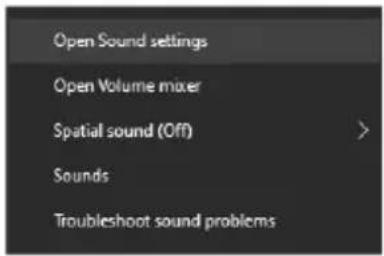
- Right Click on the speaker icon in the lower right corner and select "Open Sound settings"
- Under the Output menu select "Speakers (USB Advanced Audio Device)"
- Under the Input menu select "Microphone (USB Advanced Audio Device)"
Output
Choose your output device
Speakers (USB Advanced Audio D...
Input
Choose your input device
Microphone (USB Advanced Audi...
DISPLAY SETTINGS (macOS)
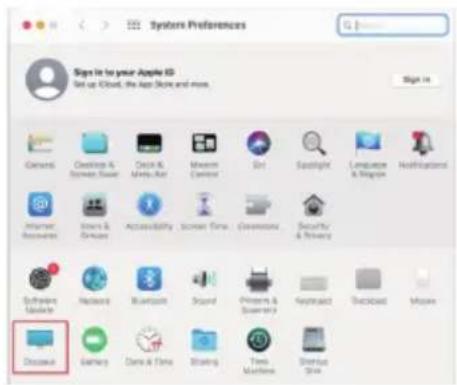
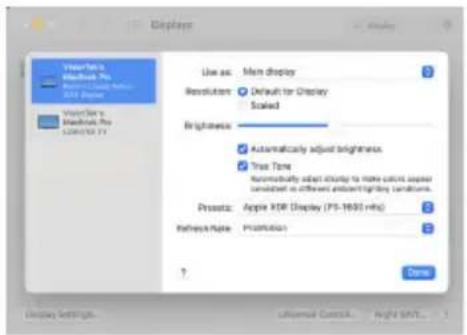
When a new display is connected to your Mac, it will default to being extended to the right of the main display. To configure the settings for each of your displays, select "Displays" from the "System Preferences" menu. This will open the "Display Preferences" window on each of your displays allowing you to configure each.
Display Preferences:
Display Resolutions
Using both extended and mirrored displays
Rotating a Display
Display Positions
Display to Mirror mode
Display to Extend
Changing the main display
DISPLAY SETTINGS (macOS Continued)
-
To arrange displays and configure mirrored or extended displays click on the arrangement tab.
-
To move a display, click and drag the display in the arrangements window.
-
To change primary display, click on the small bar on top of the main monitor and drag in onto the monitor you want to be the primary.


FAQ
Q1. Why doesn't my third monitor display when I set the triple display mode?
A1. Step 1: Selecting the main display
-
Right-click on your desktop and select "Display Settings"
-
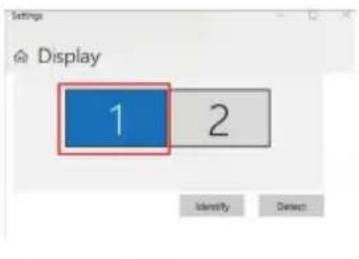
Choose a display that is not your laptop display from the display layout and scroll down to "Multiple displays".

- Mark "Make this my main display".

Step 2: Disconnect laptop display
-
Select the laptop display ("1" is the default display for laptops) and scroll down to "Multiple displays".
-
Select "Disconnect this display", then the laptop display panel will become disconnected.

Step 3: Turn on the third monitor / display
-
Choose the remaining monitor from "Display" layout at the top of the window, then scroll down to "Multiple displays".
-
Select "extend desktop to this display" to enable this display.
FAQ
Q2. Why are my 2K and 4K monitors displaying abnormally when I enable dual or triple display mode?
A2. The resolution of some monitors may not adjust automatically and the "Active signal resolution" from the Windows setting "Display resolution" may not match. Make sure to set the resolution to the same value for best results.
- Right-click on the Desktop and select "Display Settings"
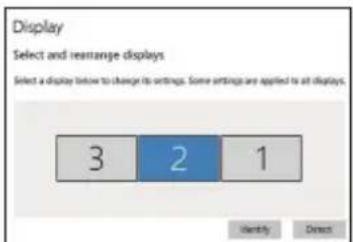
-
Select your monitor from the "Display" section and click on it. Scroll down and select "Advanced display settings"
-
Make sure that the resolution values for each monitor on "Desktop resolution" and "Active signal resolution" match.

- Click on "Display adapter properties for Display 2" and lower the resolution to the right value if the two values are different.

FAQ
Q3. What is High Dynamic Range (HDR)?
A3. High Dynamic Range (HDR) creates much more lifelike experiences by allowing bright objects such as lights and highlights glinting off shiny objects to be displayed much brighter than other objects in the scene. HDR also allows for more details in dark scenes. True HDR playback is not yet available on the built-in displays of most laptops and tablets. Many TVs and PC monitors have started to include built in DR-10 with HDCP2.2 support. Some of the key HDR content sources include.
- Streaming HDR (ex. YouTube) & streaming premium HDR (ex. Netflix)
- Local HDR Video Files
- ULTRA HD Blue-Ray
- HDR games
• HDR content creation apps
Also, if you need to stream HDR content with applications like Netflix and YouTube, make sure in Windows 10 "Stream HDR Video" setting is "on" in the "Video Playback" settings page.
Q4. Why does it show "slow charging" on my laptop.
A4. Some users may notice that charging status shows "slow charging", this might happen for the following reasons.
- The charger isn't powerful enough to charge your PC. This usually occurs if the power supply of your system is greater than 100W.
- The charger isn't connected to the charging port on your PC. Check your systems documentation. Some laptops only support USB-C Power Delivery from dedicated ports.
- The charging cable doesn't meet the power requirements for the charger or PC. Make sure to use the 100W certified USB-C cable that is included with your dock.
NOTICE
FCC Statement
This device complies with Part 15 of the FCC Rules. Operation is subject to the following two conditions:
- This device may not cause harmful interference, and
- This device must accept any interference received, including interference that may cause undesired operation.
Warning: Changes or modifications not expressly approved by the party responsible for compliance could void the user's authority to operate the equipment.
NOTE: This equipment has been tested and found to comply with the limits for a Class B digital device, pursuant to Part 15 of the FCC Rules. These limits are designed to provide reasonable protection against harmful interference in a residential installation.
This equipment generates, uses, and can radiate radio frequency energy and, if not installed and used in accordance with the instructions, may cause harmful interference to radio communications. However, there is no guarantee that interference will not occur in a particular installation. If this equipment does cause harmful interference to radio or television reception, which can be determined by turning the equipment off and on, the user is encouraged to try to correct the interference by one or more of the following measures:
• Reorient or relocate the receiving antenna.
- Increase the separation between the equipment and receiver.
- Connect the equipment into an outlet on a circuit different from that to which the receiver is connected.
- Consult the dealer or an experienced radio/TV technician for help.
Warning: Where shielded interface cables or accessories have been provided with the product or specified additional components or accessories elsewhere defined to be used with the installation of the product, they must be used in order to ensure compliance with FCC. Changes or modification to product not expressly approved by VisionTek Products, LLC could void your right to use or operate your product by the FCC.
IC Statement: CAN ICES-003 (b) / NMB -003 (B)
This device complies with Industry Canada license-exempt RSS standard(s). Operation is subject to the following two conditions: (1) this device may not cause interference, and (2) this device must accept any interference, including interference that may cause undesired operation of the device.
WARRANTY
VisionTek Products LLC, ("VisionTek") is pleased to warrant to the original purchaser ("Warrantee") of the Device ("Product"), that the product will be free from manufacturing defects in material for Two (2) Years when given normal and proper usage. The product must be registered within 30 days from the original date of purchase to receive this 2 year warranty. All products not registered within 30 days will ONLY receive a 1 year limited warranty.
VisionTek's liability under this warranty, or in connection with any other claim relating to the product, is limited to the repair or replacement, at VisionTek's option, of the product or portion of the product which is defective in manufacturing material. Warrantee assumes all risk of loss in transit. The returned products shall be the sole property of VisionTek. VisionTek warrants the repaired or replaced products will be free from manufacturing defects in material for the remainder of the warranty period.
VisionTek reserves the right to inspect and verify the defectiveness of any products or portion of product returned. This warranty does not apply to any software component.
FULL WARRANTY DISCLOSURE AVAILABLE AT WWW.VISIONTEK.COM
Product must be registered within 30 days of purchase for warranty to be valid. IF YOU HAVE QUESTIONS OR NEED ASSISTANCE WITH THIS PRODUCT,
CALL SUPPORT AT 1 (866) 883-5411.
© 2023 VisionTek Products, LLC. All rights reserved. VisionTek is a registered trademark of VisionTek Products, LLC. Windows is a registered trademark of Microsoft Corporation in the United States and other countries. Apple®, macOS® is a trademark of Apple Inc., registered in the U.S. and other countries and regions.
VisionTek®
UPGRADE YOUR DIGITAL LIFESTYLE
FOR MORE INFORMATION, PLEASE VISIT:
VISIONTEK.COM

VT2000 - 901284, VT2500 - 901381, VT2510 - 901551

- MULTI DISPLAY MST DOCK USER MANUAL
- TABLE OF CONTENTS
- SAFETY INSTRUCTIONS
- COPYRIGHT STATEMENT
- DISCLAIMER
- WEEE DIRECTIVE & PRODUCT DISPOSAL
- INTRODUCTION
- FEATURES
- CONTENTS
- VT2000 - 901284
- VT2500 - 901381
- VT2510 - 901551
- SYSTEM REQUIREMENTS
- Compatible Devices
- Operating System
- DOCKING STATION PORTS
- DOCKING STATION PORTS (Continued)
- DOCKING STATION SETUP
- Connecting Power
- DOCKING STATION SETUP (Continued)
- Connecting Systems
- Single Display Setup
- Dual Display Setup
- Triple Display Setup
- SUPPORTED RESOLUTIONS
- SINGLE DISPLAY
- DUAL DISPLAY
- DISPLAY SETTINGS (Windows)
- Windows 10 - Display Setup
- Arranging Displays
- Extending or Duplicating Displays
- Adjusting Resolution
- Adjusting Refresh Rate
- Multiple displays
- AUDIO SETTINGS (Windows)
- Windows 10 - Audio Setup
- Output
- Input
- DISPLAY SETTINGS (macOS)
- Display Preferences:
- DISPLAY SETTINGS (macOS Continued)
- FAQ
- NOTICE
- FCC Statement
- IC Statement: CAN ICES-003 (b) / NMB -003 (B)
- WARRANTY
- FULL WARRANTY DISCLOSURE AVAILABLE AT WWW.VISIONTEK.COM
- VisionTek®
Brand : VisionTek
Model : VT2000
Category : Computer accessory