
CMF250R - Household Fan Cellini - Free user manual and instructions
Find the device manual for free CMF250R Cellini in PDF.


| Product Type | Domestic Rechargeable Ultrasonic Mist Fan |
| Model | CMF250R |
| Brand | Cellini |
| Power Source | AC 220-240V 50/60Hz (corded) / DC (cordless) |
| Power Consumption | 65W |
| Battery Type | Sealed Lead-Acid 12V / 7.7Ah |
| Charging Time | 14-16 hours |
| Battery Run Time (Fan Only, Low Speed) | Approx. 13 hours |
| Battery Run Time (Fan + Mist, Low Speed) | Approx. 2.5 hours |
| Water Tank Capacity | 4 Liters |
| Mist Output (AC Powered) | Approx. 300 ml/hr |
| Mist Output (DC Powered) | Approx. 150 ml/hr |
| Fan Speed Settings | Low, Medium, High |
| Max Air Volume | >250 m³/hour |
| Max Air Speed | 4.5 m/s |
| Ionizer Output | Approx. 3 x 10⁶ ions/cm³ |
| Timer Range | 1 to 8 hours |
| Remote Control Range | Approx. 5 meters |
| Oscillation | 360° rotation |
| Dimensions (W x D x H) | 420 x 252.5 x 819.5 mm |
| Net Weight | 8.1 kg |
| Included Accessories | Remote controller (AAA batteries included), wheels, water tank |
| Recommended Cleaning Interval | Every two weeks (empty water tank, wipe with damp cloth) |
| Safety Feature | Low water alarm with automatic pump cut-off |
| Battery Maintenance | Charge monthly if not in use; fully saturate charge 14-16 hours after each use |
Frequently Asked Questions - CMF250R Cellini
User questions about CMF250R Cellini
0 question about this device. Answer the ones you know or ask your own.
Ask a new question about this device
Download the instructions for your Household Fan in PDF format for free! Find your manual CMF250R - Cellini and take your electronic device back in hand. On this page are published all the documents necessary for the use of your device. CMF250R by Cellini.
USER MANUAL CMF250R Cellini
natural_image
Line drawing of a refrigerator with fan blades and control panel (no text or symbols)
WANNING:
(1) The battery must always be stored at full state-of-charge. Low charge causes sulfating, a condition that robs the battery of performance and shorten the cycle life, as self-discharge will eventually completely discharge the battery and damage it. Thus this battery should always be charged after use and charged every month if stored unused for extend period.
(2) To keep the battery in good condition, apply a fully saturated charge lasting 14 to 16 hours. If the charge cycle does not allow this, give the battery a fully saturated charge once every few weeks.
CAUTION:
- please turn ON the main on/off switch at the rear cabinet BEFORE use.
- please turn OFF the main on/off switch at the rear cabinet when not in use.
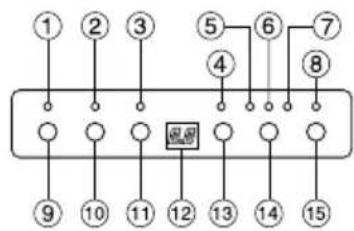
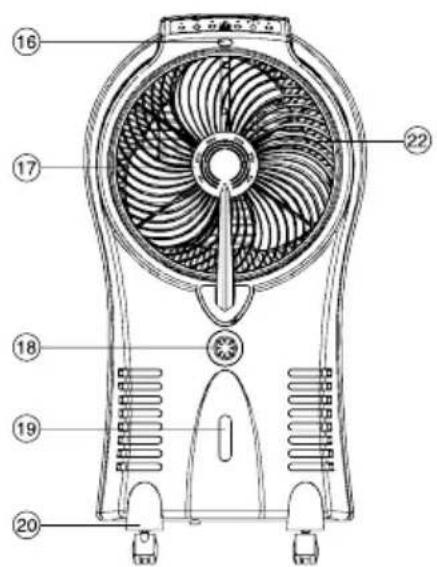
FEATURES
- Timer ON Indicator
- Ionizer ON Indicator
- Misting ON Indicator
- Fan Oscillation Indicator
- Fan Low Speed Indicator
- Fan Medium Speed Indicator
- Fan High Speed Indicator
- Power ON/Battery Charging Indicator
- Timer Button
- Ionizer Button
-
Misting ON/OFF Button
-
Timer & Temperature Display
- Fan Oscillation Button
- Fan Speed Button
- Fan Power ON/OFF Button
- Remote Controller Sensor
- Misting Outlet
- Misting Volume Control
- Water Level Indicator
- Wheel
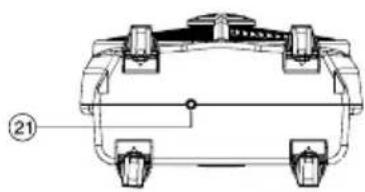
- Drain Plug
- Rotary Fan Grill
-
Handle
-
Main Power ON/Off Switch
- Battery Compartment cover
- Detachable Water Tank
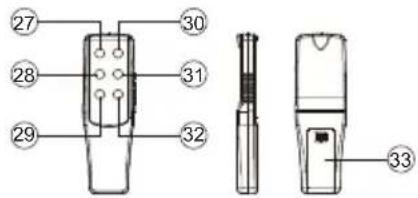
- Remote Controller Power ON/OFF Button
- Remote Controller Fan Oscillation Button
- Remote Controller Misting ON/OFF Button
- Remote Controller Timer Button
- Remote Controller Fan Speed Button
- Remote Controller Ionizer On Button
- Remote Controller Battery Flap
- Battery (inside battery compartment)
flowchart
graph TD
    A["①"] --> B["②"]
    B --> C["③"]
    C --> D["④"]
    D --> E["⑤"]
    E --> F["⑥"]
    F --> G["⑦"]
    G --> H["⑧"]
    H --> I["⑨"]
    I --> J["⑩"]
    J --> K["⑪"]
    K --> L["⑫"]
    L --> M["⑬"]
    M --> N["⑭"]
    N --> O["⑮"]
    O --> P["⑯"]
    P --> Q["⑰"]
    Q --> R["⑱"]
    R --> S["⑲"]
    S --> T["⑳"]
    T --> U["㉑"]
    U --> V["㉒"]
    V --> W["㉓"]
    W --> X["㉔"]
    X --> Y["㉕"]
    Y --> Z["㉖"]
Top Panel


Remote Controller Unit
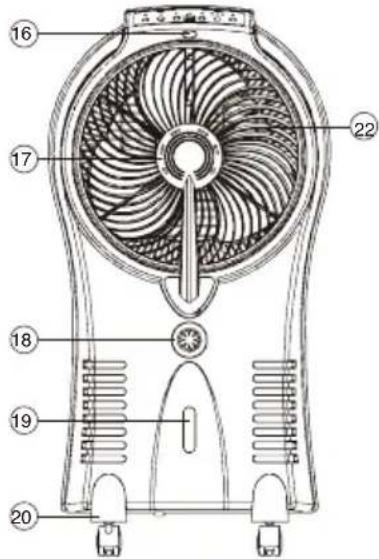
Front View Back View


natural_image
Technical line drawing of a mechanical component with mounting holes and a numbered label (21), no readable text or symbols present.Base View

CAUTION
RISK OF ELECTRIC SHOCK
DO NOT OPEN

CAUTION: TO PREVENT ELECTRICAL SHOCK OF FIRE HAZARD. DO NOT EXPOSE THIS PRODUCT TO RAIN OR MOISTURE OR REMOVE BACK COVER. NO USER-SERVICEABLE PARTS INSIDE. REFER SERVICING TO QUALIFIED SERVICE PERSONNEL.
This marking indicates that this product should not be disposed with other household wastes throughout the EU. To prevent possible harm to the environment or human health from uncontrolled waste disposal, recycle it responsibly to promote the sustainable reuse of material
resources. To return your used device, please use the return and collection systems or contact the retailer where the product was purchased. They can take this product for environmental safe recycling.
WARNING:
A. To avoid an electrical shock, please do not open the rear cabinet for repair or cleaning unless qualified person.
B. If the supply cord is damaged, it must be replaced by the manufacturer or its service agent or a similarly qualified person in order to avoid a hazard.
C. The appliance is not intended for use by persons (including children) with reduced physical, sensory or mental capabilities, or lack of experience and knowledge, unless they have been given supervision or instruction concerning use of the appliance by a person responsible for their safety.
D. Children should be supervised to ensure that they do not play with the appliance.


The lightning flash with arrowhead symbol, within an equilateral triangle, is intended to alert the user to the presence of uninsulated. "Dangerous Voltage" within the product's enclosure that may be of sufficient magnitude to constitute a risk of electric shock to persons.
The exclamation point within an equilateral triangle is intended to alert the user to the presence of important operating and maintenance (servicing) instructions in the literature accompanying the appliance.
WARNING: TO REDUCE THE RISK OF FIRE OR ELECTRIC SHOCK, DO NOT EXPOSE THIS APPLIANCE TO RAIN OR MOISTURE
PRODUCT INTRODUCTION
The AC/DC rechargeable ultrasonic mist fan is designed with digital control system. It has device for storing water. It can lower surrounding temperature, freshen the air with equipped ion humidify the air through the principle of water misting. LED panel makes it easy to use. It enables both corded and cordless operation.
IMPORTANT NOTES
Please read the instruction manual carefully before operating this unit.
-
Make sure that the home power supply consistent with the product before plug in.
-
Switch off and disconnect from the power outlet when not in use or before cleaning.
-
Unplug from power source when not in use unless recharging.
-
Do not expose the unit to rain and keep out of reach of water on the control panel or LED for proper use.
-
Do not put the fingers or any objects inside the fan grill during operation.
-
Do not operate the unit if there is any damage to the power plug or cord - take the unit to our after sales service center for repair, do not attempt to undertake any required repairs yourself.
-
Wipe clean with damp cloth only - do not use any abrasive cleaners.
-
This appliance is not intended for use by persons (including children) with reduced physical, sensory, or mental capabilities or lack of experience and knowledge unless then have been given supervision or instruction concerning use of the appliance by a person responsible for their safety.
-
Please recharge the unit when power is low.
-
Do not use the misting mode when water tank is empty; water level in must be above minimum level for this function to operate, otherwise it may cause water pump malfunction.
-
Switch off the functions when the battery is being charged. Otherwise will lower the efficiency of charging.
-
Please charge the battery 14 to 16 hours every month even the unit will not be used. In absence of charging over long period of time, the battery will be malfunction and damaged.
-
Do not use the misting function if unit is to be used in a damp place.
-
If unit is being stored up for a long period of time without use, empty the water tank before storing or transporting the unit.
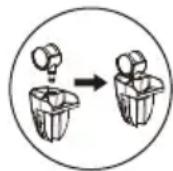
HOW TO ASSEMBLE THE WHEELS (SEE DRAWING 1)
-
Attach the four wheels to the base, then insert the four assembled bases into the unit.
-
Tightening the screws with a screwdriver in a clockwise direction.
-
Wheels can be locked in position if required.
DRAWING 1

natural_image
Diagram of a washing machine with three cups and a hanging hook (no text or labels)Make sure that the home power supply is consistent with the product before plug in. Firstly, turn on the main power ON/OFF switch at the rear (Feature 24) and press the "fan power ON/OFF button" (Feature No. 15) on the control panel or (Feature No.27) on the remote controller to start operation, then the LED light (Feature No.8) will become illuminated on the control panel and follow the fan speed operation below. Press the same button to turn off the function.
** For cordless (DC) operation, please refer to section "About the rechargeable battery".
FAN SPEED OPERATION
Select the required fan speed to Low/Medium/High by pressing the "Fan Speed Button" (Feature No.14) on the control panel or (Feature No. 31) on the remote controller. The LED light of selected speed will become illuminated on the control panel and the set speed will be memorized and kept unit the next operation.
MISTING OPERATION
- Ensure the unit is placed on a level surface and unplug from the power and switch off all the function when refilling water.
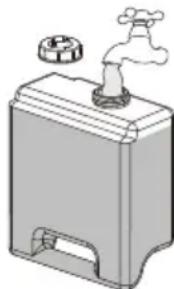
- Remove the water tank (Feature No.26) and fill water, but do not fill water over the Marking Line (see drawing 1 below) to ensure water does not overflow.
natural_image
Illustration of a water dispenser with a faucet and lid (no text or symbols)- Remove the water tank and fill clean water.
↑ Marking Line

2. Tighten the cover in clockwise direction.

3. Turn the water tank upside down to make sure no leakage.

natural_image
Technical line drawing of a mechanical device with wheels and a door (no text or symbols)-
Put the water tank back to the unit.
-
Misting function will not operate effectively if water not enough.
- Connect to the power socket, turn on the main switch
and press fan power ON/OFF button, select the fan speed to start and press "Misting ON/OFF Button" (Feature No.11) on the control panel or (Feature No.29) on the remote controller to switch the misting on or off; illuminated lights on the control panel will indicate the functions currently in operation.
- Adjust the mist density, turn the "misting control volume"(Feature No.18) clockwise to increase the mist density or anti-clockwise to decrease the mist density, then get an optimum mist performance as required.
- It may take a minute for a new misting fan to start the misting, it is normal for air to come out of the nozzles before water and the mist.
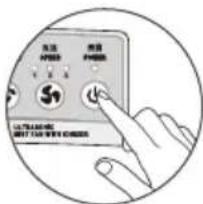
- Press the "Fan power ON/OFF" button.

- Select the Fan Speed to start.

-
Press the "Misting ON/OFF" to start misting.
-
Adjust the mist density by turning the "Misting volume control".

Warning :
- Low Water Level Alarm: when water level becomes low, you will hear the "beep" sound and the "Mist Indicator" will flash continuously.
At the same time the power of the pump inside the unit will be cut off to protect the life of the pump. To stop the alarm, turn off the
unit from the power outlet. Fill the tank with water and turn on the unit again.

DRAWING 2
2. DIRECT POUR WATER INTO MIST FAN IS PROHIBITED. (SEE DRAWING 2)
To start 360° air flow direction, press the "Fan Oscillation Button" (Feature No. 13) on the control panel or (Feature No. 28) on the remote controller once; LED light(Feature No.4) will become illuminated on the control panel and the rotary fan grill will begin to rotate, directing air in a full circle. This setting will be memorized and keep unit next operation. Press the same button to turn off the function.
IONIZER OPERATION
Press the "Ionizer Button" (Feature No. 10) on the control panel or (Feature No. 32) on the remote controller once to release the anions. Illuminated light is on the control panel will indicate function is currently in operation. Press the same button to turn the function off.
TIMER OPERATION
- Press the "Timer Button" (Feature No. 9) on the control panel or (Feature No. 30) on the remote controller to set the countdown timer. The unit will operate with its present settings until the timer counts down.
- Timer can be set from 1 to 8 hours.
- Once set, LED display will show the time set.
- To switch off the timer function and operate the unit continuously, press the timer button until LED display switches off and the LED light on the control panel above timer button LED will also be off.
REMOTE CONTROLLER
- Open the remote control battery flap (Feature No. 33) and insert 2 pieces 1.5V "AAA" size of dry battery.
- Remote controller must be aimed at the sensor (Feature No. 16) on the front of the appliance, distance within 5 meters, and will not function from beside or behind the appliance.
CLEANING AND MAINTENANCE (SEE DRAWING 3)
- Ensure the unit is switched off and disconnected from a power source before cleaning.
- Clean outer casing or control panel with a damp cloth only - do not use any abrasive cleaners or harsh chemicals, and ensure the control panel or LED is out of reach of water.
- Check the condition of misting and water tank before every use.
- After long time operation with this appliance, the unit may become clogged with dust and dirt, which will greatly affect the performance of the unit. Sometimes mold and mildew may also occur due to the water tank not regular cleaned, recommend to clean once every two weeks.
-
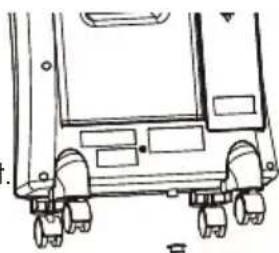
Remove the drain plug (Feature No. 21) and allow the water tank to empty.
-
If the unit is being stored for a long period of time without use, empty the water tank before storing or transporting the unit
natural_image
Line drawing of a vehicle chassis with wheels and rear panel (no text or symbols)DRAWING 3
CAUTION: PLEASE MAKE SURE THE BATTERY CONTACT (+) & (−) IS CONNECTED TO THE CORRECT POLARITY, OTHERWISE SHORT CIRCUIT & RISK OF FIRE MAY OCCUR DUE TO REVERSE CHARGING.
Warning for the rechargeable lead acid battery
- This Rechargeable Fan is only applicable for charging the sealed lead-acid battery equipped with this fan. Do not charge other or non-rechargeable batteries.
- The appliance must be disconnected from power supply before removing the battery.
- During using or recharging the lead-acid battery, the appliance must be placed in a well-ventilated area.
- The orientation of the lead-acid battery with regard to polarity battery contact (+) & (-). Do connect
the battery contact (+) & (-) to the correct polarity.
Leaking lead-acid battery must be removed from the appliance carefully.
The lead-acid battery must be recycled or disposed of properly.
The lead-acid battery must be removed from the appliance before it is scrapped.
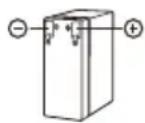


TO REPLACE BATTERY (SEE DRAWING 4)
- Ensure the unit is switched off and not connected to an AC power outlet.
- Open the battery compartment cover (Feature No.25) on the back of the unit.
- Unscrew and remove the mounting plate on top of the battery.
- Pull out wire connectors of battery terminal and remove from battery compartment.
- Place the new battery into the battery compartment, attach wire connectors to new battery, Ensure battery is placed correctly in battery compartment according to battery polarity (⊕ red area and ⊖ black area), install the mounting plate and re-attach screws.
- Replace the battery compartment cover.


natural_image
Technical line drawing of a mechanical device with a rectangular component and a separate vertical component (no text or symbols)DRAWING 4
ABOUT THE RECHARGEABLE BATTERY
- Before the first time charging or recharging the battery, ensure all the functions must be in "OFF" position, the main power switch at the rear switched to "OFF"
and plug in the AC power outlet.
- The Battery Charging indicator (Feature No.8) will become illuminated on the control panel after connection.
- Battery must be charged for approximately 14-16 hours continuously after use in order to be fully charged.
- Battery should be charged every month if not in use to maintain its performance.
- When battery operated under cordless operation, the Power ON/Battery Charging Indicator will not light up.
- For cordless operation, unplug from the AC power supply, please switch on the main power switch at the rear, press the fan power ON/OFF and select fan speed to start the operation.
- Do not charge appliance with different types of rechargeable batteries other than the battery type included. Do not fit non-rechargeable batteries.
- When recharging the battery, ensure the appliance is in a well-ventilated area and switched off all functions and the main power switch at the rear.
- The efficiency may decrease: a) When the battery is used to the end without recharge. b) When the battery is recharged at temperature below 32^(0^) or above 113^(45^) .
TECHNICAL SPECIFICATIONS
Input Voltage ...... AC220-240V 50/60Hz Input Power......65W
Operating Temperature.... 0°C-45°C
Humidity.... Lower than 90% DC Motor.... 12V
Fan Maximum Air Volume .... > 250M/Hour Fan Maximum Speed.... 4.5m/s
Water Tank Capacity .... 4 Liter Max Mist Water Volume:
AC Operated at Max ....Approx 300ml/hr DC Operated at Max ....Approx 150ml/hr Ion Density.... Approx 3 x 10 ^6 ion/cm ^3
Timer Control.... 1-8 Hours Remote Control Distance.... Approx 5 Meters Battery Spec .... Rechargeable Lead-acid 12V/7.7Ah Charging Time of Battery: Approx 14-16 Hours Continuously
Run Time Of Battery
①Fan (High Speed) ....Approx 5 Hours
②Fan (Mid Speed).....Approx 8 Hours
③Fan (Low Speed).....Approx 13 Hours
④Fan (High Speed)+Mist (Max) ....Approx 1.5 Hours
⑤Fan (Mid speed)+Mist (Max) .....Approx 2.3 Hours
⑥Fan (Low Speed)+Mist (Max) ....Approx 2.5 Hours Dimension ....Approx W420 x D252.5 x H819.5mm N. W. ....Approx 8.1 Kg
CELLINI Italy
充電式超聲波冷霧電風扇
有線、無線兩用, 帶離子空氣淨化功能
產品型號: CMF250R
使用説明書

natural_image
Line drawing of a refrigerator with fan blades and control panel (no text or symbols)
警告:
控制面板
natural_image
Technical line drawing of a mechanical component with no visible text or symbols底部
遙控器
正面

背面

風扇操作功能
natural_image
Technical line drawing of a mechanical device with wheels and a door (no text or symbols)4 將水箱放回機身
natural_image
Line drawing of a portable air conditioner unit with a cross symbol indicating no warning or prohibition (no text or labels present)預設時間操作
natural_image
Line drawing of a vehicle chassis with wheels and rear panel (no text or symbols)充電操作

- WANNING:
- CAUTION:
- FEATURES
- WARNING:
- PRODUCT INTRODUCTION
- IMPORTANT NOTES
- HOW TO ASSEMBLE THE WHEELS (SEE DRAWING 1)
- FAN SPEED OPERATION
- MISTING OPERATION
- Warning :
- DIRECT POUR WATER INTO MIST FAN IS PROHIBITED. (SEE DRAWING 2)
- IONIZER OPERATION
- TIMER OPERATION
- REMOTE CONTROLLER
- CLEANING AND MAINTENANCE (SEE DRAWING 3)
- CAUTION: PLEASE MAKE SURE THE BATTERY CONTACT (+) & (−) IS CONNECTED TO THE CORRECT POLARITY, OTHERWISE SHORT CIRCUIT & RISK OF FIRE MAY OCCUR DUE TO REVERSE CHARGING.
- Warning for the rechargeable lead acid battery
- TO REPLACE BATTERY (SEE DRAWING 4)
- ABOUT THE RECHARGEABLE BATTERY
- TECHNICAL SPECIFICATIONS
- Run Time Of Battery
- CELLINI Italy
- 充電式超聲波冷霧電風扇
- 警告:
- 風扇操作功能
- 預設時間操作
- 充電操作
Brand : Cellini
Model : CMF250R
Category : Household Fan