EHBC 547 IX - Oven BOMANN - Free user manual and instructions
Find the device manual for free EHBC 547 IX BOMANN in PDF.

User questions about EHBC 547 IX BOMANN
0 question about this device. Answer the ones you know or ask your own.
Ask a new question about this device
Download the instructions for your Oven in PDF format for free! Find your manual EHBC 547 IX - BOMANN and take your electronic device back in hand. On this page are published all the documents necessary for the use of your device. EHBC 547 IX by BOMANN.
USER MANUAL EHBC 547 IX BOMANN
Special safety Information for this Unit....Page 16
Unpacking the Appliance Page 17
Appliance Overview / Technical Information Page 18
Installation Page 19
Startup / Operation....Page 23
Cleaning and Maintenance....Page 25
Repairs....Page 27
Troubleshooting......Page 27
Disposal Page 27
Einleitung
natural_image
Technical line drawing of an open oven with internal compartments and a close-up inset showing the exterior wall detail (no text or symbols)natural_image
Diagram showing a light bulb with a circular arrow indicating rotation or cycle (no text or symbols)Thank you for choosing our product. We hope you will enjoy using the appliance.
Symbols in these instructions for use
Important information for your safety is specially marked. It is essential to comply with these instructions in order to avoid accidents and prevent damage to the machine:
WARNING:
This warns you of dangers to your health and indicates possible injury risks.
CAUTION:
This refers to possible hazards to the machine or other objects.
NOTE: This highlights tips and information.
General Notes
Read the operating instructions carefully before putting the appliance into operation and keep the instructions including the warranty and the receipt. If you give this device to other people, please also pass on the operating instructions.
• The appliance is designed exclusively for private use and for the envisaged purpose. This appliance is not fit for commercial use.
- The appliance is only to be used as described in the user manual. Do not use the appliance for any other purpose. Any other use is not intended and can result in damages or personal injuries.
- Operate the device only properly installed.
- Do not use the device outdoors. Protect it from direct sunlight and humidity.
- Switch the device off when not in use, for cleaning or in case of failure.
- Do not operate the machine without supervision.
- For safety reasons, alterations or modifications of the device are prohibited.
In order to ensure your children's safety, please keep all packaging (plastic bags, boxes, polystyrene etc.) out of their reach.
WARNING!
Don't let small children play with foils. There is danger of suffocation!
Special safety Information for this Unit
WARNING:
Danger from electrical current! Contact with live leads or components can be fatal!
- The connection of the appliance must satisfy the relevant standards and regulations and may only be performed by an authorized specialist.
- The appliance may not be used if the glass surface has cracks or is broken.
- Make sure that the device is turned off from the power supply (fuse) before changing the bulb in the oven.
- The use of high-pressure cleaners or steam jet cleaners is prohibited. Ingress of liquids can lead to electric shock. Put the unit never under water.
WARNING: Hot surface! Risk of Burning!
- During operation the device will be hot. Special caution is required to avoid touching heating elements inside the oven, cooking places and other hot surfaces.
- Accessible parts may be very high during operation of the device. Keep small children away.
- Grasp the oven only on the door handle and switches. If needed use potholders.
- Let the appliance cool down before cleaning.

WARNING: Risk of Fire!
• Overheated fats and oils can ignite easily. Never walk away from fats and oil when heating them. If fat/oil ignites, never extinguish it with water. Immediately cover with a lid or a plate. Turn off the hob and allow the cookware to cool down.
- The hob should not be used as a storage area.
- Do not operate the device with an external timer or a separate remote control system.
- Do not heat empty pots on the hob as this may lead to malfunctions or dangerous overheating.
• To prevent the risk of explosion, do not heat sealed food (for example, in tins) if unopened. - Do not store any detergents or flammable materials near the appliance.
- Make sure that with installing adequate air circulation is ensured and the ventilation slots are not blocked.
- Do not drop anything onto the glass surface. Fragile!
- This appliance can be used by children aged from 8 years and above and persons with reduced physical, sensory or mental capabilities or lack of experience and knowledge if they have been given supervision or instruction concerning use of the appliance in a safe way and understand the hazards involved.
- Keep the appliance out of reach of children less than 8 years.
• Children shall not play with the appliance.
- Cleaning and user maintenance shall not be made by children unless they are older 8 years and supervised.
- Clean the device regularly to keep the good functionality.
- Do not use harsh abrasive cleaners or sharp metal objects for cleaning the glass surface. The glass can be scratched or destroyed.
- Do not try to repair the appliance on your own. Always contact an authorized technician. To avoid the exposure to danger, always have faulty cable be replaced only by the manufacturer, by our customer service or by qualified person and with a cable of the same type.
Unpacking the Appliance
- Remove the appliance from its packaging.
- Remove all packaging materials such as films, filler material, cable clips and carton.
- To prevent hazards, check the appliance for any transport damage.
- In case of damage, do notput the device into operation. Contact your distributor.
i NOTE:
Production residue or dust may have collected on the appliance. We recommend cleaning the appliance according to chapter “Cleaning and Maintenance”.
Appliance Overview / Technical Information
Oven
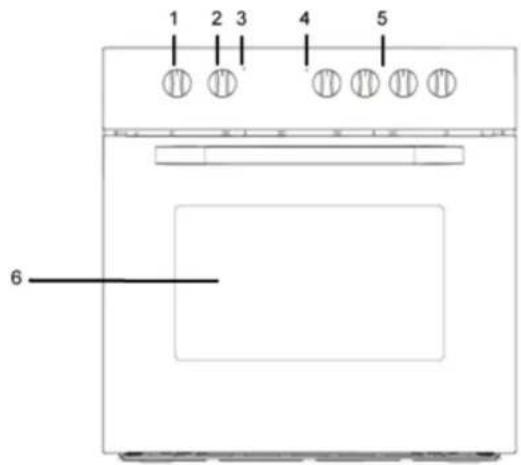
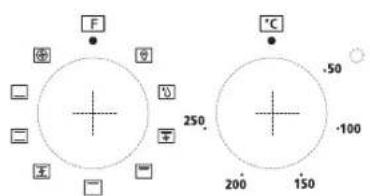
| 1 Oven function switch |
| 2 Oven temperature control |
| 3 Temperature control lamp |
| 4 Power control lamp |
| 5 Multi-stage cooking zone controls |
| 6 Oven door |
Hob
i NOTE:
The power settings listed can vary depending on the material and/or size of the cookware.
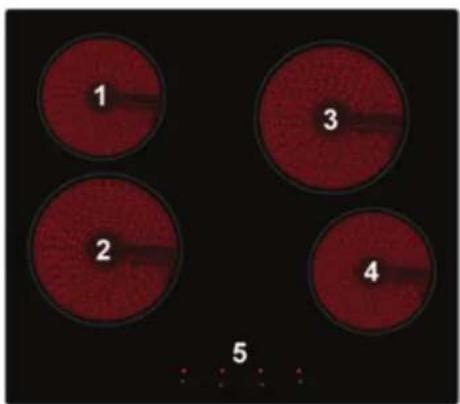
| 1 ∅ | 165 mm / 1200 W |
| 2 ∅ | 200 mm / 1800 W |
| 3 ∅ | 200 mm / 1800 W |
| 4 ∅ | 165 mm / 1200 W |
| 5 Residual heat indicators | |
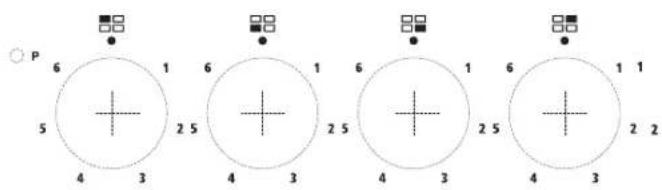
Control panel
| 1 Oven function switch |
| 2 Oven temperature control |
| 3 Multi-stage control, left front cooking zone |
| 4 Multi-stage control, left rear cooking zone |
| 5 Multi-stage control, right rear cooking zone |
| 6 Multi-stage control, right front cooking zone |
Scope of delivery

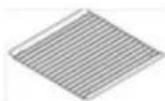
1 x baking sheet
1 x grill rack
Installation material
Technical Data
| Model | EHBC 547 IX |
| Brand | BOMANN |
| Energy efficiency class 1) A | |
| Energy consumption 2) 0.93 kWh | |
| Oven capacity 70 liters | |
| Airborne noise emission 58 dB(A) re 1 pW | |
| Design Built-in unit | |
| Number of cavity | 1 |
| The heat source per cavity | Electricity |
| Energy efficiency index(EEIcavity) | 106.9 |
| Product dimensions H x W x D / weights | |
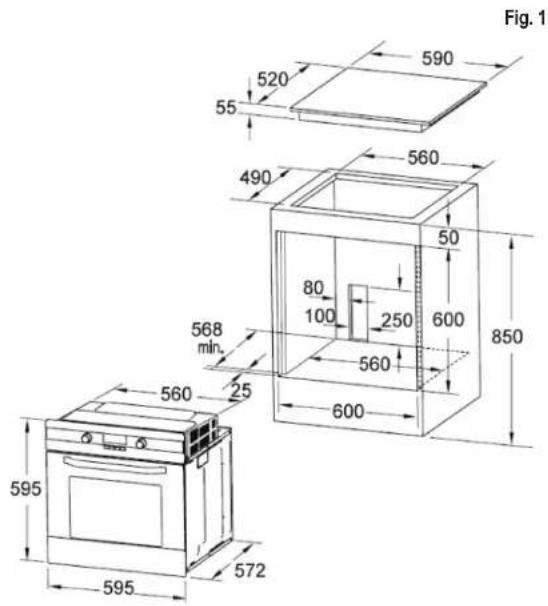
| Oven 59.5 x 59.5 x 57.2 cm | |
| Oven interior 33.0 x 47.0 x 43.0 cm | |
| Hob 5.5 x 59.0 x 52.0 cm | |
| Built-in dimensions / cutouts H x W x D | |
| Oven 60.0 x 60.0 x 57.5 cm | |
| Hob 56.0 x 49.0 cm | |
| Net weight Oven 30.0 kg – hob 8.5 kg | |
| Electric connection | |
| Total power input | 9000 W |
| Power input oven | 3000 W |
| Power input hob | 6000 W |
| Mains voltage / frequency | 220-240 V~, 50/60 Hz / 380-415 V~, 50/60 Hz |
| Fuse | 3 x 16 A |
| Protection class / degree | I / IP20 |
1) A+++ (highest efficiency) till G (lowest efficiency).
2) Conventional heating. Values measured based on standards EN 50304, EN 60704.
The right to make technical and design modifications in the course of continuous product development remains reserved.
All device-specific data of the energy label have been determined by the manufacturer under laboratory conditions in accordance with pan-European standardized measuring methods. These are regulated by ISO EN 50304. The actual energy consumption depends on the usage and might therefore also be above the values determined by the manufacturer under standard conditions. An expert knows these relations and will execute the tests with special measurement instruments in accordance with the regulations in place.
This device has been tested according to all relevant current CE guidelines, such as electromagnetic compatibility and low voltage directives, and has been constructed in accordance with the latest safety regulations.
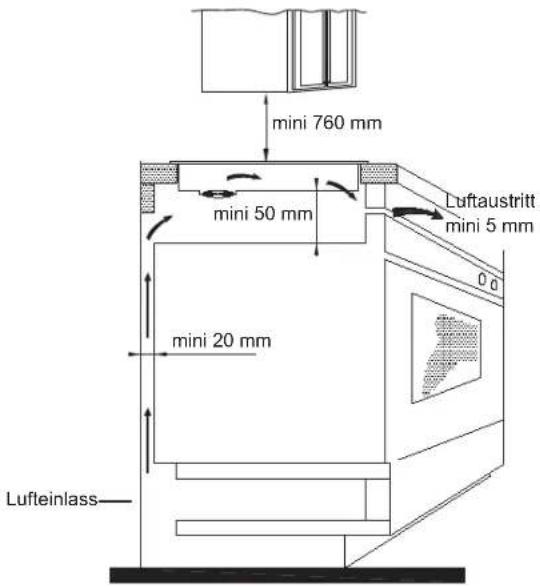
Installation
△ CAUTION:
• The installation of the device must allow for sufficient heat dissipation. Air inlets and outlets must not be blocked.
• Worktop, back panels, veneers, plastic coatings, and adhesive used must all have sufficient heat-resistance (up to 100°C).
• Hob and oven must be from the same manufacturer and have the same type designation.
• The device conforms to heat insulation class Y, i.e. only one side of the device may be installed near higher kitchen furniture or walls.
- Do not install the device directly next to refrigerators or freezers. The escaping heat would result in an unnecessary increase of energy consumption of those appliances.
• Make sure to align the centers of the oven and the hob.
Dimensions and cabinet cutout
Installation in a cabinet base
Fig. 1
Prepare the cutout of the cabinet base using the dimensional drawing.
Dimensions in mm.
Preparing the worktop for installation of the hob
- The worktop of the furniture must be of 30 to 40mm in thickness and at least 600mm in depth. It must be horizontal and the side facing the wall must be isolated against spilling liquids or humidity.
• The cut surfaces (cutout edges) must be sealed with special varnish, silicone rubber, or cast raisin in order to prevent swelling caused by humidity. - The hob must be framed by at least 5 cm of worktop.
- Clean the cutout area of the worktop.
Fig. 2
Prepare the cutout of the worktop using the dimensional drawing.
Attach the sealing to the bottom of the hob frame before installing the hob.
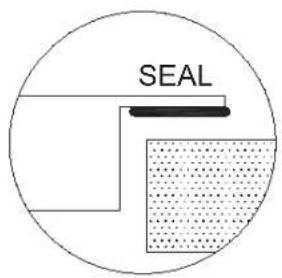
Fig. 2
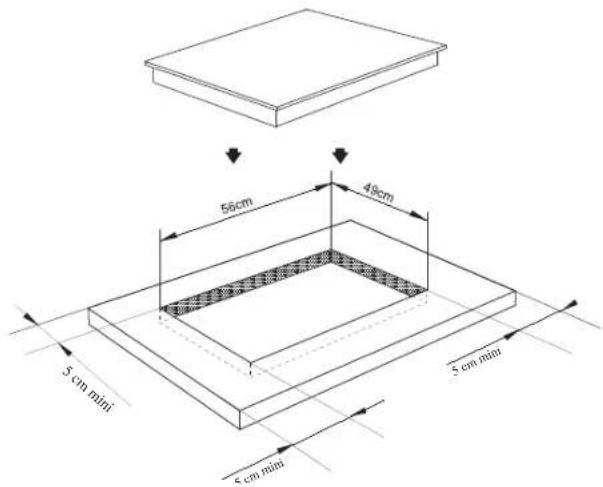
When installing the device, ensure sufficient air circulation.
Minimum distances for sufficient air circulation:
| Distance to wall cabinets 760 mm | |
| Space underneath the hob 50 mm | |
| Distance to the wall 20 mm | |
| Air inlet 20 mm | |
| Air outlet 5 mm |
Fig. 3

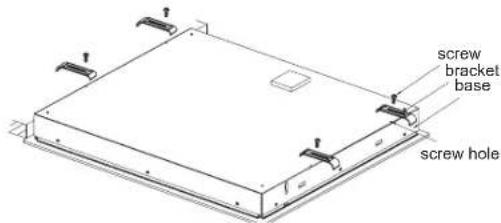
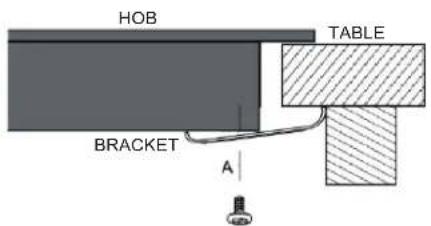
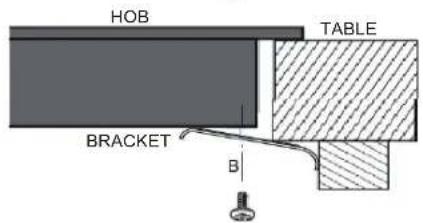
- Check the hob sealing for any damage and for correct positioning on the hob.
- Place the hob with the cables first into the prepared cutout of the worktop.
- Attach the hob to the worktop bottom using the four brackets and screws provided. Insert the screws into the four holes on the bottom of the hob and tighten them.
- Position and adjust the brackets depending on the thickness of the worktop.

Installing the oven
- Setup the cabinet base for the installation of the stove referring to the dimensions in "Fig. 1".
- Connect to the mains referring to "Electric connection".
- Insert the oven partway into the previously prepared cabinet base and connect to the hob referring to the chapter "Connecting the hob".
- Then push the oven completely into the cabinet. Make sure not to impede (bend, squeeze, or twist) the cables.
- Attach or secure the oven to the respective fixtures using the two screws. Opening the oven door will uncover the designated mounting holes on the left and right of the frame.
Electric connection
WARNING:
• Have the device connected to the mains only by an authorized expert. The installation must follow the applicable standards and regulations.
- Connecting the device to a normal wall socket or using multiple sockets or extension cables is not permitted.
Information for authorized experts:
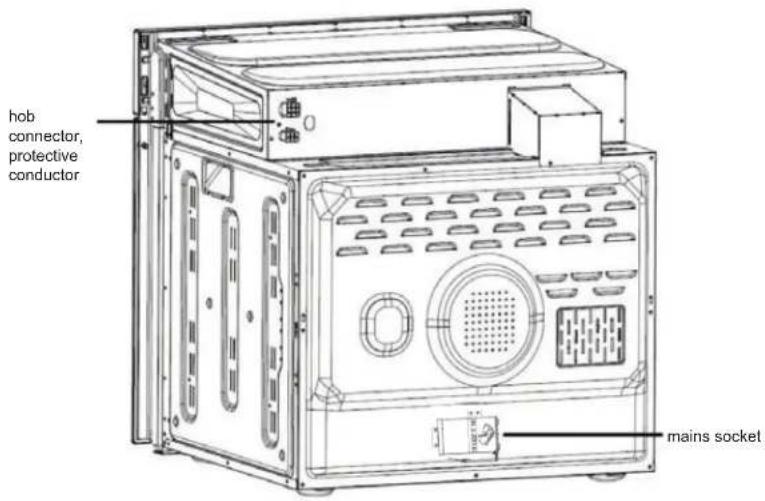
- Instructions regarding different connection methods are located on the rear panel of the device next to the terminal box of the oven.
- Before connecting the device, make sure the local voltage matches the specifications on the rating label.
- Make sure to connect the protective ground to the terminal of the marked terminal block. The electric connection of the oven should incorporate an emergency switch for disconnecting the entire device from the mains in case of an emergency. The distance between the normally open contacts of the emergency switch must be of at least 3 mm.
- The device is suitable for three-phase and AC current (400V 3N\~50Hz).
- The heating elements have a nominal voltage of 230V. The device can be adjusted for single-phase current (230V) by a respective bypass on the terminal block, based on the circuit diagram below. Select a suitable cord as mains cable, considering the connection type and nominal power of the oven.
• Fix the mains cable in the tension relief. - Guide the mains cable in such a way that it does not get in contact with any hot components of the device. Do not lead it over sharp edges or comers.
Electric circuit
Permissible connection methods
| △ CAUTION:Voltage of heating elements 230V.Each connection requires the protective ground of the mains to be connected to the ⊕ PE terminal. |  | Recommended connection method | |
| 1 | For 220-240VAC mains single-phase connection with operating neutral conductor. Jumpers connecting the terminals 1-2-3. Jumper to the terminals 4-5 for the operation neutral conductor. Protective conductor on ⊕. |  | H05VV-F3 G 6.0 mm2 |
| 2 | For 220-240VAC mains two-phase connection with operating neutral conductor. Jumpers connecting the terminals 1-2. Jumper to the terminals 4-5 for the operation neutral conductor. Protective conductor on ⊕. | 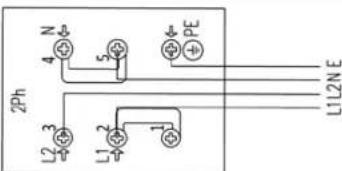 | H05VV-F4 G 6.0 mm2 |
| 3 | For 220-240VAC mains three-phase connection with operating neutral conductor. Jumpers connecting 4-5. Phase sequence according to 1-2-3. Jumper to the terminals 4-5 for the operation neutral conductor. Protective conductor on ⊕. | 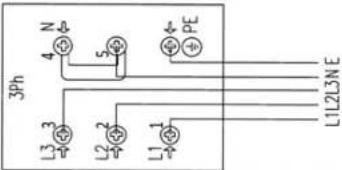 | H05VV-F5 G 2.5mm2 |
| L1, L2, L3 = Phase N = Neutral PE = Protective ground | |||
Connecting the hob
Insert the plug located at the end of the hob's cable bundle into the respective sockets on the oven switch panel.
Startup / Operation
Before first use
- Clean the hob and the oven interior, including all the accessories located therein. Follow the instructions provided in the chapter "Cleaning and Maintenance".
- Then heat the closed oven for approx. 30 minutes at 250^ in order to burn any manufacturing residue. To do so, set the oven function switch to conventional upper and lower heat and turn the temperature control to 250^ .
It is normal for smell or some smoke to escape, which is why you should provide for sufficient ventilation, especially in small rooms.
Hob
Multi-stage cooking zone controls
The temperature is set individually for each cooking zone, using the respective temperature controls. The controls can be turned clockwise and back again. The desired temperature can be adjusted continuously.
The power control lamp indicates the operation of a cooking zone. The lamp goes out when all cooking zones are switched off.
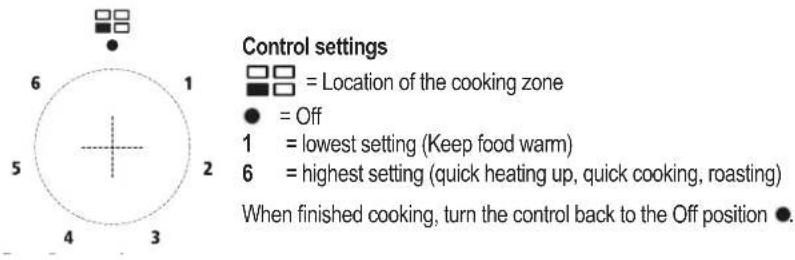
Residual heat indicator
After switching off the cooking zone, the residual heat indicator lights up.
The lit residual heat indicator warns the user not to touch the hot cooking surface.
WARNING: Risk of burning!
Do not touch the cooking zones as long as the residual heat indicator is on.
i NOTE:
After having switched off the heating power, you may use the residual heat for different purposes, such as heating up or keeping food warm without having to switch on the heating power.
Selecting appropriate cookware
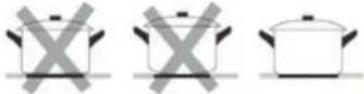 | Only use cookware with a completely flat bottom. |
 | The bottom of the cookware should be of the same size as and be centered on the cooking zone. |
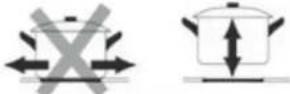 | In order to avoid scratching, do not slide the cookware over the cooking zone, but lift it up instead. |
△ CAUTION:
The cooking surface and the bottom of the pot must always be clean and dry. Use suitable cookware only.
Oven
Turning the oven on and off
Observe the following when turning on the oven:
- The oven features different functions, including baking with upper heat, lower heat, grill heat, and fan. Select the desired operating conditions, temperature, and heating functions.
- Turn the function switch clockwise or anti-clockwise to the desired position.
- Turn the temperature control clockwise to the desired temperature setting. The temperature control lamp indicates the heating function of the oven. When the control lamp goes out, the set temperature has been reached.
i NOTE:
If your recipe recommends preheating the oven, you should only place the food into the oven after the control lamp has gone out for the first time. During operation, the oven is continuously reheating in order to keep the temperature stable. The control lamp is lit up during reheating (thermostat function of the oven).
Oven function switch
Select the desired function by turning the function switch.
You may turn the switch clockwise or anti-clockwise.
Oven temperature control

The thermostat supports temperature settings between 50°C and 250°C.
△ CAUTION:
Only turn the temperature control clockwise or back to the original position. The control could get damaged otherwise.
Turn both controls to the Off position ● in order to switch off the device.
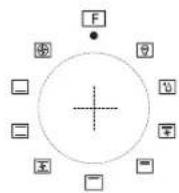
Oven functions
| Symbol Description | |
| [7cwx] | Off position: Switching the oven off. |
 | Oven lamp: The interior lighting can be switched on separately, e.g. when cleaning the oven. |
 | Defrost: Air circulation at room temperature allows for quick defrosting of frozen foodstuff (without using the heating elements). It is a gentle, yet fast method for shortening the defrosting time. |
 | Lower heat: Food gets heated from below only.When selecting this position, preheating is facilitated with lower heat only. Use, e.g., for re-baking from below. |
 | Upper/lower heat: When selecting this position, the oven preheats conventionally. Food gets heated from above and below. |
 | Upper/lower heat with fan: Combining fan with both heating elements increases the heat and saves up to 30-40 % of energy.Food will be slightly golden on the outside and still juicy on the inside. This function is suitable for grilling or roasting large meats at high temperatures. |
 | Grill: This setting allows for grilling smaller food servings on the grill rack. |
| [DYS2] | Extra grill: Upper heat will be turned on in addition to the grill heat. Food browns to a higher extend. This function allows for a higher temperature in the upper part of the oven, a deeper browning of the roast, and the grilling of larger servings. |
| Symbol Description | ||
 | Extra grill heat with fan (grill heat all around): Upper heat, grill heat, and fan are turned on, allowing for a quicker grilling operation. | |
 | Convection: An element around the convection fan provides an additional source of heat for convection style cooking. In convection mode the fan automatically comes on to improve air circulation within the oven and creates | |
Notes on baking, cooking, and grilling in the oven
i NOTE:
• In principle, you may use any heat-resistant cookware for your food.
- Use the accessories included in the delivery scope.
- Observe the recipe information regarding cooking time and any instructions on the food packaging.
Baking
- Use dark or black baking dishes. They use the heat of the oven more efficiently and therefore bake food more evenly.
• We recommend preheating the oven to the desired temperature in order to achieve better baking results. - Use the residual heat of the baking operation. Turn the function switch and the temperature control to the Off position a few minutes before the end of the cooking/baking time. Your food will then cook using the residual heat kept in the oven.
- When finished baking, we recommend leaving the food for another approx. 5 minutes in the oven.
• Before removing the cake, use a wooden stick to check if the cake is done. If done, no dough residue will stick to the wooden stick.
Cooking and grilling meat & fish
- Only cook meat of maximum 1 kg in the oven. Cook or roast servings of smaller sizes on the cooking zones.
• We recommend using ovenproof cookware with heat-resistant handles for roasting. - When using the grate or grill rack for roasting, we recommend placing a baking sheet with some water on the lower guide rail.
- You should turn the roast at least once, for example after half of the cooking time has elapsed. During roasting, pour some of the roasting liquid or hot salty water over the roast once in a while; do not use any cold water.
Grilling
When grilling, the food will be cooked with the infrared beams of the heated grill element.
To switch on the grill:
- Turn the oven switch to the position marked with the grill symbols.
- Preheat the oven for approx. 5 minutes (with the oven door closed).
- Insert the universal baking sheet with the food to be cooked into the desired guide rail. When using the grill rack for grilling, insert an empty baking sheet right below the grill rack for collecting dripping grease. That keeps the oven clean.
- Grill with the oven door closed.
Cleaning and Maintenance
WARNING:
- Make sure that the device is turned off from the power supply (fuse) before cleaning the unit or replace the bulb in the oven. Risk of electric shock!
- Allow the unit to cool sufficiently before cleaning or servicing.
- Never use high-pressure cleaners for cleaning. Ingress of liquids can reach the electrical components. Risk of electric shock! Hot steam may cause damage to the plastic parts.
- Never use flammable substances, such as paint thinner, kerosene, gasoline or acids for cleaning.
- The device must be dry before you take it in operation again.
CAUTION:
- Do not use a wire brush or any abrasive items.
- Do not use harsh abrasive cleaners or sharp metal objects for cleaning the glass surface. The surfaces can be scratched or destroyed.
Cleaning the hob
Clean the hob after each use in order to prevent food residue from burning in.
| Staining Cleaning method Cleaning tools | ||
| Slightly Use hot water and rub dry. Cleaning sponge | ||
| Dirt has accumulated | Use hot water and use a scrubbing sponge to rub dry. | Special cleaning sponge for glass ceramic |
| Pools and lime deposits | Apply hot vinegar to the affected area and wipe off with a dry cloth. Use special cleaning agent from your specialist dealer. | Special cleaning agent for glass ceramic |
| Sugar, melted aluminum, or plastic | Remove using a scraper for glass ceramic (recommending a plastic tool for more protection). | Special cleaning agent for glass ceramic |
Cleaning the oven
Clean the oven after each use in order to prevent staining from burning during the next use, as that would require a much higher cleaning effort.
The removable oven door and the oven lamp will make cleaning the oven interior much easier.
• Wipe all parts with a soft, damp cloth. Soak heavily stained areas with warm soapy water or vinegar-based cleaner beforehand.
- Clean the stainless steel surfaces with warm soapy water or with a commercial stainless steel cleaning product.
- Do not use any scrubbing agents or sponges. During too intensive cleaning, these could damage the markings (on the oven control panel), rendering them unreadable.
- Clean the glass front with warm water and some detergent. Do not use creamy cleaning liquids.
- Observe the use and safety instructions of the commercial oven cleaner.
• Use a soft, absorbing cloth for drying after cleaning.
Cleaning the racks
Always remove the racks when you want to thoroughly clean the oven walls. Soak the removed racks to make cleaning easier. It is also possible to clean the racks in the dishwasher.
- Hold the lower edge of the rack and pull it halfway out.
- Then lift the rack and pull it from the mounting holes.
Removing the oven door
You may remove the oven door to facilitate cleaning and to get better access to the oven interior.
- Open the door completely.
- Push the folding clamps of the hinges on both sides upwards.
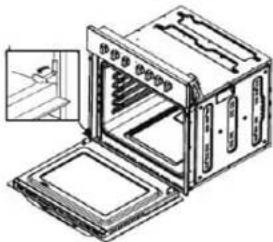
natural_image
Technical line drawing of an open oven with internal compartments and a side view showing internal structure (no text or symbols)- Slightly close the door and then lift it up to remove it.
- To reinstall the door, follow the above procedure in reverse order.
- When reinstalling the door, make sure the notch of the hinge is properly aligned with the protrusion of the hinge holder.
- Then press down the folding clamps. If you forget to do so, the hinges could get damaged when closing the oven door.
Replacing the oven lamp
If the oven lamp does not function properly anymore, you can replace it by yourself. You will require a light bulb that has a heat-resistance of up to 300^ C.
Specifications: 230-240 V\~, 25 W, E14, halogen.
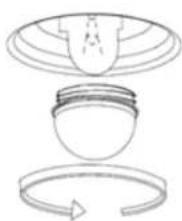
natural_image
Diagram showing a light bulb with concentric rings and a circular arrow indicating rotation (no text or symbols)- Unscrew the cover turning it anti-clockwise and clean it with a dry cloth.
• Unscrew the light bulb from the socket. - Insert a new bulb into the socket.
• Make sure the lamp sits securely in the socket. - Reattach the cover of the oven lamp and tighten it.
- Check that the lamp works properly.
Repairs
A wrong or improperly performed repair brings danger to the user.
Repairs to electrical appliances must only be carried out by an qualified specialist. A damaged power cord must be changed only by a qualified electrician.
Troubleshooting
Before contacting an expert
Read the following troubleshooting table before contacting an expert.
| Problem Possible cause Solution | ||
| Device does not work. The power supply is disconnected. Check the fuse of your domestic wiring system. | ||
| The upper part of the food is too dark, and the lower part is too light. | Not enough lower heat. | - Select the upper/lower heat function.- Use a deeper baking dish.- Reduce the oven temperature.- Insert the baking dish into the lowest guide rail. |
| The lower part of the food is too dark, and the upper part is too light. | Too much lower heat. | - Select the upper/lower heat function.- Use a deeper baking dish.- Reduce the temperature.- Insert the baking dish into a higher guide rail. |
| The food is done on the outside but not on the inside. | Temperature too high. Reduce the temperature and increase the cooking time. | |
| The oven lamp does not work. | The lamp is loose or damaged. | Tighten the lamp or replace it (see “Replacing the oven lamp”). |
i NOTE:
Should you still have problems with your device after following the steps above, please contact your distributor or an authorized specialist.
Disposal
Meaning of the "Dustbin" symbol
Protect our environment, do not dispose of electrical equipment in the domestic waste.
Please return any electrical equipment that you will no longer use to the collection points provided for their disposal.
This helps avoid the potential effects of incorrect disposal on the environment and human health.
This will contribute to the recycling and other forms of reutilisation of electrical and electronic equipment.
Information concerning where the equipment can be disposed of can be obtained from your local authority.
WARNING:
Remove or disable any existing snap and bolt locks, if you take the device out of operation or dispose it.
GARANTIEKARTE
warranty card • garantiekaart • carte de garantie • scheda di garanzia • tarjeta de garantía • cartão de garantia • garantikort • karta gwarancyjna • záruční list • kartica jamstva • carte de garanție • Garанционна карта • záručný list • garancijski list • garanciajegy • garantíйнийформуляр • Garантийный талон • SEAĐАСТУРЫЗАСТУРЫЗАСТУРЫЗАСТУРЫЗАСТУРЫЗАСТУРЫЗАСТУРЫЗАСТУРЫЗАСТУРЫЗАСТУРЫЗАСТУРЫЗАСТУРЫЗАСТУРЫЗАСТУРЫЗАСТУРЫЗА
EHBC 547 IX
24 Monate Garantie gemäß Garantieerklärung · 24 months warranty according to warranty declaration · 24 maanden garantie volgens garantieverklaring · 24 mois de garantie selon la déclaration de garantie · 24 mesi di garanzia secondo la dichiarazione di garanzia · 24 meses de garantia de acuerdo con la declaración de garantía · 24 meses de garantia, de acordo com a declaração de garantia · 24 mäneders garanti i henhold til garantibetingelsene · 24 miesiące gwarancji na podstawie oświadczenia gwarancyjnego · záruka 24 měsiců podle prohlásení o záruce · 24 mjesečno jamstvo u skladu s jamstvenom deklaracijom · 24 luni garantie conform declarației de garantie · 24 месеца гаранция в съответствие с гаранционната декларация · 24-mesačná záruka podľa vyhlásenia o záruke · 24-mesečna garancija, skladno z garancijsko izjavo · 24 hónap garancia a garanciafeltételekben leírtak szerint · гаранțия на 24 місяці відповідно заяві про гарантію · Гарантия 24 месяца согласно заявленным гарантийным правилам · عضان ملّدًا 24 شَهْرُ وَقَأَّاً لьихان الصَّام
Kaufdatum, Händlerstempel, Unterschrift - date of purchase, dealer stamp, signature - aankoopdatum, dealerstempel, handtekening - date d'achat, tampon du concessionnaire, signature - data di acquisto, timbro del rivenditore, firma - fecha de compra, sello del distribuidor, firma - data de compra, carimbo do distribuidor, assinatura - kjepsdato, forhandlerstempel, signatur - data zakupu, pieczęć sprawzczy, podpis - datum zakoupení, razitko prodejce, podpis - datum kupovine, zig trgovca, potpis - data de achiziře, stimpila furnizorului, semnátura - Dата на покупката. Печат на Продавача, Подпис - dátum nákupu, pečiatka obchodnika/predajcu, podpis - datum nakupa, zig trgovca, podpis - vásarlás dátuma, kereskedó bélyezgője, aláírás - data придбання, печатка продавця, підпис - Dата приобретення, Штамп продавца, Подпись - التrophic النشراء، وَلَّدْمُرْبِيَّهِمُرْتَّاً، وَلَّدْمُرْتَّاً،
BOMANN®
www.bomann.de
