
EBO 7908 IX - Oven BOMANN - Free user manual and instructions
Find the device manual for free EBO 7908 IX BOMANN in PDF.


| Product Type | Built-in Electric Oven |
| Brand | Bomann |
| Model | EBO 7908 IX |
| Dimensions (W x H x D) | 595 x 595 x 568 mm |
| Weight | 35 kg |
| Power Supply | 220-240 V, 50/60 Hz, 16 A |
| Power Consumption | 2.4 kW |
| Energy Class | A |
| Oven Capacity | 70 L |
| Functions | Convection, Grill, Lower Heat, Defrost, Multifunction |
| Temperature Range | 50°C – 250°C |
| Interior Material | Easy-clean Enamel |
| Cleaning Type | Hydrolysis or Hand Clean |
| Door Type | Cool Touch, Removable Inner Glass |
| Child Lock | Yes |
| Automatic Shut-off | Yes, after 12 hours |
| Clock & Timer | Digital with Timer |
| Spare Parts Availability | From Bomann Service Centers |
| Warranty | 2 Years |
Frequently Asked Questions - EBO 7908 IX BOMANN
User questions about EBO 7908 IX BOMANN
0 question about this device. Answer the ones you know or ask your own.
Ask a new question about this device
Download the instructions for your Oven in PDF format for free! Find your manual EBO 7908 IX - BOMANN and take your electronic device back in hand. On this page are published all the documents necessary for the use of your device. EBO 7908 IX by BOMANN.
USER MANUAL EBO 7908 IX BOMANN
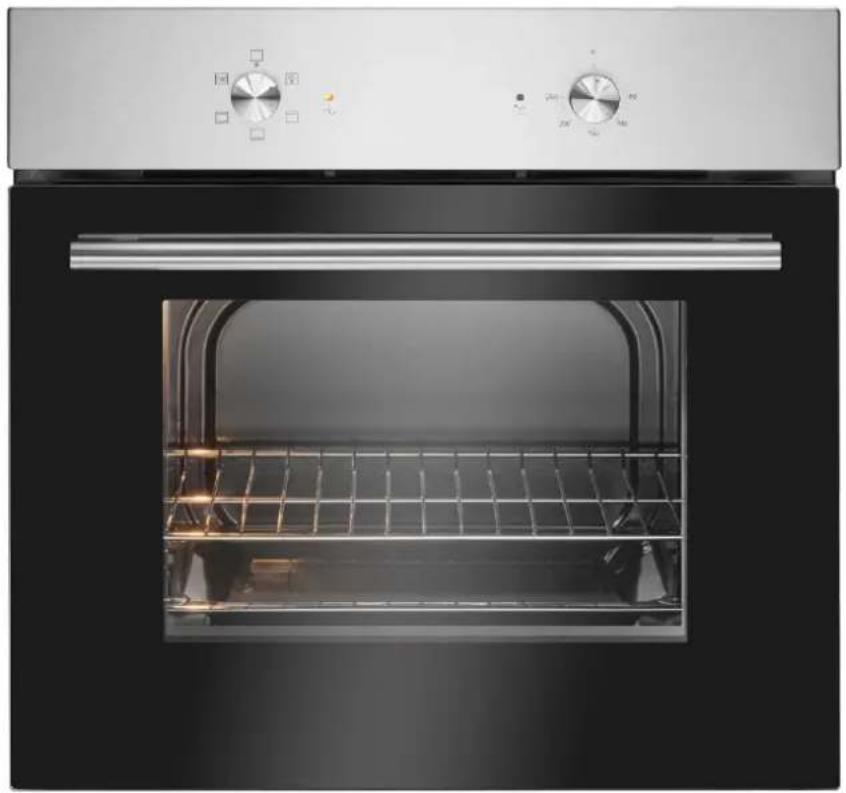
HOUSEHOLD- BUILT-IN OVEN
natural_image
Interior view of a stainless steel oven with open grating and control knobs (no visible text or symbols)General notes page 18
Special safety information for this unit ...... page 19
Transport and packaging ...... page 21
Appliance equipment ...... page 21
Installation page 21
Startup / Operation ...... page 23
Cleaning and maintenance ...... page 25
Troubleshooting page 27
Technical data page 27
Disposal page 27
EU product data sheet page 29
Einleitung
natural_image
Architectural line drawings of a two-story kitchen with oven, cabinet, and door (no text or labels)⚠️ WARNING:
| A | min. 760 mm | B | 50 mm | C | 35 mm | |
| D | Lufteintritt 30 mm | E | Luftaustritt 5 mm | |||
natural_image
Technical line drawing of a cabinet with a circular component and mounting holes (no text or symbols)natural_image
Technical line drawing of a microwave oven with cooling fins and ventilation slots (no text or symbols)VORSICHT!
natural_image
Diagram of a mechanical component with an arrow indicating direction (no text or symbols present)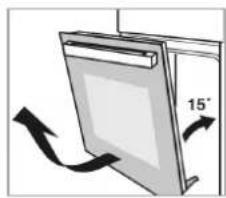
natural_image
Diagram of a door frame with an 15° angle indicator and directional arrows (no text or symbols)natural_image
Diagram of a mechanical assembly with arrows indicating force or movement (no text or symbols present)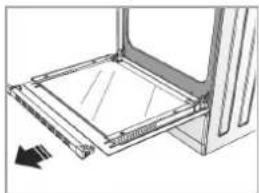
natural_image
Technical line drawing of a mechanical assembly with a square frame and directional arrow (no text or symbols)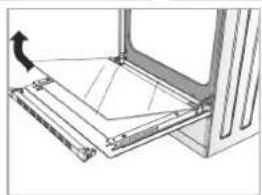
natural_image
Technical diagram of a mechanical assembly with a rotating component (no text or symbols)Thank you for choosing our product. We hope you will enjoy using the appliance.
Symbols in these instructions for use
Important information for your safety is specially marked. It is essential to comply with these instructions to avoid accidents and prevent damage:
WARNING:
This warns you of dangers to your health and indicates possible injury risks.
CAUTION:
This refers to possible hazards to the machine or other objects.
NOTE: This highlights tips and information.
General notes

Read the operating instructions very carefully before putting the appliance into
operation and keep the instructions including the warranty and the receipt. If you give this appliance to other people, also pass on the operating instructions.
i NOTE:
- Due to constant product modifications, your appliance may differ slightly from these operating instructions; Functions and methods of use remain unchanged.
- The illustrations in these operating instructions are for illustrative purposes only and may differ from the original appliance.
- The appliance is designed exclusively for private use and for the envisaged purpose. This appliance is not fit for commercial use.
- The appliance is only to be used as described in the user manual. Do not use the appliance for any
other purpose. Any other use is not intended and can result in damages or personal injuries.
- Operate the appliance only properly installed.
- Do not use it outdoors. Keep it away from sources of heat, direct sunlight and humidity.
- Do not operate the appliance without supervision.
- When not in use, for cleaning, user maintenance works or with disruption, switch off the appliance and disconnect the plug (pull the plug itself, not the lead) or turn off the fuse.
- The appliance and if possible the mains lead have to be checked regularly for signs of damage. If damage is found the appliance must not be used.
- For safety reasons, alterations or modifications of the appliance are prohibited.
- To ensure your children's safety, please keep all packaging (plastic bags, boxes, polystyrene etc.) out of their reach.
WARNING:
Do not allow small children to play with the foil. There is a danger of suffocation!
Special safety information for this unit
WARNING: Danger from electrical current! Contact with live leads or components can be fatal!
- The connection of the appliance must satisfy the relevant standards and regulations and may only be performed by an authorized specialist.
- Make sure that the appliance is turned off from the power supply (fuse) before changing the bulb in the oven.
- The use of high-pressure cleaners or steam cleaners is prohibited. Ingress of liquids can lead to electric shock. Put the appliance never under water.
WARNING: Hot surface! Risk of Burning!
- During operation the appliance and its accessible parts become hot. Special care must be taken to avoid touching heating elements. Children younger than 8 years must be kept away from the appliance.
- Grasp the oven only on the door handle and switches. Use potholders if you want to remove or insert the accessories.
- Let the appliance cool down before cleaning or maintenance.
WARNING: Risk of Fire!
Do not leave the oven unattended; unattended cooking with fat or oil can be dangerous and cause fires. NEVER try to extinguish a fire with water. In the event of fire, switch off the appliance and disconnect it from the power supply. Use a suitable fire extinguisher or a fire blanket to extinguish the fire.
- The appliance is not intended for operation with an external timer or a separate remote-control system.
- Make sure that with installing adequate air circulations ensured and the ventilation slots are not blocked.
- To avoid overheating, do not install the appliance behind decorative doors.
- Only grill with the appliance door closed.
- Never pour liquids into a hot oven! Scalding by rising water vapor as well as possible damage to enamel.
- Do not place any objects on the open appliance door.
- Do not store any cleaning agents or flammable materials in the appliance or in the immediate vicinity.
- This appliance can be used by children aged from 8 years and above and persons with reduced physical, sensory or mental capabilities or lack of experience and knowledge if they have been given supervision or instruction concerning use of the appliance in a safe way and understand the hazards involved.
• Children shall not play with the appliance. - Cleaning and user maintenance shall not be made by children, unless they are older than 8 years and are supervised.
- Do not use harsh abrasive cleaners or sharp metal objects for cleaning the glass surface. The glass can be scratched or destroyed.
- Do not try to repair the appliance on your own. Always contact an authorized technician. If the supply cord is damaged, it must be replaced by the manufacturer, its service agent or similarly qualified persons avoid a hazard.
Transport and packaging
Transport the appliance
If possible, transport the appliance in a vertical position. Secure the appliance sufficiently and protect it against weather during transport.
Unpacking the appliance
- Remove the appliance from its packaging.
- Remove all packaging material, such as foils, filler and cardboard packaging.
Dispose of packaging materials that are no longer required in accordance with the locally applicable regulations.
- To prevent hazards, check the appliance for any transport damage.
- In case of damage, do not put the appliance into operation. Contact your distributor.
i NOTE:
Production residue or dust may have collected on the appliance. We recommend cleaning the appliance according to chapter "Cleaning and maintenance".
Appliance equipment
Appliance overview
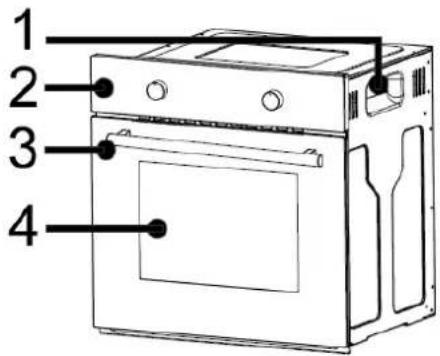
1 Recessed grips
3 Appliance door
2 Control panel
4 Oven with accessories
Delivery scope
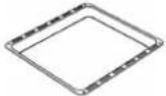 | 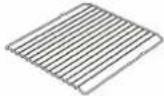 |
| 1x standard oven tray 1x grill grid | |
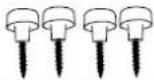 | Incl. connecting cable220-240 V~ |
| 4x mounting screws | |
Installation
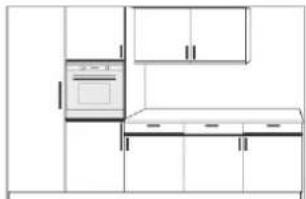
The built-in oven is designed for installation in standard kitchen units. It can be installed both in a tall cabinet and under a worktop.
natural_image
Line drawing of a modern kitchen cabinet with oven and counter (no text or symbols)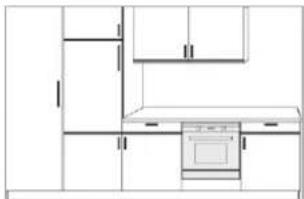
natural_image
Line drawing of a kitchen interior layout with cabinets and a stove (no text or symbols)WARNING:
The installation and the connection to the main power may only be performed by an authorized specialist.
CAUTION:
- The worktop, the cabinet, veneers, plastic coatings, used adhesives etc. must be sufficient heat-resistant (min. 100°C).
- To ensure a sufficient cooling air supply, no heat protection strips may be installed.
- If there is a drawer below the furnace or it is attached, an intermediate shelf is required.
i NOTE: Recommendation!
- When installing, ask another person to assist.
- Wear protective gloves to avoid injuries at possible sharp edges.
- When inserting, use the recessed grips on the side of the housing to lift the unit. Caution! Do not carry or hold the appliance by the door handle.
i NOTE: Recommendation!
- Do not install the appliance directly next to refrigerators or freezers. The heat dissipation will unnecessarily increase its energy consumption!
- Before installation, check that the appliance and furniture dimensions match.
Safety distances
CAUTION:
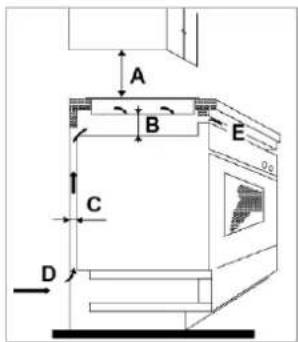
Make sure that adequate air circulations ensured, and the ventilation slots are not blocked. Follow appropriate safety distances!
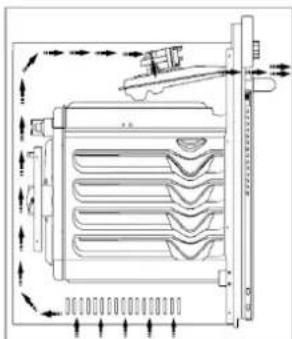
- The appliance must be installed so that heat can be dissipated. The ventilation openings must not be blocked (see illustration).
- Maintain sufficient distance behind the appliance at the installation site so that the appliance can work efficiently and well.
- The distance between the hob and the cooker hood must be at least as large as specified in the installation instructions for the hood!
natural_image
Technical diagram of a refrigerator or oven system with heat exchangers and cooling fins (no text or labels)| A | min. 760 mm | B | 50 mm | C | 35 mm | |
| D | Air intake 30 mm | E | Air outlet 5 mm | |||
Cabinet opening and appliance dimensions
Prepare the cabinet opening according to the dimensional drawings.
Dimensions in mm
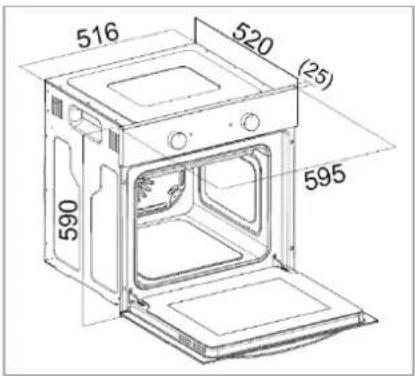
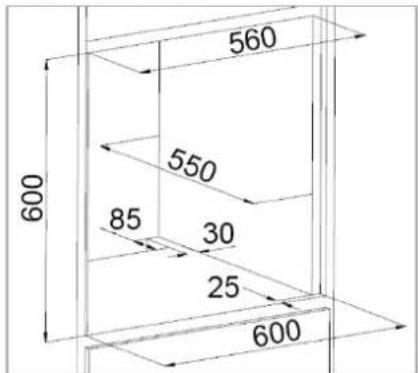
Installing the oven
- Put the appliance with the connecting cable first into the prepared cabinet a bit.
- Do the connection to the mains, see "Electrical connection".
- Push the oven completely into the cabinet opening. Make sure that the cables are free and not bent, squeezed or twisted.
- Attach and secure the oven by using the supplied screws on the side walls of the cabinet.
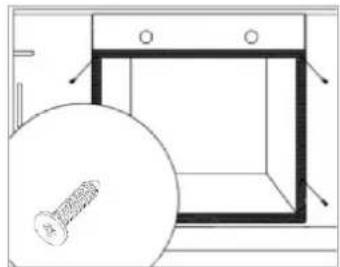
natural_image
Simple line drawing of a cabinet with a circular base and mounting holes (no text or symbols)4x mounting holes are located left and right in the door frame.
Information for the authorized expert!
WARNING:
- The installation to the mains supply must conform to the local standards and regulations.
- Improper connection may cause to an electric shock!
- Do not change the appliance plug! Let replace the mains plug by a specialist if this is not suitable for the appliance plug.
- Do not use multiple sockets or extension cords.
- Before connecting, ensure that the power supply corresponds with the information on the rating label (door frame) and the wiring diagram.
- Connect the mains cable to a properly installed and earthed wall outlet.
- Arrange the mains cable in such a way that it does not get in contact with any hot components of the appliance. Do not lead it over sharp edges or corners.
- If the plug after installation is not accessible, a corresponding disconnect device must be available to meet the relevant safety regulations.
Connected load
In total, the appliance can take up a rated power of approx. 2350 W. At this connected load, a separate supply line for the oven with a 16-ampere fuse is required.
Startup / Operation
Before initial use
- Clean the oven interior with all therein located accessories. Follow the instructions that we give you in the chapter "Cleaning and maintenance".
- To burn off possible production residues, heat the closed oven for approx. 30 minutes at maximum temperature (250°C_top/bottom heat).
i NOTE:
The occurring odor and possibly a slight smoke development cannot be avoided. So, ensure that the room is well ventilated during the heating process.
Operation overview
The detailed description of the individual controls can be found in the following sections.
Control panel
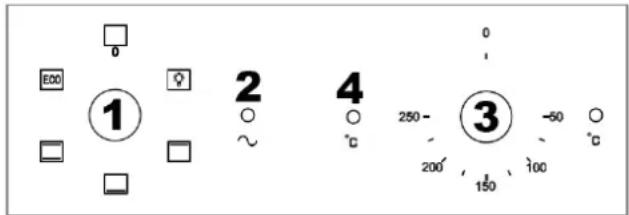
1 Function selector control
2 Operating control lamp
3 Temperature selector control
4 Temperature control lamp
1 Function selector control
The function selector control is used to set the heating mode. To set a function, turn the control to the symbol with the desired heating mode.
2 Operating control lamp
The control lamp indicates the oven operation.
3 Temperature selector control
CAUTION:
Only turn the temperature selector control clockwise and back again. Otherwise, the control will be damaged.
The temperature selector control is used to set the oven temperature. The thermostat allows temperature setting in the range from 50^ C to 250^ C.
4 Temperature control lamp
The control lamp indicates heating operation.
If the light goes out, the set oven temperature has been reached.
During operation, the oven must be reheated again and again to maintain the set temperature. During reheating, the control lamp lights up (thermostat function).
i NOTE:
If the recipe recommends placing the food in the preheated oven, this should not be done before the control light first goes out.
Switching operation on and off
The oven is equipped with various functions, see "Oven functions". Set the required operating conditions.
- Turn the function selector control to the appropriate position.
- Turn the temperature selector control to the desired temperature.
- To switch off the oven, turn both controls back to the off position.
Oven chamber lighting
The oven lighting switches on automatically during operation. The lighting can also be switched on separately via the function selector switch, independently of operation.
Oven functions
| Symbol | Description |
| 0 | Off position: oven operation is switched off. |
| Lighting: the oven lighting can be switched on independently of the oven operation, e. g. for cleaning the oven. | |
| Top heat: heating takes place with the top heat switched on. The heat is only applied to the food from above. To be used for re-baking from above or for keeping warm. |
| Symbol | Description |
 | Bottom heat: the heat is only brought to the food from below. To be used when baking from below e. g. Pizza. |
 | Top/bottom heat*: the heating is done in a conventional way. The heat is evenly brought to the food from above and below. Suitable for baking and roasting on one level. |
 | ECO: particularly economical heating mode. The top/bottom heat is combined with an eco-function.The temperature is intelligently controlled and residual heat is used for cooking in phases. This can reduce energy consumption. |
*This type of heating is used to determine the energy consumption in conventional mode.
Using the oven accessory
CAUTION:
Always insert the accessory right way and completely into the oven; the glass door can be scratched.
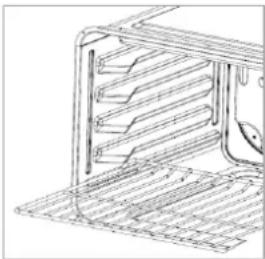
In the oven chamber there are levels for inserting the accessories at different heights. The accessories are safely used between these levels.
natural_image
Technical line drawing of a microwave oven with cooling fins and ventilation duct (no text or symbols)ATTENTION!
Slide the grill grid in the right way with the curvature facing upwards and backwards into the oven.
The right ovenware
- Pots with heat-resistant handles, recognizable by the marking "temperature-resistant up to 280°C".
-
Fireproof molds made of glass, porcelain, ceramic, clay or cast iron.
-
In particular, ovens with top and bottom heat need molds and trays with good heat transfer, preferably made of black lacquered metals. Cakes brown particularly well in them.
- Aluminum trays, with or without coating, give good results.
- Unsuitable is cookware of bright, shiny aluminum, unglazed clay and tableware made of plastic or with plastic handles.
General notes for baking and cooking in the oven
i NOTE:
- Use the accessories included in the delivery.
- Temperature and duration depend on quantity and recipe. Always follow the instructions for the duration of the completion in your recipes and preparation instructions on the product packaging.
Baking
- For good baking results, preheating is recommended up to the desired temperature.
- After finishing the baking process, we recommend resting the food for about 5 minutes in the oven.
- Before removing the cake, check if it is done by using a wooden stick. When the cake is done, no dough residue will stick to the wooden stick.
Cooking and roasting meat & fish
- Only cook meat of maximum 1 kg in the oven. We recommend roasting or cooking smaller portions on the cooking hob.
- When using the grill grid for roasting, we recommend placing a baking sheet with some water on the lower level.
- At least once after half of the cooking time, the roast should be reversed; sprinkle the roast during cooking now and then with the resulted roast liquid or with hot, salty water, thereby not using cold water.
Energy saving tips
Information to reduce the environmental effect of cooking (acc. VO (EU) No. 66/2014 appendix I, No. 2)
- We recommend the use of dark baking molds and plates because they conduct the heat better.
- Any unnecessary accessories should be removed from the baking chamber before using the appliance.
- During cooking, the oven door should remain closed to avoid unnecessary heat loss.
- Only preheat the oven if required by the recipe.
- If a selection of cooking time is specified, always use the lowest recommended temperature.
- Use the residual heat by switching back to minimum temperature shortly before the end of the cooking time.
- Save electricity! If you do not need the oven, switch off functions such as interior lighting, program, temperature
- Clean the oven after each application, to keep the cleaning effort as low as possible. We recommend the use of biological cleaners.
Cleaning and maintenance
WARNING:
- Always switch off the appliance completely before cleaning and maintenance work and disconnect it from the power supply if necessary.
- Allow the unit to cool down before cleaning.
- Do not use steam cleaners for cleaning the appliance; moisture could enter electrical components. Risk of electric shock! Hot steam could damage the plastic parts.
- Never use flammable substances, such as thinner, kerosene, gasoline or acids for cleaning.
- The unit must be dry before restarting operation.
△ CAUTION:
- Do not use a wire brush or other sharp, abrasive items.
- Do not use harsh abrasive cleaners or sharp metal objects for cleaning the glass surface. The surfaces can be scratched or destroyed.
• Always consider the application and safety notes of the detergent.
Removing the oven door
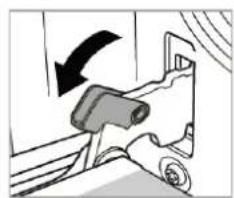
For cleaning and easier access to the oven chamber, the appliance door can be unhinged.
natural_image
Diagram of a vehicle wheel assembly with a black arrow indicating direction (no text or symbols)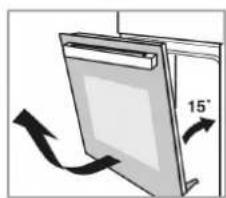
natural_image
Diagram of a door with an arrow indicating 15° angle, showing no text or symbols beyond the label- Open the appliance door completely.
- Fold the opposite retaining brackets of the hinges upwards.
- Close the appliance door slightly and lift it out upwards.
- When inserting the door, make sure that the notch of the hinge fits correctly on the protrusion of the hinge holder.
- Fold the retaining brackets back down, otherwise the hinges may be damaged when closing the appliance door.
Cleaning the oven
i NOTE:
By cleaning after each use, you avoid that cooking residues, soiling burn in during the next operation. Cleaning is then only possible with a lot of effort.
- Depending on the degree of soiling and the surface, clean the appliance and accessories only with a soft, damp cloth and commercially available, food-safe cleaners.
-
Soak stiffly soiled areas with a little warm dish-washing liquid or vinegar cleaner.
-
Wipe off grease residues on the seal surrounding the cooking chamber.
• After cleaning, use a soft absorbent cloth to dry.
Cleaning the glass panes
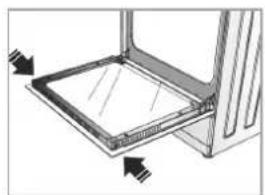
If necessary, clean the inside of the glass panes.
natural_image
Diagram of a mechanical assembly with arrows indicating direction (no text or symbols)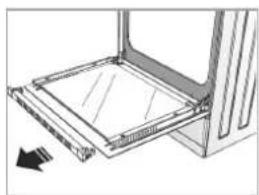
natural_image
Technical line drawing of a structural frame or panel assembly (no text or symbols)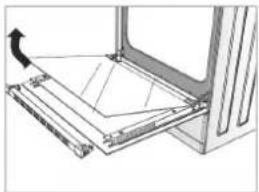
natural_image
Technical diagram of a mechanical assembly with a rotating component (no text or symbols)- Open the oven door.
- Remove the support bar by loosening the screws on the side of the bar.
- Carefully remove the glass panes forward from the holder.
- Replace the glass panes and fasten the retaining strip after you have cleaned and thoroughly dried the glass.
Changing the bulb
WARNING:
- Make sure that the appliance is turned off from the power supply (fuse).
- Allow the lamp to cool down before replacing the bulb. Danger of burns!
i NOTE:
Use the correct bulb, heat resistant up to 300°C: G9 Halogen - 1 x 25 W - 220-240 V\~
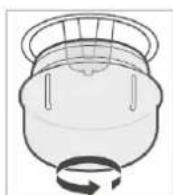
- Unscrew the lamp cover and clean it with a dry cloth.
- Change the bulb.
- Screw the lamp cover on tightly and check for proper operation.
Troubleshooting
Before you contact an authorized specialist
| Problem | Possible cause / Action |
| Oven does not work | Check the power supply. |
| Oven lamp does not work | Bulb is defective, was inserted incorrectly, is not securely seated in the socket, see “Changing the bulb”. |
| Strong smoke development | Grease residues in the oven chamber, switch off the oven, allow to cool before cleaning. |
i NOTE:
If a problem persists after following the steps above, contact your distributor or an authorized technician.
Technical data
Electrical connection....
Connection voltage: 220-240 V\~ 50/60 Hz
Rated power: 2350 W
Rated current: 16 A
Protection class: ....I
Dimension H x W x D / weight.....
Oven: 59.0 x 59.5 x 52.0 cm
Cut-out cabinet: 60.0 x 56.0 x min. 55.0 cm
Net weight: 26.5 kg
The right to make technical and design modifications during continuous product development remains reserved.
This appliance has been tested according to all relevant current CE guidelines, such as electromagnetic compatibility and low voltage directives, and has been constructed in accordance with the latest safety regulations.
Disposal
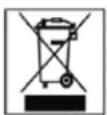
Meaning of the "Dustbin" symbol
Protect our environment; do not dispose of electrical equipment in the domestic waste.
Please return any electrical equipment that you will no longer use to the collection points provided for their disposal.
This helps avoid the potential effects of incorrect disposal on the environment and human health.
This will contribute to the recycling and other forms of reutilization of electrical and electronic equipment.
Information concerning where the equipment can be disposed of can be obtained from your local authority. Your dealer and contractual partner is also obliged to take back the old appliance free of charge.

WARNING:
Remove or disable any existing snap and bolt locks if you take the unit out of operation or dispose it.
Information to professional users for disassembly (acc. VO (EU) No. 66/2014 appendix I, No. 2)
Information for non-destructive disassembly for maintenance purposes
- Remove the lamp as described in the manual.
- For maintenance purposes, the oven door can be unhinged out and reinstalled, for the procedure please refer to the manual.
- A further disassembly for maintenance purposes is not provided.
-
If you would like to exchange defective components, please contact our customer service.
-
Motors must be expertly replaced by customer service in accordance with the repair instructions and disposed accordingly.
• Accumulators are not included.
Information for disassembly in terms of recycling, recovery and disposal at the end of the life of the appliance
- The disassembly of appliances with a gas connection should only be carried out by a licensed gas and water installer.
- The disassembly of appliances with electrical connections should be carried out by a licensed electrician.
-
For the recycling and recovery of resources give the appliance to:
-
a communal collection point waste disposal authority,
- a dedicated disposal company, offering a return system,
- a resident electric trader, who voluntary withdraws electrical appliances.
EU product data sheet
Product information for domestic ovens according to EU 65-66/2014
| Symbol | Value | Unit | |
| Brand | BOMANN | ||
| Model identification | EBO 7908 IX | ||
| Type of oven | built-in oven | ||
| Mass of the appliance M 26.5 kg | |||
| Number of cavities 1 | |||
| Heat source per cavity (electricity or gas) | electricity | ||
| Volume per cavity | V | 59 | I |
| Energy consumption (electricity) required to heat a standardized load in a cavity of an electric heated oven during a cycle in conventional mode per cavity (electric final energy) | EC_electric cavity | 0.74 kWh/cycle | |
| Energy consumption required to heat a standardized load in a cavity of an electric heated oven during a cycle in fan-forced mode per cavity (electric final energy) | EC_electric cavity | - | kWh/cycle |
| Energy consumption required to heat a standardized load in a gas-fired cavity of an oven during a cycle in conventional mode per cavity (gas final energy) | EC_gas cavity | - | MJ/cycle kWh/cycle (1) |
| Energy consumption required to heat a standardized load in a gas-fired cavity of an oven during a cycle in fan-forced mode per cavity (gas final energy) | EC_gas cavity | - | MJ/cycle kWh/cycle |
| Energy efficiency index per cavity | EEI_cavity | 92.5 | |
| Energy efficiency class (2) | A |
(1) 1 kWh/cycle = 3.6 MJ/cycle
(2) A+++ (highest efficiency) to D (lowest efficiency)
Tested acc. to: EN 60350-1
EN 50564
BOMANN®
C. Bomann GmbH
www.bomann-germany.de
Made in P.R.C.
- Einleitung
- ⚠️ WARNING:
- VORSICHT!
- WARNING:
- CAUTION:
- General notes
- i NOTE:
- Special safety information for this unit
- Transport and packaging
- Unpacking the appliance
- Appliance equipment
- Installation
- i NOTE: Recommendation!
- Safety distances
- Cabinet opening and appliance dimensions
- Installing the oven
- Information for the authorized expert!
- Connected load
- Startup / Operation
- Before initial use
- Operation overview
- Control panel
- Function selector control
- Operating control lamp
- Temperature selector control
- Temperature control lamp
- Switching operation on and off
- Oven chamber lighting
- Using the oven accessory
- ATTENTION!
- The right ovenware
- General notes for baking and cooking in the oven
- Baking
- Cooking and roasting meat & fish
- Energy saving tips
- Cleaning and maintenance
- △ CAUTION:
- Removing the oven door
- Cleaning the oven
- Cleaning the glass panes
- Changing the bulb
- Troubleshooting
- Technical data
- Disposal
- EU product data sheet
Brand : BOMANN
Model : EBO 7908 IX
Category : Oven