EMP-TW10H - Video projector EPSON - Free user manual and instructions
Find the device manual for free EMP-TW10H EPSON in PDF.
User questions about EMP-TW10H EPSON
0 question about this device. Answer the ones you know or ask your own.
Ask a new question about this device
Download the instructions for your Video projector in PDF format for free! Find your manual EMP-TW10H - EPSON and take your electronic device back in hand. On this page are published all the documents necessary for the use of your device. EMP-TW10H by EPSON.
USER MANUAL EMP-TW10H EPSON
All rights reserved. No part of this publication may be reproduced, stored in a retrieval system, or transmitted in any form or by any means, electronic, mechanical, photocopying, recording, or otherwise, without the prior written permission of SEIKO EPSON CORPORATION. No patent liability is assumed with respect to the use of the information contained herein. Neither is any liability assumed for damages resulting from the use of the information contained herein.
Neither SEIKO EPSON CORPORATION nor its affiliates shall be liable to the purchaser of this product or third parties for damages, losses, costs, or expenses incurred by purchaser or third parties as a result of: accident, misuse, or abuse of this product or unauthorized modifications, repairs, or alterations to this product, or (excluding the U.S.) failure to strictly comply with SEIKO EPSON CORPORATION's operating and maintenance instructions.
SEIKO EPSON CORPORATION shall not be liable against any damages or problems arising from the use of any options or any consumable products other than those designated as Original EPSON Products or EPSON Approved Products by SEIKO EPSON CORPORATION.
General Notice:
EPSON is a registered trademark of SEIKO EPSON CORPORATION.
Macintosh, Mac, and iMac are registered trademarks of Apple Computer, Inc.
IBM is a registered trademark of International Business Machines Corporation.
Windows and Windows NT are trademarks of Microsoft Corporation in the United States of America.
Pixelworks and DNX are trademarks of Pixelworks, Inc.
3LCD is a trademark of SEIKO EPSON CORPORATION.
Other product names used herein are also for identification purposes only and may be trademarks of their respective owners. EPSON disclaims any and all rights in those marks.
Home Projector
User's Guide
Contents
Unpacking the Projector 2
Meaning of Symbols 2
Features 3
Before Using the Projector
Part Names and Functions 4
Front/Top 4
Control panel. 4
Rear 5
Base 5
Remote Control 6
Installation 8
Installation method 8
Projection distance and screen size 8
Other installation methods 9
Connecting Equipment
Connecting a Computer 10
Compatible computers 10
Outputting images and audio from a computer 11
Adjusting computer generated images 11
Configuration Menus
Menu operation 12
Function list 13
Troubleshooting
When You Suspect a Problem 16
Power indicator 16
Warning indicator 16
When the indicators provide no help. 17
Appendices
Projector Care 20
Cleaning 20
Replacing consumables 21
Glossary 24
Supported Display Resolutions 26
Optional Extras and Consumables 28
Specifications 29
Appearance 30
Index 31
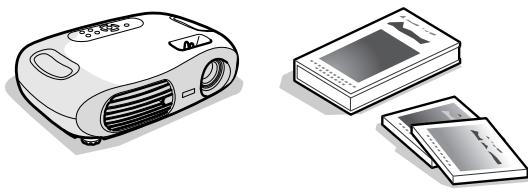
Unpacking the Projector
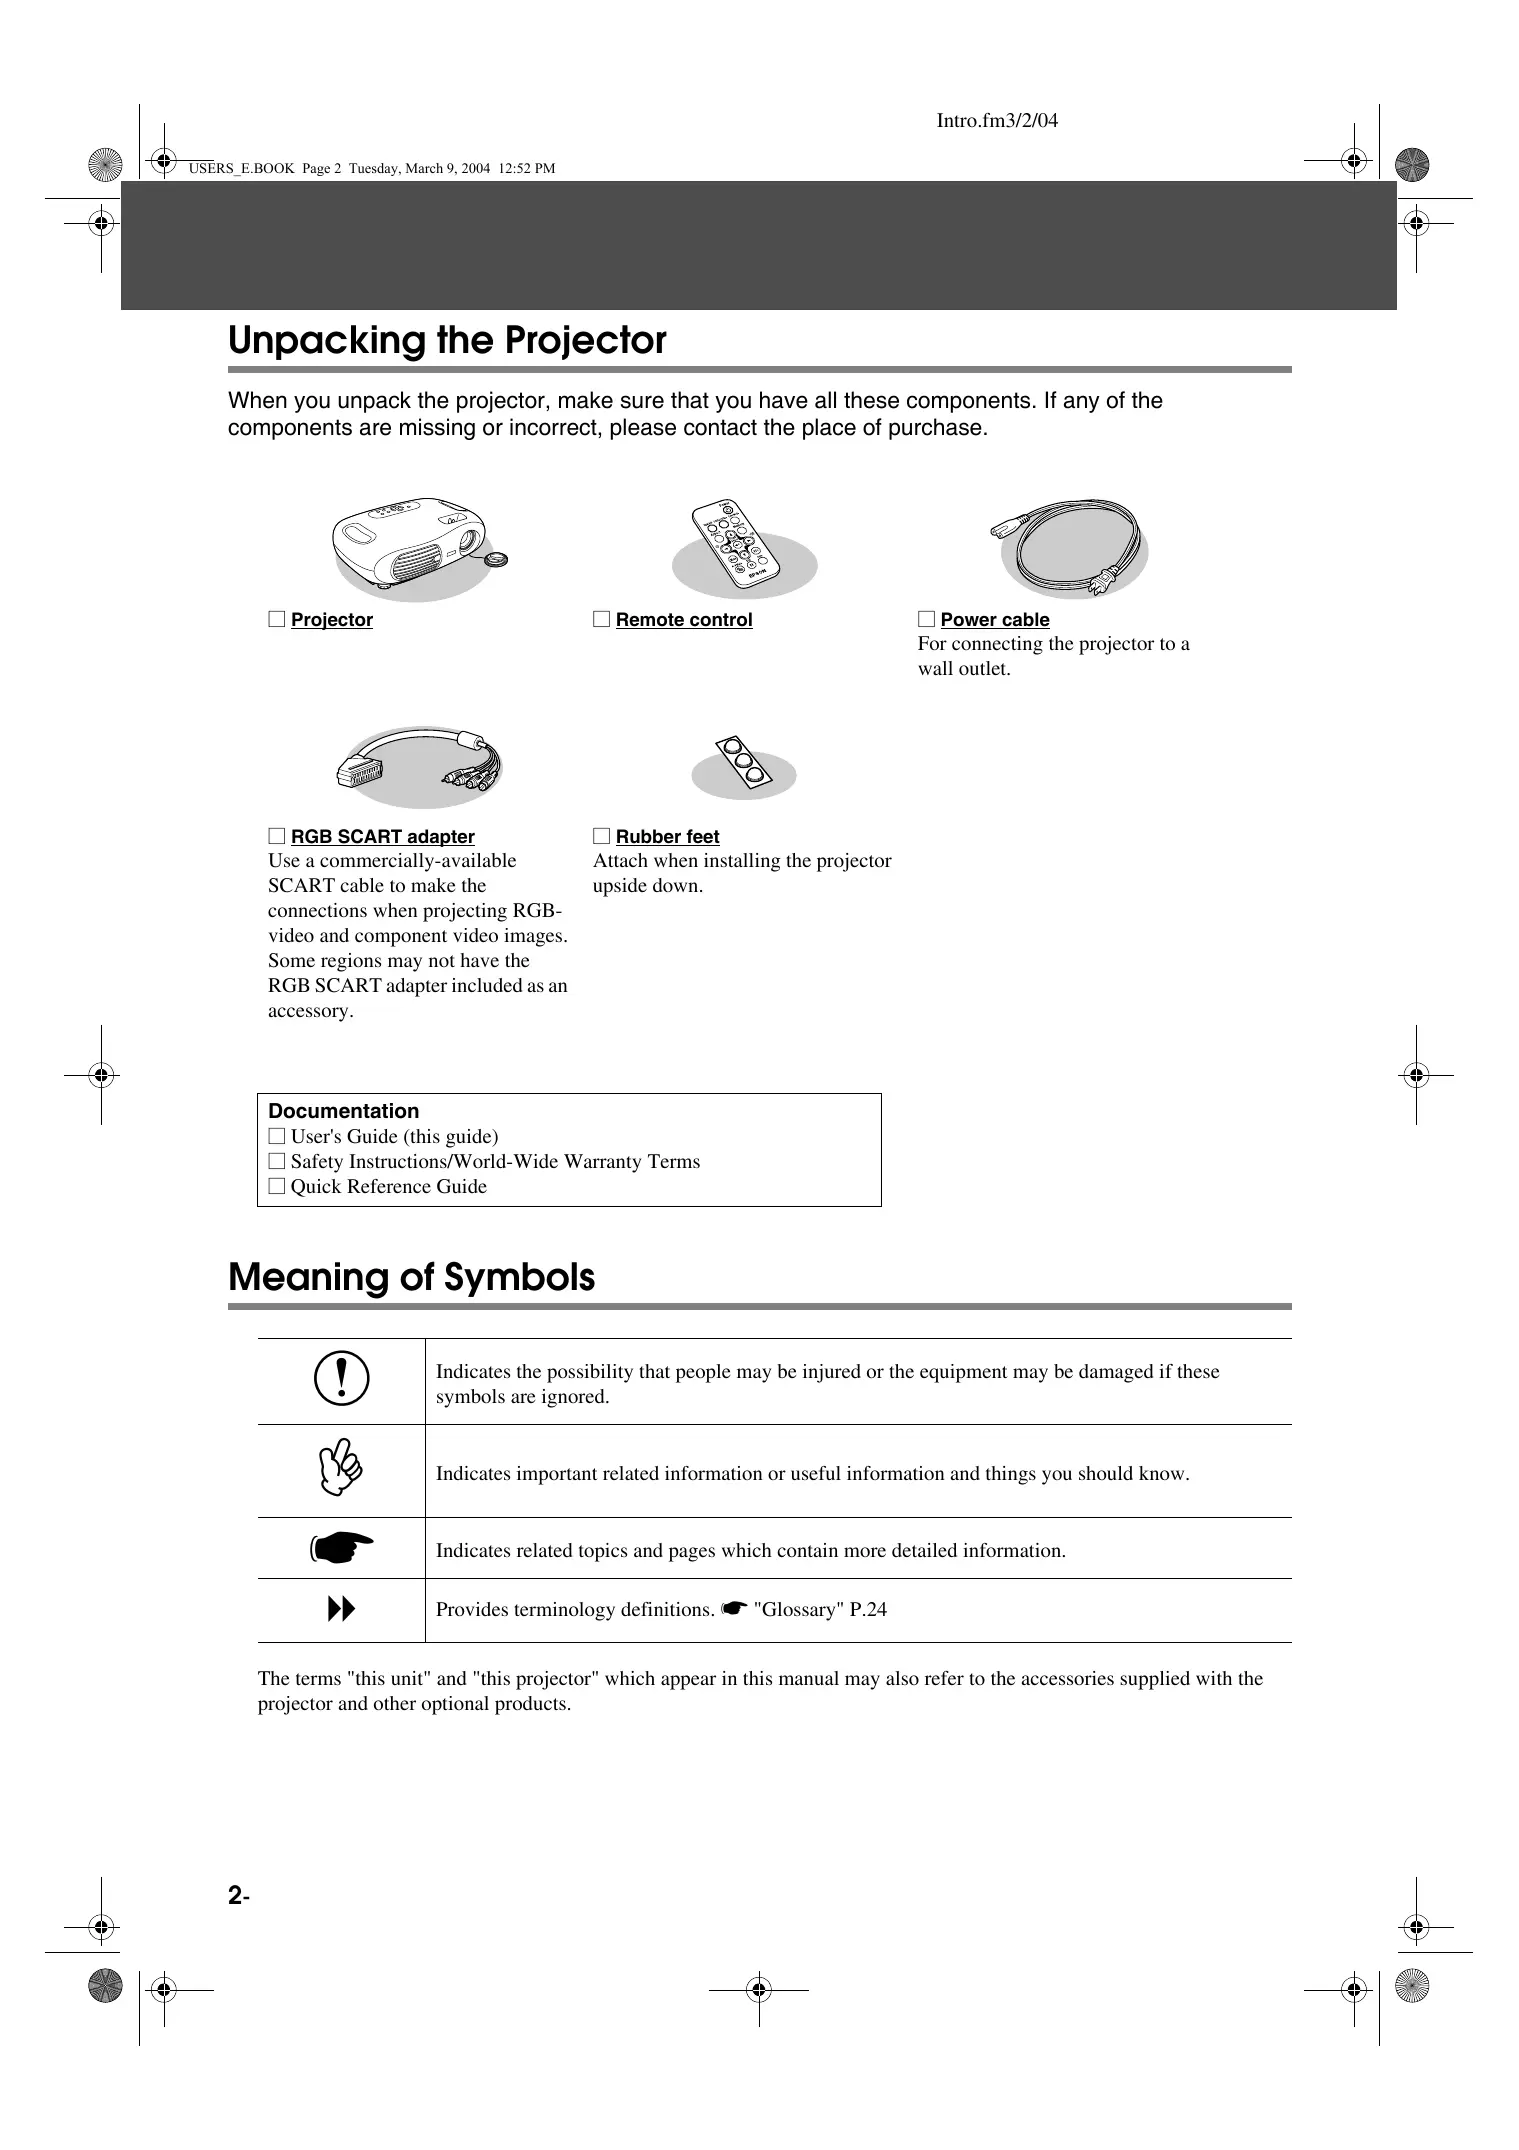
When you unpack the projector, make sure that you have all these components. If any of the components are missing or incorrect, please contact the place of purchase.
Projector
Remote control
Power cable
For connecting the projector to a wall outlet.
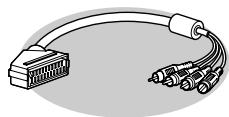
RGB SCART adapter
Use a commercially-available SCART cable to make the connections when projecting RGB-video and component video images. Some regions may not have the RGB SCART adapter included as an accessory.
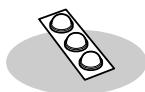
Rubber feet
Attach when installing the projector upside down.
Documentation
User's Guide (this guide)
Safety Instructions/World-Wide Warranty Terms
Quick Reference Guide
Meaning of Symbols
| ! | Indicates the possibility that people may be injured or the equipment may be damaged if these symbols are ignored. |
| Indicates important related information or useful information and things you should know. | |
| Indicates related topics and pages which contain more detailed information. | |
| → | Provides terminology definitions. "Glossary" P.24 |
The terms "this unit" and "this projector" which appear in this manual may also refer to the accessories supplied with the projector and other optional products.
Colour mode
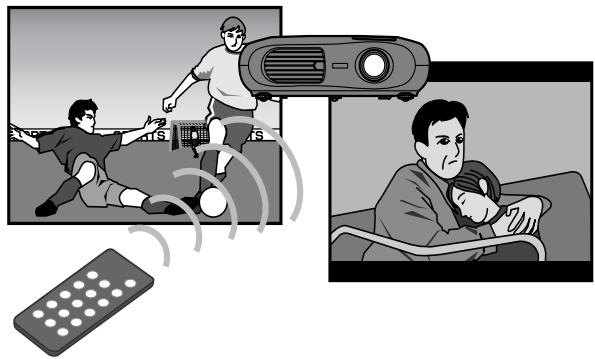
Image quality can be selected according to the type of scene. "Selecting a colour mode" Quick Reference Guide
■ Compact and lightweight
The projector's compact body is easy to carry.
Dimensions: 29.4(d) × 40.2(w) × 11.4(h) cm
Weight :approx.3.6kg
Auto setup
(Computer connections)
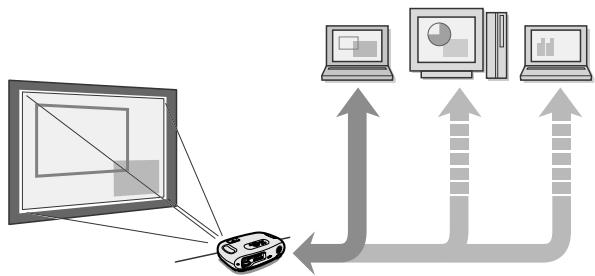
The projector analyses the signal of the computer to which it is connected and automatically makes adjustments to ensure optimal projection results.
"Auto setup (Computer connections)" P.11
Clear, vivid, images
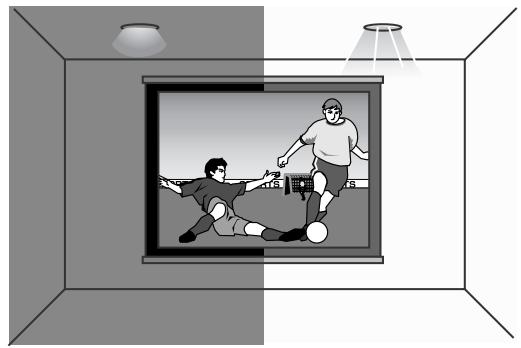
The projector's high resolution and high luminance achieves a legible display. Project sharp, detailed images, even in bright places.
Ease of use
Various projector operations can be easily performed using the included remote control, as follows:
using the configuration menus
- recalling your favourite settings
- pausing projection
Front/Top
remote control infrared receiver P.7
Receives signals from the remote control.
- ventilation outlet
- lens cover
Attach when not using the projector to prevent the lens from becoming dirty or damaged.
control panel P.4
- focus ring
Quick Reference Guide
Adjusts the image focus.
A·zoom ring
Quick Reference Guide
Adjusts the size of the projected image.
- front foot (left)
Reference Guide
Another front foot is located on the right side.
Extend and retract to adjust the projection angle.
Control panel
- [Power] button Quick Reference Guide
Turns the projector on and off.
Power indicator P.16
Flashes or lights in different colours to indicate the operating status of the projector.
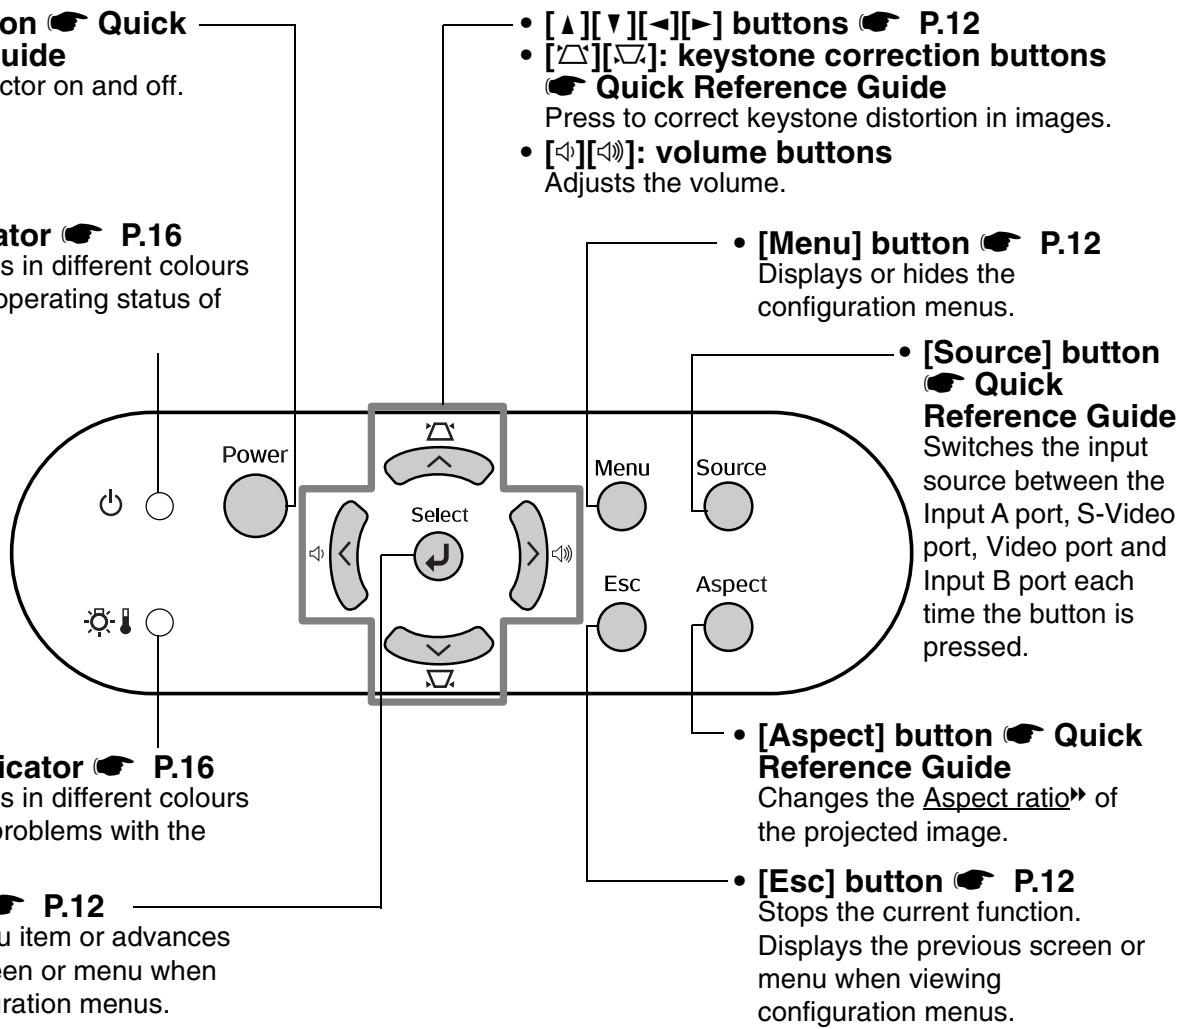
- Warning indicator P.16
Flashes or lights in different colours to alert you to problems with the projector.
- [←] button P.12
Accepts a menu item or advances to the next screen or menu when viewing configuration menus.
Rear
- Input B port
P.11
Inputs signals from a computer.
Video port
#
quick
Reference Guide
Inputs Composite Video signals to the projector.
Connect using an A/V cable.
uide
ite Video
signals to the projector.
Connect using an A/V cable.
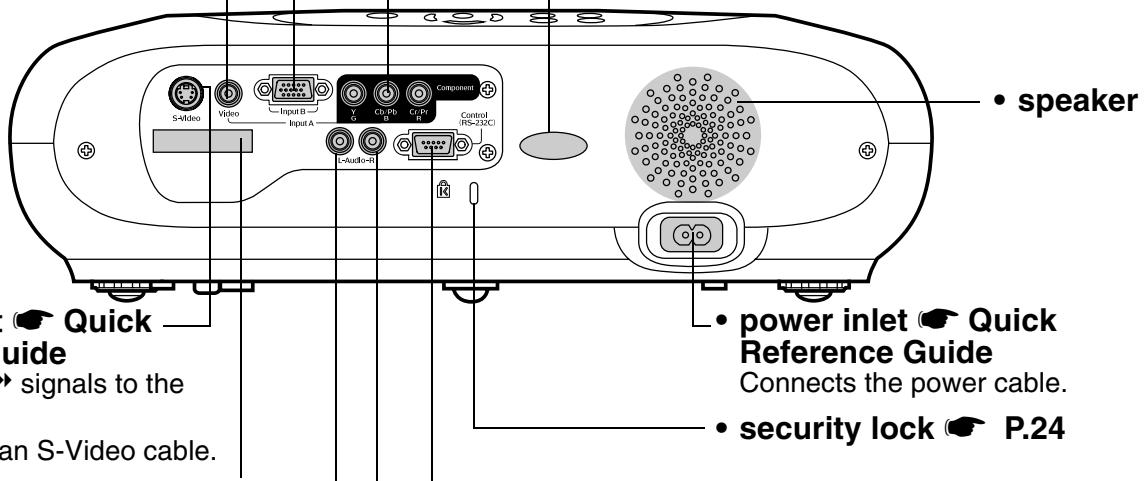
S-Video port
Gui
#
Reference Guide
Inputs S-Video signals to the projector.
Connect using an S-Video cable.
remote control holder
P.7
Store the remote control in here when not in use.
Audio port
P.11,
Guide
Quick Reference
Inputs audio signals to the projector. Connect using an A/V cable, or a stereo RCA cable.
When using computer and video equipment alternately, swap the cable or use an audio switch (commercially available).
- Input A port Quick Reference Guide
Inputs Component Video or RGB-Video signals.
remote control infrared receiver P.7
Receives signals from the remote control.
- power inlet Quick Reference Guide
Connects the power cable.
security lock P.24
Control (RS-232C) port
Connects the projector to a computer using an RS-232C cable. This port is for control use and should not be used by the customer.
Base

- air filter (air intake vent)
P.20, P.21
Prevents dust and other foreign particles from being drawn into the projector. Open the cover when changing the air filter.
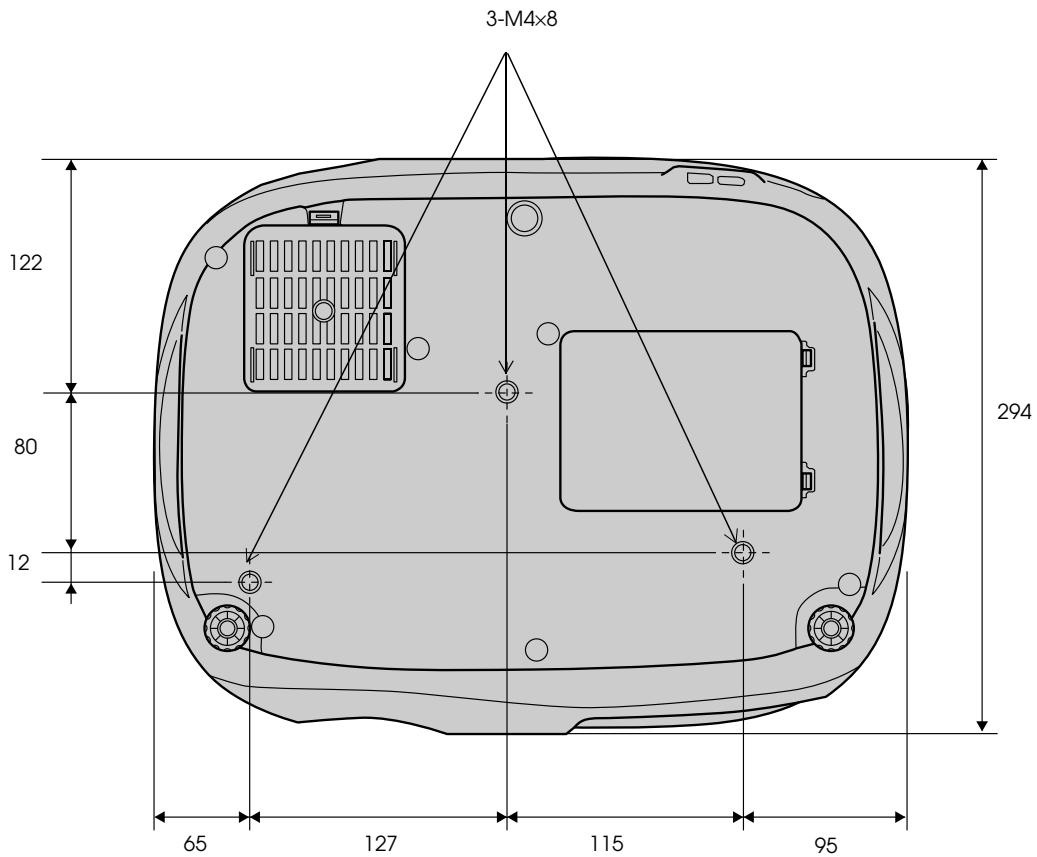
- Ceiling mount fixing points (3 points)
Install the optional ceiling mount here when suspending the projector from the ceiling.
- lamp cover
#
P.22
Open this cover when replacing the lamp inside the projector.
- remote control infrared transmitter Transmits remote control signals.
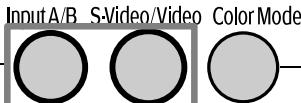
- [Source] buttons Quick Reference Guide [Input A/B]: Switches between the signal source being input to the Input A port, and the Input B port. [S-Video/Video]: Switches between the signal source being input to the S-Video port and the Video port.
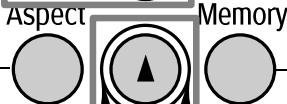
- [Aspect] button Quick Reference Guide Changes the aspect ratio of the projected image.
- [▲][▼][<▶][▶] buttons — P.12 Selects menu items and setting values.
- [>: volume buttons Adjusts the volume.
- [Menu] button P.12 Displays or hides the configuration menus.
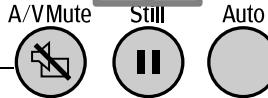
[A/V Mute] button Quick Reference Guide Momentarily turns off the audio and video.


EPSON
- [Power] button
- Quick Reference Guide Turns the projector on and off.
- [Color Mode] button Quick Reference Guide Selects the colour mode. The colour mode changes in the order of Dynamic, Living Room, Theatre and Theatre Black each time the button is pressed.
- [Memory] button
- Quick Reference Guide Recalls settings saved to memory in the configuration menus.
- [←] button P.12 Accepts a menu item or advances to the next screen or menu when viewing configuration menus.
- [Esc] button P.12 Stops the current function. Displays the previous screen or menu when viewing configuration menus.
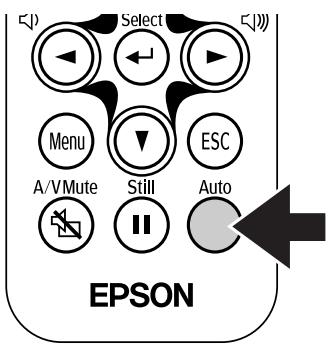
- [Auto] button P.11 Automatically adjusts analog RGB computer signals to their optimum settings.
- [Still] button
- Quick Reference Guide
- Keeps the current computer or video image on the screen.
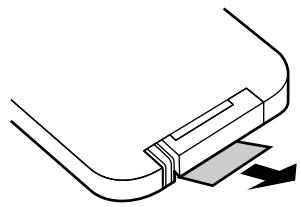
■Before using the Remote Control
Remove the insulating tape.
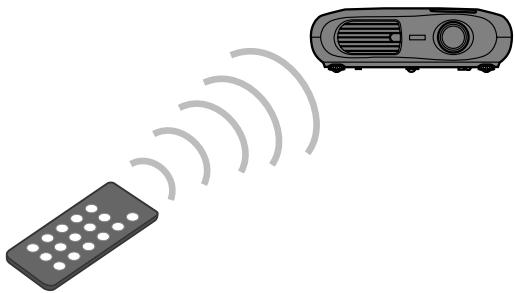
Using the Remote Control
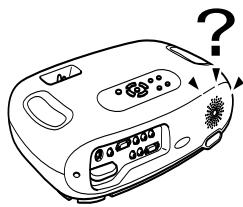
Operate the remote control by aiming it at the remote control infrared receiver on the projector.
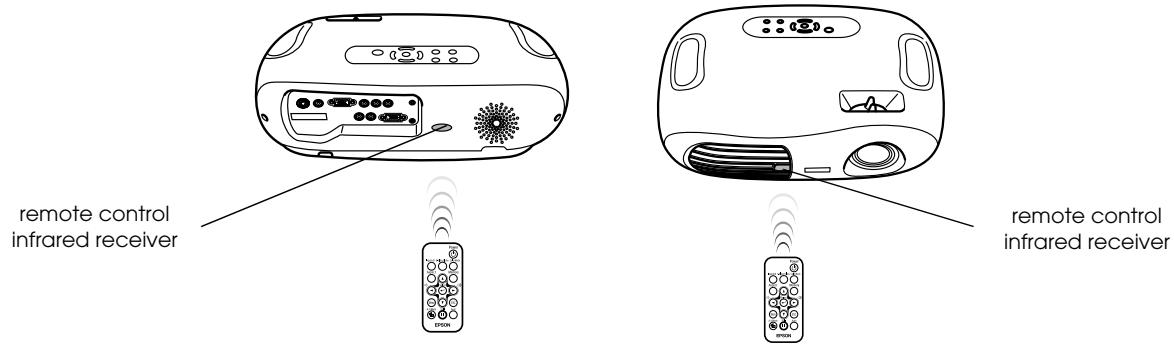

If direct sunlight or fluorescent lighting hits the remote control infrared receiver, you may not be able to use the remote control.
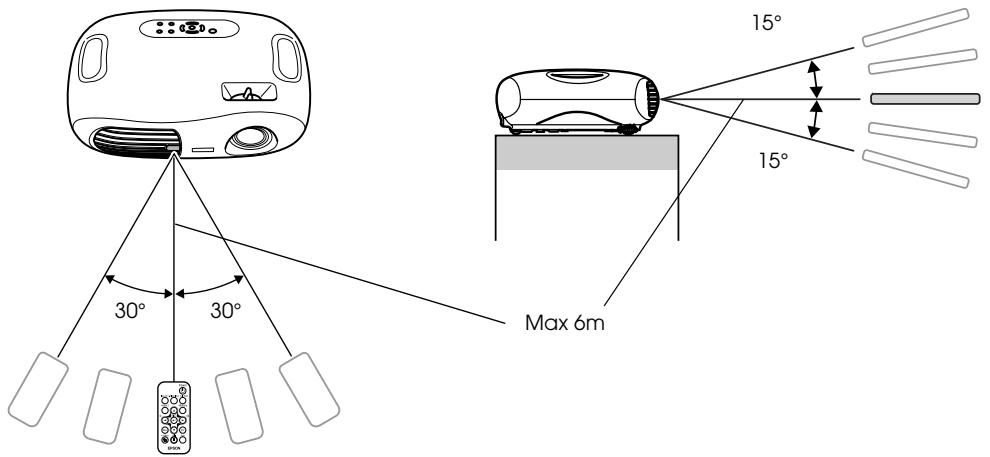
Operating range
Operable distance: Max. approx. 6m (20ft.)
(May be shorter depending on conditions.)
Operable angle : approx. 30^ horizontally, 15^ vertically
- The remote control infrared receiver on the back of the projector can also be used under the same conditions.
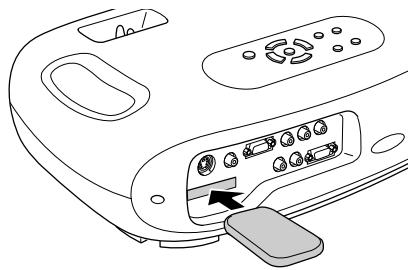
■ Storage
When not using the remote control, please store it in the remote control holder on the projector.

Be sure to read the "Safety Instructions / World-Wide Warranty Terms" guide before installation.
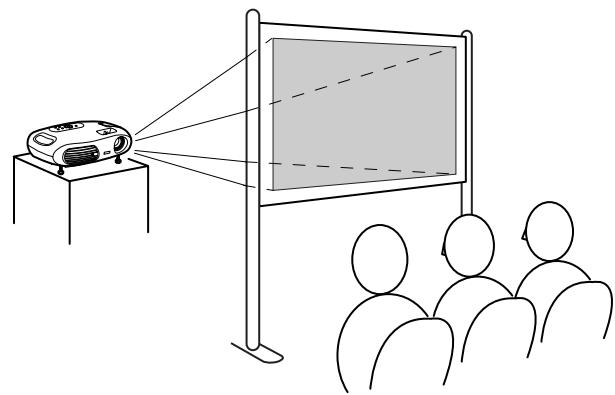
Installation method
Set up the projector so that it is at right angles to a screen.
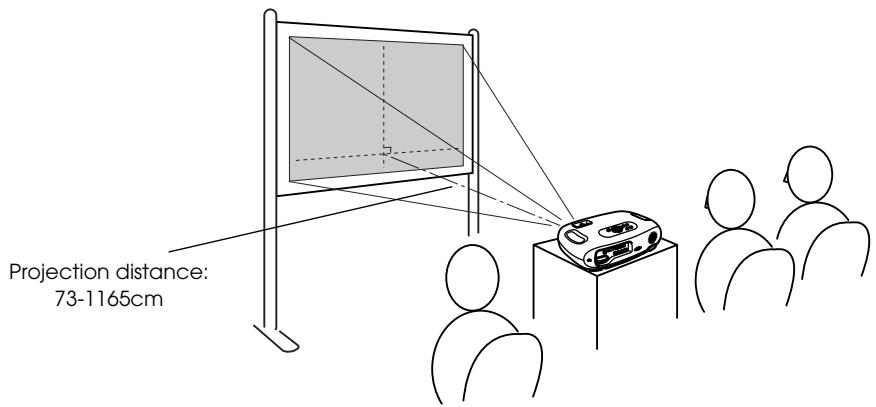
Projection distance and screen size
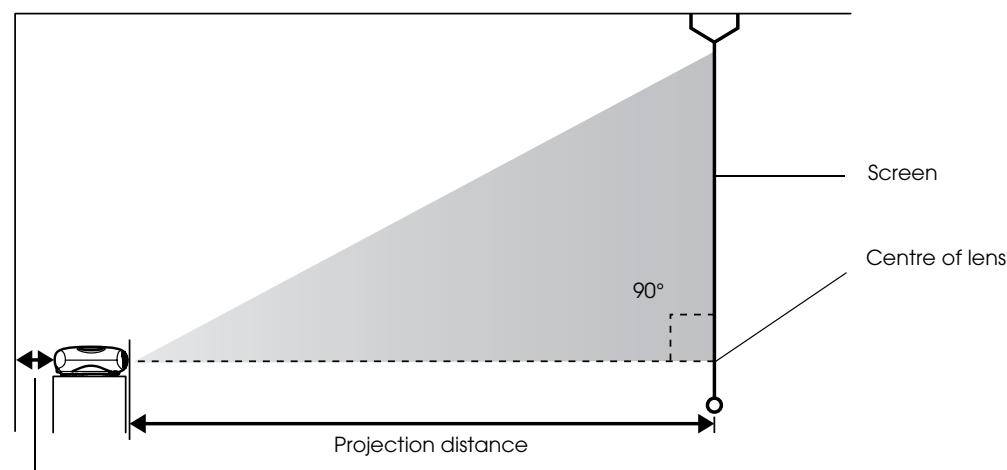
20cm(7.9in.)or more
| 16:9 Screen size cm (ft.) | 30" | 40" | 60" | 80" | 100" | 200" | 300" |
| 66 × 37 (2.1 × 1.2) | 89 × 50 (2.8 × 1.6) | 130 × 75 (4.2 × 2.4) | 180 × 100 (5.7 × 3.2) | 220 × 120 (7.2 × 4.1) | 440 × 250 (14.4 × 8.2) | 660 × 370 (21.6 × 12.1) | |
| Projection distance cm (ft.) | 73 – 114 (2.4 – 3.7) | 98 – 153 (3.2 – 5.0) | 149 – 231 (4.9 – 7.6) | 200 – 309 (6.6 – 10.1) | 251 – 387 (8.2 – 12.7) | 504 – 776 (16.5 – 25.5) | 758 – 1165 (24.9 – 38.2) |
The values should be used as a guide for setting the projector.
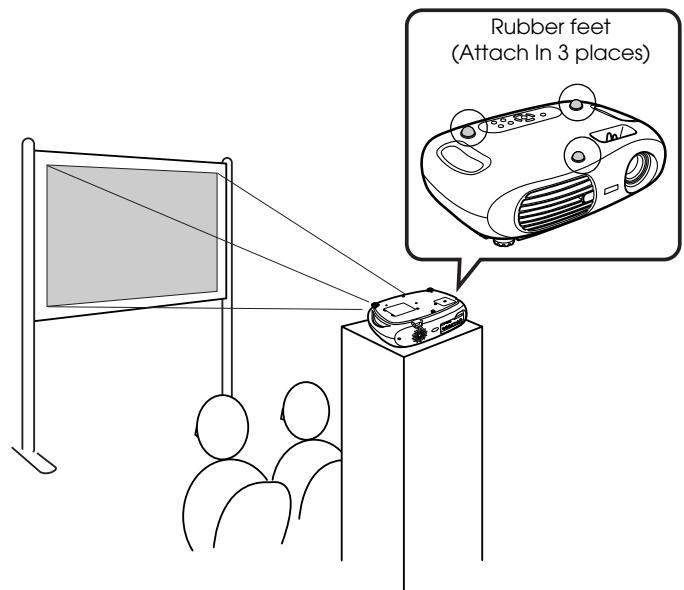
Other installation methods
Projecting when upside down
(Front/Ceiling)
Attach the enclosed rubber feet to prevent the operation panel from contacting the surface on which it is placed.
■Ceiling/Rear projection
(Using a translucent screen)
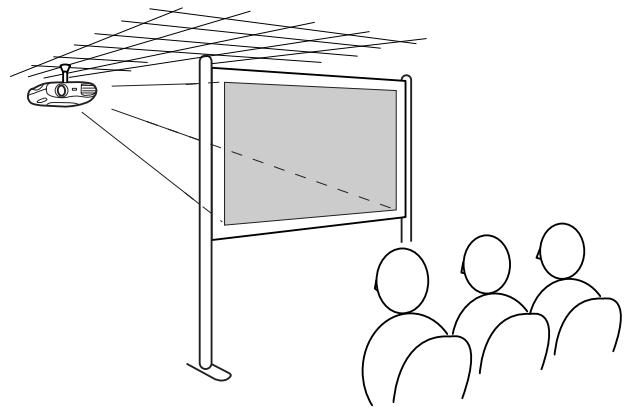
Ceiling projection
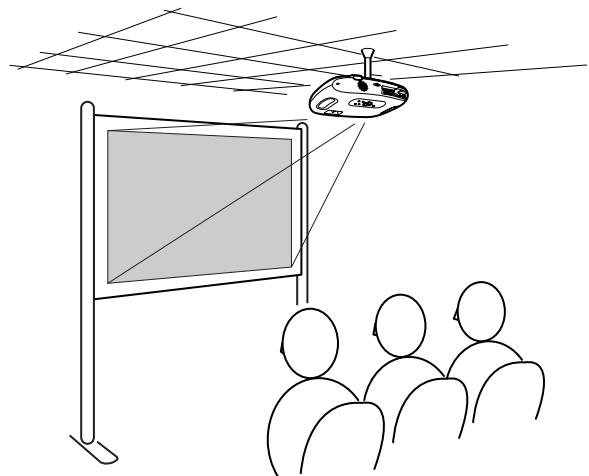
Rear projection
(Using a translucent screen)
The optional ceiling mount is required when installing the projector from a ceiling. Please contact your dealer if you wish to use this method, as special equipment is required for installation. - "Optional Extras and Consumables" P.28
Avoid setting the projector up in places which are very dusty such as bedrooms.

When using rear projection, or projecting from a ceiling, select the appropriate mode in the "Setting" "Screen" "Projection" configuration menu. "Setting menu" P.14
See the "Quick Reference Guide" for instructions on connecting to video equipment.

When connecting, be sure to:
- Turn off the power for both the projector and the computer. Damage may result if you try to make a connection when the power is switched on.
- Check the connector types. Damage may result if you attempt to insert a connector into the incorrect port.
Compatible computers
Condition 1: Check that the computer has an image output port, such as an RGB port, monitor port or CRT port.
Some computers with an in-built monitor and some laptop computers may not be compatible. Please refer to your computer manual for further details.
Condition 2: The display frequency and resolution of the computer must correspond to that of the projector. "Supported Display Resolutions" P.26

You may need to purchase a separate adapter depending on the shape of the computer's port. Refer to the documentation provided with the computer for further details.
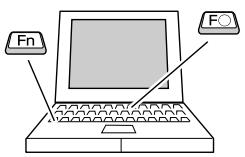
Laptop connection
Setup examples

When using a laptop or a computer with an in-built monitor, select external video output on the computer.
Windows:
Press and hold the [Fn] key, followed by the appropriate function number key.
| NEC | [Fn]+[F3] |
| Panasonic | |
| Toshiba | [Fn]+[F5] |
| IBM | [Fn]+[F7] |
| SONY | |
| Fujitsu | [Fn]+[F10] |
Macintosh:
Set mirror setting or display detection.
Refer to your computer's documentation for further details.
| Win | Depending on your version of Windows, a dialog box may appear to alert you that new display hardware has been found. Follow the on-screen instructions to proceed. If you have any problems, please contact the nearest address provided in the "International Warranty Conditions" section in the "Safety Instructions / World-Wide Warranty Terms" guide. |
| Win / Mac | • It may take a few moments until the computer image is projected. • Depending on the computer, the monitor may go blank when using the external video output on the computer. |
Outputting images and audio from a computer
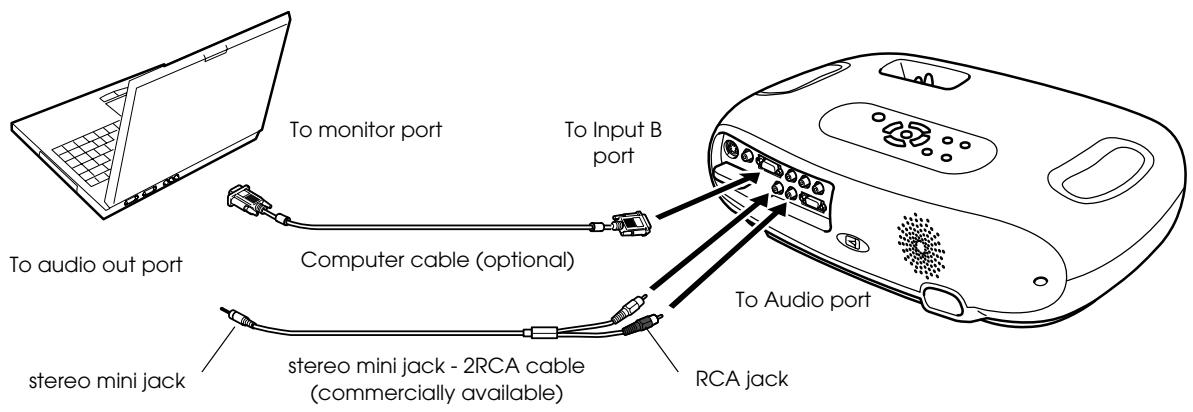

When using computer and video equipment alternately, swap the cable or use an audio switch.
Adjusting computer generated images
■Auto setup (Computer connections)
The computer signal is analysed and the following settings are adjusted to ensure the optimum image quality.
Tracking
- Position
Sync.

- You can set Auto setup to off in the "Image" "Auto Setup" configuration menu. (The default is ON) ① "Image menu" P.13
- When Auto setup is set to off, press the [Auto] button on the remote control to perform auto setup.
- If you press the [Auto] button during Freeze operation, or when a configuration menu is being displayed, the display will be halted and auto setup will take place.
Adjust the Tracking and Sync settings manually if Auto setup cannot be performed. ([Menu] button "Image" "Picture Quality" "Tracking", "Sync.") "Image menu" P.13
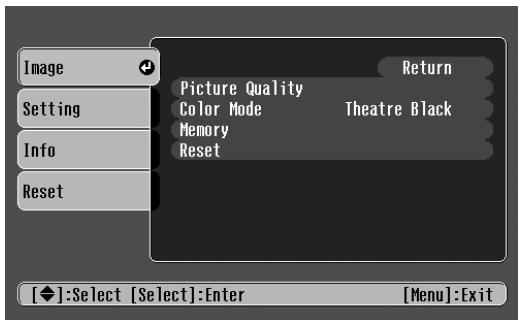
Press the [Menu] button.
![EPSON EMP-TW10H - Press the [Menu] button. - 1](/content/2019/08/103652/images/8b85ceda806a786ce61a6fd5cfc15f2b4f2129651d578f1abab4f138301e5ff7.jpg)
![EPSON EMP-TW10H - Press the [Menu] button. - 2](/content/2019/08/103652/images/ea3437590ef2a4b8a5ac815393de5c34f4ff6909aa58b1017e07e8d13f2d9b34.jpg)
The top configuration menu is displayed.
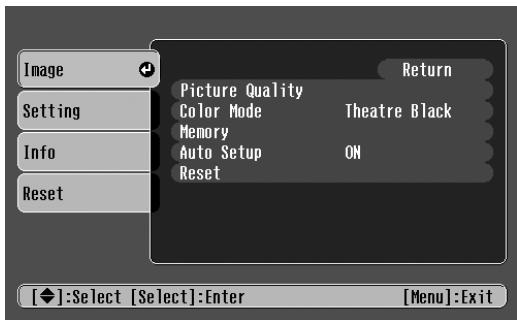
2 Press the [▲] or [▼] buttons to select the Top Menu item.
![EPSON EMP-TW10H - Press the [▲] or [▼] buttons to select the Top Menu item. - 1](/content/2019/08/103652/images/1af0169350865c73cf344460b75af68af9882143935ed11963e77a7243ba2af4.jpg)
![EPSON EMP-TW10H - Press the [▲] or [▼] buttons to select the Top Menu item. - 2](/content/2019/08/103652/images/ebbad005e2bcc1902f3ec032179472ff3c9ecfec9cf4dc755bb11050204e9193.jpg)
3 Press the [] button.
![EPSON EMP-TW10H - Press the [] button. - 1](/content/2019/08/103652/images/5eb8d60673ee45977008464c033b89944d09ff79321e31d92583f4223be6eabe.jpg)
![EPSON EMP-TW10H - Press the [] button. - 2](/content/2019/08/103652/images/a2a63940a2640ccecf4b015af1598cfc1487c956a39d2fcea7574fd40bcf0d85.jpg)
A Sub Menu is displayed.
4 Press the [▲] or [▼] buttons to select the Sub Menu items, then press the [←] button.
5 Settings can be changed in the following ways:
(a)Press the () or () buttons to change the setting values.
(b)Press the () or () buttons to select the menu item. Then press the () button.
(Green): Item currently set.
Orange): Item currently selected. Press the () button to confirm the selection.

The mark is displayed after items which perform a setting or lead to a sub menu.
(c)Press the () or () buttons to select the value.
Then, press the () button.
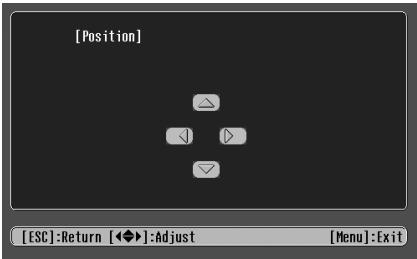
(d)Press the ()() buttons to move the image display position.
6 Set other items in the same way.
Press the (Esc) button to return to the previous item or menu, or select "Return".
7 Press the [Menu] button to finish.
■Image menu
- The functions in the "Image" Menu will be different according to the type of signal which is being input.
- When no signal is being input, only the settings for "Auto Setup" can be adjusted.
Video (Video/S-Video Component)
RGB (RGB-Video/Analog RGB)
| Sub menu | Function | |
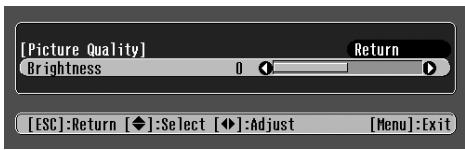
| Picture Quality | Brightness | Adjusts the brightness of the image. |
| Contrast | Adjusts the contrast of the image. | |
| Sharpness | Adjusts the sharpness of the image. | |
| Saturation (Video only) | Adjusts the colour depth. | |
| Tint (Video only) | (Adjustment is only possible when Component Video or NTSC signals are being input) Adjusts the tint of the image. | |
| Color Temperature | Adjusts bright colours from a reddish tinge to a bluish tinge. Lower colour temperature settings produce redder colours and softer colour tones. Higher colour temperature settings produce bluer colours and sharper colour tones. | |
| Flesh Tone | Adjusts the green colour level. The intensity of green tones becomes stronger when the adjustment value is high as does the intensity of red/purple tones become stronger when the adjustment value is low. | |
| Tracking (RGB only) | Adjusts the image when vertical stripes appear in the image. | |
| Sync (RGB only) | Adjusts the image when flickering, fuzziness or interference occur in the image. Flickering and fuzziness may also occur when the brightness, contrast, sharpness or keystone correction settings are adjusted. Best results can be obtained by adjusting the tracking before the sync. | |
| Color Mode | Corrects the vividness of the image colour. The settings can be saved separately for each type of source (computer or video). Select from 4 different quality settings depending on the type of scene. • Dynamic: Best for projecting video games. Vivid image quality can be enjoyed even in bright places. • Living Room: Best for projecting sports, etc. TV style image quality can be projected, even in the living room. • Theatre: Best for watching movies with a generally bright feel. The range of colours are expressed vividly without lowering the luminosity of the lamp. • Theatre Black: Best for watching movies in a pitch black environment. The luminosity of the lamp is dropped and colours are expressed more subtly. | |
| Memory | Saves image adjustment values. Select "Memory1" or "Memory2" and press the [←] button to save the current settings. You can recall the saved settings by pressing the [Memory] button. | |
| Auto Setup (RGB only) | ON: When the input source is switched to a computer signal, the projector automatically adjusts the image to its optimal state. OFF: Auto Setup is disabled. | |
| Reset | Reset all the adjustment values within the "Image" menu (except for "Memory") to their default settings. • Press the [←] button and select "Yes" on the confirmation screen which is displayed. • Select "All Reset" to restore all menu settings, such as image and sound, to their default settings. ● "Reset menu" P.15 | |
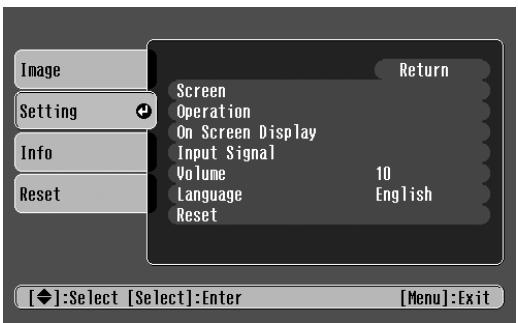
Setting menu
| Sub menu | Function | |
| Screen | Position | Moves the image display position vertically and horizontally. • Press the [←] button and adjust the display area on the Position adjustment screen which is displayed. |
| Zoom Caption | Adjustment is possible only when the Zoom aspect function has been selected. • Vertical size : You can adjust the vertical size of the image. • Zoom Position: You can adjust the vertical movement of the display position. | |
| Keystone | Corrects vertical keystone distortion in the image. • The projected image changes when keystone correction is carried out. • If the images become uneven in appearance after keystone correction has been carried out, decrease the sharpness setting. | |
| Projection | • Front : Image is displayed, as is. No vertical/horizontal reversal performed. • Front/Ceiling: The image is displayed vertically reversed. • Rear : The image is displayed horizontally reversed. • Rear/Ceiling: The image is displayed vertically and horizontally reversed. | |
| Setup Level | You can select one of two preset black levels. (When the image source is an NTSC Video/S-Video signal, or when the image source has been set to Input A, "Component".) | |
| Operation | Sleep Mode | Sets the energy saving option for when no signal is being input. • When a Sleep Mode interval has been set, the projector will enter Sleep Mode when no operation has been carried out for the set time (5, 10 and 30 minutes). Projection will shut down and the projector enters a standby state after cooling down. (The power indicator lights orange). • Projection starts again when the [Power] button is pressed on the projector's contol panel or the remote control. |
| Child Lock | Sets child lock to ON or OFF. When child lock is set to "ON", the power will not come on unless you press and hold the [Power] button on the control panel for at least 3 seconds. (The remote control functions as normal.) | |
| On Screen Display | Message | When set to "OFF", messages such as "No Signal.", and the name of the selected input source or colour mode will no longer be displayed. Warning messages such as "Replace the lamp" will continue to be displayed. |
| Background Color | Sets the background colour to black or blue. | |
| Startup Screen | Sets whether or not the "EPSON" logo will be displayed during projector startup. | |
| Input Signal | Video Signal | Selects the colour system of the video signal being input. (Changes in signal format will only be noticeable when the input source is Video/S-Video.) |
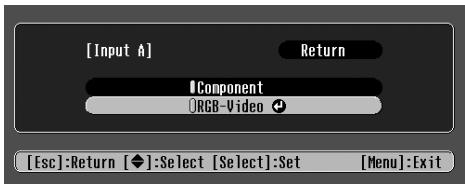
| Input A | You can switch between the sources connected to Input A. • Component: YCbCr//YPbPr' • RGB-Video: SCART", Sync on Green | |
| Volume | Adjusts the volume setting | |
| Language | Selects the language in which on-screen messages are displayed. • Press the [←] button and select the desired language from the list which is displayed. | |
| Reset | Reset all the adjustment values within the "Setting" menu (except for "Child Lock", "Input A" and "Language") to their default settings. • Press the [←] button and select "Yes" on the confirmation screen which is displayed. | |
Info menu
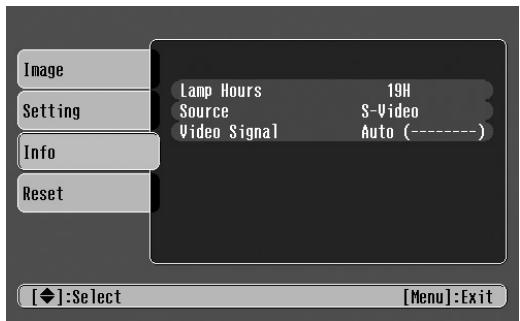
Video/S-Video
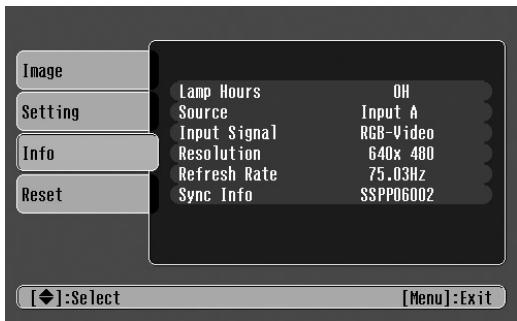
Input A/Input B
When component video is being input into the Input A port, the Refresh Rate and Sync Info will not be displayed.
| Sub menu | Function |
| Lamp Hours | Displays the cumulative lamp operating time. From 0 to 10 hours, 0H is displayed. After 10 hours, the usage time is displayed in hourly increments. ·When the accumulated usage time of the lamp reaches the appropriate time (*), a warning will be displayed in red. *If Theatre Black has been used continuously: About 2900 hours If other modes have been used continuously: About 1900 hours |
| Source | Displays the input source being projected. |
| Input Signal (Input A/Input B only) | Displays the input signal settings. |
| Video Signal (Video/S-Video only) | Displays the Video signal format. |
| Resolution (Input A/Input B only) | Displays the input resolution. (Does not appear when the input source is composite video or S-Video.) |
| Refresh Rate (Input A/Input B only) | Displays the refresh rate (Does not appear when the input source is composite video or S-Video.) |
| Sync Info (Input A/Input B only) | Displays picture signal information. In the event that you are having problems with your projector and need to contact an EPSON dealer, please quote the information displayed on this screen. |
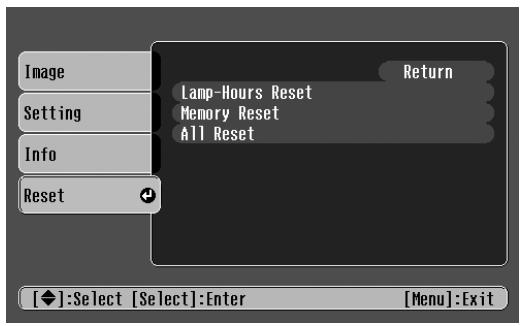
Reset menu
| Sub menu | Function |
| Lamp-Hours Reset | Reset the lamp operating time. When this command is selected, the cumulative lamp operating time is reset to the default value. |
| Memory Reset | Reset all settings stored in Memory. |
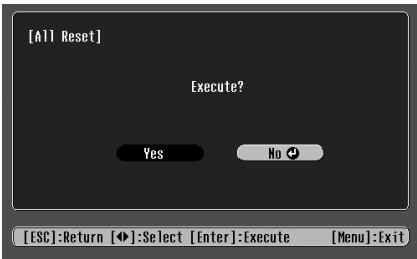
| All Reset | Reset all items in the configuration menus to their default settings. • Press the [←] button and select "Yes" on the confirmation screen which is displayed. • Select "Reset" in an individual menu to reset only the settings for the items in that sub menu. • "Memory", "Child Lock", "Input A", "Language" and "Lamp Hours" settings will not be reset. |
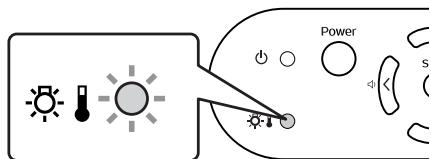
First, check the indicators on the projector. There are two indicators on the projector unit which notify you of projector conditions.
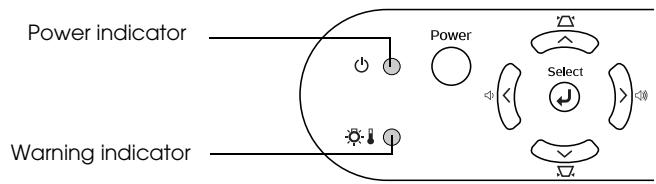
Power indicator
- lit flashing -If the indicator is not lit, the power supply is not on.
| Condition | Cause/Remedy | |
| Orange | Standby state (Not abnormal) The power cable should only be disconnected when the projector is in this state. Press the [Power] button to start projection. | Quick Reference Guide |
| Orange | Cool-down® in progress (Not abnormal) • Please wait. The cool-down period lasts about 20 seconds. • The projector will beep twice to indicate that cool-down has completed. • You cannot operate the [Power] button during the cool-down period. Press the power button again after cool-down has finished. | |
| Green | Projection in progress (Not abnormal) | |
| Green | Warming-up (Not abnormal) Please wait. Warming up takes about 40 seconds. When warming up is complete, the indicator changes to steady green. |
Warning indicator
- lit flashing -Not lit under normal operating conditions.
| Condition | Cause/Remedy | |
| Red ● | High internal temperature (overheating) The lamp turns off automatically and projection stops. Wait for about 5 minutes without operating the projector. After about 5 minutes have passed, unplug the power cable and check the following: ·Make sure the air filter and ventilation outlet are clear and that the projector is not positioned against a wall. ·If the air filter is dirty, it should be cleaned. When the power cable is plugged back in, the projector will return to its previous state. Press the [Power] button on the projector or on the remote control to turn it back on. | P.8 P.20 |
| Red (0.5 second interval) | Lamp problem ·Disconnect the power cable from the electrical outlet. Remove the lamp and check that it is not broken. If the lamp is not broken, re-install it. Reconnect the power cable and press the [Power] button on the projector or the remote control to turn it back on. ·If the lamp is broken, please contact your dealer or the nearest address provided in the "International Warranty Conditions" in the "Safety Instructions/World-Wide Warranty Terms" guide (You will not be able to use the projector until the lamp is replaced). ·Check that the lamp and lamp cover are securely installed. If the lamp or lamp cover are not securely installed, the lamp will not switch on. | P.22 |
| Red (1 second interval) | Internal problem Stop using the projector, disconnect the power cable from the electrical outlet and contact your dealer or the nearest address provided in the "International Warranty Conditions" in the "Safety Instructions/World-Wide Warranty Terms" guide. | |
| Orange | High-speed cooling in progress (This is not abnormal, but, if the temperature rises too high again, projection will stop automatically.) Set up the projector in a place which is well ventilated and ensure the air filter and ventilation outlet are clear. Clean the air filter. | P.8 P.20 |

- If problems with projection do occur, but the indicators do not show any abnormal conditions, please refer to the section below, "When the indicators provide no help".
- If a condition occurs which is not listed in this table, please consult your dealer or contact the nearest address provided in the "International Warranty Conditions" in the "Safety Instructions/World-Wide Warranty Terms" guide.
- If you follow the above steps and are still unable to correct the problem, please cease using the projector, unplug the projector from the electrical outlet and request repairs from your dealer or nearest address provided in the "International Warranty Conditions" in the "Safety Instructions/World-Wide Warranty Terms" guide.
When the indicators provide no help
■No images appear (Nothing is displayed)

- Was the power turned off and then straight back on again?
You cannot begin projecting again for at least a minute after projection has been stopped, even if you press the [Power] button on the control panel or remote control. Allow the projector to cool-down completely before projecting again.
- Has a Sleep Mode interval (5, 10 or 30 minutes) been set?
When a Sleep Mode interval has been set, the lamp cuts out after no operations have been carried out for the set time (5, 10 or 30 minutes).
- Has the image brightness been adjusted correctly?
The power indicator lights orange at this time.
Is the projected image completely black?
Adjust the brightness in the following way.
- Is an image signal being input?
[Menu] button "Image" "Picture Quality" "Brightness".
Some images being displayed, including some screen savers, may be completely black.
Check if a picture signal is being input.
Set the "Message" option to "ON" in the "Setting"
"On Screen Display" "Message" configuration menu, in order to view the picture signal information.
■No images appear (Messages are displayed)

"No Signal."
Is the input source properly selected?
Press the [Source] button on the Control panel until the correct input source is selected. For the remote control, press the [Input A/B] button or the [S-Video/Video] button.
- Are the cables connected properly?
Check that the cables are securely connected.
Depending on the equipment you are using, some settings may need to be made on the video equipment. Refer to the User's guide of your video equipment.
- Has external video output been selected on the computer?
When using a laptop or a PC with an in-built monitor, select external video output on the computer.
"Laptop connection" P.10
■Image is out of focus (unclear)
- The image is fuzzy
- Part of the image is out of focus
-
The whole image is out of focus
-
Is the projector at the correct distance from the screen?
Is the lens dirty? - Has condensation formed on the lens?
The optimum range for projection is 73-1165cm (2.4-38.2ft.). Set the projector within this range.
"Installation method" P.8
"Cleaning the lens" P.20
If the projector is suddenly taken from a cold environment to a warm environment, condensation may form on the surface of the lens, and this may cause the images to appear fuzzy. Set the projector up in the room in which it is to be used approximately one hour before use. If condensation forms on the lens, turn off the power and wait for the condensation to disappear.
Turn the focus ring to adjust the focus.
■Image is distorted / Image contains interference

Is an extension cable being used?
- Are the cables connected correctly?
If using an extension cable, electrical interference may affect the signals.
Check that the cables are securely connected. Interference may occur if the cables are not connected securely.
■Only part of the image is displayed (large/small)

Is the aspect ratio set correctly?
- Has the "Position" been adjusted correctly?
Press the [Aspect] button to change the aspect ratio. "Changing aspect ratio" Quick Reference Guide
Use the "Setting" "Screen" "Position" configuration menu to correctly adjust the display position.
■Image colours are poor, tinted green or tinted red/purple
- Does the lamp need replacement?
- Adjust each of the settings in the following menus. [Menu] button "Image" "Picture Quality"
- Are the cables connected correctly?
When the lamp is due for replacement, colours will weaken and the image will become dark. Replace the lamp when this is the case. "Lamp replacement period" P.22
"Contrast", "Color Temperature" "Saturation", "Tint", "Brightness"
If cables connecting to component video equipment are not connected securely, certain colours may not be displayed.
■Image is dark
- Does the lamp need replacement?
When the lamp is due for replacement, colours will weaken and the image will become dark. Replace the lamp when this is the case. "Lamp replacement period" P.22
- Adjust each of the settings in the following menus. [Menu] button "Image" "Picture Quality"
"Brightness", "Contrast"
No sound can be heard
Is the volume turned down to the minimum setting?
Adjust the volume using the remote control or the control panel.
Is the audio source connected correctly?
Connect an audio cable from the equipment you are using to the Audio port.
Is the connected video equipment in playback mode?
Turn on the power to the connected equipment and press the play button.
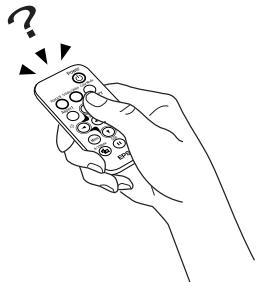
The remote control does not work
Is direct sunlight or strong light from fluorescent lamps shining onto the remote control infrared receiver?
"Using the Remote Control" P.7
Is the remote control too far from the projector?
The operating distance for the remote control is approximately 6m (20ft.).
- When in use, is the remote control infrared transmitter facing the remote control infrared receiver on the projector?
The operating angle for the remote control is approximately ± 30% horizontally and approximately ± 15% vertically.
- Has the battery insulating tape been removed?
Remove the insulating tape.
Is the battery dead?
"Changing the battery" P.21
The power does not turn off (after the (Power) button is pressed)
- The power indicator remains orange.
This projector is designed so that the Power indicator remains lit even after the power has been turned off. The Power indicator will switch off when the power cable is disconnected from the electrical outlet.
The power will not turn on
| ·The power does not come on, even when you press the [Power] button on the control panel. | Is the "Child Lock" set to "On"?Press and hold the [Power] button for at least 3 seconds to turn the power on. |

Be sure to read the separate "Safety Instructions/World-Wide Warranty Terms" before proceeding.
Cleaning
You should clean the projector if it becomes dirty or if the projected image starts to deteriorate.
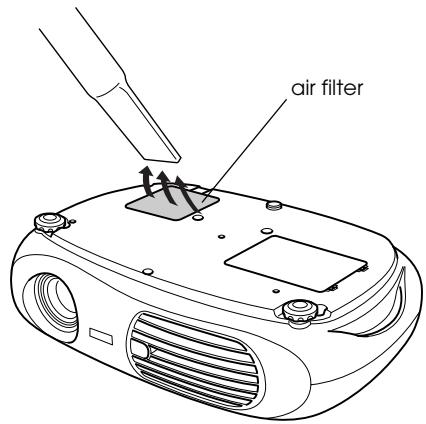
■ Cleaning the air filter
Keeping the projector horizontal, use a vacuum cleaner to clean away the dust from the air filter.
If dust collects in the air filter (air intake vent) it can cause the internal temperature of the projector to rise. This can lead to problems with operation and shorten the service life of the optical engine.
We recommend that you clean this part at least once every three months. Clean it more often if you are using the projector in a particularly dusty environment.

If the air filter is difficult to clean or if it is broken, it should be replaced. Contact your dealer for a new air filter.
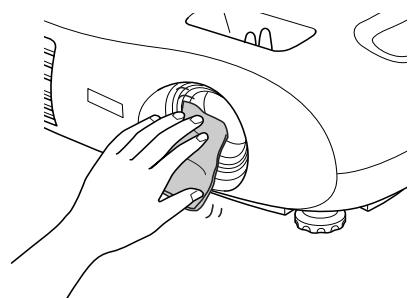
■ Cleaning the projector case
Clean the projector case by wiping it gently with a soft cloth.
If the projector is particularly dirty, moisten the cloth with water containing a small amount of (ph) neutral detergent, and then firmly wring the cloth dry before using it to wipe the projector case. After you have done this, wipe the projector another time with a soft, dry cloth.

Do not use volatile substances such as wax, alcohol or thinner to clean the projector case. These can cause the case to warp and make the surface coating peel off.

■ Cleaning the lens
Use a commercially-available air blower, or lens cleaning paper to gently wipe the lens.

As the lens can be easily damaged, do not rub the lens with harsh materials or subject the lens to shocks.
Replacing consumables
Replacing the air filter
(Air filter: ELPAF04)
Replacing the air filter can also be performed when the projector is mounted to a ceiling.
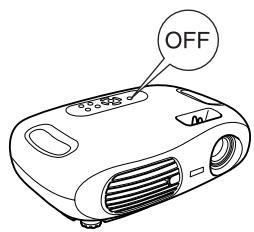
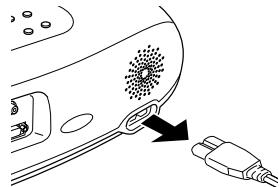
1 Turn off the projector power, wait for the cool-down period to end, then disconnect the power cable.
Cool-down takes about 20 seconds.
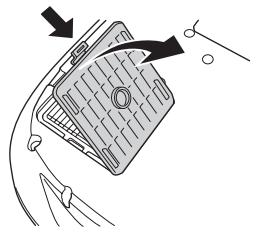
2 Put your finger into the latch and lift off the cover. Lift up the air filter to remove it.
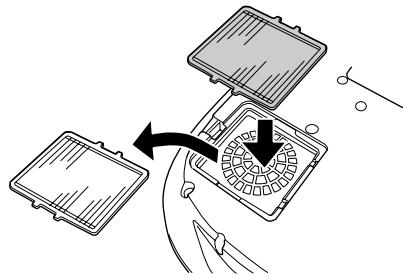
3 Replace the air filter with a new one. Take out the old air filter and install the new one. Please ensure there are no gaps between the air filter and the plastic grill.
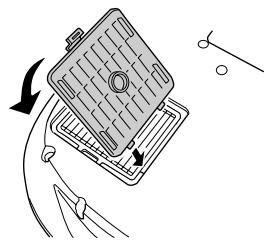
4 Replace the air filter cover. First insert the tabs, and then press down on the opposite side until it clicks into place.

Dispose of used air filters properly in accordance with your local regulations.
Changing the battery
(Replacement battery: 1 × CR2025 lithium battery)

Keep batteries away from children to avoid the risk of accidents. If a child swallows the battery, contact your doctor immediately.
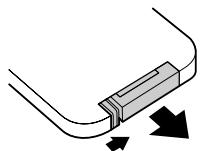
1 Remove the battery holder.
While pressing the catch of the battery holder inwards, pull the battery holder out.
2 Remove the old battery and insert the new one.
Check the position of the (+) mark inside the battery holder to ensure that the battery is inserted the correct way.
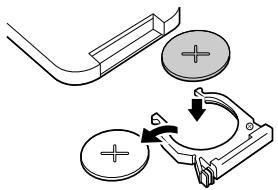
3 Replace the battery holder.
Press the battery holder in until it clicks.


Please dispose of used batteries in accordance with local waste disposal regulations.
Lamp replacement period
- It is time to change the lamp when the "Replace the lamp" message appears in the bottom left hand corner of the screen at the commencement of projection and remains for 30 seconds.
- It is also time to change the lamp when the Warning indicator flashes red at 0.5 second intervals.

- The time when the replacement message appears varies depending on the colour mode which has been used. If Theatre Black has been used continuously: About 2900 hours If other modes have been used continuously: About 1900 hours
- When this message is displayed, please replace the lamp as quickly as possible.
- The lamp may explode if you continue to use it beyond the lamp replacement period.
- Some lamps may stop operating before the replacement message is displayed. It is recommended that you have a replacement lamp ready in case this happens.
- Replacement lamps can be purchased at your nearest dealer.
Replacing the lamp
(Spare lamp: ELPLP29)

- Wait until the lamp has cooled down sufficiently before opening the lamp cover. It takes a further one hour after the cooldown period has finished for the lamp to be cool enough.
- When the lamp is broken, replace it with a new lamp, or contact your dealer for further advice. If replacing the lamp yourself, be careful to avoid pieces of broken glass.
1 Turn off the projector and wait for the cool-down period to end. (Approx. 20 seconds)
Remove the power cable and wait for the lamp to cool down. (Approx. 1 hour)
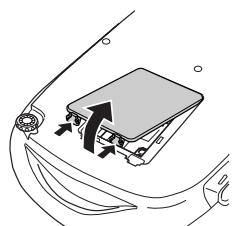
2 Open the lamp cover.
Lift the lamp cover by putting your fingers in the latches and lifting upwards.
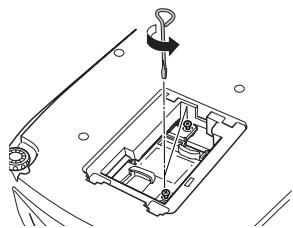
3 Loosen the fixing screws holding the lamp in place.
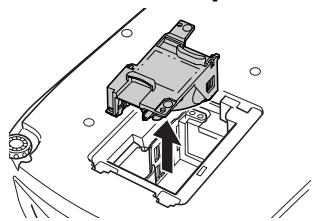
4 Remove the old lamp.
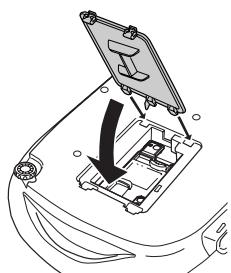
5 Install the new lamp.
Press the lamp until it clicks into place, then tighten the two fixing screws.

6 Replace the lamp cover.
First insert the tabs, and then press down on the opposite side until it clicks into place.

- Install the lamp securely. If the lamp cover is removed, the lamp turns off automatically as a safety precaution. The lamp will not turn on if the lamp or the lamp cover is not installed correctly.
- After replacing the lamp, be sure to reset the lamp operating time.
- The lamp contains mercury. Dispose of used lamps properly in accordance with your local regulations.
Resetting the lamp operating time
The projector has a built-in counter which keeps track of the lamp operating time and causes the replacement warning message to be displayed when the cumulative operating time reaches a certain point. Therefore, the counter needs to be reset from the configuration menu, after the lamp has been replaced with a new one.

Please do not reset the lamp operating time except when the lamp has been changed. Otherwise, the lamp operating time will not be displayed correctly.
1 Turn on the power and press the [Menu] button.
![EPSON EMP-TW10H - Turn on the power and press the [Menu] button. - 1](/content/2019/08/103652/images/39d163c65b39f2de70c2dbd2e28b79cd26efdc110776207b715715fd60fc2bd2.jpg)
![EPSON EMP-TW10H - Turn on the power and press the [Menu] button. - 2](/content/2019/08/103652/images/824feca6f0450343a81a87e5bba7b9e5648c6f56be5dc733104595805687626b.jpg)
2 Select "Lamp-Hours Reset" from the "Reset" menu, using the [][][] buttons.
3 Use the [ ][ ] buttons to select "Yes", then press the [ ] button.
The lamp operating time will be reset.
![EPSON EMP-TW10H - Turn on the power and press the [Menu] button. - 3](/content/2019/08/103652/images/a7a16ae1745470b7b519b8e889dae6e5391bc4201efc939b8cf6b7e37487a7dd.jpg)
Complex terms used in this book, or terms not explained in the body of the text, will be briefly explained here. For further explanation, please consult commercially available reference texts.
| Aspect ratio | The ratio between an image's length and its height. Images which have an aspect ratio of 16:9 are called Widescreen. The aspect ratio for standard images is 4:3. |
| Color Temperature | The temperature of an object which is emitting light. When the colour temperature is high, colours tend to take on a bluish tinge; when the colour temperature is low, colours tend to take on a reddish tinge. |
| Component Video | A type of video signal which has the video brightness and colour signal information separated, in order to provide better image quality. In high-definition TV (HDTV), it refers to images which consist of three independent signals: Y (luminance signal), and Pb and Pr (colour difference signals). |
| Composite Video | The standard home video signal (NTSC, PAL, SECAM) which has the video brightness and colour signal information mixed together. Composite video consists of the carrier signal Y (luminance signal) and the chroma (colour) signal, combined within the colour bar signal. |
| Contrast | The relative brightness of the light and dark areas of an image can be increased or decreased in order to make text and graphics stand out, or appear softer. Adjusting this particular property of an image is called "contrast adjustment". |
| Cool-down | The process used to cool down a projector lamp that is hot from use. Cool-down happens automatically when the [Power] button is pressed on the projector or on the remote control to turn the projector off. Do not unplug the projector power cable whilst it is cooling down. If cool-down is interrupted, heat from the lamp gets trapped inside the projector, potentially shortening the life of the lamp and causing projector failure. |
| Dolby digital | An audio format developed by Dolby Laboratories. Normal stereo is a 2-channel format which uses two speakers, whereas Dolby Digital is a 6-channel (5.1-channel) system which adds a centre speaker, two rear speakers and a sub-woofer. |
| HDTV | An abbreviation for High-Definition Television, it refers to high definition systems which satisfy the following conditions. • Vertical resolution of 750p or 1125i or greater (p=Progressive scanning), i=Interlaced scanning) • Screen aspect ratio of 16:9 • Dolby digital1 audio reception and playback (or output) |
| Interlaced scanning | Each screen is divided into fine horizontal lines which are displayed in sequence starting from left to right and then from top to bottom. This method of image scanning, whereby even numbered lines and odd numbered lines are displayed alternately, is called Interlaced scanning. |
| Progressive scanning | A method of image scanning whereby the image data from a single image is scanned sequentially from top to bottom to create a single image. |
| Refresh Rate | The light-emitting element of a display maintains the same luminosity and colour for an extremely short time. For this reason, the image must be scanned many times per second in order to refresh the light-emitting element. The number of refresh operations per second is called the "refresh rate", and is expressed in hertz (Hz). |
| RGB-Video | A term used to describe a video signal most commonly output to computer monitors. RGB video is made up of electrical pulses representing the intensities of the three primary colours of light, red, green and blue. A fourth or fifth pulse carries timing information. |
| SCART | A 21pin rectangular shaped connector for transmitting audio and video signals between TV, VTR and AV equipment. RGB, S-Video/Composite video and two audio channels can be transmitted. |
| SDTV | An abbreviation for Standard Definition Television. It refers to standard television systems which do not satisfy the conditions for High-Definition Television. |
| Security lock | A device consisting of a projector case with a hole in it that a commercially-available theft-prevention cable can be passed through in order to secure the device to a table or pillar. This projector is compatible with the Microsaver Security System manufactured by Kensington. |
| Squeeze mode | The method of compressing 16:9 Widescreen images and recording them on video software as 4:3 images. When projecting with Squeeze mode on, the images will return to their original 16:9 format. |
| SVGA | A type of video signal with a resolution of 800 (horizontal) × 600 (vertical) dots which is used by IBM PC/AT-compatible computers. |
| S-Video | A type of video signal which has the video brightness and colour signal information separated, in order to provide better image quality. It refers to images which consist of two independent signals: Y(luminance signal), and C (colour signal). |
| Sync. (Synchronisation) | The signals output from computers have a specific frequency. Image quality will suffer if the projector frequency and the computer frequency do not match. The process of matching the phases of these signals (the relative position of the crests and troughs in the signal) is called "synchronisation". If the signals are not synchronised, problems such as flickering, blurriness and horizontal interference can occur. |
| Tracking | The signals output from computers have a specific frequency. Image quality will suffer if the projector frequency and the computer frequency do not match. The process of matching the frequency of these signals (the number of crests in the signal) is called "tracking". If tracking is not carried out correctly, wide vertical stripes will appear in the projected images. |
| VGA | A type of video signal with a resolution of 640 (horizontal) × 480 (vertical) dots which is used by IBM PC/AT-compatible computers. |
| XGA | A type of video signal with a resolution of 1,024 (horizontal) × 768 (vertical) dots which is used by IBM PC/AT-compatible computers. |
| YCbCr | The carrier signal contained in the colour bar signal used in modern (NTSC) TV transmissions. The name comes from the Y (luminance) signal and the CbCr (chroma (colour)) signals. |
| YPbPr | The carrier signal contained in the colour bar signal used in high-definition TV (HDTV) transmissions. The name comes from the Y (luminance) signal and the PbPr (colour difference) signals. |
■Component Video
| Signal | Resolution | Aspect mode | ||
| Normal | Squeeze | Zoom | ||
| SDTV(525i, 60Hz) | 640 × 480 | 640 × 480 (4:3 aspect) | ||
| SDTV(625i, 50Hz) | 768 × 576 | 640 × 480 (4:3 aspect) | ||
| SDTV(525p) | 640 × 480 | 640 × 480 (4:3 aspect) | ||
| SDTV(625p) | 768 × 576 | 640 × 480 (4:3 aspect) | ||
| HDTV(750p) 16:9 | 1280 × 720 | 854 × 480 (16:9 aspect) | - | - |
| HDTV (1125i) 16:9 | 1920 × 1080 | 854 × 480 (16:9 aspect) | - | - |
Composite Video/S-Video
| Signal | Resolution | Aspect mode | ||
| Normal | Squeeze | Zoom | ||
| TV (NTSC) | 640 × 480 | 640 × 480 (4:3 aspect) | ||
| TV (PAL, SECAM) | 768 × 576 | 640 × 480 (4:3 aspect) | ||
SCART (4RCA/RGB-Video)
| Signal | Resolution | Aspect mode | ||
| Normal | Squeeze | Zoom | ||
| SDTV (525i, 60Hz) | 640 × 480 | 640 × 480 (4:3 aspect) | ||
| SDTV (625i, 50Hz) | 768 × 576 | 640 × 480 (4:3 aspect) | ||
| SDTV (525p) | 640 × 480 | 640 × 480 (4:3 aspect) | ||
| SDTV(625p) | 768 × 576 | 640 × 480 (4:3 aspect) | ||
■ Computer (Analog RGB)
| Signal | Resolution | Aspect mode | ||
| Normal | Squeeze | Zoom | ||
| EGA | 640 × 350 | 854 × 468 | - | - |
| VGA»60 | 640 × 480 | 640 × 480(4:3 aspect) | ||
| VESA72 / 75 / 85,iMac* | 640 × 480 | 640 × 480(4:3 aspect) | ||
| SVGA»56 / 60 / 72 / 75 / 85,iMac* | 800 × 600 | 640 × 480(4:3 aspect) | ||
| XGA»43i / 60 / 70 / 75 / 85,iMac* | 1024 × 768 | 640 × 480(4:3 aspect) | ||
| MAC13" | 640 × 480 | 640 × 480(4:3 aspect) | ||
| MAC16" | 832 × 624 | 640 × 480(4:3 aspect) | ||
| MAC19" | 1024 × 768 | 640 × 480(4:3 aspect) | ||
| MAC21" | 1152 × 870 | 636 × 480 | ||
| SDTV(525i, 60Hz) | 640 × 480 | 640 × 480(4:3 aspect) | ||
| SDTV(525p) | 640 × 480 | 640 × 480(4:3 aspect) | ||
| SDTV(625i, 50Hz) | 768 × 576 | 640 × 480(4:3 aspect) | ||
| SDTV(625p) | 768 × 576 | 640 × 480(4:3 aspect) | ||
| HDTV (750p)16:9 | 1280 × 720 | 854 × 480(16:9 aspect) | - | - |
| HDTV (1125i)16:9 | 1920 × 1080 | 854 × 480(16:9 aspect) | - | - |
" " indicates the aspect modes available according to each signal.
The supported resolution is 854 × 480 (16:9 aspect).
* Connection is not possible if the equipment does not have a VGA output port.
It may be possible to project signals which are not listed in the above table. However, not all functions may be supported with such signals.
Optional Extras and Consumables
The following optional accessories and consumables are available for purchase if required. This list is current as of October 2004. Details of accessories and consumables are subject to change without notice.
Consumable Products
| Part number | Part name | Use |
| ELPLP29 | Spare lamp | Use as a replacement for spent lamps. |
| ELPAF04 | Air filter | Use as a replacement for spent air filters. |
■ Optional Products
| Part number | Part name | Use |
| ELPST12 | Remote controller | Identical to the remote control provided with the projector. |
| ELPSC06 | 50" Portable screen | A compact screen which can be carried easily. (4:3 aspect ratio) |
| ELPSC07 | 60" screen | A portable roll type screen. (4:3 aspect ratio) |
| ELPSC11 | 60" wall hanging screen | |
| ELPSC08 | 80" screen | |
| ELPSC10 | 100" screen | |
| ELPKC02 | VGA-HD15 PC cable (1.8m/6ft.) (for mini D-Sub 15pin/mini D-Sub 15pin) | Use to connect the projector to a computer. |
| ELPKC09 | VGA-HD15 PC cable (3m/9.8ft.) (for mini D-Sub 15pin/mini D-Sub 15pin) | |
| ELPKC10 | VGA-HD15 PC cable (20m/65.6ft.) (for mini D-Sub 15pin/mini D-Sub 15pin) | |
| ELPKC29 | RGB SCART adapter (0.3m/0.98ft.) (for RCA × 4/SCART) | This is the same as the cable provided with your projector. |
| ELPAP01 | Mac adapter set | Used to convert a Macintosh D-sub 15pin plug into a mini D-sub 15 pin plug. |
| ELPMB18 | Ceiling mount* | Use when installing the projector to a ceiling. |
| ELPFC03 | Ceiling plate* | Use when installing the projector to a high ceiling or a ceiling with veneer panels. |
| ELPFP04 | Pipe 370 (370mm silver)* | |
| ELPFP05 | Pipe 570 (570mm silver)* | |
| ELPFP06 | Pipe 770 (770mm silver)* | |
| ELPKS51 | Soft carring case | Use this case if you need to carry the projector by hand. |
- A special method of installation is required in order to suspend the projector from the ceiling. Please contact your dealer if you require this installation method.
| Product name | EMP-TW10H | |||
| Dimensions | 402 (W) × 114 (H) × 294 (D) mm(not including feet) | |||
| Panel Size | 0.55 inches | |||
| Display method | Polysilicon TFT active matrix | |||
| Resolution | 409,920 (854 (W) × 480 (H) dots) × 3 | |||
| Focus adjustment | Manual | |||
| Zoom adjustment | Manual (1:1.54) | |||
| Lamp (light source) | UHE Lamp 130W, Model No.:ELPLP29 | |||
| Max.audio output | 1W Monaural | |||
| Speaker | 1 | |||
| Power supply | 100-240VAC 50/60Hz 2.3-1.0A | |||
| Operating temperature | +5°C to +35°C (41°-95°F) (No condensation) | |||
| Storage temperature | -10°C to +60°C (14°-140°F) (No condensation) | |||
| Weight | Approx. 3.6kg | |||
| Connectors | Input A port | SCART | 1 | 4RCA pin jack |
| Component | 3RCA pin jack | |||
| Input B port | 1 | Mini D-Sub 15pin(female) | ||
| S-Video port | 1 | Mini DIN 4pin | ||
| Video port | 1 | RCA pin jack | ||
| Audio port | 1 | RCA pin jack × 2(L,R) | ||
| Control (RS-232C) port | 1 | D-Sub 9 pin(male) | ||
Safety
USA (100-120VAC)
UL60950 3^rd Edition
Canada (100-120VAC)
CSA C22.2 No.60950 (cUL)
European Community (200-240VAC)
The Low Voltage Directive (73/23/EEC)
IEC60950 3rd Edition, +Amd.1, +Amd.2, +Amd.3, +Amd.4
EMC
USA (100-120VAC)
FCC 47CFR Part15B Class B (DoC)
Canada (100-120VAC)
ICES-003 Class B
European Community (200-240VAC)
The EMC Directive (89/336/EEC)
EN55022, 1998 Class B
EN55024, 1998
IEC61000-4-2, IEC61000-4-3,
IEC61000-4-4, IEC61000-4-5,
IEC61000-4-6, IEC61000-4-8,
IEC61000-4-11,
IEC61000-3-2, IEC61000-3-3
Australia/New Zealand (200-240VAC)
AS/NZS 3548:1995,A1:1997,A2:1997, Class B
CISPR Pub.22:1993, A1:1995, A2:1996, Class B

Pixelworks DNX^TM ICs are used in this Projector.
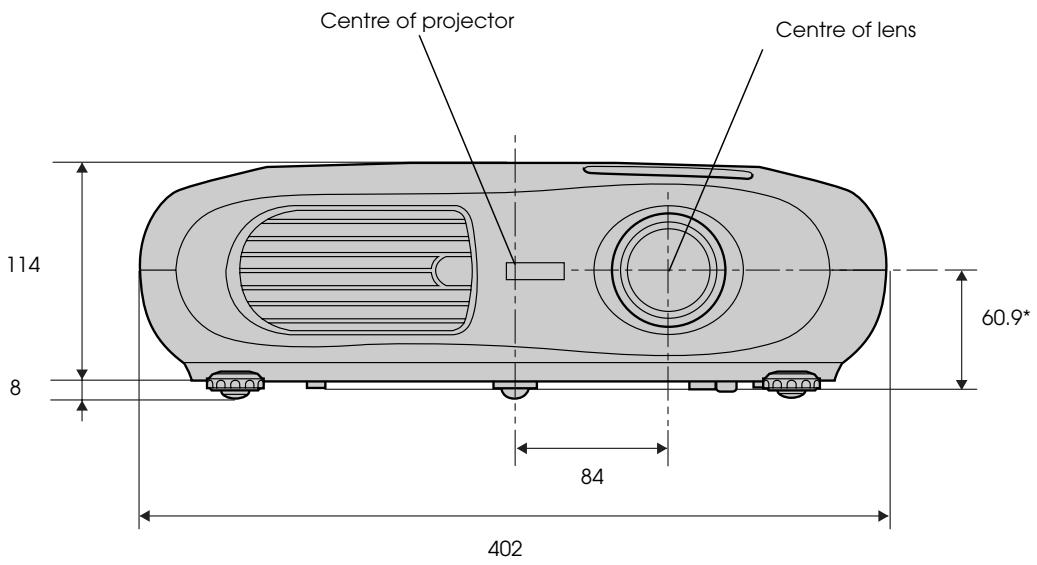
* Distance from centre of lens to ceiling mount
A
Air filter 5
Air intake vent 5
All Reset 15
Aspect ratio 4, 24
Audio port 5
Auto Setup 11, 13
B
Background Color 14
Battery holder 21
Brightness 13
C
Ceiling 9, 14
Ceiling mount fixing points 5
Changing the battery 21
Child Lock 14
Cleaning the air filter 20
Cleaning the lens 20
Cleaning the projector case 20
Color Mode 13
Color Temperature 13
Component Video 5
Composite Video 5
Computer cable 11
Connecting a Computer 10
Contrast 13
Control (RS-232C) port 5
Control panel 4
Cool-down 16
F
Flesh Tone 13
Focus ring 4
Front foot 4
G
Glossary 24
H
HDTV 24
1
Image menu 13
Indicators 4, 16
Info menu 15
Input A 14
Input A port 5
Input B 11
Input B port 5
Input Signal 15
Installation 8
K
Keystone 14
L
Lamp cover 5
Lamp Hours 15
Lamp replacement period 22
Lamp-Hours Reset 15
Language 14
Lens cover 4
M
Memory 13
Memory Reset 15
Message 14
N
Normal 26
0
On Screen Display 14
Operating range 7
Operating temperature 29
Operation 14
Optional Extras and Consumables 28
Overheating 16
P
Part Names and Functions 4
Picture Quality 13
Port 5
Position 14
Power cable 2
Power indicator 4, 16
Power inlet 5
Projection 14
R
Remote Control 6
Remote control holder 5
Remote control infrared receiver 4,5
Remote control infrared transmitter 6
Replacing the air filter 21
Replacing the lamp 22
Reset menu 15
RGB 13
s
Saturation 13
SCART 24
Screen 14
Screen size 8
Security lock 5
Setting menu 14
Setup Level 14
Sharpness 13
Sleep Mode 14
Source 15
Speaker 5
Specifications 29
Squeeze 26
Startup Screen 14
Sub Menu 12
Supported Display 26
S-Video port 5
Sync Info 15
Sync. 13
T
Tint 13
Top Menu 12
Tracking 13
Translucent screen 9
V
Ventilation outlet 4
Video 15
Video port 5
Video Signal (Info menu) 15
Video Signal (Setting menu) 14
Volume 14
W
Warning indicator 4, 16
When You Suspect a Problem 16
Y
YCbCr 14,25
YPbPr 14,25
Z
Zoom 26
Zoom Caption 14
Zoom ring 4
Home Projector
| NEC | [Fn]+[F3] |
| Panasonic | |
| Toshiba | [Fn]+[F5] |
| IBM | [Fn]+[F7] |
| SONY | |
| Fujitsu | [Fn]+[F10] |
Macintosh :
- Alignment
- Position
Sync.

European Community (200-240VAC)
The Low Voltage Directive (73/23/EEC)
IEC60950 3^rd Edition, +Amd.1, +Amd.2,
+Amd.3, +Amd.4
EMC
USA (100-120VAC)
FCC 47CFR Part15B Class B (DoC)
Canada (100-120VAC)
ICES-003 Class B
European Community (200-240VAC)
The EMC Directive (89/336/EEC)
EN55022, 1998 Class B
EN55024, 1998
IEC61000-4-2, IEC61000-4-3,
IEC61000-4-4, IEC61000-4-5,
IEC61000-4-6, IEC61000-4-8,
IEC61000-4-11,
IEC61000-3-2, IEC61000-3-3
Australia/New Zealand (200-240VAC)
AS/NZS 3548:1995,A1:1997,A2:1997, Class B
CISPR Pub.22:1993,A1:1995,A2:1996, Class B
(Computeranschlüsse)
| NEC | [Fn]+[F3] |
| Panasonic | |
| Toshiba | [Fn]+[F5] |
| IBM | [Fn]+[F7] |
| SONY | |
| Fujitsu | [Fn]+[F10] |
Macintosh
European Community (200-240VAC)
The Low Voltage Directive (73/23/EEC)
IEC60950 3^rd Edition, +Amd.1, +Amd.2, +Amd.3, +Amd.4
EMC
USA (100-120VAC)
FCC 47CFR Part15B Class B (DoC)
Canada (100-120VAC)
ICES-003 Class B
European Community (200-240VAC)
The EMC Directive (89/336/EEC)
EN55022, 1998 Class B
EN55024, 1998
IEC61000-4-2, IEC61000-4-3,
IEC61000-4-4, IEC61000-4-5,
IEC61000-4-6, IEC61000-4-8,
IEC61000-4-11,
IEC61000-3-2, IEC61000-3-3
Australia/New Zealand (200-240VAC)
AS/NZS 3548:1995,A1:1997,A2:1997, Class B
CISPR Pub.22:1993,A1:1995,A2:1996, Class B
DECLARATION OF CONFORMITY
According to 47CFR, Part 2 and 15
Class B Personal Computers and Peripherals; and/or
CPU Boards and Power Supplies used with Class B
Personal Computers
We :EPSON AMERICA, INC.
Located at : 3840 Kilroy Airport Way
MS: 3-13
Long Beach, CA 90806
Tel : 562-290-5254
Declare under sole responsibility that the product identified herein, complies with 47CFR Part 2 and 15 of the FCC rules as a Class B digital device. Each product marketed, is identical to the representative unit tested and found to be compliant with the standards. Records maintained continue to reflect the equipment being produced can be expected to be within the variation accepted, due to quantity production and testing on a statistical basis as required by 47CFR 2.909. Operation is subject to the following two conditions : (1) this device may not cause harmful interference, and (2) this device must accept any interference received, including interference that may cause undesired operation.
Trade Name :EPSON
Type of Product : Projector
Model : EMP-TW10H
FCC Compliance Statement
For United States Users
This equipment has been tested and found to comply with the limits for a Class B digital device, pursuant to Part 15 of the FCC Rules. These limits are designed to provide reasonable protection against harmful interference in a residential installation. This equipment generates, uses, and can radiate radio frequency energy and, if not installed and used in accordance with the instructions, may cause harmful interference to radio or television reception. However, there is no guarantee that interference will not occur in a particular installation. If this equipment does cause interference to radio and television reception, which can be determined by turning the equipment off and on, the user is encouraged to try to correct the interference by one or more of the following measures.
- Reorient or relocate the receiving antenna.
- Increase the separation between the equipment and receiver.
- Connect the equipment into an outlet on a circuit different from that to which the receiver is connected.
- Consult the dealer or an experienced radio/TV technician for help.
WARNING
The connection of a non-shielded equipment interface cable to this equipment will invalidate the FCC Certification or Declaration of this device and may cause interference levels which exceed the limits established by the FCC for this equipment. It is the responsibility of the user to obtain and use a shielded equipment interface cable with this device. If this equipment has more than one interface connector, do not leave cables connected to unused interfaces. Changes or modifications not expressly approved by the manufacturer could void the user's authority to operate the equipment.
EPSON®