X4 360 Quadcopter FPV - Drone Carson - Free user manual and instructions
Find the device manual for free X4 360 Quadcopter FPV Carson in PDF.

| Type | Quadcopter Drone with FPV |
| Brand | Carson |
| Model | X4 360 Quadcopter FPV |
| Dimensions | Approx. 35 x 35 x 8 cm |
| Weight | Approx. 95 g (including battery) |
| Battery | 3.7V 650mAh Li-Po (rechargeable) |
| Charging Time | Approx. 60 minutes |
| Flight Time | Approx. 7-9 minutes |
| Control Range | Up to 50 meters |
| FPV Camera | Built-in 720p camera with Wi-Fi transmission |
| Frequency | 2.4 GHz |
| Gyroscope | 6-axis |
| Functions | Altitude hold, headless mode, one-key return, 360° flip, speed switching |
| Propellers | 4 replaceable propeller blades |
| Spare Parts | Available: batteries, propellers, motors, landing gear (order separately) |
| Maintenance | Clean with dry cloth; store in dry place; avoid moisture |
| Safety | Not for children under 14; adult supervision recommended; avoid flying near people or animals |
| Repairability | User-replaceable parts; basic tools required |
| Power Supply | Remote: 4x AA batteries (not included) |
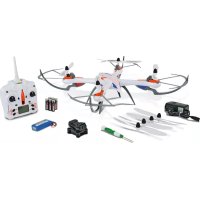
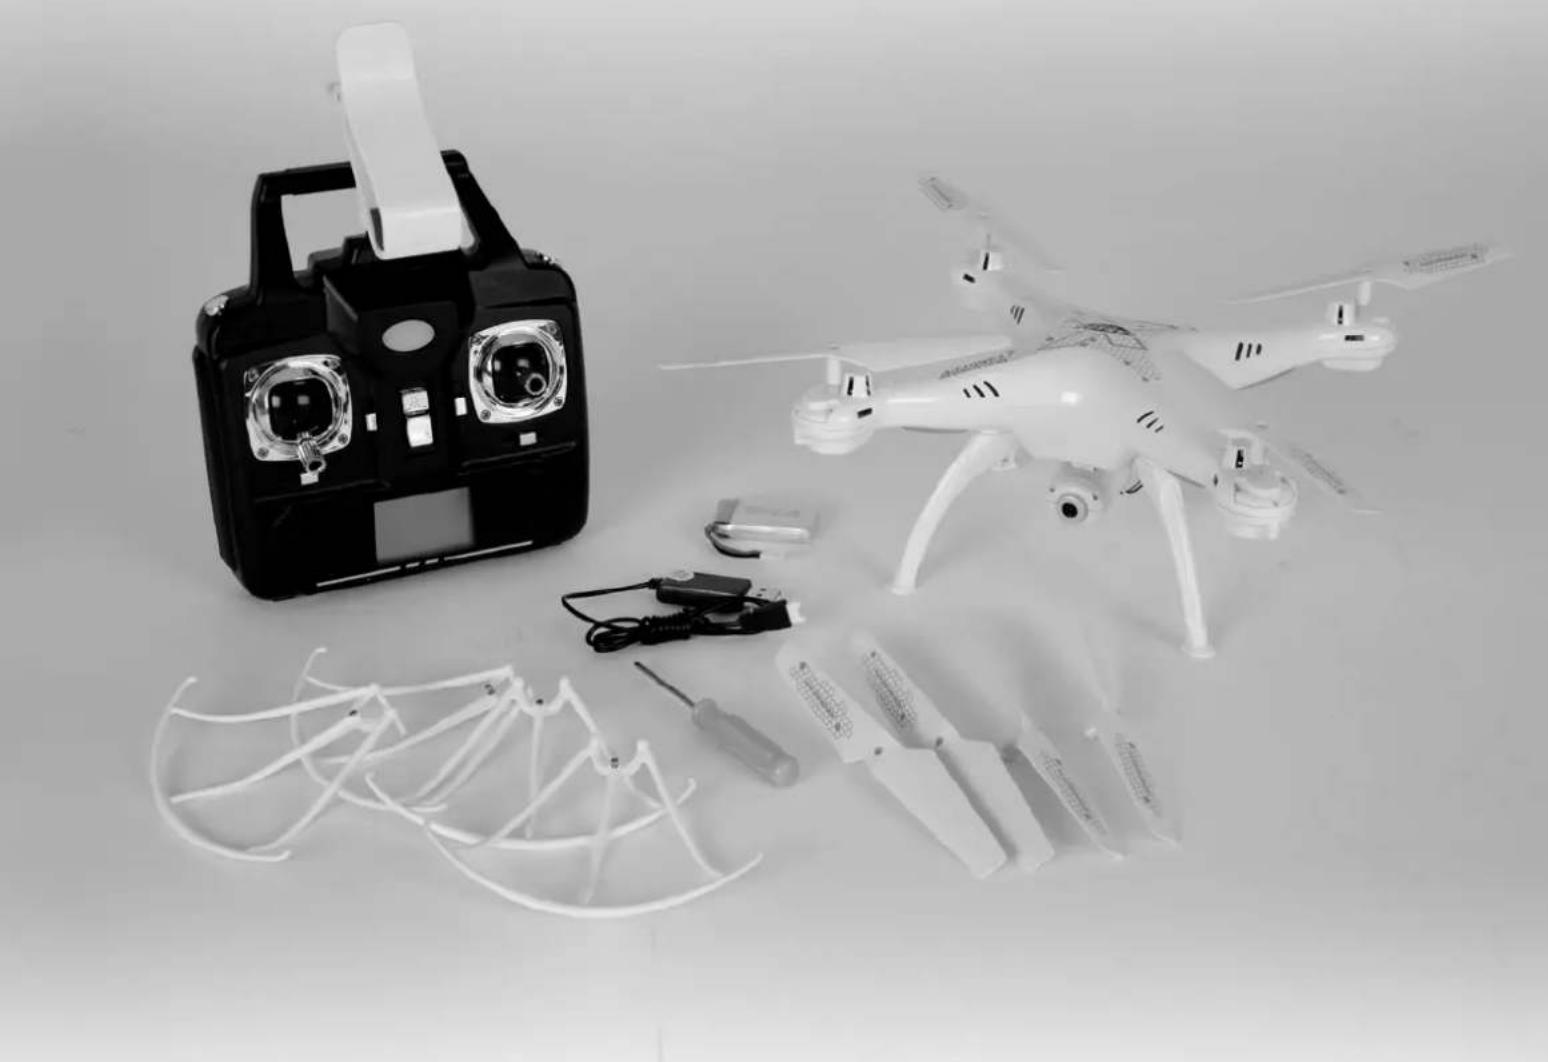
| Included Items | Drone, remote controller, battery, USB charger, 4 spare propellers, phone holder, manual |
Frequently Asked Questions - X4 360 Quadcopter FPV Carson
User questions about X4 360 Quadcopter FPV Carson
0 question about this device. Answer the ones you know or ask your own.
Ask a new question about this device
Download the instructions for your Drone in PDF format for free! Find your manual X4 360 Quadcopter FPV - Carson and take your electronic device back in hand. On this page are published all the documents necessary for the use of your device. X4 360 Quadcopter FPV by Carson.
USER MANUAL X4 360 Quadcopter FPV Carson
Radio Controlled Quadcopter RTF
X4Quadcopter 360FPV
natural_image
Top-down view of a white quadcopter drone with extended wings and propellers (no visible text or symbols)Sehr geehrter Kunde
natural_image
Black-and-white photo of a quadcopter drone with control panel and attached sensors, no visible text or symbolsnatural_image
Illustration of a rural landscape with power transmission towers, houses, and a large 'X' symbol (no text or symbols present)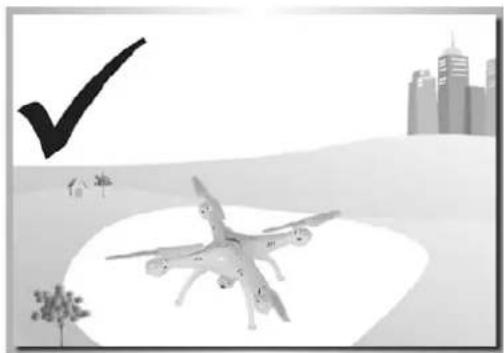
natural_image
Illustration of a drone flying over water with a checkmark and city skyline in the background (no text or symbols)
natural_image
Black-and-white photo of a quadcopter drone flying indoors near a window, with a large checkmark overlay (no text or symbols on the drone or environment)
natural_image
Black-and-white illustration of a quadcopter drone flying over rain with lightning bolts, no text or symbols present.
natural_image
Illustration of a flying drone under a sunny sky with clouds and a checkmark (no text or symbols)natural_image
Symbol of an umbrella with raindrops and an exclamation mark (no text or numbers present)
natural_image
Illustration of a drone flying above a campfire with a black X symbol (no text or labels)Propeller
natural_image
Mechanical assembly diagram showing two arms with arrows indicating force or movement (no text or symbols present)
natural_image
Medical procedure image showing a stethoscope inserted into a human forearm (no visible text or symbols)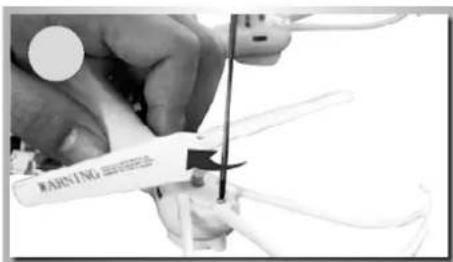
natural_image
Mechanical assembly diagram showing a valve inserted into a pump, with no visible text or symbols
natural_image
Mechanical component with a curved bracket and two arrows indicating force or movement (no text or symbols visible)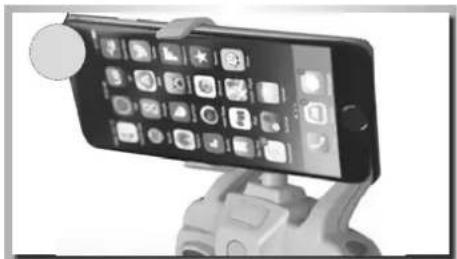
natural_image
Close-up of a smartphone mounted on a stand with a camera, showing its screen and app icons (no readable text or symbols)natural_image
Icon of a camera with 'SYMA' branding, no additional text or symbols visible

natural_image
Exterior view of a SYMA camera icon with no visible text or symbols on the device itself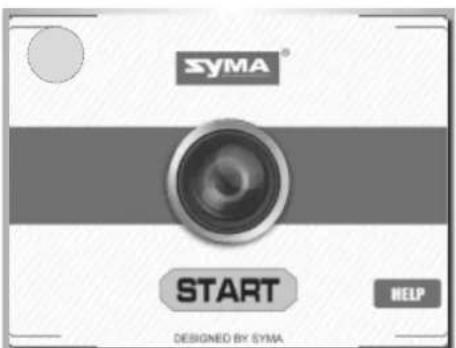
natural_image
Black-and-white landscape photo showing a rural field with trees and a dirt path, no visible text or symbols.natural_image
Close-up of a hand pressing a button on a computer mouse, with two arrows pointing to the button (no text or symbols visible)natural_image
Close-up of a mechanical component with a tool and a star-shaped annotation (no readable text or symbols)natural_image
Diagram showing cable connection between a computer monitor and two USB cables (no text or symbols)natural_image
Close-up of a person wearing a headset with a black arrow pointing to the front panel (no visible text or symbols)There are Old pilots, and there are Bold pilots... ... but, there are no Old Bold pilots!
natural_image
Close-up of a mechanical component with two circular ports and a highlighted section showing a button labeled 'CN' (no text or symbols beyond labels)natural_image
Close-up of a hand pressing a button on a small electronic device (no visible text or symbols)natural_image
Close-up of a camera lens assembly with directional arrows indicating alignment (no text or symbols)natural_image
Line drawing of a helicopter's front panel with control buttons and a directional arrow (no text or symbols)natural_image
Front view diagram of a control console with dual motors and display (no text or symbols)natural_image
Front view of a control console with dual speakers and buttons (no text or symbols visible)Rückwärts
natural_image
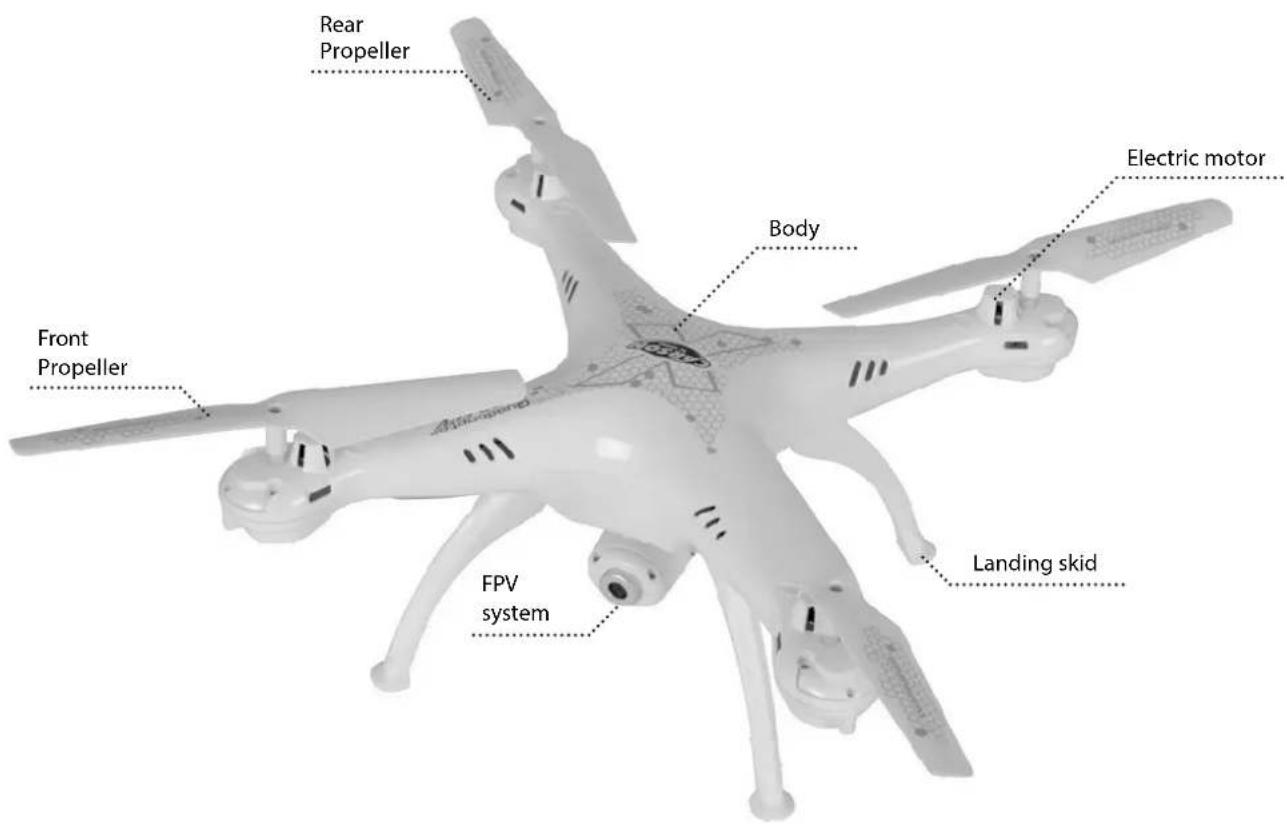
Line drawing of a quadcopter drone with labeled components and directional arrows (no text or symbols on the diagram itself)Vorwärts
natural_image
Front view of a control panel with dual motors and a display unit (no text or symbols visible)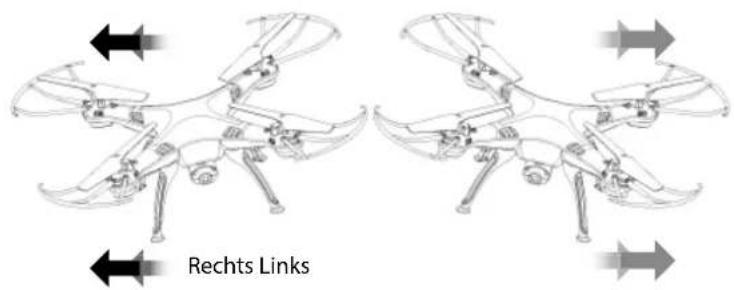
natural_image
Diagram showing a drone with control panel and directional arrows indicating rotation (no text or symbols)natural_image
Diagram of a four-legged robotic head with arrows indicating force or movement (no text or labels)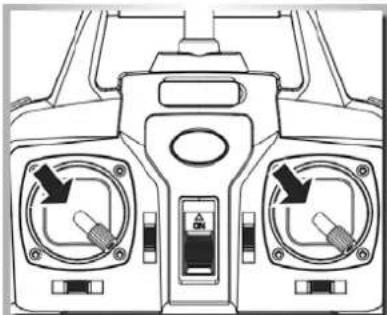
natural_image
Front view of a vehicle's front dashboard with two rotary switches and a central control panel (no text or symbols visible)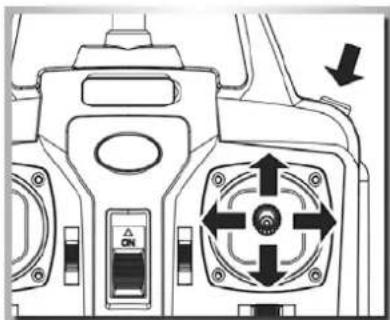
natural_image
Technical diagram of a mechanical device with directional control buttons and a central rotary knob (no text or symbols)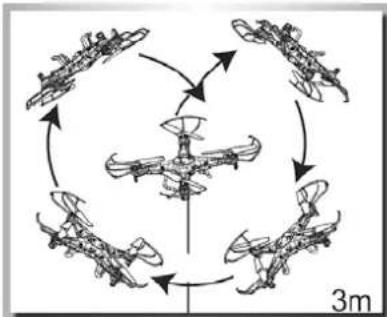
flowchart
graph TD
    A["Top: Aircraft"] --> B["Midplane"]
    B --> C["Bottom: Aircraft"]
    C --> D["Top: Aircraft"]
    D --> E["Midplane"]
    E --> F["Bottom: Aircraft"]
    F --> G["Top: Aircraft"]
    G --> H["Midplane"]
    H --> I["Bottom: Aircraft"]
    I --> J["Top: Aircraft"]
    J --> K["Midplane"]
    K --> L["Bottom: Aircraft"]
    L --> M["Top: Aircraft"]
    M --> N["Midplane"]
    N --> O["Bottom: Aircraft"]
    O --> P["Top: Aircraft"]
    P --> Q["Midplane"]
    Q --> R["Bottom: Aircraft"]
    R --> S["Top: Aircraft"]
    S --> T["Midplane"]
    T --> U["Bottom: Aircraft"]
    U --> V["Top: Aircraft"]
    V --> W["Midplane"]
    W --> X["Bottom: Aircraft"]
    X --> Y["Top: Aircraft"]
    Y --> Z["Midplane"]
    Z --> AA["Bottom: Aircraft"]
    AA --> AB["Top: Aircraft"]
Wurf-Start
natural_image
Black-and-white photo of a hand reaching toward a flying drone over a field, with trees in the background (no text or symbols visible)natural_image
Technical line drawing of a vehicle front panel with speakers and control buttons (no text or symbols)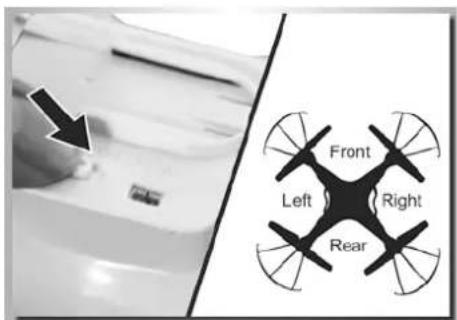
natural_image
Diagram of a camera with an arrow indicating upward and downward motion, showing no text or symbols.natural_image
Technical line drawing of a mechanical component with a black arrow pointing to a feature (no text or symbols present)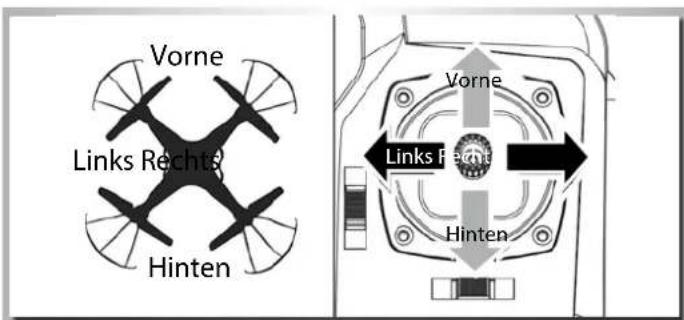
natural_image
Front view diagram of a vehicle air conditioner unit with two vent gauges and control panel (no text or symbols)We congratulate you for buying this CARSON RC models, which is designed using state of the art technology.
According to our policy of steady development and product improvement we reserve the right to make changes in specifications concerning equipment, material and design at any time without notice.
Specifications or designs of the actual product may vary from those shown in this manual or on the box.
The manual forms part of this product. Should you ignore the operating and safety instructions, the warranty will be void. Keep this guide for future reference.
Limited Warranty
This product is warranted by CARSON against manufacturing defects in materials and workmanship under normal use for 24 months from the date of purchase from authorised franchisees and dealers. In the event of a product defect during the warranty period, return the product along with your receipt as proof of purchase to any CARSON store.
CARSON will, at its option, unless otherwise provided by law:
(a) Correct the defect by repairing the product without charging for parts and labour
(b) Replace the product with one of the same or similar design; or
(c) Refund the purchase price.
All replacement parts and products, and products on which a refund is made, become the property of CARSON. New or reconditioned parts and products may be used in the performance of warranty services.
Repaired or replaced parts and products are warranted for the remainder of the original warranty period. You will be charged for repair or replacement of the product made after the expiration of the warranty period.
The Warranty does not cover:
- Damage or failure caused by or attributable to acts of God, abuse, accident, misuse, improper or abnormal usage, failure to follow instructions, improper installation or maintenance, alteration, lightning or other incidence of excess voltage or current;
• Damage caused by losing control of your car; - Any repairs other than those provided by a CARSON Authorised Service Facility;
• Consumables such as fuses or batteries; - Cosmetic damage;
• Transportation, shipping or insurance costs; or - Costs of product removal, installation, set-up service adjustment or reinstallation
This warranty gives you specific legal rights, and you may also have other rights which may vary according to the country of purchase.
Declaration of conformity
Dickie-Tamiya GmbH & Co. KG hereby declares that this model kit with radio, motor, battery and charger is in accordance with the basic requirements of the following European directives: 98/37 EG and 89/336/EWG and other relevant regulations of guideline 1999/5/EG (R&TTE).
The original declaration of conformity can be obtained from the following address:
Included is a rechargeable LiPo battery (Lithium-Polymer). It is possible to recycle this battery. Included are Alkaline batteries. These batteries are not rechargeable. Batteries must not be placed in with the household refuse. Please dispose of the batteries, according to the actual law, by the designated recycling points.
The explanation of the symbol on the product, packaging or instructions: Electronic devices are valuable products and should not be disposed of with the household waste when they reach the end of their running time! Help us to protect the environment and respect our resources by handing this appliance over at the relevant recycling poi.

We wish you good luck and a lot of fun flying your CARSON model!
Before using your new model carefully read these instructions!
Contents
Preface 18
Included Items 19
Safety Precautions ....20
The Quadcopter with More Functions ....24
Technical Data 24
Four Channel FPV-Wifi Remote Control Transmitter 25
Input Key Function 25
Inserting batteries 26
Install landing skids & bldae protecting frame....26
FPV system / Wi-Fi transmission....27
Changing and charging the flight battery 28
Ready for lift-off! 29
Explanation of the controls....29
Trimming the control channels....30
Change control mode - Modes 1 and 2....31
Special function explanation....31
Trouble Shooting 33
Included Items
• Model built ready-to-fly
• 4-channel remote control transmitter 2,4 GHz including mobile phone bracket
• FPV system / Wi-Fi transmission
- Prop-safeframe
• LiPo battery 3.7 V/500 mAh
• USB-LiPo-Balance charger
- Operating manual
• Batteries for the transmitter
- Spare propeller
natural_image
Black-and-white photo of a quadcopter drone with control panel and multiple camera modules, no visible text or symbols.Safety Precautions
General
- Read the Operating Manual carefully and keep it for future reference.
• Make yourself familiar with all the instructions for flight operation.
This model is not a toy!
- This radio controlled model is not a toy. Learning how to control it correctly is a gradual process.
• Children under 14 years of age should be supervised by an adult.
If you are not yet proficient with model aircraft, we suggest you approach a more experienced model pilot or a model-making club about making your first flight attempts.
Flying a radio controlled quadcopter is a fascinating hobby. However, it has to be practised with the necessary caution and respect.
A radio controlled model can cause damage and injury in an uncontrolled flying mode, and the user is liable for any such incident.
As a manufacturer and distributor of the model, we are not responsible for the correct handling and operation of the model.
Make sure that you have sufficient insurance cover when practising your hobby.
Only a well maintained model will function in a correct manner. Only use approved spare parts and never improvise with any unsuitable items.
It is the user's responsibility to ensure that the model is functioning correctly and that all nuts, bolts and screws are properly tightened.
Keep the model well beyond the reach of small children. They may unintentionally activate the model and cause themselves injury with it, or they may put batteries and small parts into their mouths and swallow or choke on them.
Preparations
Never start flying before you have made sure of the following points:
- Pay attention to visible damage on the model, remote control, battery charger, and lithium-polymer battery.
-
Ensure that the model is functioning correctly and that all nuts, bolts and screws are properly tightened
-
The flight battery must be fully charged, with the correct voltage. Only use fresh new batteries for the transmitter.
• Always check the radio operation before starting the quadcopter.
Flight operation
The model is primarily conceived for indoor flights since its own slight weight and instable flight position resulting from the construction type make it very susceptible to air movements.
Moreover the components are not dust- and moisture-proof.
Do not fly any longer than one battery charging!
Afterwards the motors must cool down for at least 5 minutes.
Then recharge the battery. Avoid low discharge in any case.
ATTENTION!!! The pilot must maintain visual contact with the model plane at all times. The model must not be controlled by watching the
transmitter screen because the pilot will be unable to keep it in view should there be any radio interference with the video transmission.
natural_image
Illustration of a rural landscape with power transmission towers, houses, and a large 'X' symbol (no text or symbols present)
natural_image
Illustration of a drone flying over water with a checkmark and city skyline in the background (no text or symbols)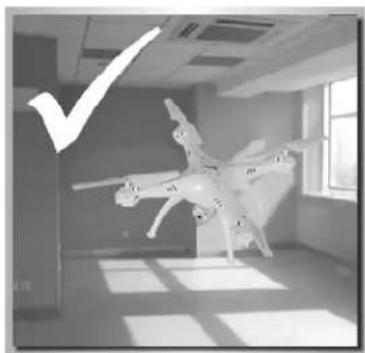
natural_image
Black-and-white photo of a quadcopter drone flying indoors near a window, with a large checkmark overlay (no text or symbols on the drone or background)
natural_image
Illustration of a quadcopter drone flying under storm clouds with lightning bolts (no text or symbols)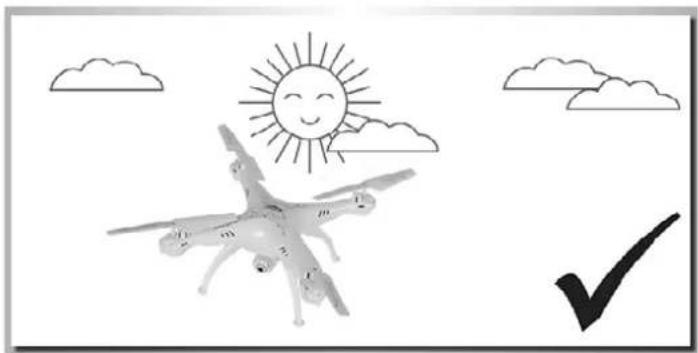
natural_image
Illustration of a quadcopter drone flying under a smiling sun and clouds, with a black checkmark below (no text or symbols)It is best to fly only in closed rooms
• With a free space of at least 3 m in all directions
• On a smooth foundation
- Without standing (furniture) or moving obstacles (persons, animals)
• In rooms without air draught
If you want to fly outdoors, do this
• Only when there is no wind
Do not fly
• If you are overtired or your reactivity is impaired in any way.
• At wind-force 1 or greater.
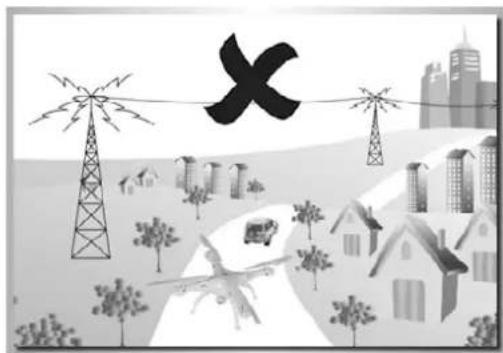
- Keep your model away from high voltage cables or radio masts. Never use the model when lightning is present. Atmospheric disturbances can affect the signals of your remote controlling transmitter.
- Choose a sufficiently open & large area; it should be free of obstacles, as buildings, furniture, people and animals.
- Keep away from roads, highways, people and animals.
natural_image
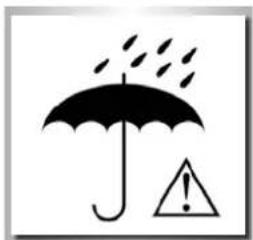
Symbol of an umbrella with raindrops and an exclamation mark (no text or numbers present)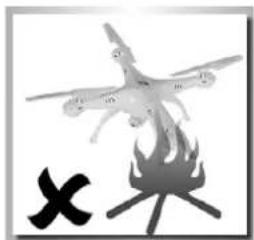
natural_image
Illustration of a drone flying above a campfire with a black X symbol (no text or labels)Propeller
- Damaged propellers must be exchanged! Refrain from attempts at repair!
- Keep away from the propellers, as soon as the battery is connected.
- Avoid presence in the plane of rotation of the propellers.
Do not operate the model while seated, so that you can rapidly get out of the hazardous area if necessary.
Employ exclusively the enclosed battery charger.
- Operate the battery charger only on fire resistant surfaces and
- Also place the battery on a non-inflammable surface while charging.
-
Ensure for sufficient ventilation of the battery charger while charging.
-
Never leave the battery charger unattended during the charging process.
- Never mix fully charged batteries and batteries which have already run low, or batteries of a different capacity at the same time.
- When charging the batteries pay attention to the correct polarity.
Never subject the battery charger, the batteries and the model to adverse local conditions!
These are for instance:
- Wetness, too high air humidity (> 75% rel., condensing). Do not touch the battery charger with wet hands.
- Never operate the battery charger right after it has been brought from cold into warm surroundings. The resulting condensation water can destroy the device. Permit the device to attain the ambient temperature while unconnected.
• Dust and inflammable gases, vapours or solvents, benzene - Too high ambient temperatures (> about +40°C), direct solar radiation
- Open fire, ignition sources
• Mechanical stresses such as shocks, vibrations
• Strong contamination - Strong electromagnetic fields (motors or transformers) or electrostatic fields (charges)
- Transmitters (radio telephones, transmitters for model building etc.). The transmitter radiation can lead to the malfunction of the charging operation or to the destruction of the battery charger and thereby also of the batteries.
Permit the battery charger to cool down between charging operations. Disconnect the battery charger from the power when the charging operation is finished.
A defective battery charger may no longer be employed. If it is assumed that the device is defective, i.e. if
• The device shows visible damage,
• The device no longer works and
• After longer storage under unfavourable conditions or
• After severe transportation stress, then it should be made inoperative without delay and secured against unintentional operation.
Dispose of the unusable (irreparable) battery charger according to the prevailing statutory regulations.
For safety and registration reasons (CE), the arbitrary reconstruction and/or modification of the battery charger is not permitted.
Lithium-Polymer battery
Employ the enclosed battery exclusively for this model.
Only employ an original part as a replacement battery.
- Do not overload or exhaustively discharge the battery! Both can cause that electrolyte leaks out and lead to self-ignition.
- Never mix fully charged batteries with half-charged ones or batteries with different capacity.
- Charge the LiPo battery at least every two months in order to avoid low discharging.
- Remove the charged battery from the battery charger in order to avoid self-discharging.
At the end of its useful life, under various national/state and local laws, it may be illegal to dispose of this battery into the municipal waste stream. Check with your local solid waste officials for details in your area for recycling options or proper disposal.
The batteries must not
• Be immersed in liquid,
- Be thrown in the fire or subjected to high temperatures or
• Mechanical stresses or
• Be taken apart or damaged
• Or be short-circuited.
If during operation or while charging or storing the battery you perceive a noticeable smell, a discolouration, excessive heating or deformation or any other abnormality:
- Disconnect the battery from the battery charger
• Separate the battery from the consumer
• No longer employ the battery..
If electrolyte drains out:
- Avoid contact with eyes and skin!
- Wash the affected locations immediately with clear water and
- Consult a physician.
Advice
• Non-rechargeable batteries are not to be recharged.
- Rechargeable batteries are only to be charged under adult supervision.
- Batteries are to be inserted with the correct polarity.
• The supply terminals are not to be short-circuited.
- Regular examination of transformer or battery charger for any damage to their cord, plug, enclosure and other parts.
Li-Polymer battery safety instructions
- Do not disassemble or reconstruct the battery.
- Do not use or leave the battery nearby fire, stove or heated place.
- Do not immerse the battery in the water or get it wet.
- Do not charge battery nearby the fire or under the blazing sun.
- Do use the specified charger and observe the charging requirements.
- Do not drive a nail into the battery, strike it by hammer, or tread it.
- Do not give the battery impact or fling it.
- Do not use the battery with conspicuous damage or deformation.
- Do not make direct soldering on the battery.
- Do not reverse-charge or overdischarge the cell.
- Do not reverse-charge or reverse-connect.
- Do not connect battery to the plug socket or car-cigarette-plug.
- Do not touch a leaked battery directly.
- Keep the battery away from babies.
- Do not continue to charge battery over specified time.
- Do not get the battery into a microwave or high pressure container.
-
Do not use a leaked battery nearby fire.
-
Do not use or leave the battery under the blazing sun (or heated car by sunshine).
- Do not use nearby the place where generates static electricity which give damage to the protection circuit.
- Charging temperature range is regulated 0 degrees centigrade and 45 degrees centigrade. Do not charge the battery out of recommended temperature range.
- When the battery has rust, bad smell or something abnormal at first-time-using, do not use the equipment and bring the battery to the shop where it was bought.
- Keep the battery out of the reach of children. And also, using the battery, pay attention to be taken out from the charger or equipment by little children.
- If the skin or cloth is smeared with liquid from the battery, wash with fresh water. It may cause inflammation of the skin.
- Never charge the battery on a carpeted floor as this may cause fire.
- Do not use the battery for equipment that is not specified nor for any other purposes.
- Do not touch the battery if it is leaking. If you do touch the battery, you should wash your hands immediately.
- Do not use any batteries that have swelled up or are damaged.
- Never leave a charging battery unattended.
The Quadcopter with More Functions
Completely preassembled, no construction required! Fun straight out of the box!
Control your quadcopter using all four functions.
Features:
• Stable flight behaviour
• Completely assembled Ready To Fly
• Includes professional 4-channel 2.4 GHz radio control
• + Gyro (stabilising function)
• With LiPo battery 3.7 V/500 mAh and "LiPo balance" charger
• WiFi FPV system for mobile phones
Technical Data
Rotor diameter 135 mm
Length 315 mm
Weight approx. 120 g
Four Channel FPV-Wi-Fi Remote Control Transmitter
Transmitter overview
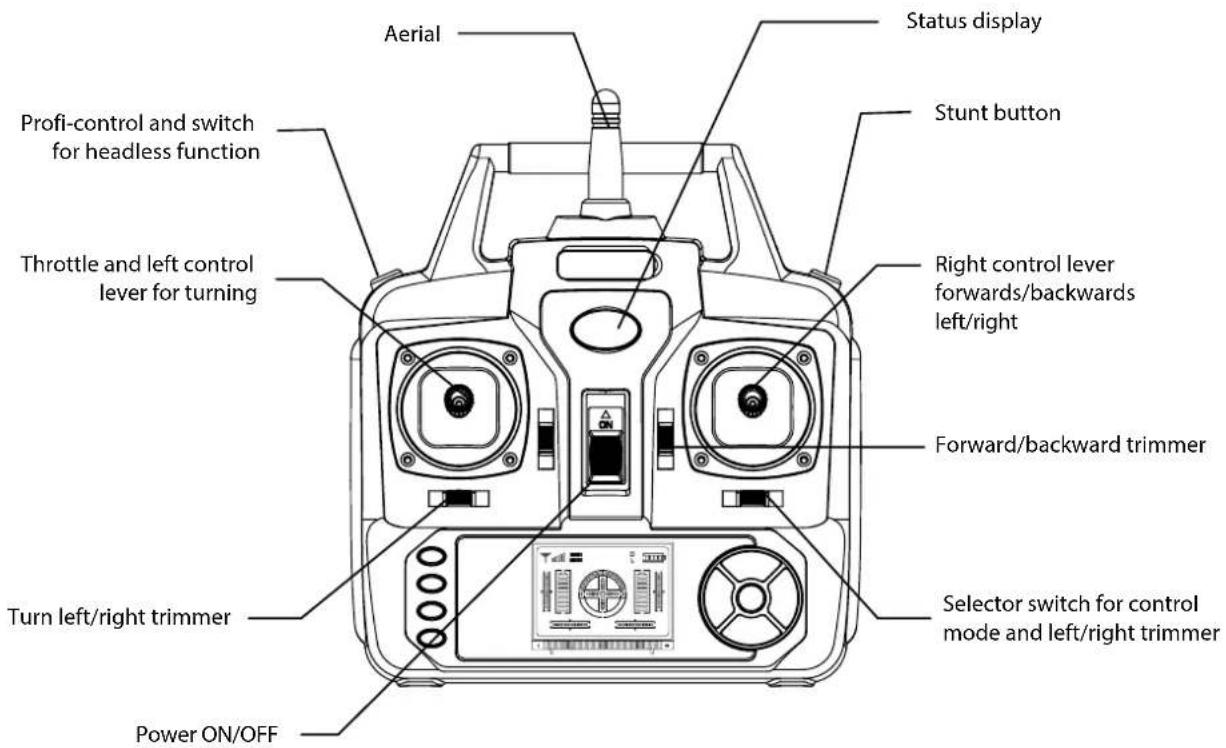
Input Key Function
| S/N Identification Function | ||
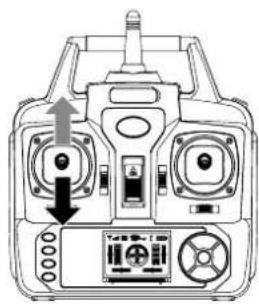
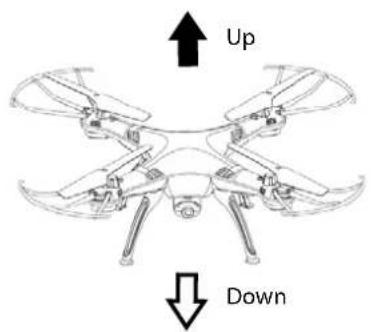
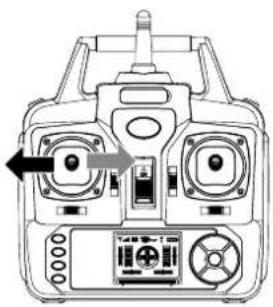
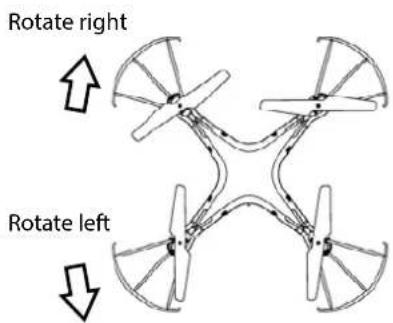
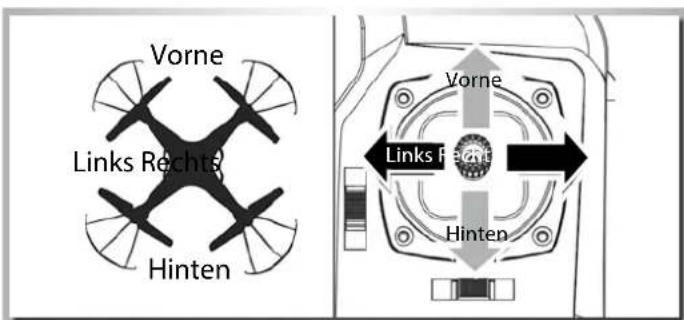
| 1 Left control lever Mode 2 | Pushing the stick forwards or backwards makes the quadcopter climb or descend. Pushing it to the left or right makes the copter turn left or right. | |
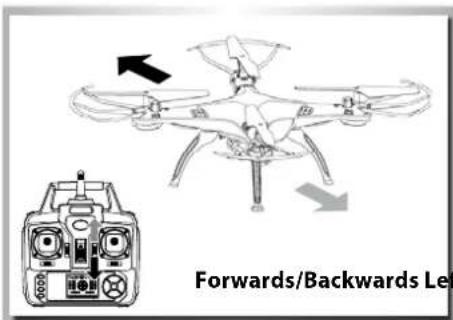
| 2 Right control lever Mode 2 | Pushing the stick forwards or backwards makes the quadcopter move forwards or backwards. Pushing it to the left or right makes the copter drift sideways to the left or right. | |
| 3 Roll trim Roll trim adjusts left and right drift. | ||
| 4 Pitch trim Pitch trim adjusts forward and backward movement. | ||
| 5 Yaw trim Yaw trim adjusts left and right rotation. | ||
| 6 Throttle trim Throttle trim adjusts ascent and descent. | ||
| 7 | On/Off power switch | Pushing up switches on the power transmitter, pulling down switches it off. |
| 8 Stunt button Push this button to perform flips and loops. | ||
| 9 Switch for professional mode and headless function | Pressing this button briefly changes the agility. Pressing it for a longer period activates/deactivates the headless mode. | |
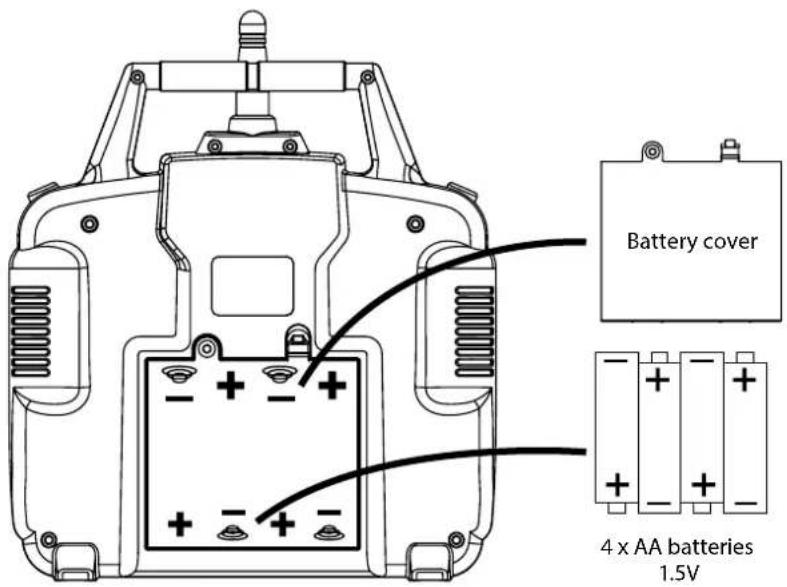
Inserting batteries
Caution
• Do not mix old and new batteries.
• Do not mix different types of batteries.
- Only use AA batteries. Other types of battery can damage the transmitter
- Remove the cover
- Install 4 x AA battery observing correct polarity
- Replace the cover
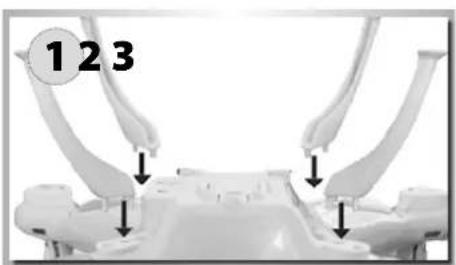
Install landing skids & blade protection frame
natural_image
Mechanical assembly diagram showing two robotic arms with downward arrows indicating motion or force (no text or symbols present)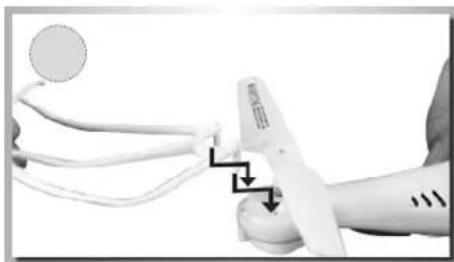
natural_image
Medical procedure image showing a stethoscope measuring a patient's arm with a magnified view (no text or symbols visible)
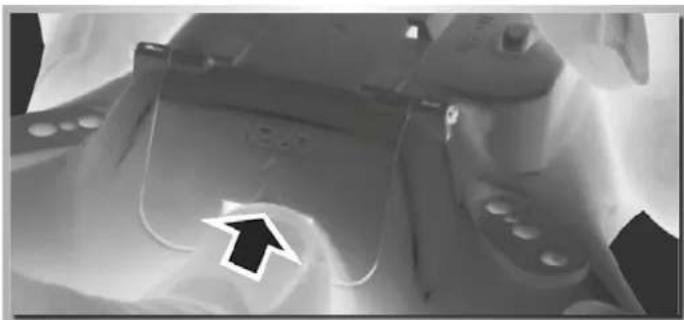
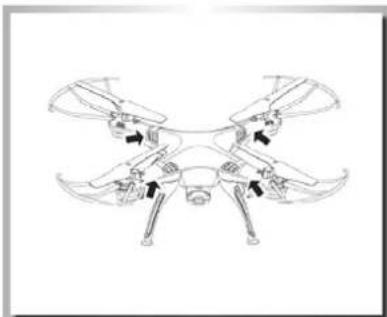
- Insert the landing feet into the slots on the body as shown in Figure 1.
- Fix the blade protection frame to the propellers and secure with the screws.
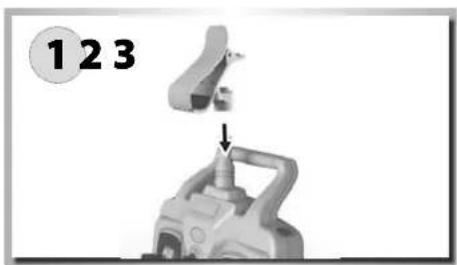
FPV system / Wi-Fi transmission
Mounting the phone clamp
natural_image
Mechanical assembly diagram showing a valve being inserted into a pump (no text or symbols visible)
natural_image
Mechanical component with a curved handle and two arrows indicating force or movement (no text or symbols visible)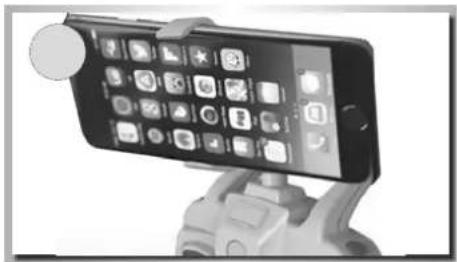
natural_image
Smartphone mounted on a stand with app icons, no visible text or symbols- Attach the phone clamp to the aerial as shown in Figure 1.
- Squeeze the spring of the clamp together to adjust to the correct size.
- Insert your phone into the clamp.
FPV App for Smartphone - Download and Installation

natural_image
Close-up of a camera lens icon with 'SYMA' branding (no additional text or symbols)In order to relay the video signal to the smartphone, you must download and install the appropriate mobile app. There is an IOS version for all iPhones and an Android version for Android phones. Please install the app on your mobile phone and then go to the next step.


Version for iPhone devices Version for Android devices
Connection Description
Switch on the transmitter and then the quadcopter as normal. The LED on the camera will glow green initially, but start to flash after approx. 20 seconds. Now you can connect your phone to the model via WLAN. Open "settings" on your mobile and click on "FPV WIFI****" in the search list. Wait until it has connected, then launch the FPV app and click the START button on the control. The camera image should now appear on the screen. If it does not, please repeat the process.
natural_image
Icon of a SYMA camera with no visible text or symbols on the device itself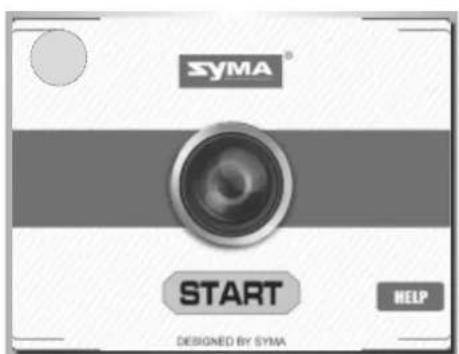
natural_image
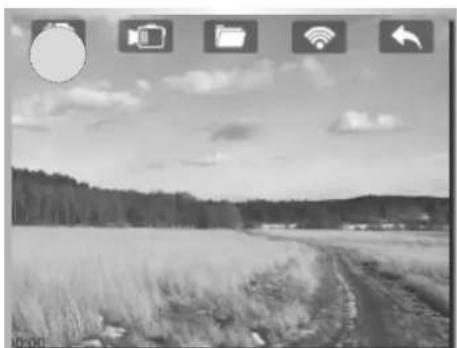
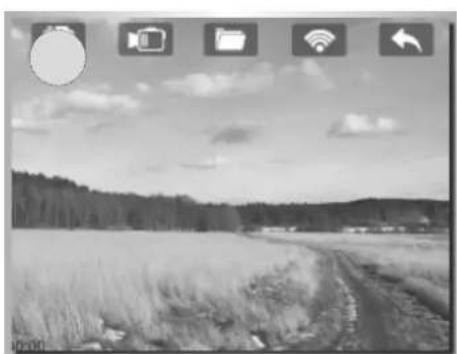
Black-and-white landscape photo showing a rural field with trees and a dirt path, overlaid with icons for camera, folder, Wi-Fi, and cloud (no readable text or symbols)Key to symbols on the screen Taking photos and video
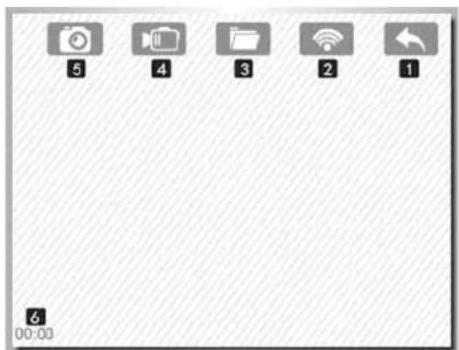
- Back
- Wi-Fi signal
- Memory / videos and photos
- Video start / stop
- Shutter release for photos
- Recording time
recording
You can take still photos and video via the app when the Wi-Fi connection is steady and the live image is showing on your smartphone screen. Click the photo symbol (5) to take a photo and the video camera symbol (4) to record. Click once to start recording and click a second time to stop. Your images and recordings are stored in the app memory (3) (folder symbol).
Changing and charging the flight battery
natural_image
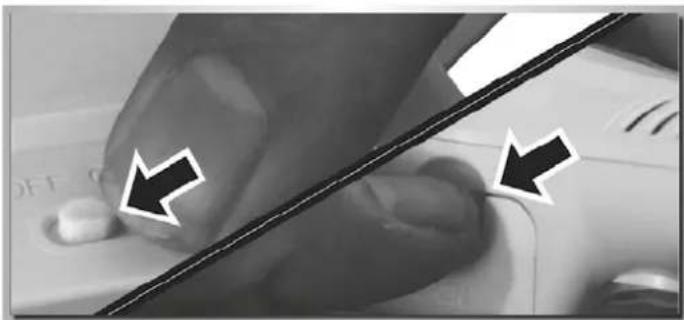
Close-up of a hand pressing a button on a computer mouse, with two arrows pointing to the button (no text or symbols visible)- The X4 Quadcopter is operated by a LiPo flight battery. Push the quadcopter on/off switch to the OFF position then open the battery cover.
natural_image
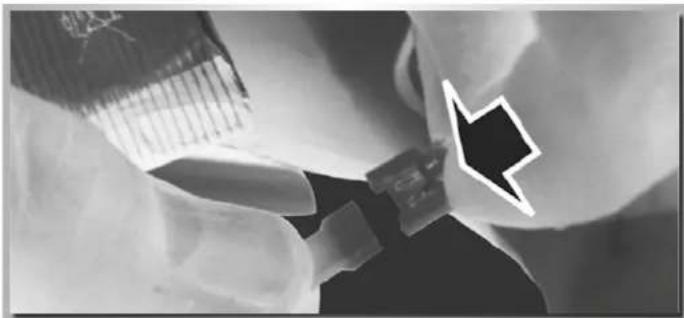
Close-up of a robotic arm joint with a black arrow pointing to a specific part (no text or symbols visible)- Pull the battery wire out from the power port.
natural_image
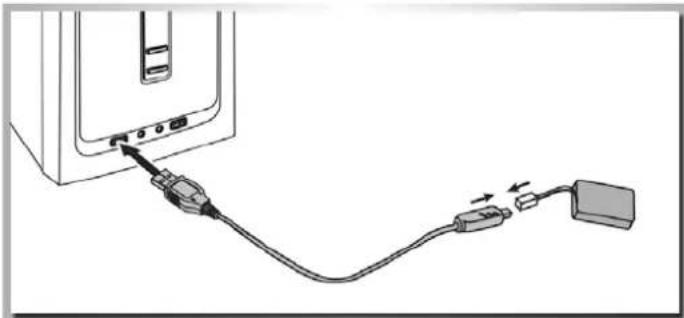
Diagram showing cable connection between a computer monitor and a USB drive (no text or symbols)- To charge the battery, plug the charging cable into a USB port or USB charger. Then insert the battery into the charger. The LED on the charging cable will glow during charging and go out when the battery is fully charged.
natural_image
Close-up of a person wearing a VR headset with a black arrow pointing to the front panel (no visible text or symbols)- Once the battery is charged the battery can be reconnected to the model and the battery inserted back into the battery compartment. Please ensure that you secure the cover correctly.
It is essential that the safety instructions given in these instructions are strictly observed!!!
Ready for lift-off!
Your quadcopter is an easy model to fly but you will will not become an expert flyer without taking the time to learn the basic functions.
As the saying goes:
There are old pilots and bold pilots...
...but there are no old, bold pilots!
In other words, if you do not want to reckon with your first flights ending in a heap of scrap, requiring expensive repairs to your new
model – take the time to follow this short training programme. Learning to fly it is already part of the fun!
MAKING THE QUADCOPTER CLEAR FOR TAKEOFF (FAILSAFE)
Your quadcopter is equipped with a 4-in-1 Gyro receiver, which includes a failsafe mechanism that becomes active after power-up. This is there so that the motors do not start until a corresponding radio signal is received after the LiPo rechargeable battery has been connected.
natural_image
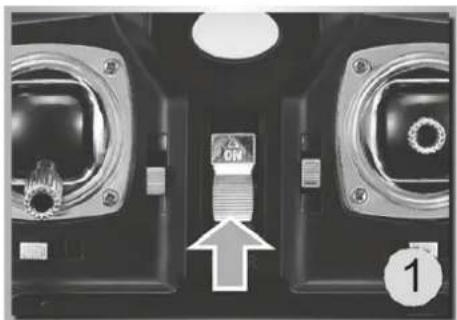
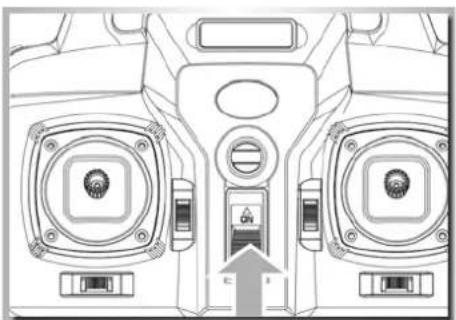
Close-up of a mechanical component with two circular components and an arrow pointing to a labeled section (no readable text or symbols)Pull back the power control joystick on the transmitter to its lowest setting and switch on the transmitter (push the switch up). The status LED will start to flash.
natural_image
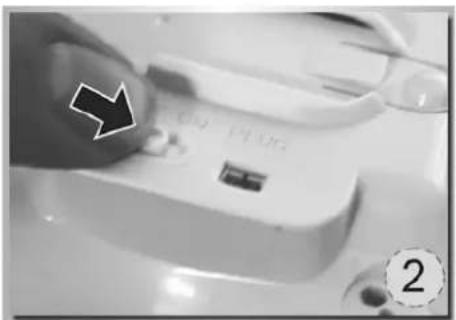
Close-up of a hand holding a small electronic device with a black arrow pointing to it, labeled '2' in the corner (no readable text or symbols on device)Insert the battery in the battery compartment. Connect the connecting cable between battery and model. Replace the battery cover and switch on the model.
natural_image
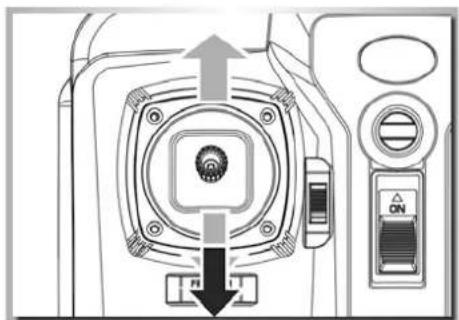
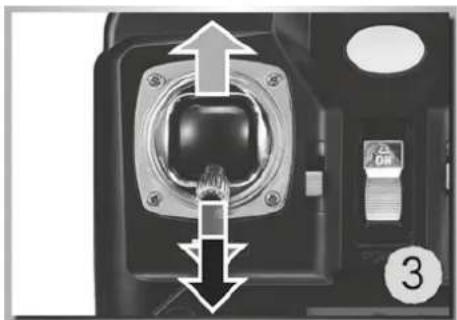
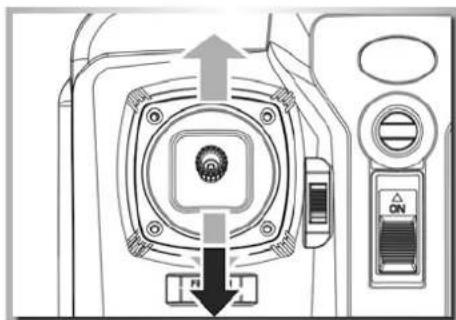
Close-up of a camera lens assembly with directional arrows indicating alignment (no text or symbols)Now push the power joystick forwards to its maximum position and then pull it back to minimum. A peep confirms that the connection has been successfully established. Your model is now clear for take-off!
Explanation of the controls
Controlling the X4 quadcopter (mode 2)
CAUTION: To avoid loss of control, ALWAYS move the Tx sticks S-L-O-W-L-Y!
natural_image
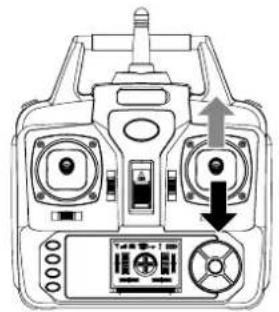
Front view of a control panel with dual motors and a keypad (no text or symbols visible)The (collective)power joystick causes your quadcopter to gain/loose height.
natural_image
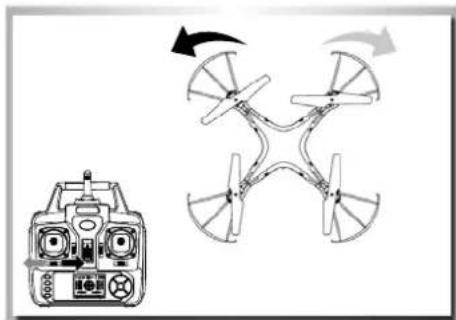
Front view diagram of a control console with dual motors and display (no text or symbols)With the rotation joystick, you can rotate your quadcopter to the left or the right.
natural_image
Top-down schematic of a multi-right helicopter with control panel and directional arrows (no text or labels)Forwards
natural_image
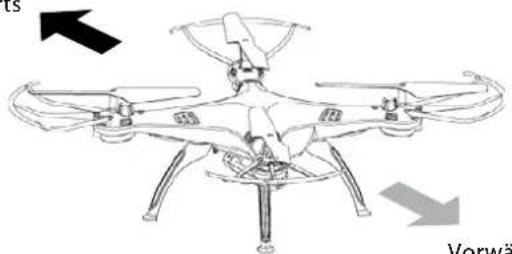
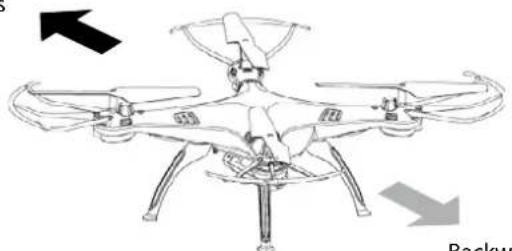
Line drawing of a quadcopter drone with labeled wings and propellers, showing front and back orientation arrows (no text or symbols on the diagram itself)Backwards
The cyclic pitch joystick causes your quadcopter to fly forwards/backwards.
natural_image
Front view of a multi-rotor control device with dual motors and a display panel (no text or symbols visible)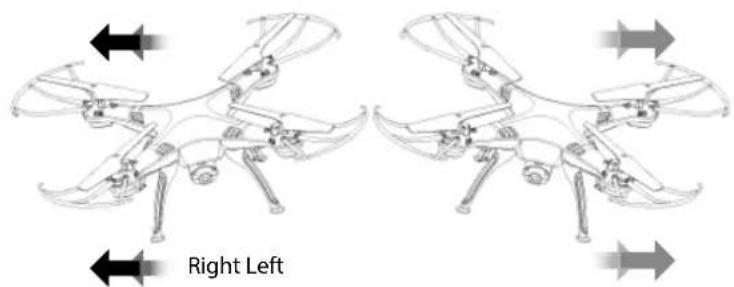
natural_image
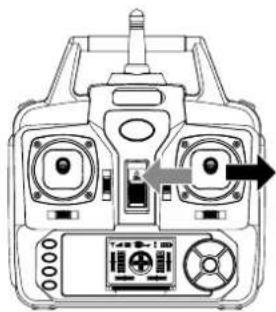
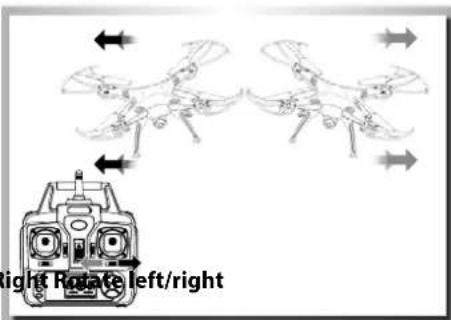
Two identical drone diagrams with arrows indicating left and right directional movement (no text or symbols on the diagrams themselves)The cyclic roll joystick causes your quadcopter to fly to the left/right.
Caution:
The controls will appear to be reversed when the model is flying towards you! For example, the cyclic roll joystick causes your quadcopter to fly to the right/left (instead of left/right).
Trimming the control channels
The control channels can be adjusted with the trim buttons if the model tends to drift in any particular direction. For each direction of flight, there is a corresponding trim button.
If, with the controls in a neutral position, the X4 drifts forwards or backwards, this can be trimmed out with the fore/aft trim button.
If, with the controls in a neutral position, the X4 drifts to the left or the right, this can be trimmed out with the left/right trim button.
natural_image
Diagram showing a drone with control panel and directional arrows indicating rotation (no text or symbols)If, with the controls in a neutral position, the X4 tends to rotate to the left or the right, this can be trimmed out with the left/right rotate trim button.
Change control mode - Modes 1 and 2
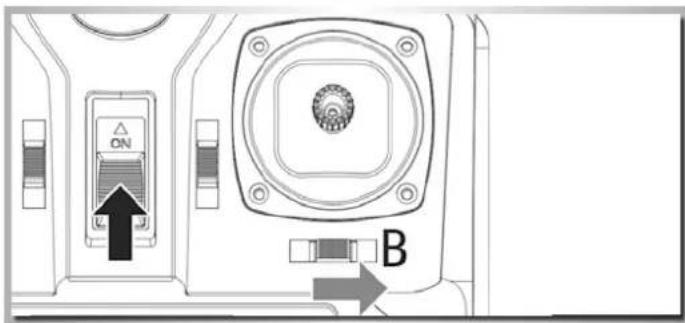
The control mode on the transmitter can be changed. You can switch between Mode 1 and Mode 2. Push the trim slider to the right to switch on the transmitter. You will hear a signal indicating the change of mode.
Mode 1: Turn function to right control lever
Mode 2: Turn function to left control lever
Special function explanation
1. Low power warning
When the four indicator lights on the bottom of the quadcopter start to flicker, the battery is running out of charge. You should guide the copter down immediately to avoid crash landing.
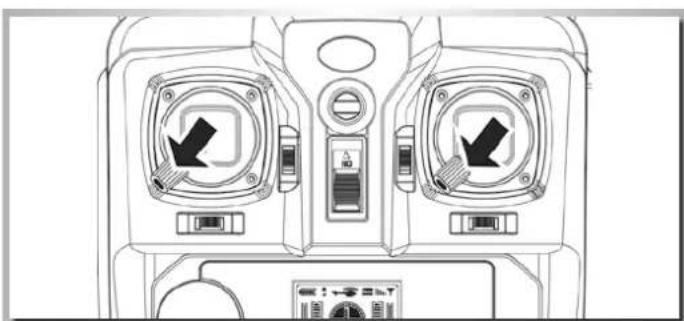
2. Re-calibrating the gyro
After a hard landing or crash you can recalibrate the gyro. To do so, place the copter on a completely flat surface. Then push the left and right levers of the transmitter to the bottom right hand corner for about 2-3 seconds until the LEDs stop flashing, as shown in the illustration on the right. The copter is ready to fly again.
3. Acrobatic Flight (Flips and Loops)
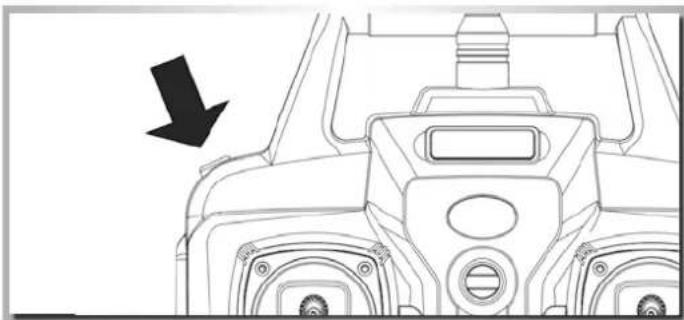
When you are familiar with the basic operation, you can do some awesome and exciting tricks and stunts! First of all, fly the aircraft to a height of more than 3 meters, press the stunt button switch on the rear right hand side of the transmitter, then push the right control lever (in any direction) to perform a 360 degree flip.
natural_image
Line drawing of a four-legged robotic aircraft with visible structural components and directional arrows (no text or symbols)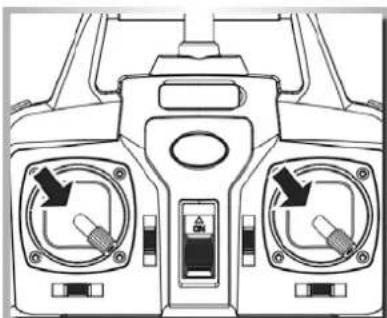
natural_image
Front view of a vehicle's front dashboard with two control panels and directional arrows (no text or symbols)
natural_image
Technical diagram of a mechanical device with directional control buttons and a central rotary knob (no text or symbols)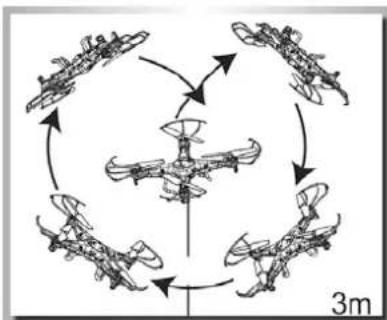
flowchart
graph TD
    A["Top: Aircraft"] --> B["Midplane"]
    B --> C["Bottom: Aircraft"]
    C --> D["Top: Aircraft"]
    D --> E["Midplane"]
    E --> F["Bottom: Aircraft"]
    F --> G["Top: Aircraft"]
    G --> H["Midplane"]
    H --> I["Bottom: Aircraft"]
    I --> J["Top: Aircraft"]
    J --> K["Midplane"]
    K --> L["Bottom: Aircraft"]
    L --> M["Top: Aircraft"]
    M --> N["Midplane"]
    N --> O["Bottom: Aircraft"]
    O --> P["Top: Aircraft"]
    P --> Q["Midplane"]
    Q --> R["Bottom: Aircraft"]
    R --> S["Top: Aircraft"]
    S --> T["Midplane"]
    T --> U["Bottom: Aircraft"]
    U --> V["Top: Aircraft"]
    V --> W["Midplane"]
    W --> X["Bottom: Aircraft"]
    X --> Y["Top: Aircraft"]
    Y --> Z["Midplane"]
    Z --> AA["Bottom: Aircraft"]
    AA --> AB["Top: Aircraft"]
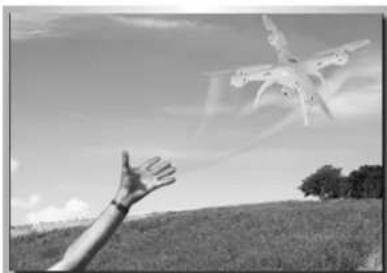
Throw launch
Experienced pilots can launch a quadcopter the cool way! Throw your copter into the air, making sure that you've got sufficient clearance (approx. 3-5m) and pushing the throttle gently up. It will automatically level out and hover smoothly in the sky. Throw launching is best done on a large lawn or field.
natural_image
Black-and-white photo of a hand reaching toward a flying drone over a field (no text or symbols visible)Special function explanation
Headless - Function
The Headless-function allows simplified control of a quadcopter, in which all control commands as use the reference point the location of the pilot. Here, it is no longer necessary, the position and orientation of the model taken into account. A feature which may be a bit confusing for experienced pilots, beginners, however, it facilitates control significantly.
1. Forward definition
natural_image
Technical line drawing of a vehicle dashboard with two front seats and a central control panel (no text or symbols)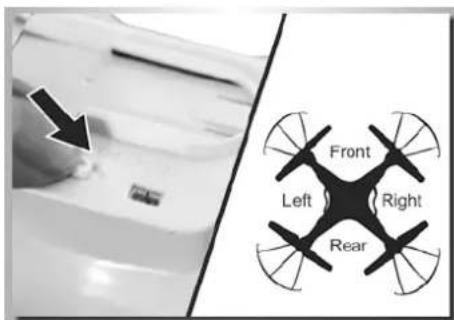
natural_image
Diagram of a camera module with directional arrows indicating movement or force (no text or symbols)Turn on power switch of remote control. After aircraft connects with power supply, place the switch in "ON" position, adjust the direction pointed by aircraft's handpiece and regard it as the dead ahead in headless situation.
Push the accelerator's push rod of remote control to the highest point and pull back to the lowest point. When remote control pops, it indicates that frequency modulation and forward definition have already finished.
2. Switch to headless function and general function
natural_image
Technical line drawing of a mechanical component with a black arrow pointing to a feature (no text or symbols present)- After frequency modulation, the aircraft defaults to general pattern. The indicator light on aircraft is long bright state. After pressing down headless function switch on the top left of master remote controller for 2 seconds, remote control will give out "DDD...", it means that it enters into headless state. After pressing for 2 seconds and hearing long "D", it means that it exits headless state.(In headless mode, four indicators on the aircraft flicker slowly for once within four seconds)
- In headless state, the operator has no need to recognize the position of aircraft's headpiece, and he just needs to control the aircraft in accordance with the direction of remote control's operating rod.
3. Correcting forward direction
natural_image
Front view diagram of a vehicle air conditioner unit with two control panels and directional arrows (no text or symbols)- After aircraft crashes in headless state, if there is deviation in head direction, it just needs to adjust the aircraft's direction again, pull remote control's accelerator and operating rod to bottom left simultaneously. When indicator light on the aircraft flickers for slow three seconds, it means that correction is done.
Trouble Shooting
| Problem Correction | |
| Transmitter and X4 will not bind | Throttle position needs to be fully minimized. Please do not move the transmitter sticks or trims during initial power-on binding. |
| Transmitter LED light came on and then suddenly went o | Replace new AA batteries |
| Gyro not working well Battery voltage too low | |
| Re-bind | |
| Unable to Flip Lipo power is too low and needs to be recharged | |
| Can not take o | Wrong installation of the props. Props are marked with "A"(CW) and "B"(CCW). Please check the pictures below for the correct order. |
| Wrong installation of motors. Please check to make sure that each motor is installed in its correct position. There are two dierent types of motors with dierent motor wire colors. Please check the pictures below for the correct order. | |
| One or more motors stop working Motor is damaged. Replace the motor. | |
| The motor connections(s) are disconnected. Resolder. | |
| The X4 is still drifting excessively when hovering even after a good accelerometer calibration | Set it on a level surface and shim the side that it drifts to with a few sheets of paper (the number of sheets will vary depending on the amount of drift), so it can calibrate the accelerometers with a level oset angle |
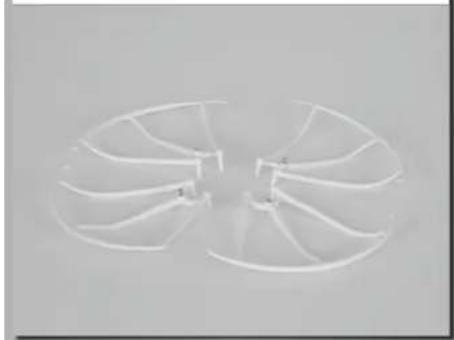
natural_image
Three white plastic components arranged in a V-shape on a plain background (no text or symbols visible)500508624 Propeller Schutzring Prop-saferring
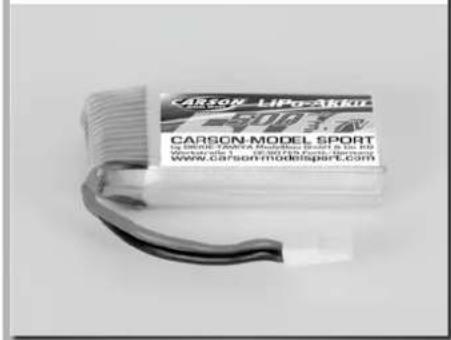
natural_image
Two white fan blades arranged in a close, fan-like pattern on a plain background (no text or symbols visible)500608162 LiPo-Akkupack 3,7V/500mAh LiPo-battery 3.7V/500mAh
Notizen / Notes

For Germany:
Service-Hotline: