NV-U74T - Gps SONY - Free user manual and instructions
Find the device manual for free NV-U74T SONY in PDF.
| Product type | Car navigation GPS |
| Brand | Sony |
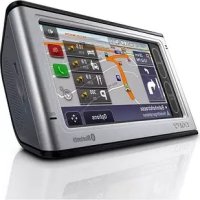
| Model | NV-U74T |
| Screen | Color touch screen |
| GPS antenna | Built-in, with external antenna jack |
| Bluetooth | Hands-free for phone calls |
| Traffic information (TMC) | Built-in, TMC antenna supplied, subscription after 90-day trial |
| Media player | Viewing JPEG photos from Memory Stick Duo |
| Microphone | Built-in for hands-free calls |
| Speaker | Built-in for voice guidance and calls |
| Power supply | Car battery adapter (cigarette lighter) supplied; AC adapter XA-AC13 optional; built-in rechargeable battery |
| Software update | Via esupport.sony.com (firmware and manuals) |
| Mounting bracket | Suction cup for windshield or dashboard |
| Maintenance and cleaning | Clean the suction cup with a soft, damp, lint-free cloth |
| Safety | Use the RESET button in case of malfunction; do not obstruct the GPS antenna |
| Spare parts and reparability | Bracket, suction cup, car adapter, TMC antenna available as options or replacements |
Frequently Asked Questions - NV-U74T SONY
User questions about NV-U74T SONY
0 question about this device. Answer the ones you know or ask your own.
Ask a new question about this device
Download the instructions for your Gps in PDF format for free! Find your manual NV-U74T - SONY and take your electronic device back in hand. On this page are published all the documents necessary for the use of your device. NV-U74T by SONY.
USER MANUAL NV-U74T SONY
Following registration enables Sony to send you periodic mailings about software, firmware updates and other important product information.
To register your product, please visit our website at:
U.S.A.
http://productregistration.sony.com
Canada
http://www.sonystyle.ca/registration
Thank you.
Note
Illustrations in this manual may differ from the actual device.
Table of contents
US
Getting Started 4
Installation / Connection 8
Navigation 16
Basic Settings 27
Bluetooth® Hands-free Calling 28
Photo Playback 32
Questions / Problems 33
Extra Items 34
Checking the box contents
US
Make sure you have received all items.

Main unit
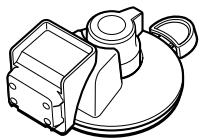
Cradle
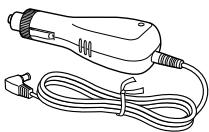
Car battery adapter
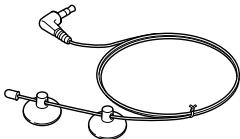
TMC antenna
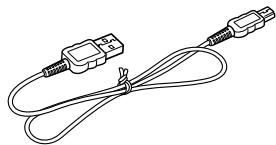
USB cable
Quick Start Guide (this manual)
Important Information
End-User License Agreement
Warranty Card
US
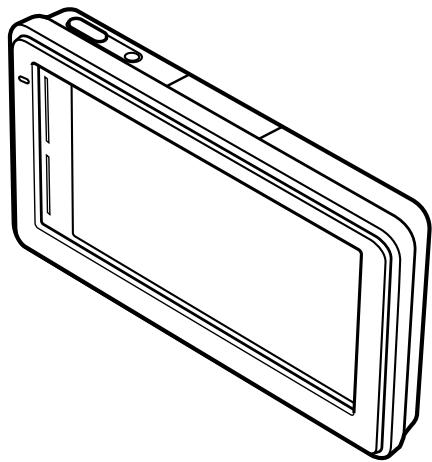
Location of controls
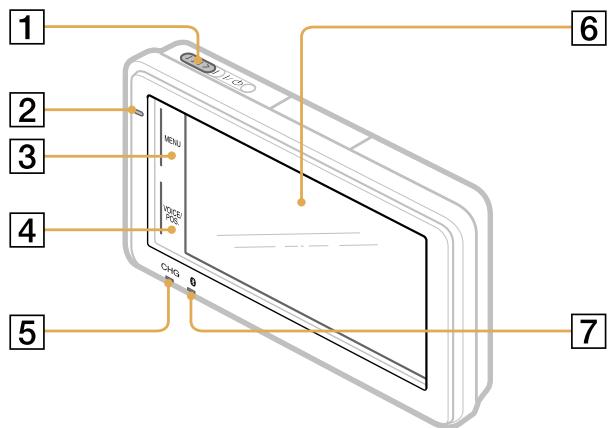
1 I/ (on/standby) switch
2 Built-in microphone for hands-free calling
3 MENU button
4 VOICE/POS. button Shows the current position and repeats the last voice guidance.
5 CHG (battery charge) indicator
Red: charging.
Green: fully charged.
Off:adapterdisconnected.
6 Display window/touch screen
7 (Bluetooth) indicator
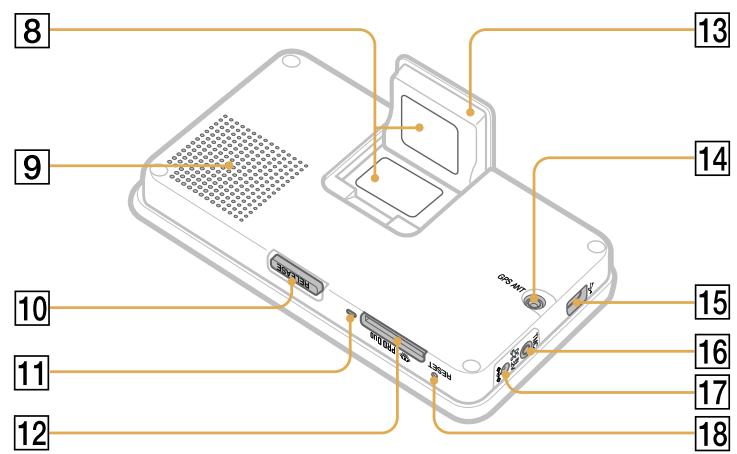
8 Nameplate
9 Speaker
10 RELEASE button
11 Memory Stick access indicator
PRO DUO (Memory Stick Duo) slot
13 Built-in GPS antenna
14 GPS ANT (GPS antenna) jack
15 (USB) jack
16 TMC (TMC antenna) jack
DC IN 5-5.2V jack Connects to the car battery adapter or optional AC adapter XA-AC13.
18 RESET button
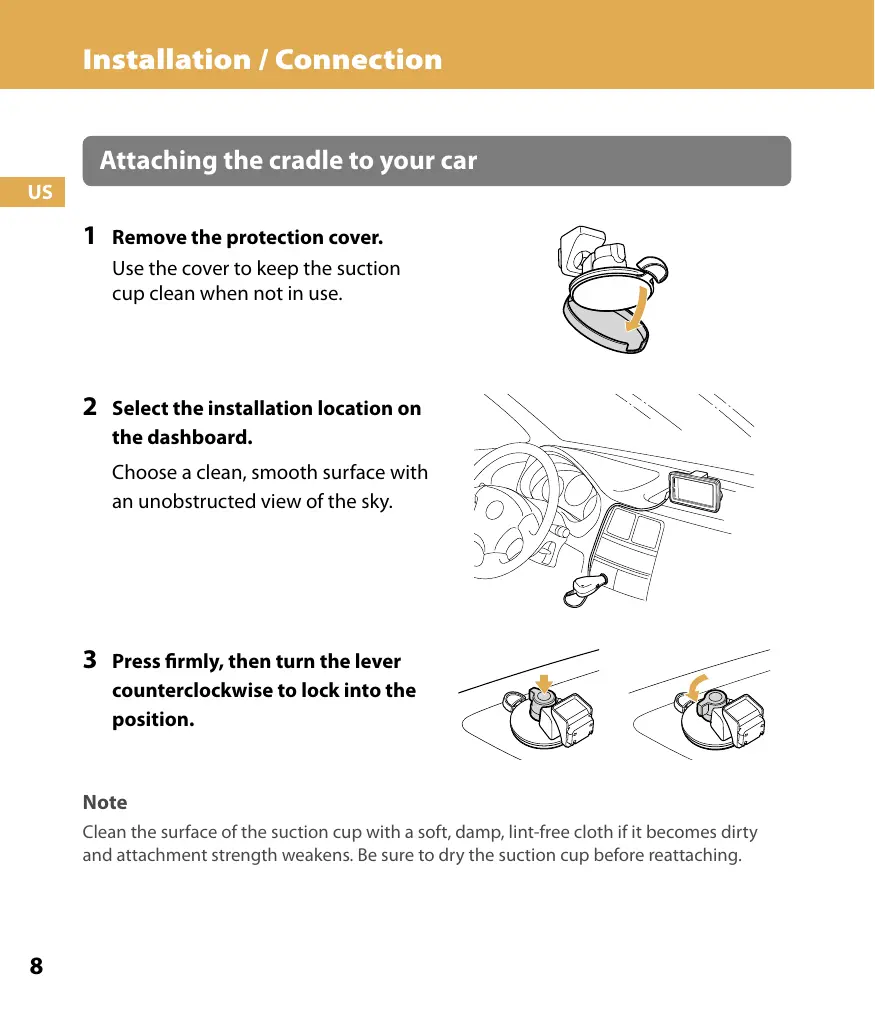
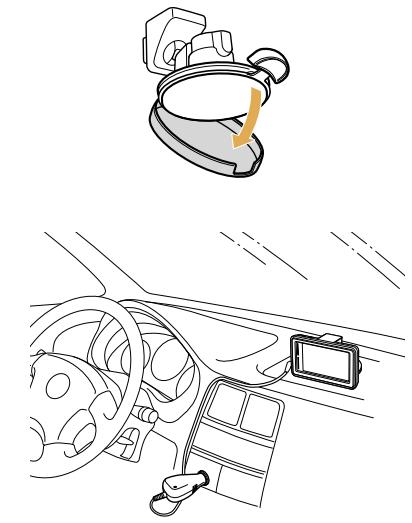
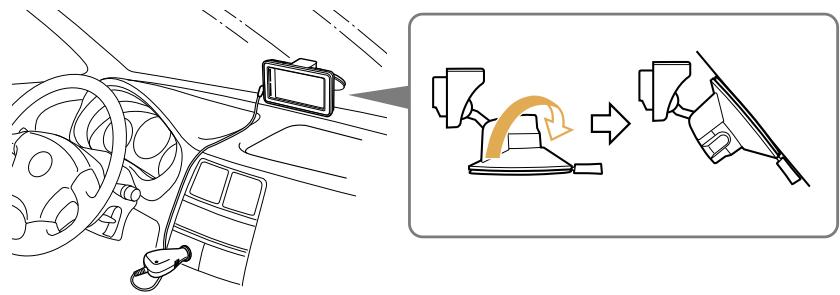
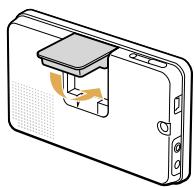
Attaching the cradle to your car
1 Remove the protection cover.
Use the cover to keep the suction cup clean when not in use.
2 Select the installation location on the dashboard.
Choose a clean, smooth surface with an unobstructed view of the sky.
3 Press firmly, then turn the lever counterclockwise to lock into the position.
Note
Clean the surface of the suction cup with a soft, damp, lint-free cloth if it becomes dirty and attachment strength weakens. Be sure to dry the suction cup before reattaching.
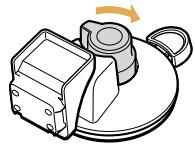
To install on the windshield
Rotate the suction cup before attaching.
Any other procedure is the same as for installing on the dashboard.
Attaching the unit to the cradle
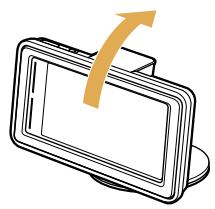
1 Open the built-in GPS antenna.
2 Insert the unit firmly into the cradle until it clicks into place.
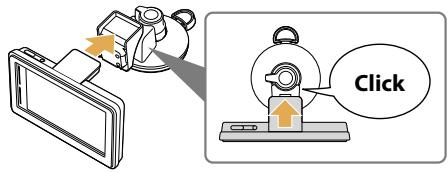
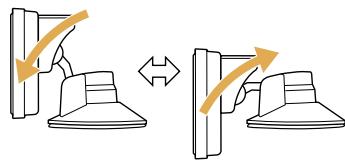
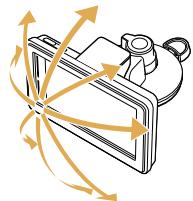
3 Adjust the monitor angle for optimal viewing.
Connecting the power
Connect the unit to the cigarette lighter socket with the supplied car battery adapter.

US
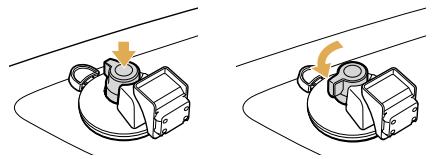
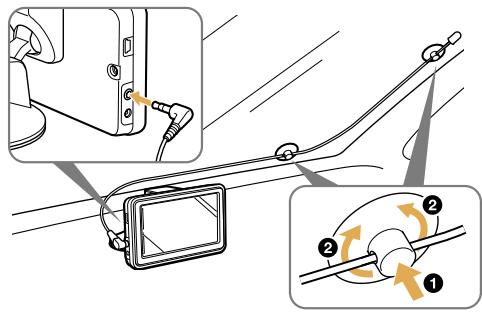
Installing the TMC antenna
1 Plug the cord to the unit.
2 Attach the suction cups to the inside of the car's windshield.
To expel air inside the suction cups, press the center 1 and periphery 2 firmly.
Activating the TMC service
After the 90-day free trial, the TMC (Traffic Message Channel) service requires a fee.
Follow the procedure below to activate the TMC service.
Purchase the TMC activation code at: http://www;navigation.com/sony
For details, follow the instructions at the above website.
2 Activate the service on the unit.
Touch MENU "Traffic Information" "Settings" "Activate TMC Service" "Activate."
Enter the purchased activation code.
Detaching the unit
US
1 Press and hold RELEASE to release the unit.
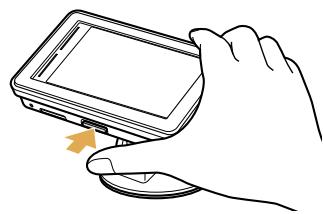
2 Close the built-in GPS antenna.
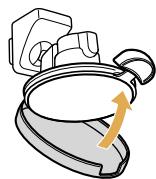
IMPORTANT
Follow the instructions below to avoid damaging the surface of the suction cup.
1 Turn the lever clockwise to unlock the cradle.
2 Use the tab to detach the cradle from surface.
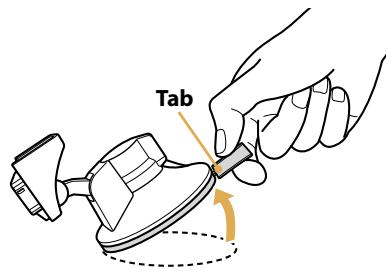
3 Attach the protection cover.
Note
After each use, detach the cradle from the dashboard or windshield.
Turning on the unit
1 Park your car in a safe, open place where the unit has a clear view of the sky.
2 Slide I/O.
3 Follow the on-screen instructions of the Startup Configuration Wizard before the first use.
4 Read the warning, then touch "Agree."
5 Touch VOICE/POS.
6 Wait until the current position calculation completes via GPS signals.
The icon will turn red to indicate sufficient GPS signal strength.
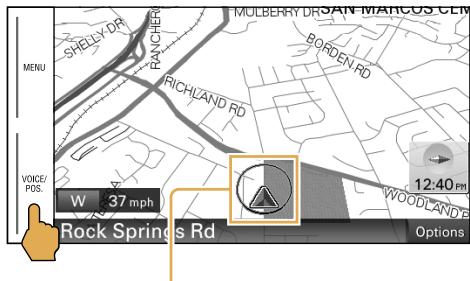
Current position icon
Gray: Position not fixed (insufficient signals).
Orange: Reception temporarily interrupted.
Red: Position fixed.
Notes
- The calculation may take as long as 10 minutes the first time you use the unit.
- The default position is displayed on the map until the calculation is complete.
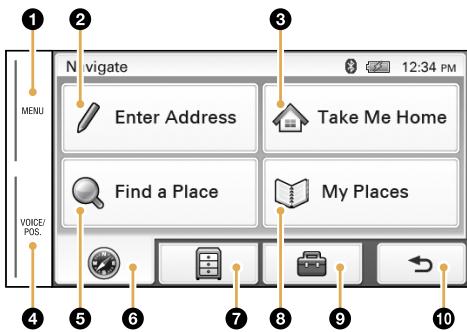
Touch to show the main menu.
Touch to show the address input menu.
Touch to start the route guidance to your home.
Touch to show the current position on the map.
Touch to show the place search menu.
Touch to show the navigation menu.
Touch to show the application menu.
Touch to show the stored/recent destinations search menu.
Touch to show the setting menu.
10 Touch to return to the previous display.
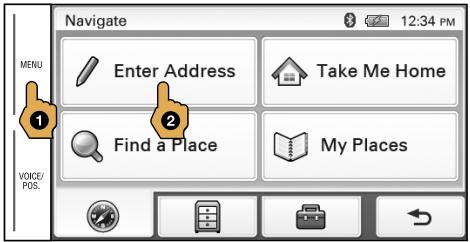
Searching by address
US
1 Touch MENU, then "Enter Address."
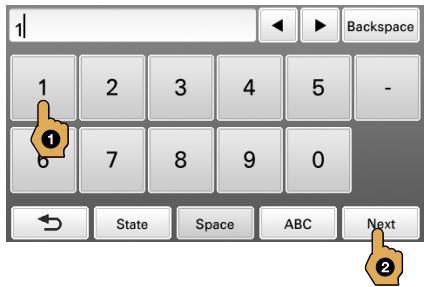
2 Enter the house number.
Touch "Next" after entering the house number.
To change the state, touch "State" before touching "Next."
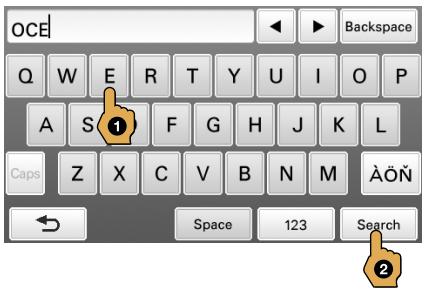
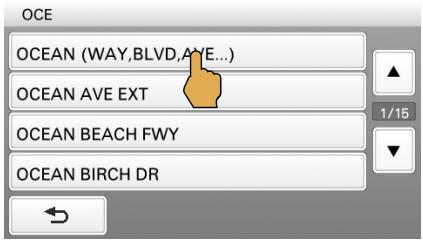
3 Set the street name.
Enter the name, touch "Search," then select from the list.

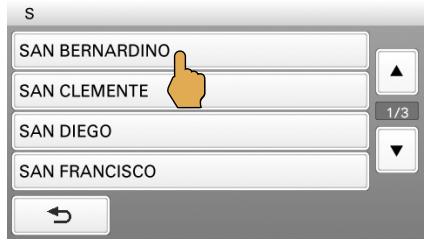
4 Set the city name.
Enter the name, touch "Search," then select from the list.


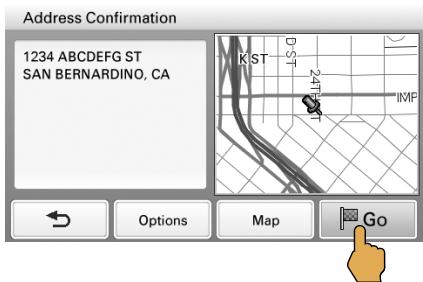
5 Touch "Go."
Tips
- By entering just the first few letters of a street, city, or state name, its candidate list will be generated after touching "Search."
- The state can be set by entering its standard 2-letter abbreviation (e.g., NY for New York).
Searching by POI (Points Of Interest) name
1 Touch MENU, then "Find a Place."
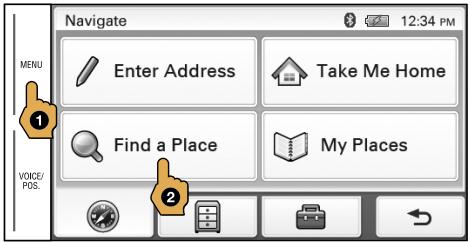
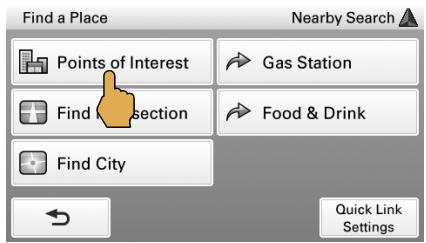
2 Touch "Points of Interest."
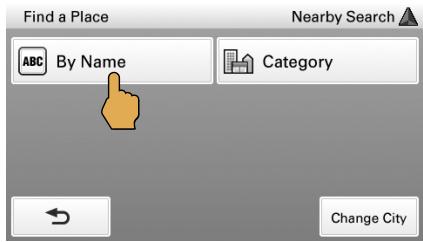
3 Touch "By Name."
4 Enter the POI name, then touch "Search."
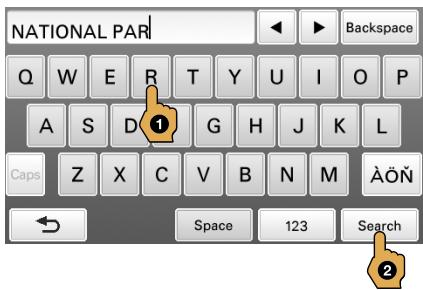
5 Touch the desired POI in the list.
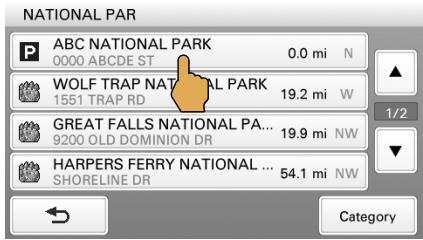
6 Touch "Go."
To search by POI category
Select "Find a Place" "Points of Interest" "Category" the desired category the desired POI "Go."
Tip
You can find local airports by entering their 3-letter abbreviations (e.g., LAX for Los Angeles International Airport).
Map display
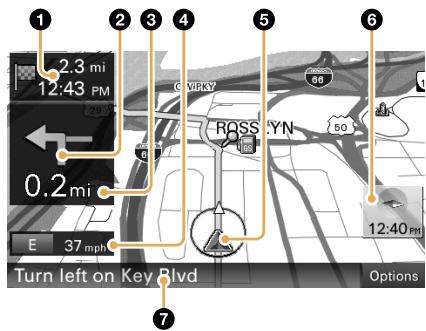
Distance/ETA (Estimated Time of Arrival) to destination
Next turn instruction
3 Distance to next turn
Current direction/speed
Current position/GPS status indication
North indicator/current time
Next instruction
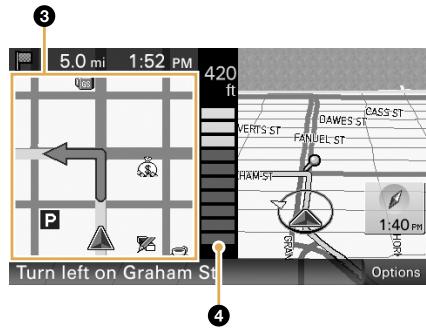
Dual view
US
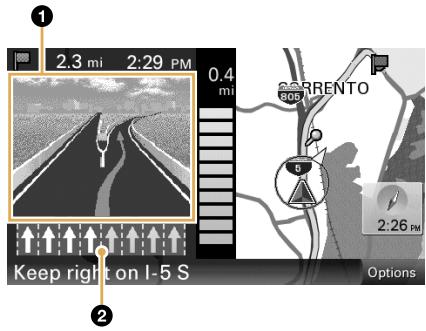
Approaching a freeway junction
Approaching a street intersection
3D junction image
Lane guide (correct lane in yellow)
Magnified view of an intersection
Distance bar
Map tools
US
Touch "Options" to show the map tool bar.
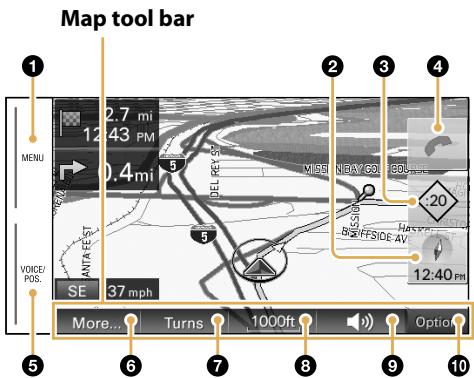
Touch to show the main menu.
Touch to toggle the map orientation (heading up/north up).
Touch to show the traffic messages.
: Checks the delay time (minutes) and shows messages on the current route.
: Shows messages not on the current route.
Touch to show the call in progress display.
(Only during a hands-free call)
During route guidance:
Touch to repeat the last voice guidance.
In other cases:
Touch to return to the current position display.
Touch to show additional map options.
(E.g., "Save This Location," "Quit Navigation," etc.)
Touch to show the turn-by-turn list. (Only during route guidance)
Touch to zoom in/out the map.
Touch / .
Touch to adjust the voice guidance volume.
Touch + / -
To turn off the sound, touch ※.
10 Touch to hide the map tool bar.
Map scrolling mode
US
1 Touch the map to switch to the scrolling mode.
2 Place the desired point into the crosshair.
To scroll a map
Drag the screen.
To move the desired point to the center of the screen
Touch the point.
To pan the map
Touch and hold the center of the crosshair until the beep sounds, then drag it in the desired direction.
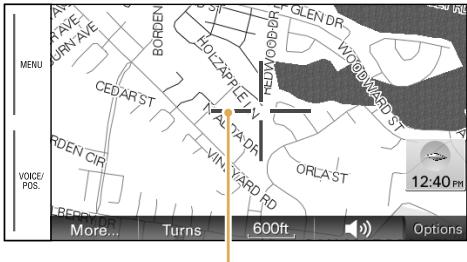
Crosshair
To exit the map scrolling mode
Touch VOICE/POS. (the current position reappears).
Touch MENU to show the setting menu.
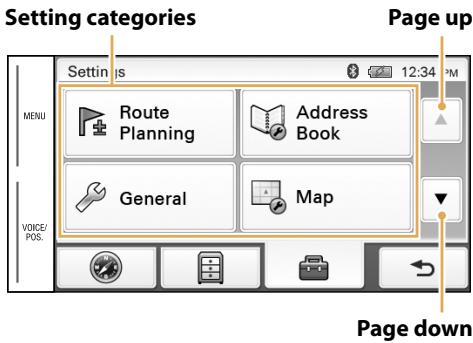
The setting menu includes the following categories:
- "Route Planning": Future route planning by adding interim destinations
- "Address Book": Saved locations edit
- "General": Menu settings and device information
- "Map": Map display settings
- "Route Profile": Route calculation settings
- "Guide": Route guidance voice and zoom settings
- "Bluetooth": General Bluetooth setups
- "Phone": Bluetooth hands-free setups
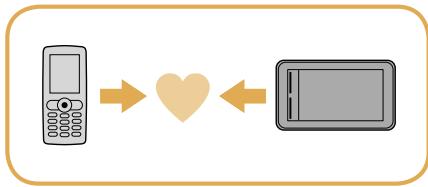
Step 1: Pairing
US
First, register ("pair") your cellphone with this unit. This registration (pairing) is required only for the first time.
1 Set the cellphone to allow for searching (discoverable).
2 Touch MENU.
3 Touch, then "Bluetooth."
4 Touch "Bluetooth Signal" to set to "ON."
The Bluetooth indicator lights up in blue.
5 Touch "Add Devices," then "OK."
6 In the list, touch the cellphone to register.
7 Enter the same passkey on this unit and the cellphone.
The passkey is a 4 or more digit number (e.g., 1234), which is either selected by yourself or determined by the cellphone.
For details, see also the manual of the cellphone.
Step 2: Connecting
US
Connect this unit and the cellphone for hands-free calling.
Once paired, the unit automatically connects to the last connected cellphone. To connect manually, follow the procedure below.
1 Touch MENU.
2 Touch, then "Phone."
3 Touch"Select Phone."
4 In the list, touch the cellphone to connect, then "OK."
The unit is connected to the cellphone.
Note
The Bluetooth signal must be active both on this unit and the cellphone in order to connect.
Step 3: Hands-free calling
Once the unit is connected to the cellphone, you can make/receive a hands-free call.
Making a call
1 Touch MENU.
2 Touch, then "Phone."
3 Touch "Make a Call," then "Numeric Input."
4 Enter the phone number.
5 Touch.
To end the call
Touch
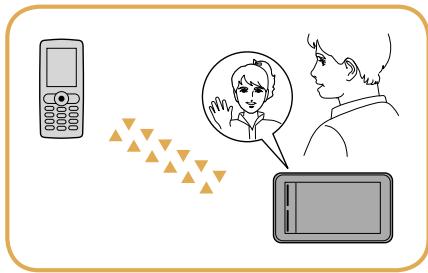
Receiving a call
The following display indicates an incoming call, along with the ring tone.
Touch to answer.
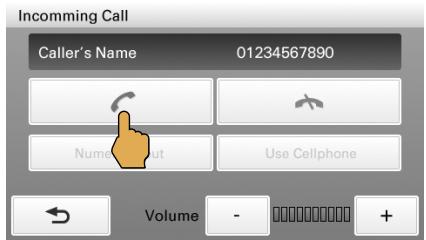
To reject the call
Touch
To end the call
Touch
US
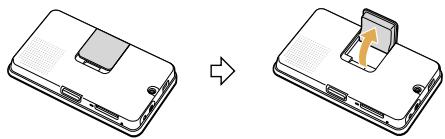
You can view photo files on a "Memory Stick Duo."
To start playback, touch MENU 图 "Photo."
Photo playback display
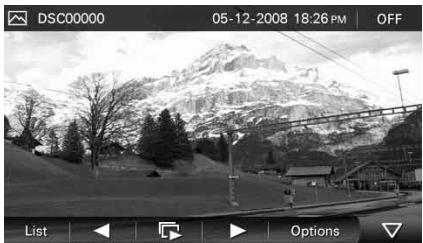
JPEG files shot by a Sony digital still camera are played.
Use the tool bar to control playback.
For details on compatible file type, see "Instruction Manual" (PDF)*.
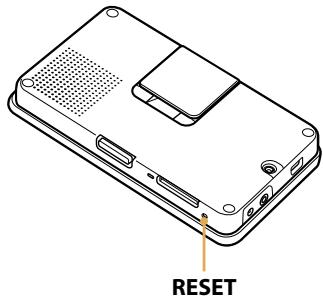
If you have any question or problem with this product, try the following first.
1 Read Troubleshooting in the supplied "Important Information."
If the problem persists
2 Reset the unit by pressing RESET.
Note
Stored data/destinations such as in the following items will not be erased.
- "Address Book"
- "Recent Destinations"
- "Phone Book"
If the problem still persists
3 Please contact:
U.S.A.
Call 1-800-222-7669
URL http://www.sony.com/nav-u/support
Canada
Call 1-877-899-7669
URL http://www.sony.ca/nav-u
To get the most out of the unit, download and install the following items on your computer.
Instruction Manual (PDF): Contains descriptions of all functions.
PC application software: For firmware upgrades and data management.
1 Go to http://esupport.ony.com/
2 Enter your model number (NV-U74T), then click "Continue."
3 Download the desired item.
To download the manual, select "Documentation" "Instruction Manual." To download the software, select "Drivers" "nav-u tool."
For details, follow the instructions at the website.
Avertissement
VEUILLEZ LIRE CE MANUEL AINSI QUE LE MANUEL « INFORMATION IMPORTANTE » FOURNI DANS LEUR INTÉGRALITE AVANT D'INSTALLER OU DE FAIRE FONCTIONNER VOTRE SYSTème DE NAVIGATION PERSONNEL. UNE INSTALLATION OU UNE UTILISATION INCORRECTE DE CET APPAREIL PEUT ENTRAIÑER UN ACCIDENT, DES BLESSURES OU LA MORT.
ENREGISTREMENT DU PRODUIT
Installation / Raccordement 8
Navigation 16
Réglages de base 27
Appels Bluetooth® en mains libres 28
Lecture de photos 32
Vert: charge complete.