T 11 - Phone AGFEO - Free user manual and instructions
Find the device manual for free T 11 AGFEO in PDF.

| Product Type | Corded Telephone |
| Brand | AGFEO |
| Model | T 11 |
| Dimensions (approx.) | 200 x 160 x 80 mm |
| Weight (approx.) | 500 g |
| Power Supply | AC adapter or via phone line |
| Display | LCD display with backlight |
| Handsfree Function | Yes, with speakerphone |
| Memory Keys | 10 direct memory keys |
| Ringer Volume Control | Adjustable |
| Wall Mountable | Yes |
| Number of Lines | 1 line |
| Caller ID | Supported |
| Redial Function | Last number redial |
| Mute Function | Yes |
| Pause Function | Yes |
| Flash Key | Yes |
| Cleaning and Care | Wipe with dry cloth, avoid liquids |
| Safety Precautions | Do not expose to moisture or extreme temperatures |
| Spare Parts Availability | AC adapter, handset cord, base |
| Repairability | Modular design, easy to replace handset and cords |
| Warranty | 2 years (manufacturer standard) |
Frequently Asked Questions - T 11 AGFEO
User questions about T 11 AGFEO
0 question about this device. Answer the ones you know or ask your own.
Ask a new question about this device
Download the instructions for your Phone in PDF format for free! Find your manual T 11 - AGFEO and take your electronic device back in hand. On this page are published all the documents necessary for the use of your device. T 11 by AGFEO.
USER MANUAL T 11 AGFEO
natural_image
Black and white photo of a FOX phone with a coiled cord, no visible text or symbols on the device itself.AGFEO
Table of Contents...... D-3
Accessories and Content...... E-2
The AGFEO T 11 E-2
AGFEO T 11 Buttons....E-3
Making a call E-4
One Touch Memory....E-4
Make a call with One Touch Memory...... E-4
Two Touch Memory....E-4
Make a call with Two Touch Memory....E-5
Ringer Level and Melody....E-5
Notes.....E-5
Wall Mounting with Bracket....E-6
Location E-7
Cleaning....E-7
Verpackungsinhalt
text_image
Technical diagram of a telephone handset with numbered parts and labeled connectionsAccessories and Content
Following items are included in the package of the AGFEO T 11
- Phone base unit
- Handset with coil cord
- Line cord
- Wall mounting kit
- This manual
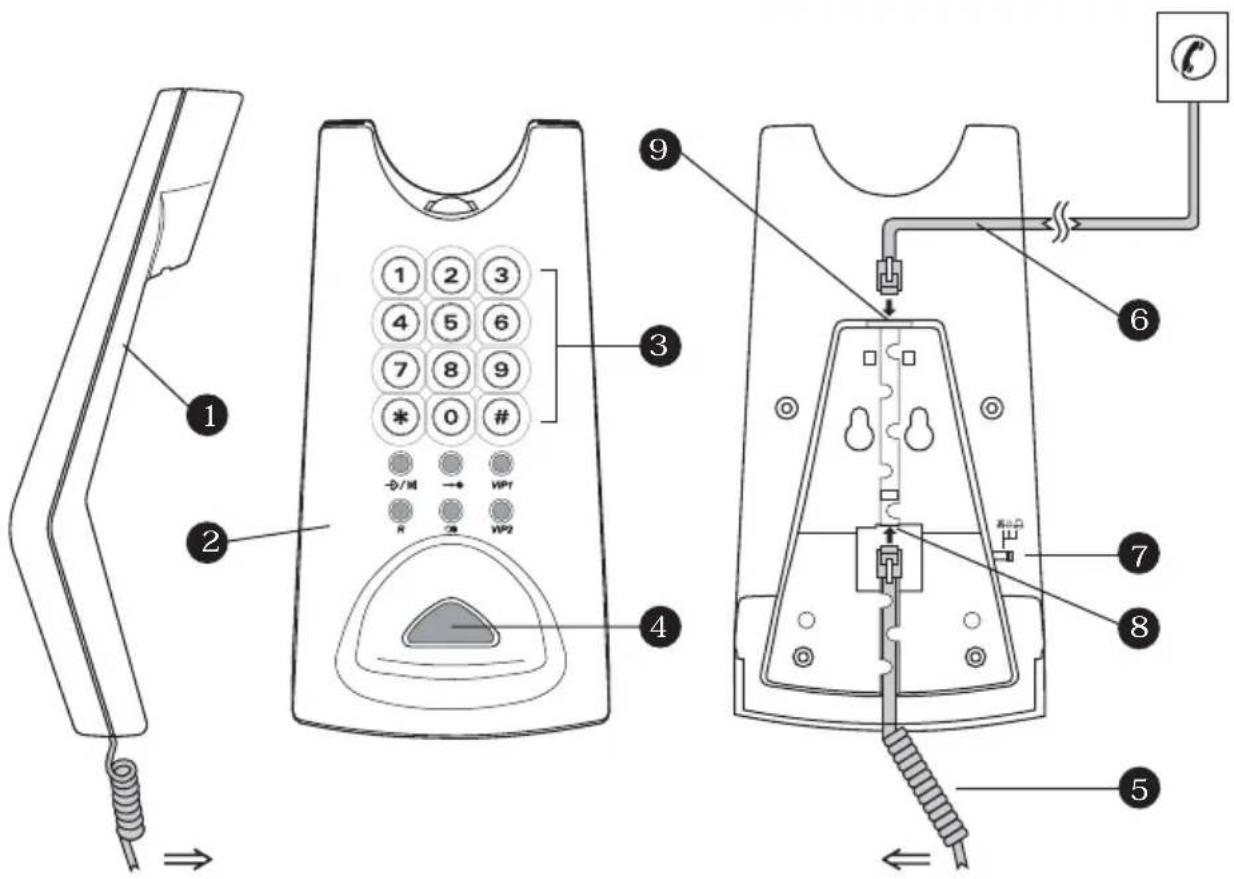
The AGFEO T 11
text_image
Technical diagram of a telephone receiver with numbered parts and wiring connections- Handset
- Base unit
- Key top
- Hook switch
- Coil cord
-
Line cord
-
Ringer switch
- Jack for coil cord
- Jack for line cord
Ringer high:

Ringer middle:

Ringer low:

| Function buttons Description | |
| 0...9 | To enter the digits 0-9 |
| * | To enter * |
| # | To enter # |
| →/⊗ | This button functions as "MUTE" during conversation. Press this button once and your voice will not pass through the microphone. To resume, press this button again.This button functions as "STORE" when programming a telephone number into a memory bank. Please refer to "ONE/TWO Touch MEmory" section for details. |
| →● | Two touch memory (21 digits maximum). Push MEMORY button followed by 0-9 to make a call with stored telephone numbers. Please refer to section "Two Touch Memory" |
| VIP1/VIP2 | One touch memory (21 digits maximum). A single push on one of these buttons to make a call with stored telephone numbers. Please refer to section "One Touch Memory". |
| R | Flash or Recall. To switch between 2 lines. |
| ○● | This button functions as last number redial, when making a call (31 digits maximum).This button functions as "pause" when programming a telephone number into a memory bank. |
Making a call
To make a call, simply pick up the handset and wait for the dialling tone. Then dial the desired telephone number with the numeric keys. To end a call, replace the handset on the cradle of the base unit or push the hook switch. Refer to the "T 11 Buttons" section and find out detailed functions about each individual button.
One Touch Memory
One Touch Memory provides you with the easiest way to call a frequently used number. Follow the instructions listed below to store a number (21 digits maximum) into the One Touch Memory bank:
- Pick up Handset.
- Press and release STORE button (→/→).
-
Press VIP1/VIP2 followed by the desired phone number. You may enter for # buttons into the dialling sequence just like the way you usually make calls to the desired phone number after you have picked up the handset. If your Phone is connected to a PABX switching system, you may enter the PAUSE button (○) into the dialling sequence to insert a delay when necessary.
-
Press STORE button →/→ or replace handset to store entry.
Make a call with One Touch Memory
To make a call with One Touch Memory, simply pick up the handset and wait for the dialling tone. Then Press VIP1/VIP2. The stored phone number will be dialled.
Two Touch Memory
Besides the One Touch Memory, the AGFEO T 11 is also equipped with 10 two touch memory banks. Follow the instructions below to store a number (21 digits maximum) into the Two Touch Memory Bank:
- Pick up handset.
- Press and release STORE button (→/→).
- Press the MEMORY button ( ) followed by a numbered button from 0 to 9 to select the memory bank position.
-
Enter the desired phone number. You may enter * or # buttons into the dialling sequence just like the way you usually make calls to the desired phone number after you have picked up the handset. If your Phone is connected to a PABX switching system, you may enter the PAUSE button (○) into the dialling sequence to insert a delay when necessary.
-
Press STORE button →/or replace handset to store entry.
Make a call with Two Touch Memory
To make a call with the Two Touch Memory, simply pick up the handset and wait for the dial-ling tone. Press the MEMORY button (→●) followed by a corresponding numbered button (0-9). The stored phone number will be dialled.
Ringer Level and Melody
The AGFEO T 11 has three preset ringer melodies and loudness levels. To change the melodies and loudness level, follow the instructions listed below:
- Pick up handset.
- Press and release the STORE button (→/→).
3 Press and release #. - Use the numbered button to make your selection of ringer melodies and loudness level combination.
Numbered Buttons Ringer Melody Loudness Level
| 1 A Low |
| 2 A Normal |
| 3 A High |
| 4 B Low |
| 5 B Normal |
| 6 B High |
| 7 C Low |
| 8 C Normal |
| 9 C High |
| 0 OFF OFF |
- Press and release the STORE button (→/⊗).
Notes
No ringing tone will be heard, if ringer melody is set to "OFF"!
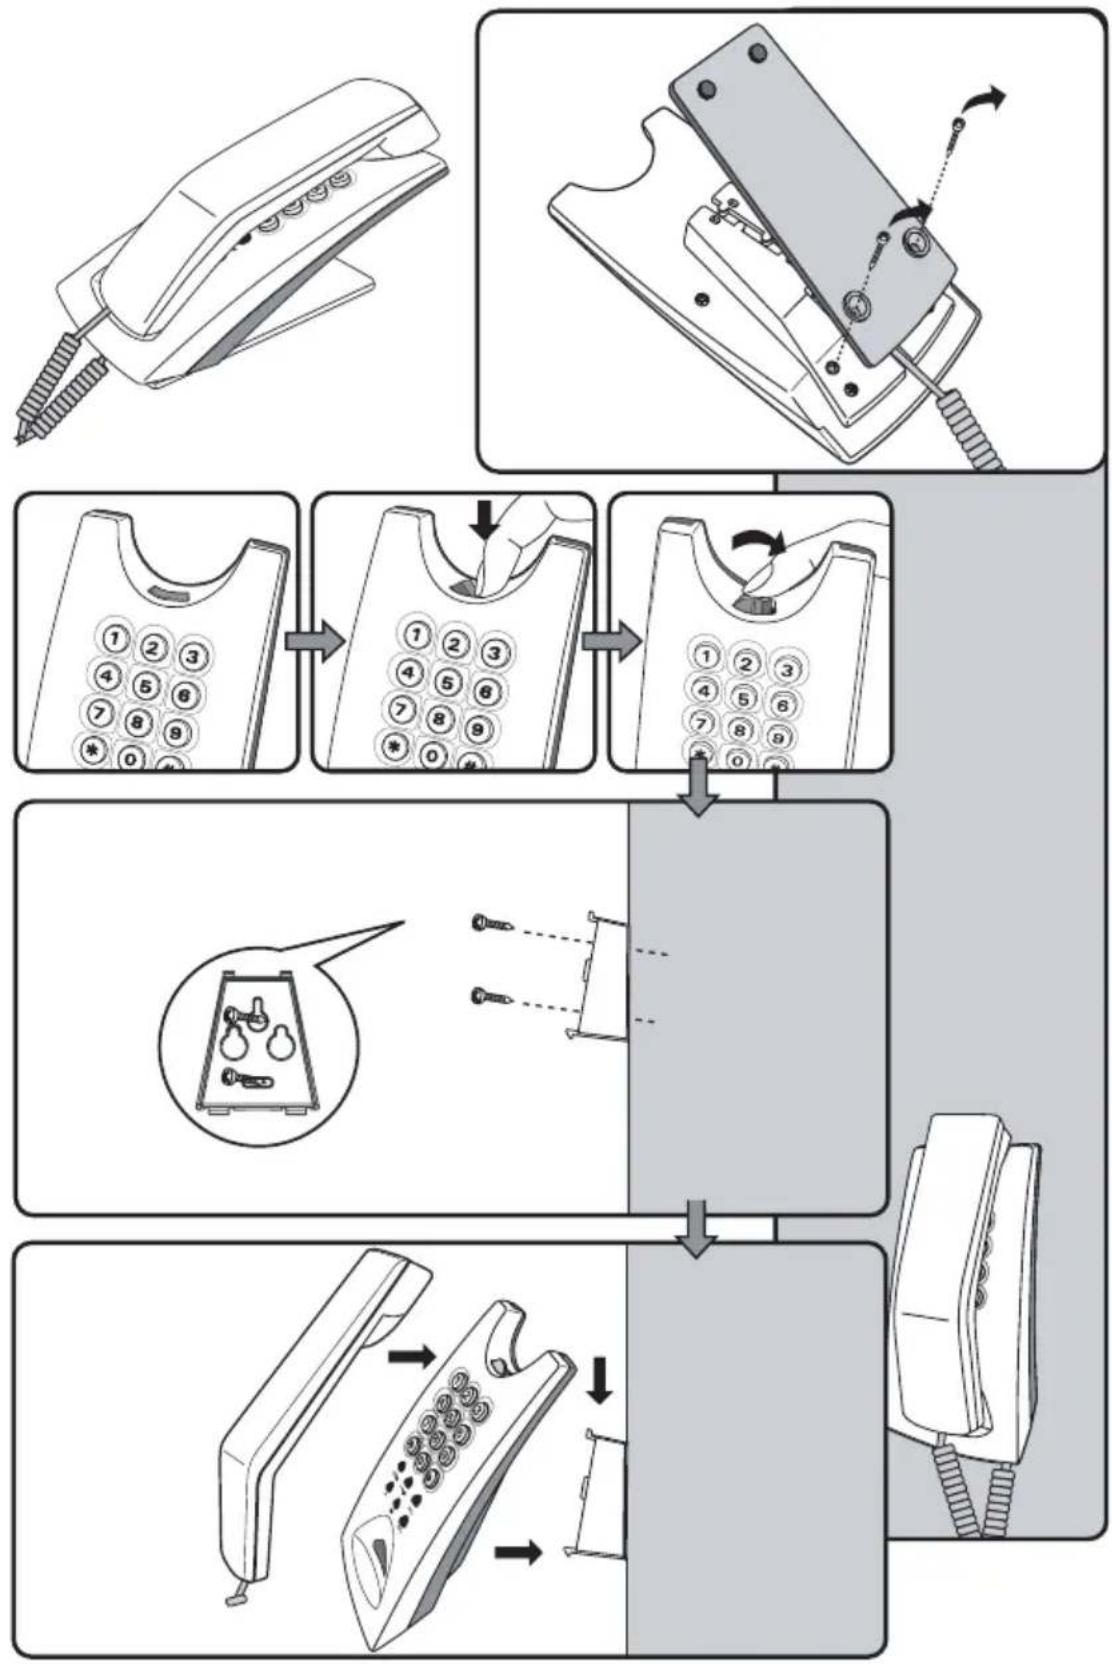
Wall Mounting with Bracket
flowchart
graph TD
    A["Receipt"] --> B["Callout"]
    B --> C["Arrow pointing to 'Read' or 'Write'"]
    C --> D["Arrow pointing to 'Read' or 'Write'"]
    D --> E["Arrow pointing to 'Write'"]
    E --> F["Arrow pointing to 'Write'"]
    F --> G["Arrow pointing to 'Write'"]
    G --> H["Arrow pointing to 'Write'"]
    H --> I["Arrow pointing to 'Write'"]
    I --> J["Arrow pointing to 'Write'"]
    J --> K["Arrow pointing to 'Write'"]
    K --> L["Arrow pointing to 'Write'"]
    L --> M["Arrow pointing to 'Write'"]
    M --> N["Arrow pointing to 'Write'"]
    N --> O["Arrow pointing to 'Write'"]
    O --> P["Arrow pointing to 'Write'"]
    P --> Q["Arrow pointing to 'Write'"]
    Q --> R["Arrow pointing to 'Write'"]
    R --> S["Arrow pointing to 'Write'"]
    S --> T["Arrow pointing to 'Write'"]
    T --> U["Arrow pointing to 'Write'"]
    U --> V["Arrow pointing to 'Write'"]
    V --> W["Arrow pointing to 'Write'"]
    W --> X["Arrow pointing to 'Write'"]
    X --> Y["Arrow pointing to 'Write'"]
    Y --> Z["Arrow pointing to 'Write'"]
    Z --> AA["Arrow pointing to 'Write'"]
    AA --> AB["Arrow pointing to 'Write'"]
    AB --> AC["Arrow pointing to 'Write'"]
    AC --> AD["Arrow pointing to 'Write'"]
    AD --> AE["Arrow pointing to 'Write'"]
    AE --> AF["Arrow pointing to 'Write'"]
    AF --> AG["Arrow pointing to 'Write'"]
    AG --> AH["Arrow pointing to 'Write'"]
    AH --> AI["Arrow pointing to 'Write'"]
    AI --> AJ["Arrow pointing to 'Write'"]
    AJ --> AK["Arrow pointing to 'Write'"]
    AK --> AL["Arrow pointing to 'Write'"]
    AL --> AM["Arrow pointing to 'Write'"]
    AM --> AN["Arrow pointing to 'Write'"]
    AN --> AO["Arrow pointing to 'Write'"]
    AO --> AP["Arrow pointing to 'Write'"]
    AP --> AQ["Arrow pointing to 'Write'"]
    AQ --> AR["Arrow pointing to 'Write'"]
    AR --> AS["Arrow pointing to 'Write'"]
    AS --> AT["Arrow pointing to 'Write'"]
    AT --> AU["Arrow pointing to 'Write'"]
    AU --> AV["Arrow pointing to 'Write'"]
    AV --> AW["Arrow pointing to 'Write'"]
    AW --> AX["Arrow pointing to 'Write'"]
    AX --> AY["Arrow pointing to 'Write'"]
    AY --> AZ["Arrow pointing to 'Write'"]
    AZ --> BA["Arrow pointing to 'Write'"]
    BA --> BB["Arrow pointing to 'Write'"]
    BB --> BC["Arrow pointing to 'Write'"]
    BC --> BD["Arrow pointing to 'Write'"]
    BD --> BE["Arrow pointing to 'Write'"]
    BE --> BF["Arrow pointing to 'Write'"]
    BF --> BG["Arrow pointing to 'Write'"]
    BG --> BH["Arrow pointing to 'Write'"]
    BH --> BI["Arrow pointing to 'Write'"]
    BI --> BJ["Arrow pointing to 'Write'"]
    BJ --> BK["Arrow pointing to 'Write'"]
    BK --> BL["Arrow pointing to 'Write'"]
    BL --> BM["Arrow pointing to 'Write'"]
    BM --> BN["Arrow pointing to 'Write'"]
    BN --> BO["Arrow pointing to 'Write'"]
    BO --> BP["Arrow pointing to 'Write'"]
    BP --> BQ["Arrow pointing to 'Write'"]
    BQ --> BR["Arrow pointing to 'Write'"]
    BR --> BS["Arrow pointing to 'Write'"]
    BS --> BT["Arrow pointing to 'Write'"]
    BT --> BU["Arrow pointing to 'Write'"]
    BU --> BV["Arrow pointing to 'Write'"]
    BV --> BW["Arrow pointing to 'Write'"]
    BW --> BX["Arrow pointing to 'Write'"]
    BX --> BY["Arrow pointing to 'Write'"]
    BY --> BZ["Arrow pointing to 'Write'"]
    BZ --> CA["Arrow pointing to 'Write'"]
    CA --> CB["Arrow pointing to 'Write'"]
    CB --> CC["Arrow pointing to 'Write'"]
    CC --> CD["Arrow pointing to 'Write'"]
    CD --> CE["Arrow pointing to 'Write'"]
    CE --> CF["Arrow pointing to 'Write'"]
    CF --> CG["Arrow pointing to 'Write'"]
    CG --> CH["Arrow pointing to 'Write'"]
    CH --> CI["Arrow pointing to 'Write'"]
    CI --> CJ["Arrow pointing to 'Write'"]
    CJ --> CK["Arrow pointing to 'Write'"]
    CK --> CL["Arrow pointing to 'Write'"]
    CL --> CM["Arrow pointing to 'Write'"]
    CM --> CN["Arrow pointing to 'Write'"]
    CN --> CO["Arrow pointing to 'Write'"]
    CO --> CP["Arrow pointing to 'Write'"]
    CP --> CQ["Arrow pointing to 'Write'"]
    CQ --> CR["Arrow pointing to 'Write'"]
    CR --> CS["Arrow pointing to 'Write'"]
    CS --> CT["Arrow pointing to 'Write'"]
    CT --> CU["Arrow pointing to 'Write'"]
    CU --> CV["Arrow pointing to 'Write'"]
    CV --> CW["Arrow pointing to 'Write'"]
    CW --> CX["Arrow pointing to 'Write'"]
    CX --> CY["Arrow pointing to 'Write'"]
    CY --> CZ["Arrow pointing to 'Write'"]
    CZ --> DA["Arrow pointing to 'Write'"]
    DA --> DB["Arrow pointing to 'Write'"]
    DB --> DC["Arrow pointing to 'Write'"]
    DC --> DD["Arrow pointing to 'Write'"]
    DD --> DE["Arrow pointing to 'Write'"]
    DE --> DF["Arrow pointing to 'Write'"]
    DF --> DG["Arrow pointing to 'Write'"]
    DG --> DH["Arrow pointing to 'Write'"]
    DH --> DI["Arrow pointing to 'Write'"]
    DI --> DJ["Arrow pointing to 'Write'"]
    DJ --> DK["Arrow pointing to 'Write'"]
    DK --> DL["Arrow pointing to 'Write'"]
    DL --> DJ
    style A fill:#f9f,stroke:#333
    style B fill:#ccf,stroke:#333
    style C fill:#cfc,stroke:#333
    style D fill:#fcc,stroke:#333
    style E fill:#cff,stroke:#333
    style F fill:#ffc,stroke:#333
    style G fill:#cfc,stroke:#333
    style H fill:#fcc,stroke:#333
    style I fill:#cfc,stroke:#333
    style J fill:#fcc,stroke:#333
    style K fill:#cfc,stroke:#333
    style L fill:#fcc,stroke:#333
    style M fill:#cfc,stroke:#333
    style N fill:#fcc,stroke:#333
    style O fill:#cfc,stroke:#333
    style P fill:#fcc,stroke:#333
    style Q fill:#cfc,stroke:#333
    style R fill:#fcc,stroke:#333
    style S fill:#cfc,stroke:#333
    style T fill:#fcc,stroke:#333
    style U fill:#cfc,stroke:#333
    style V fill:#fcc,stroke:#333
    style W fill:#cfc,stroke:#333
    style X fill:#fcc,stroke:#333
    style Y fill:#cfc,stroke:#333
    style Z fill:#fcc,stroke:#333
    style AA fill:#cfc,stroke:#333
    style AB fill:#fcc,stroke:#333
    style AC fill:#cfc,stroke:#333
    style AD fill:#fcc,stroke:#333
    style AE fill:#cfc,stroke:#333
    style AF fill:#fcc,stroke:#333
    style AG fill:#cfc,stroke:#333
    style AH fill:#fcc,stroke:#333
    style AI fill:#cfc,stroke:#333
    style AJ fill:#fcc,stroke:#333
    style AK fill:#cfc,stroke:#333
    style AL fill:#fcc,stroke:#333
    style AM fill:#cfc,stroke:#333
    style AN fill:#fcc,stroke:#333
    style AO fill:#cfc,stroke:#333
    style AP fill:#fcc,stroke:#333
    style AQ fill:#cfc,stroke:#333
    style AR fill:#fcc,stroke:#333
    style AS fill:#cfc,stroke:#333
    style AT fill:#fcc,stroke:#333
    style AU fill:#fcc,stroke:#333
    style AV fill:#fcc,stroke:#333
    style AW fill:#fcc,stroke:#333
    style AX fill:#fcc,stroke:#333
    style AY fill:#fcc,stroke:#333
Location
Select a suitable location for the T 11 to be installed. Please observe the following points:
- Do not use locations where the phone could be subjected to water or chemicals.
- Rubber feet of the Phone:
Your phone has been manufactured for general use. Some chemicals found in furniture polish or other furniture care products may alter the substance of the rubber feet of the phone. Due to this influence it may be possible that the rubber feet of the telephone may leave some marks. We will not accept any liability for any of such occurrences. With reference to new furniture or polished furniture we would suggest to use a non-slip protective matt for your telephone.
Cleaning
To clean your telephone use a soft damp cloth. An antistatic cloth may also be used.
NEVER use a dry cloth as this could result in a static discharge which may damage electronic components within the telephone. Please take great care that NO MOISTURE will enter the telephone as this will lead to malfunction and ultimately damage the telephone.

natural_image
Symbol of a trash bin crossed with no visible text or numbers, accompanied by a black rectangular block below (no text or symbols present)The crossed out wheeled bin on the product means that this belongs to the group of Electro- and electronic apparatus.
In this context you are directed by the European regulation to dispose of used apparatus
- at the point of buying an item of equal proportion / value
- at the local available collection point for disposal
With this you will participate in the reuse of material and valorisation of disused electric- and electronic apparatus, which otherwise could be a health hazard and be negative to the environment.