MD-620BT - Car stereo Auna - Free user manual and instructions
Find the device manual for free MD-620BT Auna in PDF.

| Type of product | Car stereo |
| Brand | Auna |
| Model | MD-620BT |
| Dimensions (W x H x D) | 178 x 50 x 160 mm (standard 1-DIN) |
| Weight | 0.8 kg |
| Power supply | 12V DC (negative ground) |
| Maximum power output | 4 x 50W |
| Supported radio bands | FM (87.5-108 MHz), AM (531-1611 kHz) |
| Bluetooth version | Bluetooth 4.0 with A2DP and hands-free profile |
| USB port | Yes, front USB for playback and charging |
| SD card slot | Yes, supports up to 32 GB |
| AUX input | 3.5 mm front AUX |
| Remote control | Included |
| Equalizer | Preset EQ (Rock, Pop, Classic, Flat, etc.) |
| Display | LCD with adjustable backlight |
| Steering wheel control compatible | Yes (requires adapter, not included) |
| Maintenance & cleaning | Wipe with a soft dry cloth; avoid solvents and liquids |
| Safety | Disconnect car battery before installation; use correct fuse rating |
| Spare parts and repairability | Contact Auna customer service for replacement parts |
| General information | Designed for 12V vehicles; supports MP3/WMA playback |
Frequently Asked Questions - MD-620BT Auna
User questions about MD-620BT Auna
0 question about this device. Answer the ones you know or ask your own.
Ask a new question about this device
Download the instructions for your Car stereo in PDF format for free! Find your manual MD-620BT - Auna and take your electronic device back in hand. On this page are published all the documents necessary for the use of your device. MD-620BT by Auna.
USER MANUAL MD-620BT Auna
natural_image
Symbol of a trash bin crossed with a diagonal line, no text or numbers present- Unpack all parts and remove protective material.
- Do not connect the unit to the mains before checking the main voltage and before all other connections have been made.
- Do not cover any vents and make sure that there is a space of several centimeters around the unit for ventilation.
Safety instructions
- Read these instructions.
- Keep these instructions.
- Heed all warnings.
- Follow all instructions.
- Do not use this aparatus near water.
- Clean only with dry cloth.
- Do not block any ventilation openings. Install in accordance with manufacturer's instructions.
- Do not install near any heat sources such as radiators, heat registers, stoves, or other apparatus (including amplifiers) that produce heat.
- This product is equipped with a 3 wire grounding type plug having a third(grounding) pin.
- Do not defeat the safety purpose of the polarized or grounding-type plug.
- A polarized plug has two blades with one wider than the other.
- A grounding type plug has two blades and third grounding prong.
- The wide blade or the third prong are provided for your safety. If the provided plug does not fit into your outlet, consult an electrician for replacement of the obsolete outlet.
- Only use attachments/accessories specified by the manufacturer.
- Use only with the cart, stand, tripod, bracket, or table specified by the manufacturer, or sold with the apparatus. When a cart is used, use caution when moving the cart/apparatus combination to avoid injury from tip-over.
- Refer all servicing to qualified service personnel. Servicing is required when the apparatus has been damaged in anyway, such as power-supply cord or plug is damaged, liquid has been spilled or objects have fallen into the apparatus, the apparatus has been exposed to rain or moisture, does not operate normally, or has been dropped.
- The apparatus shall not be exposed to dripping or splashing and that no objects filled with liquids, such as vases, shall be placed on the apparatus.
- WARNING - To reduce the risk of fire or electric shock, do not expose the apparatus to rain or moisture.
- The apparatus shall not be exposed to dripping or splashing and no objects filled with liquids, such as vases, shall be placed on the apparatus.
- Do not place this product on an unstable cart, stand or table. The product may fall, causing serious damage to the product.
- Slots and openings in the cabinet and the back are provided for ventilation: to ensure reliable operation of the product, these openings must not be blocked by placing the product on a bed, sofa, rug or other similar surface. This product should never be placed near or over a heat register. This product should not be placed in a built-in installation unless proper ventilation is provided.
- This product should be operated from the type of power source indicated on the marking label. If you are not sure of the type of power available, consult your dealer or local power company. This is a safety feature. If you are unable to insert the plug into the outlet, contact your electrician to replace your obsolete outlet. Do not defeat the purpose of the grounding-type plug.
- Do not allow anything to rest on the power cord. Do not locate this product where persons will walk on the cord.
-
If an extension cord is used with this product, make sure that the total of the ampere ratings on the products plugged into the extension cord do not exceed the extension cord ampere rating. Also, make sure that the total of all products plugged into the wall outlet does not exceed 10 amperes.
-
Never push objects of any kind into this product through cabinet slots as they may touch dangerous voltage points or short out parts that could result in a risk of fire or electric shock.
- Never spill any kind of liquid on the product.
- Do not attempt to service this product yourself, as opening or removing covers may expose you to dangerous voltage points or other risks. Refer all servicing to service personnel.
Caution
Removal of the back cover should be carried out only by qualified personnel.
DO NOT USE IN HOSTILE ENVIRONMENTS
To prevent shock or fire hazard, do not expose the unit to rain or moisture. This unit is designed to be used in the office or home. Do not subject the unit to vibrations, dust of corrosive gases.
KEEP IN A WELL VENTILATED PLACE
Ventilation holes are provided on the cabinet to prevent the temperature from rising.
Do not cover the unit or place anything on the top of unit.
AVOID HEAT
Avoid placing the unit in direct sunshine or near a heating appliance.

CAUTION
RISK OF ELECTRIC SHOCK DO NOT OPEN.


This symbol is intended to alert the user to the presence of uninsulated idangerous voltage within the product's enclosure that may be of sufficient magnitude to constitute a risk of electric shock to persons.

This symbol is intended to alert the user to the presence of important operating and maintenance(servicing) instructions in the literature accompanying the appliance.
WARNING
TO REDUCE THE RISK OF ELECTRIC SHOCK, DO NOT REMOVE COVER (OR BACK). NO USER-SERVICEABLE PARTS INSIDE. REFER SERVICING TO QUALIFIED SERVICE PERSONNEL.
Remote control
text_image
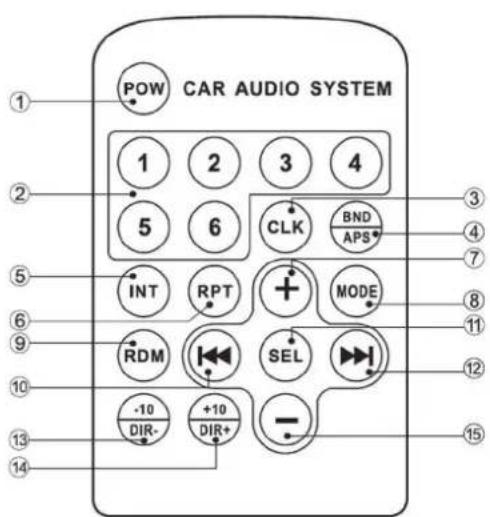
POW CAR AUDIO SYSTEM 1 2 3 4 5 6 CLK BND APS* INT RPT MODE RDM SEL -10 DIR- +10 DIR+ - 15- POWER
2.Number Button - Clock
4.Band/APS
5.INT
6.REPEAT
7.Volume + - Mode change
- Random
- Next Song
- Select
- Last Song
- Last 10 song
- Next 10 song
- Volume -
BT - Only 10026822
- Short press the MODE button continue, when the display BT (shorted for BT) ON/OFF setting by rotating the knob.
- Under the BT ON mode, the player can be matched to your mobile phone (The name is CAR BT, the default code is "0000");
-
Then you can press the MODE button switching to BT mode and can operate the BT function.
-
CH-/
If there is an incoming call, short press means reject the call. During the call, short press this button means close the calling. Under music pausing mode, short press to play the song. Under music playing mode, short press to play last song.
- CH+/
If there is an incoming call, short press means answer the call. Under music playing mode, short press to play next song.
Operation
1. MODE/
- On power on state, short press can change the mode as follow: AUX---BT---RADIO---USB---SD, long press to power off. On power off state, short press to power on.
2. BAND
- Under the radio mode, short press can change the band as following: FM1→FM2→FM3→FM1, long press can scan and store the stations automatically.
- Under the USB/SD music displaying mode, short press is for selecting the song by Numbers, rotating the volume button to choose first number and wait 3 seconds to enter into next numbers, rotating again to choose number then press SEL for playing.
- Long press can change the playing mode as follow: RDM ON---RPT ONE---RPT DIR---INT ON
3. CH- Button:
- Under the radio mode, short press is to play last channel, long press is automatically searching the stations backwardly.
- Under the music playing mode, short press is playing last song, long press is quickly backwardly choose time to play. The specific operation as below: long press CH+ to enter quickly backward function, now is playing song in twice as fast backward, then continually short press CH+ three times as below function: playing song in quadruple as fast backward > playing song in octuple as fast backward > playing song normal speed.
4. CH+ Button:
- Under the radio mode, short press is to play next channel, long press is automatically searching the stations forwardly.
- Under the music playing mode, short press is playing next song, long press is quickly forwardly choose time to play. The specific operation as below: long press CH+ to enter quickly forward function, now is playing song in twice as fast forward, then continually short press CH+ three times as below function: playing song in quadruple as fast forward > playing song in octuple as fast forward > playing song normal speed.
5. CLK
- Short press will show the present time or calendar, when it shows the present time, long press to enter into hour adjustment function, adjust it by rotating the VOL knob, then short press again can adjust minute. When it shows the present calendar, long press can enter into year adjustment, then short press repeat CLK can adjust month and date, use VOL knob to adjust. After the adjustments, it will confirm the time and calendar automatically in 3 seconds or by short pressing CLK button.
6.VOL/R.CN
- Under radio mode, short press it the station will flashing, then rotating the VOL knob to change the station.
- Long press it, the station number will flashing, rotating the VOL knob to choose the station number, then short press the VOL button or it will confirm automatically to save the present station on this station number.
- Under music playing mode, short press continuous can change the music playing mode as following: INT---RPT--RDM. Long press to select next folder.
7. MEN
- Under radio mode, short press and the screen will show SEL or BND, when showing BAND, short press VOL/R. CN will show the present Band, then rotating the VOL knob to change the band as following: FM1---FM2---FM3, short press VOL knob to confirm. Long press to search and save the station automatically.
- Under music playing mode, short press will show SEL, then continuous pressing VOL knob to enter into the selection as following: BASS---TREBLE---BALANCE---FADER---LOUND---EQ, rotating the VOL knob to adjust the functions.
8. Aux In
• Outer connection signal input.
9. LCD Display
- Display the channel of radio or the playing information.
10. SD/MMC Card Slot:
- Insert the SD or MMC card, the system will play it accordingly.
- USB Slot: Insert the USB, the system will play it accordingly
Installation
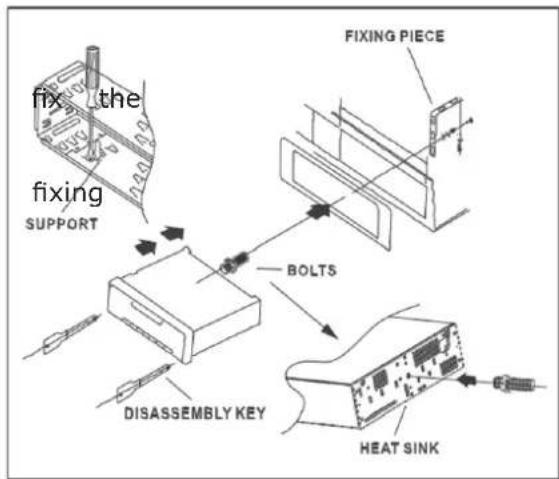
Install the main unit
- Install the support on the instrument panel of the car, bend the clamp of the support
- Connect the power wire and speaker wire, fixing piece in the car
- Insert the antenna plug, push the main unit into the support, and tighten the fixing nut of the piece.
Insert two disassembly keys into the left and right gap, make the keys hook the main unit, pull out it to remove the main unit from the support, then disassemble the connection wire and unplug the antenna plug.
text_image
fix the fixing SUPPORT FIXING PIECE BOLTS DISASSEMBLY KEY HEAT SINK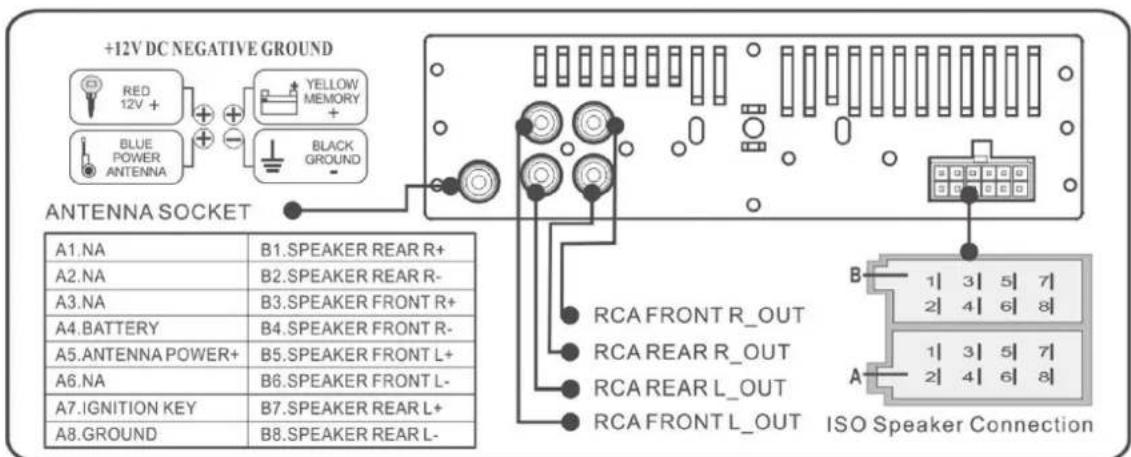
text_image
+12V DC NEGATIVE GROUND RED 12V + YELLOW MEMORY + BLUE POWER ANTENNA BLACK GROUND ANTENNA SOCKET A1.NA B1.SPEAKER REAR R+ A2.NA B2.SPEAKER REAR R- A3.NA B3.SPEAKER FRONT R+ A4.BATTERY B4.SPEAKER FRONT R- A5.ANTENNAPAower+ B5.SPEAKER FRONT L+ A6.NA B6.SPEAKER FRONT L- A7.IGNITION KEY B7.SPEAKER REAR L+ A8.GROUND B8.SPEAKER REAR L- RCA FRONT R_OUT RCA REAR R_OUT RCA REAR L_OUT RCA FRONT L_OUT ISO Speaker Connection B 1 3 5 7 2 4 6 8 1 3 5 7 2 4 6 8Technical specifications
Tuner Part:
FM Frequency Range: 87.5MHz-108MHz
Intermediate frequency: 10.7MHZ
Signal to noise ratio (S/N): 50>dB
Play Part:
Signal to noise ratio (S/N) : 50>dB
Channel Separation (1 KHZ): 50>dB
Voltage Harmonic Distortion: <5%
Frequency Response: 100Hz-10kHz(+6dB)
Amplifier Part:
Output: speaker output
Speaker Impedenc: 4Ω-8Ω Power source: 12VDVC
Car battery (the negative pole connect ground, see on the unit in detail
Electric and electronic equipment and included batteries contains materials, componentsans substances that can be hazardous to your health and the environment, if the waste material (discarded electric and electronic equipment and batteries) is not handled correctly.

Electric and electronic equipment and batteries is marked with the crossed ou trash can symbol, seen here. This symbol signifies that electric and electronic equipment and batteries should not be disposed of with other household waste, but should be disposed of separately.
As the end user it is important that you submit your used batteries to the appropriate and designated facility. In this manner you make sure that the batteries are recycled in accordance with legislature and will not harm the environment.
All cities have established collection points, where electric and electronic equipment and batteries can either be submitted free of charge at recycling stations and other collection sites, or be collected from the households. Additional information is available at the technical department of your city.
CHAL-TEC Vertriebs- + Handels GmbH; Wallstraße 16; 10179 Berlin, Germany