
WAVEDRUM MINI - Electronic percussion instrument KORG - Free user manual and instructions
Find the device manual for free WAVEDRUM MINI KORG in PDF.

| Product Type | Dynamic percussion synthesizer (electronic percussion instrument) |
| Brand | KORG |
| Model | WAVEDRUM MINI |
| Dimensions (W x D x H) | 216 x 216 x 67 mm |
| Weight | 1.0 kg (without batteries) |
| Power supply | DC9V AC adapter (included) or 6 AA Ni-MH batteries (not included) |
| Power consumption | 7.5 W |
| Battery life | Approximately 4 hours with 1900 mAh Ni-MH batteries |
| Number of sounds | 100 |
| Number of effects | 10 types (reverb, delay, flanger, pitch shifter, etc.) |
| Rhythm patterns | 100 patterns (with overdub recording capability) |
| Looper function | Multi-track recording up to 25 seconds |
| Built-in speaker | 1.3 W output |
| Audio outputs | OUTPUT jack (mono), headphone jack (stereo mini-jack) |
| Input | CLIP jack for sensor clamp |
| Display | 2-character 7-segment LED |
| Sampling frequency | 48 kHz |
| Operating temperature | 0 to +40°C (without condensation) |
| Included accessories | Owner's manual, AC adapter, sensor clamp, strap |
| Maintenance and cleaning | Clean with a clean, dry cloth. Do not use liquid solvents. |
| Safety | Avoid exposure to humidity, extreme temperatures, and shocks. Do not place heavy objects on the pad. |
| Spare parts and repairability | For any repairs, contact an authorized Korg dealer. |
Frequently Asked Questions - WAVEDRUM MINI KORG
User questions about WAVEDRUM MINI KORG
0 question about this device. Answer the ones you know or ask your own.
Ask a new question about this device
Download the instructions for your Electronic percussion instrument in PDF format for free! Find your manual WAVEDRUM MINI - KORG and take your electronic device back in hand. On this page are published all the documents necessary for the use of your device. WAVEDRUM MINI by KORG.
USER MANUAL WAVEDRUM MINI KORG
Dynamic Percussion Synthesizer
Getting to know the WAVEDRUM Mini ....6
Getting ready to play 7
Connecting the clip to the WAVEDRUM Mini .......7
Connecting the power 7
Turning the power on 7
Adjusting the volume 8
Turning the power off 8
Switching the output destination 8
Using batteries 8
Location 9
Performing 11
Performance techniques 11
Selecting sounds 11
Using effects 12
Playing and overdubbing rhythm patterns .... 12
Overdubbing phrases (Looper) 13
Editing the settings 14
Editing procedure 14
Parameter list 14
Effect type list 15
Appendix 17
Restoring the factory settings 17
Error messages 17
Troubleshooting 17
Specifications 18
Voice Name List 68
Sounds 68
Effects 69
Rhythm Patterns 69
Thank you for purchasing the Korg WAVE-DRUM Mini dynamic percussion synthesizer. To help you get the most out of your new instrument, please read this manual carefully.
Precautions
Location
Using the unit in the following locations can result in a malfunction.
In direct sunlight
- Locations of extreme temperature or humidity
- Excessively dusty or dirty locations
- Locations of excessive vibration
- Close to magnetic fields
Power supply
Please connect the designated AC adapter to an AC outlet of the correct voltage. Do not connect it to an AC outlet of voltage other than that for which your unit is intended.
Interference with other electrical devices
Radios and televisions placed nearby may experience reception interference. Operate this unit at a suitable distance from radios and televisions.
Handling
To avoid breakage, do not apply excessive force to the switches or controls.
Care
If the exterior becomes dirty, wipe it with a clean, dry cloth. Do not use liquid cleaners such as benzene or thinner, or cleaning compounds or flammable polishes.
Keep this manual
After reading this manual, please keep it for later reference.
Keeping foreign matter out of your equipment
Never set any container with liquid in it near this equipment. If liquid gets into the equipment, it could cause a breakdown, fire, or electrical shock. Be careful not to let metal objects get into the equipment. If something does slip into the equipment, unplug the AC adapter from the wall outlet. Then contact your nearest Korg dealer or the store where the equipment was purchased.
THE FCC REGULATION WARNING (for USA)
This equipment has been tested and found to comply with the limits for a Class B digital device, pursuant to Part 15 of the FCC Rules. These limits are designed to provide reasonable protection against harmful interference in a residential installation. This equipment generates, uses, and can radiate radio frequency energy and, if not installed and used in accordance with the instructions, may cause harmful interference to radio communications. However, there is no guarantee that interference will not occur in a particular installation. If this equipment does cause harmful interference to radio or television reception, which can be determined by turning the equipment off and on, the user is encouraged to try to correct the interference by one or more of the following measures:
Reorient or relocate the receiving antenna.
- Increase the separation between the equipment and receiver.
- Connect the equipment into an outlet on a circuit different from that to which the receiver is connected.
- Consult the dealer or an experienced radio/ TV technician for help.
Unauthorized changes or modification to this system can void the user's authority to operate this equipment.
Notice regarding disposal (EU only)

When this "crossed-out wheeled bin" symbol is displayed on the product, owner's manual, battery, or battery package, it signifies that when you wish to dispose of this product, manual, package or battery you must do so in an ordered manner. Do not discard this product, all, package or battery along with ordinary mold waste. Disposing in the correct way will prevent harm to human health and fatal damage to the environment. Since the best method of disposal will depend on the stable laws and regulations in your local-use contact your local administrative or details. If the battery contains heavy or in excess of the regulated amount, a local symbol is displayed below the "red-out wheeled bin" symbol on the battery package.

the package or battery you must do so in an approved manner. Do not discard this product, as, in the case of a solid, package or battery along with ordinary mold waste. Disposing in the correct order will prevent harm to human health and total damage to the environment. Since the best method of disposal will depend on the available laws and regulations in your local lease contact your local administrative office details. If the battery contains heavy metals in excess of the regulated amount, a local symbol is displayed below the "red-out wheeled bin" symbol on the battery package.
Cautions for use
The speaker contains a magnet
This speaker that's built into this instrument contains a magnet. Do not place it near cards or medical devices that might be affected by magnetism.
Do not allow heavy objects to rest on the pad for an extended time
Do not leave the clip attached for an extended time
If a heavy object is left on the WAVEDRUM Mini's pad surface for an extended time, a mark may be left both on the pad surface and on the object touching it. Do not leave heavy objects on the pad surface, or leave the WAVEDRUM Mini face down for an extended time. Similarly, leaving the clip attached for an extended time may cause a mark.
Changes due to aging or the state of the surface may also cause such marks to occur regardless of how long the WAVEDRUM Mini is in contact with the other object.
About feedback
The WAVEDRUM Mini uses a sensor to detect the vibrations that occur in the pad or clip when you strike it. In some cases, the sensor will respond not only to this direct impact but also to the sound from a high-volume speaker, picking it up as though the signal was coming through a microphone. In partic
ular, when you're playing the WAVEDRUM Mini while monitoring the sound through a large PA system, the WAVEDRUM Mini's sound that's being output from the speakers may be conveyed directly from the speakers or as vibration from the floor transmitted through a stand, and detected by the WAVEDRUM Mini's sensor, producing acoustic feedback (a whine or howl) that can cause an uncontrollable sustained sound to be produced.
Feedback places an excessive load on the amps and speakers, and may damage them seriously. When using the WAVEDRUM Mini with a large monitor system, please use the PA system's equalizers and limiters to prevent feedback and protect the speakers just as you would do for a microphone used by an acoustic instrument or vocalist.
Recording with the Looper function will make feedback more likely. Please be careful with the volume.
Data handling
Unexpected malfunctions can result in the loss of memory contents. Korg cannot accept any responsibility for any loss or damage which you may incur as a result of data loss.
- This product was developed under license of physical modeling tone generator patents (http://www.sondius-xg.com) owned by Stanford University USA and the Yamaha Corporation.
- All product names and company names are the trademarks or registered trademarks of their respective owners.
Introduction
The WAVEDRUM Mini is a completely new concept in percussion synthesizers, with the following three major features:
It can be played anywhere
It can turn anything into a Wavedrum
It's easy to transport
Main features
Revolutionary synthesis technology
The pad and clip sensors capture the sound of the musician's strikes, and a variety of Wavedrum-based synthesis technologies are used to generate unique sounds. Since the output is based on the sounds that
you perform, the sound will change sensitively and diversely in response to your playing technique and the subtle movements of your fingers and palm, allowing a high degree of performance freedom with endless variation.
Turn anything into WAVEDRUM
The clip with the built-in sensor can be attached to any object, transforming it into a Wavedrum.
This lets you turn a nearby object into a Wavedrum, and the tonal character will change depending on the material of the object—wood, metal, or glass etc.
100 sounds, 10 effects
The 100 sounds cover all styles from percussion to sound effects. The sounds produce totally different tones depending on your playing style. Different sounds can be independently assigned to the pad and the clip.
There are also 10 dedicated effects that are optimized for percussion.
Rhythm patterns
You can enjoy jam sessions by playing along with 100 rhythm patterns that range across many genres and tempo settings.
There's also a recording function that lets you layer your own performances onto these rhythm patterns.
Looper
The Looper function lets you create grooves from scratch.
It's a great way to create your very own original grooves.
Internal speaker and battery operation for portability
The lightweight and compact design make it easy to carry the WAVEDRUM Mini anywhere. With a built-in speaker and battery operation, you'll be able to play it anywhere and anytime.
You can use the included strap to attach the WAVE-DRUM Mini to your foot or another part of your body.
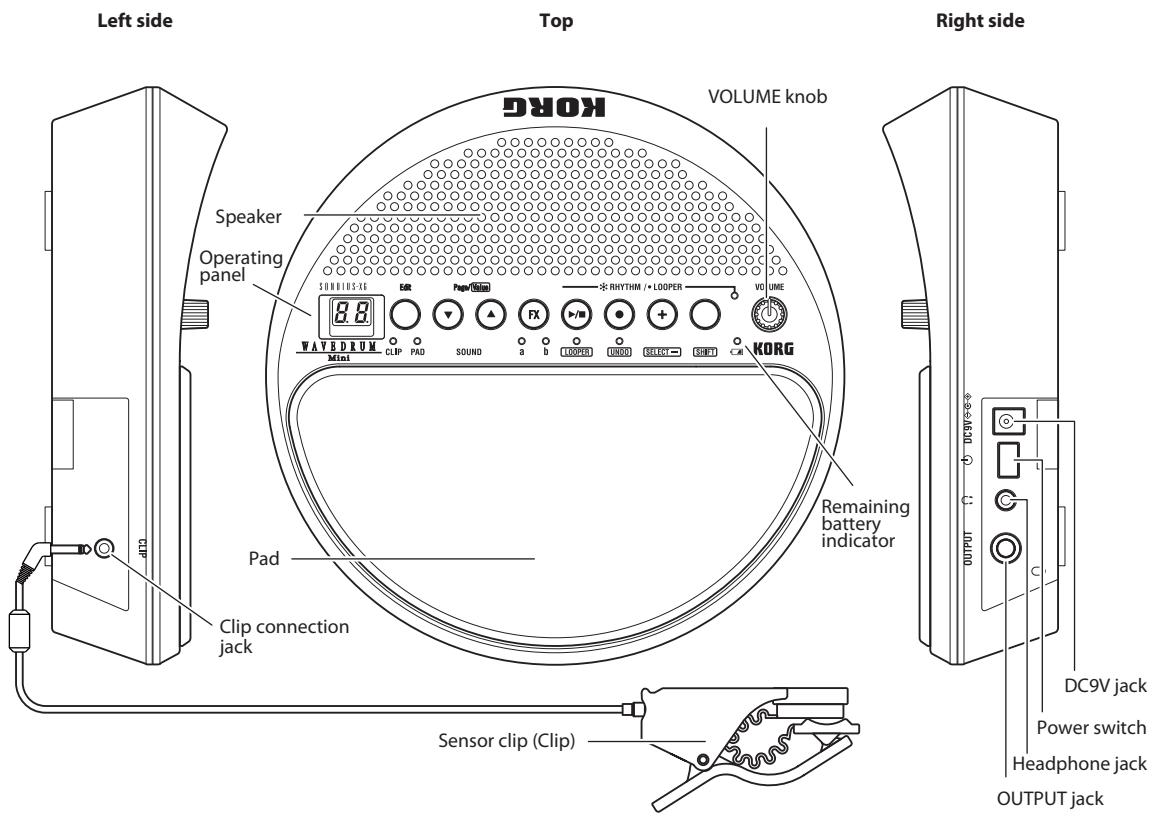
Getting to know the WAVEDRUM Mini
Getting ready to play
Connecting the clip to the WAVE-DRUM Mini
- Make sure that the WAVEDRUM Mini's power switch is turned off. (The display and indicators should be unlit.)
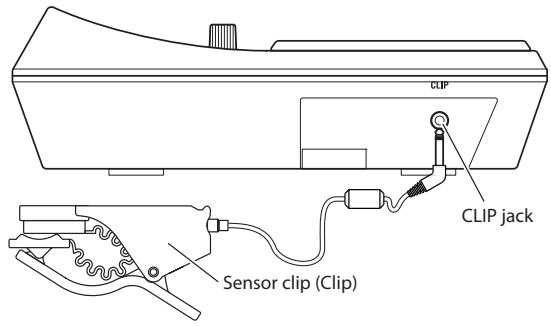
- Connect the clip to the CLIP jack located on the left side of the WAVEDRUM Mini.
Do not connect anything other than the included clip to the CLIP jack.
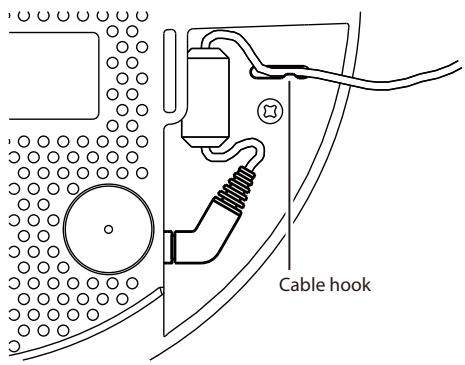
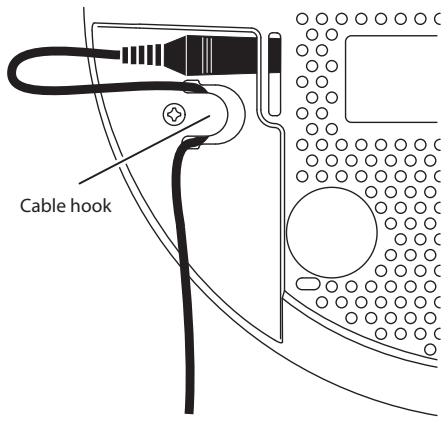
3. To prevent the clip cable from being unplugged, use the cable hook located on the bottom of the WAVEDRUM Mini to secure the cable in place.
Connecting the power
- Connect the DC plug of the included AC Adapter to the DC9V jack located on the right side of the WAVEDRUM Mini.
- Plug the AC Adapter into an electrical outlet.
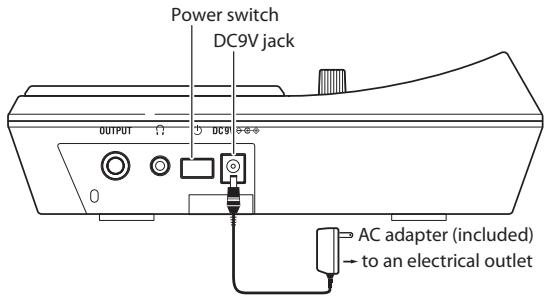
Use only the included AC Adapter. Using any other AC Adapter may cause malfunctions.
Use an AC outlet of the correct voltage for the included AC Adapter.
3. To prevent the AC Adapter cable from being unplugged, use the cable hook located on the bottom of the WAVEDRUM Mini to secure the cable in place.
Turning the power on
- Lower the volume by turning the VOLUME knob all the way to the left.
- Press the power switch to turn the power on.
Adjusting the volume
- Turn the VOLUME knob toward right to increase the volume, or toward the left to lower the volume.
The VOLUME knob controls the output of the built-in speaker, the headphone jack, and the OUT-PUT jack.
After you've adjusted the volume to an appropriate level, try playing the WAVEDRUM Mini. For details, refer to "Performing" (See page 11).
Turning the power off
When you've finished performing, turn the power off.
- Lower the volume by turning the WAVEDRUM Mini's VOLUME knob all the way to the left.
- Hold down the power switch for approximately one second; the power will turn off.
Auto power-off function
The WAVEDRUM Mini's auto power-off function will automatically turn off the power approximately four hours after the last panel operation was performed.
If desired, you can disable the auto power-off function. See page 14 for details.
By default, the auto power-off function is enabled.
Switching the output destination
2 Your monitor equipment might be damaged if high volume sound is suddenly output from the WAVEDRUM Mini. This could also damage your hearing if you're listening through headphones. Please use caution when setting the volume.
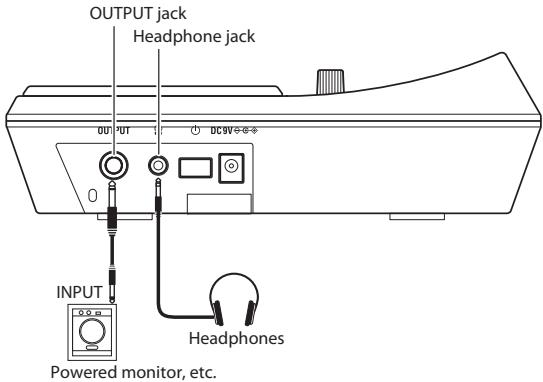
Using headphones
If you're using headphones, connect them to the headphone jack. If headphones are connected, sound won't be output from the built-in speaker. You can use headphones when you don't want to disturb others around you, such as at night. Insert the plug of your stereo headphones into the headphone jack located on the right side of the WAVE-DRUM Mini.
If you're using headphones with a 1/4" mini adapter plug, be sure to grasp the adapter when inserting or removing the plug.
To protect your hearing, avoid listening at high volume for extended periods of time when using headphones.
Connecting to an audio device
Connect the WAVEDRUM Mini's OUTPUT jack to the input jack of your mixer or powered monitor. The output signal is monaural. If a cable is connected to the OUTPUT jack, the built-in speaker will be muted.
Before plugging anything in, be sure to poweroff the WAVEDRUM Mini and the device that's being connected. If you connect the WAVEDRUM mini to other devices while it's powered-on, you might damage the WAVEDRUM Mini, the other device or malfunctions might occur. In addition, be sure that the volume is lowered on all connected equipment.
Using batteries
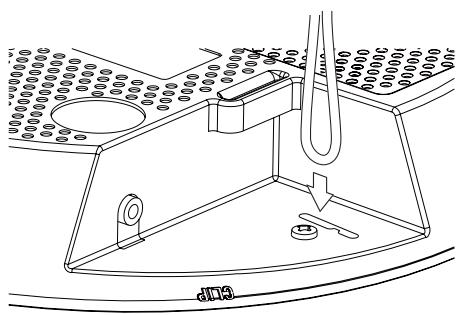
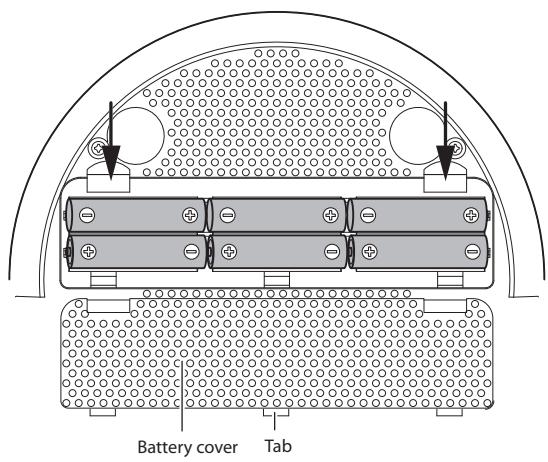
Detach the battery cover located on the bottom of the WAVEDRUM Mini, and install six nickel-metal hydride batteries, making sure that they are oriented in the correct polarity.
note: Batteries are not included. You'll need to obtain them separately.
Disconnect the AC Adapter's DC plug before you install or replace the batteries.
Do not mix charged batteries with exhausted batteries, and do not mix batteries of different types.
- To open the battery cover, lightly press and lift up the latches indicated by the arrows in the illustration.
- Insert six AA nickel-metal hydride batteries. Take care that the polarity (+ and - indication) of each battery is correct.
- Align the tabs of the battery cover, and close it. Press down on the latches indicated by the arrows until the cover clicks securely closed.
Replacing the batteries
When the batteries run low, the battery indicator will blink. The WAVEDRUM Mini will continue functioning for a time, but you should replace the batteries as soon as possible.
Batteries that have become unusable should be removed immediately. Leaving dead batteries in the unit may cause malfunctions (e.g., electrolyte leakage from the batteries). You should also remove the batteries if you won't be using the unit for an extended period of time.
Location
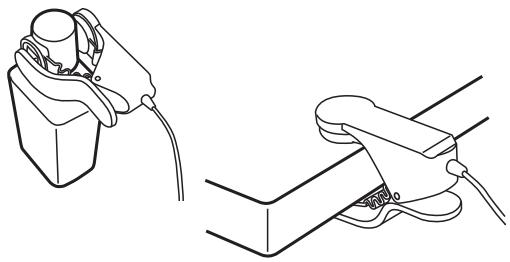
Place the WAVEDRUM Mini on a flat and stable location. If you're performing in a seated position, you can use the included strap to fasten it to your leg. When using the clip, fasten it securely to the object, ensuring that it's in a stable location like the WAVEDRUM Mini itself. You should neatly bundle the power cable and audio cable so that they don't catch on anything.
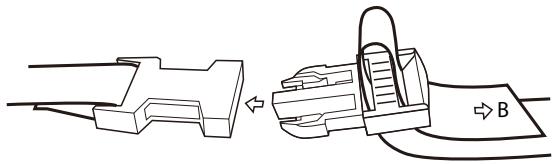
Attaching the included clip to an object, or detaching it
By attaching the WAVEDRUM Mini's clip to a nearby object that emits sound when you strike it, you can transform that object into a Wavedrum. The tonal character will vary depending on the object, so we suggest that you try out various types of objects.
- Lower the VOLUME knob before you attach or detach the clip.
- Secure the clip to the object so that it does not come off while you perform.
- Do not pull on the jaws of the clip when detaching it from the object. Doing so may damage the clip or the object. Be sure to open the clip when detaching it.

Although the clip can be attached to a wide variety of objects, you should be aware of your surroundings, and refrain from attaching it in ways that would inconvenience others. Since it is possible for the clip to deform or scratch the object where it's attached, please use caution when attaching it.

If the clip is left attached to an object for an extended period of time, it may leave a mark on the object when removed. Depending on aging or the state of the object's surface finish, damage may occur regardless of the length of time.
Attaching and detaching the included strap
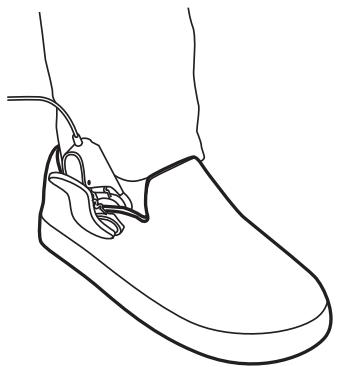
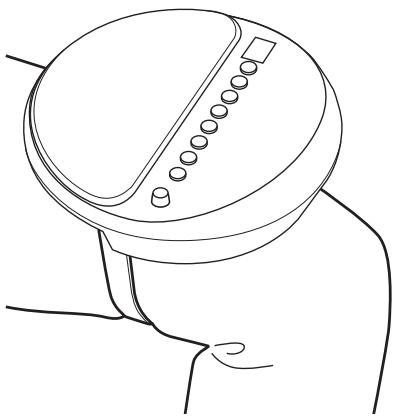
You can use the included strap to attach the WAVE-DRUM Mini to your leg for performances.
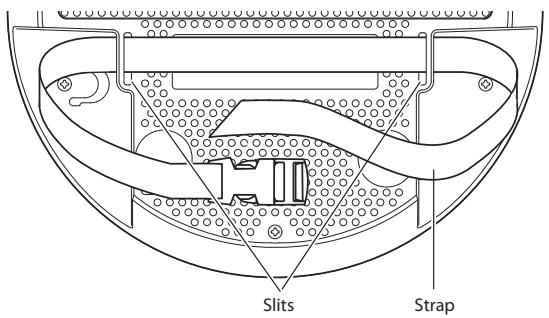
Pass the strap through the slits on the bottom of the WAVEDRUM Mini as shown in the illustration below. If you fail to do this correctly, the strap may slip off or come loose.
The buckle is made of plastic, and should be inspected before use to make sure that it is not cracked or damaged. Accidents may occur if you use the strap with a cracked or damaged buckle.
1. Pass the strap through the slits as shown in the illustration below.
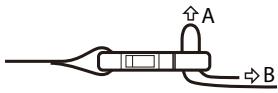
- Pass the strap through the buckle as shown in the illustration.
To tighten, pull end 'B' of the strap in parallel with the buckle.
To loosen, push portion 'A' of the buckle upward in the direction of the arrow.
- Place the WAVEDRUM Mini on your leg as shown in the illustration, and secure it with the strap. Pass the strap around your leg and latch the buckle. Pull end 'B' of the strap (shown in the previous illustration) to securely fasten the WAVEDRUM Mini to your leg.
Performing
Performance techniques
The WAVEDRUM Mini lets you independently assign different sounds to the pad and the clip for performances.
Since the tone will change sensitively and diversely in response to your playing technique and to subtle movements of your fingers and palm, you'll have a high degree of performance freedom with a wide range of sonic variation.
The sounds range from simulations of typical percussion instruments to sounds in where the pitch will differ for each strike, and you can even use scale settings to perform phrases. In addition to the output volume being controlled by the force of your strike, the output of some sounds will also be affected by the tone of your strike, whether it's a soft (warm) tone or a hard (sharp) tone. Although different materials will produce different results, striking near the center of the surface will tend to produce a softer tone, while striking near the edge will produce a harder tone. Again, although there will be differences between users, striking the surface with the pad of your fingertip as though you were pressing it will produce a softer sound, while slapping the surface with all your fingers will tend to produce a harder sound. The open and slap performance techniques used on a conga or djembe will produce similar tonal changes.
For the clip, you can try attaching it to different materials, and enjoy the resulting differences in strike responses and tonal changes.
For details on the sounds, refer to "Sounds" (See page 68).
Do not strike any part of the WAVEDRUM Mini other than its pad; e.g., do not strike the control panel or speaker.
Do not strike the clip itself.
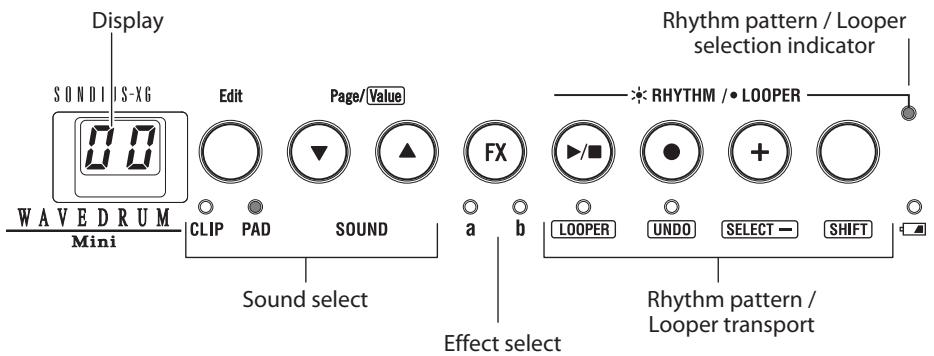
Selecting sounds
Here's how to select from the 100 different sounds.
- To choose whether you'll be selecting a sound for the clip or pad, press the CLIP/PAD button that's located to the left side of the control panel. This selection will alternate each time you press the button. The indicator of the selected side (clip or pad) will light.
You won't be able to switch sounds if the CLIP, PAD, 'a', or 'b' indicators are blinking (Edit mode). In this case, press the CLIP/PAD button to make the indicator light up.
- Use the buttons to select the desired sound. The display will indicate the sound number.
If you hold down the or button, the number will change consecutively.
Strike the pad or the object to where the clip is attached, and listen to the sound you've selected.
note: Immediately after the power is turned on, sound 00 will be selected for both the pad and the clip.
note: You can also exit Edit mode by pressing the / , , or + buttons as well as the CLIP/PAD button.
Using effects
Here's how to apply an effect to the sound. You can use either effect 'a' or b', but not both.
- Press the FX button. Each time you press it, the effect setting will cycle through effect 'a' (the 'a' indicator lit), effect 'b' (the 'b' indicator lit), and off (both indicators 'a' and 'b' unlit).
You won't be able to switch effects if the CLIP, PAD, 'a', or 'b' indicators are blinking (Edit mode). In this case, press the CLIP/PAD button to make the indicator light up.
Note: You can assign different effect types to effects 'a' and 'b'. You can also adjust settings such as the amount of effect that will be applied. For details on these settings, refer to "Editing the settings" (See page 14).
note: Immediately after the power is turned on, the effect will be off. 'a' and 'b' will remember the settings that you had last specified before turning the power off.
note: You can also exit Edit mode by pressing the / , , or + buttons as well as the CLIP/PAD button.
Playing and overdubbing rhythm patterns
You can enjoy jamming along with rhythm patterns in a variety of genres. You can also overdub your own performance onto these rhythm patterns.
Playing back a rhythm pattern
- While holding down the SHIFT button, press the / button to make the rhythm pattern / looper select indication (located in the upper right of the operating panel) light up.
This selects the rhythm pattern function. - Press the / button to start playback (the indicator will light).
- Press the / button to stop playback (the indicator will go dark).
- You can choose from 100 different rhythm patterns. To switch rhythm patterns, press the + button. The next rhythm pattern (i.e., the pattern of the following number) will be selected. If you hold down the SHIFT button and press the + button, the previous rhythm pattern will be selected.
By holding down the + button, you can step through the rhythm patterns.
The pattern number in the display will blink while the rhythm pattern is switching. Once the change has occurred, the display will revert to indicating the sound number.
For details on each rhythm pattern, refer to "Rhythm Patterns" (See page 69).
note: You can adjust the volume of the rhythm pattern. Refer to "Editing the settings" (See page 14).
note: You can't change the playback speed of the rhythm pattern.
Over dubbing your own performance onto a rhythm pattern
- Select a rhythm pattern, and play it back. See "Playing back a rhythm pattern."
- Select the sound that you want to overdub. See "Selecting sounds."
- Press the button to start recording (the indicator will light up).
- Strike the pad or the object where the clip is attached; your performance will be recorded.
- Press the button or the / button to stop recording.
If you press the button, recording will end and playback will continue. If you press the / button, recording will end and playback will stop.
- You can repeat the above steps to overdub your performance as many times as you wish.
note: If you want to erase your recorded performance and re-record, you can use the Undo/Redo function. Refer to "Undo and Redo" (See page 13).
note: If you press the button from the stopped condition, playback and recording will start simultaneously.
The recorded performance will disappear when you select another rhythm pattern, switch to the Looper function, or turn off the power. Immediately after the power is turned on, the original rhythm pattern 00 will be selected.
During playback and recording, the pad sensitivity will automatically be lowered to prevent acoustic feedback.
7. You can mute (or unmute) the sound of the rhythm pattern if desired. If you mute the rhythm pattern, you'll hear only the performance that you overdubbed.
Hold down the SHIFT button and press the FX button. Each time you do so, muting will turn on/
off. When muted, the rhythm pattern / looper select indicator will blink.
note: If you select another rhythm pattern (or switch to the Looper) while muted, muting will automatically be cancelled.
Over dubbing phrases (Looper)
You can create phrases by overdubbing the sound of your own performance. The maximum length of the phrase is 25 seconds.
First recording pass
- Hold down the SHIFT button and press the / button to make the rhythm pattern / looper select indicator (at the upper right of the operating panel) go dark.
The Looper function is now selected.
- Press the button. The WAVEDRUM Mini will be in record-ready mode (the / and buttons will blink).
- Start performing by striking the pad or the object to where the clip is attached. Recording will start the instant the first sound is input to the pad or clip.
Alternatively, you can press the / button to start recording.
The display will indicate the remaining number of seconds available for recording.
- To stop recording, press one of the four buttons to the right ( / - SHIFT) ; recording will stop, and the recorded phrase will play back repeatedly.
The location where you stopped recording on this first pass will be the end of the loop; i.e., this determines the length of the phrase.
Second and subsequent recording passes
- Press the / button to play back the Looper (the indicator will light up).
As desired, select the sound that you want to overdub.
- Press the button. Recording will start (the indicator will light up).
-
Strike the pad or the object where the clip is attached; your performance will be recorded (overdubbed).
-
When you've finished performing, press the or / button.
If you press the button, recording will end and playback will continue. If you press the / button, recording will end and playback will stop.
note: If you decide to cancel the recorded performance and re-record, you can use Undo/Redo. Refer to "Undo and Redo."
note: If you press the button from the stopped status, playback and recording will start simultaneously.
The recorded performance will disappear when you switch to the Rhythm Pattern function, or when you turn off the power.
During playback and recording, the pad sensitivity will automatically be lowered to prevent acoustic feedback.
Undo and Redo
Undo takes you back to the state of the previous recording.
During playback, while stopped, or during recording, hold down the SHIFT button and press the button.
note: If you Undo while recording, you won't be able to Redo. You can't Undo while recording the first pass of the Looper.
Redo takes you from the state following Undo back to the last-recorded state.
During playback or while stopped, hold down the SHIFT button and press the button.
Editing the settings
The WAVEDRUM Mini lets you adjust the volume of the pad, clip, and rhythm pattern.
For some sounds, you can change the pitch or transposition.
You can also change the effect type for effects 'a' and 'b', and adjust the effect.
These types of adjustments are referred to as "editing."
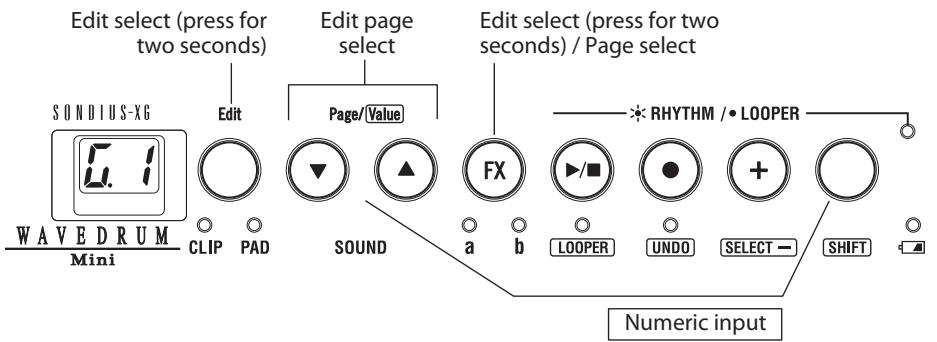
Editing procedure
- Hold down the Edit (CLIP/PAD) button for approximately two seconds.
The two indicators below the button will blink, and the display will indicate an edit page. If you're editing an effect, the indicators below the FX button will also blink.
- To select the parameter that you want to edit, use the buttons to switch between edit pages.
For more about the edit pages and their parameters, refer to "Parameter list."
For example if you want to edit the effect type for effect 'a', choose 出 出 (effect 'a': Type select).
- Edit the value.
Hold down the SHIFT button, and use the buttons to change the value. The value will appear in the display when you press the SHIFT button; you'll see this value change when you press the or button. If you hold down a button, the value will change successively.
- When you've finished editing, press the Edit (CLIP/PAD) button to exit the edit pages.
note: The edited content is automatically saved when you exit the edit pages.
note: You can also exit the edit pages by pressing the , or + button instead of the Edit (CLIP/PAD) button.
note: If you want to edit the Transpose or Scale setting, you must first select a sound where those parameters are available, and then enter the edit pages. Refer to "Sounds" (See page 68).
note: You can't enter the edit pages while the Rhythm Pattern or the Looper is playing or recording.
Note: You can also enter the edit pages by holding down the FX button for two seconds or longer. Each time you press the FX button, you'll step through the edit pages in the order of _1 _2 _3 .
Parameter list
The WAVEDRUM Mini lets you edit the following parameters.
Global parameters
Edit page no.: Parameter name [Default value]
:Transpose [0...12]
Specifies the key in semitone steps.
Transpose can be edited only for some of the sounds. A value of 0 corresponds to C. Increasing the value will raise the pitch in semitone steps. However in some cases, incrementing this value will make the pitch "wrap around" to the octave below; for example at the value 6 (F#), the pitch might be the F# an octave below, with subsequent increments once again raising the pitch. This will differ for each sound.
The right column of the table in "Sounds" (See page 68) indicates the value where the pitch of a transposable sound will wrap around.
:Scale (temperament) [0...6]
Some sounds allow you to play phrases in a scale. Some phrases will sound randomly with a different pitch of the scale being heard each time you strike, while for other phrases the pitch is determined by the force of your strike. The scale can be specified only for some of the sounds.
The right column of the table in "Sounds" (See page 68) contains a "O" for sounds that let you specify the scale.
You can choose from the following scales.
- Major, 1. Major Pentatonic, 2. Minor Pentatonic,
- Minor, 4. India (Hanuma Todi), 5. Gamelan,
- Tonic
With the 6. Tonic setting, the sound will be at the pitch specified by the "Transpose" setting. For other settings, refer to "Scale" (See page 69).
:Pad level [0...99]
Adjusts the volume of the sound output by the pad.
Use this to adjust the volume balance between the pad and the clip.
4:Clip level [0...99]
Adjusts the volume of the sound output by the clip.
Use this to adjust the volume balance between the pad and the clip.
5:Clip gain [0...99]
Adjusts the level of the input signal from the clip.
Adjust this as appropriate for the volume produced by the object where the clip is attached.
_: Rhythm level [0..99]
Adjusts the volume of the rhythm pattern.
7:Speaker level [0...99]
Adjusts the output volume of the speaker. This setting does not affect the OUTPUT or headphone jacks.
B:Auto power-off [Off,On]
With the On (_n) setting, the auto power-off function is enabled; the WAVEDRUM Mini will automatically turn off the power approximately four hours after the last panel operation was performed.
With the Off () setting, the auto power-off function is disabled.
Effect parameters
Edit page no.: Parameter name [Default value]
:Effect'a':Type select [0...9]
Selects the effect type for effect 'a'. For the available effect types, refer to "Effect type list" below.
:Effect'a:Dry/wet[0..99]
Adjusts the balance between the effect sound and direct sound. With a setting of 0, only the direct sound will be heard.
3: Effect 'a': Parameter 1 [min...max]
4: Effect 'a': Parameter 2 [min...max]
5: Effect 'a': Parameter 3 [min...max]
These parameters edit the effect. The three parameters will differ depending on the effect type. Refer to "Effect type list" below.
b:Effect'b':Type select[0...9]
Selects the effect type for effect 'b'. For the available effect types, refer to "Effect type list" below.
b:Effect'b:Dry/wet [0..99]
Adjusts the balance between the effect sound and direct sound. With a setting of 0, only the direct sound will be heard.
b:Effect'b':Parameter1[min...max]
b:Effect'b':Parameter2[min...max]
b.5:Effect'b':Parameter3[min...max]
These parameters edit the effect. The three parameters will differ depending on the effect type. Refer to "Effect type list" below.
Effect type list
Use a.1 or b.1 to select an effect type, and use a.3, a.4, a.5 or b.3, b.4, b.5 respectively to edit the parameters. For every effect type, a.2 and b.2 adjust the "dry/wet" balance.
Effect type 0:Reverb
This adds reverberation to the sound.
Parameter 1: Type [0...10]
Selects the type of reverb.
0: Off, 1: Slap, 2: Spring1, 3: Spring2, 4: Plate,
5: Garage, 6: Chamber, 7: Canyon, 8: Room,
9: Studio, 10: Hall
Parameter 2: Mix [0...99]
Adjusts the mix amount of the reverb sound.
Parameter 3: Depth [0...99]
Adjusts the duration of the reverb.
Effect type 1: Multi Tap Delay
This provides a multi-tap delay with three taps.
Delay creates an "echo-like" effect.
Parameter 1: Mode [0...4]
This specifies the combination of heads to use.
0: Conventional echo.
1: Plays delayed sound in the rhythm "ta ta ta (rest)
2: Plays delayed sound in the rhythm "ta (rest) ta ta"
3: Plays delayed sound in the rhythm "ta ta (rest) ta"
4: Plays delayed sound in the rhythm "ta ta ta ta"
Parameter 2: Time [0...99]
Adjusts the delay time.
Parameter 3: Feedback [0...99]
Adjusts the amount of feedback.
Effect type 2: Delay + Reverb
This is a combination of delay and reverb.
Parameter 1: Time [0...99]
Adjusts the delay time of the delay.
Parameter 2: Feedback [0...99]
Adjusts the amount of feedback for the delay.
Parameter 3: Mix [0...99]
Adjusts the mix amount of the reverb.
Effect type 3:Reverb ^+ Phaser
This is a combination of reverb and phaser, which produces a twisting sound like that of a rotary speaker.
Parameter 1: Mix [0...99]
Adjusts the mix amount of the reverb.
Parameter 2: Depth [0...99]
Adjusts the phaser's modulation depth.
Parameter 3: Speed [0...99]
Adjusts the phaser's modulation speed.
Effect type 4:Reverb + Flanger
This is a combination of reverb and flanger, which produces a swooshing sound reminiscent of a jet airplane taking off and landing.
Parameter 1: Mix [0...99]
Adjusts the mix amount of the reverb.
Parameter 2: Depth [0...99]
Adjusts the flanger's modulation depth.
Parameter 3: Speed [0...99]
Adjusts the flanger's modulation speed.
Effect type 5: Pitch Shifter
This effect generates harmony by adding a pitch-shifted sound.
Parameter 1: Pitch [0...48]
Adjusts the pitch in semitone steps.
Parameter 2:Tracking [0..99]
Adjusts the tracking characteristics of the pitch shifter. A shorter setting is appropriate when the
Pitch is set near 24, and a longer setting is appropriate when the Pitch is set at a more distant value.
Parameter 3: Delay Time [0...99]
Adjusts the delay time of the mixed sound.
Effect type 6: Random Step Filter
This effect applies a filter with a randomly changing frequency.
Parameter 1: Speed [0...99]
Adjusts the speed.
Parameter 2: Depth [0...99]
Adjusts the depth of modulation.
Parameter 3: Resonance [0...99]
Adjusts the depth of resonance.
Effect type 7: Sweep Modulation Delay + Flanger
This is a combination of a sweep modulation delay that applies modulation according to the dynamics of the input sound, and a flanger.
Parameter 1: Time [0...99]
Adjusts the sweep time of the sweep modulation delay.
Parameter 2: Type [0...1]
Specifies the sweep direction of the sweep modulation delay.
Parameter 3: Mix [0...99]
Adjusts the mix amount of the flanger.
Effect type 8: Tube OD + Flanger
This is a combination of an overdrive that distorts the sound, and a flanger.
Parameter 1: Drive [0...99]
Adjusts the distortion (boost) of the overdrive.
Parameter 2: Speed [0...99]
Adjusts the flanger's modulation speed.
Parameter 3: Mix [0...99]
Adjusts the mix amount of the flanger.
Effect type 9: Random Step Filter + Delay
This is a combination of a random step filter and a delay.
Parameter 1: Speed [0...99]
Adjusts the speed of the random step filter.
Parameter 2: Depth [0...99]
Adjusts the modulation depth of the random step filter.
Parameter 3: Time [0..99]
Adjusts the delay time.
Appendix
Restoring the factory settings
Here's how to return the WAVEDRUM Mini's global settings and effect settings to their factory-set condition.
- While holding down the button, press the power switch to turn on the power.
The display will blink "PL" and the button indicator will blink. - Hold down the button for approximately two seconds to execute the factory reset.
If you decide to cancel without executing, press the power switch to turn off the power.
Never turn off the power while data is being loaded. Doing so may damage the data. - When you execute this operation, the WAVE-DRUM Mini will be returned to its factory-set condition, and will be in the same state as after a normal power-on.
Error messages
The WAVEDRUM Mini automatically performs an internal check when its power is turned on. If a problem is detected, one of the following error messages will be displayed. Take the appropriate action described below.
E.0: The user data has been lost. Initialize the data as described in "Restoring the factory settings" above.
E.1: A system error has occurred. Immediately stop using the WAVEDRUM Mini, and contact your nearby Korg dealer.
Troubleshooting
If you suspect a malfunction, check the following points first. If this does not resolve the problem, contact your nearby Korg dealer.
Power won't turn on
- Make sure that the AC Adapter is correctly connected to the WAVEDRUM Mini and to an AC outlet.
- If you're using batteries, make sure that they are inserted correctly.
No sound from the speaker
- Turn the VOLUME knob toward the right.
- No sound will be output from the speaker if a cable is connected to the headphone jack or the OUTPUT jack.
Could the global parameter 5.7 Speaker Level be set to 0?
Can't select sounds or effects
Could the CLIP or PAD indicators of the buttons on the left of the control panel be blinking?
Press one of the CLIP/PAD, , , or + buttons to make the indicator change from blinking to steadily lit.
Rhythm pattern doesn't sound
- Could the rhythm pattern / looper select indicator (on the upper right side of the panel) be blinking? If it's blinking, the rhythm pattern is muted. To cancel muted, hold down the SHIFT button and press the FX button.
Could the global parameter 5.6 rhythm pattern level be set to 0?
Can't operate the buttons
The pattern number on the display will blink while the rhythm pattern is being switched. During this time, you won't be able to switch sounds or start/stop the rhythm pattern.
The sound is different than another WAVE-DRUM Mini
As with many other instruments, each WAVE-DRUM Mini will sound slightly different. This is due to many factors, such as the environment where it's being played and how it has been maintained.
This means that even if multiple WAVEDRUM Mini units are set to the same program and the same settings, they might not produce the identical sound when played. This is an example of how although the WAVEDRUM Mini is an electronic instrument, it also has some characteristics of an acoustic instrument.
Feedback occurs
Consider using the equalizer and limiter of your PA system to suppress feedback and protect your amps and speakers. See page 5
No response when you press the pad
Unlike the Wavedrum, the WAVEDRUM Mini does not provide the Pressure functionality that lets you modify the sound by pressing the pad.
Specifications
Dynamic Percussion Synthesizer
Sounds: 100
Effects: 10
Rhythm patterns: 100 (user can overdub onto the patterns)
Loop: Maximum 25 seconds (from beginning to end of phrase)
Output jacks: OUTPUT (monaural phone jack) Headphones (stereo mini-phone jack)
Input jack: CLIP connection jack
Amp output / speaker: 1.3 W
Display: 2 character, 7-segment LED
Sampling frequency: 48kHz
A/D, D/A conversion: 24-bit
Power supply: Included DC9V AC Adapter, or six AA nickel-metal hydride batteries
Battery life: Approximately 4 hours when using nickel-metal hydride batteries (1900 mAh)
- Battery life will vary depending on the batteries used and the conditions of use.
Power consumption: 7.5 W
Weight: 1.0kg / 2.20 Ibs. (without batteries)
Dimensions (W x D x H): 216 x 216 x 67 mm / 8.50" x 8.50" x 2.64"
Operating temperature: 0 - + 40 degrees C (noncondensing)
Included items: Owner's manual, AC Adapter (DC9V, ), Sensor clip, Strap
- Specifications and appearance are subject to change without notice for improvement.
WAVEDRUM
Mini
Sommaire
100 sons, 10 effects
:Transposition [0...12]
5: Accentuation de la pince [0...99]
0: Off, 1: Slap, 2: Spring1, 3: Spring2, 4: Plate,
5: Garage, 6: Chamber, 7: Canyon, 8: Room,
9: Studio, 10: Hall
Paramètre 2: Mix [0...99]
Conversion A/N, N/A: 24 bits
:Transposition [0...12]
Energiesparfungk (Off, On]
0: Off, 1: Slap, 2: Spring1, 3: Spring2, 4: Plate, 5: Garage, 6: Chamber, 7: Canyon, 8: Room, 9: Studio, 10: Hall
Parameter 2: Mix [0...99]
| No. | Name | Category | Transpose | Scale | Pitch change |
| 00 | Club Kit | Drum Kit | |||
| 01 | Big Tom | Drum/Perc. Instrument | |||
| 02 | Katim | Drum/Perc. Instrument | |||
| 03 | SD & HH | Drum Kit | |||
| 04 | Analog Bass Drum | Drum/Perc. Instrument | |||
| 05 | Synth Bass 1 | Synth Bass | 6 (F#!) | Ran. | |
| 06 | Hand Clap (w/Jingle) | Drum/Perc. Instrument | |||
| 07 | Wah Hit | Other Tuned Instrument | 6 (F#!) | Vel. | |
| 08 | 1970 Space Tom | Drum/Perc. Instrument | |||
| 09 | Ethnic Guitar Slide | Other Tuned Instrument | 8 (Ab) | Vel. | |
| 10 | BD/SD/HH Kit 1 | Drum Kit | |||
| 11 | Marimba Duo | Tuned Percussion | 6 (F#!) | ○ | Ran./Vel. |
| 12 | Jingle (Light) | Drum/Perc. Instrument | |||
| 13 | Techno Voice | Drum/Perc. Instrument | |||
| 14 | BD/SD/HH Kit 2 | Drum Kit | |||
| 15 | BD/SD/HH Kit 3 | Drum Kit | |||
| 16 | Dance Drum Kit | Drum Kit | |||
| 17 | BD/SD/HH & OHH | Drum Kit | |||
| 18 | Dance Jam Kit | Drum Kit | |||
| 19 | Human Drum Kit | Drum Kit | 6 (F#!) | Sec. | |
| 20 | Analog Kit Session | Drum Kit | 6 (F#!) | ○ | Ran. |
| 21 | Analog Kit | Drum Kit | |||
| 22 | Human Beatbox | Drum Kit | 6 (F#!) | ||
| 23 | Voice Tom | Drum Kit | |||
| 24 | Dance Bass Drum | Drum/Perc. Instrument | |||
| 25 | Messy Tekno Kick | Drum/Perc. Instrument | |||
| 26 | Boomy Rap Kick | Drum/Perc. Instrument | |||
| 27 | Toy Snare | Drum/Perc. Instrument | |||
| 28 | Ring Snare | Drum/Perc. Instrument | |||
| 29 | Tribal Ambi Tom | Drum/Perc. Instrument | |||
| 30 | Celebration Tom Tom | Drum/Perc. Instrument | |||
| 31 | Techno Clapper | Drum/Perc. Instrument | |||
| 32 | Jingle (Ethnic) | Drum/Perc. Instrument | |||
| 33 | Sagat Close | Drum/Perc. Instrument | |||
| 34 | Riq | Drum/Perc. Instrument | |||
| 35 | Big Riq | Drum/Perc. Instrument | |||
| 36 | Electric Tambourine | Drum/Perc. Instrument | |||
| 37 | Shaker Drum | Drum/Perc. Instrument | |||
| 38 | Dance HH | Drum/Perc. Instrument | |||
| 39 | Triarimba | Drum/Perc. Instrument | |||
| 40 | Random Perc | Drum/Perc. Instrument | |||
| 41 | Bonga | Drum/Perc. Instrument | |||
| 42 | Conga | Drum/Perc. Instrument | |||
| 43 | Tabil | Drum/Perc. Instrument | |||
| 44 | Water Drum | Drum/Perc. Instrument | |||
| 45 | Tar | Drum/Perc. Instrument | |||
| 46 | Agogo Set | Drum/Perc. Instrument | |||
| 47 | Udu & Tambourine | Drum/Perc. Instrument | |||
| 48 | Cajon | Drum/Perc. Instrument | |||
| 49 | Timbale | Drum/Perc. Instrument |
| No. | Name | Category | Transpose | Scale | Pitch change |
| 50 | Tabla | Drum/Perc. Instrument | 9 (A) | ||
| 51 | Djembe | Drum/Perc. Instrument | |||
| 52 | Elektro Slider | Drum/Perc. Instrument | |||
| 53 | Chord Hit | Synth Bass | 6 (F#) | Ran./Vel. | |
| 54 | Piko Piko | Synth Bass | 6 (F#) | ○ | Ran. |
| 55 | Synth Bass 2 | Synth Bass | 6 (F#) | ||
| 56 | Kicked Bassline | Synth Bass | 6 (F#) | Sec. | |
| 57 | Hand Clap (w/Bass) | Synth Bass | 6 (F#) | Ran. | |
| 58 | Bass SEQ | Synth Bass | 6 (F#) | Sec. | |
| 59 | Slap Bass | Synth Bass | 6 (F#) | Vel. | |
| 60 | Space Triangle | Synth Bass | 6 (F#) | Sec. | |
| 61 | Industrial Kit 1 | Industrial | |||
| 62 | Industrial Kit 2 | Industrial | |||
| 63 | Industrial Kit 3 | Industrial | |||
| 64 | Metal Game | Industrial | |||
| 65 | Steel Drum Bluesy | Tuned Percussion | 6 (F#) | Vel. | |
| 66 | Exotic Vibraphone | Tuned Percussion | 8 (Ab) | Vel. | |
| 67 | Gamelan Hard | Tuned Percussion | 6 (F#) | Vel. | |
| 68 | Gamelan Soft | Tuned Percussion | 6 (F#) | ○ | Ran. |
| 69 | Kalimba | Tuned Percussion | 6 (F#) | Vel. | |
| 70 | Celesta | Tuned Percussion | 8 (Ab) | Vel. | |
| 71 | Reso Tubular Bell | Tuned Percussion | 6 (F#) | Vel. | |
| 72 | Air Bamboo | Tuned Percussion | 6 (F#) | ○ | Ran. |
| 73 | Balafon | Tuned Percussion | 6 (F#) | ○ | Ran. |
| 74 | Log's Club | Tuned Percussion | 6 (F#) | ○ | Ran. |
| 75 | Toy Wind Drum | Tuned Percussion | 6 (F#) | ○ | Ran. |
| 76 | Arabic Marimba | Tuned Percussion | 6 (F#) | ○ | Ran. |
| 77 | Metal Delay Bell | Other Tuned Instrument | 6 (F#) | Vel. | |
| 78 | Chord Sequence | Other Tuned Instrument | 6 (F#) | Vel./Sec. | |
| 79 | Synth Chord Hit | Other Tuned Instrument | 6 (F#) | Vel./Sec. | |
| 80 | Splash Cymbal Log | Other Tuned Instrument | 6 (F#) | ○ | Ran. |
| 81 | Sitar | Other Tuned Instrument | 8 (Ab) | ○ | Ran. |
| 82 | Belly Dancing Jam Drum | Other Tuned Instrument | 8 (Ab) | ○ | Ran. |
| 83 | Tambura | Other Tuned Instrument | 8 (Ab) | ||
| 84 | Choir | Other Tuned Instrument | 6 (F#) | Vel. | |
| 85 | Pizz. Ensemble | Other Tuned Instrument | 6 (F#) | Vel. | |
| 86 | Piano Concert | Other Tuned Instrument | 6 (F#) | Vel. | |
| 87 | Telephone SFX | SFX | |||
| 88 | Scratch | SFX | 6 (F#) | Ran./Vel. | |
| 89 | Computer Robot | SFX | 6 (F#) | Ran./Vel. | |
| 90 | Synth Short Kit | SFX | |||
| 91 | Game Hit | SFX | 6 (F#) | Ran./Vel. | |
| 92 | One for time | SFX | |||
| 93 | Breath Drum | SFX | |||
| 94 | Cosmos | SFX | 6 (F#) | Vel. | |
| 95 | Yamiuchi | SFX | 8 (Ab) | ||
| 96 | Space Frog | SFX | |||
| 97 | Gun Explosion | SFX | |||
| 98 | Noise Up | SFX | |||
| 99 | Harp Bell | SFX |
Pitch change: Ran. (Random pitch change), Vel. (Pitch change by velocity), Seq. (Sequenced pitch change)
Scale
0 Major

1 Major Pentatonic

2 Minor Pentatonic

3 Minor

4 Indian-type scale

5 Gamelan-type scale

6 Tonic only.... each note will sound at the pitch specified by the Transpose parameter.
Pitch change
Ran.: Random pitch change.
Vel.: Pitch change by velocity.
Seq.: Sequenced pitch change. When you play repeated notes with a certain force and tempo, each strike will repeat phrases of a certain pattern.
Effects
| No. | Name | Default |
| 0 | Reverb | a |
| 1 | Multi Tap Delay | |
| 2 | Delay + Reverb | |
| 3 | Reverb + Phaser | |
| 4 | Reverb + Flanger | b |
| 5 | Pitch Shifter | |
| 6 | Random Step Filter | |
| 7 | Sweep Modulation Delay + Flanger | |
| 8 | Tube OD + Flanger | |
| 9 | Random Step Filter + Delay |
Rhythm Patterns
| No. | Name [bpm] |
| 00 | Dreamy Planets [104] |
| 01 | Techno Kick&Hat [128] |
| 02 | Submarine [100] |
| 03 | Ambi Windy [97] |
| 04 | AquCity 1 [120] |
| 05 | Hip Hop Windy [90] |
| 06 | Wavesquence Beat [130] |
| 07 | Arp Techno [128] |
| 08 | DubStep Drama [145] |
| 09 | Machine Gun [120] |
| 10 | Opening [80] |
| 11 | Jupiter Highs [90] |
| 12 | Flying Saucer [137] |
| 13 | Simple Shakers [85] |
| 14 | Simple Shakers [115] |
| 15 | Simple Shakers [128] |
| 16 | Swing Hop Percussion [100] |
| 17 | Swing Hop Tambo [100] |
| 18 | West Coast Rapper [66] |
| 19 | Slow R&B [77] |
| 20 | Hip Pop [80] |
| 21 | New Cool 1 [80] |
| 22 | New Cool 2 [80] |
| 23 | Skittles [80] |
| 24 | Pop Camel [85] |
| 25 | Pregnant Pause [85] |
| 26 | Mellow Pop [87] |
| 27 | Hip Vox Hop [88] |
| 28 | Hip Hop Icy [90] |
| 29 | R&B Gold Digger [90] |
| 30 | Tek Pop [110] |
| 31 | R&B Grenade [111] |
| 32 | AquCity 2 [120] |
| 33 | AquCity 3 [120] |
| 34 | Jakarta 1 [120] |
| 35 | Jakarta 2 [120] |
| 36 | Jakarta 3 [120] |
| 37 | Jakarta 4 [120] |
| 38 | SuperTek [128] |
| 39 | Progressive [128] |
| 40 | Hard Techno [128] |
| 41 | Didgeridoo [122] |
| 42 | Dance Beat [124] |
| 43 | Trancy [132] |
| 44 | Techno Sequence [128] |
| 45 | DubStepper [170] |
| 46 | Atmosphere [80] |
| 47 | Conga Hop [100] |
| 48 | Sweeper [120] |
| 49 | Choir [105] |
| No. | Name [bpm] |
| 50 | Waterphone [102] |
| 51 | Tragedy [82] |
| 52 | Spacey [80] |
| 53 | Orgel [84] |
| 54 | Murk [128] |
| 55 | Afrikanah [105] |
| 56 | DubStep Drama [145] |
| 57 | Suspects [90] |
| 58 | Arpeggio [76] |
| 59 | Dark Hop Beat [90] |
| 60 | Hip Hop Thinker [90] |
| 61 | Granular Hip Hop [78] |
| 62 | Heavy Marching [75] |
| 63 | Doubt [85] |
| 64 | Slow Dance Pop [96] |
| 65 | Warehouse Rock [80] |
| 66 | Wah Hop [89] |
| 67 | Sweep Whistle [70] |
| 68 | Beat VOCode [80] |
| 69 | Marching Rock [94] |
| 70 | Rock 1 [110] |
| 71 | Rock 2 [112] |
| 72 | Rock 3 [Swing, 95] |
| 73 | Rock 4 [Triplet, 130] |
| 74 | Pop 1 [130] |
| 75 | Pop 2 [110] |
| 76 | Pop 3 [Swing, 104] |
| 77 | Pop 4 [100] |
| 78 | Ballad 1 [100] |
| 79 | Ballad 2 [75] |
| 80 | Funk 1 [84] |
| 81 | Funk 2 [95] |
| 82 | Soul [80] |
| 83 | 16beat [120] |
| 84 | Jazz Samba [Swing, 120] |
| 85 | Latin 1 [108] |
| 86 | Latin 2 [130] |
| 87 | Bossa [65] |
| 88 | Fast Bossa [106] |
| 89 | Andean [110] |
| 90 | Brazilian Samba [102] |
| 91 | ChaCha [124] |
| 92 | Reggae [130] |
| 93 | Sambalegre [112] |
| 94 | Turkish Pop [127] |
| 95 | 2/4 Oyun [112] |
| 96 | Arabic Rumba [96] |
| 97 | Baladi [112] |
| 98 | Nobi [95] |
| 99 | Rumba [138] |
IMPORTANT NOTICE TO CONSUMERS
This product has been manufactured according to strict specifications and voltage requirements that are applicable in the country in which it is intended that this product should be used. If you have purchased this product via the internet, through mail order, and/or via a telephone sale, you must verify that this product is intended to be used in the country in which you reside.
WARNING: Use of this product in any country other than that for which it is intended could be dangerous and could invalidate the manufacturer's or distributor's warranty. Please also retain your receipt as proof of purchase otherwise your product may be disqualified from the manufacturer's or distributor's warranty.