VT-1684 - Microwave Vitek - Free user manual and instructions
Find the device manual for free VT-1684 Vitek in PDF.


| Product Type | Countertop Microwave |
| Brand | Vitek |
| Model | VT-1684 |
| Capacity | 20 liters |
| Power Output | 800 W |
| Power Consumption | 1200 W |
| Dimensions (W x D x H) | 455 x 310 x 265 mm |
| Weight | 10.5 kg |
| Power Supply | 220-240 V, 50 Hz |
| Control Type | Electronic touch + dial |
| Display | LED digital |
| Functions | Defrost, Auto Cook, Timer, Clock, Child Lock |
| Power Levels | 10 levels |
| Turntable Diameter | 245 mm |
| Interior Light | Yes |
| Child Lock | Yes |
| Cleaning | Wipe with damp cloth; do not use abrasive cleaners |
| Safety Features | Door interlock, overheat protection |
| Spare Parts Availability | Turntable, glass tray, fuse available |
| Repairability | Service center recommended for internal repairs |
Frequently Asked Questions - VT-1684 Vitek
User questions about VT-1684 Vitek
0 question about this device. Answer the ones you know or ask your own.
Ask a new question about this device
Download the instructions for your Microwave in PDF format for free! Find your manual VT-1684 - Vitek and take your electronic device back in hand. On this page are published all the documents necessary for the use of your device. VT-1684 by Vitek.
USER MANUAL VT-1684 Vitek
natural_image
Simple line drawing of a round table with grid pattern and two legs (no text or symbols)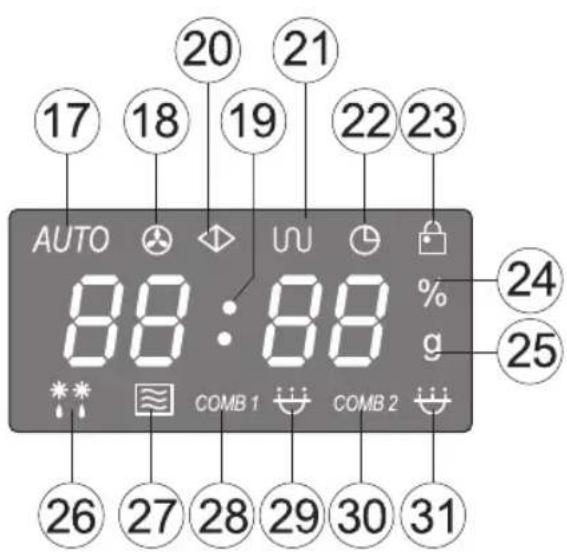
Please acquaint yourself with these instructions before using your microwave oven.
If these instructions are strictly adhered to, your microwave oven will serve you trouble-free for many years. Store these instructions in an easily accessible location
PRECAUTIONS, WHICH MUST BE FOLLOWED IN ORDER TO MINIMIZE THE RISK OF MICROWAVE ENERGY EXPOSURE
- Do not attempt to use the microwave oven with the door open as you will risk exposure to harmful microwave energy. It is very important that you do not damage the internal latches and door blocking mechanism.
- Do not place foreign objects between the door and the front of the microwave oven and do not allow food or cleaning liquid remnants to build up on the screening grill or on the inside of the door.
- Do not use the microwave oven if it is damaged or malfunctioning. It is especially important that the door always be closed and that the following parts are not damaged:
- door (bent)
- hinges and latches (broken or weakened)
• screening grill on the inside of the door
IMPORTANT SAFETY INSTRUCTIONS
WARNING: While the microwave oven is operating in combination mode (MICROWAVE + GRILL) or being operated by children, an adult should always be present to supervise in order to prevent the children from burning themselves.
WARNING: Do not use the microwave oven if the screening grill on the door is damaged.
WARNING: Repairing a microwave oven always presents danger to any person conducting the repairs if it is necessary to remove the metal housing that provides protections from microwave radiation. Do not repair the microwave oven yourself.
WARNING: Do not forget to open products packaged in hermetic or vacuum packaging before heating or cooking. Otherwise, pressure could grow within the package and cause it to explode, regardless of whether or not the food was prepared earlier.
WARNING: Children may only use the microwave oven by themselves after they have been acquainted with these instructions and understand the dangers associated with operating a microwave oven.
- Use only microwave-safe dishes. Do not use metallic dishes in the microwave oven as microwaves reflected off the dish may cause sparks and fire.
- In order to avoid overheating and burning food, constantly supervise the microwave's operation if you are heating food in disposable plastic, paper or other similar containers or if the oven is heating only a small amount of food.
- When heating any kind of liquid (water, coffee, milk, etc.), keep in mind that it can suddenly start to boil and splash on your hands while you are removing it from the oven. To avoid this, place a heat resistant plastic spoon or glass mixer in the container and stir the liquid before removing it from the oven.
- Infant feeding bottles and jars of baby food should be heating without lids or nipples. Their contents should be mixed or periodically shaken. Test the temperature of the food before feeding in order to prevent burns.
Important information
- ALWAYS check to make sure the food is not too hot before giving it to a child. We recommend shaking the bottle or jar to make sure the heat is distributed evenly throughout the volume of the container.
- Do not cook an egg in its shell or reheat an egg in its shell in MICROWAVE mode as they can break from the internal pressure.
SAFETY MEASURES
- Install the oven on a flat, stable surface. Choose a place that will not be accessible to small children.
- Install the oven so that the distance between the wall and the back of the oven is no less than 7-8 cm and the free space above the microwave is no less than 30 cm.
- The microwave door is equipped with a blocking system that turns off the power when it is open. Do not make changes to the operation of the door blocking mechanism.
- Do not turn on the microwave while empty; operating the oven with no food inside can lead to malfunction.
- Preparing foods with extremely small moisture contents can lead to burning and fire.
If a fire occurs:
- Do not open the door.
- Turn off the microwave oven and disconnect the plug from the electrical outlet.
- When preparing bacon, do not place it directly on the glass tray; localized overheating of the glass tray can cause it to crack.
- Do not heat liquids in containers with narrow openings.
ENGLISH
- Do not attempt to heat products to a well-done state.
- Do not use the microwave for canning and preserving food because there is no way of knowing if the contents of the jar reached boiling temperature.
- In order to avoid prolonged rapid boiling of liquid foods and drinks, and also to prevent burns, we recommend stirring the product before and in the middle of the cooking process. To do this, start cooking, wait a while, remove the dish from the oven and stir, then place it back in the oven to continue the cooking process.
- Clean the microwave oven regularly. Irregular care for your oven can lead to poor outward appearance, negatively affects its operating ability, and also can lead to danger during further exploitation.
Rules that should always be remembered:
- Do not exceed product cooking times in the microwave oven. Always monitor the cooking process when using dishes made from paper, plastic and other flammable materials.
- Never use the microwave oven to store things. Never store flammable materials and food in the microwave like bread, cookies, paper packaging, etc., because during lightning storms, the microwave oven can turn on by itself.
- Metal ties and wire handles must be removed from paper and plastic bags and containers before placing them into the microwave oven.
- The microwave oven should be properly grounded. Only connect the microwave oven to an electrical outlet that is properly grounded.
- Some food items, like eggs in their shells, liquid or hard fats, and also hermetically sealed jars and sealed glass containers can be explosive and should not be placed in your microwave oven.
- Use your microwave oven exclusively for the purposes for which it was designed and in strict adherence to the instructions explained herein.
- The microwave oven in designed exclusively for heating and preparing food and is not designed for laboratory or industrial use.
- Pay special attention when children are using the microwave oven.
- Do not use the microwave oven if the power cord or plug is damaged, or if the oven has been damaged or dropped.
- Repair of the microwave oven should only be conducted by qualified specialists at an authorized service center.
- Do not block the ventilation openings on the microwave oven's housing.
- Do not store or use the microwave oven outdoors.
- Do not use the microwave oven near water, immediately near kitchen sinks, in damp basements or directly near swimming pools.
- Do not submerse the power cord and plug in water.
- Avoid allowing the power cord and plug to come into contact with hot surfaces.
- Do not allow the power cord to hang off the edge of the table or counter.
- When cleaning the door and internal surfaces of the microwave oven, always use a soft, non-abrasive cleanser on a sponge or soft cloth.
CAUTION
Injury due to electric shock.
Touching the elements of the electrical circuits inside the microwave oven can lead to serious trauma and injury from electric shock. Do not take apart the microwave oven yourself.
Grounding the Microwave Oven
The microwave oven should be properly grounded. In case of any kind of short-circuit, grounding reduces the risk of electric shock, as the current will flow through the ground wire.
The microwave oven uses a power cord with ground wire and a grounded plug. The plug should be connected to an electrical outlet that also has a ground contact.
WARNING: Connecting a grounded plug to an un-grounded outlet can lead to electric shock.
Consult with a qualified electrician if you do not understand these grounding instructions or if you are not sure that the microwave oven is properly grounded.
- In order to avoid confusion, the microwave oven is equipped with a short power cord.
- If an extension cord is necessary, only use a 3-wire extensions cord with ground contacts on the power plug and outlet(s).
- The sectional markings on the microwave oven's power cord should match those on the extension cord.
- The extension cord should not hang off the edge of the table where children can pull on it; it should be placed where it will not be walked on.
ENGLISH
Dishes for microwave ovens
CAUTION!
- Tightly sealed containers heated in a microwave can be explosive.
- Sealed containers should be opened and plastic bags should be poked a few times with a fork in order to allow steam to escape before being placed in the microwave oven.
- If you are unsure about using a certain dish in the microwave oven, then conduct a test.
Checking dishes before using them in the microwave
- Place the dish in the cooking chamber of the oven (a plate, for example) and place a glass cup of water in the center of the dish.
- Set the microwave to maximum power and heat for no more than one minute.
- Carefully touch the dish you are testing: if it heated up and the water in the cup is cold, than the dish should not be used in the microwave.
- Avoid testing dishes for more than one minute.
Materials you can use in microwave oven
Utensils Remarks
| Aluminum foil prevent overcooking. Arcing can occur if foil is too close to oven walls. The foil should be at least 1 inch (2.5cm) away from oven walls. | |
| Browning dish to break. | Follow manufacturer's instructions. The bottom of browning dish must be at the turntable |
| Dinnerware dishes. | Microwave-safe only. Follow manufacturer's instructions. Do not use cracked or chipped |
| Glass jars ant and may break. | Always remove lid. Use only to heat food until just warm. Most glass jars are not heat resist |
| Glassware or chipped dishes. | Heat-resistant oven glassware only. Make sure there is no metallic trim. Do not use cracked |
| Oven cooking steam to escape. | Follow manufacturer's instructions. Do not close with metal tie. Make slits to bags allow |
| Paper plates cooking. | Use for short -term cooking/warming only. Do not leave oven unattended while and cups |
| Paper towels term cooking. | Use to cover food for reheating and absorbing fat. Use with supervision and only for short |
| Parchment paper Plastic age. | Use as a cover to prevent splattering or a wrap for steaming.Microwave-safe only. Follow the manufacturer's instructions. Should be labeled "Microwave Safe". Some plastic containers soften as the food inside gets hot. "Boiling bags" and tightly closed plastic bags should be slit, pierced or vented as directed by pack |
| Plastic wrap plastic wrap to touch food. | Microwave-safe only. Use to cover food during cooking to retain moisture. Do not allow |
| Thermometers | Microwave-safe only (meat and candy thermometers). |
| Wax paper | Use as a cover to prevent splattering and retain moisture. |
Materials to be avoided in microwave oven
Utensils Remarks
| Aluminum tray | May cause arcing. Transfer food into microwave-safe dish. |
| Food carton with metal handle | May cause arcing. Transfer food into microwave-safe dish. |
| Metal or metal-trimmed utensils | Metal shields the food from microwave energy. Metal trim may cause arcing. |
| Metal twist ties | May cause arcing and could cause a fire in the oven. |
| Paper bags | May cause a fire in the oven. |
| Plastic foam | Plastic foam may melt or contaminate the liquid inside when exposed to high temperature. |
| Wood | Wood will dry out when used in the microwave oven and may split or crack. |
Description
- Door interlock system
- Viewing window
- Microwave guide
- Roller ring support
ENGLISH
- Glass tray
- Control panel
- Grill heating element
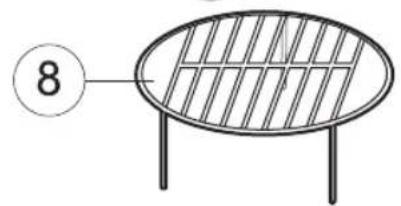
- Grill rack. Used only in Grill mode.
Control Panel
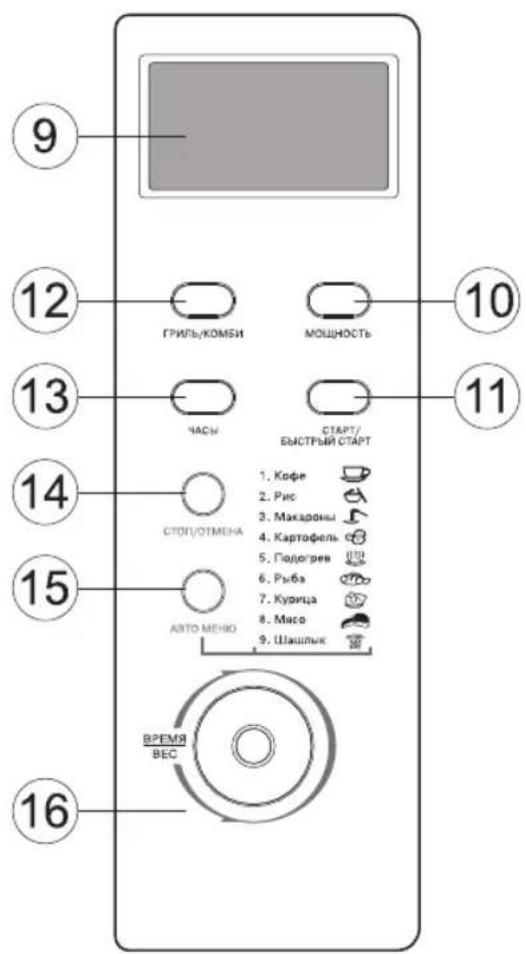
9. Display
The display shows the current time, cooking time information, power levels and operating mode pictograms.
10. "МОЩНОСТЬ" button
Used to set the cooking power level. The power level selection is done in the following order: 100%, 80%, 60%, 40%, 20% and 0%. To verify the current power level setting during the cooking process, simply press the "МОЩНОСТЬ" button; the set power level will be shown on the display for five seconds.
11. "СТАРТ/БЫСТРЫЙ СТАРТ" button
Press to start the cooking or defrosting process according to the set program.
To use quick start, press this button the necessary number of times to set the reheating or cooking time; the oven will start operating at maximum (100%) power.
12. "ГРИЛЬ/КОМБИ" button
Use to turn on the grill or choose the COMB1 or COMB2 combination cooking programs.
13. "ЧАСЫ" button
Use to choose between the 12 and 24-hour time format and to set the time.
14. "СТОП/ОТМЕНА" button
Press to cancel the previously programmed power level, cooking or defrosting program.
Note: the "CTOP/OTMEHA" button cannot erase the current time.
15. "ABTO MEHIO" button
For choosing 1 of the 9 automatic cooking programs.
16. "ВРЕМЯ/ВЕС" knob
By turning the knob clockwise, set the current time, cooking time and product weight.
Display
- Automatic cooking pictogram.
- Timer mode pictogram.
- Blinking hours and minutes separator.
- Readiness of the oven for activation pictogram.
- Grill mode pictogram.
- Current time pictogram.
- Child-lock mode pictogram.
- Chosen power level pictogram.
- Food weight pictogram.
- Defrost mode pictogram.
- Microwave cooking mode pictogram.
- Combination cooking mode 1 pictogram.
- 100 and 80% power level operation pictogram.
- Combination cooking mode 2 pictogram.
- 60, 40 and 20% power level operation pictogram.
Assembling the microwave oven
Remove the packing material and accessories from the cooking chamber of the oven. Inspect the microwave oven for any deformities. Pay special attention to the operation of the oven door. If any defects are found, do not install the oven and do no turn it on.
Protective covering
Housing: Remove the protective film (if any) from the microwave housing.
Do not remove the light-grey micaceous plate from the inside of the cooking chamber; it protects the magnetron.
ENGLISH
Installing the glass tray
- Install the base for the rotating tray (4) into the opening located in the floor of the cooking chamber.
-
Carefully install the glass tray (5).
-
Do not block the rotation of the glass tray during the cooking process.
- During the cooking process, always use the glass tray, rolling ring and tray base.
- Food and cooking dishes must always be placed only on the glass tray.
- The glass tray may rotate clockwise or counter-clockwise. This is normal.
- Replace the tray immediately if it becomes cracked or chipped.
Installation
- Before connecting the microwave oven, make sure that the operating voltage and power usage matches the parameters of your electrical system. Connect the microwave oven to a grounded electrical outlet.
• Install the oven on a flat, stable surface. Choose a location that will not be accessible to small children.
• Install the oven so that the distance between the wall and the back of the oven is no less than 7-8 cm and the free space above the microwave is no less than 30 cm. - Do not remove the legs from the bottom of the microwave oven.
- Do not block the ventilation openings on the microwave oven's housing.
- The microwave oven should be installed away from televisions and radios in order to prevent static interference of radio and television signals.
WARNING: Do not install the microwave oven on heating surfaces (kitchen stoves) or other sources of heat waves. If the microwave oven malfunctions due to user error, the warranty for free service and repair is voided.
While operating, the top surface of the microwave oven and heat up significantly; avoid touching hot surfaces of the oven with bare skin in order to prevent burns.
Using the oven
Audible signal
Each time a button on the control panel is pressed the oven will emit an audible "beep."
Setting the current time
Connect the power plug to the outlet; the microwave will emit a "beep" and the display will show the numbers "1:01." Press the "ЧАСЫ" button one or two times to choose between the 12 or 24-hour time format.
For example: to set the current time of 8 hours 30 minutes.
- Press the "ЧАСЫ" button once.
- Rotate the "ВРЕМЯ/ВЕС" knob clockwise and set the hours to 8.
- Press the "ЧАСЫ" button again to confirm.
- Rotate the "BPEMЯ/BEC" knob clockwise to set the minutes to 30; the display will show the time as 8:30.
- Press the "ЧАСЫ" button to confirm.
The display will show the set time; the (22) pictogram and the colon (19) will blink.
Note: if you do not complete the time setting process then, after 30 seconds, the microwave will "beep" and the display will return to its initial setting. To see the current time during the cooking process, just press the "ЧАСЫ" button and the current time will be displayed for 5 seconds.
Cooking in the microwave oven
To start the oven in microwave mode, press the "МОЩНОСТЬ" button several times to set the desired power level and then rotate the "ВРЕМЯ/ВЕС" knob clockwise to set the needed cooking time.
The maximum possible cooking time is 60 minutes.
Choose the power level:
| "МОЩНОСТЬ" button pushes Power level | |
| 1 time 100% | |
| 2 times 80% | |
| 3 times 60% | |
| 4 times 40% | |
| 5 times 20% | |
| 6 times (timer) 0 |
ENGLISH
Note: when the power level is set to 100% or 80%, pictogram (29) will appear; when the power level is set to 60%, 40% or 20%, pictogram (31) will appear.
Example: to cook some food for 10 minutes at 60% microwave power level.
- Press the "МОЩНОСТЬ" button 3 times; the display will show the chosen power level - 60%, and pictograms 27 and 31 will appear.
-
Rotate the "BPEMЯ/BEC" knob clockwise to set the cooking time to "10:00;" pictograms 27 and 31 will appear on the display and pictogram (20) will blink.
-
Press the "СТАРТ/БЫСТРЫЙ СТАРТ" button to begin cooking; pictograms 27 and 31 will appear and pictogram (20) will disappear.
During the cooking process, pictograms 27 and 31, as well as the remaining cooking time will be shown on the display.
Grill
The grill is used to prepare fried, crispy pieces of meat, fish, chicken and potatoes. In grill mode, heat from the quartz heating element is distributed throughout the entire oven cooking chamber.
The maximum possible cooking time is 60 minutes.
Example: you need to turn on the grill for 12 minutes.
- Press the "ГРИЛЬ/КОМБИ" button once; pictogram (21) will appear on the display.
- Rotate the "BPEMЯ/BEC" knob clockwise to set the time to "12:00;" pictogram (21) will appear on the display and pictogram (20) will blink.
- Press the "СТАРТ/БЫСТРЫЙ СТАРТ" button to start cooking; pictogram (21) will appear on the display and pictogram (20) will disappear.
During the cooking process, pictogram (21) and the remaining cooking time will be shown on the display.
Combination cooking
Combines microwave and grill cooking modes to achieve the best cooking results.
COMB1 - 30% microwave cooking + 70% grill - for preparing fish and potatoes.
COMB2 - 55% microwave cooking + 45% grill - for preparing omelets, baked potatoes, and poultry.
Example: to prepare some food in COMB1 mode for 25 minutes.
- Press the "ГРИЛЬ/КОМБИ" button twice; pictogram (28) will appear.
- Rotate the "ВРЕМЯ/ВЕС" knob clockwise to set the time to "25:00;" pictogram (28) will appear and pictogram (20) will flash.
- Press the "СТАРТ/БЫСТРЫЙ СТАРТ" to begin cooking; pictogram (28) will appear and pictogram (20) will disappear.
During the cooking process, pictogram (28) and the remaining cooking time will be shown on the display.
Example: to prepare some food in COMB2 mode for 12 minutes.
- Press the "ГРИЛЬ/КОМБИ" button three times; pictogram (30) will appear.
- Rotate the "BPEMЯ/BEC" knob clockwise to set the time to "12:00;" pictogram (30) will appear and pictogram (20) will blink.
- Press the "СТАРТ/БЫСТРЫЙ СТАРТ" button to begin cooking; pictogram (30) will appear and pictogram (20) will disappear.
During the cooking process, pictogram (30) and the remaining cooking time will be shown on the display.
Automatic food preparation
In automatic food preparation mode, you do not need to set the power level and cooking time - you only need to choose the type of food and its weight. To do this, press the "ABTO MEHIO" button to choose the food category and then set its weight by rotating the "ВРЕМЯ/ВЕС" knob clockwise, then start the oven by pressing the "СТАРТ/БЫСТРЫЙ СТАРТ" button. You may need to turn the food over in the middle of the cooking program in order to insure that the food is cooked evenly.
Example: to cook 400 gr of fish.
- Press the "ABTO MEHIO" button 6 times; the display will show the automatic program number and the (17) pictogram.
- Rotate the "BPEMЯ/BEC" knob clockwise to set the weight of "400 g;" pictogram (17) will appear and pictogram (20) will blink.
- Press the "СТАРТ/БЫСТРЫЙ СТАРТ" button to start cooking; pictogram (17) will appear and pictogram (20) will disappear.
During the automatic cooking process, pictogram (17) and the remaining cooking time will be shown on the display.
ENGLISH
Automatic cooking menu
| Program # Type of Food Food weight (grams) | ||||||||||
| 1 Coffee/$oup (cup) | 1 2 3 | |||||||||
| 2 | Rice | 100 | 200 | 400 | 600 | 800 | 1000 | |||
| 3 | Spaghetti | 100 | 200 | 300 | ||||||
| 4 | Potato | 150 | 300 | 450 | 600 | |||||
| 5 | Auto reheat | 100 | 200 | 300 | 400 | 500 | 600 | 700 | 800 | 1000 |
| 6 | Fish | 100 | 200 | 400 | 600 | 800 | 1000 | |||
| 7 | Whole chicken | 800 | 1000 | 1200 | 1300 | 1400 | ||||
| 8 | Beef/Veal | 300 | 500 | 800 | 1000 | 1200 | 1300 | |||
| 9 | Beef on a spit | 100 | 200 | 300 | 400 | 500 | 600 | 700 | ||
The results of automatic food preparation depend on the weight and form of the food, and also on the food's position on the glass tray. In any case, if you think that the food preparation is unsatisfactory, please increase or decrease the weight of the food.
Automatic defrost
The oven is equipped with an automatic defrost function. The defrost time and power level is set automatically - you only need to set the weight of the food.
Example: you need to defrost 600gr of shrimp.
-
Place the shrimp into the oven's cooking chamber.
-
Rotate the "ВРЕМЯ/ВЕС" knob clockwise to set the weight to "600 g;" pictograms 17 and 25, 26 will appear and pictogram (20) will blink.
-
Press the "СТАРТ/БЫСТРЫЙ СТАРТ" to start defrosting; pictograms 17 and 26 will appear on the display and pictogram (20) will disappear.
During the defrosting process, pictogram (26) and the remaining cooking time will be shown on the display.
Quick Start
This function allows you to quickly turn on the oven to reheat or cook food at maximum power.
Press the "СТАРТ/БЫСТРЫЙ СТАРТ" button to choose the oven cooking time and the oven will turn on at maximum power.
Example: to cook for 2 minutes.
- Press the "СТАРТ/БЫСТРЫЙ СТАРТ" button 4 times; pictograms 27 and 29 will appear on the display and pictogram (20) will blink. After the oven starts cooking, pictogram (20) will disappear.
During the cooking process, pictograms 27 and 29, as well as the remaining cooking time will be shown on the display.
Note:
- the maximum cooking time in quick start mode is 10 minutes.
- the quick start time setting increases incrementally with each button-press: from 30 sec. to 2 min. - in 39 sec. increments; from 2 min. to 10 min. - in 1 min increments.
Timer mode
Used to alert you with an audible signal at the end of a set time period.
Example: to set the timer for 2 minutes.
-
Use the "МОЩНОСТЬ" button to set the power level to "0%;" pictogram (18) will appear on the display.
-
Rotate the "Time/Weight" knob clockwise to set the time to "2:00;" pictogram (18) will appear and pictogram (20) will blink.
-
Press the "СТАРТ/БЫСТРЫЙ СТАРТ" button to begin the countdown timer process; pictogram (18) will appear on the display and pictogram (20) will disappear.
ENGLISH
While the timer is operating, pictogram (18) and the remaining time will be shown on the display.
Child-lock function
In order to prevent small children from using the oven, you can set the child-lock.
- Press and hold the "СТОП/ОТМЕНА" button for 3 seconds; with oven will "beep" and the (23) pictogram will appear.
- To remove the child-lock, press and hold the "СТОП/ОТМЕНА" button for 3 seconds; the oven will "beep" and the (23) pictogram will disappear.
Special functions
Auto reminder
- After the cooking or defrosting program has finished, the oven will emit three beeps and repeat these beeps every two minutes until either the door is opened or the "СТОП/ОТМЕНА" button is pressed.
- If the time or cooking mode is not fully completed, then, after 30 seconds, the display will return to its default setting.
Stopping the oven during the cooking process
- To stop the cooking process, simply open the oven door. To continue cooking, close the oven door and press "СТАРТ/БЫСТРЫЙ СТАРТ".
- To cancel the programmed cooking process, press "СТОП/ОТМЕНА".
Eliminating malfunctions
| Malfunction Possible causes | Method of elimination | |
| The oven will not turn on | The power plug is not firmly connected to the electrical outlet | Remove the power plug from the outlet. Wait 10 seconds and then replace |
| Problem with power outlet | Try plugging another electrical device into the outlet to test it | |
| The oven will not heat The door is not closed firmly Close the door firmly | ||
| When the oven is operating, the rotating glass tray makes strange noises | The roller ring or the cooking chamber floor is dirty | Remove the glass tray and roller ring. Wash the roller ring and the cooking chamber floor |
Normal operation
| The microwave oven creates static in television and radio signals. | Static in television and radio signals can occur while the oven is operating. Similar static is created by small electrical devices like mixers, vacuum cleaners and electrical fans. This is a normal occurrence. |
| The oven light is dim. | If the oven is set to a low power level, the light in the cooking chamber may also be low. This is a normal occurrence. |
| Steam collects on the door and hot air comes out of the ventilation openings. | During the cooking process, steam is released from the food. Most of the steam is released through the ventilation openings, but some can collect on the inside of the door. This is a normal occurrence. |
| The microwave oven was turned on without food inside. | Turning on the microwave oven for a short period of time while empty will not cause any harm. Always make sure there is food in the oven before starting it. |
Care and cleaning
- Turn off the oven and disconnect from electrical power before cleaning.
- Do not allow moisture to contact the control panel. Clean it with a soft, lightly dampened paper towel.
- Keep the oven's cooking chamber clean. If pieces of food or liquid sprays are left on the chamber walls, remove them with a damp paper towel.
- A mild cleanser may be used if the chamber becomes exceptionally dirty.
ENGLISH
- Do not use abrasive cleaning instruments or wire brushes to clean the inside or outside of the oven. Make sure that no water or cleanser gets in any of the ventilation or steam release openings on the top of the microwave oven.
- Do not use ammonia-based cleansers.
- The outer surfaces should be cleaned with a damp paper towel.
- The oven door should always be clean. Do not allow crumbs of food to build-up between the door and the front panel of the oven; this may prevent normal closure of the door.
- Clean the ventilation openings on top of the oven housing regularly - keep them free of dust and dirt.
- Regularly remove and wash the glass tray and its base - wipe the oven chamber floor clean.
- Wash the glass tray and rotating drive mechanism in water with a neutral soap solution. These parts are dish-washer safe.
- Do not submerse the glass tray in cold water if it is still hot: the sudden drop in temperature can cause the glass tray to break.
Technical Characteristics
Power requirements: 220-240 V \~ 50 Hz
Nominal output power in microwave mode: 800 W
Power usage in grill mode: 900 W
Oven volume:
20
The manufacturer reserves the right to change the characteristics of the device without prior warning.
Service life of the unit not less than 5 years
Guarantee
Details regarding guarantee conditions can be obtained from the dealer from whom the appliance was purchased. The bill of sale or receipt must be produced when making any claim under the terms of this guarantee.

This product conforms to the EMC-Requirements as laid down by the Council Directive 89/336/EEC and to the Law Voltage Regulation (73/23 EEC)
DEUTSCH
MIKROWELLENGERÄT
A production date of the item is indicated in the serial number on the technical data plate. A serial number is an eleven-unit number, with the first four figures indicating the production date. For example, serial number 0606xxxxxxx means that the item was manufactured in June (the sixth month) 2006.
DE
- PRECAUTIONS, WHICH MUST BE FOLLOWED IN ORDER TO MINIMIZE THE RISK OF MICROWAVE ENERGY EXPOSURE
- IMPORTANT SAFETY INSTRUCTIONS
- Important information
- SAFETY MEASURES
- If a fire occurs:
- ENGLISH
- Rules that should always be remembered:
- CAUTION
- Dishes for microwave ovens
- CAUTION!
- Checking dishes before using them in the microwave
- Materials you can use in microwave oven
- Materials to be avoided in microwave oven
- Description
- Control Panel
- Display
- "МОЩНОСТЬ" button
- "СТАРТ/БЫСТРЫЙ СТАРТ" button
- "ГРИЛЬ/КОМБИ" button
- "ЧАСЫ" button
- "СТОП/ОТМЕНА" button
- "ABTO MEHIO" button
- "ВРЕМЯ/ВЕС" knob
- Display
- Assembling the microwave oven
- Protective covering
- Installing the glass tray
- Installation
- Using the oven
- Setting the current time
- Cooking in the microwave oven
- Grill
- Combination cooking
- Automatic food preparation
- Automatic defrost
- Quick Start
- Timer mode
- Child-lock function
- Special functions
- Auto reminder
- Stopping the oven during the cooking process
- Care and cleaning
- Technical Characteristics
- Service life of the unit not less than 5 years
- Guarantee
- DEUTSCH
- MIKROWELLENGERÄT
- DE
Brand : Vitek
Model : VT-1684
Category : Microwave