Alex - Baby bed Moweo - Free user manual and instructions
Find the device manual for free Alex Moweo in PDF.

User questions about Alex Moweo
0 question about this device. Answer the ones you know or ask your own.
Ask a new question about this device
Download the instructions for your Baby bed in PDF format for free! Find your manual Alex - Moweo and take your electronic device back in hand. On this page are published all the documents necessary for the use of your device. Alex by Moweo.
USER MANUAL Alex Moweo
- Read all instructions before assembly and use of the beside sleeper.
- Keep instructions for future use.
- WARNING! Do not use this product without reading the instructions for use first.
- WARNING! Placing additional items in the product may cause suffocation.
- WARNING! Do not place the product close to another product, which could present a danger of suffocation or strangulation, e.g. strings, bling/curtain cords, etc..
- WARNING! Only use the mattress sold with this crib, do not add a second mattress on this one.
- The product should be placed on a horizontal floor.
- The crib should be locked in the fixed position when the child is left unattended.
- All assembly fittings should always be tightened properly and that care should be taken that no screws are loose, because a child could trap parts of the body or clothing (e.g. strings, necklaces, ribbons for babies' dummies, etc.), which would pose a risk of strangulation.
• To be aware of the risk of burning cigarettes, open fires and other sources of strong heat, such as electric bar fires, gas fires, etc. in the near vicinity of the crib. - DO NOT use product if any parts are missing, damaged, or broken.
Contact manufacturer for replacement parts and instructional literature if needed. DO NOT substitute parts.
- The attachment system shall be used and the user shall not use other attachment system.
- Bedside sleepers shall never be used in an inclined position.
- DANGER! Always completely raise the drop side when not attached to the adult's bed.
- WARNING! To avoid the risk of your child being strangled the attachment system to the adult's bed shall always be kept away from and out of the crib.
There shall never be a gap between the lower side of the bedside sleeper and the mattress of the adult bed. Check the tightness of the attachment system before each use by pulling the bedside sleeper in a direction away from adult bed.
- If there is any gap between the bedside sleeper and the adult bed DO NOT use product.
- Gaps should not be filled with pillows, blankets or other items.
- When on crib mode, the height adjustment interval of right and left sides shall not be more than 2 gears.
- After the low guardrail is unlocked, the internal movable pipe needs to be pulled out to avoid gap between crib and adult's bed.
- NEVER LEAVE THE CHILD UNATTENDED IN THE BEDSIDE SLEEPER.
- IT IS DANGEROUS TO PLACE THE PRODUCT ON A RAISED SURFACE SUCH AS A TABLE.
- DO NOT USE THE PRODUCT IF ANY PART IS BROKEN, TORN, OR MISSING.
- ONLY AN ADULT SHOULD ASSEMBLE, FOLD AND UNFOLD THE BEDSIDE SLEEPER.
- BEFORE ASSEMBLY, CHECK THAT THE PRODUCY AND ALL OF IT'S COMPONENTS HAVE
- NOT BEEN DAMAGED DURING TRANSPORTATION. SHOULD ANY PART BE DAMAGED, DO
• NOT USE AND KEEP OUT OF REACH OF CHILDREN.
- ENSURE USERS OF THIS PRODUCT ARE KNOWLEDGEABLE ON IT'S CORRECT OPERATION.
- DO NOT POSITION THE COT NEAR WALLS AND OBSTACLES TO PREVENT ENTRAPMENT.
• DO NOT ADJUST THE PRODUCT WITH THE CHILD INSIDE.
• DO NOT MOVE THE PRODUCT WITH THE CHILD INSIDE.
- DO NOT USE THE PRODUCT WITH MORE THAN ONE CHILD AT A TIME.
- This product is intended for use for babies aged between 0 and 5 months, weighing up to a maximum of 9kg.
UK
- When a child is able to sit, kneel or to pull itself up, the product should not be used anymore for this child.
- Before use in “bedside sleeper” mode (fixed to the bed), make sure the product is securely anchored and positioned.
- When the product is used in “bedside sleeper” mode (fixed to the bed), make sure the connection belts are hooked and tensioned properly, before laying child in the sleeper. The product must be secured to the parent’s mattress and no gaps between the product and the adult’s mattress must be present.
- DO NOT use the sleeper without the support frame. Keep the fastening belts out of reach of children.
- DO NOT leave any object inside the product that could reduce it's depth.
- Be aware of the risk of open fires and other sources of strong heat, such as electric bar heaters, gas fires etc.
- The product is ready for use only when all locking mechanism are engaged. Check carefully that
• these are engaged before use. - Failure to follow these warnings and instructions could result in serious injury or death.
- NEVER use the bedside sleeper bassinet in beside sleeper position without the anchor plate attached and locked as shown. Failure to use this anchoring system could result in serious injury or death to the infant. Make sure all straps are secured and tight. Check straps before each use.
- SUFFOCATION HAZARD: Discard all packing materials immediately after opening. Plastic bags and ties may cause suffocation or choking.
- FALL HAZARD: To help prevent falls, do not use this product when infant begins to push up on hands and knees or has reached manufacturer's recommended maximum weight of 9kgs, whichever comes first.
- SUFFOCATION HAZARD - IN GAPS BETWEEN EXTRA PADDING AND SIDE OF BASSINET/CRADLE AND ON SOFT BEDDING.
- USE ONLY THE PAD PROVIDED BY MANUFACTURER.
- NEVER ADD A PILLOW, COMFORTER OR ANOTHER MATTRESS FOR PADDING.
• To reduce the risk of SIDS, paediatricians recommend healthy infants be placed in their backs to sleep, unless otherwise advised by your physician.
- A bedside sleeper is designed to provide a sleeping area for an infant until he or she begins to push up on hands and knees or approximately 5 months of age. Move your child to another sleeping product when you child reaches this stage.
- STRANGULATION/SUFFOCATION HAZARD: The top edge of the lowering bar must be level with or below the top of the adult mattress when used as the bedside sleeper.
- NEVER raise the level of the bedside sleeper bassinet mattress.
- NEVER use plastic shipping bags or other plastic film as mattress covers not sold and intended for that purpose. They can cause suffocation.
- Make sure all straps are secured and tight when used in the bedside sleeper position. Tighten straps periodically.
• ENTRAPMENT HAZARD - TO PREVENT DEATH FROM ENTRAPMENT, BEDSIDE SLEEPER
- MUST BE PROPERLY SECURED TO ADULT BED USING THE ATTACHMENT SYSTEM.
- ALWAYS read and follow assembly instructions for each product use mode (bedside sleeper, bassinet).
- ALWAYS use ALL required parts for each use mode. Check instruction manual for a list of required parts. Periodically check product for loose, damaged, or missing parts.
- The anchor plate and straps assembly must always be used in bedside sleeper mode.
- NEVER use this product if there are any loose or missing fasteners, loose joints, broken parts, or torn mesh/fabric, check before assembly and periodically durings.
- Assemble product according to manufacturer's instructions for ANY use mode - bedside sleeper as well as the bassinet.
- To avoid death from the infant's neck being caught on the top rail on the side that is next to the adult bed, the top rail must be no higher than the adult bed mattress.
- NEVER permit bedding from the adult bed to extend into the bedtime sleeper.
- NEVER leave your infant in the product without the top HORIZONTL RAIL installed in the upper most position, unless securely attached to the adult bed.
- Failure to use this securing system will allow the bedside sleeper to move away from the adult bed and could result in the infant falling out of the bedside sleeper bedside bassinet.
- STRANGULATION HAZARD: When anchor plate and strap assembly are not in use, store in a safe place not accessible to children.
- DO NOT place product near a window where cords from blinds or drapes may strangle a child.
- Keep the bassinet away from stoves, heaters, camp fires and other hazards.
- DO NOT allow children to climb or play on or under unit in any configuration.
- FALL HAZARD: Remove infant from the bedside sleeper before starting any conversions.
• Always make sure all top and bottom rails are securely locked, in all configurations, before putting an infant child into the unit.
- To prevent serious or fatal injury from falls always keep child within arm's reach.
- NEVER leave your child unattended.
- Strings can cause strangulation! DO NOT place items with a string around a child's neck, such as hood strings over a bassinet or cradle or attach strings to toys.
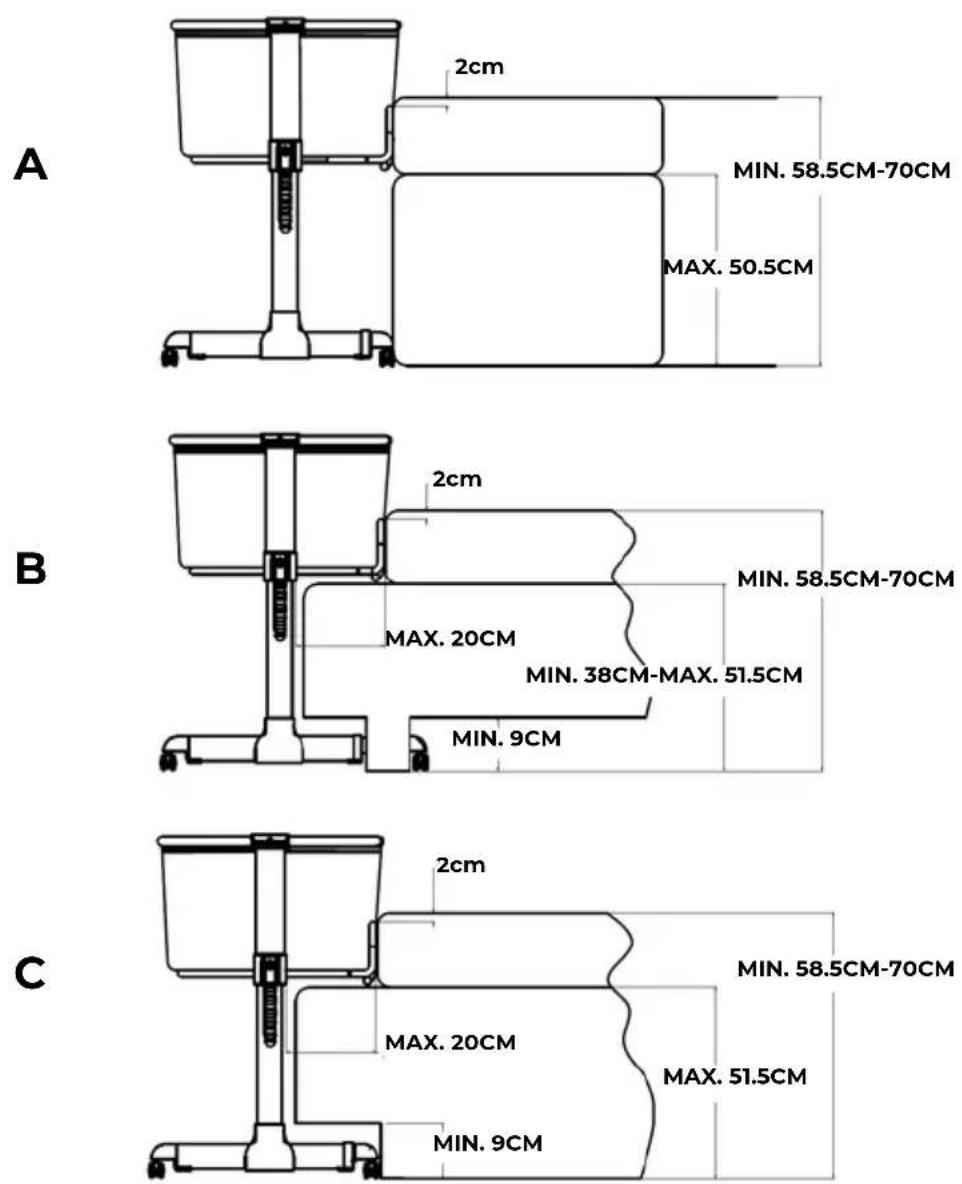
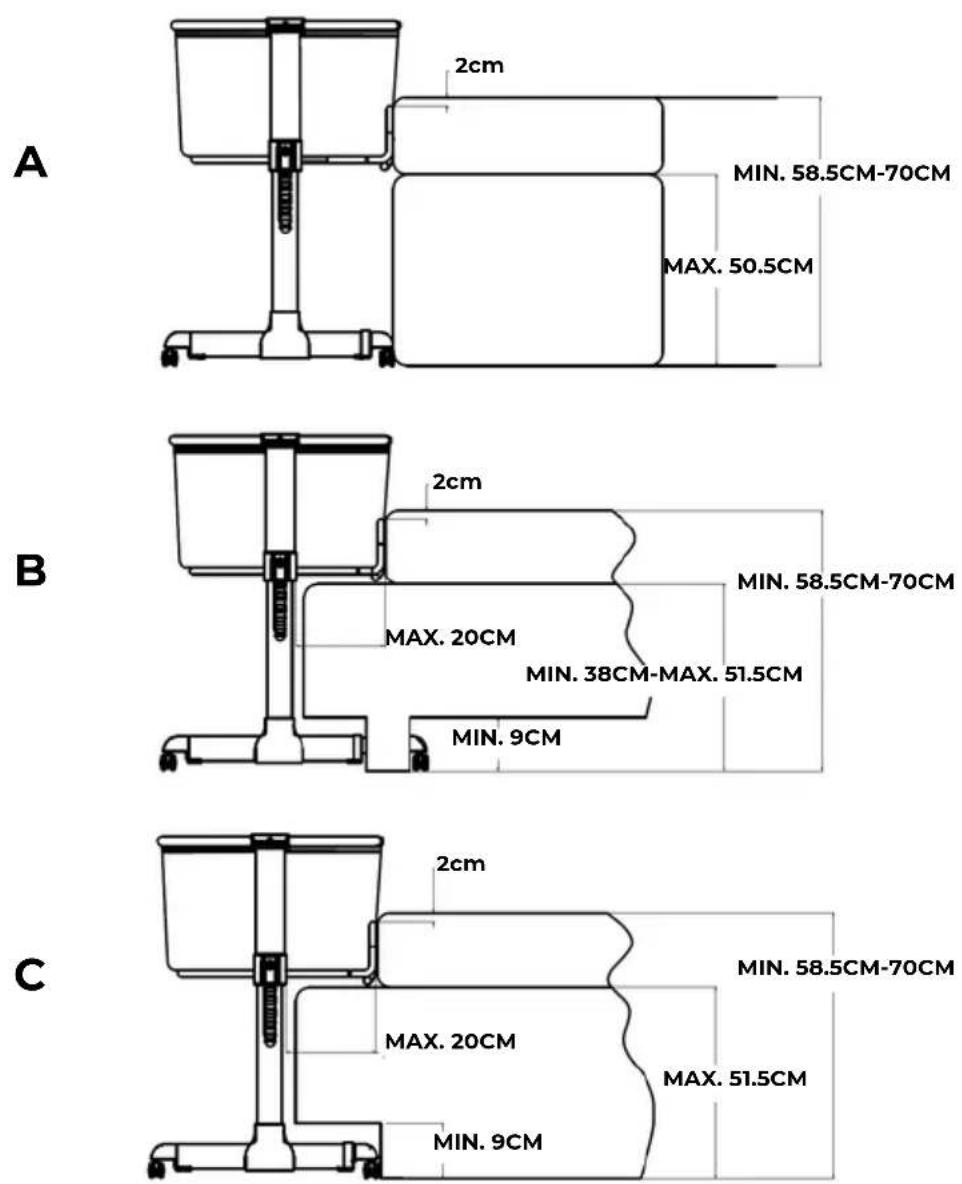
- The bedside sleeper is designed for use only with adult beds that are between 58.5-70cm from floor to top of adult mattress.
European Standard:EN 1130:2019
(Incorporating corrigendum December 2020)

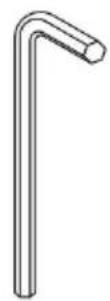
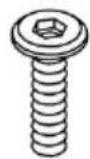
1X

2X
M6*20mm
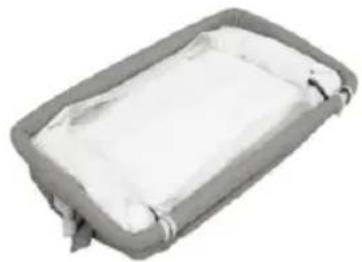
Top frame, liner and mattress with removable cover
natural_image
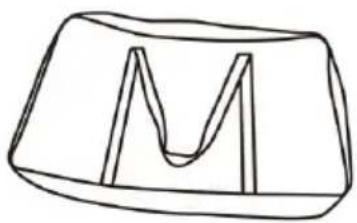
Exterior view of a rectangular bed or tray with a white cushioned seat (no text or symbols visible)1X
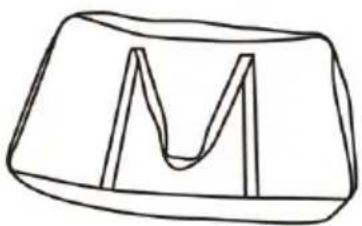
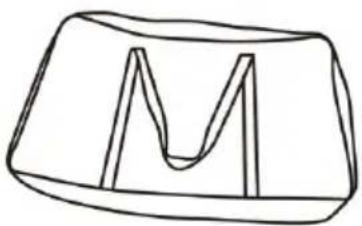
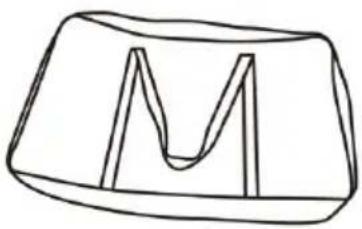
Carry bag
natural_image
Simple line drawing of a 3D rectangular block with a central M-shaped cutout (no text or symbols)1X
Foot board panel
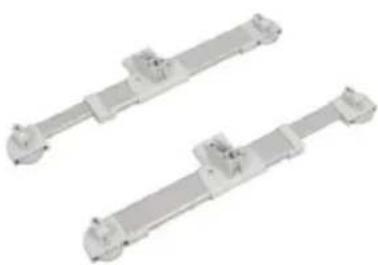
natural_image
Two identical mechanical components with cylindrical ends and mounting holes, shown in isometric view (no text or symbols visible)2X
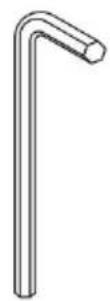
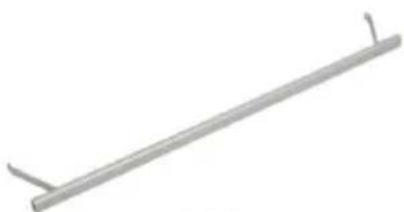
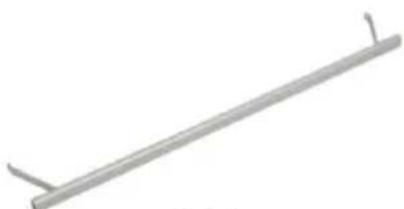
Lower crossbar
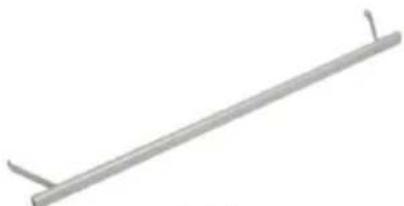
natural_image
Simple line drawing of a diagonal metal rod or rod with two ends (no text or symbols)1X
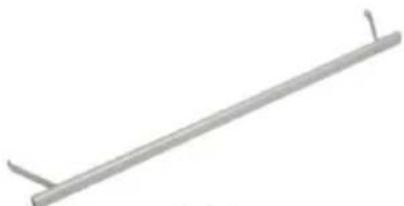
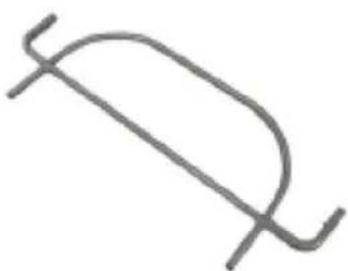
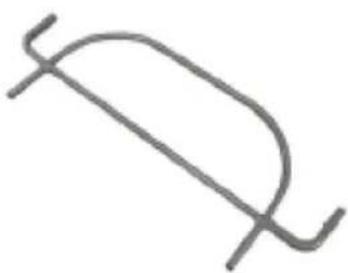
Middle support frame

natural_image
Simple curved line drawing with two intersecting lines (no text or symbols)1X
Front support frame
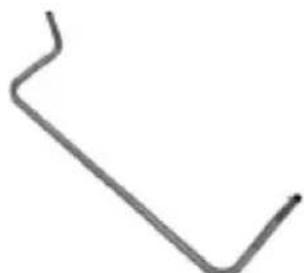
natural_image
Simple curved line drawing without any text, numbers, or symbols1X
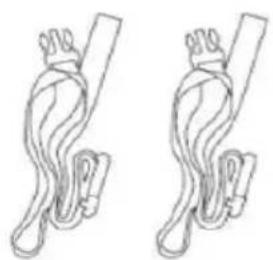
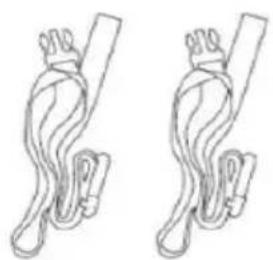
Fixing belts
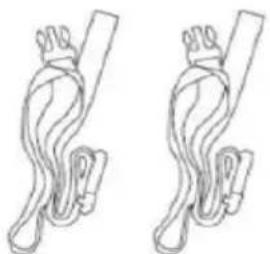
natural_image
Two identical line drawings of a rope knot or cable, no text or symbols present2X
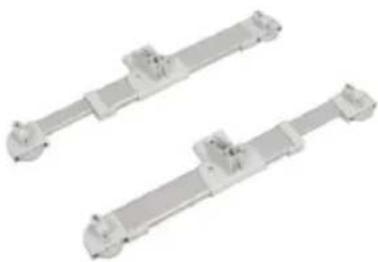
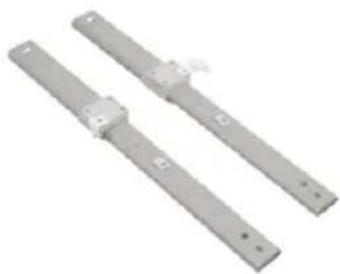
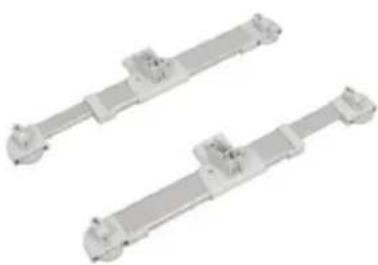
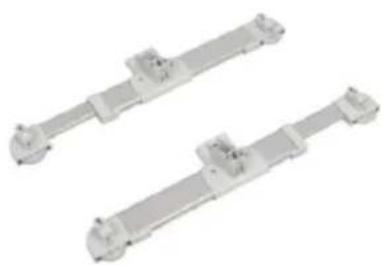
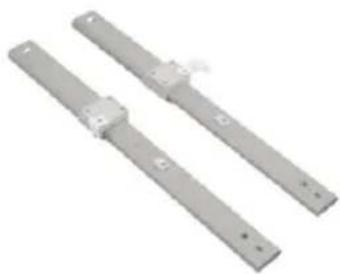
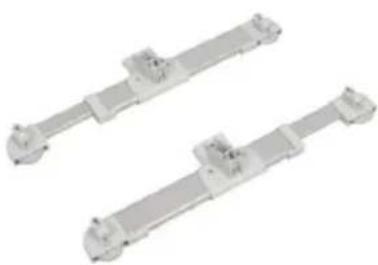
Side support frame
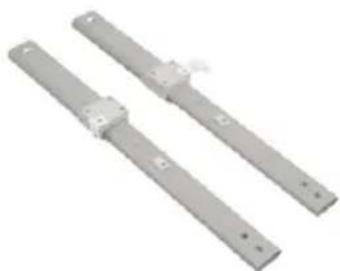
natural_image
Two metallic mechanical components with mounting holes and mounting brackets (no text or symbols visible)2X
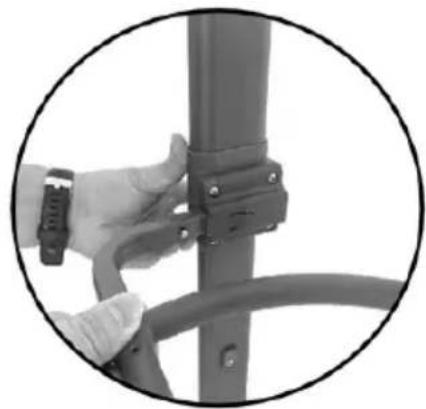
1 To assemble frame & bedside sleeper liner:
Insert side support frame into the foot panel with the fixing belt connector on the same side as the adjustable sliding leg.
Push the spring button in to allow the frame to lock into place.
Repeat for other side support frame.
natural_image
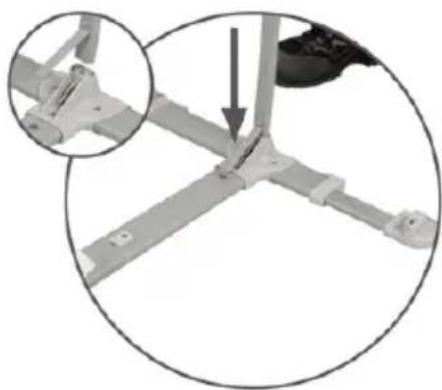
Close-up of a metal bracket with a hand adjusting a small component, showing alignment and mounting detail (no text or symbols)2 Lay the side support panel on a flat surface and push the lower cross bar into the plastic connector on the side support panel.
natural_image
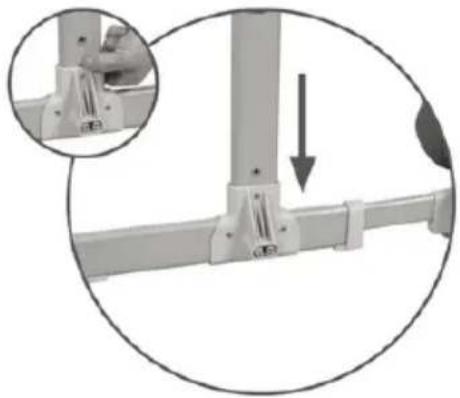
Mechanical assembly diagram showing a bracket with a close-up inset of a component (no text or symbols)3 Align the bracket with the bolt hole and insert the bolt.
Tighten with Allen Key.
Repeat (2)-(3) for other end.
natural_image
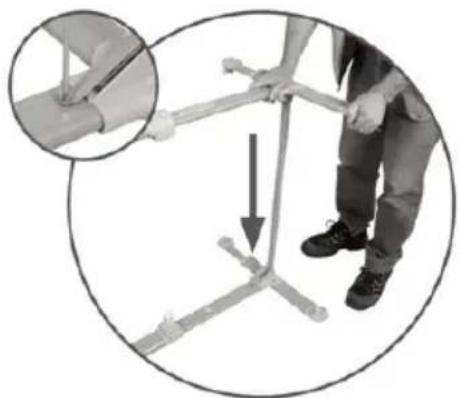
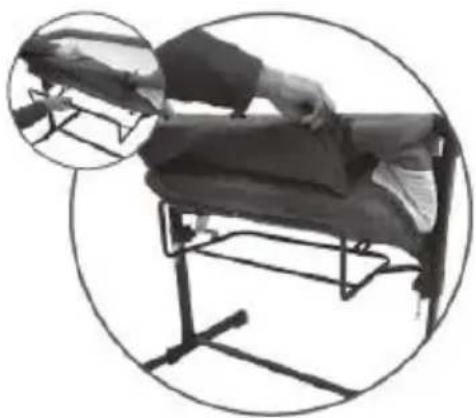
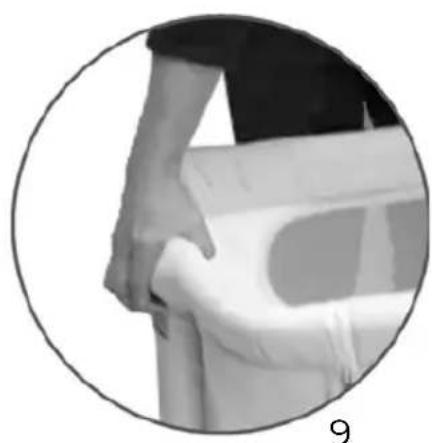
Person using a tool to tie or stand on a chair, with an inset showing hand positioning and a downward arrow indicating motion (no text or symbols)4 Insert the liner and top frame assembly into the top of the side support frames.
Push in until secure.
Please ensure that the zip side of the liner faces the same way as the adjustable leg.
Repeat for other side.
natural_image
Close-up of hands adjusting a garment sleeve, showing a circular inset with an arrow and number 7 (no text or symbols on the main image)
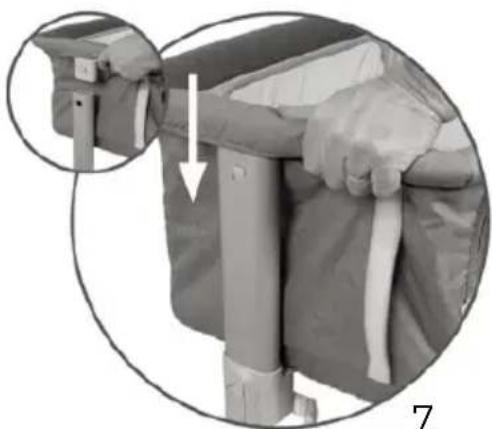
5 Insert the Middle support frame in to the mounting on each side frame. Push frame in until secure, check for locking.
natural_image
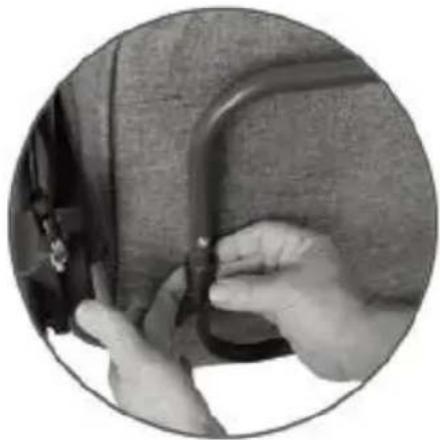
Close-up of a hand adjusting a metal bracket with a cable (no text or symbols visible)6 Attach Front support bar to front Middle support frame via push pins.
natural_image
Person using a table to press or fold a cloth, enclosed in a circular frame (no text or symbols visible)7 Locate the Velcro tabs on the underside of the liner and attach to Middle support frame.
natural_image
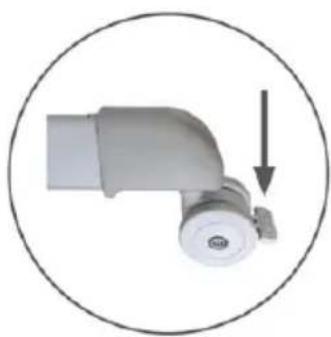
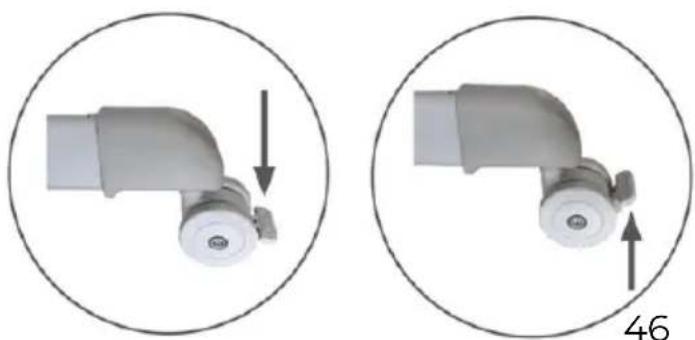
Close-up of hands installing or adjusting a component on a textured surface (no visible text or symbols)To lock wheels:
-
Press lock down to lock wheels in place.
-
Lift lock up to release wheels.
natural_image
Close-up of a white mechanical pipe fitting with a circular arrow indicating downward motion (no text or symbols)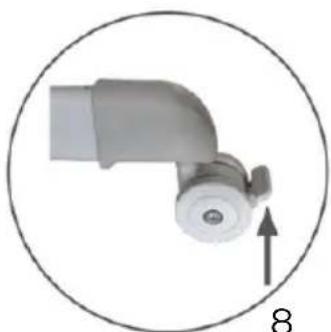
natural_image
Mechanical component with curved pipe fitting and circular head, circled in a circle (no text or symbols)
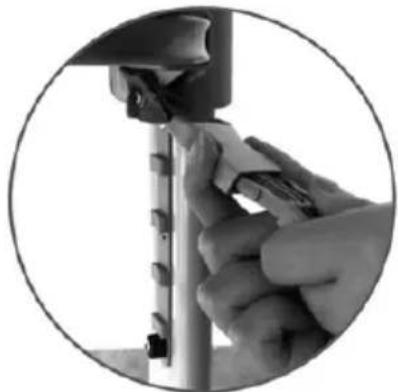
To fix to bed in sleeper mode:
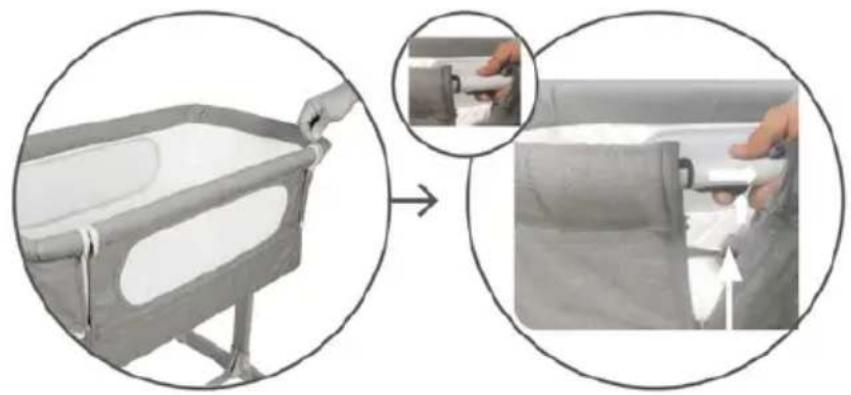
- Unzip the front panel on both sides.
- Press the second lock & slide the bar lever back and lift on both sides.
natural_image
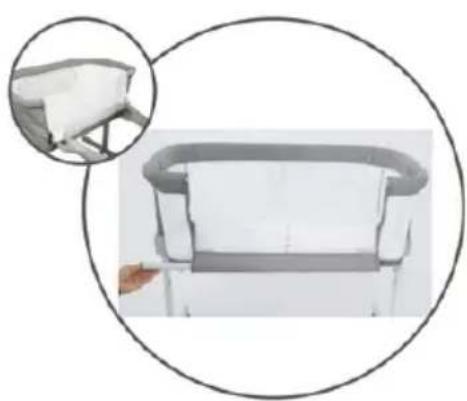
Illustration of a baby seat with hand positioning and close-up of the seat being adjusted (no text or symbols)- Remove the tube and put the front panel down.
natural_image
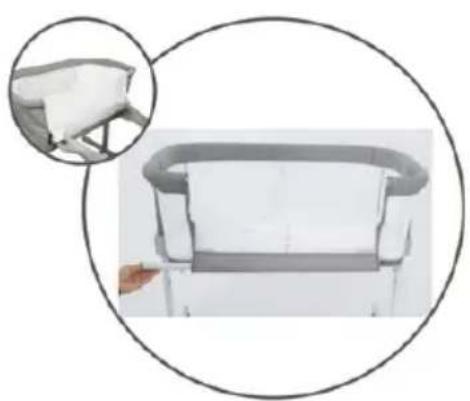
Diagram of a baby seat with a magnified inset showing the interior structure (no text or symbols)To adjust the height of bedside sleeper:
5-step height adjustment.
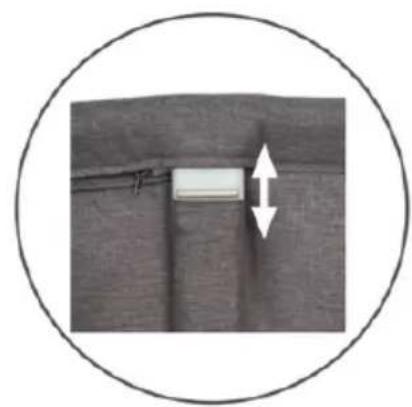
Easily adjustable the height by pressing the button upwards or lower. Or hold bedside of two sides button together to adjust the height. Option of small inclination of the mattress.
natural_image
Close-up of a mechanical component with two white arrows indicating a measurement or alignment, enclosed in a circular border (no text or symbols)To adjust the height of bedside sleeper continued: ANTI REFLUX FEATURE! To help with any reflux issues, you can raise the head end of the bedside sleeper to be 1 or 2 settings higher than the foot end. Your baby should still sleep on its back as per normal.
natural_image
Close-up of a person's lower torso and arm in a medical or rehabilitation setting, enclosed in a circular frame (no visible text or symbols)
To fix to bed in sleeper mode continued:
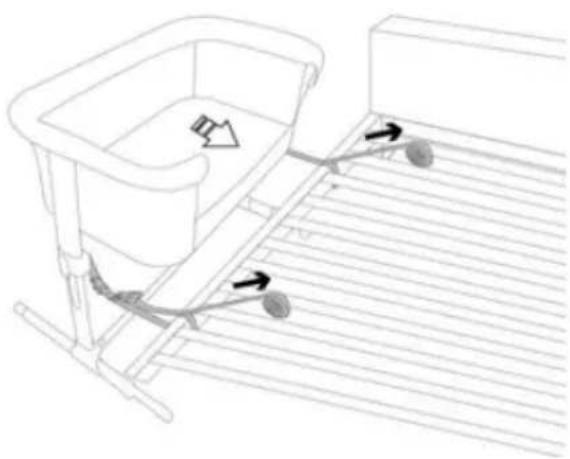
- Clip the fixing belts to the side support panels.
natural_image
Close-up of hands using a tool to adjust or install a mechanical component (no visible text or symbols)- Move the sleeper close to the parent's bed and check the height of the sleeper compared with the mattress on the bed. The side support of the sleeper should always be placed close to the parent's mattress and the mattress should always be maximum 2cm higher than the height of the side support for restraint of the sleeper.

natural_image
3D rendered sketch of a small boat or container with legs and a handle, no text or symbols present
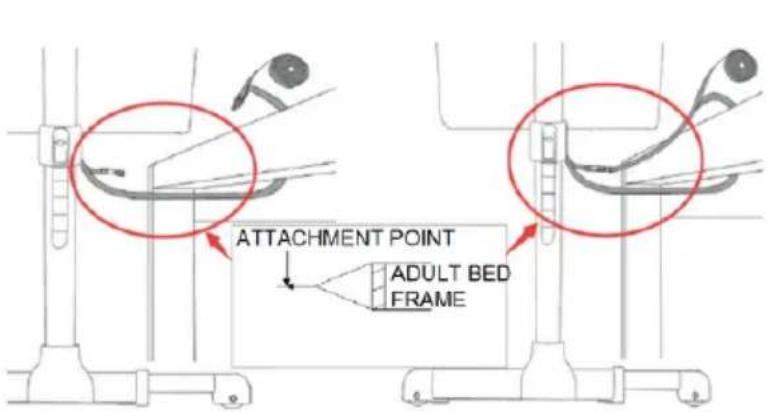
- In order to fix the sleeper to the parent's bed in bedside sleeping mode, use the attached pair of fixing belts provided. Tighten the loop by pulling the belts firmly. Adjust the belts separately until the sleeper is firmly in contact with the parent's mattress. Store any excess of belts between the mattress and the bed base.
natural_image
Line drawing of a bathtub with a side-mounted rod and two balls on the floor, no text or symbols presentThe straps shall be aligned with the adult bed frame(see picture as above).

WARNING!

- Before every use always check to make sure there is no space between the parent's mattress and the side of the sleeper.
- If there is, pull the belts firmly to tighten until there's no space and the permitted condition of use has been restored.
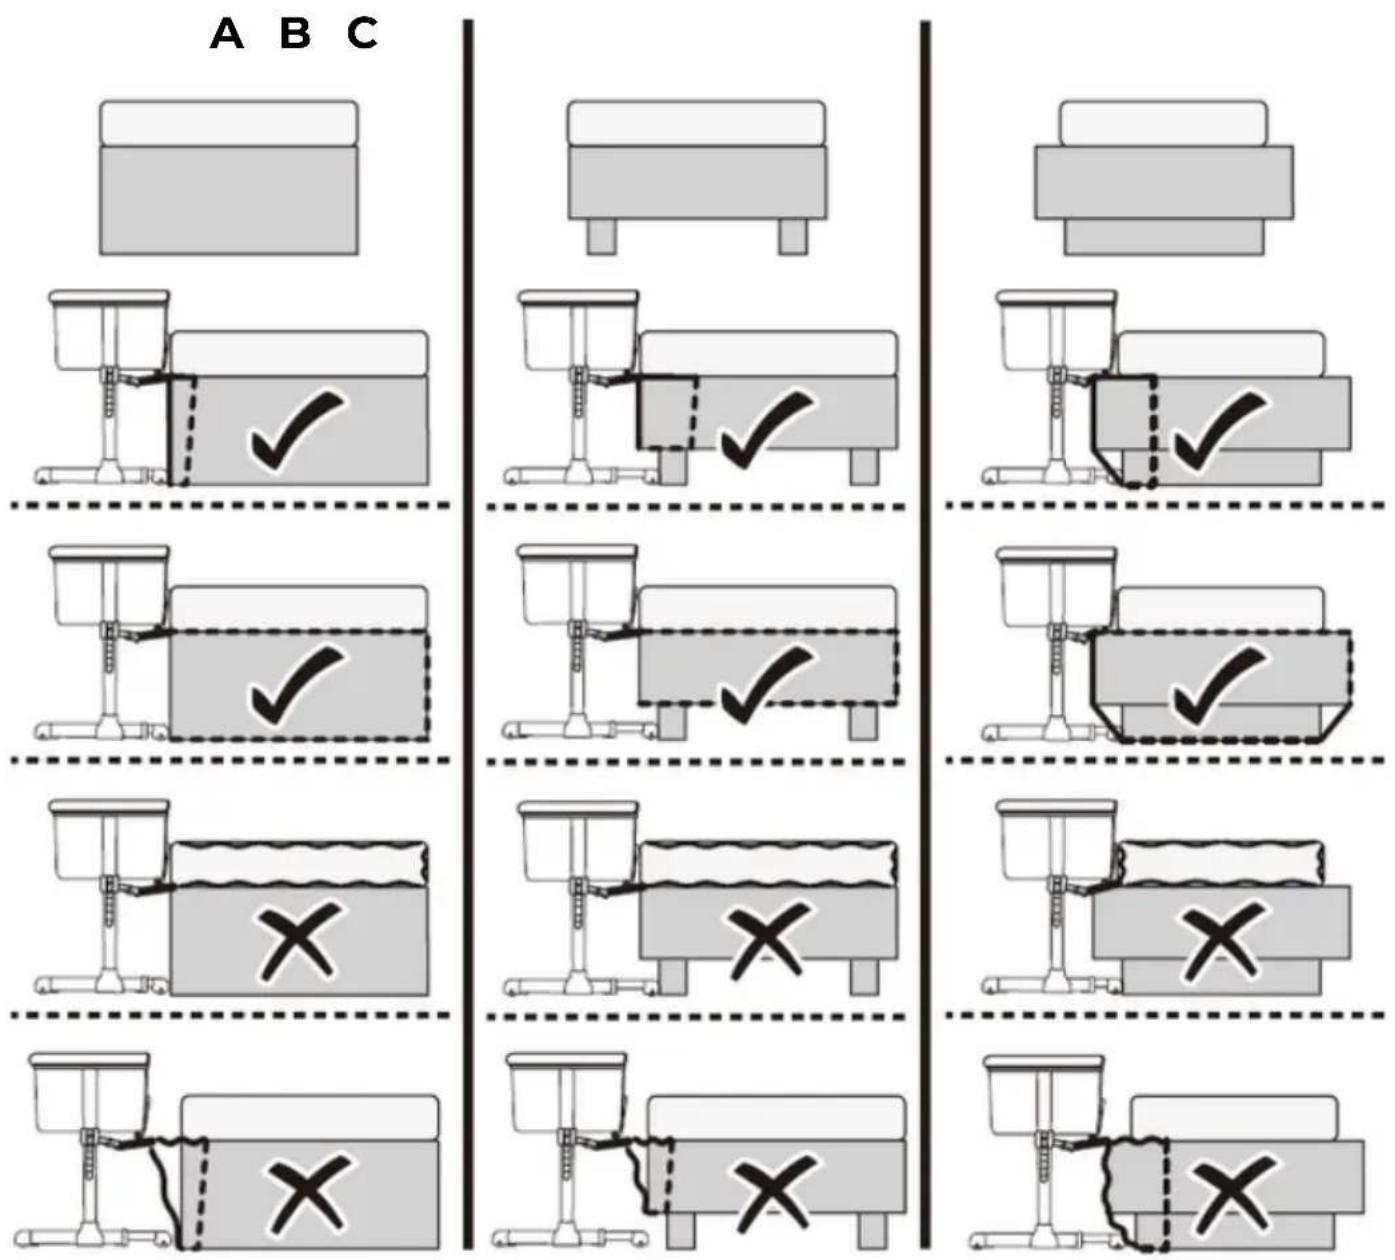
- Use of product is only permitted with beds and/or mattress with straight sides, use of the product with round mattress and or water bed is not permitted.
- When the product is used in the bedside sleeping mode, it should always be fitted to the long side of access to the bed, do not fix the product to the head or bottom of the bed.
ACCEPTABLE BED FRAME AND BED SIZE
HOW TO CARE FOR YOUR CHILDCARE SLEEPER CLEANING
Cleaning
- This product has been designed and developed with safety, comfort and functionality in mind. Please take the time to read this manual carefully before using this product and keep it in a safe place for future reference.
• To Ensure the long-lasting use of your sleeper, do not use solvents, abrasives or aggressive cleaning products. After each wash check the resistance of the fabric and the stitching. For washing of the fabric, carefully comply with instructions indicated on the label (listed below).

natural_image
Five abstract geometric symbols: a hand holding a square, five crossed-out triangles, two crossed-out circles, and one crossed-out circle (no text or labels)WARNING!
(Incorporating corrigendum December 2020)


1X
2X
M6*20mm
natural_image
Gray rectangular box with a white cushioned blanket, no visible text or symbols1X
Transportväska
natural_image
Simple line drawing of a 3D rectangular object with a central M-shaped cutout (no text or symbols)1X
Fötter
natural_image
Two identical mechanical components with cylindrical ends and mounting brackets, shown in 3D rendering (no text or symbols visible)2X
Nedre tvärstång

natural_image
Simple line drawing of a diagonal metal rod or rod with two ends (no text or symbols)1X
Mellersta stödram

natural_image
Simple curved line drawing with two intersecting lines (no text or symbols)1X
Främre stödram

natural_image
Simple curved line drawing with no text or symbols1X
Förankringsremmar

natural_image
Two identical line drawings of a rope knot or tie, no text or symbols present2X
Sängben
natural_image
Two metallic mechanical components with mounting holes and mounting brackets (no text or symbols visible)2X

MONTERING / BRUKSANVISNING
natural_image
Mechanical assembly diagram showing a bracket with a hand adjusting a pin, and a magnified inset highlighting the detail (no text or symbols present)natural_image
Mechanical assembly diagram showing a bracket with a pull rod and a magnified inset of the component (no text or symbols)natural_image
Person using a tool to tie or stand on a chair, with an inset showing hand positioning and a downward arrow indicating motion (no text or symbols)natural_image
Close-up of hands installing or adjusting a mechanical component, showing a circular inset with an arrow and number 19 (no text or symbols on the main subject)SE
natural_image
Close-up of a hand adjusting a vertical metal bracket with a cable (no text or symbols visible)natural_image
Person operating a medical examination table with an inset magnified view of the device (no text or symbols visible)natural_image
Close-up of hands adjusting a small mechanical component (no visible text or symbols)Låsa hjulen:
natural_image
Two circular diagrams showing a mechanical component with an arrow indicating direction, no text or symbols present.
natural_image
Illustration of a baby crib with hand positioning and close-up of the seat being adjusted (no text or symbols)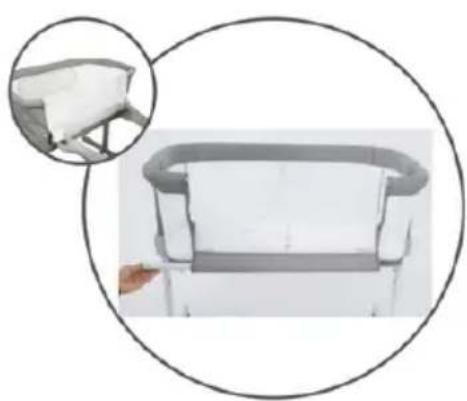
natural_image
Diagram of a modern kitchen sink with a magnified inset showing the interior structure (no text or symbols)
natural_image
Close-up of a fabric or material sample with a central rectangular feature and two white double-headed arrows indicating measurement or alignment (no text or symbols)natural_image
Close-up of a person's lower torso and arm in a seated position, no visible text or symbols
natural_image
Close-up of hands using a tool to adjust or install a mechanical component (no visible text or symbols)natural_image
3D rendered image of a baby crib with a small rectangular object on top, no text or symbols visible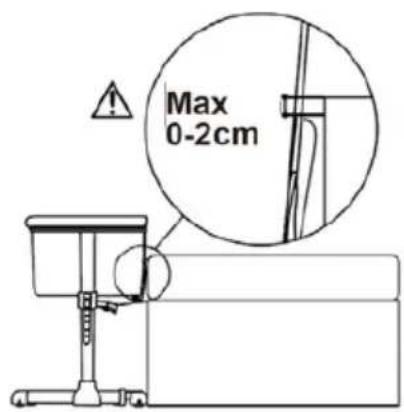
natural_image
Line drawing of a bathtub with a side-mounted rod and two circular objects on the floor, no text or symbols present.natural_image
Five abstract geometric symbols: a hand holding a circle, an asterisk, a square, an exclamation mark, and an exclamation mark (no text or labels)ADVARSEL!
EN 1130:2019 (Incorporating corrigendum December 2020)

1X

2X
M6*20mm
natural_image
Gray rectangular tray with white cushioned blanket, no visible text or symbols1X
Bæreveske
natural_image
Simple line drawing of a 3D rectangular object with a central M-shaped cutout (no text or symbols)1X
Føtter
natural_image
Two identical cylindrical electronic components with mounting holes, shown in isometric view (no text or symbols visible)2X
Nedre tverrstang
natural_image
Simple line drawing of a diagonal metal rod or rod with two ends (no text or symbols)1X
Midtre støtteramme
natural_image
Simple curved line drawing with two intersecting strokes (no text or symbols)1X
Fremre støtteramme

natural_image
Simple curved line drawing without any text, numbers, or symbols1X
Forankrin sbelter

natural_image
Two identical line drawings of a rope knot or tie, no text or symbols present2X
Sengebein

natural_image
Two metallic mechanical components with mounting holes and mounting brackets (no text or symbols visible)2X

MONTERING / BRUKSANVISNINGASSEMBLY & FUNCTIONS
natural_image
Close-up of a mechanical assembly with a hand adjusting a component, showing a circular inset view (no text or symbols)natural_image
Mechanical assembly diagram showing a bracket with mounting holes and a magnified inset of the component (no text or symbols)natural_image
Person using a tool to adjust or install a mechanical component, shown with an inset magnified view of the hand (no text or symbols visible)natural_image
Close-up of hands adjusting a seatbelt with a magnified inset showing a detail (no text or symbols visible)NO
natural_image
Close-up of a hand adjusting a vertical metal bracket with a cable (no text or symbols visible)natural_image
Person operating a table under compression, viewed through an inset magnified view (no text or symbols visible)natural_image
Close-up of hands adjusting a small mechanical component (no visible text or symbols)For å låse hjulene:
natural_image
Two circular diagrams showing a mechanical component with an arrow indicating direction, no text or symbols present.
Justere krybben til "bedside sleeper"-modus:
natural_image
Illustration of a baby crib with hand positioning and close-up of the interior panel (no text or symbols)natural_image
Close-up of a modern office chair with a hand pointing to the frontrest area, shown in an inset magnified view (no text or symbols visible)natural_image
Close-up of a textured surface with a white rectangular object and two double-headed arrows pointing to it, enclosed in a circular border (no text or symbols)natural_image
Close-up of a person's lower torso and upper torso, showing hand positioning (no text or symbols visible)
"Bedside sleeper"-modus fortsatt:
natural_image
Close-up of hands using a tool to adjust or install a mechanical component (no visible text or symbols)natural_image
3D sketch of a small indoor space chair with legs and a small rectangular panel on top, no text or symbols present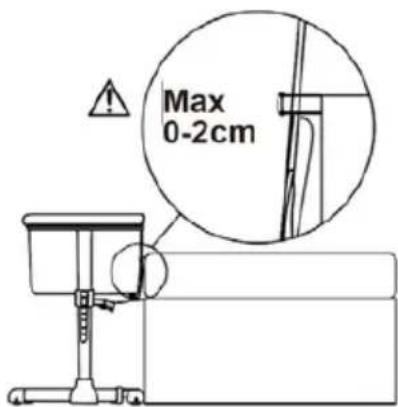
natural_image
Five abstract geometric symbols: a hand holding a diamond, an asterisk, a square with an 'X', an exclamation mark, and an 'X' (no text or labels)SIKKERHEDSFORANSTALTNINGER
natural_image
Exterior view of a rectangular storage tray with a white cushion (no text or symbols visible)1X
Bæretaske
natural_image
Simple line drawing of a 3D rectangular block with a central M-shaped cutout (no text or symbols)1X
Fødder
natural_image
Two identical metallic cylindrical electronic components with mounting holes, shown against a white background (no text or symbols visible)2X
Nedre tværstang
natural_image
Simple line drawing of a diagonal metal rod or rod with two ends (no text or symbols)1X
Midterste steldel
natural_image
Simple curved line drawing with two intersecting lines (no text or symbols)1X
Forreste steldel

natural_image
Simple curved line drawing without any text, numbers, or symbols1X
Fastgørelsesbælter
natural_image
Two identical line drawings of a rope knot or tie, no text or symbols present2X
Sidestøtteramme
natural_image
Two metallic mechanical components with mounting holes, shown against a white background (no text or symbols visible)2X

MONTERING / BRUGSVEJLEDNING
natural_image
Close-up of a metal bracket assembly with a hand adjusting a small component, showing no text or symbols.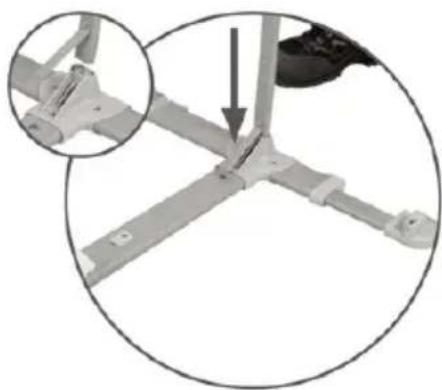
natural_image
Mechanical assembly diagram showing a bracket with a close-up inset of a component (no text or symbols)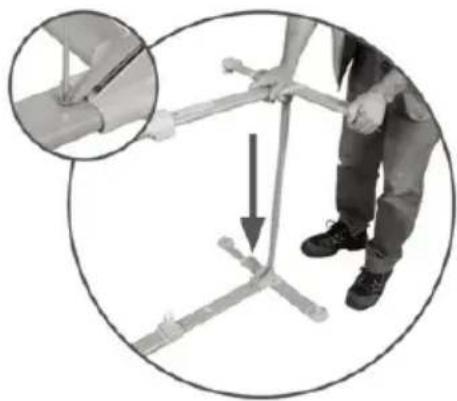
natural_image
Person using a manual tool to tie or stand on a chair, with an inset showing hand positioning (no text or symbols visible)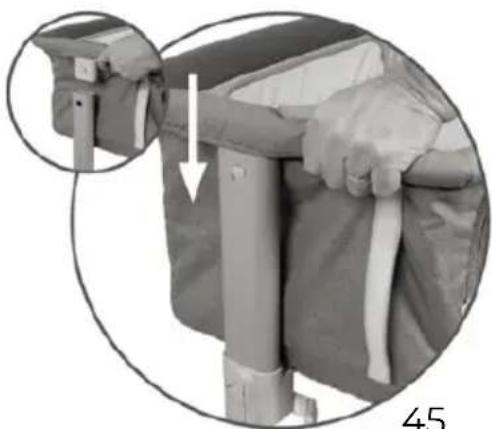
natural_image
Close-up of hands installing or adjusting a mechanical component, showing a circular inset with an arrow and number 45 (no text or symbols on the main subject)
natural_image
Close-up of a hand adjusting a vertical metal bracket with a cable (no text or symbols visible)natural_image
Person using a handheld device on a table, viewed through a circular inset (no text or symbols visible)natural_image
Close-up of hands adjusting a mechanical component (no visible text or symbols)For at låse hjulene:
- Tryk ned for at låse hjulene.
- Løft op for at frigøre hjulene.
natural_image
Two circular diagrams showing a mechanical component with an arrow indicating direction, no text or symbols present.Fastgøre til seng i "sleeper"-indstilling:
natural_image
Illustration of a baby crib with a hand inserting a seatbelt, showing the process from opening to adjusting the seatbelt (no text or symbols present)natural_image
Close-up of a modern office chair with a hand inserting a component (no visible text or symbols)natural_image
Close-up of a textured surface with a rectangular object and two white arrows pointing to it, enclosed in a circular border (no text or symbols)natural_image
Close-up of a person's leg and wrist in a seated position, no visible text or symbols
"Bedside sleeper"-indstilling, fortsat:
natural_image
Close-up of hands using a tool to adjust or install a mechanical component (no visible text or symbols)natural_image
3D rendered image of a baby crib with legs and arms, no text or symbols visible
ACCEPTABEL JUSTERING

PLEJE AF PRODUKTET
Rengøring
natural_image
Five abstract geometric symbols: a hand holding a square, an asterisk, a triangle, an exclamation mark, and an exclamation mark (no text or labels)TURVALLISUUS!
natural_image
Exterior view of a modern office building (no signage)1X
Kuljetuslaukku
natural_image
Simple line drawing of a 3D rectangular block with a central M-shaped cutout (no text or symbols)1X
Jalat
natural_image
Two identical cylindrical electronic components with mounting brackets, shown in isometric view (no text or symbols visible)2X
natural_image
Simple line drawing of a diagonal metal rod or rod with two ends (no text or symbols)1X
natural_image
Simple curved line drawing with two intersecting lines (no text or symbols)1X
Etummainen tukikehys

natural_image
Simple curved line drawing without any text, numbers, or symbols1X
Kiinnitysremmit
natural_image
Two identical line drawings of a rope knot or tie, no text or symbols present2X
Telineen sivutangot

natural_image
Two metallic mechanical components with mounting holes and mounting brackets (no text or symbols visible)2X

TUOTTEEN KOKOAMINEN JA KÄYTTÖ
natural_image
Mechanical assembly diagram showing a bracket with mounting holes and a magnified inset of the component (no text or symbols)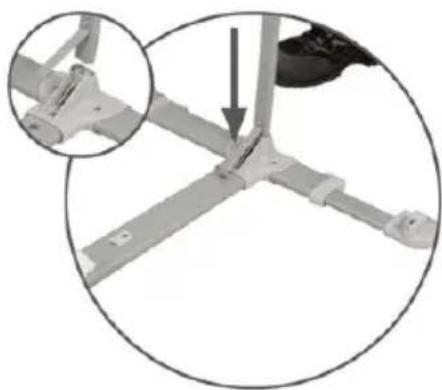
natural_image
Mechanical assembly diagram showing a bracket with a close-up inset of a mechanical component (no text or symbols visible)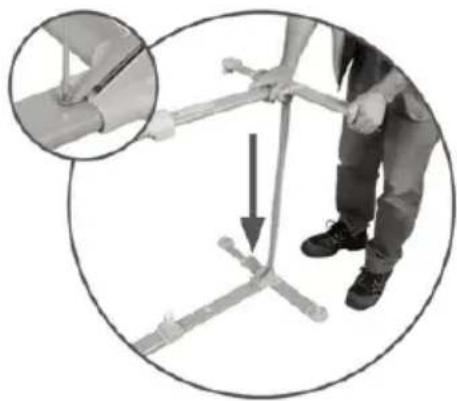
natural_image
Person using a tool to tie or stand on a chair, with an inset showing hand positioning and a downward arrow indicating motion (no text or symbols)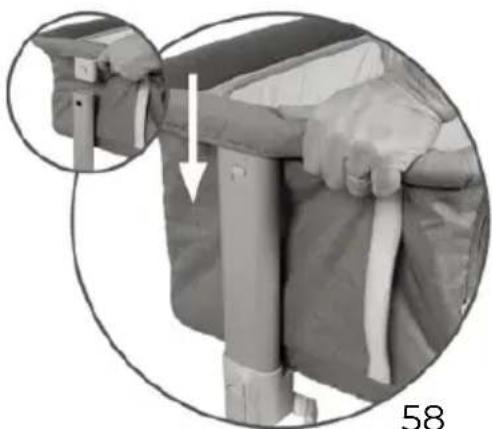
natural_image
Close-up of hands installing or adjusting a garment with a cable, showing a circular inset highlighting the step (no text or symbols)FI
natural_image
Close-up of a hand adjusting a vertical metal bracket with a cable (no text or symbols visible)natural_image
Person operating a table with a cloth rack, viewed through a circular inset (no text or symbols visible)natural_image
Close-up of hands adjusting a mechanical component (no visible text or symbols)natural_image
Two circular diagrams showing a mechanical component with an arrow indicating direction, no text or symbols present.
natural_image
Illustration of a baby crib with hand positioning and close-up of the seat being adjusted (no text or symbols)3.Irrota putki ja laske etupaneeli alas.
natural_image
Diagram of a baby seat with a magnified inset showing the interior structure (no text or symbols)natural_image
Close-up of a mechanical component with two white arrows indicating a measurement or alignment (no text or symbols present)natural_image
Close-up of a person's leg and wrist in a medical or surgical setting, enclosed in a circular frame (no visible text or symbols)
natural_image
Close-up of hands using a tool to adjust or install a mechanical component (no visible text or symbols)natural_image
3D sketch of a baby crib with a small arrow pointing to the backrest (no text or symbols)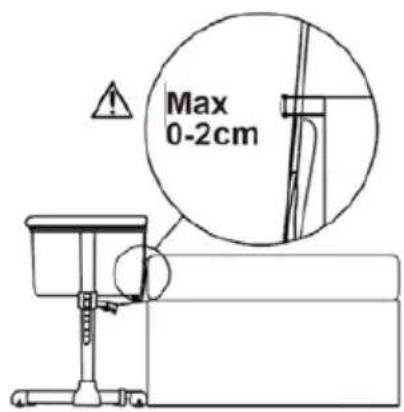
natural_image
Five abstract geometric symbols: a hand holding a star, an asterisk, a square, an arrow, and an exclamation mark (no text or labels)WARNUNG!
natural_image
Gray rectangular tray with white cushion, no visible text or symbols1X
Fußstützen

natural_image
Simple line drawing of a 3D rectangular block with a central M-shaped cutout (no text or symbols)1X
Fußstützen
natural_image
Two identical mechanical components with cylindrical ends and mounting brackets, shown in isometric view (no text or symbols visible)2X
unterer Querbalken
natural_image
Simple line drawing of a diagonal metal rod or rod with two ends (no text or symbols)1X
natural_image
Simple curved line drawing with two intersecting strokes (no text or symbols)1X
natural_image
Simple curved line drawing with no text or symbols1X
Befestigungsriemen
natural_image
Two identical line drawings of a rope tied with a loop, no text or symbols present2X
natural_image
Two metallic mechanical components with mounting holes and mounting brackets (no text or symbols visible)2X

natural_image
Mechanical assembly diagram showing a bracket with mounting holes and a magnified inset of the detail (no text or symbols)natural_image
Mechanical assembly diagram showing a bracket with mounting points and a magnified inset view (no text or symbols)natural_image
Person using a tool to adjust or install a mechanical component, shown with an inset magnified view of the hand (no text or symbols visible)natural_image
Close-up of hands adjusting a garment sleeve, showing a circular inset with an arrow and number 73 (no text or symbols on the main subject)DE
natural_image
Close-up of a hand adjusting a metal bracket with a cable (no text or symbols visible)natural_image
Person performing a backrest exercise on a table, with an inset magnified view of the device (no text or symbols visible)natural_image
Close-up of hands adjusting a small mechanical component (no visible text or symbols)natural_image
Two circular diagrams showing a mechanical component with an arrow indicating direction, no text or symbols present.
natural_image
Illustration of a baby crib with hand positioning and close-up of the seat being adjusted (no text or symbols)natural_image
Close-up of a gray plastic tank with a handle, shown in an inset circle (no text or symbols visible)natural_image
Close-up of a textured surface with a small rectangular object and two white arrows pointing to it, enclosed in a circular border (no text or symbols)natural_image
Close-up of a person's leg and arm in a seated position, no visible text or symbols
natural_image
Close-up of hands using a tool to adjust or install a mechanical component (no visible text or symbols)natural_image
3D rendered image of a white baby stool with legs and arms, no text or symbols visible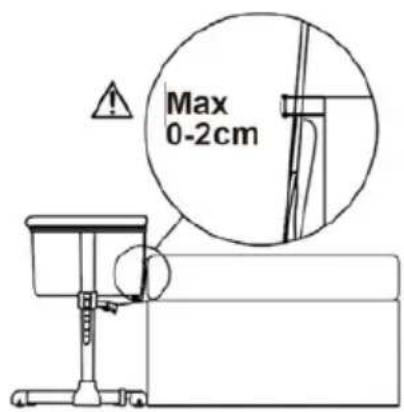
natural_image
Five abstract geometric symbols: a hand holding a circle, an asterisk, a square, an exclamation mark, and an hourglass (no text or labels)
natural_image
Line drawing of a baby crib with adjustable legs and seat (no text or symbols)