
DCS-71 - Camera bag D-LINK - Free user manual and instructions
Find the device manual for free DCS-71 D-LINK in PDF.


| Product Type | Outdoor Dome Housing for Security Camera |
| Model | DCS-71, DCS-71P, DCS-71W |
| Weatherproof Rating | IP66 Certified |
| Heater | On: Below 0°C; Off: Above 10°C |
| Blower | On: Above 40°C; Off: Below 30°C |
| Operating Humidity | 5% - 95% |
| Power Consumption (DCS-71) | 35 W (Enclosure: 24 V AC, Camera: 12 V DC) |
| Power Consumption (DCS-71P) | 29 W (PoE 802.3at) |
| Power Consumption (DCS-71W) | 35 W (Enclosure: 24 V AC, Camera: 12 V DC) |
| Compatible Cameras | DCS-5605A1 (DCS-71, DCS-71P); DCS-5635A2 (DCS-71W) |
| Data Transmission Rate | 10/100 Mbps |
| Transmission Distance | <100 m |
| Ethernet Cable | TIA/EIA-568, Cat-5 Cable |
| Package Contents | Metal Housing, Dome Cover, Wall Mount Bracket, Screws, Quick Installation Guide; DCS-71W also includes 2 Wireless Antennas & 2 Antenna Holders |
| Mounting Type | Wall Mount |
| Wireless Antennas | Included only for DCS-71W |
| Certifications | CE, FCC, C-Tick |
| Dimensions | 7-inch Dome Housing (exact dimensions not specified) |
| Weight | Not specified (estimated ~2-3 kg) |
| Material | Metal Housing with Dome Cover |
| Maintenance | Clean dome cover with soft cloth; avoid harsh chemicals |
| Spare Parts | Contact D-Link support for replacement dome cover or brackets |
| Safety | Use only with specified power supplies; IP66 for outdoor use |
| General Information | For motorized pan/tilt cameras; includes heater and blower for temperature control |
Frequently Asked Questions - DCS-71 D-LINK
User questions about DCS-71 D-LINK
0 question about this device. Answer the ones you know or ask your own.
Ask a new question about this device
Download the instructions for your Camera bag in PDF format for free! Find your manual DCS-71 - D-LINK and take your electronic device back in hand. On this page are published all the documents necessary for the use of your device. DCS-71 by D-LINK.
USER MANUAL DCS-71 D-LINK
Quick Installation Guide
DCS-71 Series Outdoor Dome Housing
This document will guide you through the basic installation process for your new D-Link 7" Outdoor Dome Housing.
DCS-71 Series
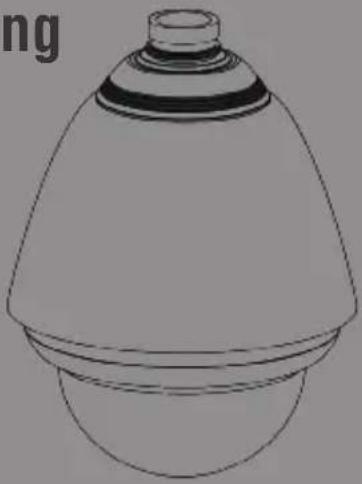
natural_image
Line drawing of a conical spray bottle with a bulbous top and flared rim (no text or symbols)Quick Installation Guide
DCS-71 Series Quick Installation Guide
This installation guide provides basic instructions for installing the DCS-71 Series 7" Outdoor Dome Housing. The DCS-71 series are dome-type enclosures designed for use with D-Link's motorized pan and tilt cameras. This IP66-certified enclosure protects your camera against dust and heavy jets of water. These models include a heater and a blower for a wider range of temperature-sensitive environments. The DCS-71 series consists of the DCS-71, DCS-71P and DCS-71W.
Installation
- Verify the package contents against the list below.
- Hardware Overview
- Hardware Installation
1. Package Contents
° 7" Metal Housing
° 7" Dome Cover
° Wall Mount Bracket
° Screws
° 2 Wireless Antennas (for DCS-71W only)
° 2 Antenna Holders (for DCS-71W only)
° Quick Installation Guide
If any of the above items are missing, please contact your reseller.
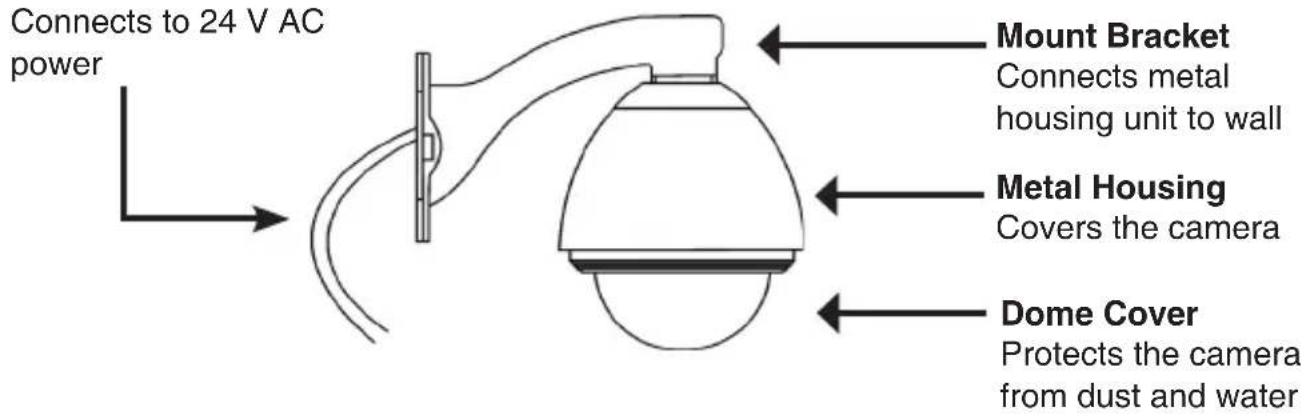
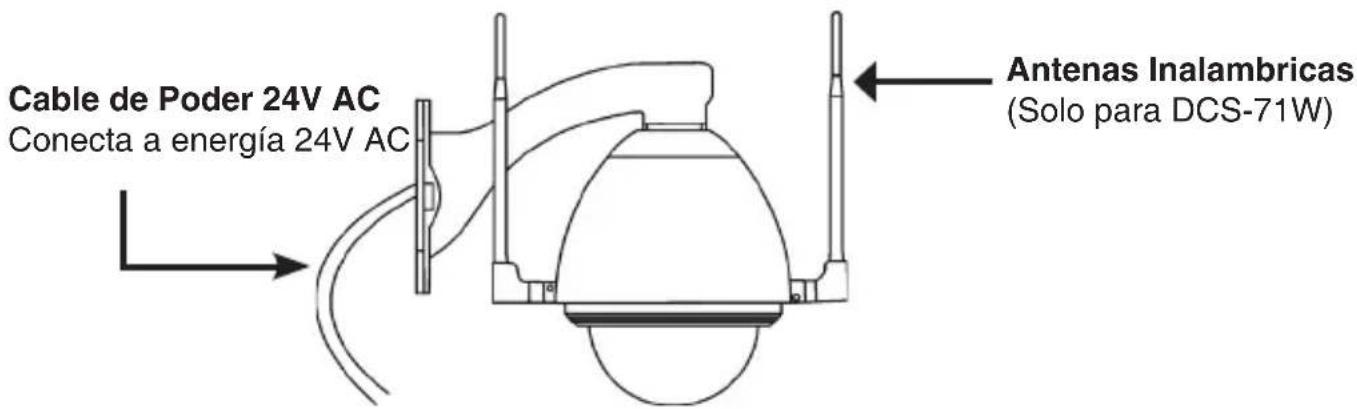
2. Hardware Overview
DCS-71
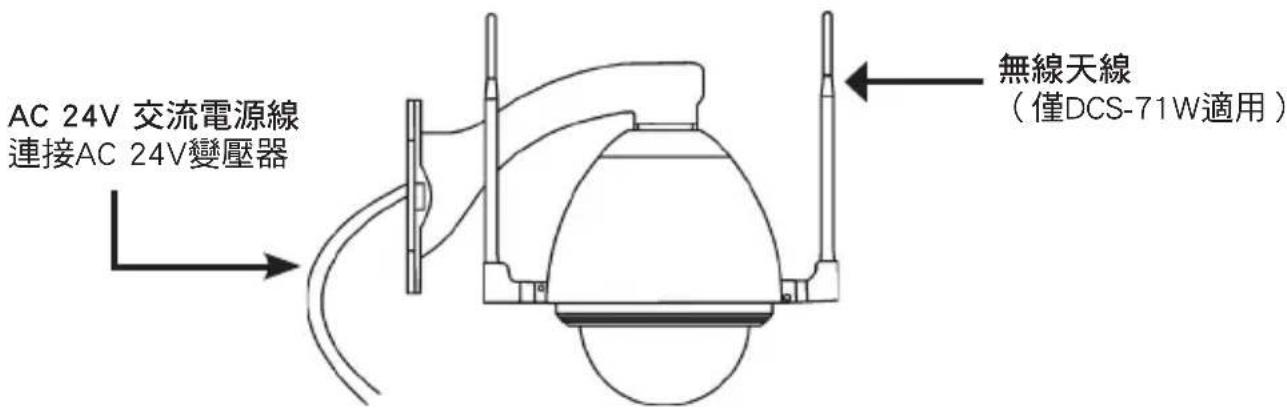
24 V AC Power Cable
DCS-71P
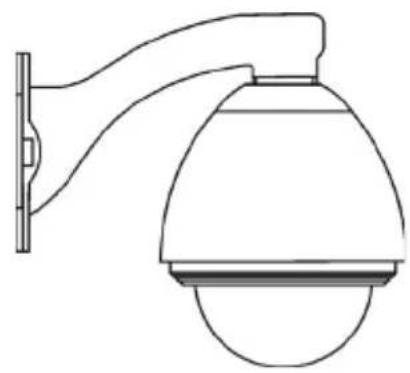
natural_image
Line drawing of a security camera with mounted sensor array (no text or symbols)DCS-71W
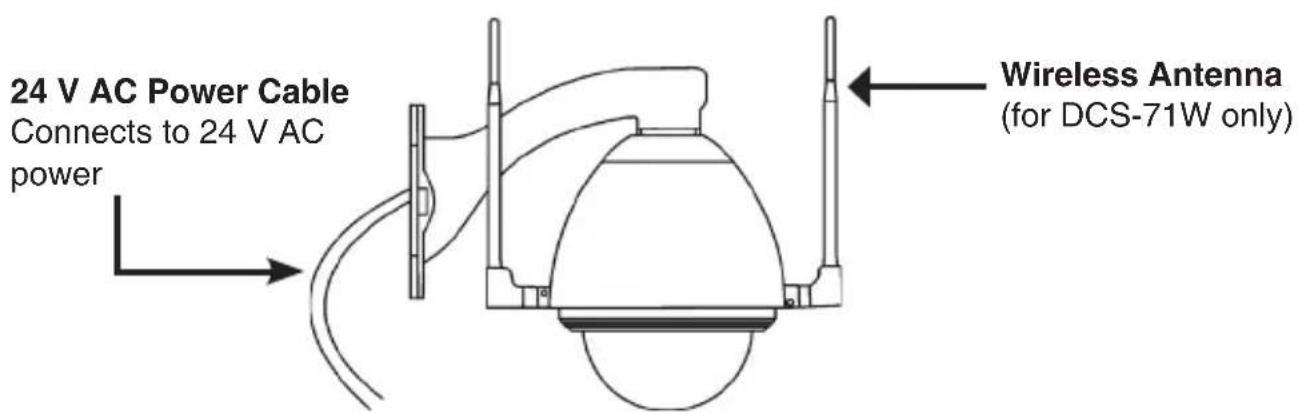
3. Hardware Installation
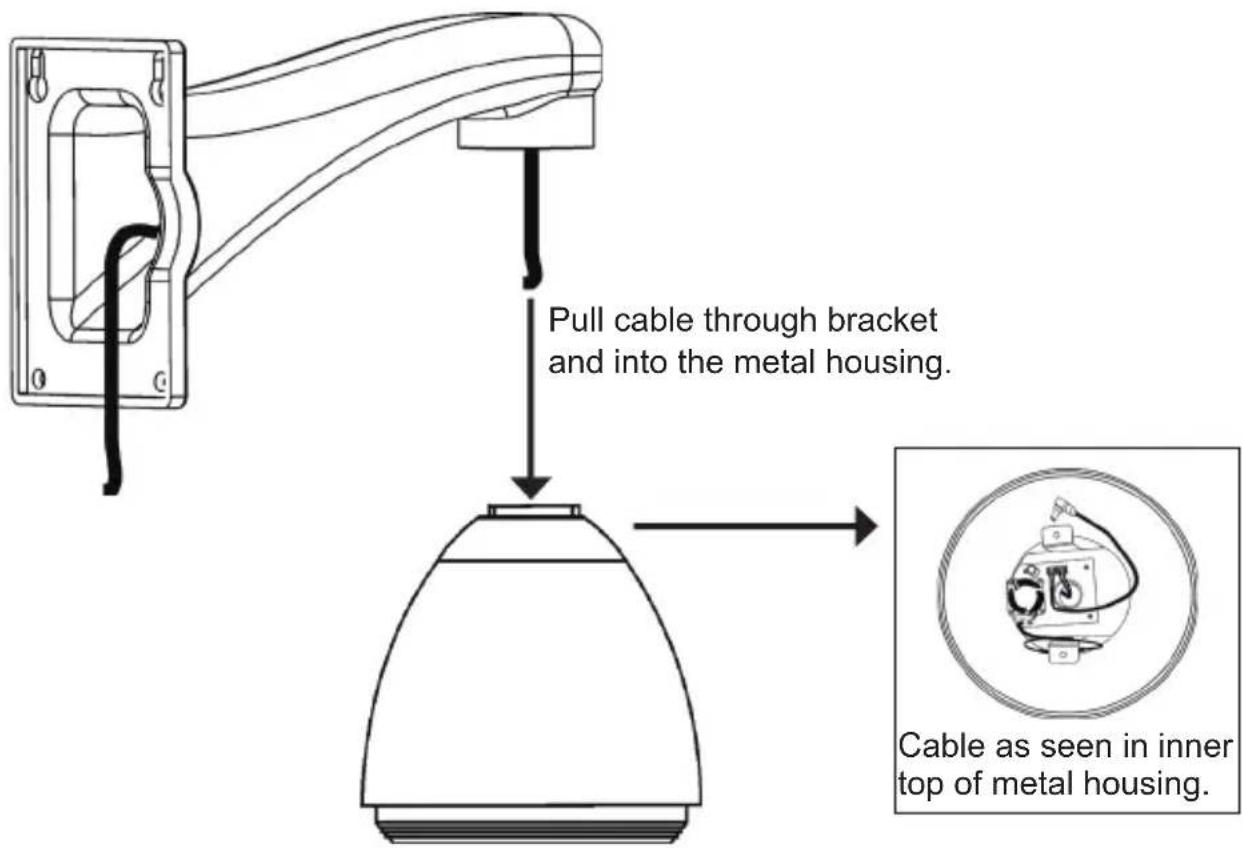
Step 1
Pull the Ethernet cable (DCS-71, DCS-71P) through the wall mount bracket and the center of the housing.
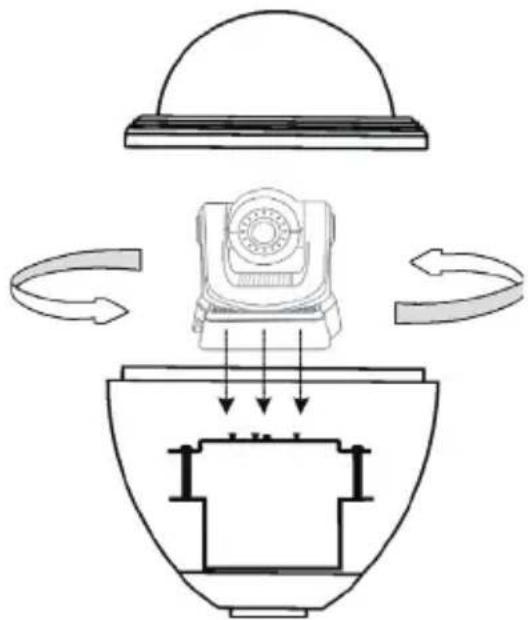
Step 2
Turn the metal housing upside down and open it. Rotate the base of the camera to lock it onto the bracket in the inside top surface of the metal housing.
natural_image
Diagram of a mechanical device with rotating arrows indicating motion, no text or symbols presentStep 3
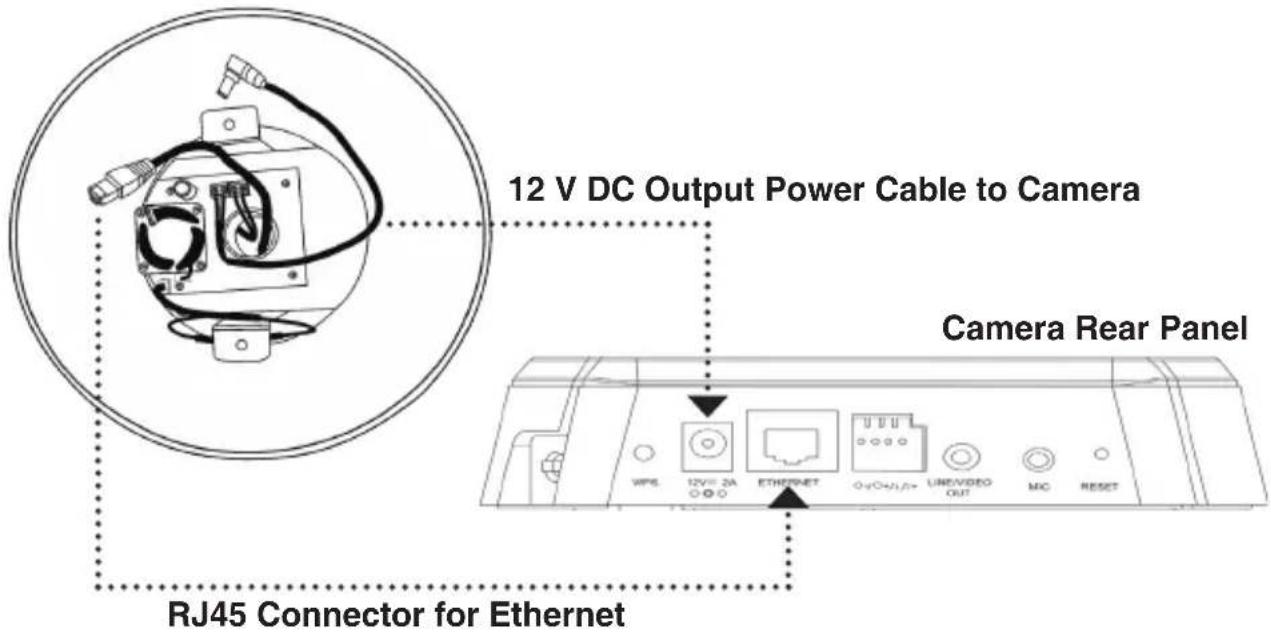
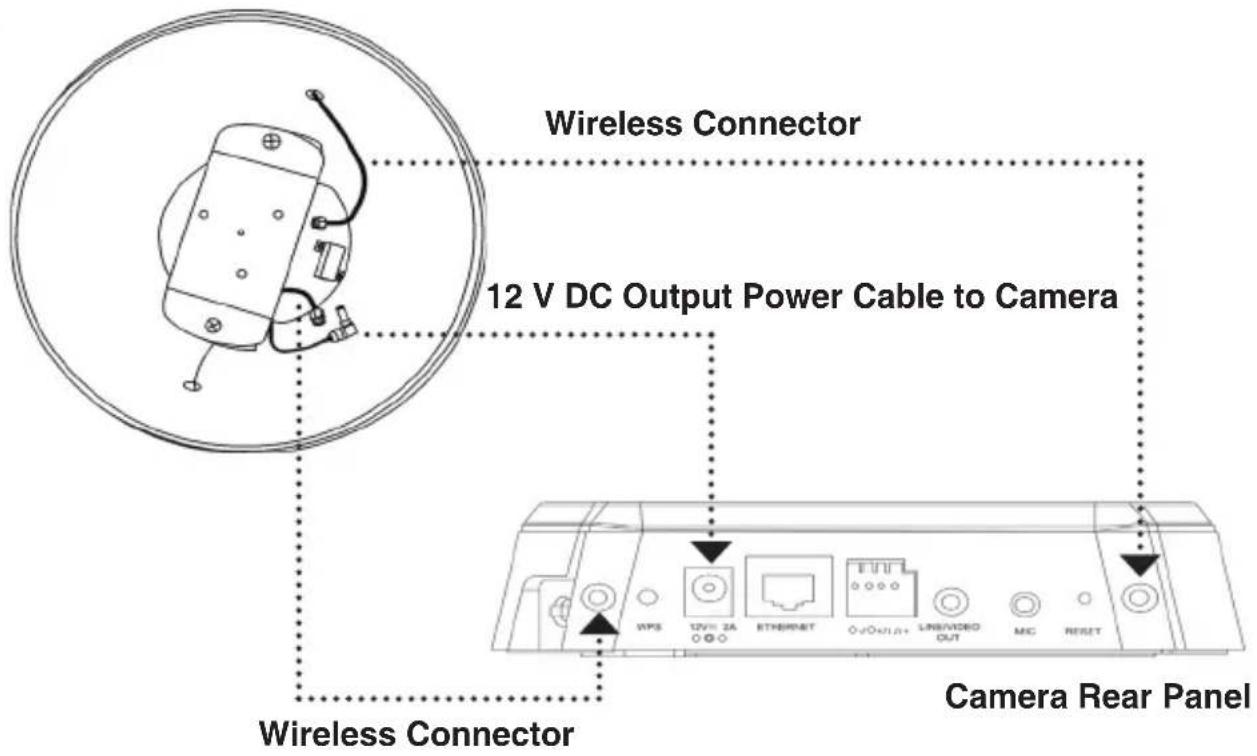
Plug in the power and external Ethernet cable to the camera.
For DCS-71
Connect the 12 V DC power cable and Ethernet cable's RJ45 connector to the camera.
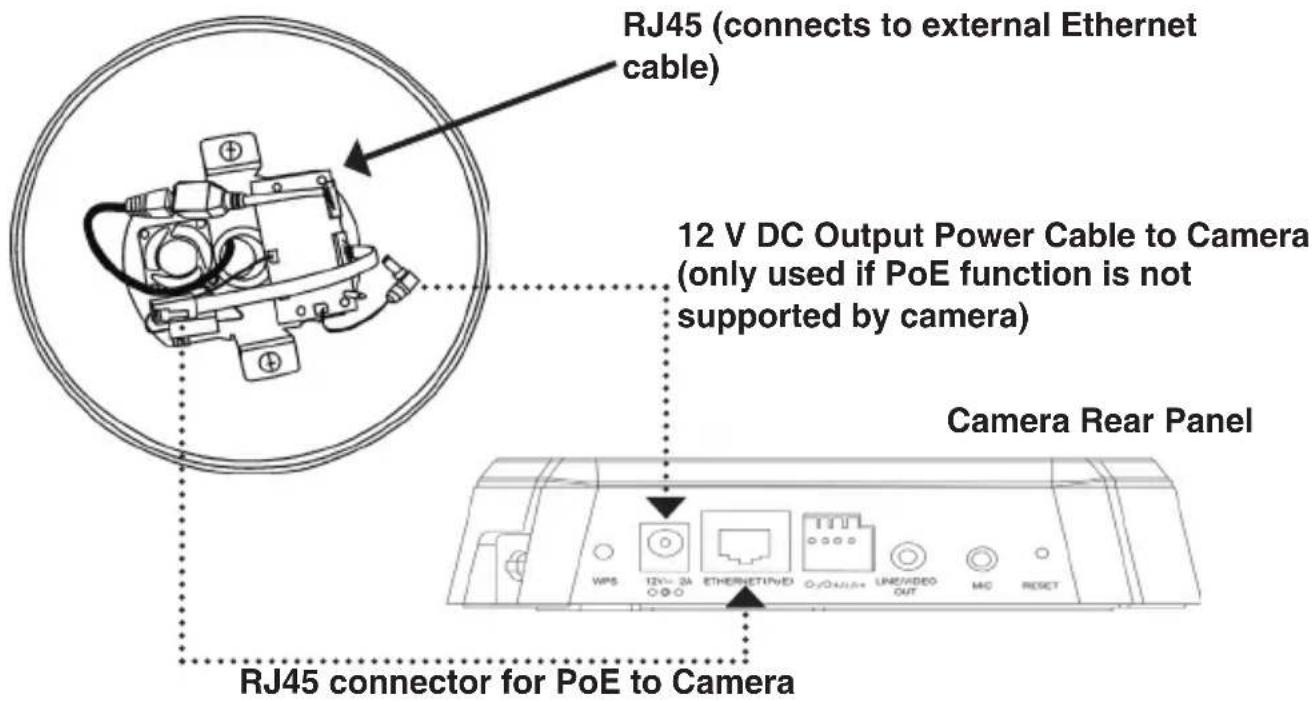
For DCS-71P
Connect the external Ethernet cable to the housing's PoE covert board and the onboard RJ45 connector to the camera. The Ethernet cable is used to provide an Ethernet connection and to power the camera using PoE. If the camera is not a PoE type, please connect the 12 V DC connector to the camera.
For DCS-71W
Connect the 12 V DC power cable and wireless connectors to the camera.
Step 4
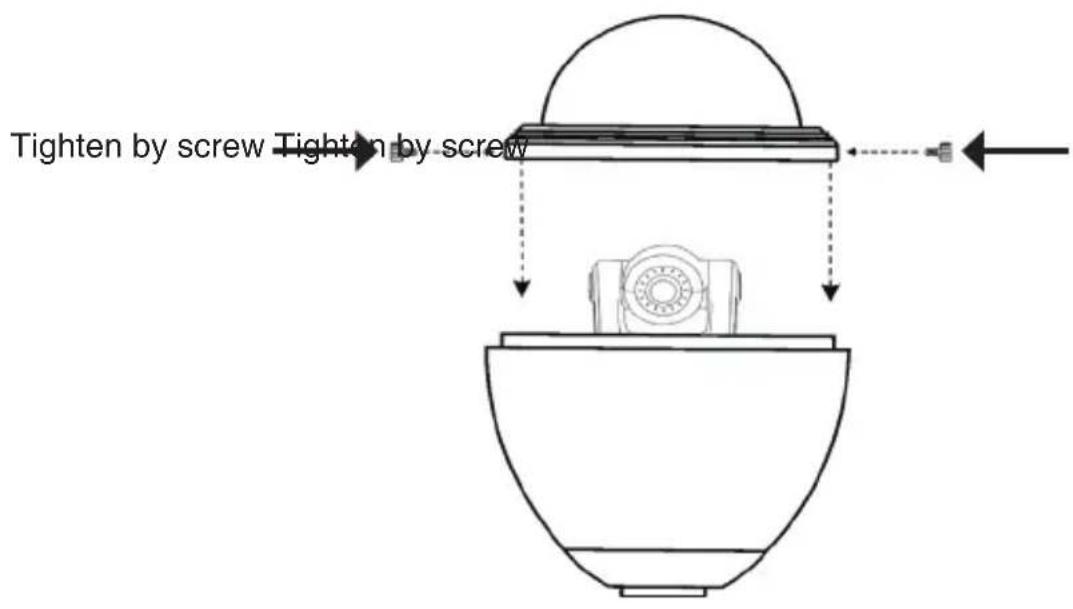
Place the dome cover over the metal housing and secure it by tightening the screws.
Step 5
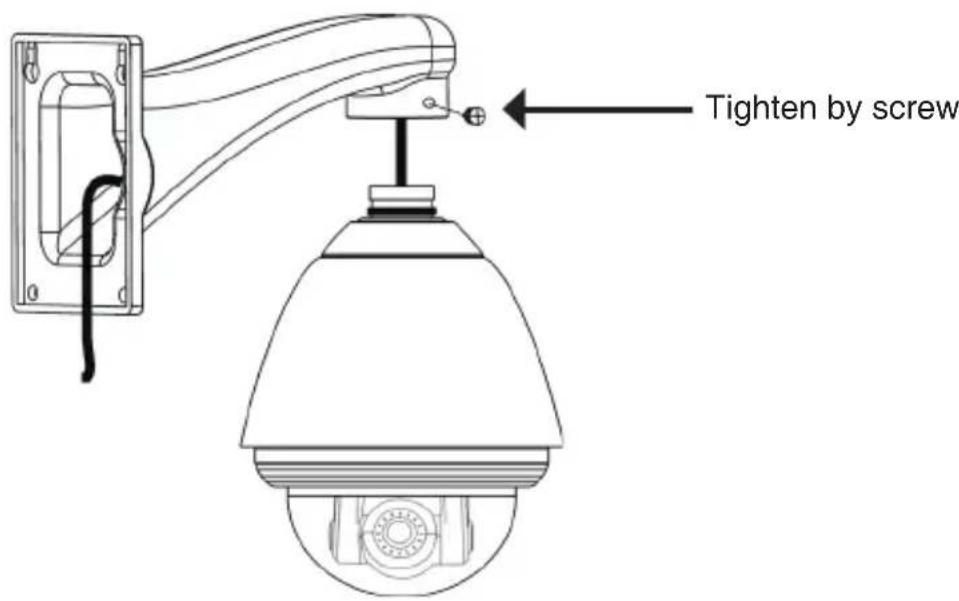
Mount the metal housing to the bracket.
Step 6
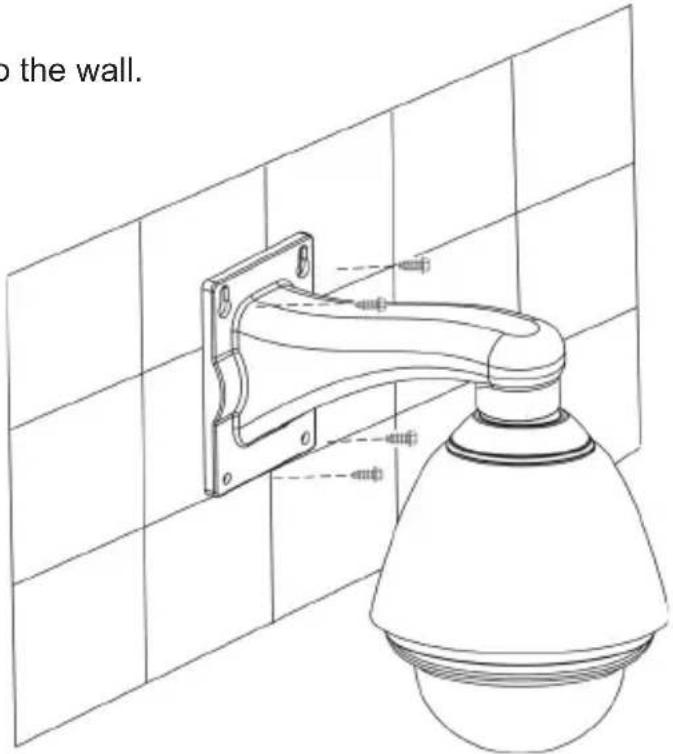
Install the mount bracket onto the wall.
Step 7
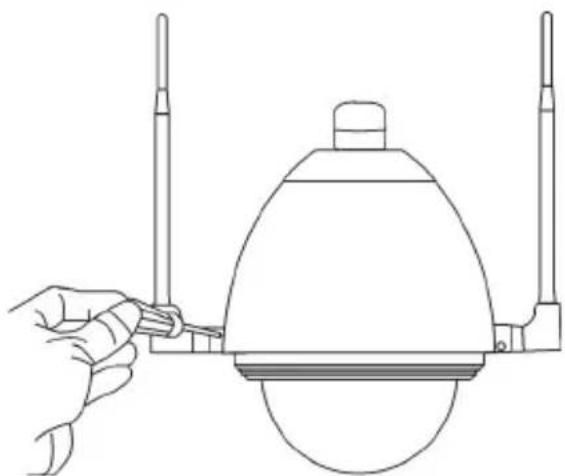
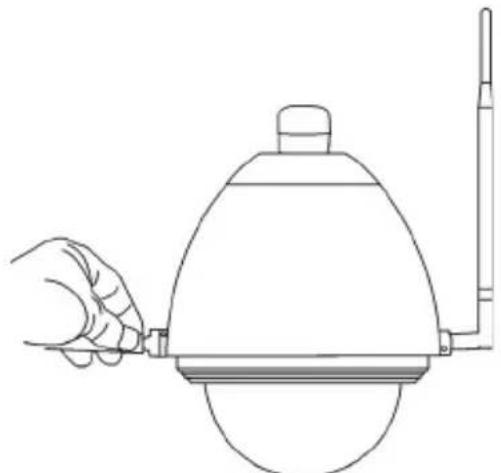
Install Wireless Antennas (for DCS-71W only)
- Connect the wireless antenna to the metal housing.
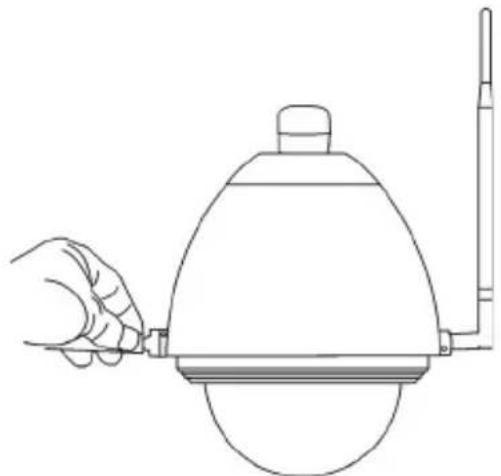
natural_image
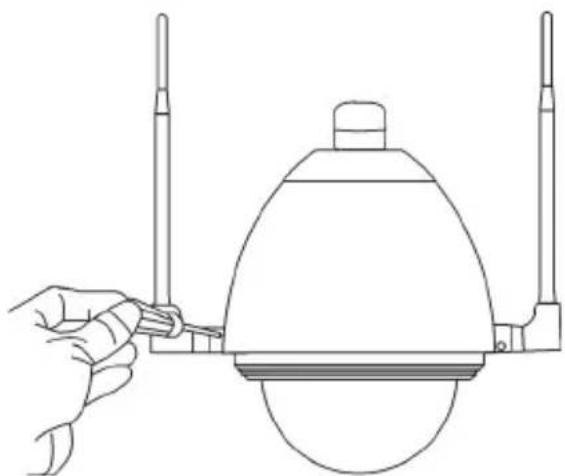
Line drawing of a hand holding a cylindrical device with a lid and a vertical tube, no text or symbols present- Attach the antenna holders to the housing and tighten them in place.
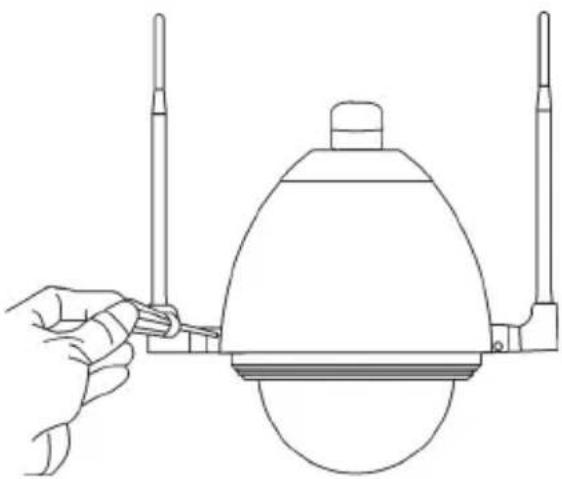
natural_image
Line drawing of a hand using a tool to adjust or install a mechanical component (no text or symbols present)Step 8
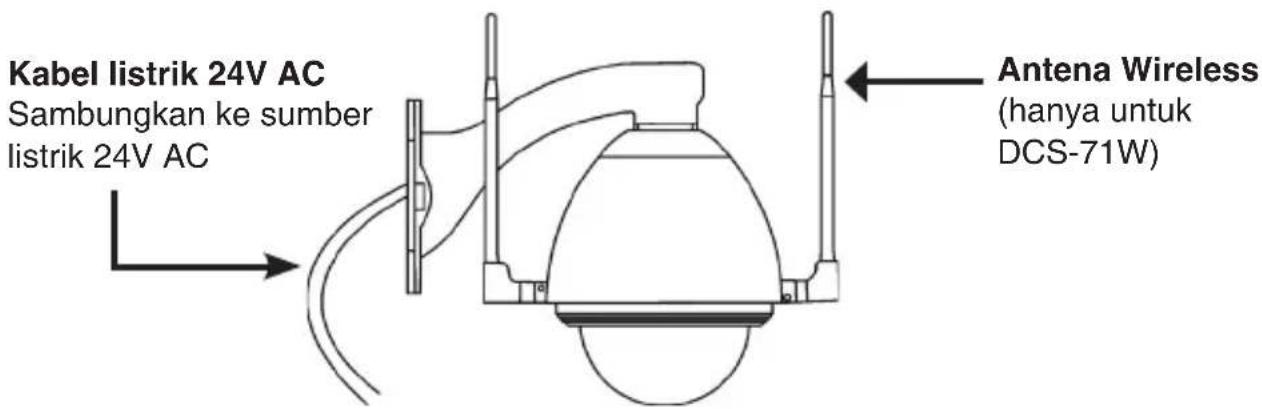
Connect the 24 V AC power cable (DCS-71, DCS-71W) to a power adapter or Ethernet cable (DCS-71P) to a PoE device.
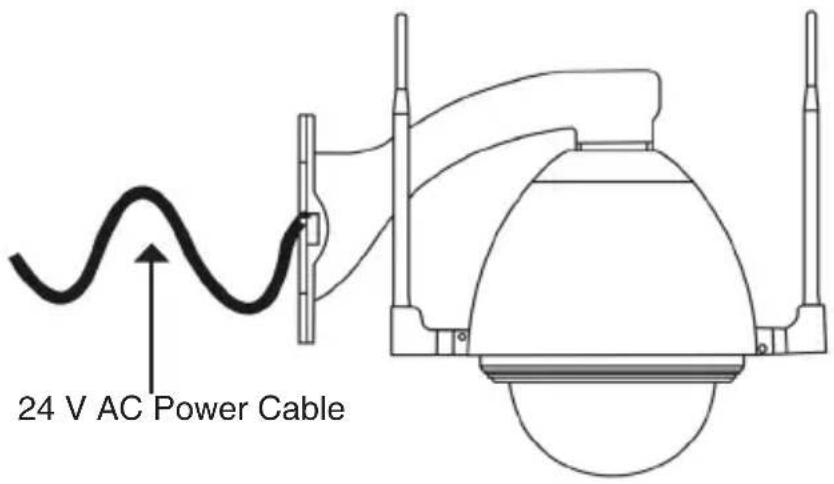
- Specifications
| Model | DCS-71 | DCS-71P DCS-71W | |
| CAT Mid-Span, End-Span | |||
| Data Transmission Rate | 10/100 Mbps | ||
| Transmission Distance | <100 m | ||
| Ethernet Data Line | TIA/EIA-568, Cat-5 Cable | ||
| Heater On: below 0°; Off: above 10°C | |||
| Blower On: above 40°; Off: below 30°C | |||
| Weatherproof IP66 Certified | |||
| Power Consumption | 35 W 29 W | 35 W | |
| Power Source for Camera | 12 V DC 12 V | DC802.3at PoE | 12 V DC |
| Power Source for Enclosure | 24 V AC 802. | 3at PoE 24 V AC | |
| Humidity 5%-95% | |||
| Certifications CE, FCC, C-Tick | |||
| Supported Camera | DCS-5605A1 version or above | DCS-5605A1 version or above | DCS-5635A2 version or above |
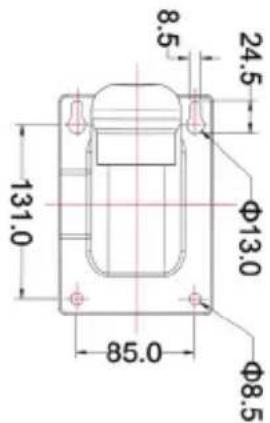
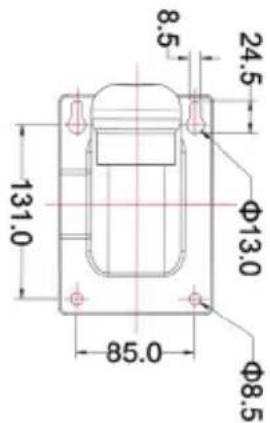
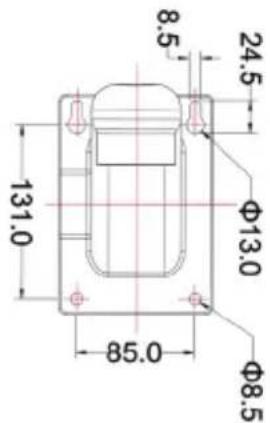
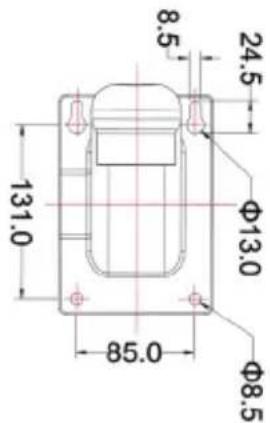
5. Dimensions
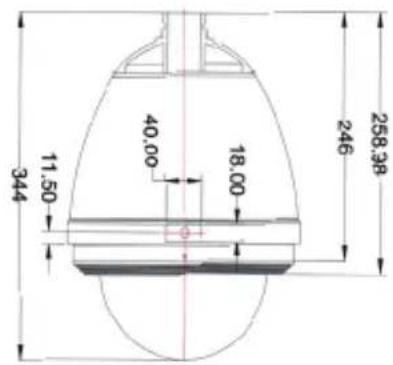
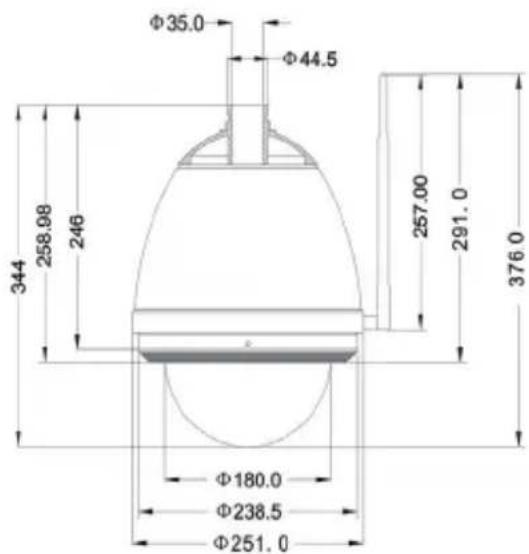
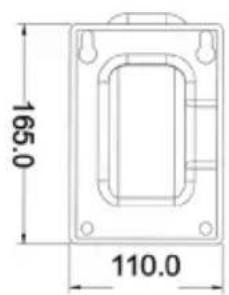
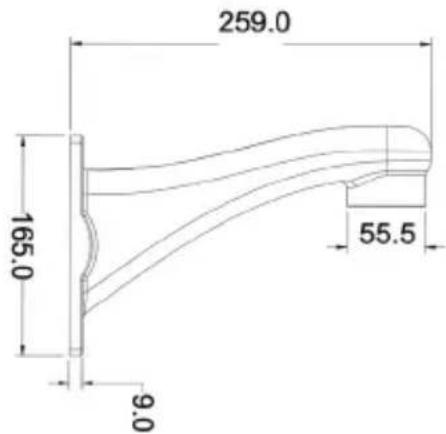
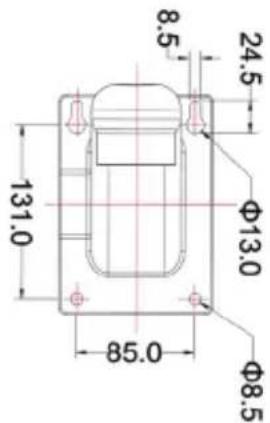
You can find software updates and user documentation on the D-Link website.
Tech Support for customers in
Australia:
Tel: 1300-766-868
24/7 Technical Support
Web: http://www.dlink.com.au
E-mail: support@dlink.com.au
India:
Tel: +91-22-27626600
Toll Free 1800-22-8998
Web: www.dlink.co.in
E-Mail: helpdesk@dlink.co.in
Singapore, Thailand, Indonesia, Malaysia, Philippines, Vietnam:
Singapore - www.dlink.com.sg
Philippines - www.dlink.com.ph
Vietnam - www.dlink.com.vn
Korea:
Tel : +82-2-2028-1810
Monday to Friday 9:00am to 6:00pm
24/7 Technical Support
Web: http://www.dlink.co.nz
E-mail: support@dlink.co.nz
South Africa and Sub Sahara Region:
Tel: +27 12 661 2025
08600 DLINK (for South Africa only)
Monday to Friday 8:30am to 9:00pm South
Africa Time
Web: http://www.d-link.co.za
E-mail: support@d-link.co.za
Saudi Arabia (KSA):
Tel: +966 01 217 0008
Fax: +966 01 217 0009
Saturday to Wednesday 9.30AM to 6.30PM
Thursdays 9.30AM to 2.00 PM
E-mail: Support.sa@dlink-me.com
D-Link Middle East - Dubai, U.A.E.
Plot No. S31102,
Jebel Ali Free Zone South,
P.O.Box 18224, Dubai, U.A.E.
Tel: +971-4-8809022
Fax: +971-4-8809066 / 8809069
Technical Support: +971-4-8809033
General Inquiries: info.me@dlink-me.com
Tech Support: support.me@dlink-me.com
Egypt
1, Makram Ebeid Street - City Lights Building
Nasrcity - Cairo, Egypt
Floor 6, office C2
Tel.: +2 02 26718375 - +2 02 26717280
Technical Support: +2 02 26738470
General Inquiries: info.eg@dlink-me.com
Tech Support: support.eg@dlink-me.com
Kingdom of Saudi Arabia
Office # 84,
Al Khaleej Building ( Mujamathu Al-Khaleej)
Opp. King Fahd Road, Olaya
Riyadh - Saudi Arabia
Tel: +966 1 217 0008
Technical Support:
+966 1 2170009 / +966 2 6522951
General Inquiries: info.sa@dlink-me.com
Tech Support: support.sa@dlink-me.com
Pakistan
Islamabad Office:
61-A, Jinnah Avenue, Blue Area,
Suite # 11, EBC, Saudi Pak Tower,
Islamabad - Pakistan
Tel.: +92-51-2800397, 2800398
Fax: +92-51-2800399
Karachi Office:
D-147/1, KDA Scheme # 1,
Opposite Mudassir Park, Karsaz Road,
Karachi – Pakistan
Phone: +92-21-34548158, 34326649
Fax: +92-21-4375727
Technical Support: +92-21-34548310, 34305069
General Inquiries: info.pk@dlink-me.com
Tech Support: support.pk@dlink-me.com
TECHNICAL SUPPORT
Iran
Unit 5, 5th Floor, No. 20, 17th Alley, Bokharest
St., Argentine Sq.,
Tehran IRAN
Postal Code : 1513833817
Tel: +98-21-88880918,19
+98-21-88706653,54
General Inquiries: info.ir@dlink-me.com
Tech Support: support.ir@dlink-me.com
Morocco
M.I.T.C
Web:www.dlink.com.tr
Teknik Destek: support.tr@dlink.com.tr
ISRAEL
בִרְשָׁה
20
natural_image
Line drawing of a security camera with mounted sensor array (no text or symbols)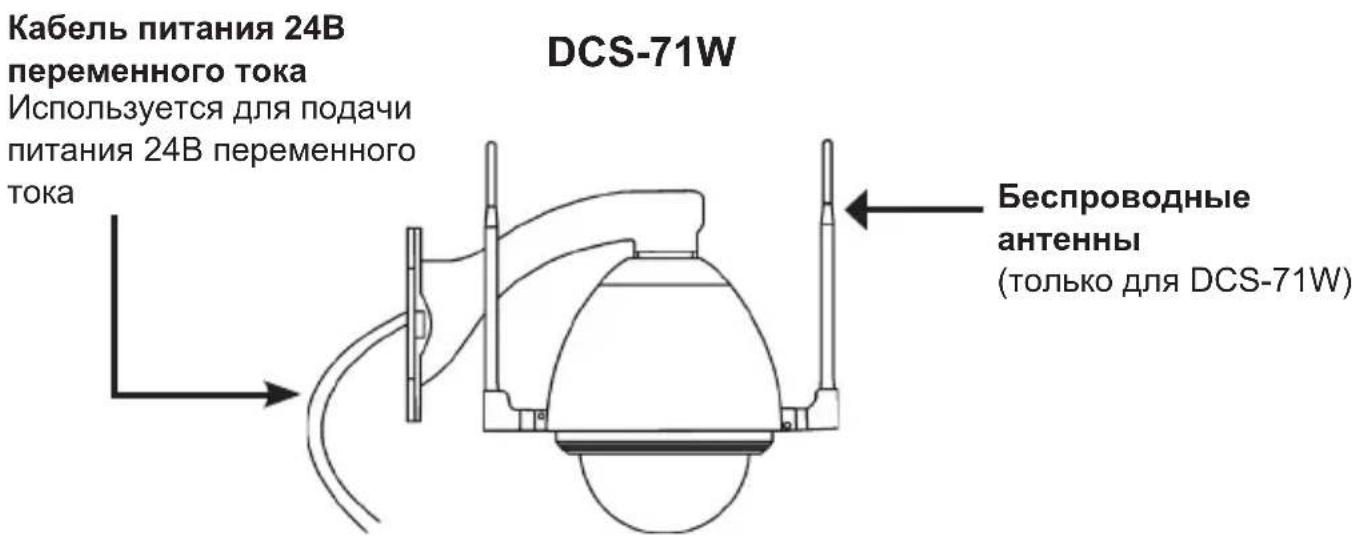
natural_image
Diagram of a mechanical device with rotating components and directional arrows indicating motion (no text or symbols)War 3
natural_image
Line drawing of a hand holding a cylindrical device with a lid and a vertical tube inserted, no text or symbols present.natural_image
Line drawing of a hand using a tool to adjust or install a component on a circular base (no text or symbols)War 8
natural_image
Line drawing of a security camera with mounted sensor array (no text or symbols)DCS-71W
natural_image
Diagram of a mechanical device with rotating components and directional arrows indicating motion (no text or symbols)Paso 3
natural_image
Technical line drawing of a wall-mounted security guard with a spherical lamp, showing mounting bracket and base (no text or symbols)Paso 7
natural_image
Line drawing of a hand holding a cylindrical object with a side arm, no text or symbols presentnatural_image
Line drawing of a hand using a tool to adjust or install a mechanical component (no text or symbols present)Paso 8
natural_image
Line drawing of a security camera mounted on a wall-mounted device (no text or symbols)natural_image
Diagram of a mechanical device with rotating components and directional arrows indicating motion (no text or symbols)Etapa 3
Instale as antenas wireless (somente para o DCS-71W)
natural_image
Line drawing of a hand holding a cylindrical object with a side arm, no text or symbols present- Prenda os suportes de antena no gabinete e fixe-os no lugar.
natural_image
Line drawing of a hand using a tool to adjust or install a dome-shaped object with two vertical posts (no text or symbols)Etapa 8
SUPORTE TÉCNICO
natural_image
Line drawing of a security camera with mounted sensor array (no text or symbols)DCS-71W
natural_image
Diagram of a mechanical device with rotating components and directional arrows indicating motion (no text or symbols)步驟三
網路攝影機插上電源並連結網路線。
DCS-71 安装
natural_image
Technical line drawing of a wall-mounted security guard assembly with a spherical base (no text or symbols)步驟七
安裝無線天線(只適用DCS-71W)
- 將無線天線連接到圓頂金屬外殼側邊
natural_image
Line drawing of a hand holding a cylindrical device with a lid and a vertical rod extending upward (no text or symbols)- 無線天線連接處固定並鎖緊
natural_image
Line drawing of a hand using a tool to adjust or install a dome-shaped object with two vertical posts (no text or symbols)步驟八
natural_image
Line drawing of a security camera with mounted sensor array (no text or symbols)DCS-71W
natural_image
Diagram of a mechanical device with rotating components and directional arrows indicating motion (no text or symbols)Langkah 3
Sambungkan kabel listrik serta kabel ethernet ke kamera.
Untuk DCS-71
Sambungkan kabel listrik 12V DC dan konektor RJ45 ke ethernet kamera.
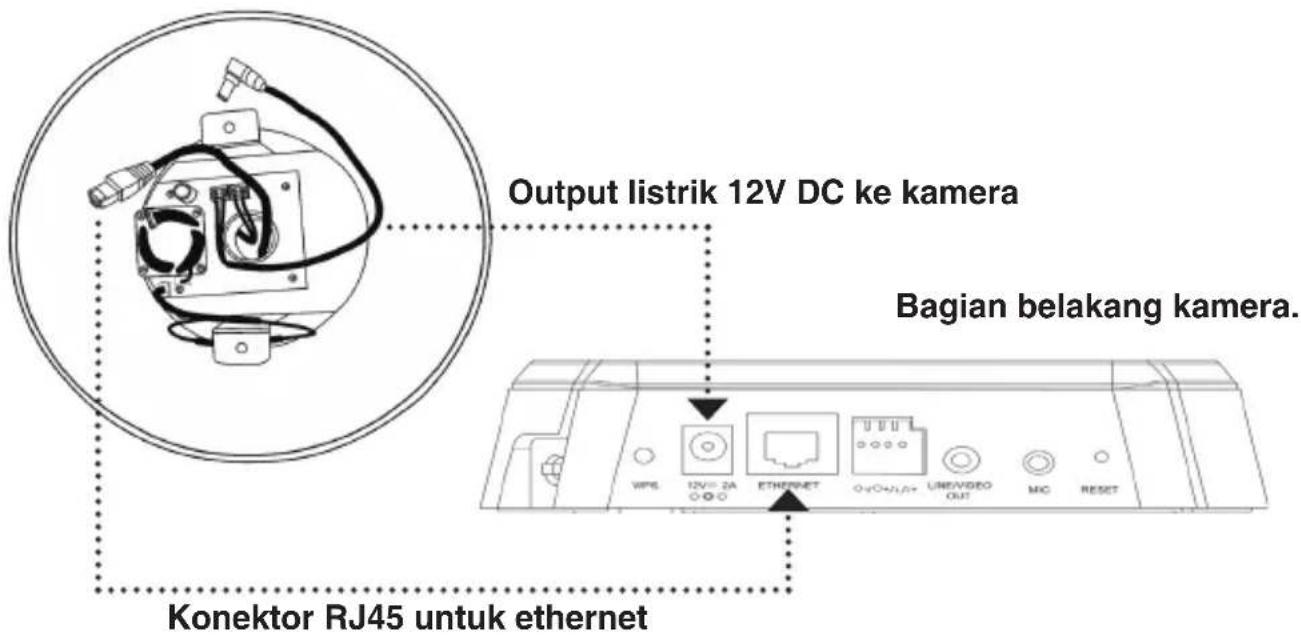
Untuk DCS-71P
natural_image
Line drawing of a hand holding a cylindrical device with a lid and a vertical rod extending outward (no text or symbols)natural_image
Line drawing of a hand using a tool to adjust or install a dome-shaped component (no text or symbols present)Langkah 8
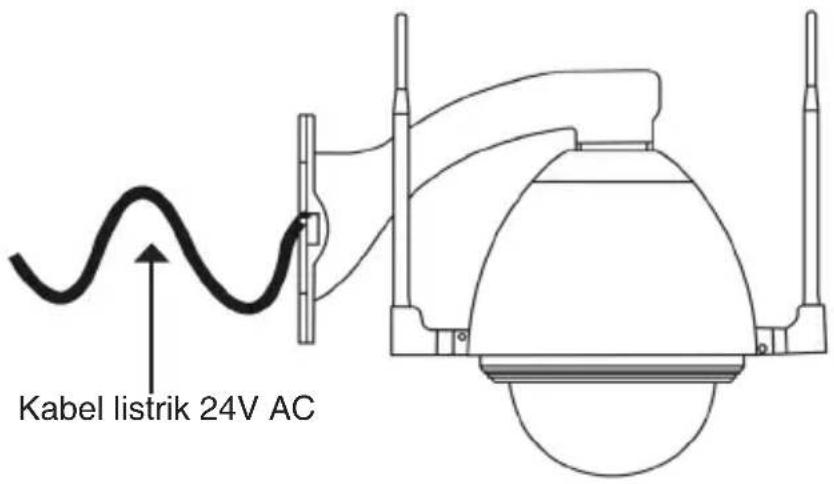
Sambungkan kabel listrik 24V AC (DCS-71, DCS-71W) ke adaptor listrik dan kabel ethernet (DCS-71P) ke alat PoE.
- Spesifikasi
DUKUNGAN TEKNIS
- Quick Installation Guide
- DCS-71 Series Outdoor Dome Housing
- DCS-71 Series Quick Installation Guide
- Installation
- Package Contents
- Hardware Overview
- Hardware Installation
- Step 1
- Step 2
- Step 3
- For DCS-71
- For DCS-71P
- For DCS-71W
- Step 4
- Step 5
- Step 6
- Step 7
- Step 8
- Dimensions
- Tech Support for customers in
- Australia:
- India:
- Singapore, Thailand, Indonesia, Malaysia, Philippines, Vietnam:
- Korea:
- South Africa and Sub Sahara Region:
- Saudi Arabia (KSA):
- D-Link Middle East - Dubai, U.A.E.
- Egypt
- Kingdom of Saudi Arabia
- Pakistan
- TECHNICAL SUPPORT
- Iran
- Morocco
- ISRAEL
- War 3
- War 8
- Paso 3
- Paso 7
- Paso 8
- Etapa 3
- Etapa 8
- SUPORTE TÉCNICO
- 步驟三
- DCS-71 安装
- 步驟七
- 步驟八
- Langkah 3
- Untuk DCS-71
- Untuk DCS-71P
- Langkah 8
- DUKUNGAN TEKNIS
Brand : D-LINK
Model : DCS-71
Category : Camera bag