USER MANUAL MC175 PHILIPS
Controls and connections. 4-5Clock/Timer .8
General information. 6 CD-player, CD handling .9-10
Remote control 6 Radio/RDS 11
Power supply 6 Troubleshooting 12
Basic functions 7 Technical data 12
Important notes for users in the U.K.
Mains plug
This apparatus is fitted with an approved 13 Amp plug. To change a fuse in this type of plug proceed as follows:
1 Remove fuse cover and fuse.
2 Fix new fuse which should be a BS1362 5 Amp, A.S.T.A. or BSI approved type.
3 Refit the fuse cover.
If the fitted plug is not suitable for your socket outlets, it should be cut off and an appropriate plug fitted in its place. If the mains plug contains a fuse, this should have a value of 5 Amp. If a plug without a fuse is used, the fuse at the distribution board should not be greater than 5 Amp.
Note: The severed plug must be disposed of to avoid a possible shock hazard should it be inserted into a 13 Amp socket elsewhere.
How to connect a plug
The wires in the mains lead are coloured with the following code: blue = neutral (N), brown = live (L). As these colours may not correspond with the colour markings identifying the terminals in your plug, proceed as follows:
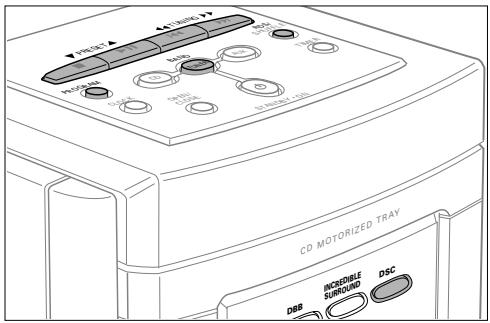
- Connect the blue wire to the terminal marked N or coloured black.
- Connect the brown wire to the terminal marked L or coloured red.
- Do not connect either wire to the earth terminal in the plug, marked E (or 12 ) or coloured green (or green and yellow).
Before replacing the plug cover, make certain that the cord grip is clamped over the sheath of the lead - not simply over the two wires.
Copyright in the U.K.
Recording and playback of material may require consent.
See Copyright Act 1956 and The Performer's Protection
Acts 1958 to 1972.
Italia
Philips Consumer Electronics
Philips, Glaslaan 2
5616 JB Eindhoven, The Netherlands
Norge
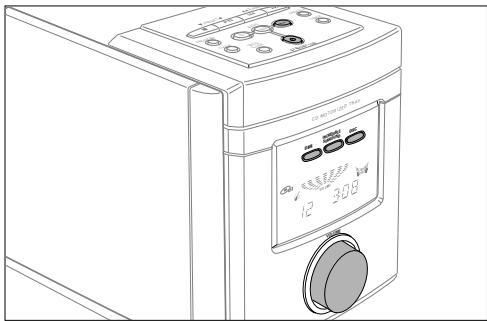
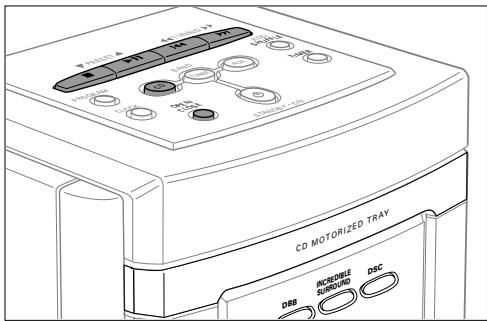
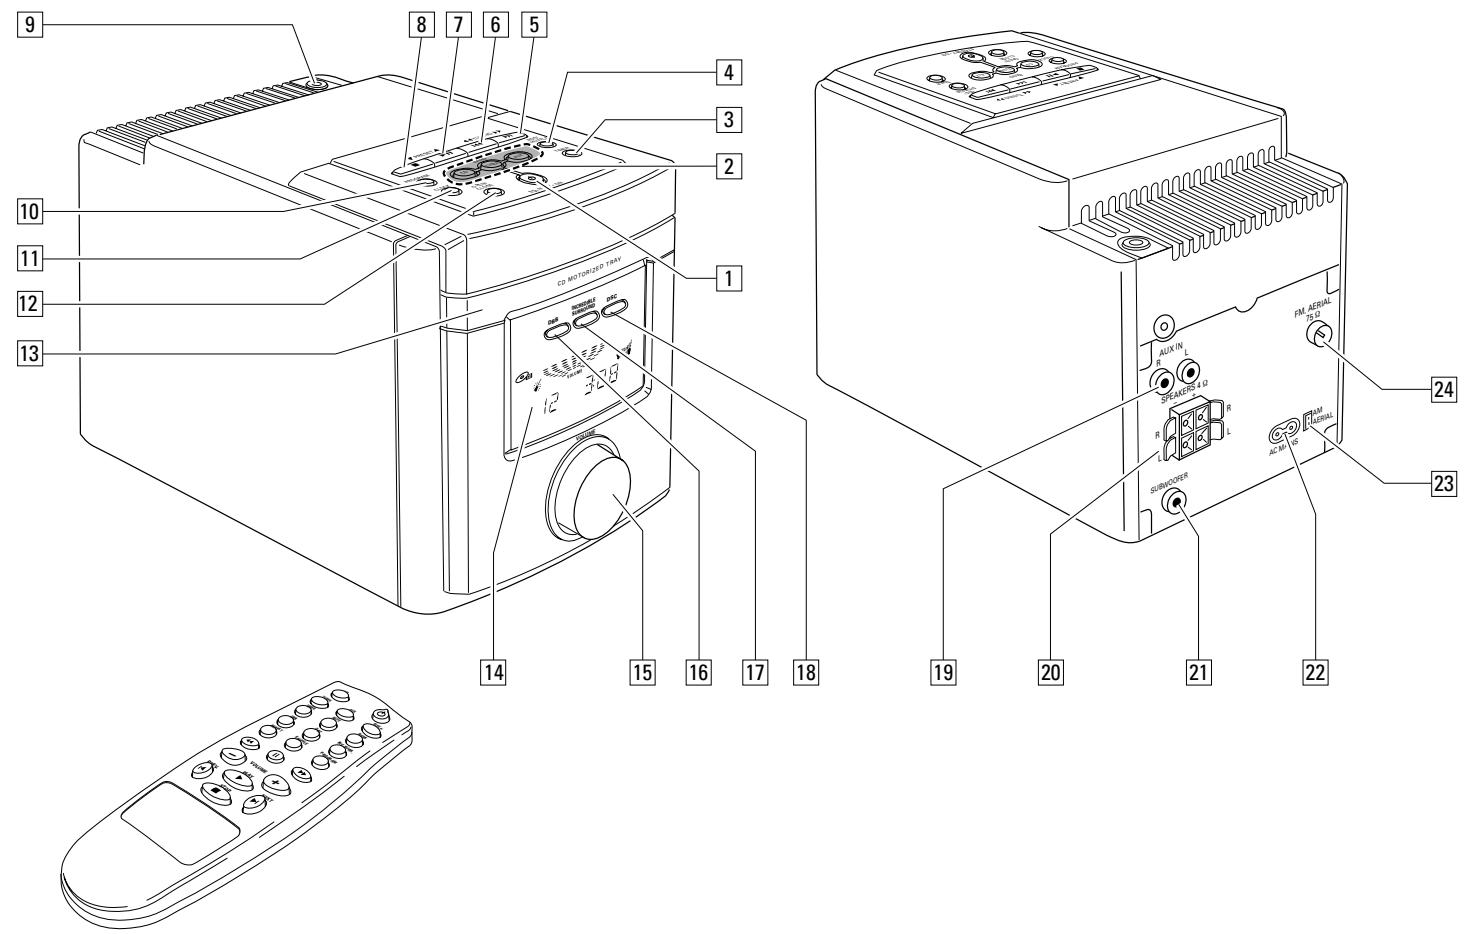
1 STANDBY-ON...switches the set on and to standby
CD.........selects the CD-player
TUNER.........selects the tune BAND.........selects the wave band
2 AUX.....selects the input for an additional appliance
3 TIMER............activates and deactivates the timer
4 RDS/.........switches through RDS information SHUFFLE.....plays tracks in random order
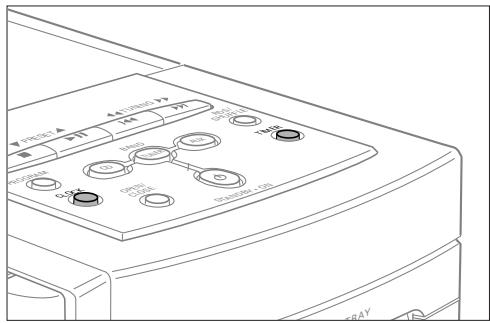
5 skips and searches forward TUNING.tunes to radio stations
6 skips and searches backward TUNING.....tunes to radio stations
7 11.....starts and interrupts CD play PRESET ..selects preset radio stations
8 stops CD play and erases the program PRESET...selects preset radio stations
9 3.5 mm headphone socket Note: Connecting the headphones will switch off the speakers.
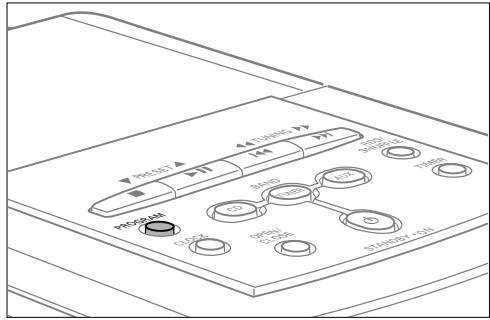
10 PROGRAM.....CD: programs tracks and reviews the program RADIO: programs radio stations
11 CLOCK.........selects the clock function
12 OPEN/CLOSE...opens/closes the CD tray
13 CD tray
14 Display
15 VOLUME......... adjusts the volume
16 DBB............DYNAMIC BASS BOOST enhances the bass
17 INCRIDIBLE SURROUND .......creates a phenomenal stereo effect
DSC DIGITAL SOUND CONTROL enhances sound characteristics
On the back
19 AUX IN R/L.........connect to the audio output of an additional appliance
20 SPEAKERS 4Ω.....connect to the supplied speakers
21 SUBWOOFER.....connect to a subwoofer
22 AC MAINS......After all other connections have been made, connect this mains lead to the wall socket.
23 AM AERIAL.........connect to the supplied AM frame antenna
24 FM AERIAL 75 Ω....connect to the supplied antenna wire
On the remote control
CD...selects the CD-player
O...switches to standby
TUNER...selects the tuner
AUX...selects the input for an additional appliance
SLEEP...activates the sleptimer
TIMER...activates and deactivates the timer
MUTE...mutes the sound
NEWS...switches the news announcement on and off
DBB..DYNAMIC BASS BOOST enhances the bass
DSC...DIGITAL SOUND CONTROL enhances sound characteristics
INC.SURR...creates a phenomenal stereo effect
REPEAT repeats a track, the entire CD or the program
SHUFFLE .plays tracks in random order
PROGRAM CD: programs tracks and reviews the program
← CD: searches backward RADIO: tunes to radio stations
II. interrupts CD play
→ CD: searches forward RADIO: tunes to radio stations
VOLUME -/+ decreases/increases the volume
PREV. CD: skips backward RADIO: selects a preset radio station
PLAY. starts CD play
NEXT CD: skips forward RADIO: selects a preset radio station
STOP stops CD play and erases the program
Note: Select the desired sound source first and then press the required function key.
Supplied accessories
- 2 loudspeaker boxes
- 2 loudspeaker cables
- Remote control
- 2 batteries for the remote control
- AM/MW frame antenna
FM wire antenna
- Mains lead
Place the set on a solid surface. Make sure that there is sufficient space around the set to prevent overheating.
Active mobile phones near to the CD-player may cause malfunctions.
Maintenance
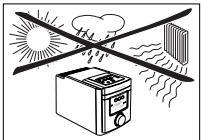
Do not expose the set, batteries or CDs to humidity, rain, sand or excessive heat (caused by heating equipment or direct sunlight).
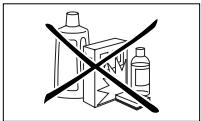
You can clean the set with a soft, slightly dampened lint-free cloth. Do not use any cleaning agents as they may have a corrosive effect.
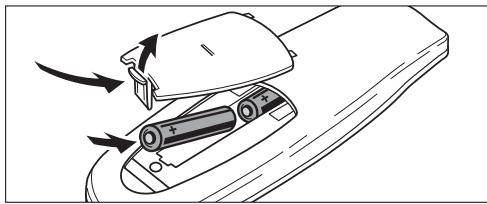
Batteries for the remote control
- Open the battery compartment of the remote control and insert 2 batteries, type R03, UM-4 or AAA-cells (preferably alkaline).
Remove batteries if they are flat or the set is not going to be used for a long time.
Batteries contain chemical substances, so they should be disposed of properly.
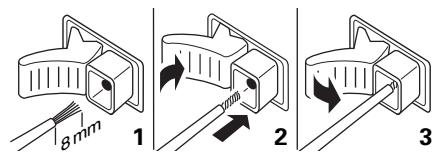
Loudspeaker connections
The loudspeaker terminals are click-fit connectors. Use them as shown below.
- Connect the unmarked wire to the red terminal and the marked (black) to the black one.
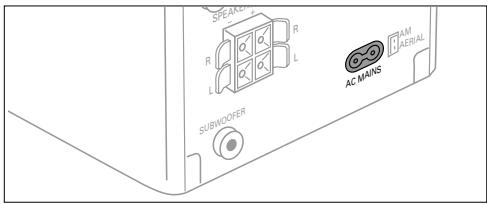
Mains
The type plate is located on the bottom of the set.
1 Check whether the mains voltage as shown on the type plate corresponds to your local mains voltage. If it does not, consult your dealer or service organisation.
2 Connect the mains cable to the AC MAINS inlet and the wall socket. This switches on the mains supply.
To disconnect the set from the mains completely, remove the mains plug from the wall socket.
For users in the U.K.: please follow the instructions on page 2.
To avoid overheating of the set a safety circuit has been built in. Therefore your set may disconnect under extreme conditions. If this happens, switch the set off and let it cool down before reusing it.
This set complies with the radio interference requirements of the European Community
Switching on
To switch the set on press STANDBY-ON on the set.
To switch the set to standby press STANDBY-ON again (on the remote control).
Demo mode
The demo mode displays various digital features of the set. It can be activated during standby.
Activating and deactivating the demo mode
1 Keep STANDBY-ON on the set depressed for at least 5 seconds.
The demo mode is activated.
2 Press STANDBY-ON (on the remote control).
→ The demo mode is deactivated.
Volume and sound adjustment
Adjust the volume by using VOLUME (VOLUME - / + on the remote control).
→The volume level between VOL MIN and VOL MAX is displayed.
Press DSC repeatedly to select the desired sound characteristics.
JAZZ ,CLASSIC 一 ,POP or OPTIML is displayed.
Press DBB to switch the bass enhancement on and off.
DBB is shown.
Press INCREDIBLE SURROUND (INC. SURR. on the remote control) to switch the surround sound effect on and off.
is shown.
Note: The effect of INCREDIBLE SURROUND may vary with different types of music.
1 Press MUTE on the remote control to interrupt the sound reproduction instantly.
Playback will be continued without sound.
2 Press MUTE on the remote control again to reactivate the sound reproduction.
Using additional appliances
It is possible to use an additional appliance, e. g. tape recorder with the set. Look into the instruction manual of the appliance on how to connect and operate it.
1 Insert the red plug of a cinch cable to the red socket (AUX IN R) and the white one to the white socket (AUX IN L).
2 Connect the other end of the cinch cable to the additional appliance.
3 Press AUX to select the input for the appliance.
FLX is displayed.
4 Operate your appliance as usual and adjust volume and sound with the set.
Note: It is not possible to use a turntable with AUX IN.
All redundant packing material has been omitted. We have done our utmost to make the packaging easily separable into three mono materials: cardboard (box), polystyrene foam (buffer) and polyethylene (bags, protective foam sheet).
Your set consists of materials which can be recycled if disassembled by a specialized company. Please observe the local regulations regarding the disposal of packing materials, exhausted batteries and old equipment.
Clock setting
It is possible to set the clock by using a time signal which is broadcast with RDS stations. This only works if the RDS station is sending this signal.
Automatic clock setting
1 Tune to a RDS station (see "RADIO").
2 Press CLOCK on the set.
→The clock digits□□:□□ flashes.
3 Press RDS on the set.
READING RIS CLOCK and the clock time is displayed.
4 Press CLOCK on the set to confirm the settings.
If NO RDS CLOCK is displayed there is no time signal transmitted. In that case you have to set the clock manually.
Note: The time signal broadcasted from certain RDS stations may not always be accurate. If you find there is a discrepancy in clock time, set your clock manually (and the time will then run accurately).
Manual clock setting
1 Press CLOCK on the set. The clock digits: flashes.
2 Press PRESET on the set to set the hour.
3 Press TUNING on the set to set the minutes.
4 Press CLOCK on the set to confirm the settings.
Timer setting
The set can be used as an alarm clock, whereby the CD or tuner is switched on at a set time.
1 Keep TIMER on the set depressed for more than 2 seconds. flashes.
2 Press PRESET on the set to select the desired sound source. CD or TUNER is shown.
3 Press TIMER on the set. The clock digits flash.
4 Press PRESET on the set to set the desired hour.
5 Press TUNING on the set to set the desired minute.
6 Press TIMER on the set to confirm the settings.
Note: A power-saving feature is built into the timer. If no key or control is adjusted during 30 minutes of timer set playback, the unit will automatically switch to standby mode.
Timer activation and deactivation
- Press TIMER during standby or playback. is shown.
- Press TIMER anytime to deactivate the timer. goes off.
Sleeptimer
The sleptimer is a set period of time before the set switches off. The clock time has to be set before the sleptimer can be used.
1 Press SLEEP on the remote control until the desired sleeper time is displayed.
→SLCEP,60,45,30,15,10,OFF
2 As soon as the desired time is displayed, do not press the key again.
After the chosen time has elapsed, the set switches to standby.
- To deactivate the sleeptimer, press SLEEP on the remote control until F F is displayed.
Playing a CD
This CD player can play all kinds of Audio Disc such as CD-Recordables and CD-Rewritables. Do not try to play a CD-ROM, CD-I, CDV or computer CD.
1 Press OPEN/CLOSE on the set.
CD is shown and the tray is opened.
2 Insert an audio CD (printed side up) and close the tray by pressing OPEN/CLOSE on the set again.
READING is displayed. Then, the CD-player stops. The total number of tracks and the total playing time of the CD are displayed.
3 Press (PLAY on the remote control) to start playback.
The current track number and the elapsed playing time are displayed.
4 Press (STOP on the remote control) to stop playback.
The total number of tracks and the total playing time of the CD are displayed.
- You can interrupt playback by pressing II (II on the remote control).
→The time where playback was interrupted is flashing.
- Continue playback by pressing▶(PLAY▶ on the remote control).
Note: Playback will also stop if:
SHUFFLE and REPEAT
Repeating a track, the CD or the program
1 Press repeatedly REPEAT on the remote control during playback to select either:
REPEAT: The current track is played repeatedly.
→ REPEAT ALL: The entire CD (or program) is played repeatedly.
2Playback starts in the chosen mode.
3 To return to normal playback, press REPEAT on the remote control until the display indication disappears.
Playing tracks in random order
1 Press SHUFFLE during playback.
SHUFFLE is shown and all tracks of the CD (or program) are played in random order.
2 To return to normal playback, press SHUFFLE again.
Note: It is possible to combine shuffle and repeat e. g. SHUFFLE REPEAT ALL.
Selecting a track and searching
Selecting a track during playback
- Briefly press or (PREV. or NEXT on the remote control) once or several times to skip to the beginning of the current, previous or subsequent track(s).
Playback continues with the selected track.
Selecting a track when playback is stopped
1 Briefly press or (PREV. or NEXT on the remote control) once or several times.
2 Press II (PLAY on the remote control) to start CD play.
Playback starts with the selected track.
Searching for a passage during playback
1 Keep or depressed (or on the remote control) to find a particular passage in a backward or forward direction.
Playback continues at a low volume.
2 Release the button when you have reached the desired passage.
Normal playback continues.
Note: During shuffle, while repeating a track or playing a program, searching is only possible within the particular track.
Programming track numbers
You can select up to 20 tracks and store them in the memory in a desired sequence. You can store any track more than once.
1 If necessary press (STOP on the remote control) to stop playback.
2 Select a desired track with or (PREV. or NEXT on the remote control).
3 Press PROGRAM to store the track.
→PROGRAM flashes and the calculated playing time of the tracks programmed is shown.
4 Select and store all desired tracks in this way.
5 Press (PLAY on the remote control) to listen to your selection of tracks.
Reviewing the program
1 If necessary press (STOP on the remote control) to stop playback.
2 To review your program keep PROGRAM depressed for more than 2 seconds.
The display shows all stored tracks in sequence.
Note: If you try to store more than 20 tracks the display shows PROGRAM FULL.
Erasing the program
1 If necessary press (STOP on the remote control) to stop playback.
2 Press (STOP on the remote control) to erase the program.
→PROGRAM [CLEAR] is displayed once, PROGRAM goes off and the program is erased.
Note: The program will also be erased if you
- interrupt the power supply,
open the CD tray.
CD-player and CD handling
If the CD-player cannot read CDs correctly use a commonly available cleaning CD to clean the lens before taking the CD-player to repair. Other cleaning methods may destroy the lens. Always keep the tray closed to avoid dust on the lens.
The lens may cloud over when the set is suddenly moved from cold to warm surroundings. Playing a CD is not possible then. Leave the CD-player in a warm environment until the moisture evaporates.
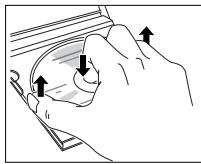
To take the CD out of its box easily, press the centre spindle while lifting the CD. Always pick up the CD by the edge and put it back in its box after use.
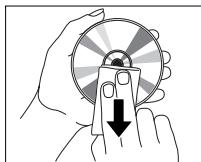
To clean the CD, wipe it in a straight line from the centre toward the edge using a soft, lint-free cloth. A cleaning agent may damage the disc! Never write on a CD or attach a sticker to it.
Tuning to radio stations
1 Press TUNER.
TUNER is shown.
2 Select a wave band by pressing BAND repeatedly.
→The selected waveband is shown.
3 Keep TUNING (or on the remote control) depressed for approximately 1 second.
SEARCH is displayed and the radio tunes to a station with sufficient strength.
4 Repeat searching until you find the desired station.
To tune to a weak station briefly press TUNING (or on the remote control) as often as necessary for optimum reception.
Programming radio stations
It is possible to store up to 30 radio stations. The set can select and programme stations by itself or you can choose them yourself.
Automatic programming
Using automatic programming will overwrite your former presets.
- Keep PROGRAM on the set depressed for more than 2 seconds.
RUTO is displayed and all available stations are programmed.
Manual programming
1 Tune to a desired radio station (see "Tuning to radio stations").
2 Press PROGRAM on the set.
→PROGRAM flashes.
3 Press PRESET to allocate a number from 1 to 30 to this station.
4 Press PROGRAM on the set to confirm the setting.
→PROGRAM goes off, the preset number and the frequency of the preset station are displayed.
Tuning to preset stations
- Press PRESET until the preset number of the desired station is displayed.
Switching FM antenna sensitivity
If the signal of a FM transmitter is too strong or too weak it is possible to adjust the antenna sensitivity.
- Keep DSC depressed for more than 5 seconds.
Either LOCAL or DI sTANT is displayed.
RDS
Radio Data System is a service that allows FM stations to send additional information. If you are receiving a RDS station, and the station name are displayed.
- Press RDS on the set repeatedly to switch through the following information (if available):
Frequency
- Program type such as: NEWS, SPORT, POP M...
Radio text messages
- Station name
News announcement
It is possible to set up the tuner in a way that listening to a CD is interrupted by the news of a RDS station.
1 Tune to the desired RDS station.
2 Play your CD (see "Playing a CD").
3 Press NEWS on the remote control.
→ NEWS is shown. While news are broadcast the set will switch to tuner. Afterwards CD play continues.
WARNING
Under no circumstances should you try to repair the set yourself as this will invalidate the guarantee. Do not open the set as there is a risk of electric shock.
If a fault occurs, first check the points listed, before taking the set for repair.
If you are unable to solve a problem by following these hints, consult your dealer or service center.
| Problem | Possible cause | Solution |
| No sound, no power | Volume is not adjusted. | Adjust volume. |
| Headphone is connected. | Disconnect headphone. |
| Mains cable is not securely connected. | Connect mains cable properly. |
| No reaction to controls | Electrostatic discharge. | Disconnect the set from power supply,reconnect after a few seconds. |
| Poor radio reception | Weak radio signal. | Direct the antenna for optimum reception. |
| Interference caused by electrical equipment like TVs, computers, engines, etc. | Keep the set away from electrical equipment. |
| NO DISC indication | The CD is badly scratched or dirty. | Replace or clean the CD. |
| No CD, or CD is inserted upside down. | Insert a CD with label upwards. |
| CD-RW (CD-R) is not properly recorded for the use on a standard CD player. | Use FINALIZE on the CD recorder to complete the recording. |
| The laser lens is steamed up. | Wait until the lens has cleared. |
| The CD skips tracks | The CD is damaged or dirty. | Replace or clean the CD. |
| SHUFFLE or PROGRAM is active. | Switch off SHUFFLE or PROGRAM play. |
| Remote control does not function properly | Batteries are inserted incorrectly. | Insert batteries correctly. |
| Batteries are flat. | Insert fresh batteries. |
| Distance to the set is too large. | Reduce distance. |
Amplifier
Standby power consumption .<7W
Output power. 2× 18 W RMS
Output power 360 W PMPO
Signal-to-noise ratio. 65 dBA (IEC)
Input sensitivity AUX. .0.5 V (max. 2 V)
SUBW00FER output. 20,000 Ω
Impedance loudspeakers. 24
Impedance headphones. 32Ω-1000Ω
Tuner
FM wave range. 87.5-108 MHz
MW wave range 531-1602 kHz
LW wave range 153-279 kHz
Sensitivity at 75
mono, 26dB signal-to-noise ratio. 2.8 V
- stereo, 46dB, signal-to-noise ratio. 61 μV
Selectivity. 28 dB
Total harmonic distortion. ≤ 5%
Frequency response. 63-12,500 Hz (± 3 dB)
Signal-to-noise ratio. 50 dBA
CD player
Frequency range. 20-20,000 Hz
Signal-to-noise ratio. 67 dBA
Speakers
Bass reflex system
Dimensions MC 165 (w× h× d) . 130× 158× 185mm
Dimensions MC 175 (w× h× d) . 130× 157× 190mm
General
Dimensions (w× h× d) 140x163x255mm
Weight. 5,6 kg (total)
Subject to modification.
Accessoires fournis
SLEEP...active le timer de sometime (sleeptimer)
Sous reserve de modifications.
Consumo in standby. <7 W
Range FM .87,5-108 MHz
Range MW .531-1602 kHz
Range LW. 153-279 kHz
Sensibilità a 75 Ω
Matt (1× h× b) 140x163x255mm
Vikt. 5,6 kg (totalt)
Ratt till andringar forbahls.
DBB. DYNAMIC BASS BOOST
forstaerkerbassen
DSC... DIGITAL SOUND CONTROL forstaeker lydens egenskap
INC. SARR. ......skaber en faenomenal stereoeffekt
REPEAT .........gentager et nummer, hele CD'en ellerprogrammet
SHUFFLE.....afspiller numreitilfaeldg rakkefalge
VOLUME - / + ....skruer ned/op for lyden
PREV. CD: Springer i retning bagud
RADIO: vaelger en forudindstillet radiostation
PLAY .starter afspiling at CD'en
NEXT 1 CD:springer i retning fremad
RADIO: vaelger en forudindstillet radiostation
Dimensioner (b× h× d) 140x163x255mm
Vaegt. 5,6 kg (ialt)
CLASS 1 LASER PRODUCT